# SuperCAT

# User’s Manual

Super-Performance Soft EtherCAT Controller

![SuperCAT\nADLINK](.20260413-2a0c61ae-0b8/89c11afa53d54e74a4945c0a2cbca88718b5db7545b5a995469fc9d14f67ff2b.jpg)

Manual Rev.: 1.1

Revision Date: April 10, 2026

Part Number: 50M-27019-1010

# Preface

# Copyright

Copyright 2026 ADLINK Technology, Inc. This document contains proprietary information protected by copyright. All rights are reserved. No part of this manual may be reproduced by any mechanical, electronic, or other means in any form without prior written permission of the manufacturer.

# Disclaimer

The information in this document is subject to change without prior notice in order to improve reliability, design, and function and does not represent a commitment on the part of the manufacturer. In no event will the manufacturer be liable for direct, indirect, special, incidental, or consequential damages arising out of the use or inability to use the product or documentation, even if advised of the possibility of such damages.

# Environmental Responsibility

ADLINK is committed to fulfill its social responsibility to global environmental preservation through compliance with the European Union's Restriction of Hazardous Substances (RoHS) directive and Waste Electrical and Electronic Equipment (WEEE) directive. Environmental protection is a top priority for ADLINK. We have enforced measures to ensure that our products, manufacturing processes, components, and raw materials have as little impact on the environment as possible. When products are at their end of life, our customers are encouraged to dispose of them in accordance with the product disposal and/or recovery programs prescribed by their nation or company.

![Symbol of a trash bin crossed with two crossed lines and a solid rectangle below (no text or labels)](.20260413-2a0c61ae-0b8/15082e9923d3354890a289aeb2732d15ae0e09cb639eb61c9f01e5fc47e3402a.jpg)

Battery Labels (for products with battery)

![Simple line drawing of a trash bin with no text or symbols](.20260413-2a0c61ae-0b8/2d37353b85921d7a0503033341c5f0e5ce02f9e710c23f77a530e1bfb0d4759f.jpg)

![Li-ion](.20260413-2a0c61ae-0b8/34cffaca1e1e44d145c6758b990bb7a5823584b0ff1602e4e466884c44c2723a.jpg)

![RECYCLE\nRBRC\nLi-ion\n7.800.822.8837](.20260413-2a0c61ae-0b8/3b80611e111bfa92d56922ecaa258262552e7cc409d6f388406d0b713b548385.jpg)

![廢電池請回收](.20260413-2a0c61ae-0b8/d8390972fbf3a7c211201a74751e3ede7e8efbb46947c5f00e69654e92d46636.jpg)

# California Proposition 65 Warning

![This image displays a standard warning sign. It features a yellow equilateral triangle with a thick black border. In the center of the triangle is a black exclamation point.](.20260413-2a0c61ae-0b8/9f3580b47a8125ca7934582fe75c541f865081756efe26f975f9f3f11dedebad.jpg)

WARNING: This product can expose you to chemicals including acrylamide, arsenic, benzene, cadmium, Tris(1,3-dichloro-2-propyl)phosphate (TDCPP), 1,4-Dioxane, formaldehyde, lead, DEHP, styrene, DINP, BBP, PVC, and vinyl materials, which are known to the State of California to cause cancer, and acrylamide, benzene, cadmium, lead, mercury, phthalates, toluene, DEHP, DIDP, DnHP,

DBP, BBP, PVC, and vinyl materials, which are known to the State of California to cause birth defects or other reproductive harm. For more information go to www.P65Warnings.ca.gov.

# Trademarks

Product names mentioned herein are used for identification purposes only and may be trademarks and/or registered trademarks of their respective companies.

Revision History

<table><tr><td>Revision</td><td>Description</td><td>Date</td><td>By</td></tr><tr><td>1.0</td><td>Initial release</td><td>2023-04-26</td><td>RA</td></tr><tr><td>1.1</td><td>Introduction, features and specifications, system configuration, and appendix updated</td><td>2026-04-10</td><td>AL</td></tr></table>

# Table of Contents

# Preface...

# 1 Introduction...

1.1 Product Nomenclature ....
1.2 Anti-virus Compatibility with Real-time SuperCAT Execution ...
1.3 Disclaimer ..

# 2 Features and Specifications........

2.1 Highlights . .3
2.2 Key Features . 3
2.3 Product Function Portfolio. 4
2.4 System Requirements. .5
2.5 Supported Network Controllers . .5

# 3 System Configuration ..............

3.1 SuperCAT Software Installation Guide.. 7
3.2 SuperCAT Configuration Guide....

# 4 Appendix ....

4.1 SuperCAT Performance Optimization . .9

# Safety Instructions......... .19

# Getting Service.... .20

# 1 Introduction

ADLINK SuperCAT is a super-performance Soft EtherCAT Controller capable of supporting up to 128 synchronized axes and over 10,000 points. SuperCAT fully supports the ADLINK ECAT-4XMO for EtherCAT to pulse train conversion and diversified pulse control. SuperCAT also supports the ADLINK ECAT-TRG4 with comparison triggers used for AOI/dispensing machines. Optimum jitter control is provided in minimal cycles of 125μs to optimize synchronous I/O performance for vertical automation applications in the semiconductor and electronics manufacturing industries, among others.

SuperCAT provides an out-of-shell application-ready (APS) function library to generate multi-dimensional, highly synchronized, time-deterministic event-triggered motion and I/O control. A wide range of compatible third-party slaves are easily controlled with ADLINK's APS function library. ADLINK's Motion Creator Pro 2 utility is fully compliant with the Microsoft Windows environment, allowing complete EtherCAT motion and I/O configuration and function evaluation as well as process download functions.

# 1.1 Product Nomenclature

<table><tr><td colspan="6">EM - n x 0 0 y</td></tr><tr><td></td><td>Supported Axes2 = 16 axes4 = 32 axes8 = 64 axesF = 128 axes</td><td>P = ClassicC = PremiumA = Ultimate</td><td>Reserved</td><td>Specific application</td><td>D = dongle license</td></tr></table>

EM: product identifier, short for EtherCAT Motion controller
n: number of supported axes
x: product support functionality
y: license type. If using a dongle license, the license code is stored on the dongle and any platform with the dongle can work with the specific version of SuperCAT.

# 1.2 Anti-Virus Compatibility with Real-time SuperCAT Execution

ADLINK recommends careful consideration when using anti-virus programs.

In general, anti-virus programs are designed to be compatible with a wide range of computer systems and software configurations. Some compatibility issues may arise depending on the specific anti-virus program and the software or hardware installed on the computer.

Some anti-virus programs may conflict with other security software installed on the computer, such as firewalls or anti-spyware programs, that can cause performance issues or prevent programs from functioning properly. In some cases, anti-virus programs may also conflict with other software or drivers, causing system instability or crashes.

Windows Defender is pre-installed in Windows 10 as an anti-virus component.

During regular tests of Windows with Windows Defender in real-time examinations of SuperCAT and ADLINK IPCs, ADLINK has found no real-time violations of SuperCAT; however, no there is no guarantee that future updates will potentially destabilize the system. Tests with active Windows Defender and SuperCAT "real-time operation" can cause real-time violations of SuperCAT because it monitors and examines process sequences and their data by accessing the Windows system.

Third-party anti-virus programs interact in different ways with the Windows system following installation and activation. ADLINK cannot guarantee that systems will remain unaffected by third-party software and its influence on the real-time execution of SuperCAT.

# 1.3 Disclaimer

ADLINK makes no warranties, expressed or implied, for real-time performance of SuperCAT after installation or update of other software, including but not limited to anti-virus software.

This page intentionally left blank.

# 2 Features and Specifications

# 2.1 Highlights

• Enhanced computing power and ultra-low system latency ensure superior motion execution performance
• Supports a 125 μs EtherCAT control cycle and up to 128 devices for synchronized motion control
• Real-time performance guaranteed through validation on ADLINK computing platforms
• ADLINK soft-motion framework (user tasks) in RTOS for executing user motion processes
• ADLINK RTOS development environment for user program execution
• Dual-master support for independent cycle times and load balancing

# 2.2 Key Features

• EtherCAT cyclic synchronous modes supported: CSP / CSV / CST
• Point-table support for continuous motion (contouring) applications
2D/3D dynamic error and orthogonal system compensation
• Programmable interrupt control for axes and system parameters
• EtherCAT utilities supported: ECAT Configurator and third-party I/O mapping
• EtherCAT diagnostic tools supported: frame loss, bus loading, and slave device status monitoring
Master jitter measurement and visualization in the RTOS Configurator tool
• User-defined I/O data sequencing, supporting up to 65,536 points independently

2.3 Product Function Portfolio

<table><tr><td colspan="2"></td><td>Classic</td><td>Premium</td><td>Ultimate</td></tr><tr><td rowspan="5">Control Mode</td><td>CSP (Cyclic Synchronous Position)</td><td>V</td><td>V</td><td>V</td></tr><tr><td>CSV (Cyclic Synchronous Velocity)</td><td></td><td>V</td><td>V</td></tr><tr><td>CST (Cyclic Synchronous Torque)</td><td></td><td>V</td><td>V</td></tr><tr><td>HM (Homing Mode)</td><td>V</td><td>V</td><td>V</td></tr><tr><td>PT / PVT Motion Mode</td><td></td><td>V</td><td>V</td></tr><tr><td rowspan="8">Motion</td><td>Speed &amp; Position Override</td><td>V</td><td>V</td><td>V</td></tr><tr><td>Linear / Circular / Helical Interpolation</td><td>V</td><td>V</td><td>V</td></tr><tr><td>E-Gear / Gantry</td><td>V</td><td>V</td><td>V</td></tr><tr><td>Point-table for Continuous Move</td><td></td><td>V</td><td>V</td></tr><tr><td>Linear &amp; Rotary Coordinates Supported</td><td>V</td><td>V</td><td>V</td></tr><tr><td>Backlash &amp; Pitch Error Compensator</td><td>V</td><td>V</td><td>V</td></tr><tr><td>2D Position Error Compensation</td><td></td><td>V</td><td>V</td></tr><tr><td>2D / 3D Dynamic Error Compensation</td><td></td><td></td><td>V</td></tr><tr><td rowspan="6">Application</td><td>Contouring Synchronized DO Control</td><td></td><td>V</td><td>V</td></tr><tr><td>Position Comparison Trigger Output</td><td>V</td><td>V</td><td>V</td></tr><tr><td>Position Latch Function</td><td>V</td><td>V</td><td>V</td></tr><tr><td>Interrupt Control</td><td>V</td><td>V</td><td>V</td></tr><tr><td>User Task Framework (by API supported)</td><td>V</td><td>V</td><td>V</td></tr><tr><td>User RTOS Application Dev. Environment</td><td></td><td></td><td>V</td></tr><tr><td rowspan="6">Utility &amp; GUI</td><td>Sampling Function</td><td>V</td><td>V</td><td>V</td></tr><tr><td>API &amp; RTOS Log and Viewer</td><td>V</td><td>V</td><td>V</td></tr><tr><td>EtherCAT Utility &amp; Diagnostic Tools</td><td>V</td><td>V</td><td>V</td></tr><tr><td>IO Address Mapping</td><td>V</td><td>V</td><td>V</td></tr><tr><td>Simulation Axis and IO</td><td>V</td><td>V</td><td>V</td></tr><tr><td>Master Jitter Measurement Tools</td><td>V</td><td>V</td><td>V</td></tr></table>

# 2.4 System Requirements

# Supported Operating Systems

o Windows 10 64-bit
Windows 11 64-bit

# • Hardware

o Intel Atom (AHL)/Core-i/Xeon with processor clock speed of 1.8 GHz or faster; dual-core or better is recommended supporting x86 architecture
o RAM:

64-bit systems: 2 GB min., 8 GB recommended

o Storage: 32 GB min. Solid State Disk (SSD) recommended (10 GB for operating system and 1 GB for RT system)

# 2.5 Supported Network Controllers

<table><tr><td>Link Layer Name</td><td>Name</td><td>Supported PCI devices</td></tr><tr><td>emlll8254x</td><td>Intel® Gigabit Ethernet Controllers PCIe</td><td rowspan="4">For the latest information, please visit the website</td></tr><tr><td>emlll8255x</td><td>Intel® PRO100</td></tr><tr><td>emllRTL8139</td><td>Realtek® RTL8139</td></tr><tr><td>emllRTL8169</td><td>Realtek® RTL8169</td></tr></table>

\* Website: https://public.acontis.com/manuals/EC-Master/3.1/html/supported-nics/emllI8254x.html

For example, using the “emllI8254x” as a reference:

Supportea sous

Supported PCl devices

Supported Reference Boards

emllEG20T

Supported OS and Arch

emllETSEC

Supported OS and Arch

Supported SoC's

Supported Reference Boards

emllFslFec

Supported OS and Arch

Supported SoC's

Supported Reference Boards

emllGEM

Supported OS and Arch

Supported SoC's

Supported Reference Boards

# emll18254x

Supported OS and Arch

Supported PCl devices

emll18255x

Supported OS and Arch

Supported PCl devices

emllicss

Supported OS and Arch

#

# Intel@ Gigabit Ethernet Controllers PCle.

# Supported OS and Arch

<table><tr><td></td><td>INTEGRITY</td><td>INtime6</td><td>Linux</td><td>QNX6</td><td>QNX7</td><td>QNX71</td></tr><tr><td rowspan="5">emlll8254x</td><td rowspan="5">PPC</td><td rowspan="5">x86_32</td><td>ARM_32</td><td rowspan="5">x86_32</td><td>ARM_32</td><td rowspan="5">x86_64</td></tr><tr><td>ARM_64</td><td>x86_32</td></tr><tr><td>PPC</td><td rowspan="3">x86_64</td></tr><tr><td>x86_32</td></tr><tr><td>x86_64</td></tr></table>

# Supported PCl devices

Intel PRO-10oo PCl specific definitions (Vendorld, Deviceld)

·PCI\_DEVICE\_I82540EM\_DESKTOP (OX8086,0x100E)
·PCI\_DEVICE\_I82545EM\_COPPER (OX8086,0x100F)
·PCI\_DEVICE\_I82546EB\_COPPER\_DUAL (OX8086,0X1010)
·PCI\_DEVICE\_I82541EI\_COPPER (0x8086,0x1013)
·PCI\_DEVICE\_I82547GI\_C0PPER (0X8086,0x1019)
·PCI\_DEVICE\_I82545GM\_C0PPER (0x8086,Ox1026)
·PCI\_DEVICE\_I82566MM (0x8086,0x1049)

·PCI\_DEVICE\_I218V\_3 (0x8086, 0x15A3)
·PCI\_DEVICE\_I219LM (0x8086,0x156F)
·PCI\_DEVICE\_I219LM\_2 (0x8086,0x15B7)
·PCI\_DEVICE\_I219LM\_3 (0X8086,0x15B9)
·PCI\_DEVICE\_I219LM\_4 (0x8086,0x15D7)
·PCI\_DEVICE\_I219LM\_5 (Ox8086,0x15E3)
·PCI\_DEVICE\_I219LM\_6 (0x8086,0X15BD)

This page intentionally left blank.

# 3 System Configuration

# 3.1 SuperCAT Software Installation Guide

There are two SuperCAT software packages:

• APS SDK: Includes all APIs for users to develop their own applications for ALDINK motion control products
• SuperCAT RTOS SDK: Used for SuperCAT only. It provides the real-time environment for the EtherCAT master stack

Complete the installation steps below:

Step 1: Download the APS SDK and SuperCAT RTOS SDK files from ADLINK and run each separately. (Installation will start automatically.)

Step 2: Select NEXT as prompted to complete installation.

Step 3: After installation is complete, select FINISH.

# 3.2 SuperCAT Configuration Guide

Step 1: Start the RTOS Configurator

Step 2: Assign CPU for RTOS

Step 3: Assign NIC for RTOS

Step 4: Reboot the PC (do not shut down the PC)

For more detailed instructions, please refer to the "SuperCAT\_QuickStart" file located in "C:\Program Files (x86)\ADLINK\SuperCAT" after installing the SuperCAT RTOS SDK.

This page intentionally left blank.

# 4 Appendix

# 4.1 SuperCAT Performance Optimization

# 4.1.1 Adjust BIOS Settings

# 4.1.1.1. CRB\_Advanced Menu Settings

Disable Legacy USB Support.

<table><tr><td colspan="2">Aptio Setup - AMI
CRB_Advanced</td></tr><tr><td>USB Configuration
USB Module Version 28
USB Controllers:
1 XHCI
USB Devices:
1 Drive, 1 Keyboard, 1 Mouse</td><td rowspan="2">Enables Legacy USB support.
AUTO option disables legacy
support if no USB devices are
connected. DISABLE option will
keep USB devices available
only for EFI applications.</td></tr><tr><td>Legacy USB Support [Disabled]
XHCI Hand-off [Enabled]
USB Mass Storage Driver Support [Enabled]</td></tr><tr><td>USB hardware delays and time-outs:
USB transfer time-out [20 sec]
Device reset time-out [20 sec]
Device power-up delay [Auto]</td><td rowspan="2">+: Select Screen
↑↓: Select Item
Enter: Select
+/-: Change Opt.
F1: General Help
F8: Previous Values
F9: Optimized Defaults
F10:Save &amp; Exit
ESC: Exit</td></tr><tr><td>Mass Storage Devices:
JetFlashTranscend 4GB 8.07 [Auto]</td></tr><tr><td colspan="2">Version 2.22.1286 Copyright (C) 2023 AMI</td></tr></table>

# 4.1.1.2. Advanced Menu Settings

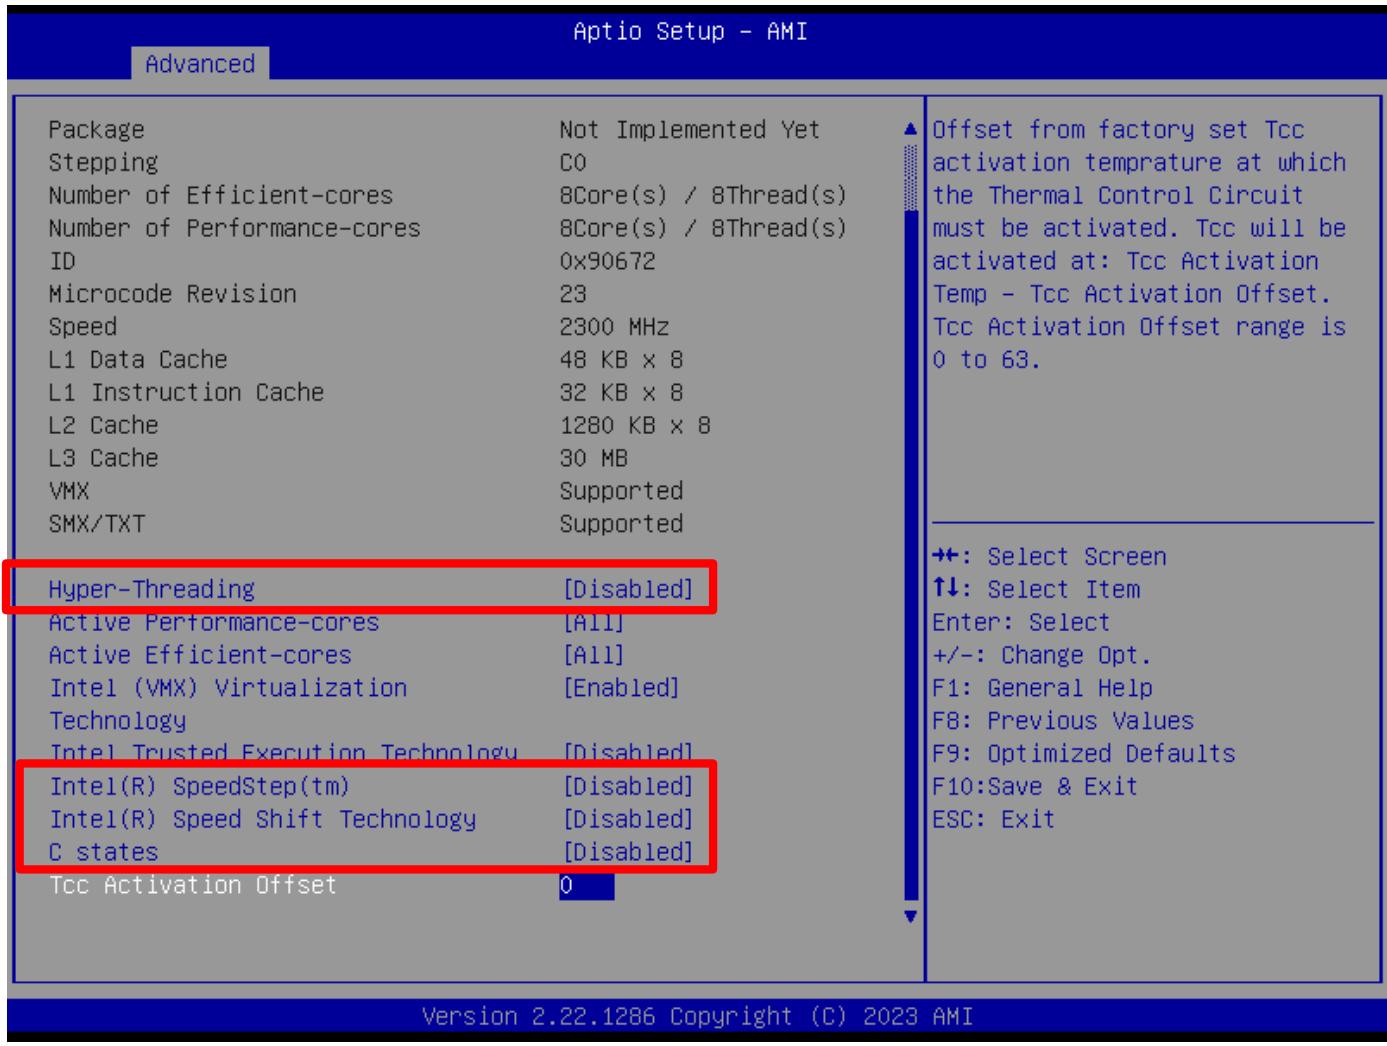
Disable the following Advanced menu settings:

Hyper-Threading
 Intel(R) SpeedStep(tm)
 Intel(R) Speed Shift Technology
C states
![Aptio Setup - AMI\nAdvanced\nPackage	Not Implemented Yet\nStepping	C0\nNumber of Efficient-cores	8Core(s) / 8Thread(s)\nNumber of Performance-cores	8Core(s) / 8Thread(s)\nID	0x90672\nMicrocode Revision	23\nSpeed	2300 MHz\nL1 Data Cache	48 KB x 8\nL1 Instruction Cache	32 KB x 8\nL2 Cache	1280 KB x 8\nL3 Cache	30 MB\nVMX	Supported\nSMX/TXT	Supported\nHyper-Threading	(Disabled)\nActive Performance-cores	(All)\nActive Efficient-cores	(All)\nIntel (VMX) Virtualization	(Enabled)\nTechnology\nIntel Trusted Execution Technology	(Disabled)\nIntel(R) SpeedStep(tm)	(Disabled)\nIntel(R) Speed Shift Technology	(Disabled)\nC states	(Disabled)\nTcc Activation Offset	0\nOffset from factory set Tcc\nactivation temperature at which\nthe Thermal Control Circuit\nmust be activated. Tcc will be\nactivated at: Tcc Activation\nTemp - Tcc Activation Offset.\nTcc Activation Offset range is\n0 to 63.\n+: Select Screen\n↑↓: Select Item\nEnter: Select\n+/-: Change Opt.\nF1: General Help\nF8: Previous Values\nF9: Optimized Defaults\nF10:Save & Exit\nESC: Exit\nVersion 2.22.1286 Copyright (C) 2023 AMI](.20260413-2a0c61ae-0b8/c1e2658010ed910622c4fd34e4180011ae66fb86cef48799ec993e410cbec3cc.jpg)

# 4.1.1.3. Boot Menu Settings

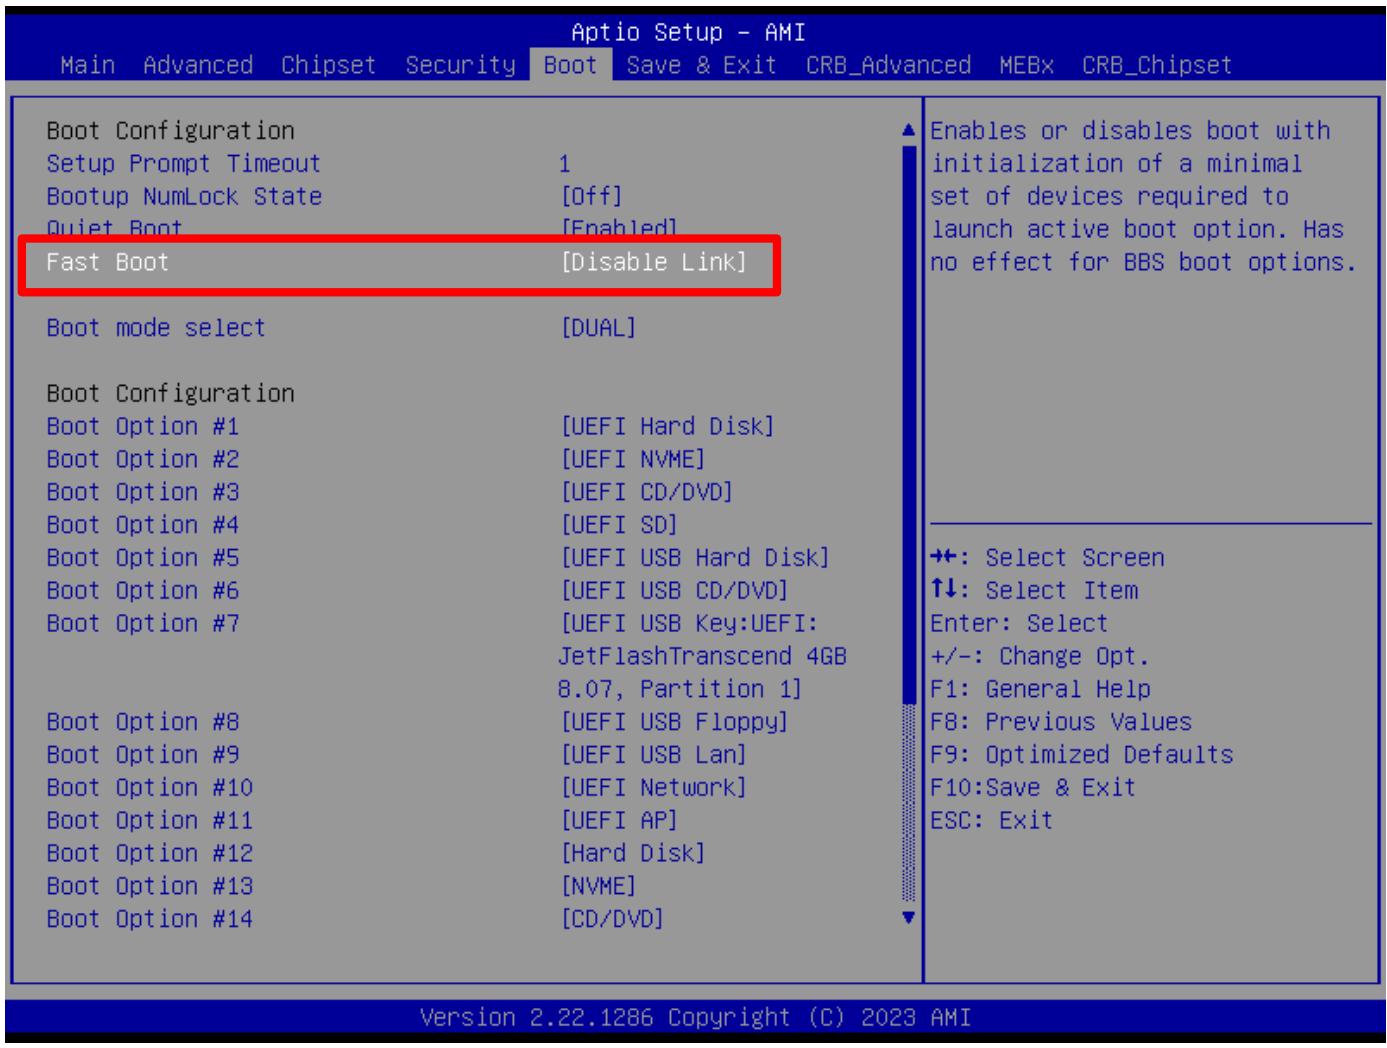
Disable the following Boot menu setting:

 Fast Boot (if HDD Fast Startup is not available)
![Aptio Setup - AMI\nMain Advanced Chipset Security Boot Save & Exit CRB_Advanced MEBx CRB_Chipset\nBoot Configuration\nSetup Prompt Timeout 1\nBootup NumLock State (Off)\nQuiet Boot (Enabled)\nFast Boot (Disable Link)\nBoot mode select (DUAL)\nBoot Configuration\nBoot Option #1 (UEFI Hard Disk)\nBoot Option #2 (UEFI NVME)\nBoot Option #3 (UEFI CD/DVD)\nBoot Option #4 (UEFI SD)\nBoot Option #5 (UEFI USB Hard Disk)\nBoot Option #6 (UEFI USB CD/DVD)\nBoot Option #7 (UEFI USB Key:UEFI:\nJetFlashTranscend 4GB\n8.07, Partition 1)\nBoot Option #8 (UEFI USB Floppy)\nBoot Option #9 (UEFI USB Lan)\nBoot Option #10 (UEFI Network)\nBoot Option #11 (UEFI AP)\nBoot Option #12 (Hard Disk)\nBoot Option #13 (NVME)\nBoot Option #14 (CD/DVD)\nEnables or disables boot with\ninitialization of a minimal\nset of devices required to\nlaunch active boot option. Has\nno effect for BBS boot options.\n++: Select Screen\n↑↓: Select Item\nEnter: Select\n+/-: Change Opt.\nF1: General Help\nF8: Previous Values\nF9: Optimized Defaults\nF10:Save & Exit\nESC: Exit\nVersion 2.22.1286 Copyright (C) 2023 AMI](.20260413-2a0c61ae-0b8/c0ae00a62235cec12f0a93f4a5dc095dae5b085d4e1f94345e2e742c3113905e.jpg)

# 4.1.2 Windows 10 Real-time Optimization

# 4.1.2.1. Microsoft Basic Display Adapter Driver

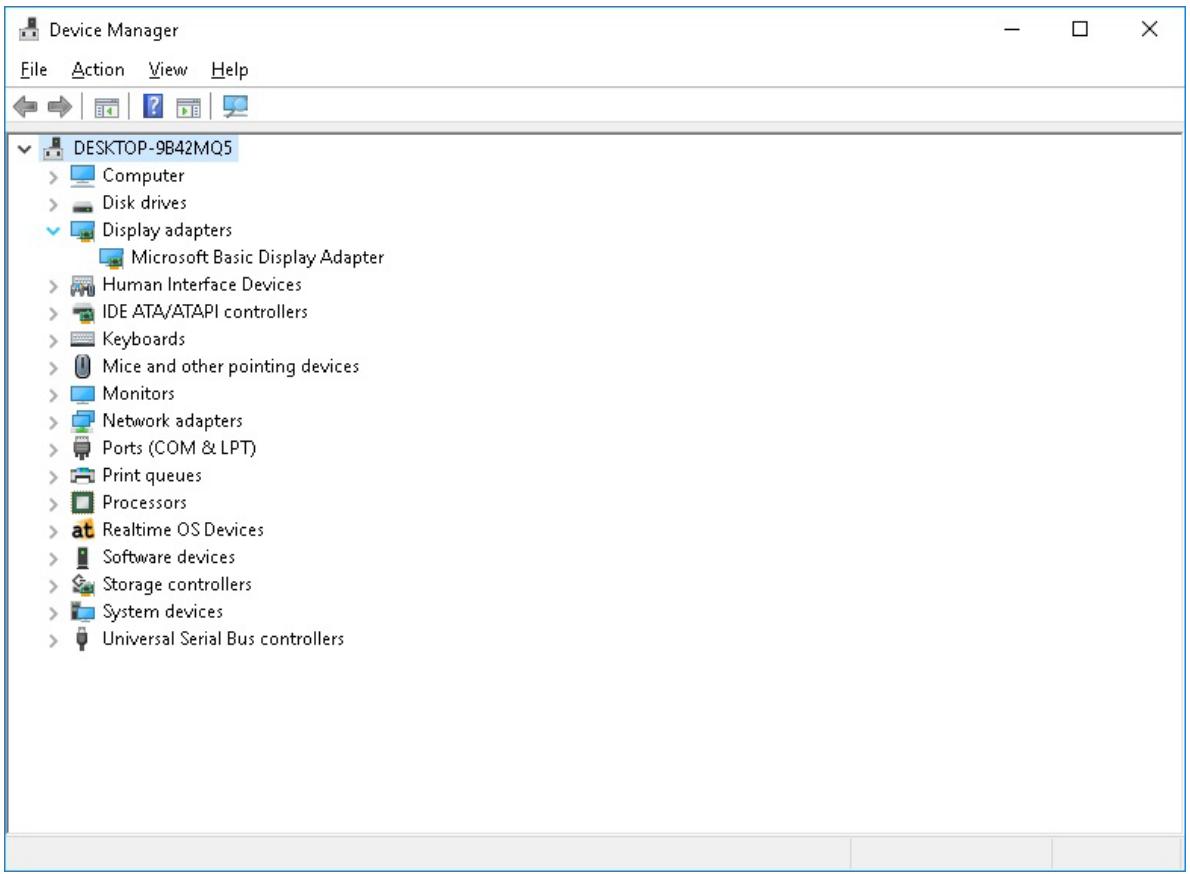
Open the Device Manager by selecting Start > Control Panel > Device Manager. Set the default display driver to the Windows driver.
![Device Manager\nFile Action View Help\nDESKTOP-9B42MQ5\n  Computer\n  Disk drives\n  Display adapters\n    Microsoft Basic Display Adapter\n  Human Interface Devices\n  IDE ATA/ATAPI controllers\n  Keyboards\n  Mice and other pointing devices\n  Monitors\n  Network adapters\n  Ports (COM & LPT)\n  Print queues\n  Processors\n  at Realtime OS Devices\n  Software devices\n  Storage controllers\n  System devices\n  Universal Serial Bus controllers](.20260413-2a0c61ae-0b8/0f5c4b16d4c9568e1ee73257b82c48affa84f2edb84dec347b22f64a66429a7a.jpg)

# 4.1.2.2. Power Options Advanced Settings

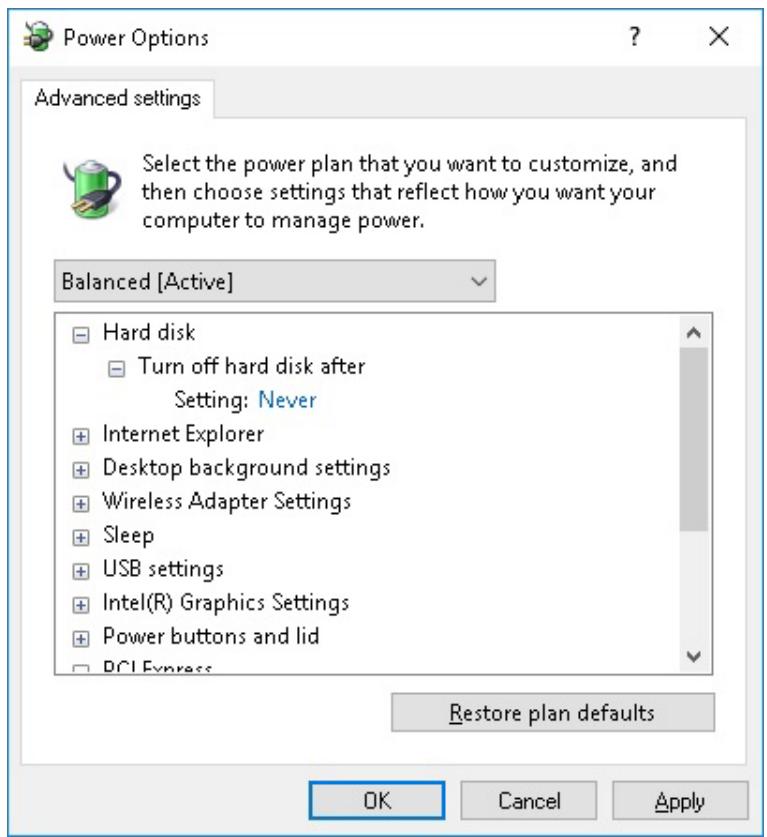
Open the Power Options Advanced Settings by selecting Start > Control Panel > Power Options. Under Selected plan, click Change plan settings, and then click Change advanced power settings.

Set Turn off hard disk after to Never.
![Power Options\nAdvanced settings\nSelect the power plan that you want to customize, and then choose settings that reflect how you want your computer to manage power.\nBalanced (Active)\nHard disk\nTurn off hard disk after\nSetting: Never\n+ Internet Explorer\n+ Desktop background settings\n+ Wireless Adapter Settings\n+ Sleep\n+ USB settings\n+ Intel(R) Graphics Settings\n+ Power buttons and lid\n+ PCI Express\nRestore plan defaults\nOK	Cancel	Apply](.20260413-2a0c61ae-0b8/e15a2d236db99bccfa1a907f308f069ebd3403ac08b418e206dea2faaeed5c82.jpg)

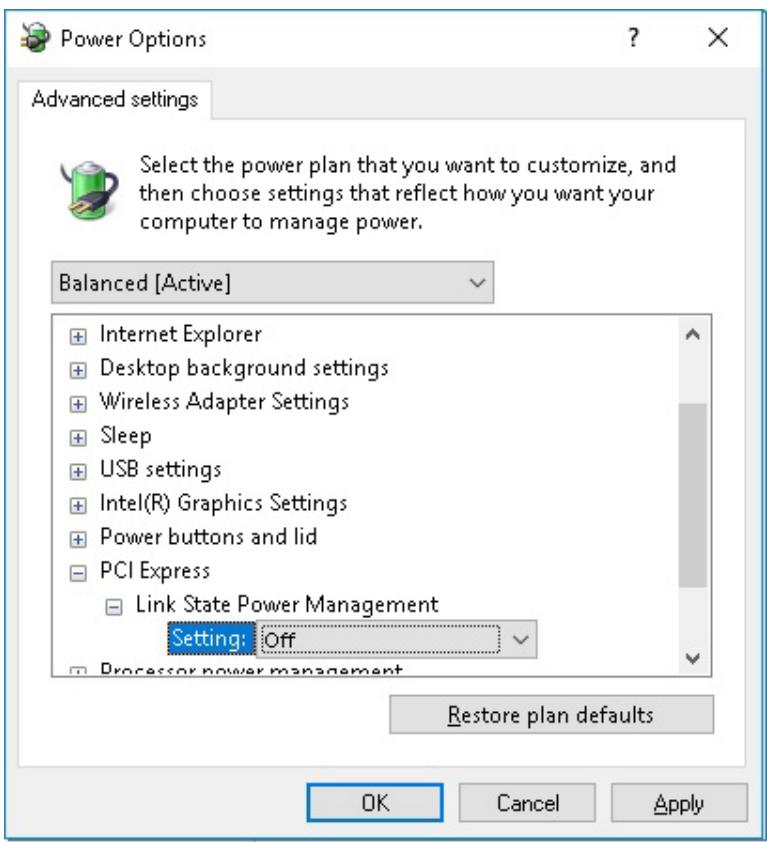
Set the PCI Express > Link State Power Management to Off.
![Power Options\nAdvanced settings\nSelect the power plan that you want to customize, and then choose settings that reflect how you want your computer to manage power.\nBalanced (Active)\n+ Internet Explorer\n+ Desktop background settings\n+ Wireless Adapter Settings\n+ Sleep\n+ USB settings\n+ Intel(R) Graphics Settings\n+ Power buttons and lid\n- PCI Express\n  - Link State Power Management\nSetting: Off\nProcessor power management\nRestore plan defaults\nOK    Cancel    Apply](.20260413-2a0c61ae-0b8/33a5839f6918ce1a9f632d80aae07e9218368ee1491acd5add034426cf86c5b8.jpg)

# 4.1.2.3. Performance Options Settings

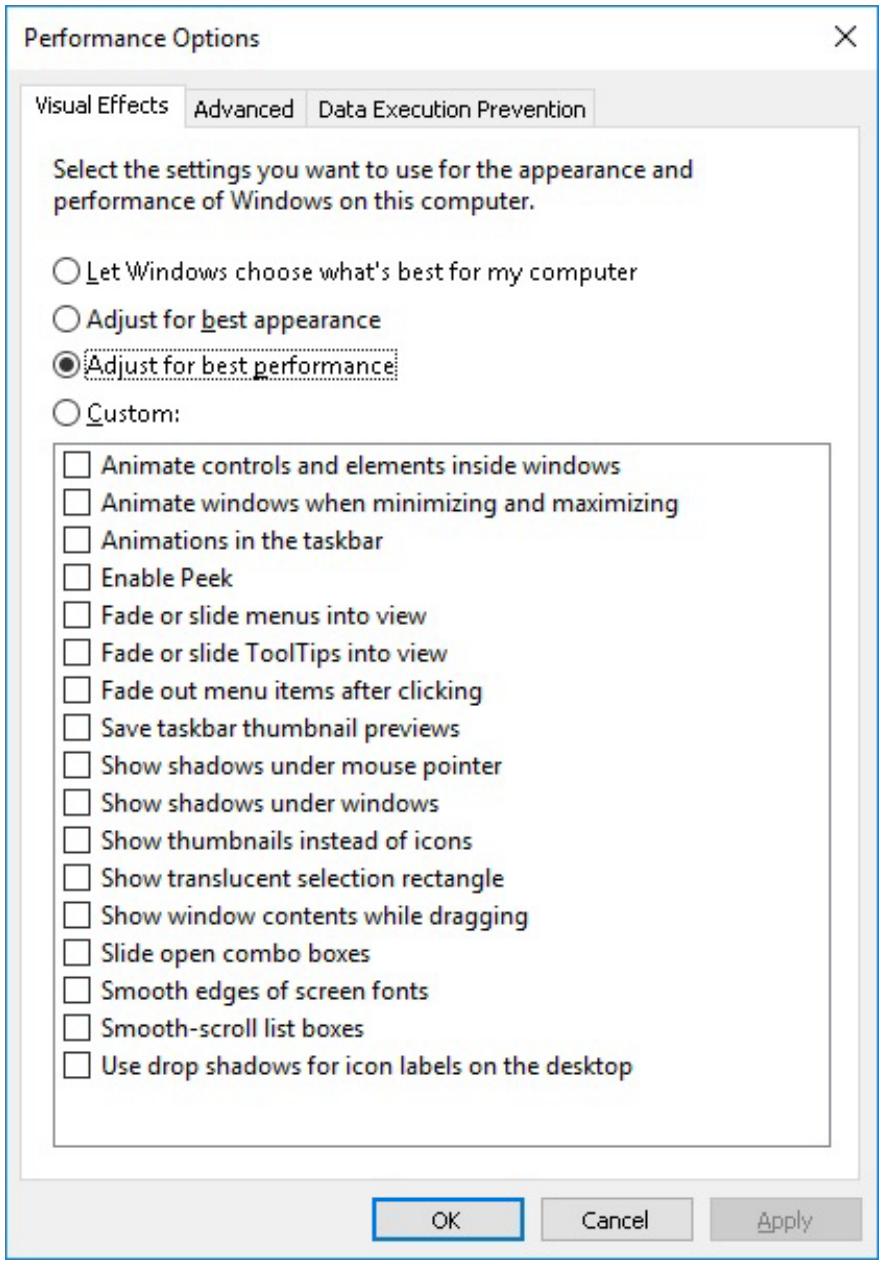
Open the Performance Options by selecting Start > Control Panel > System > Advanced system settings and then clicking Settings under Performance.

Set Visual Effects to Adjust for best performance.
Disable all unused Windows Services.
![Performance Options\nVisual Effects Advanced Data Execution Prevention\nSelect the settings you want to use for the appearance and performance of Windows on this computer.\n○ Let Windows choose what's best for my computer\n○ Adjust for best appearance\n● Adjust for best performance\n○ Custom:\n□ Animate controls and elements inside windows\n□ Animate windows when minimizing and maximizing\n□ Animations in the taskbar\n□ Enable Peek\n□ Fade or slide menus into view\n□ Fade or slide ToolTips into view\n□ Fade out menu items after clicking\n□ Save taskbar thumbnail previews\n□ Show shadows under mouse pointer\n□ Show shadows under windows\n□ Show thumbnails instead of icons\n□ Show translucent selection rectangle\n□ Show window contents while dragging\n□ Slide open combo boxes\n□ Smooth edges of screen fonts\n□ Smooth-scroll list boxes\n□ Use drop shadows for icon labels on the desktop\nOK Cancel Apply](.20260413-2a0c61ae-0b8/2fa5b9aa4b75fde855bfefdda24ee25ac12caab70c80feec35bdcde9577467e7.jpg)

# 4.1.2.4. Power Options

Open the Power Options by selecting Start > Control Panel > Power Options and then clicking Choose what the power buttons do. Disable Turn on fast startup (recommended).

# Define power buttons and turn on password protection

Choose the power settings that you want for your computer. The changes you make to the settings on this page apply to all of your power plans.

Power and sleep button settings

![This image displays a circular icon featuring the universal power symbol in white. The symbol is centered on a button-like background that features a gradient of blue and purple hues, transitioning from lighter in the center to darker at the edges. The icon has a slightly soft or blurred appearance.](.20260413-2a0c61ae-0b8/89ede1cc0fe3f71f75b7cd7ea8f3a8377988bad840c933728f4b93f8b1aada3a.jpg)

When l press the power button:

Shut down

![Two dark grey downward-pointing chevron icons arranged horizontally against a light grey background.](.20260413-2a0c61ae-0b8/18d6c981f9116547669b0309a2459701c444993a968f01b25ba231f15fb90873.jpg)

![The image displays a circular, silver-colored object resembling a United States quarter coin against a plain white background. It features a left-facing profile of George Washington, rendered with a blue-tinted gradient that gives it a metallic, three-dimensional appearance.](.20260413-2a0c61ae-0b8/746a3bb5bf125488648d05bb7a605cedaf072b989248cd43b865829f8f340927.jpg)

When l press the sleep button:

Sleep

![The image displays two identical, dark grey downward-pointing chevrons positioned side-by-side horizontally against a light grey background.](.20260413-2a0c61ae-0b8/cfce42e16b4b97232ce4c3567e4139bf622e4ebf78fc10c9a25cd045308eb83d.jpg)

Shutdown settings

Turn on fast startup (recommended)

This helps start your PC faster after shutdown. Restart isn't affected. Learn More

Sleep

Show in Power menu.

Hibernate

Show in Power menu.

Lock

Show in account picture menu.

# 4.1.3 CodeMeter

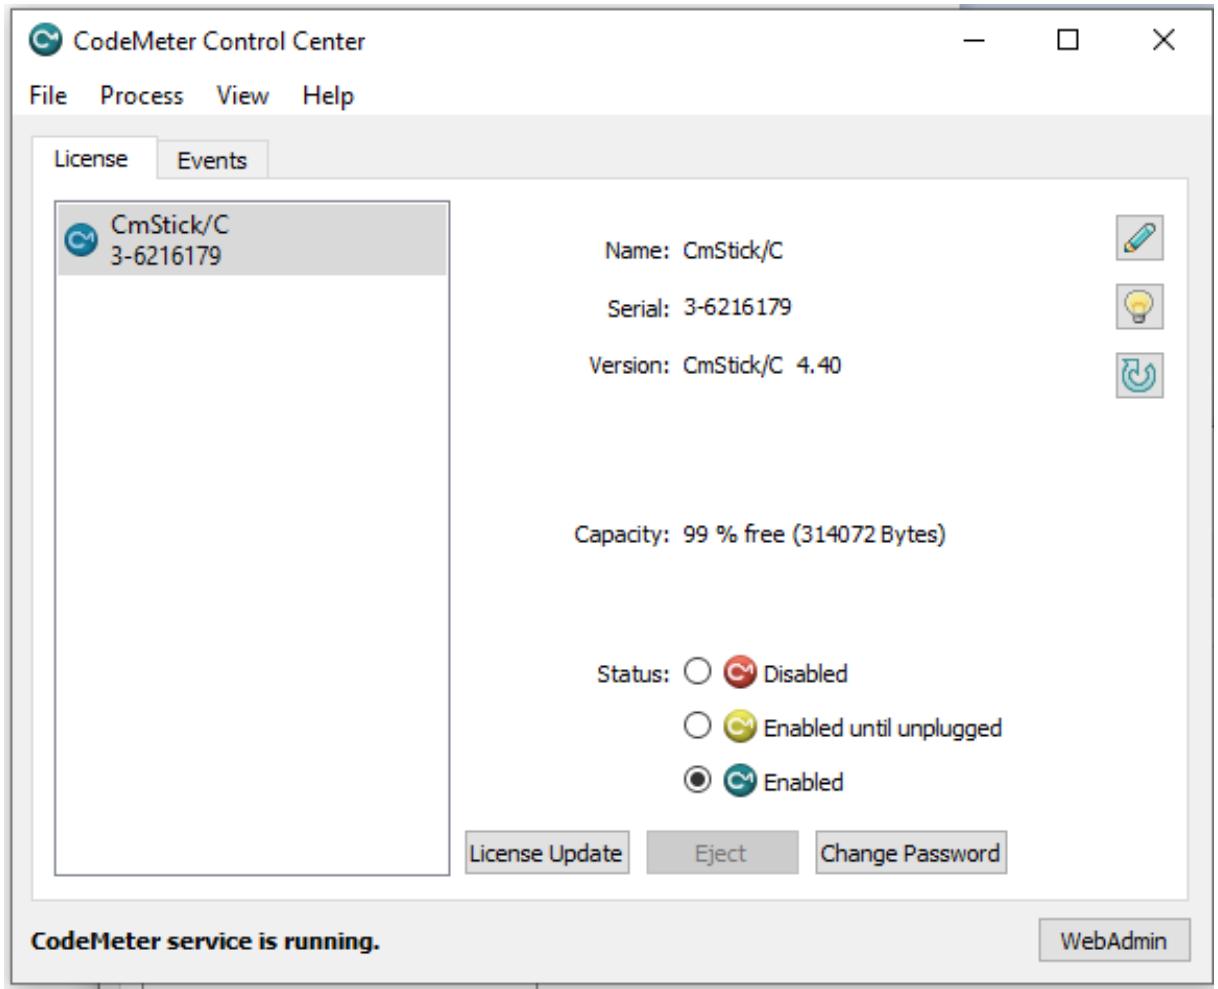
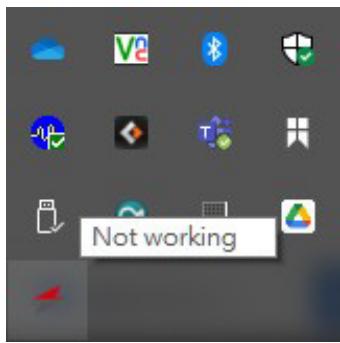
The SuperCAT license is protected by WIBU, and CodeMeter is a service that runs in the system tray. Through the CodeMeter Control Center, users can review the license information.
![CodeMeter Control Center\nFile Process View Help\nLicense Events\nCmStick/C\n3-6216179\nName: CmStick/C\nSerial: 3-6216179\nVersion: CmStick/C 4.40\nCapacity: 99 % free (314072 Bytes)\nStatus: ○ Disabled\n○ Enabled until unplugged\n● Enabled\nLicense Update Eject Change Password\nCodeMeter service is running.\nWebAdmin](.20260413-2a0c61ae-0b8/18dfbbd4521a0ad5a61bb9242c42d02d324bcf0861cb359142ce8ef0437c4128.jpg)

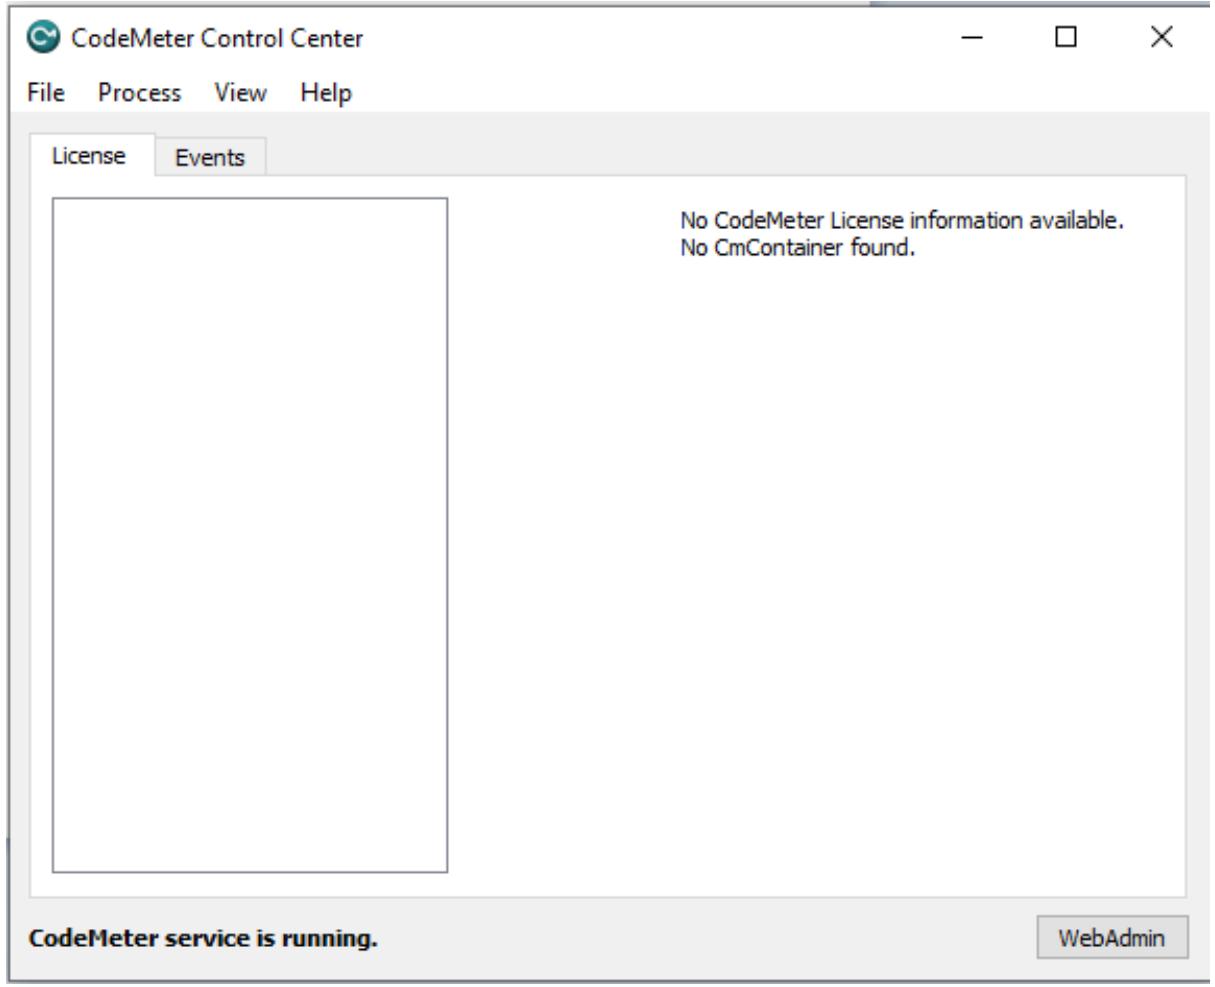
If there is no license available, the CodeMeter Control Center License tab will be empty.
![CodeMeter Control Center\nFile Process View Help\nLicense Events\nNo CodeMeter License information available.\nNo CmContainer found.\nCodeMeter service is running.\nWebAdmin](.20260413-2a0c61ae-0b8/cb19c917f4986052dd1ab759ac3f63686f06be6e8fc21ab88786eb5a866af444.jpg)

If there is no license agreement, the SuperCAT run-time might not work as designed, or ocassionally stop working altogether, with the following message.
![Not working](.20260413-2a0c61ae-0b8/ae01ba80b57219867a88c09e08a5cf7f240b02dc4594de647563439f484a85c4.jpg)

# Safety Instructions

Read and follow all instructions marked on the product and in the documentation before you operate your system. Retain all safety and operating instructions for future use.

Please read these safety instructions carefully.
• Please keep this User‘s Manual for later reference.
• Read the specifications section of this manual for detailed information on the operating environment of this equipment.
• When installing/mounting or uninstalling/removing equipment, turn off the power and unplug any power cords/cables.
• To avoid electrical shock and/or damage to equipment:

Keep equipment away from water or liquid sources.
Keep equipment away from high heat or high humidity.
 Keep equipment properly ventilated (do not block or cover ventilation openings).
 Make sure to use recommended voltage and power source settings.
 Always install and operate equipment near an easily accessible electrical socket-outlet.
Secure the power cord (do not place any object on/over the power cord).
 Only install/attach and operate equipment on stable surfaces and/or recommended mountings.
 If the equipment will not be used for long periods of time, turn off and unplug the equipment from its power source.

• Never attempt to fix the equipment. Equipment should only be serviced by qualified personnel.

# Getting Service

Ask an Expert: https://www.adlinktech.com/en/Askanexpert

# ADLINK Technology, Inc.

Address: No.66, Huaya 1st Rd., Guishan Dist., Taoyuan City 333411, Taiwan

Tel: +886-3-216-5088

Fax: +886-3-328-5722

Email: service@adlinktech.com

# Ampro ADLINK Technology, Inc.

Address: 6450 Via Del Oro, San Jose, CA 95119-1208, USA

Tel: +1-408-360-0200

Toll Free: +1-800-966-5200 (USA only)

Fax: +1-408-600-1189

Email: info@adlinktech.com

# ADLINK Technology (China) Co., Ltd.

Address: 300 Fang Chun Rd., Zhangjiang Hi-Tech Park, Pudong New Area, Shanghai, 201203 China

Tel: +86-21-5132-8988

Fax: +86-21-5132-3588

Email: market@adlinktech.com

# ADLINK Technology GmbH

Address: Hans-Thoma-Straße 8-10, 68163 Mannheim, Germany

Tel: +49-621-43214-0

Fax: +49-621 43214-30

Email: emea@adlinktech.com

Please visit the Contact page at www.adlinktech.com for information on how to contact the ADLINK regional office nearest you.
[🔗 Link to the original document](.20260413-2a0c61ae-0b8/20260413-2a0c61ae-0b8.pdf)
