# CoreModuleTM 730

# (Stackable Single Board Computer)

# Reference Manual

P/N 50-1Z019-1010

# DISCLAIMER

ADLINK Technology, Incorporated makes no representations or warranties with respect to the contents of this manual or of the associated ADLINK products, and specifically disclaims any implied warranties of merchantability or fitness for any particular purpose. ADLINK shall under no circumstances be liable for incidental or consequential damages or related expenses resulting from the use of this product, even if it has been notified of the possibility of such damages. ADLINK reserves the right to revise this publication from time to time without obligation to notify any person of such revisions. If errors are found, please contact ADLINK at the address shown later in this section.

# TRADEMARKS

CoreModule and the Ampro logo are registered trademarks, and ADLINK, Little Board, LittleBoard, MightyBoard, MightySystem, MilSystem, MiniModule, ReadyBoard, ReadyBox, ReadyPanel, ReadySystem, and RuffSystem are trademarks of ADLINK Technology, Inc. All other marks are the property of their respective companies.

REVISION HISTORY

<table><tr><td>Revision</td><td>Reason for Change</td><td>Date</td></tr><tr><td>00</td><td>Initial Release</td><td>July/09</td></tr><tr><td>1.1</td><td>Revised currents in Table 2-5; changed revision of this manual from 00 to 1.1</td><td>Nov/09</td></tr><tr><td>1010</td><td>Added 1.1 GHz model; added JP10 jumper header; changed JP9 to 2 pins in Table 2-3; added BIOS Setup Menus to ch. 4; changed revision of this doc from 1.1 to 1010</td><td>Dec/10</td></tr><tr><td></td><td></td><td></td></tr><tr><td></td><td></td><td></td></tr><tr><td></td><td></td><td></td></tr><tr><td></td><td></td><td></td></tr></table>

ADLINK Technology, Incorporated

5215 Hellyer Avenue, #110

San Jose, CA 95138-1007

Tel. 408 360-0200

Fax 408 360-0222

www.adlinktech.com

© Copyright 2009, 2010 ADLINK Technology, Incorporated

# Audience

This manual provides reference only for computer design engineers, including but not limited to hardware and software designers and applications engineers. ADLINK Technology, Inc. assumes you are qualified to design and implement prototype computer equipment.

# Contents

# Chapter 1 About This Manual ..

Purpose of this Manual ..

References ..

# Chapter 2 Product Overview...........

Stackable Architecture .3

Product Description.. .4

Module Features .4

Block Diagram . ..6

Major Components (ICs)..

Header, Connector, and Socket Definitions ..... 9

Jumper Header Definitions ......... ..11

Specifications......... ..11

Physical Specifications ..... ..11

Mechanical Specifications ...... ..12

Power Specifications ....... ..13

Environmental Specifications. ..13

Thermal/Cooling Requirements..... ...13

# Chapter 3 Hardware... ..15

Overview .... ...15

CPU ...16

Graphics... ...16

Memory.. ...16

Interrupt Channel Assignments.. ..17

Memory Map... ..18

I/O Address Map.... ...18

USB Interfaces . ..20

Ethernet Interface ..21

Video Interfaces . ..22

VGA Interface . .22

LVDS Interface . .23

Utility Interface ....... ..23

Power Button ........ .23

Reset Switch.. ..24

BIOS Recovery (Using Reset Switch) . ..24

Speaker ...... .24

Miscellaneous .. ..24

Battery ......... .24

Real Time Clock (RTC)... .24

User GPIO Interface ... ..25

Oops! Jumper (BIOS Recovery) ..

Serial Console .. .26

Serial Console BIOS Setup . ..26

Hot (Serial) Cable .. .26

System Management Bus (SMBus).. ..26

Ethernet External LED. .27

Watchdog Timer .. ..27

Power Interface.. ..28

# Chapter 4 BIOS Setup ..... . 29

Introduction... . 29

Entering BIOS Setup (VGA Display) .. . 29

Entering BIOS Setup (Remote Access) . 29

OEM Logo Utility (Splash Screen).. . 30

Logo Image Requirements.. . 30

BIOS Setup Menus .. .. 31

BIOS Main Setup Screen .. . 31

BIOS Advanced Setup Screen.. . 32

BIOS Chipset Setup Screen.. . 36

BIOS Boot Setup Screen . . 39

BIOS Security Setup Screen...... . 40

BIOS Save & Exit Setup Screen .. . 41

# Appendix A Technical Support .. . 43

# Index .. . 45

# List of Figures

Figure 2-1. Stacking Modules with the CoreModule 730 .. 3

Figure 2-2. Block Diagram . 6

Figure 2-3. Component Locations (Top Side)...... 8

Figure 2-4. Component Locations (Bottom Side) .. 8

Figure 2-5. Connector Pin Identifications...... ..... 10

Figure 2-6. Header, Connector, Socket Locations (Top Side).... .. 10

Figure 2-7. Mechanical Dimensions (Top Side)... . 12

Figure 3-1. Oops! Jumper ......... .. 25

Figure 3-2. Hot Cable Jumper . . 26

Figure 4-1. BIOS Main Setup Screen .. . 31

Figure 4-2. BIOS Advanced Setup Screen ........... ... 32

Figure 4-3. BIOS Chipset Setup Screen....... .... 36

Figure 4-4. BIOS Boot Setup Screen.......... .. 39

Figure 4-5. BIOS Security Setup Screen .. . 40

Figure 4-6. BIOS Save & Exit Setup Screen ........ .. 41

# List of Tables

Table 2-1. Major Components (ICs) Descriptions and Functions.

Table 2-2. Header, Connector, and Socket Descriptions ...... 9

Table 2-3. Jumper Settings . 11

Table 2-4. Weight and Footprint Dimensions ...... .. 11

Table 2-5. Power Supply Requirements. . 13

Table 2-6. Environmental Requirements . . 13

Table 3-1. Interrupt Channel Assignments . . 17

Table 3-2. Memory Map .... . 18

Table 3-3. I/O Address Map ........ ..... 18

Table 3-4. USB0 and USB1 Interface Pin Signals (J12) .. . 20

Table 3-5. USB2 and USB3 Interface Pin Signals (J13) ..... .. 20

Table 3-6. Ethernet Interface Pin/Signal Descriptions (J3).. . 21

Table 3-7. VGA Interface Pin Signals (J7).. . 22

Table 3-8. LVDS Interface Pin/Signal Descriptions (J8).... .. 23

Table 3-9. Utility Interface Pin Signals (J25) . . 24

Table 3-10. User GPIO Interface Pin/Signal Descriptions (J20) . ..25

Table 3-11. SMBus Reserved Addresses. ..26

Table 3-12. SMBus Pin Signals (J27) .. ..26

Table 3-13. Ethernet External LED Pin Signals (J26).. .27

Table 3-14. Power Interface Pin/Signals (J23).. .28

Table 4-1. BIOS Setup Menus ... ..31

Table A-1. Technical Support Contact Information.. ...43

# Purpose of this Manual

This manual is for designers of systems based on the CoreModule™ 730 stackable Single Board Computer (SBC) module. This manual contains information that permits designers to create embedded systems based on specific design requirements.

Information provided in this reference manual includes:

• CoreModule 730 SBC Specifications
Environmental requirements
Major chips and features implemented
• CoreModule 730 SBC connector/pin numbers and definitions
• BIOS Setup information

Information not provided in this reference manual includes:

• Detailed chip specifications
• Internal component operation
• Internal registers or signal operations
Bus or signal timing for industry standard busses and signals

# References

The following list of references may help you successfully complete your custom design.

# Specifications

SUMIT Specification Revision 1.0, April 4, 2008
Web site: http://www.sff-sig.org/sumit\_spec\_v10.pdf
ISM Specification Revision 1.0, August, 2009
Web site: http://www.sff-sig.org/ism\_spec\_v10.pdf
• PCI Express Specification Revision 1.0a
Web site: http://www.pcisig.com

# Major Integrated Circuit (IC) Specifications

The following ICs are used in the CoreModule 730 SBC:

• Intel® Corporation and the Atom™ Z510 and Z530 processors (with integrated Northbridges)
Web site: http://www.intel.com/products/processor/atom/techdocs.htm
• Intel Corporation and the US15W System Controller Hub (SCH)
Web site: http://download.intel.com/design/chipsets/embedded/datashts/319537.pdf
• Analog Devices and the ADM1032ARMZ-1 CPU Temperature Monitor
Web site: http://www.analog.com/static/imported-files/data\_sheets/ADM1032.pdf
• Chrontel and the SDVO to RGB Converter
Web site: http://www.chrontel.com/pdf/7317ds.pdf

. PLX and the PEX8505 PCIe to PCIe Switch
Web site:
http://www.plxtech.com/products/expresslane/pex8505
Intel Corporation and the 82574IT Gigabit Ethernet controller
Web site: http://download.intel.com/design/network/datashts/82574.pdf
• Renesas and the R4F2117R H8S Controller
Web site: http://http://am.renesas.com/

# NOTE

If you are unable to locate the datasheets using the links provided, search the internet to find the manufacturer’s web site and locate the documents you need.

This introduction presents general information about the Stackable architecture and the CoreModule 730 Single Board Computer (SBC). After reading this chapter you should understand:

Stackable architecture
CoreModule 730 product description
. CoreModule 730 features
• Major components
Header, Connector, Socket definitions
. Specifications

# Stackable Architecture

Stackable architecture affords a great deal of flexibility in system design. You can build a simple system using only a CoreModule SBC and a Compact Flash card in the Compact Flash socket. To expand a simple CoreModule system, simply add self-stacking ADLINK MiniModule products or 3rd party stackable expansion boards to provide additional capabilities, such as:

Additional I/O ports
Analog or digital I/O interfaces

Stackable expansion modules can be stacked with the CoreModule 730 avoiding the need for card cages and backplanes. The stackable expansion modules can be mounted directly to the SUMIT connector of the CoreModule 730. SUMIT-compliant modules can be stacked with an inter-board spacing of \~0.60" (15mm) so that a 3-module system fits in a 3.6" x 3.8" x 2.4" space. See Figure 2-1.

One or more MiniModule products or other stackable modules can be installed on the CoreModule expansion connectors. When installed on the SUMIT connectors, the expansion modules fit within the CoreModule outline dimensions. Most MiniModule products have stack-through connectors compatible with the SUMIT Version 1.0 specification. Several modules can be stacked on the CoreModule headers. Each additional module increases the thickness of the package by 0.60" (15mm). See Figure 2-1.

![4-40 nut (4)\nStack-Through\nSUMIT Connectors\n4-40 screw (4)\nCoreModule 730\n0.6 inch spacer (8)\nStackable Expansion\nModules](.50-1z019-1010-cm730-refman-final/68f7240a05807c9359d6fbb706528a2086be3741319acd2346ed8bb0e10249fa.jpg)

Figure 2-1. Stacking Modules with the CoreModule 730

# Product Description

The CoreModule 730 SBC is an exceptionally high integration, x86-based, PC compatible system in the ISM (Industry Standard Module) form factor. This rugged and high quality single-board system contains all the component subsystems of a PC/AT motherboard plus the equivalent of several PC/AT expansion boards.

The CoreModule 730 includes a comprehensive set of system extensions and enhancements that are specifically designed for embedded systems. These enhancements ensure fail-safe embedded system operation, such as a Watchdog Timer and a temperature monitor. This design meets the size, power consumption, temperature range, quality, and reliability demands of embedded applications and requires only a single +5V power source.

Embedded and portable applications benefit from the flexibility of the CoreModule 730, making system design quick and easy. The CoreModule 730 stacks with ADLINK MiniModule products or other SUMITcompliant expansion boards or it can serve as the computing engine in a fully customized application.

# Module Features

CPU

Provides x86-based Intel Atom Z510 (1.10GHz) or Z530 (1.60GHz) processors
Supports Front Side Buses (FSBs) of 100 MHz (for Z510) or 133 MHz (for Z530)
Supports IA 32-bit architecture
♦ Provides 32kB Unified Instruction Cache and 24kB Write-Back Data Cache
♦ Provides Low Power and System Management Modes

SCH (System Controller Hub)

♦ Provides integrated Northbridge and Southbridge
♦ Provides CMOS Front Side Bus signaling
Integrates a DDR2 memory controller with a single 64-bit wide interface
Provides three UHCI USB 1.1 controllers
♦ Provides one EHCI USB 2.0 controllers

• Memory

♦ Provides one standard DDR2 SODIMM socket
Supports 533 MHz Clock Speed
Supports non-ECC, unbuffered memory
Supports +2.5V DDR2, 533MHz RAM up to 2GB DDR2 SODIMM

• SUMIT Interface

Provides up to two SUMIT connectors
Supports high-speed serial bus signals

IDE Interface

♦ Provides one IDE channel
Supports two enhanced IDE devices
Supports Ultra ATA
Supports ATAPI and DVD peripherals
Supports IDE native and ATA compatibility modes

Compact Flash Socket

♦ Provides Compact Flash socket (Type I or II)
♦ Attached to Primary IDE bus

• Ethernet

Supports IEEE 802.3 10BaseTX/100Base/1000BaseT compatible physical layer
Supports Auto-negotiation for speed, duplex mode, and flow control
Supports full-duplex or half-duplex mode

Full-duplex mode supports transmit and receive frames simultaneously
Supports IEEE 802.3x Flow control in full-duplex mode
Half-duplex mode supports enhanced proprietary collision reduction mode

Utility Interface

Supports standard external 8Ω “Beep” speaker interface
Supports external Reset switch
Supports external Power button

. USB Ports

♦ Provide three root USB hubs
♦ Provide seven USB ports
Support USB v2.0 EHCI and v1.1 UHCI

• Video (LCD/CRT) Display

Supports full hardware acceleration of H.264 video decode standard
Supports CRT (2048 x 1536) with up to 224MB UMA (Unified Memory Architecture)
Single channel 24-bit LVDS

. Miscellaneous

♦ Provides Real Time Clock and CMOS RAM, with support for battery-free operation
♦ Provides General Purpose I/O (GPIO) interface
♦ Provides Ethernet External LED
♦ Provides System Managment Bus (SMBus)
Supports Oops! Jumper (BIOS Recovery)
Supports Serial Console (Console Redirection)
Supports customizable Splash Screen
Supports Watchdog Timer (WDT)

# Block Diagram

Figure 2-2 shows the functional components of the CoreModule 730.
![Based on the provided block diagram, here are the labeled blocks and their connections:\n\n**Labeled Blocks:**\n*   CPU Temperature Sensor\n*   Intel Atom Z510 or Z530 CPU\n*   CK540 Clock\n*   LVDS Header\n*   VGA Header\n*   SDVO to RGB Controller\n*   USB0 and USB1 Header\n*   USB2 and USB3 Header\n*   Gigabit Ethernet Header\n*   Ethernet Magnetics\n*   Ethernet Controller\n*   PCIe to PCIe Switch\n*   SUMIT Connector - B\n*   SUMIT Connector - A\n*   Intel US15W SCH\n*   DDR2 SODIMM (up to 2GB)\n*   Compact Flash Socket\n*   IDE Header\n*   SMBus Header\n*   GPIO Header\n*   H8S Controller (LPC to SPI Conversion and Power Management)\n*   SPI Flash\n\n**Connections:**\n*   **CPU Temperature Sensor** ↔ **Intel Atom Z510 or Z530 CPU**\n*   **Intel Atom Z510 or Z530 CPU** ↔ **CK540 Clock**\n*   **Intel Atom Z510 or Z530 CPU** ↔ **Intel US15W SCH** (Label: FSB)\n*   **CK540 Clock** ↔ **Intel US15W SCH**\n*   **Intel US15W SCH** ↔ **LVDS Header**\n*   **Intel US15W SCH** ↔ **SDVO to RGB Controller**\n*   **SDVO to RGB Controller** ↔ **VGA Header**\n*   **Intel US15W SCH** ↔ **USB0 and USB1 Header**\n*   **Intel US15W SCH** ↔ **USB2 and USB3 Header**\n*   **Intel US15W SCH** ↔ **Ethernet Controller** (Label: X1 PCIe)\n*   **Ethernet Controller** ↔ **Ethernet Magnetics**\n*   **Ethernet Magnetics** ↔ **Gigabit Ethernet Header**\n*   **Gigabit Ethernet Header** → **PCIe to PCIe Switch** (Label: X1 PCIe)\n*   **Gigabit Ethernet Header** → **SUMIT Connector - B** (Label: X1 PCIe)\n*   **PCIe to PCIe Switch** ↔ **Intel US15W SCH** (Label: X1 PCIe)\n*   **PCIe to PCIe Switch** → **SUMIT Connector - B** (Label: X2 PCIe)\n*   **PCIe to PCIe Switch** ↔ **SUMIT Connector - A** (Label: X1 PCIe)\n*   **Intel US15W SCH** ↔ **DDR2 SODIMM (up to 2GB)**\n*   **Intel US15W SCH** ↔ **Compact Flash Socket**\n*   **Compact Flash Socket** ↔ **IDE Header**\n*   **Intel US15W SCH** ↔ **SMBus Header**\n*   **Intel US15W SCH** ↔ **GPIO Header**\n*   **Intel US15W SCH** → **SUMIT Connector - A** (Label: LPC)\n*   **SUMIT Connector - A** → **Intel US15W SCH** (Label: USB)\n*   **Intel US15W SCH** → **H8S Controller** (Label: LPC)\n*   **H8S Controller** → **SUMIT Connector - A** (Label: I2C to SUMIT)\n*   **H8S Controller** → **SUMIT Connector - A** (Label: SPI to SUMIT)\n*   **H8S Controller** ↔ **SPI Flash** (Label: SPI)](.50-1z019-1010-cm730-refman-final/e6385b62723adf8e11a250b77dacc975a74494c0a1f3724cd93412d9ffda72b9.jpg)

Figure 2-2. Block Diagram

# Major Components (ICs)

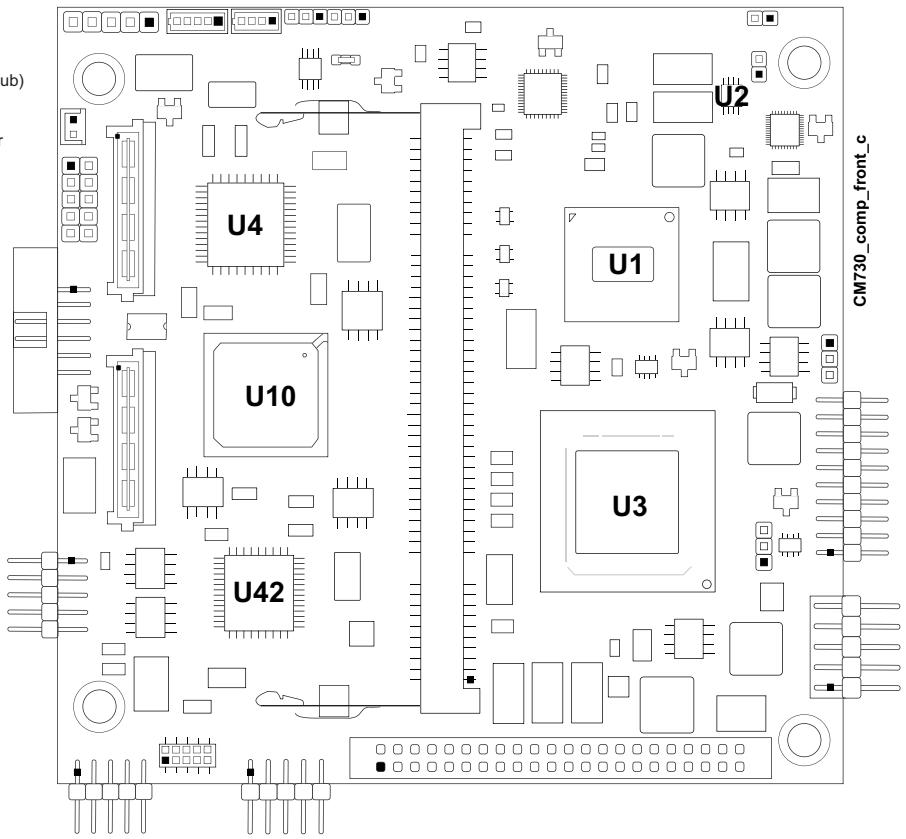
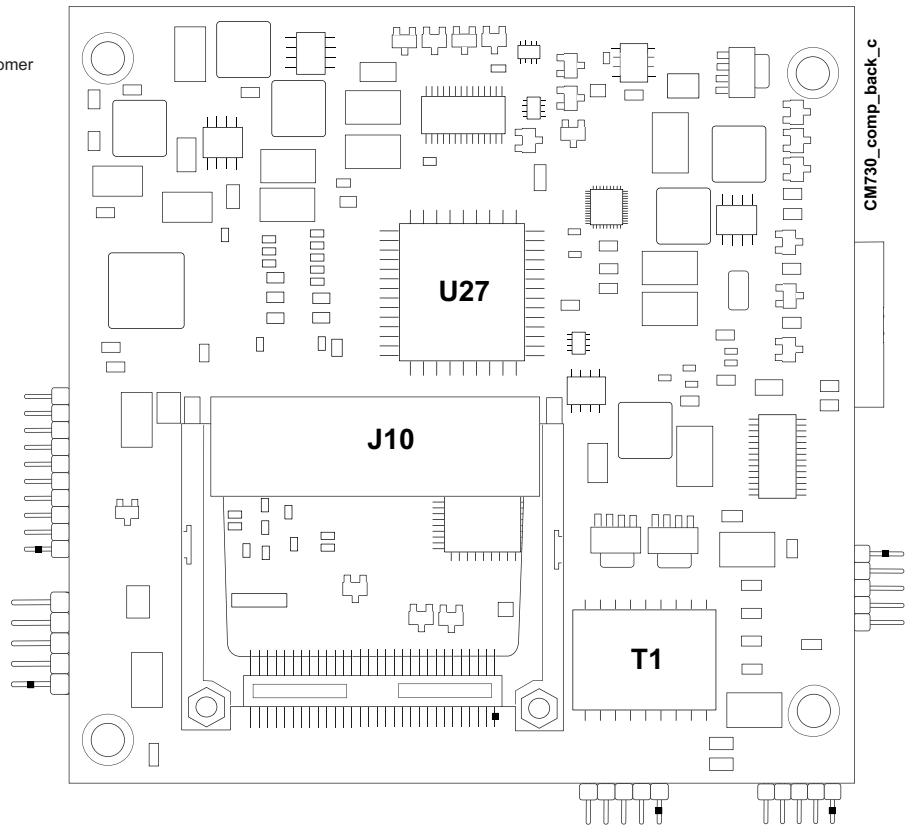
Table 2-1 lists the major ICs, including a brief description of each, on the CoreModule 730, and Figures 2-3 and 2-4 show the locations of the major ICs on the board.

Table 2-1. Major Components (ICs) Descriptions and Functions

<table><tr><td>Chip Type</td><td>Mfg.</td><td>Model</td><td>Description</td><td>Function</td></tr><tr><td>CPU (U1)</td><td>Intel</td><td>Atom Z510 and Z530</td><td>x86 32-bit processor offered at 1.1GHz (Z510) and 1.6GHz (Z530)</td><td>Embedded CPU</td></tr><tr><td>Sensor (U2)</td><td>Analog Devices</td><td>ADM1032ARMZ-1</td><td>CPU Temperature Monitor</td><td>Temperature Monitor and Alarm</td></tr><tr><td>SCH (U3)</td><td>Intel</td><td>US15W</td><td>Graphics, Memory, and I/O Expansion controller</td><td>System Controller Hub</td></tr><tr><td>Converter (U4)</td><td>Chrontel</td><td>CH7317A</td><td>SDVO to RGB Display Controller</td><td>Digital to Analog Conversion</td></tr><tr><td>Switch (U10)</td><td>PLX</td><td>PEX8505</td><td>PCIe to PCIe Switch</td><td>I/O Expansion Interconnect</td></tr><tr><td>Microcomputer (U27) - on bottom side; see Figure 2-4 on page 8</td><td>Renesas</td><td>R4F2117R</td><td>H8S Controller</td><td>LPC to SPI Conversion and Power Management</td></tr><tr><td>Controller (U42)</td><td>Intel</td><td>WG82574IT</td><td>Ethernet Controller</td><td>Gigatbit Ethernet</td></tr><tr><td>Transformer (T1) - on bottom side; see Figure 2-4 on page 8</td><td>Pulse</td><td>H5004NL</td><td>XFMR, 10/100/1000BaseT</td><td>Ethernet Magnetics</td></tr></table>

# Key:

U1 - CPU
U2 - Temperature Monitor
U3 - SCH (System Controller H
U4 - SDVO to RGB Converter
U10 - PCIe to PCIe Switch
U42 - Gigabit Ethernet Controller
![ub)\nCM730_comp_front_c\nU2\nU1\nU4\nU10\nU3\nU42](.50-1z019-1010-cm730-refman-final/2540b76ca50dd912b5909b4dfb98c2b5b6e0b2e147a848140a211c8b7d03ff76.jpg)

Figure 2-3. Component Locations (Top Side)

#

U27 - H8S Microcontroller
T1 - Gigabit Ethernet Transfo
J10 - Compact Flash (See header table)
![U27\nJ10\nT1\nCM730_comp_back_c](.50-1z019-1010-cm730-refman-final/9845d59b3cce8fd4a6351c137274eb5879884aae36281ddf24d150f30a540761.jpg)

Figure 2-4. Component Locations (Bottom Side)

# Header, Connector, and Socket Definitions

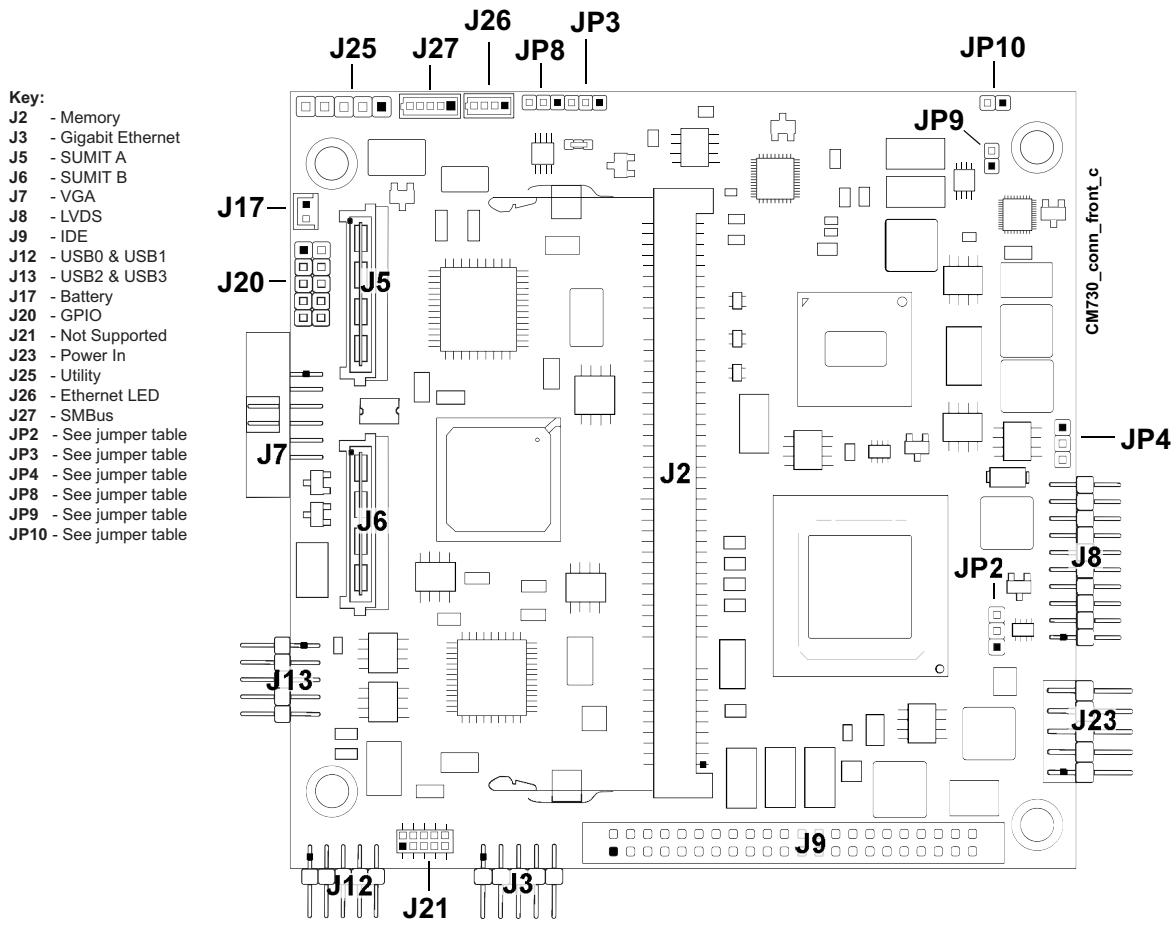
Table 2-2 describes the headers, connectors, and sockets shown in Figure 2-6. All I/O interfaces use 0.100" (2.54mm) pitch unless otherwise indicated.

Table 2-2. Header, Connector, and Socket Descriptions

<table><tr><td>Reference #</td><td>Access</td><td>Description</td></tr><tr><td>J2 – Memory</td><td>Front</td><td>200-pin, 0.024&quot; (0.60mm) socket for DDR2 SODIMM</td></tr><tr><td>J3 – Ethernet</td><td>Front</td><td>10-pin, 0.079&quot; (2mm), right-angle header for 10/100/1000BaseT Gigabit Ethernet port</td></tr><tr><td>J5 – SUMIT A (de-populated on one model)</td><td>Front</td><td>52-pin, 0.025&quot; (0.635mm) connector for out-going USB, PCIe, Power, ACPI, SMBus, I2C, SPI, LPC, Serial, Keyboard, Mouse, and Clock signals</td></tr><tr><td>J6 – SUMIT B (de-populated on certain models)</td><td>Front</td><td>52-pin, 0.025&quot; (0.635mm) connector for PCIe and Power</td></tr><tr><td>J7 – VGA</td><td>Front</td><td>12-pin, 0.079&quot; (2mm), right-angle, shrouded header for Video Out</td></tr><tr><td>J8 – LVDS</td><td>Front</td><td>20-pin, 0.079&quot; (2mm), right-angle header for Video Out</td></tr><tr><td>J9 – IDE</td><td>Front</td><td>44-pin, standard header for primary IDE interface</td></tr><tr><td>J10 – Compact Flash (on bottom side; see Figure 2-4)</td><td>Back</td><td>50-pin, 0.050&quot; (1.27mm) socket for Type I or II Compact Flash cards</td></tr><tr><td>J12 – USB0 &amp; USB1</td><td>Front</td><td>10-pin, 0.079&quot; (2mm), right-angle header for USB0 and USB1 ports</td></tr><tr><td>J13 – USB2 &amp; USB3</td><td>Front</td><td>10-pin, 0.079&quot; (2mm), right-angle header for USB2 and USB3 ports</td></tr><tr><td>J17 – BATT</td><td>Front</td><td>2-pin, 0.049&quot; (1.24mm), shrouded header for power from external battery</td></tr><tr><td>J20 – GPIO</td><td>Front</td><td>10-pin, 0.079&quot; (2mm) header for General Purpose I/O</td></tr><tr><td>J21 – N/S</td><td>Front</td><td>Not Supported</td></tr><tr><td>J23 – Power In</td><td>Front</td><td>10-pin, right-angle header for receiving external power</td></tr><tr><td>J25 – Utility</td><td>Front</td><td>5-pin header for Power Button, Reset, and Speaker</td></tr><tr><td>J26 – Ethernet LED</td><td>Front</td><td>4-pin, 0.049&quot; (1.25mm) header for external Gigabit Ethernet LED</td></tr><tr><td>J27 – SMBus</td><td>Front</td><td>5-pin, 0.049&quot; (1.25mm) header for Clock, Data, and Power I/O</td></tr></table>

NOTE The pinout tables in Chapter 3 of this manual identify pin sequence using the following methods: A 20-pin header with two rows of pins, using odd/even numbering, where pin 2 is directly across from pin 1, is noted as 20-pin, 2 rows, odd/ even (1, 2). Alternately, a 20-pin connector using consecutive numbering, where pin 11 is directly across from pin 1, is noted in this way: 20-pin, 2 rows, consecutive (1, 11). The second number in the parenthesis is always directly across from pin 1. See Figure 2-5.

![| Group | Row Index | Value |\n|-------|-----------|-------|\n| 20-pin, two rows, Odd/Even | 1 | 19 |\n| 20-pin, two rows, Odd/Even | 2 | 19 |\n| Or | 1 | 10 |\n| Or | 2 | 10 |\n| Or | 3 | 5 |\n| Or | 4 | 4 |\n| Or | 5 | 3 |\n| Or | 6 | 2 |\n| Or | 7 | 2 |\n| Or | 8 | 1 |\n| Or | 9 | 1 |\n| Or | 10 | 1 |\n| Or | 11 | 1 |\n| Or | 12 | 1 |\n| Or | 13 | 1 |\n| Or | 14 | 1 |\n| Or | 15 | 1 |\n| Or | 16 | 1 |\n| Or | 17 | 1 |\n| Or | 18 | 1 |\n| Or | 19 | 1 |\n| Or | 20 | 10 |\n| Or | 21 | 5 |\n| Or | 22 | 4 |\n| Or | 23 | 3 |\n| Or | 24 | 2 |\n| Or | 25 | 1 |\n| Or | 26 | 1 |\n| Or | 27 | 1 |\n| Or | 28 | 1 |\n| Or | 29 | 1 |\n| Or | 30 | 1 |\n| Or | 31 | 1 |\n| Or | 32 | 1 |\n| Or | 33 | 1 |\n| Or | 34 | 1 |\n| Or | 35 | 1 |\n| Or | 36 | 1 |\n| Or | 37 | 1 |\n| Or | 38 | 1 |\n| Or | 39 | 1 |\n| Or | 40 | 1 |\n| Or | 41 | 1 |\n| Or | 42 | 1 |\n| Or | 43 | 1 |\n| Or | 44 | 1 |\n| Or | 45 | 1 |\n| Or | 46 | 1 |\n| Or | 47 | 1 |\n| Or | 48 | 1 |\n| Or | 49 | 1 |\n| Or | 50 | 1 |\n| Or | 51 | 1 |\n| Or | 52 | 1 |\n| Or | 53 | 1 |\n| Or | 54 | 1 |\n| Or | 55 | 1 |\n| Or | 56 | 1 |\n| Or | 57 | 1 |\n| Or | 58 | 1 |\n| Or | 59 | 1 |\n| Or | 60 | 1 |\n| Or | 61 | 1 |\n| Or | 62 | 1 |\n| Or | 63 | 1 |\n| Or | 64 | 1 |\n| Or | 65 | 1 |\n| Or | 66 | 1 |\n| Or | 67 | 1 |\n| Or | 68 | 1 |\n| Or | 69 | 1 |\n| Or | 70 | 1 |\n| Or | 71 | 1 |\n| Or | 72 | 1 |\n| Or | 73 | 1 |\n| Or | 74 | 1 |\n| Or | 75 | 1 |\n| Or | 76 | 1 |\n| Or | 77 | 1 |\n| Or | 78 | 1 |\n| Or | 79 | 1 |\n| Or | 80 | 1 |\n| Or | 81 | 1 |\n| Or | 82 | 1 |\n| Or | 83 | 1 |\n| Or | 84 | 1 |\n| Or | 85 | 1 |\n| Or | 86 | 1 |\n| Or | 87 | 1 |\n| Or | 88 | 1 |\n| Or | 89 | 1 |\n| Or | 90 | 1 |\n| Or | 91 | 1 |\n| Or | 92 | 1 |\n| Or | 93 | 1 |\n| Or | 94 | 1 |\n| Or | 95 | 1 |\n| Or | 96 | 1 |\n| Or | 97 | 1 |\n| Or | 98 | 1 |\n| Or | 99 | 1 |\n| OR   | Consecutive (1)   |       |\n|     (CM730_ConNum_a)      (Odds/Even)    (Odd/Even)    (Consecutive)    (Consecutive)    (Consecutive)    (Consecutive)    (Consecutive)    (Consecutive)    (Consecutive)    (Consecutive)    (Consecutive)    (Consecutive)    (Consecutive)    (Consecutive)    (Consecutive)    (Consecutive)    (Consecutive)    (Consecutive)    (Consecutive)    (Consecutive)    (Consecutive)    (Consecutive)    (Contrinsic)     (Odds/Even)     (Odd/Even)     (Contrinsic)     (Contrinsic)     (Contrinsic)     (Contrinsic)     (Contrinsic)     (Contrinsic)     (Contrinsic)     (Contrinsic)     (Contrinsic)     (Contrinsic)     (Contrinsic)     (Contrinsic)     (Contrinsic)     (Contrinsic)     (Contrinsic)     (Contrinsic)     (Contrinsic)     (Contrinsic)     (Contrinsic)     (Contrinsic)     (Con Singular)     (Odds/Even)     (Odd/Even)     (Odds/Even)     (Odds/Even)     (Odds/Even)     (Odds/Even)     (Odds/Even)     (Odds/Even)     (Odds/Even)     (Odds/Even)     (Odds/Even)     (Odds/Even)     (Odds/Even)     (Odds/Even)     (Odds/Even)     (Odds/Even)     (Odds/ Even)      (Odds/Even)      (Odds/Even)      (Odds/Even)      (Odds/Even)      (Odds/Even)      (Odds/Even)      (Odds/Even)      (Odds/Even)      (Odds/ Even)      (Odds/ Even)      (Odds/ Even)      (Odds/ Even)      (Odds/ Even)      (Odds/ Even)      (Odds/ Even)](.50-1z019-1010-cm730-refman-final/ff639db7d2818b4df8652efb6aa945a7498840884fa1f4f38b5d3299e3a9b662.jpg)

Figure 2-5. Connector Pin Identifications
![Key:\nJ2 - Memory\nJ3 - Gigabit Ethernet\nJ5 - SUMIT A\nJ6 - SUMIT B\nJ7 - VGA\nJ8 - LVDS\nJ9 - IDE\nJ12 - USB0 & USB1\nJ13 - USB2 & USB3\nJ17 - Battery\nJ20 - GPIO\nJ21 - Not Supported\nJ23 - Power In\nJ25 - Utility\nJ26 - Ethernet LED\nJ27 - SMBus\nJP2 - See jumper table\nJP3 - See jumper table\nJP4 - See jumper table\nJP8 - See jumper table\nJP9 - See jumper table\nJP10 - See jumper table\nJ17-\nJ20-\nJ5-\nJ7-\nJ6-\nJ13-\nJ12-\nJ21-\nJ3-\nJ26-\nJP3-\nJP4-\nJP2-\nJP9-\nJP10-\nJP2-\nJP4-\nJP2-\nJP8-\nJP23-\nCM730 conn front_c](.50-1z019-1010-cm730-refman-final/45dd29eb424d2a26551dbc5b77b17a8eec111306b93f22ba99ab90d4589af183.jpg)

Figure 2-6. Header, Connector, Socket Locations (Top Side)

# NOTE

Pin 1 is shown as a black pin (square or round) on vertical headers in all illustrations. Black dots on right-angle headers indicate pin 2 in top-side views and pin 1 in bottom-side views.

# Jumper Header Definitions

Table 2-3 describes the jumper headers shown in Figure 2-6.

Table 2-3. Jumper Settings

<table><tr><td>Jumper #</td><td>Installed</td><td>Removed/Moved</td></tr><tr><td>JP2 – LVDS Voltage Select</td><td>+3.3 Volts (Pins 1-2) Default</td><td>+5 Volts (Pins 2-3)</td></tr><tr><td>JP3 – IDE Select</td><td>Enable HDD master, CF slave (Pins 1-2) Default</td><td>Enable HDD slave, CF master (Pins 2-3)</td></tr><tr><td>JP4 – Compact Flash Voltage Select</td><td>+5 Volts (Pins 1-2)</td><td>+3.3 Volts (Pins 2-3) Default</td></tr><tr><td>JP8 – N/S</td><td>Not Supported</td><td>Not Supported</td></tr><tr><td>JP9 – Clear CMOS</td><td>Clear CMOS Setup (pins 1-2)</td><td>Normal (Removed) Default</td></tr><tr><td>JP10 – N/S</td><td>Not Supported</td><td>Not Supported</td></tr></table>

Note: All jumper headers use $0 . 0 7 9 "$ (2mm) pitch.

# Specifications

# Physical Specifications

Table 2-4 shows the physical dimensions of the module, and Figure 2-7 shows the mounting dimensions.

Table 2-4. Weight and Footprint Dimensions

<table><tr><td>Item</td><td>Dimension</td><td rowspan="5">NOTE</td><td rowspan="5">Height is measured from the upper board surface to the top of the highest permanent component (J25 Utility header) on the upper board surface. This does not include the heatsink. The height of the board with the heatsink installed is 0.433&quot; (11mm). Component height should not exceed 0.435&quot; (11.05mm) from the upper surface of the board and 0.100&quot; (2.54mm) from the lower surface of the board.</td></tr><tr><td>Weight</td><td>0.105 kg. (0.232 lbs.)</td></tr><tr><td>Height (upper surface)</td><td>10.16mm (0.40&quot;)</td></tr><tr><td>Width</td><td>90.170mm (3.550&quot;)</td></tr><tr><td>Length</td><td>95.885mm (3.775&quot;)</td></tr></table>

# Mechanical Specifications

![| Component         | Value  |\n| ----------------- | ------ |\n| CM730_mech_dwg_top_c | 3.375  |\n| 3.150             | 3.575  |\n| 3.350             | 3.150  |\n| Other Components   | 0.200  |\n| Other Components   | 0.000  |\n| Other Components   | 0.185  |\n| Other Components   | 0.200  |\n| Other Components   | 0.000  |\n| Other Components   | 0.185  |\n| Other Components   | 0.200  |\n| Other Components   | 0.300  |\n| Other Components   | 0.650  |\n| Other Components   | 1.693  |\n| Other Components   | 2.900  |\n| Other Components   | 3.150  |\n| Other Components   | 3.350  |](.50-1z019-1010-cm730-refman-final/18a1edac9af2887b97a97d152668ca1caf9e6ed8c5b83a2d44bf2f456aa9cb0d.jpg)

Figure 2-7. Mechanical Dimensions (Top Side)

# NOTE

All dimensions are given in inches. Pin 1 is shown as a black pin (square or round) on vertical headers. Black dots on right-angle headers indicate pin 2 in top-side views and pin 1 in bottom-side views.

# Power Specifications

Table 2-5 provides the power requirements for the CoreModule 730.
Table 2-5. Power Supply Requirements

<table><tr><td>Parameter</td><td>1.1GHz Z510 CPU Characteristics (with only SUMIT A)</td><td>1.6GHz Z530 CPU Characteristics (without SUMIT)</td><td>1.6GHz Z530 CPU Characteristics (with SUMIT A and B)</td></tr><tr><td>Input Type</td><td>Regulated DC voltages</td><td>Regulated DC voltages</td><td>Regulated DC voltages</td></tr><tr><td>In-rush Current (Maximum)</td><td>1.88A (9.40W)</td><td>1.68A (8.40W)</td><td>1.81A (9.05W)</td></tr><tr><td>Idle Power (Typical)</td><td>0.91A (4.57W)</td><td>0.93A (4.66W)</td><td>1.00A (4.98W)</td></tr><tr><td>BIT Current (Typical)</td><td>1.41A (7.06W)</td><td>1.55A (7.74W)</td><td>1.99A (9.94W)</td></tr></table>

# Operating configurations:

In-rush operating configuration includes CRT video, MMSIO (only on SUMIT boards) and 1GB DDR2 RAM.
Idle operating configuration includes the In-rush configuration as well as on-board 128MB Compact Flash, one IDE hard drive, one mouse (on MMSIO), and one keyboard (on MMSIO).
BIT (Burn-In-Test) operating configuration includes Idle configuration as well as one USB Compact Flash reader with 64MB Compact Flash, one Ethernet connection, and one USB CD-ROM drive.

# Environmental Specifications

Table 2-6 provides the operating and storage condition ranges required for this module.
Table 2-6. Environmental Requirements

<table><tr><td>Parameter</td><td>Conditions</td></tr><tr><td>Temperature</td><td></td></tr><tr><td>Operating</td><td> $-20^{\circ}$  to  $+70^{\circ}$  C ( $-4^{\circ}$  to  $+158^{\circ}$  F)</td></tr><tr><td>Extended (Optional)</td><td> $-40^{\circ}$  to  $+85^{\circ}$  C ( $-40^{\circ}$  to  $+185^{\circ}$  F)</td></tr><tr><td>Storage</td><td> $-55^{\circ}$  to  $+85^{\circ}$  C ( $-67^{\circ}$  to  $+185^{\circ}$  F)</td></tr><tr><td>Humidity</td><td></td></tr><tr><td>Operating</td><td>5% to 90% relative humidity, non-condensing</td></tr><tr><td>Non-operating</td><td>5% to 95% relative humidity, non-condensing</td></tr></table>

# Thermal/Cooling Requirements

The CPU is the primary source of heat on the board. The CoreModule 730 CPU is designed to operate at maximum speed and requires a heatsink (provided). The height of the heatsink is 0.433" (11mm).

# Overview

This chapter discusses the ICs and headers of the module features in the following order:

CPU
. Graphics
• Memory
• Interrupt Channel Assignments
• Memory Map
• I/O Address Map
. USB
• Ethernet
. Video

VGA

♦ LVDS

Utility

♦ Power Button
♦ Reset Switch
BIOS Recovery (Using Reset Switch)
♦ Speaker

Miscellaneous

♦ Battery
Time of Day/RTC
User GPIO
♦ SMBus
▲ Ethernet LED
♦ Oops! Jumper (BIOS Recovery)
Serial Console (Console Redirection)
+ Hot Cable
Watchdog Timer

Power Interface

# NOTE

ADLINK Technology, Inc. only supports the features and options listed in this manual. The main components used on the CoreModule 730 may provide more features or options than are listed in this manual. Some of these features/options are not supported on the module and will not function as specified in the chip documentation.

The pinout tables only of non-standard headers and connectors are included in this chapter. This chapter does not include pinout tables for standard headers and connectors such as SUMIT, 44-pin IDE, and Compact Flash.

# CPU

The CoreModule 730 offers an embedded microprocessor—the Intel Atom Z510 and Z530—operating at 1.1 GHz and 1.6 GHz, respectively. This CPU provides a powerful x86 core and support for the SCH (System Controller Hub) US15W which integrates Northbridge and Southbridge functions.

# Graphics

The US15W SCH integrates a graphics controller which provides LVDS and SDVO ports that terminate to LVDS and VGA headers, respectively. The graphics controller achieves high 2D and 3D performance with a DDR2 memory interface (shared with the system controller) supporting a bandwith of up to 2 GB (DDR2 @ up to 533 MHz.)

# Memory

The CoreModule 730 provides one 200-pin DDR2 SODIMM of up to 2GB of memory, which is shared between the system memory controller and the graphics memory controller in the SCH.

# Interrupt Channel Assignments

The interrupt channel assignments are shown in Table 3-1.

Table 3-1. Interrupt Channel Assignments

<table><tr><td>Device vs IRQ No.</td><td>0</td><td>1</td><td>2</td><td>3</td><td>4</td><td>5</td><td>6</td><td>7</td><td>8</td><td>9</td><td>10</td><td>11</td><td>12</td><td>13</td><td>14</td><td>15</td></tr><tr><td>Timer</td><td>X</td><td></td><td></td><td></td><td></td><td></td><td></td><td></td><td></td><td></td><td></td><td></td><td></td><td></td><td></td><td></td></tr><tr><td>Keyboard*</td><td></td><td>X</td><td></td><td></td><td></td><td></td><td></td><td></td><td></td><td></td><td></td><td></td><td></td><td></td><td></td><td></td></tr><tr><td>Secondary Cascade</td><td></td><td></td><td>X</td><td></td><td></td><td></td><td></td><td></td><td></td><td></td><td></td><td></td><td></td><td></td><td></td><td></td></tr><tr><td>COM1*</td><td></td><td></td><td></td><td>O</td><td>D</td><td></td><td></td><td></td><td></td><td></td><td>O</td><td>O</td><td></td><td></td><td></td><td></td></tr><tr><td>COM2*</td><td></td><td></td><td></td><td>D</td><td>O</td><td></td><td></td><td></td><td></td><td></td><td>O</td><td>O</td><td></td><td></td><td></td><td></td></tr><tr><td>COM3*</td><td></td><td></td><td></td><td>O</td><td>O</td><td></td><td></td><td></td><td></td><td></td><td>O</td><td>D</td><td></td><td></td><td></td><td></td></tr><tr><td>COM4*</td><td></td><td></td><td></td><td>O</td><td>O</td><td></td><td></td><td></td><td></td><td></td><td>D</td><td>O</td><td></td><td></td><td></td><td></td></tr><tr><td>Parallel*</td><td></td><td></td><td></td><td></td><td></td><td>O</td><td></td><td>D</td><td></td><td></td><td></td><td></td><td></td><td></td><td>O</td><td>O</td></tr><tr><td>RTC</td><td></td><td></td><td></td><td></td><td></td><td></td><td></td><td></td><td>X</td><td></td><td></td><td></td><td></td><td></td><td></td><td></td></tr><tr><td>IDE</td><td></td><td></td><td></td><td></td><td></td><td></td><td></td><td></td><td></td><td></td><td></td><td></td><td></td><td></td><td>D</td><td></td></tr><tr><td>Math Coprocessor</td><td></td><td></td><td></td><td></td><td></td><td></td><td></td><td></td><td></td><td></td><td></td><td></td><td></td><td>X</td><td></td><td></td></tr><tr><td>PS/2 Mouse*</td><td></td><td></td><td></td><td></td><td></td><td></td><td></td><td></td><td></td><td></td><td></td><td></td><td>X</td><td></td><td></td><td></td></tr><tr><td>PCI INTA*</td><td colspan="16">Automatically Assigned</td></tr><tr><td>PCI INTB*</td><td colspan="16">Automatically Assigned</td></tr><tr><td>PCI INTC*</td><td colspan="16">Automatically Assigned</td></tr><tr><td>PCI INTD*</td><td colspan="16">Automatically Assigned</td></tr><tr><td>PCI INTE</td><td colspan="16">Automatically Assigned</td></tr><tr><td>PCI INTF</td><td colspan="16">Automatically Assigned</td></tr><tr><td>PCI INTG</td><td colspan="16">Automatically Assigned</td></tr><tr><td>PCI INTH</td><td colspan="16">Automatically Assigned</td></tr></table>

Legend: D = Default, O = Optional, X = Fixed, \* = Located on the optional expansion module.

# NOTE

The PCI IRQs for the Ethernet, Video, and Internal Local Bus are automatically assigned by the BIOS Plug and Play logic. Local ISA IRQs assigned during initialization can not be used by external devices.

# Memory Map

The following table provides the common PC/AT memory allocations. These are DOS-level addresses. The OS typically hides these physical addresses by way of memory management. Memory below 000500h is used by the BIOS.

Table 3-2. Memory Map

<table><tr><td colspan="2">Base Address</td><td>Function</td></tr><tr><td>00000000h -</td><td>0009FFFFh</td><td>Conventional Memory</td></tr><tr><td>000A0000h -</td><td>000AFFFFh</td><td>Graphics Memory</td></tr><tr><td>000B0000h -</td><td>000B7FFFh</td><td>Mono Text Memory</td></tr><tr><td>000B8000h -</td><td>000BFFFFh</td><td>Color Text Memory</td></tr><tr><td>000C0000h -</td><td>000CFFFFh</td><td>Standard Video BIOS</td></tr><tr><td>000D0000h -</td><td>000DFFFFh</td><td>Reserved for Extended BIOS</td></tr><tr><td>000E0000h -</td><td>000EFFFFh</td><td>Extended System BIOS Area</td></tr><tr><td>000F0000h -</td><td>000FFFFFFh</td><td>System BIOS Area (Storage and RAM Shadowing)</td></tr><tr><td colspan="2">Top 0, 1, 4, or 8MB of DRAM</td><td>Integrated Graphics Memory</td></tr><tr><td>FFE00000h -</td><td>FFFFFFFFh</td><td>System Flash</td></tr></table>

# I/O Address Map

Table 3-3 provides the I/O address map. These are DOS-level addresses. The OS typically hides these physical addresses by way of memory management.

\* Located on the optional expansion module.
Table 3-3. I/O Address Map

<table><tr><td>Address (hex)</td><td>Subsystem</td></tr><tr><td>0000-000F</td><td>System reserved</td></tr><tr><td>0020-0021</td><td>Master Interrupt Controller</td></tr><tr><td>0040-0043</td><td>Programmable Interrupt Timer (Clock/Timer)</td></tr><tr><td>0060</td><td>Keyboard Controller</td></tr><tr><td>0061</td><td>NMI, Speaker control</td></tr><tr><td>0062</td><td>Board Controller</td></tr><tr><td>0063</td><td>NMI Controller</td></tr><tr><td>0064*</td><td>Keyboard Controller</td></tr><tr><td>0065</td><td>NMI Controller</td></tr><tr><td>0066</td><td>Board Controller</td></tr><tr><td>0067</td><td>NMI Controller</td></tr><tr><td>0070-007F</td><td>CMOS RAM, NMI Mask Reg, RT Clock</td></tr><tr><td>0080</td><td>System reserved</td></tr><tr><td>0081-0083</td><td>System reserved</td></tr><tr><td>0084-0086</td><td>System reserved</td></tr><tr><td>0087</td><td>System reserved</td></tr><tr><td>0088</td><td>System reserved</td></tr><tr><td>0089-008B</td><td>System reserved</td></tr><tr><td>008C-008E</td><td>System reserved</td></tr><tr><td>008F</td><td>System reserved</td></tr><tr><td>0090-0091</td><td>System reserved</td></tr><tr><td>0092</td><td>Fast A20 gate and CPU reset</td></tr><tr><td>0093-009F</td><td>System reserved</td></tr><tr><td>00A0-00A1</td><td>Slave Interrupt Controller</td></tr><tr><td>00A2-00BF</td><td>System reserved</td></tr><tr><td>00C0-00DF</td><td>System reserved</td></tr><tr><td>00E0-00EF</td><td>System reserved</td></tr><tr><td>00F0-00FF</td><td>Math Coprocessor</td></tr><tr><td>01F0-01F7</td><td>IDE Hard Disk Controller</td></tr><tr><td>0201</td><td>Watchdog Timer (WDT)</td></tr><tr><td>0205</td><td>System reserved</td></tr><tr><td>02E8-02EF*</td><td>Serial Port 4 (COM4)</td></tr><tr><td>02F8-02FF*</td><td>Serial Port 2 (COM2)</td></tr><tr><td>360</td><td>Board Controller</td></tr><tr><td>364</td><td>Board Controller</td></tr><tr><td>0378-037F*</td><td>Parallel Port (Standard and EPP)</td></tr><tr><td>03B0-03BB</td><td>Video (monochrome)</td></tr><tr><td>03C0-03DF</td><td>Video (VGA)</td></tr><tr><td>03E8-03EF*</td><td>Serial Port 3 (COM3)</td></tr><tr><td>03F6</td><td>IDE Hard Disk Controller</td></tr><tr><td>03F8-03FF*</td><td>Serial Port 1 (COM1)</td></tr><tr><td>04D0-04D1</td><td>Edge/Level Trigger PIC</td></tr><tr><td>0778-077F*</td><td>Parallel Port (ECP Extensions) (Port 378+400)</td></tr><tr><td>0CF8-0CFF</td><td>PC I Configuration Registers</td></tr><tr><td>0CF9</td><td>Reset Control Register</td></tr></table>

# USB Interfaces

The CoreModule 730 contains three root USB (Universal Serial Bus) hubs and seven functional USB ports. The SCH terminates four USB ports to two headers and routes three USB ports to the SUMIT Connector A. Each of these ports include the following features:

USB EHCI v.2.0 and USB UHCI v.1.1
Over-current detection
Over-current protection

High-speed data transfers up to 480 MB/sec on USB 2.0

Table 3-4 describes the pin signals of the USB0 and USB1 header which consists of 10 right-angle pins, in two rows, with odd/even (1, 2) pin sequence, and 0.079" (2mm) pitch.

Table 3-4. USB0 and USB1 Interface Pin Signals (J12)

<table><tr><td>Pin #</td><td>Signal</td><td>Description</td></tr><tr><td>1</td><td>USB-PWR_0</td><td>USB0 Power – VCC (+5V +/-5%) power goes to the port through an on board fuse. Port is disabled if this input is low.</td></tr><tr><td>2</td><td>USB-PWR_1</td><td>USB1 Power – VCC (+5V +/-5%) power goes to the port through an on board fuse. Port is disabled if this input is low.</td></tr><tr><td>3</td><td>CONN_USB0_N</td><td>USB0 Port Data Negative</td></tr><tr><td>4</td><td>CONN_USB1_N</td><td>USB1 Port Data Negative</td></tr><tr><td>5</td><td>CONN_USB0_P</td><td>USB0 Port Data Positive</td></tr><tr><td>6</td><td>CONN_USB1_P</td><td>USB1 Port Data Positive</td></tr><tr><td>7</td><td>USB_GND0</td><td>USB0 Ground</td></tr><tr><td>8</td><td>USB_GND1</td><td>USB1 Ground</td></tr><tr><td>9</td><td>USB_GND0</td><td>USB0 Ground</td></tr><tr><td>10</td><td>USB_GND1</td><td>USB1 Ground</td></tr></table>

Note: The shaded areas denote power or ground.

Table 3-5 describes the pin signals of the USB2 and USB3 header which consists of 10 right-angle pins in two rows, with odd/even (1, 2) pin sequence, and 0.079" (2mm) pitch.

Table 3-5. USB2 and USB3 Interface Pin Signals (J13)

<table><tr><td>Pin #</td><td>Signal</td><td>Description</td></tr><tr><td>1</td><td>USB-PWR_2</td><td>USB2 Power – VCC (+5V +/-5%) power goes to the port through an on board fuse. Port is disabled if this input is low.</td></tr><tr><td>2</td><td>USB-PWR_3</td><td>USB3 Power – VCC (+5V +/-5%) power goes to the port through an on board fuse. Port is disabled if this input is low.</td></tr><tr><td>3</td><td>CONN_USB2_N</td><td>USB2 Port Data Negative</td></tr><tr><td>4</td><td>CONN_USB3_N</td><td>USB3 Port Data Negative</td></tr><tr><td>5</td><td>CONN_USB2_P</td><td>USB2 Port Data Positive</td></tr><tr><td>6</td><td>CONN_USB3_P</td><td>USB3 Port Data Positive</td></tr><tr><td>7</td><td>USB_GND2</td><td>USB2 Ground</td></tr><tr><td>8</td><td>USB_GND3</td><td>USB3 Ground</td></tr><tr><td>9</td><td>USB_GND2</td><td>USB2 Ground</td></tr><tr><td>10</td><td>USB_GND3</td><td>USB3 Ground</td></tr></table>

Note: The shaded areas denote power or ground.

# Ethernet Interface

The Ethernet solution originates from the 82574IT Gigabit Ethernet controller and consists of both the Media Access Controller (MAC) and the Physical Layer (PHY) combined into a single component solution. The Gigabit Ethernet Control Unit is a 64-bit PCIe controller that features enhanced scatter-gather bus mastering capabilities, which enables the processor to perform high-speed data transfers over the internal PCIe bus. The bus master capabilities enable the component to process high-level commands and perform multiple operations, thereby off-loading communication tasks from the CPU. The Ethernet interface offers the following features:

Full duplex or half duplex support at 10 Mbps, 100 Mbps, or 1000 Mbps
• In full duplex mode, the Ethernet controller adheres to the IEEE 802.3x Flow Control specification.
• In half duplex mode, performance is enhanced by a proprietary collision reduction mechanism.
IEEE 802.3 compatible physical layer to wire transformer
IEEE 802.3u Auto-Negotiation support
Fast back-to-back transmission support with minimum interframe spacing (IFS).
IEEE 802.3x auto-negotiation support for speed and duplex operation
3 kB transmit and 3 kB receive FIFOs (helps prevent data underflow and overflow)
On-board magnetics (Ethernet isolation transformer)

Table 3-6 describes the pin signals of the Ethernet header which consists of 10 right-angle pins, two rows, odd/even (1,2) pin sequence, and 0.079" (2mm) pitch.
Table 3-6. Ethernet Interface Pin/Signal Descriptions (J3)

<table><tr><td>Pin #</td><td>Signal</td><td>Description</td></tr><tr><td>1</td><td>GND</td><td rowspan="2">Ground</td></tr><tr><td>2</td><td>GND</td></tr><tr><td>3</td><td>MDI0+</td><td rowspan="2">Media Dependent Interface 0 +/-</td></tr><tr><td>4</td><td>MDI0-</td></tr><tr><td>5</td><td>MDI1+</td><td rowspan="2">Media Dependent Interface 1 +/-</td></tr><tr><td>6</td><td>MDI1-</td></tr><tr><td>7</td><td>MDI2+</td><td rowspan="2">Media Dependent Interface 2 +/-</td></tr><tr><td>8</td><td>MDI2-</td></tr><tr><td>9</td><td>MDI3+</td><td rowspan="2">Media Dependent Interface 3 +/-</td></tr><tr><td>10</td><td>MDI3-</td></tr></table>

Note: The shaded areas denote power or ground.

NOTE The magnetics (isolation transformer, T1) for the Ethernet connector is included on the CoreModule 730.

# Video Interfaces

The SCH chip provides the graphics control and video signals to traditional glass CRT (VGA) monitors and LVDS flat panel displays, supporting full hardware acceleration of H.264 video decode. Other chip features are listed below:

VGA features:

Support for an integrated 400-MHz, 24-bit RAMDAC to drive a progressive scan analog monitor and outputs to three, 8-bit DACs that provide the R, G, and B signals to the monitor
Support for resolutions up to QXGA (2048x1536)
Support for a maximum allowable video frame buffer size of 224MB UMA (Unified Memory Architecture)

LVDS features:

Support for a single channel LFP Transmitter interface
Support for LVDS LCD panel resolutions up to UXGA (1600X1200)
Support for a maximum pixel format of 24 bpp with SSC supported frequency range from 25 MHz to 112 MHz (single channel)

# VGA Interface

Table 3-7 describes the pin signals of the VGA interface, which uses 12 right-angle pins, 2 rows, odd/even sequence (1, 2) with 0.079" (2mm) pitch.
Table 3-7. VGA Interface Pin Signals (J7)

<table><tr><td>Pin #</td><td>Signal</td><td>Description</td></tr><tr><td>1</td><td>RED</td><td>Red – This is the Red analog output signal to the CRT.</td></tr><tr><td>2</td><td>GND1</td><td>Ground 1 (Red Return)</td></tr><tr><td>3</td><td>GREEN</td><td>Green – This is the Green analog output signal to the CRT.</td></tr><tr><td>4</td><td>GND2</td><td>Ground 2 (Green Return)</td></tr><tr><td>5</td><td>BLUE</td><td>Blue – This is the Blue analog output signal to the CRT.</td></tr><tr><td>6</td><td>GND3</td><td>Ground 3 (Blue Return)</td></tr><tr><td>7</td><td>HSYNC</td><td>Horizontal Sync – This signal is used for the digital horizontal sync output to the CRT.</td></tr><tr><td>8</td><td>GND4</td><td>Ground 4 (VGA)</td></tr><tr><td>9</td><td>VSYNC</td><td>Vertical Sync – This signal is used for the digital vertical sync output to the CRT.</td></tr><tr><td>10</td><td>PWR</td><td>Power – Provided through fuse (F1) to +5 volts +/- 5%. F1 is next to J7 header on board.</td></tr><tr><td>11</td><td>DDC_DATA</td><td>Display Data Channel - Data</td></tr><tr><td>12</td><td>DDC_CLK</td><td>Display Data Channel - Clock</td></tr></table>

Note: The shaded areas denote power or ground.

# LVDS Interface

Table 3-8 describes the pin signals of the LVDS interface, which uses a 20-pin, right-angle header with 2 rows, odd/even sequence (1, 2), and 0.079" (2mm) pitch.

Table 3-8. LVDS Interface Pin/Signal Descriptions (J8)

<table><tr><td>Pin #</td><td>Signal</td><td>Description</td><td>Line</td></tr><tr><td>1</td><td>VCC_INTRV</td><td>+12V source</td><td></td></tr><tr><td>2</td><td>VCC_LVDS_CONN</td><td>JP2 = +3.3 or +5V source</td><td></td></tr><tr><td>3</td><td>GND</td><td>Ground</td><td rowspan="2">Gnd</td></tr><tr><td>4</td><td>GND</td><td>Ground</td></tr><tr><td>5</td><td>LVDS_CLK+</td><td>Clock Positive Output</td><td rowspan="2">Clk</td></tr><tr><td>6</td><td>LVDS_CLK-</td><td>Clock Negative Output</td></tr><tr><td>7</td><td>LVDS_DAT3+</td><td>Data 3 Positive Output</td><td rowspan="2">3</td></tr><tr><td>8</td><td>LVDS_DAT3-</td><td>Data 3 Negative Output</td></tr><tr><td>9</td><td>LVDS_DAT2+</td><td>Data 2 Positive Output</td><td rowspan="2">2</td></tr><tr><td>10</td><td>LVDS_DAT2-</td><td>Data 2 Negative Output</td></tr><tr><td>11</td><td>LVDS_DAT1+</td><td>Data 1 Positive Output</td><td rowspan="2">1</td></tr><tr><td>12</td><td>LVDS_DAT1-</td><td>Data 1 Negative Output</td></tr><tr><td>13</td><td>LVDS_DAT0+</td><td>Data 0 Positive Output</td><td rowspan="2">0</td></tr><tr><td>14</td><td>LVDS_DAT0-</td><td>Data 0 Negative Output</td></tr><tr><td>15</td><td>LVDS_BKLT_CTRL</td><td>Backlight Control</td><td></td></tr><tr><td>16</td><td>LVDS_VDD_EN</td><td>LCD Enable</td><td></td></tr><tr><td>17</td><td>LVDS_DDC_CLK</td><td>Clock</td><td></td></tr><tr><td>18</td><td>LVDS_DDC_DATA</td><td>Data</td><td></td></tr><tr><td>19</td><td>LVDS_BKLT_EN</td><td>Backlight Enable</td><td></td></tr><tr><td>20</td><td>NC</td><td>Not connected</td><td></td></tr></table>

Note: The shaded areas denote power or ground.

# Utility Interface

The Utility interface provides three utility and I/O signals on the module and consists of a 5-pin, 0.100" (2.54mm), single row header. The US15W SCH drives the signals on the Utility interface. Table 3-9 provides the signal definitions.

Power Button
. Reset Switch
• Speaker

# Power Button

The Utility header provides a signal for an external Power button through pins 1 and 2. The Power button allows the user to turn Off the system.

# Reset Switch

Pins 2 and 3 on the Utility header provide the signal for an external reset button which allows the user to reboot the system.

# BIOS Recovery (Using Reset Switch)

In the event you have selected BIOS settings that prevent you from booting the system, you can stop the current BIOS settings in the CMOS from being loaded by pressing and holding the Reset button for five seconds and then releasing the button. The system re-boots, and the BIOS loads the default settings.

# Speaker

The speaker signal provides sufficient signal strength to drive a 1W 8 Ω “Beep” speaker through the Utility interface at an audible level. The speaker signal is driven from an on-board amplifier and the SCH.

Table 3-9. Utility Interface Pin Signals (J25)

<table><tr><td>Pin #</td><td>Signal</td><td>Description</td></tr><tr><td>1</td><td>/PWR_BTN</td><td>External Power Button (Pins 1-2)</td></tr><tr><td>2</td><td>GND</td><td>Ground</td></tr><tr><td>3</td><td>/RESET SW*</td><td>External Reset Switch signal (Pins 2-3)</td></tr><tr><td>4</td><td>5V</td><td>+5 Volts Power</td></tr><tr><td>5</td><td>SPKR_CONN</td><td>Speaker Output (Pins 4-5)</td></tr></table>

Note: The shaded area denotes power or ground. The signals marked with \* indicate active low.

# Miscellaneous

# Battery

An external battery connection is provided through the J17 header to support a backup battery for the CMOS RAM and the RTC (Real Time Clock).

# Real Time Clock (RTC)

The CoreModule 730 contains a Real Time Clock (RTC). The CMOS RAM can be backed up with a lithium battery. If the battery is not present, a battery-free boot option in the BIOS completes the boot process and resets the clock to the default date and time.

NOTE Some operating systems require a valid default date and time to function.

# User GPIO Interface

The CoreModule 730 provides GPIO pins for customer use, and the signals are routed to header J20 which uses 10 pins with odd/even (1,2) pin sequence and 0.049" (2mm) pitch. An example of how to use the GPIO pins resides in the Miscellaneous Source Code Examples on the CoreModule 730 Support QuickDriveTM.

Table 3-10. User GPIO Interface Pin/Signal Descriptions (J20)

<table><tr><td>Pin #</td><td>Signal</td><td>Description</td></tr><tr><td>1</td><td>H8S_GPI0</td><td>User defined</td></tr><tr><td>2</td><td>H8S_GPO0</td><td>User defined</td></tr><tr><td>3</td><td>H8S_GPI1</td><td>User defined</td></tr><tr><td>4</td><td>H8S_GPO1</td><td>User defined</td></tr><tr><td>5</td><td>H8S_GPI2</td><td>User defined</td></tr><tr><td>6</td><td>H8S_GPO2</td><td>User defined</td></tr><tr><td>7</td><td>H8S_GPI3</td><td>User defined</td></tr><tr><td>8</td><td>H8S_GPO3</td><td>User defined</td></tr><tr><td>9</td><td>GND</td><td>Ground</td></tr><tr><td>10</td><td>GND</td><td>Ground</td></tr></table>

Note: The shaded areas denote ground.

# Oops! Jumper (BIOS Recovery)

The Oops! jumper is provided in the event you have selected BIOS settings that prevent you from booting the system. By using the Oops! jumper you can stop the current BIOS settings in the CMOS from being loaded, allowing you to proceed, using the default settings. Connect the DTR pin to the RI pin on Serial port 1 (COM 1 on the MiniModule board) prior to boot up to prevent the present BIOS settings from loading. After booting with the Oops! jumper in place, remove the Oops! jumper and go into the BIOS Setup Utility. Change the desired BIOS settings, or select the default settings, and save changes before rebooting the system.

To convert a standard DB9 connector to an Oops! jumper, short together the DTR (4) and RI (9) pins on the rear of the female connector or the front of the male connector as shown in Figure 3-1 on the Serial Port 1 DB9 connector.

To restore your BIOS setting changes without the errors, you must first select Load Factory Default Settings, which will automatically load and save the defaults and reboot the system. Then you can modify the default settings to your desired values. Ensure you save the changes before rebooting the system.

# NOTE

Serial Port 1 (on the MiniModule) is a 10-pin header and uses pin 7 = DTR and pin 8 = RI for the Oops! Jumper. At Serial Port 1, short pin 7 to 8, as shown in Figure 3-1. Alternatively, you may short the equivalent pins (4 to 9) on the DB9 connector attached to Serial Port 1 as shown in Figure 3-1.

![Serial Port Header\n(COM1 on MiniModule)\nOr\nStandard DB9 Serial\nPort 1 Connector\non MiniModule (Male)\nFront View\n(or Rear View\nof Female Connector)\nCM730_Oopsjump_b](.50-1z019-1010-cm730-refman-final/f455028055348f9ff1e17a247764f72b403cd44dae5898e79341efe3c312d48c.jpg)

Figure 3-1. Oops! Jumper

# Serial Console

The CoreModule 730 BIOS supports the serial console (or console redirection) feature. These I/O functions are provided by an ANSI-compatible serial terminal, or the equivalent terminal emulation software running on another system. This can be very useful when setting up the BIOS on a production line for systems that are not connected to keyboards and displays.

# Serial Console BIOS Setup

The serial console (console redirection) feature is implemented by connecting a standard null-modem cable or a modified serial cable (or “Hot Cable”) between one of the serial ports, such as Serial 1 or 2 (from SUMIT connector A), and the serial terminal or a PC with communications software. The BIOS Setup Utility controls the serial console settings on the CoreModule 730. Refer to the BIOS Setup for the serial console option settings using a serial terminal or PC with communications software.

# Hot (Serial) Cable

To convert a standard serial cable to a Hot Cable, certain pins must be shorted together at the Serial port header or at the DB9 connector. Short together the RTS (4) and RI (8) pins on either serial port header (J3 or J9). As an alternate, you can short the equivalent pins 7 and 9 on the rear of the respective DB9 female connector or the front of the male connector as shown in Figure 3-2.

![Serial Port Header\n(COM1 or COM2\non MiniModule)\nOr\nStandard DB9 Serial\nPort Connector (Female)\nRear View\n(or Front View of\nMale Connector)\n1 2 3 4 5\n6 7 8 9\nCM730_HotCable_b](.50-1z019-1010-cm730-refman-final/dbff8fdcb4cf50c788851bed94e16b17c47f3f1fbb320871507bbc22a4c45f06.jpg)

Figure 3-2. Hot Cable Jumper

# System Management Bus (SMBus)

The SCH chip contains a host SMBus port. The host port allows the CPU access to the SMBus slaves through header J27. The SMBus slaves include the SODIMM EPROM, CPU Temperature Sensor, Clock Buffer, and the Clock Generator. Table 3-11 lists the device names and corresponding reserved binary addresses on the SMBus. Table 3-12 lists the SMBus pin signals on 5 pins, 1 row, 0.049" (2 mm) pitch on the external SMBus header (J27).

Table 3-11. SMBus Reserved Addresses

<table><tr><td>Component</td><td>Address Binary</td></tr><tr><td>SODIMM EPROM</td><td> $1010,000x_b$ </td></tr><tr><td>Clock Generator</td><td> $1101,001x_b$ </td></tr><tr><td>Clock Buffer</td><td> $1101,110x_b$ </td></tr><tr><td>CPU Temperature Sensor</td><td> $1001,100x_b$ </td></tr></table>

Table 3-12. SMBus Pin Signals (J27)

<table><tr><td>Pin #</td><td>Signal</td><td>Description</td></tr><tr><td>1</td><td>SMB_CLK</td><td>SMBus Clock</td></tr><tr><td>2</td><td>GND</td><td>Ground</td></tr><tr><td>3</td><td>SMB_DATA</td><td>SMBus Data</td></tr><tr><td>4</td><td>VSM</td><td>+3.3V standby voltage</td></tr><tr><td>5</td><td>/SMB_ALERT*</td><td>SMBus Alert</td></tr></table>

Note: The shaded areas denote power or ground. The signals marked with \* indicate Active Low.

# Ethernet External LED

This header provides signals for an external LED that indicates Ethernet links and activity using a single row of 4 pins with 0.049" (1.25mm) pitch.

Table 3-13. Ethernet External LED Pin Signals (J26)

<table><tr><td>Pin #</td><td>Signal</td><td>Description</td></tr><tr><td>1</td><td>V3.3_CONN</td><td>+3 volts – Provides +3 volts to external LED (Pins 1-2 for Green LED)</td></tr><tr><td>2</td><td>ETH_ACT_LED</td><td>Ethernet Activity</td></tr><tr><td>3</td><td>ETH_LINK100_LED</td><td>Fast Ethernet Link with +3 volts power (Pins 3-4 for Bi-Color LED)</td></tr><tr><td>4</td><td>ETH_LINK1000_LED</td><td>Gigabit Ethernet Link</td></tr></table>

Note: The shaded area denotes power or ground.

# Watchdog Timer

The Watchdog Timer (WDT) restarts the system if an error or mishap occurs, allowing the system to recover from the mishap, even though the error condition may still exist. Possible problems include failure to boot properly, loss of control by the application software, failure of an interface device, unexpected conditions on the bus, or other hardware or software malfunctions.

The WDT (Watchdog Timer) can be used both during the boot process and during normal system operation.

During the Boot process – If the OS fails to boot in the time interval set in the BIOS, the system will reset.
Enable the Watchdog Timer (sec) field in the BIOS and Hardware Settings screen of BIOS Setup. Set the WDT for a time-out interval in seconds, between 1 and 255, in one second increments. Ensure you allow enough time for the operating system (OS) to boot. The OS or application must tickle (reset) the WDT before the timer expires. This can be done by accessing the hardware directly or through a BIOS call.
During System Operation – An application can set up the WDT hardware through a BIOS call, or by accessing the hardware directly. ADLINK Board Support Packages provide APIs to the WDT. The application must tickle (reset) the WDT before the timer expires or the system will be reset.
Watchdog Code examples – ADLINK has provided source code examples on the CoreModule 730 Support Software QuickDrive illustrating how to control the WDT. The code examples can be easily copied to your development environment to compile and test the examples, or make any desired changes before compiling. Refer to the WDT Readme file in the Sample Code directory on the CoreModule 730 Support Software QuickDrive.

# Power Interface

The CoreModule 730 requires one +5 volt DC power source and uses a 10-pin header with odd/even (1, 2) pin sequence and 0.10" (2.54mm) pitch. If the +5VDC power drops below \~4.65V, a low voltage reset is triggered, resetting the system.

The power input header (J23) supplies the following voltages and ground directly to the module:

5.0VDC +/- 5%

Table 3-14. Power Interface Pin/Signals (J23)

<table><tr><td>Pin</td><td>Signal</td><td>Descriptions</td></tr><tr><td>1</td><td>GND</td><td>Ground</td></tr><tr><td>2</td><td>+5V</td><td>+5 Volts</td></tr><tr><td>3</td><td>Key/GND</td><td>Key Pin on connector/Grounded on board</td></tr><tr><td>4</td><td>+12V</td><td>+12 volts routed to SUMIT A</td></tr><tr><td>5</td><td>GND</td><td>Ground</td></tr><tr><td>6</td><td>NC</td><td>Not connected</td></tr><tr><td>7</td><td>GND</td><td>Ground</td></tr><tr><td>8</td><td>+5V</td><td>+5 Volts</td></tr><tr><td>9</td><td>GND</td><td>Ground</td></tr><tr><td>10</td><td>+5V</td><td>+5 Volts</td></tr></table>

Note: The shaded areas denote power or ground.

# Introduction

This section assumes the user is familiar with general BIOS Setup. Refer to the appropriate PC reference manuals for information about the on-board ROM-BIOS software interface.

# Entering BIOS Setup (VGA Display)

To access BIOS Setup using a VGA display for the CoreModule 730:

1. Turn on the VGA monitor and the power supply to the CoreModule 730.
2. Start Setup by pressing the [Del] key when the following message appears on the boot screen.

Press DEL to run Setup

# NOTE

If the setting for Quick Boot is [Enabled], you may not see this prompt appear on screen. If this happens, press the &lt;Del&gt; key earlier in the boot sequence to enter BIOS Setup.

3. Follow the instructions on the right side of the screen to navigate through the selections and modify any settings.

# Entering BIOS Setup (Remote Access)

This section describes how to enable the Remote Access in VGA mode and enter the BIOS setup through a serial terminal or PC.

1. Turn on the power supply to the CoreModule 730 and enter the BIOS Setup Utility in VGA mode.
2. Set the BIOS feature Serial Console Redirection to [Enabled] under the Advanced menu.
3. Accept the default options or make your own selections for the balance of the Remote Access fields and record your settings.
4. Ensure you select the type of remote serial terminal you will be using and record your selection.
5. Select Save Changes and Exit and then shut down the CoreModule 730.
6. Connect the remote serial terminal (or the PC with communications software) to the COM port you selected and recorded earlier in the BIOS Setup Utility.
7. Turn on the remote serial terminal or PC and set it to the settings you selected in the BIOS Setup Utility. The default settings for the CoreModule 730 are:

COM1
♦ 8 bits
♦ 1 stop bit
♦ no parity

8. Restore power to the CoreModule 730 and look for the screen prompt shown below.

Press &lt;space bar&gt; to update BIOS

9. Press the F4 key to enter Setup (early in the boot sequence if Quick Boot is set to [Enabled].) If Quick Boot is set to [Enabled], you may never see the screen prompt.

10. Use the &lt;Enter&gt; key to select the screen menus listed in the Opening BIOS screen.

# NOTE

The serial console port is not hardware protected. Diagnostic software that probes hardware addresses may cause a loss or failure of the serial console functions.

# OEM Logo Utility (Splash Screen)

The CoreModule 730 BIOS supports a graphical logo utility, which can be customized by the user and displayed when enabled through the BIOS Setup Utility. The graphical image can be a company logo or any custom image the user wants to display during the boot process. The custom image can be displayed as the first image displayed on screen during the boot process and remain there, depending on the options selected in BIOS Setup, while the OS boots.

# Logo Image Requirements

The user’s image may be customized with any image editing tool, and the system will automatically convert the image into an acceptable format to the tools (files and utilities) provided by ADLINK. The CoreModule 730 OEM Logo utility supports the following image formats:

• Bitmap image
16-Color, 640x480 pixels
♦ 256-Color, 640x480 pixels
JPG image
16-Color, 640x480 pixels
• PCX image
256-Color, 640x480 pixels
• A file size no larger than sample image

# BIOS Setup Menus

This section provides illustrations of the six main setup screens in the CoreModule 730 BIOS Setup Utility. Below each illustration is a bulleted list of the screen’s submenus and setting selections. The setting selections are presented in brackets after each submenu or menu item and the default settings are presented in bold. Refer to right hand columns of your actual BIOS screens for descriptions of the selected settings.

Table 4-1. BIOS Setup Menus

<table><tr><td>BIOS Setup Utility Menu</td><td>Item/Topic</td></tr><tr><td>Main</td><td>BIOS and Memory Information, System Date and Time</td></tr><tr><td>Advanced</td><td>Legacy OpROM Support, Launch PXE OpROM, PCI Subsystem Settings, CPU, IDE, Thermal, USB, Super IO, Serial Port Console Redirection</td></tr><tr><td>Chipset</td><td>North Bridge and South Bridge Configurations</td></tr><tr><td>Boot</td><td>Boot up Settings, Boot Order, Removable Drives</td></tr><tr><td>Security</td><td>Setting or changing Passwords</td></tr><tr><td>Save &amp; Exit</td><td>Exiting with or without changing settings, Loading Optimal or Failsafe conditions</td></tr></table>

# BIOS Main Setup Screen

<table><tr><td colspan="6">BIOS Setup Utility</td></tr><tr><td>Main</td><td>Advanced</td><td>Chipset</td><td>Boot</td><td>Security</td><td>Save &amp; Exit</td></tr><tr><td colspan="5">BIOS Information</td><td>[Setting Description]</td></tr><tr><td>BIOS Vendor</td><td></td><td></td><td colspan="2">American Megatrends</td><td></td></tr><tr><td>Core Version</td><td></td><td></td><td colspan="2">X.X.X.X</td><td></td></tr><tr><td>Project Version</td><td></td><td></td><td colspan="2">CM730 BIOS Rev: B1.1</td><td></td></tr><tr><td>Build Date</td><td></td><td></td><td colspan="2">XX/XX/20XX XX:XX:XX</td><td></td></tr><tr><td colspan="5">Memory Information</td><td></td></tr><tr><td>Total Memory</td><td></td><td></td><td colspan="2">XXXX MB (DDR2)</td><td></td></tr><tr><td colspan="5">Platform Information</td><td rowspan="4">→←: Select Screen↑↓: Select ItemEnter: Select+ - : Change fieldF1 : General HelpF2 : Previous ValuesF3 : Optimized DefaultsF4 : Save ESC: Exit</td></tr><tr><td>System Date</td><td></td><td></td><td colspan="2">[Fri XX/XX/20XX]</td></tr><tr><td>System Time</td><td></td><td></td><td colspan="2">[XX:XX:XX]</td></tr><tr><td>Access Level</td><td></td><td></td><td colspan="2">Administrator</td></tr></table>

CM730\_BIOS\_Main\_a Version X.XX.XXXX Copyright (C) 20XX, American Megatrends, Inc.

Figure 4-1. BIOS Main Setup Screen

# • Platform Information

♦ SCH Stepping D1
CMC Hi-Module 0D2.017X
♦ CMC Lo-Module 0D2.025X
♦ IGD VBIOS Version 0016

PSlewRate LUT Rev XX/XX/XX
♦ NSlewRate LUT Rev XX/XX/XX

# • Date & Time

System Date (day of week, mm:dd:yyyy) – This field requires the alpha-numeric entry of the day of week, day of the month, calendar month, and all 4 digits of the year, indicating the century plus year (Fri XX/XX/20XX).
♦ System Time (hh:mm:ss) – This is a 24-hour clock setting in hours, minutes, and seconds.

# BIOS Advanced Setup Screen

<table><tr><td colspan="6">BIOS Setup Utility</td></tr><tr><td>Main</td><td>Advanced</td><td>Chipset</td><td>Boot</td><td>Security</td><td>Save &amp; Exit</td></tr><tr><td colspan="5">Legacy OpROM SupportLaunch PXE OpROM [Enabled]PCI Subsystem SettingsCPU ConfigurationIDE ConfigurationThermal ConfigurationUSB ConfigurationSuper IO ConfigurationSerial Port Console Redirection</td><td>[Setting Description]Select Screen&lt;img src="images/bb1053b9b6c22220584d8304e0cb3bdf72da37827b628a7365a77f29cd90a3e0.jpg"/&gt;Select ItemEnter: Select+ - : Change fieldF1 : General HelpF2 : Previous ValuesF3 : Optimized DefaultsF4 : Save ESC: Exit</td></tr></table>

CM730\_BIOS\_Advanced\_a Version X.XX.XXXX Copyright (C) 20XX, American Megatrends, Inc.

# Figure 4-2. BIOS Advanced Setup Screen

# Legacy OpROM Support

♦ Launch PXE OpROM [Disabled; Enabled]

# • PCI Subsystem Settings

♦ PCI Settings

PCI Latency Timer [32 PCI Bus Clocks; 64 PCI Bus Clocks; 96 PCI Bus Clocks; 128 PCI Bus Clocks; 160 PCI Bus Clocks; 192 PCI Bus Clocks; 224 PCI Bus Clocks; 248 PCI Bus Clocks]

♦ PCI Express Device Settings

Relaxed Ordering [Disabled; Enabled]
Extended Tag [Disabled; Enabled]
• No Snoop [Disabled; Enabled]

Maximum Payload [Auto; 128 Bytes; 256 Bytes; 512 Bytes; 1024 Bytes; 2048 Bytes; 4096 Bytes]

Maximum Read Request [Auto; 128 Bytes; 256 Bytes; 512 Bytes; 1024 Bytes; 2048 Bytes; 4096 Bytes]

♦ PCI Express Link Settings

Automatic ASPM [Disabled; Auto; Force L0] WARNING: Enabling ASPM may cause some PCI-E devices to fail

♦ IRQ Settings

IRQ3 [Available; Reserved]
IRQ4 [Available; Reserved]
IRQ5 [Available; Reserved]
IRQ7 [Available; Reserved]
IRQ9 [Available; Reserved]
IRQ10 [Available; Reserved]
IRQ11 [Available; Reserved]
IRQ14 [Available; Reserved]
IRQ15 [Available; Reserved]

# CPU Configuration

♦ Processor Type Intel(R) Atom(TM) CPU XXXX
♦ EMT64 Not Supported
♦ Processor Speed XXXX MHz
♦ System Bus Speed XXX MHz
▲ Ratio Status XX
A Actual Ratio XX
♦ Processor Stepping XXXcX
Microcode Revision XXX
♦ L1 Cache RAM XX k
♦ L2 Cache RAM XXX k
♦ Processor Core Single
Hyper-Threading Not Supported
Execute - Disable Bit [Disabled; Enabled]
Limit CPUID Maximum [Disabled; Enabled]
EMTTM [Disabled; Enabled]
Turbo Mode [Disabled; Enabled]
SpeedStep (tm) [Disabled; Enabled]
Boot Performance Mode [Max Performance; Max Battery; Auto]
♦ C-States [Disabled; Enabled]
Enhanced C-States [Disabled; Enabled]
♦ Max C-States [C1; C2; C3; C4; C6]
♦ Hard C4E [Disabled; Enabled]
TM1 [Disabled; Enabled]
TM2 [Disabled; Enabled]

Bi-directional PROCHDT# [Disabled; Enabled]
♦ ACPI 3.0 T-States [Disabled; Enabled]

# • IDE Configuration

♦ PATA Master Not Present
♦ PATA Slave Not Present

# Thermal Configuration

♦ Critical Trip Point [60C; 70C; 80C; 90C; 95C; 100C; 105C; 110C]
♦ Passive Trip Point [60C; 70C; 80C; 90C; 95C; 100C; 105C; Disabled]
♦ Throttling Ratio [87.5%; 75.0%; 62.5%; 50.0%; 37.5%; 25.0%; 12.5%]

# • USB Configuration

♦ USB Devices
1 Keyboard
♦ Legacy USB Support [Enabled; Disabled; Auto]
EHCI Hand-Off [Disabled; Enabled]
♦ Device Reset Timeout [10 sec; 20 sec; 30 sec; 40 sec]

# Super IO Configuration

♦ Serial Port 1 Configuration
Serial Port [Disabled; Enabled]
RS485 Mode [Disabled; Enabled]
Device Settings IO=3F8h; IRQ=4
Change Settings [IO=3F8h; IRQ=4 IO=2F8h; IRQ=3 IO=3E8h; IRQ=11 IO=2E8h; IRQ=10]

Serial Port 2 Configuration

Serial Port [Disabled; Enabled]
RS485 Mode [Disabled; Enabled]
Device Settings IO=2F8h; IRQ=3
Change Settings [IO=2F8h; IRQ=3 IO=3F8h; IRQ=4 IO=3E8h; IRQ=11 IO=2E8h; IRQ=10]

Serial Port 3 Configuration

Serial Port [Disabled; Enabled]
RS485 Mode [Disabled; Enabled]
Device Settings IO=3E8h; IRQ=11
Change Settings [IO=3E8h; IRQ=7 IO=3F8h; IRQ=4 IO=2F8h; IRQ=3 IO=2E8h; IRQ=10]

Serial Port 4 Configuration

Serial Port [Disabled; Enabled]
RS485 Mode [Disabled; Enabled]
Device Settings IO=2E8h; IRQ=10
Change Settings [IO=2E8h; IRQ=7 IO=3F8h; IRQ=4 IO=2F8h; IRQ=3 IO=3E8h; IRQ=11]

Parallel Port Configuration

Parallel Port [Disabled; Enabled]
Device Settings IO=378h; IRQ=7
Change Settings [IO=378h; IRQ=7 IO=378h; IRQ=5 IO=278h; IRQ=7 $\scriptstyle \mathrm { I O = } 2 7 8 \mathrm { h ; I R Q = } 5$ $\scriptstyle \mathrm { I O = } 3 \mathrm { B C h ; ~ I R Q = } 7$ $\mathrm { I O } { = } 3 \mathrm { B C h } ; \mathrm { I R Q } { = } 5 ]$

♦ Device Mode [Printer Mode; SPP Mode]

# Serial Port Console Redirection

♦ COM1 +

Console Redirection [Disabled; Enabled]
Console Redirection Settings

COM2

Console Redirection [Disabled; Enabled]
Console Redirection Settings

Serial Port for Out-of-Band Management/ Windows Emergency Management Services (EMS)

Out-of-Band Mgmt Port [COM1; COM2]
Data Bits 8
Parity None
Stop Bits 1
Terminal Type [VT-UTF8]

# BIOS Chipset Setup Screen

<table><tr><td colspan="6">BIOS Setup Utility</td></tr><tr><td>Main</td><td>Advanced</td><td>Chipset</td><td>Boot</td><td>Security</td><td>Save &amp; Exit</td></tr><tr><td rowspan="8" colspan="5">North Bridge Chipset Configuration
South Bridge Chipset Configuration</td><td>[Setting Description]</td></tr><tr><td>Select Screen
Select Item</td></tr><tr><td>Enter: Select</td></tr><tr><td>+ - : Change field</td></tr><tr><td>F1 : General Help</td></tr><tr><td>F2 : Previous Values</td></tr><tr><td>F3 : Optimized Defaults</td></tr><tr><td>F4 : Save ESC: Exit</td></tr></table>

CM730\_BIOS\_Chipset\_a Version X.XX.XXXX Copyright (C) 20XX, American Megatrends, Inc.

Figure 4-3. BIOS Chipset Setup Screen

# . North Bridge Chipset Configuration

♦ Memory Information
Total Memory XXXX MB (DDR2)
IGD Mode Select [Disabled; Enabled, 1MB; Enabled, 4MB; Enabled, 8MB]

Boot Display Configuration

Boot Display Device [Auto; CRT; LFP]
Flat Panel Scaling [Auto; Forced; Disabled]
Flat Panel Type [640x480 18bpp (generic)
800x600 18bpp (generic)
1024x768 18bpp (generic)
640x480 18bpp (NEC 8.4" NL6448BC26-08D)
800x480 18bpp (NEC 9" NL8048BC24-01)
1024x600 18bpp (TMD 5.61" LTD056ET0S)
1024x600 18bpp (Samsung 4.8" LTS480WS-C01)
1024x768 18bpp (Samsung 15" LTX150XG-L01)
1024x768 24bpp (AUO 15" M150XN07 V.2)
1280x768 18bpp (Sharp 7.2" LQ072K1LAXX)
1280x800 24bpp (Samsung 15.4" LTN154X5-L01)
1366x768 18bpp (TMD 11.1" LTD111EXDA)]

# South Bridge Chipset Configuration

♦ SMBUS Controller [Enabled; Disabled]
High Precision Timer [Disabled; Enabled]
USB Controllers
UHCI Controller #1 [Disabled; Enabled]
UHCI Controller #2 [Disabled; Enabled]
UHCI Controller #3 [Disabled; Enabled]
USB Client Controller [Disabled; Enabled]

# ♦ PCI Ports Configuration

PCI Express Root Port 1 [Disabled; Enabled]
-VCI Enable [Disabled; Auto]
-ASPM [Disabled; Enabled]
-Automatic ASPM [Manual; Auto]
-URR [Disabled; Enabled]
-FER [Disabled; Enabled]
-NFER [Disabled; Enabled]
-CER [Disabled; Enabled]
-CTO [Disabled; Enabled]
-SEFE [Disabled; Enabled]
-SENFE [Disabled; Enabled]
-SECE [Disabled; Enabled]
-PME Interrupt [Disabled; Enabled]
-PME SCI [Disabled; Enabled]
-Hot Plug SCI [Disabled; Enabled]
-Extra Bus Reserved 0
-Reserved Memory 10
-Reserved I/O 4

PCI Express Root Port 2 [Disabled; Enabled]

-VCI Enable [Disabled; Auto]

-ASPM [Disabled; Enabled]

-Automatic ASPM [Manual; Auto]

-URR [Disabled; Enabled]

-FER [Disabled; Enabled]

-NFER [Disabled; Enabled]

-CER [Disabled; Enabled]

-CTO [Disabled; Enabled]

-SEFE [Disabled; Enabled]

-SENFE [Disabled; Enabled]

-SECE [Disabled; Enabled]

-PME Interrupt [Disabled; Enabled]

-PME SCI [Disabled; Enabled]

-Hot Plug SCI [Disabled; Enabled]

-Extra Bus Reserved 0

-Reserved Memory 10

-Reserved I/O 4

PCI-to-PCI Bridge

-Extra Bus Reserved 0

♦ PPM Configuration

C-State POPUP [Disabled; Enabled]

# BIOS Boot Setup Screen

<table><tr><td colspan="6">BIOS Setup Utility</td></tr><tr><td>Main</td><td>Advanced</td><td>Chipset</td><td>Boot</td><td>Security</td><td>Save &amp; Exit</td></tr><tr><td colspan="5">Boot Configuration</td><td rowspan="2">[Setting Description]</td></tr><tr><td colspan="5">Quiet Boot [Disabled]Setup Prompt Timeout 1Bootup NumLock State [Off]Option ROM Message [Force BIOS]Interrupt 19 Capture [Disabled]Watchdog Timeout [0]▶ GPIO Configuration [0]</td></tr><tr><td colspan="5">Boot Option Priorities</td><td rowspan="2">&lt;img src="images/abde0a13015f840d9067cc39c26ab213501c9d66db76f4f14bc02da2656c6d43.jpg"/&gt;Enter: Select+ - : Change fieldF1 : General HelpF2 : Previous ValuesF3 : Optimized DefaultsF4 : Save ESC: Exit</td></tr><tr><td colspan="5">Boot Option #1 [IBA GE Slot 0700 vXXXX]Network Device BBS Priorities</td></tr></table>

Version X.XX.XXXX Copyright (C) 20XX, American Megatrends, Inc.

CM730\_BIOS\_Boot\_a

Figure 4-4. BIOS Boot Setup Screen

# Boot Configuration

Quiet Boot [Disabled; Enabled]
Setup Prompt Timeout 1
Bootup Num-Lock [On; Off]
♦ Option ROM Messages [Force BIOS; Keep Current]
Interrupt 19 Capture [Disabled; Enabled]
Watchdog Timeout 0
♦ GPIO Configuration

GPIO Configuration [Disabled; Enabled]
GPIO 1 Direction [Input; Output]
GPIO 2 Direction [Input; Output]
GPIO 3 Direction [Input; Output]
GPIO 4 Direction [Input; Output]
GPIO 5 Direction [Input; Output]
GPIO 6 Direction [Input; Output]
GPIO 7 Direction [Input; Output]
GPIO 8 Direction [Input; Output]
GPIO 1 Output Level [0; 1]
GPIO 2 Output Level [0; 1]

GPIO 3 Output Level [0; 1]
GPIO 4 Output Level [0; 1]

# • Boot Option Priorities

Boot Option #1 [IBA GE Slot 0700 vXXXX; Disabled]
♦ Network Device BBS Priorities
• Boot Option #1 [IBA GE Slot 0700 vXXXX]

# BIOS Security Setup Screen

<table><tr><td colspan="6">BIOS Setup Utility</td></tr><tr><td>Main</td><td>Advanced</td><td>Chipset</td><td>Boot</td><td>Security</td><td>Save &amp; Exit</td></tr><tr><td colspan="5">Password DescriptionIf ONLY the Administrator&#x27;s password is set, then this only limits access to Setup and is only asked for when entering Setup. If ONLY the User&#x27;s password is set, then this is a power on password and must be entered to boot or enter Setup. In Setup the user will have Administrator rights.Administrator PasswordUser Password</td><td>[Setting Description]: Select Screen&lt;img src="images/d9ca97d1874247302b9f6fb323e0d063e7359c1d5c06e54adf3886b206a72ace.jpg"/&gt;: Select ItemEnter: Select+ - : Change fieldF1 : General HelpF2 : Previous ValuesF3 : Optimized DefaultsF4 : Save ESC: Exit</td></tr></table>

CM730\_BIOS\_Security\_aVersion X.XX.XXXX Copyright (C) 20XX, American Megatrends, Inc.

Figure 4-5. BIOS Security Setup Screen

Administrator Password [Create New Password]
. User Password [Create New Password]

# BIOS Save & Exit Setup Screen

<table><tr><td colspan="7">BIOS Setup Utility</td></tr><tr><td>Main</td><td>Advanced</td><td>Chipset</td><td>Boot</td><td>Security</td><td>Save &amp; Exit</td><td></td></tr><tr><td colspan="5">Save Changes and ExitDiscard Changes and ExitDiscard Changes and Reset</td><td colspan="2">[Setting Description]</td></tr><tr><td colspan="5">Save OptionsSave ChangesDiscard Changes</td><td colspan="2"></td></tr><tr><td colspan="5">Restore DefaultsSave as User DefaultsRestore User Defaults</td><td rowspan="2" colspan="2">&lt;img src="images/82d50c4f89595ef542081d74d137e90d1d9b6cee1183c8c79add321670c6ebc3.jpg"/&gt;Enter: Select+ - : Change fieldF1 : General HelpF2 : Previous ValuesF3 : Optimized DefaultsF4 : Save ESC: Exit</td></tr><tr><td colspan="5">Boot OverrideIBA GE Slot 0700 vXXXX</td></tr></table>

CM730\_BIOS\_Save&Exit\_a Version X.XX.XXXX Copyright (C) 20XX, American Megatrends, Inc.

Figure 4-6. BIOS Save & Exit Setup Screen

Save Changes and Exit
Save Configuration and Exit? [Yes; No]
♦ Discard Changes and Exit
Quit without Saving? [Yes; No]
Save Changes and Reset
Save Configuration and Reset? [Yes; No]
♦ Discard Changes and Reset
Reset without Saving? [Yes; No]

# Save Options

Save Changes
Save Configuration [Yes; No]
♦ Discard Changes
• Load Previous Values [Yes; No]
♦ Restore Defaults
• Load Optimized Defaults [Yes; No]

# • Restore Defaults

Save as User Defaults
Save Configuration [Yes; No]

♦ Restore User Defaults
Restore User Defaults? [Yes; No]

# • Boot Override

IBA GE Slot 0700 vXXXX
Save Configuration and Reset? [Yes; No]

ADLINK Technology, Inc. provides a number of methods for contacting Technical Support listed in the Table A-1 below. Requests for support through the Ask an Expert are given the highest priority, and usually will be addressed within one working day.

ADLINK’s Ask an Expert – This is a comprehensive support center designed to meet all your technical needs. This service is free and available 24 hours a day through the Ampro By ADLINK web page at http://www.adlinktech.com/AAE/. This includes a searchable database of Frequently Asked Questions, which will help you with the common information requested by most customers. This is a good source of information to look at first for your technical solutions. However, you must register online if you wish to use the Ask a Question feature.

ADLINK strongly suggests that you register with the web site. By creating a profile on the ADLINK web site, you will have a portal page called “My ADLINK” unique to you with access to exclusive services and account information

Personal Assistance – You may also request personal assistance by creating an Ask an Expert account and then going to the Ask a Question feature. Requests can be submitted 24 hours a day, 7 days a week. You will receive immediate confirmation that your request has been entered. Once you have submitted your request, you must log in to go to My Stuff area where you can check status, update your request, and access other features.
Download Service – This service is also free and available 24 hours a day at http://www.adlinktech.com. For certain downloads such as technical documents and software, you must register online before you can log in to this service.

Table A-1. Technical Support Contact Information

<table><tr><td>Method</td><td>Contact Information</td></tr><tr><td>Ask an Expert</td><td>http://www.adlinktech.com/AAE/</td></tr><tr><td>Web Site</td><td>http://www.adlinktech.com</td></tr><tr><td>Standard Mail</td><td>Contact us should you require any service or assistance.ADLINK Technology, Inc.Address: 9F, No.166 Jian Yi Road, Chungho City,Taipei County 235, Taiwan台北縣中和市建一路166號9樓Tel: +886-2-8226-5877Fax: +886-2-8226-5717Email: service@adlinktech.comAmpro ADLINK Technology, Inc.Address: 5215 Hellyer Avenue, #110, San Jose, CA 95138, USATel: +1-408-360-0200Toll Free: +1-800-966-5200 (USA only)Fax: +1-408-360-0222Email: info@adlinktech.comADLINK Technology (China) Co., Ltd.Address: 上海市浦东新区张江高科技园区芳春路300号(201203)300 Fang Chun Rd., Zhangjiang Hi-Tech Park,Pudong New Area, Shanghai, 201203 ChinaTel: +86-21-5132-8988Fax: +86-21-5132-3588Email: market@adlinktech.com</td></tr></table>

Table A-1. Technical Support Contact Information

<table><tr><td rowspan="8"></td><td>ADLINK Technology BeijingAddress:北京市海淀区上地东路1号盈创动力大厦E座801室(100085)Rm. 801, Power Creative E, No. 1, B/DShang Di East Rd., Beijing, 100085 ChinaTel: +86-10-5885-8666Fax: +86-10-5885-8625Email: market@adlinktech.com</td></tr><tr><td>ADLINK Technology ShenzhenAddress:深圳市南山区科技园南区高新南七道数字技术园A1栋2楼C区(518057)2F, C Block, Bldg. A1, Cyber-Tech Zone, Gao Xin Ave. Sec. 7, High-Tech Industrial Park S., Shenzhen, 518054 ChinaTel: +86-755-2643-4858Fax: +86-755-2664-6353Email: market@adlinktech.com</td></tr><tr><td>ADLINK Technology (Europe) GmbHAddress: Nord Carree 3, 40477 Duesseldorf, GermanyTel: +49-211-495-5552Fax: +49-211-495-5557Email: emea@adlinktech.com</td></tr><tr><td>ADLINK Technology, Inc. (French Liaison Office)Address: 15 rue Emile Baudot, 91300 Massy CEDEX, FranceTel: +33 (0) 1 60 12 35 66Fax: +33 (0) 1 60 12 35 66Email: france@adlinktech.com</td></tr><tr><td>ADLINK Technology Japan CorporationAddress: 〒101-0045 東京都千代田区神田鍛冶町3-7-4KANDA374 ビル 4FKANDA374 Bldg. 4F, 3-7-4 Kanda Kajicho, Chiyoda-ku, Tokyo 101-0045, JapanTel: +81-3-4455-3722Fax: +81-3-5209-6013Email: japan@adlinktech.com</td></tr><tr><td>ADLINK Technology, Inc. (Korean Liaison Office)Address: 서울시 서초구 서초동 1506-25 한도B/D 2 층2F, Hando B/D, 1506-25, Seocho-Dong, Seocho-Gu, Seoul 137-070, KoreaTel: +82-2-2057-0565Fax: +82-2-2057-0563Email: korea@adlinktech.com</td></tr><tr><td>ADLINK Technology Singapore Pte. Ltd.Address: 84 Genting Lane #07-02A, Cityneon Design Centre, Singapore 349584Tel: +65-6844-2261Fax: +65-6844-2263Email: singapore@adlinktech.com</td></tr><tr><td>ADLINK Technology Singapore Pte. Ltd. (Indian Liaison Office)Address: No. 1357, &quot;Anupama&quot;, Sri Aurobindo Marg, 9th Cross, JP Nagar Phase I, Bangalore - 560078, IndiaTel: +91-80-65605817Fax: +91-80-22443548Email: india@adlinktech.com</td></tr></table>

# B

Battery

external Lithium type . 24

function .. 24

BIOS recovery

Oops! jumper .. 25

BIOS Recovery See also Oops! jumper

BIOS Setup

accessing BIOS setup (VGA) . 29

accessing serial console . 29

console redirection . 26

Hot (Serial) Cable . 26

serial terminal . . 26

splash screen configuration . 30

Watchdog Timer (WDT) . 27

BIOS Setup Utility

supported features . 31

# C

connectors

connector list . 9

connector locations 9

pin arrangement description . 9

pin identification 9

console redirection

features . 26

serial console . 26

console redirection See also serial console

CoreModule 730

2 GB memory ..... . 16

block diagram . 6

connector locations 9

CPU features ... 4, 16

current capability . 28

dimensions 11

environmental requirements 13

Ethernet connector . 21

Ethernet features .. 21

features 4

GPIO features .. .. 25

heatsink requirements 1 3

Jumper settings . 11

low voltage limit . 28

major Integrated Circuits (ICs) 7

mechanical dimensions . 12

miscellaneous features . 24

Oops! jumper (BIOS recovery) . 25

pin-1 locations . . 10

product description . 4

Real Time Clock (RTC) . 24

see also supported features 4

serial console .. 26

Single Board Computer (SBC) 3

splash screen customization . 30

Stackable Architecture 3

voltage requirements .28

Watchdog Timer (WDT) .27

weight 11

CPU

heatsink requirements .13

Intel Atom features .16

D

dimensions 11

E

Environmental specifications .13

Ethernet

controller ..21

header . ..21

supported feature .21

Ethernet chip specifications

web sites .2

H

Hot Cable

console redirection .26

modified serial cable .26

serial console ..26

I

Integrated Circuit (IC) specifications

web sites

Interrupt (IRQs) list .17

J

Jumper headers

locations .

Jumpers

settings

L

Lithium Battery

Real Time Clock (RTC) .24

logo screen

requirements .30

low voltage limit . ..28

LVDS interface

pin-out list . .23

M

major IC specifications

web sites

N

null modem serial cable ..26

O

Oops! jumper

DB9 connector .25

Serial port 1 ..25

Oops! jumper (BIOS recovery) ..25

# P

Pin-1 locations .. 10

power interface header . 28

pinouts . 28

# R

Real Time Clock (RTC) . 24

Reset switch

supported feature .. 23

reset switch

header pin outs . 24

#

serial console

accessing BIOS .. 29

console redirection . 26

Hot cable . 26

modified serial cable . 26

serial terminal .. 26

standard null modem serial cable .. 26

terminal emulation software . 26

two methods . 26

serial console See also console redirection

serial terminal

ANSI-compatible .. 26

SMBus

supported features .. 26

Speaker

header pin outs . 24

supported feature . 23

splash screen

customer defined . 30

standard null modem serial cable

serial console .. 26

supported features

2 GB RAM . 16

BIOS recovery (Oops! jumper) ...5, 25

Compact Flash socket . 5

connector list . 9

console redirection ..5, 26

Ethernet port . ...5, 21

external Ethernet LED . 27

external speaker . . 24

GPIO interface 5

Hot Cable . 26

IDE drives 4

IDE interface 4

Intel Atom CPU ...4, 16

jumpers, on board 11

major Integrated Circuits (ICs) 7

mechanical dimensions 12

memory 4

Oops! jumper (BIOS recovery) ... 5, 25

Real Time Clock (RTC) .. 5, 24

reset switch . 24

serial console .. 5, 26

SMBus devices . 26

splash screen . 30

Splash Screen customization 5

SUMIT interface 4

USB interfaces . 20

USB ports . 5

user GPIO signals . 25

Utility header . 23

VGA interface . . 22

video display 5

video interfaces . 22

Watchdog Timer (WDT) ... 5, 27

# T

Technical Support

Ask an Expert . . 43

contact information . 43

terminal emulation software

serial console . 26

thermal cooling

heatsinks . 1 3

# U

USB

header pin outs . 20

port features . 20

Utility header

external speaker connection . 24

reset switch connection . 24

# V

VGA interface

pin-out list . 22

# W

Watchdog Timer (WDT)

1 to 255 settings . 27

description . 27

source code examples . 27

web sites

Ethernet chip specifications 2

integrated circuit (IC) specifications

weight 11
[🔗 Link to the original document](.50-1z019-1010-cm730-refman-final/50-1z019-1010-cm730-refman-final.pdf)
