# iM-Connect

# Protocol Conversion Software User Guide

July, 2023

Version 1.03

# Directory

1. Log in to the Web . 3
2. Interface Description .. 5
3. PLC Setting ... 8
4. Tag Setting .. . 13
5. Data Logger ..... .22
6. Alarm. .26
7. MQTT.. . 32
8. Edit Macro . .41
9. OPCUA Client .. .46
10. Online Monitor ..... .. 49
11. Project Setting .. .51
12. System Setting .. . 52
12.1 System Information .... .52
12.2 Network Setup... .54
12.3 Date and Time. . 55
12.4 Security Setting ......... .. 56
12.5 Service Status . . 75
13. About .... .76
14. FAQ.. .77
15. Connection Setup Example.. .. 78
16. Software Upgrade Guide.. .83

# 1. Log in to the Web

When you use GATEWAY for the first time, the default network port can be used to enter the web page for editing. The default interface is【LINK1】.

The IP address is set as【http：//192.168.0.80】or 【http：//im-connect.local】. Please do not change this IP address if not necessary.

A new IP address of 【LINK2】 can be set after entering the webpage if needed.

When you enter the web page for the first time, the home page of the company profile (About) is shown. With the change of the operation screen, the page that a user leaves at last time would be shown in the next visit.

The first step is to set the computer's IP to match the same network segment as GATEWAY. Then, in Internet settings, click on Ethernet Properties,【Internet Protocol Version 4 (TCP/IPv4) 】, and【Properties】.
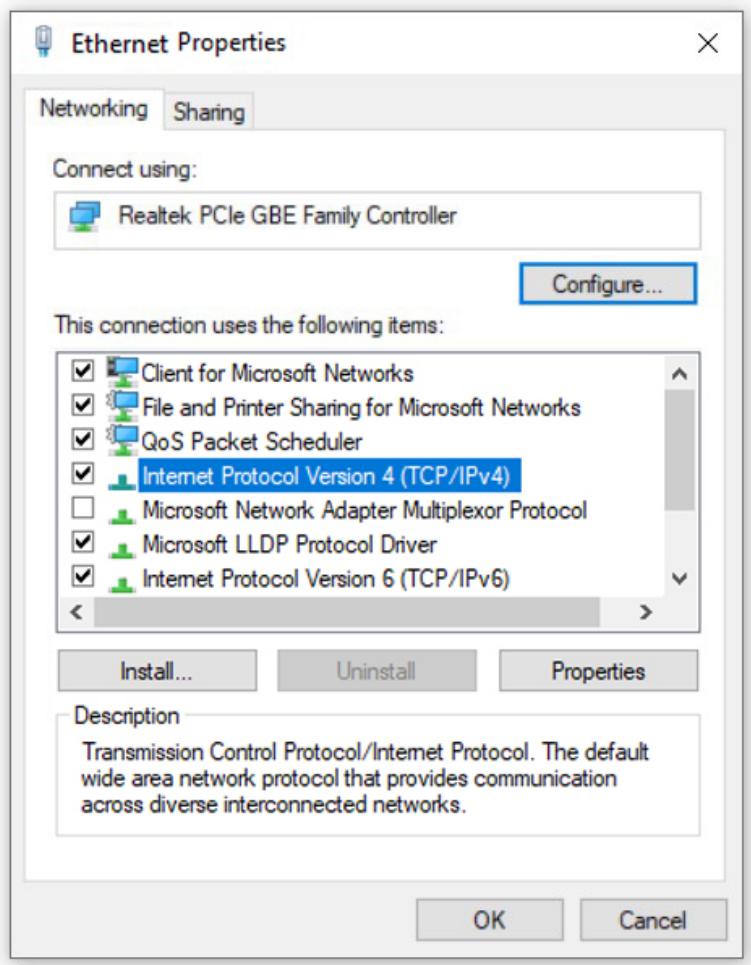
![Ethernet Properties\nNetworking Sharing\nConnect using:\nRealtek PCIe GBE Family Controller\nConfigure...\nThis connection uses the following items:\n✓ Client for Microsoft Networks\n✓ File and Printer Sharing for Microsoft Networks\n✓ QoS Packet Scheduler\n✓ Internet Protocol Version 4 (TCP/IPv4)\n✓ Microsoft Network Adapter Multiplexor Protocol\n✓ Microsoft LLDP Protocol Driver\n✓ Internet Protocol Version 6 (TCP/IPv6)\nInstall... Uninstall Properties\nDescription\nTransmission Control Protocol/Internet Protocol. The default wide area network protocol that provides communication across diverse interconnected networks.\nOK Cancel](.im-connect-user-manual-english/d2049f74f47628233841e8af65195f1692fecffd2f731a1ee214cdec385fe145.jpg)

Next is to assign an IP address to the computer, which must be in the same network segment as GATEWAY. For example, the IP of GATEWAY is 192.168.0.80, and the computer can be set to 192.168.0.XXX as well. Both IPs have the same network segment but with different URLs.
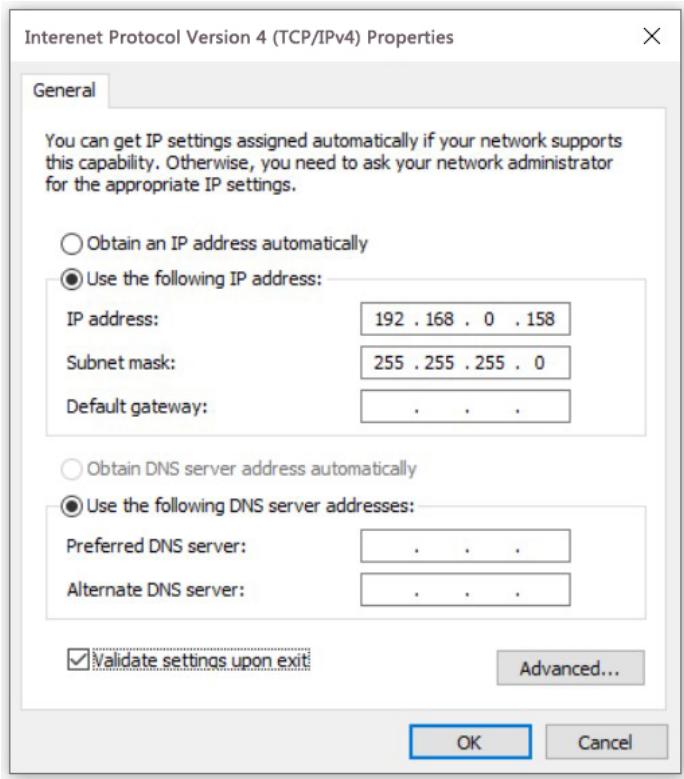
![Interenet Protocol Version 4 (TCP/IPv4) Properties\nGeneral\nYou can get IP settings assigned automatically if your network supports this capability. Otherwise, you need to ask your network administrator for the appropriate IP settings.\nObtain an IP address automatically\nUse the following IP address:\nIP address: 192 . 168 . 0 . 158\nSubnet mask: 255 . 255 . 255 . 0\nDefault gateway: .\nObtain DNS server address automatically\nUse the following DNS server addresses:\nPreferred DNS server: .\nAlternate DNS server: .\nValidate settings upon exit Advanced...\nOK Cancel](.im-connect-user-manual-english/f4f8ac0f4d97cd2b08193629a80eb919dfd590987afa20ba140333abff74ea86.jpg)

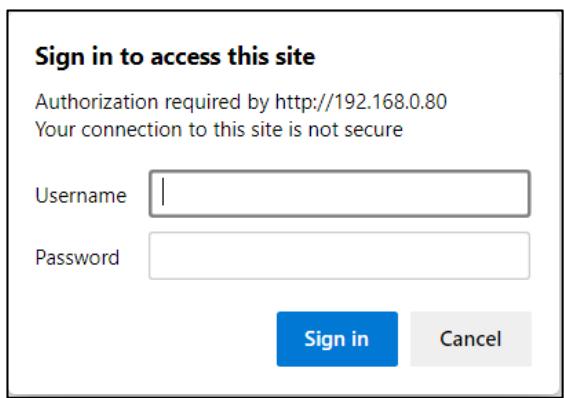
Open the browser and enter the default URL ：【http： //192.168.0.80】to enter the login page.

User name ：【admin】

Default password ：【1234】

![Sign in to access this site\nAuthorization required by http://192.168.0.80\nYour connection to this site is not secure\nUsername\nPassword\nSign in	Cancel](.im-connect-user-manual-english/c9f756e995d30bf0ec70737b3d693c8bc62c5b448afdcfb0c5c39a69153fe7b4.jpg)

【Note】： When restarting the Gateway, one must wait at least 50 seconds before restarting the web page.

# 2. Interface Description

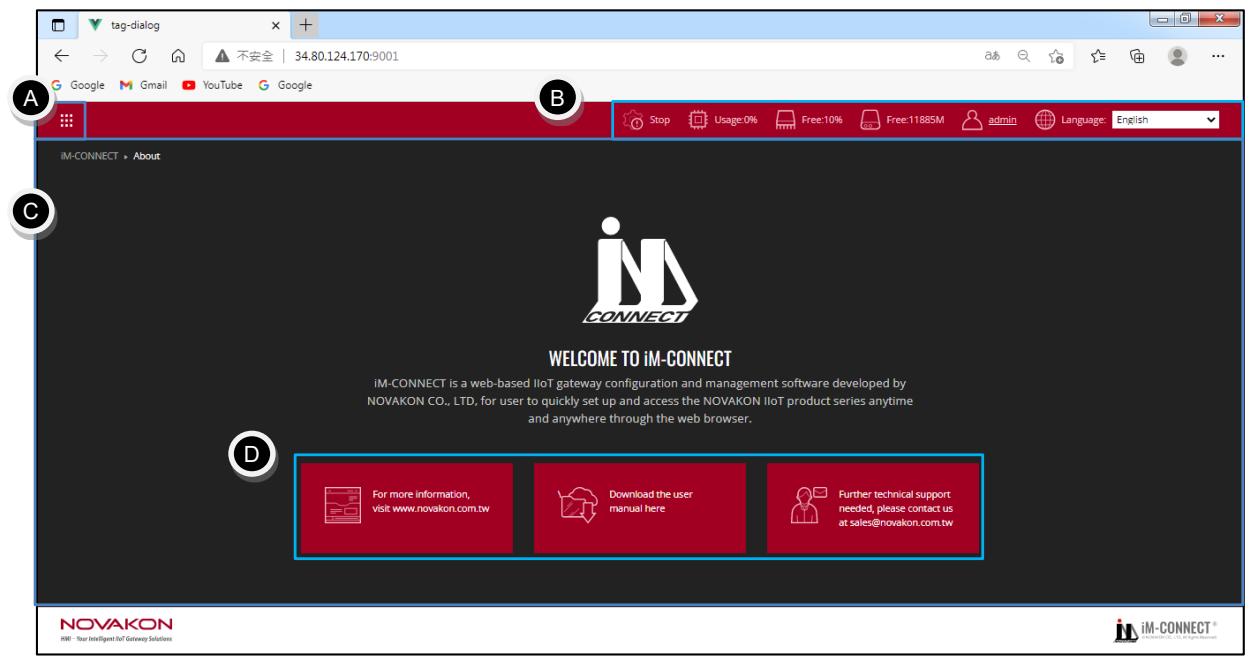
After entering the URL and logging in, the following webpage is displayed.
![tag-dialog\n不安全 34.80.124.170:9001\nGoogle Gmail YouTube Google\nStop Usage:0% Free:10% Free:1188SM admin Language: English\niM-CONNECT » About\nWELCOME TO iM-CONNECT\niM-CONNECT is a web-based IIoT gateway configuration and management software developed by\nNOVAKON CO., LTD, for user to quickly set up and access the NOVAKON IIoT product series anytime\nand anywhere through the web browser.\nFor more information,\nvisit www.novakon.com.tw Download the user\nmanual here Further technical support\nneeded, please contact us\nat sales@novakon.com.tw\nNOVAKON\nHRI: Your Intelligent IoT Gateway Solutions\niM-CONNECT®](.im-connect-user-manual-english/b7e82d6aa796e27e21925d213d0a71823591a820d0819b4e01243664a44f5eef.jpg)

<table><tr><td>AIM-CONNECT Menu</td><td>BSystem Status Bar</td></tr><tr><td>COperation Setting Area</td><td>DExternal Links</td></tr></table>

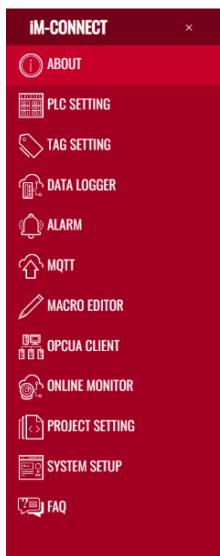
○A Click the button to open the【IM-CONNECT】Menu. Then, choose the action to be performed：

![iM-CONNECT\nABOUT\nPLC SETTING\nTAG SETTING\nDATA LOGGER\nALARM\nMQTT\nMACRO EDITOR\nOPCUA CLIENT\nONLINE MONITOR\nPROJECT SETTING\nSYSTEM SETUP\nFAQ](.im-connect-user-manual-english/628932f9fc614bb969a57c14d6529ef34905b40c2881b10c95167e0feee8eebd.jpg)

![A red square featuring a 3x3 grid of nine evenly spaced white squares.](.im-connect-user-manual-english/575dc7ae0dcf5a65f4f1838ba1f7e9d995303588f1f1a9a1c52ba6382efd6033.jpg)

# 【IM-CONNECT】website options：

<table><tr><td>IM-CONNECT Menu</td></tr><tr><td>1.ABOUT</td></tr><tr><td>2.PLC SETTING</td></tr><tr><td>3.TAG SETTING</td></tr><tr><td>4.DATA LOGGER</td></tr><tr><td>5.ALARM</td></tr><tr><td>6.MQTT</td></tr><tr><td>7.MACRO EDITOR</td></tr><tr><td>8.OPCUA CLIENT</td></tr><tr><td>9.ONLINE MONTOR</td></tr><tr><td>10.PROJECT SETTING</td></tr><tr><td>11.SYSTEM SETTING</td></tr><tr><td>11.1 System Information</td></tr><tr><td>11.2 Network Setup</td></tr><tr><td>11.3 Date and Time</td></tr><tr><td>11.4 Security Setting</td></tr><tr><td>11.5 Service Status</td></tr><tr><td>12.FAQ</td></tr></table>

# ○B System Status Bar：

![Stop\nUsage:1%\nFree:10%\nFree:11885M\nadmin\nLanguage: English](.im-connect-user-manual-english/64a140911a17ea2370442e02ef1e4b6923cc1c5826cb04a8d9731a0903f86f89.jpg)

： Display whether the RT is running or stopped

： Display the percentage of current CPU usage

： Display the remaining capacity of SDRAM

： Display the remaining capacity of Flash

： Press to log out current user

： The language to be displayed in the interface and on the webpage. 2 options are available at this moment, including 【English】, 【Traditional Chinese】, 【Simplified Chinese】and 【Japanese】.

○C Operation Setting Area：The selected function can be set up and performed in this area.
○D External Links：By clicking the buttons, you can access to Novakon official website for product introduction, document download or contact us for technical support.

The related settings and operations of each function are introduced in the following chapters.

# 3. PLC Setting

In the industrial automation applications, control and monitoring through the connection with PLC (Programmable Logic Controller) or controllers is very common. NOVAKON provides PLC Drivers that support various industrial communication protocols and PLC models widely used in the markets.

# 3.1 Communication Port Setting

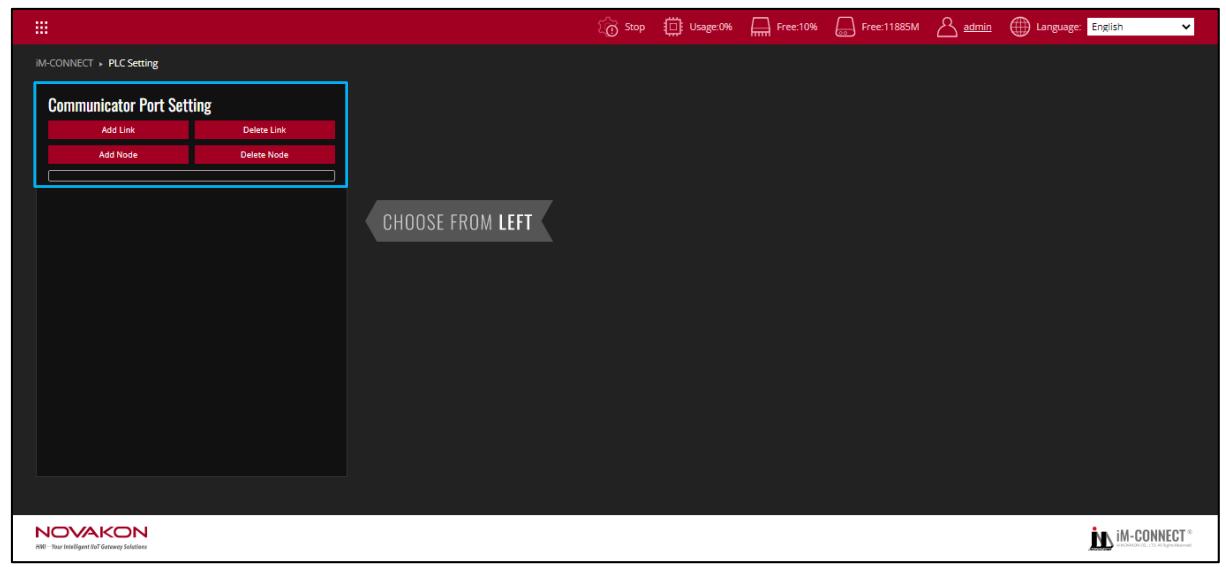
First, set the communication port and related parameter to be used.
![IM-CONNECT • PLC Setting\nCommunicator Port Setting\nAdd Link Delete Link\nAdd Node Delete Node\nCHOOSE FROM LEFT\nNOVAKON\nHMI: Your Intelligent IoT Gateway Solutions\nStop Usage: 0% Free: 10% Free: 11885M admin Language: English\niM-CONNECT®](.im-connect-user-manual-english/759e2d18db6c8e680501be3c99ceb90a2df845ad23a62e6e917608a4d0fbd400.jpg)

【Add Link】：Add a new link to be connected.

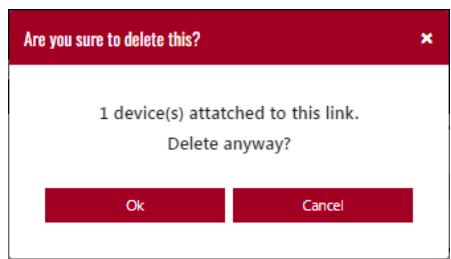
【Delete Link】：Check the box of the link desired to be deleted. After pressing【Delete Link】, a dialog box would pop up for the user to confirm to delete a LINK.

Press 【Yes】 to delete the selected link. Press 【No】 to cancel this action.
![Are you sure to delete this?\n1 device(s) attached to this link.\nDelete anyway?\nOk	Cancel](.im-connect-user-manual-english/7c4227bf7669c010d207ffb238f7dc4dc2724fcca1b3977d710d6837a1c3e9f3.jpg)

【Add Node】：Add a node to the selected Link.

【Delete Node】：Delete the selected node directly in the Link.

After adding a new link, the related details of the Link can be set up, such as the communication port to be used, PLC model (Protocol type), communication parameters, etc.

# 3.2 Link Setting

![Link\nEnabled\nDisplay_Name: Port:\nLink 1 COM1(RS232)\nLink Type: (1-to-1)(Direct Link) Data Refresh Rate:\n30 msec](.im-connect-user-manual-english/8bc5f2e5adaf66bc6ea1c1ba7d43f740f2ccb8a34eee320b1ccb68d699cecb4b.jpg)

【Enable】：Check this box to activate the connection. The 【Enable】 is checked by default after the connection is established.

【Display\_Name】：The name of the connection to be displayed. The default name is Link1.

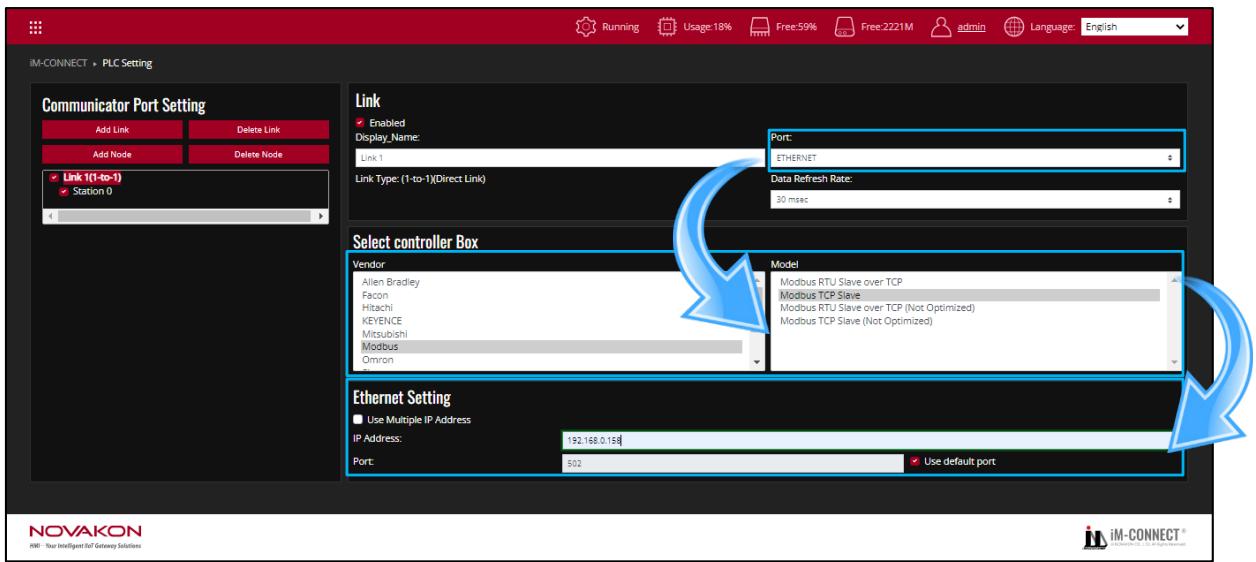
【Port】：Select the communication port to be used. Based on different scenarios, one can select the corresponding communication ports, including【COM1(RS232)】、

【COM1(RS422/RS485】、【Ethernet】.

【Link Type】：Indicating the current connection type of the control is 1 to 1 direct connection (1-to-1).

【Data Refresh Rate】：To set the speed and frequency of receiving data from the controller

![Select controller Box\nVendor\niBase\nKEYENCE\nKoyo\nLust\nMisc\nMitsubishi\nMKS\nModbus\nModel\nMitsubishi AJ71\nMitsubishi AJ71 for AnA/AnU\nMitsubishi AJ71 Format4\nMitsubishi FR-A700\nMitsubishi FX2N Series\nMitsubishi FX3U Series\nMitsubishi FX3U Series 232/485BD](.im-connect-user-manual-english/5ed644b3be2c83802cad2628831c30f03a9ddcb462c44f68bb81b7ef972e48e7.jpg)

【Select controller Box】：Currently supported controller vendor and model. Please choose the vendor and then choose the model. For example, when COM is selected, only PLC models that support COM Port would be displayed. Likewise, when Ethernet is selected, only PLC models that support Ethernet are displayed.

![Communication Format\nInterface:\nBaud rate:\nRS422 9600\nParity: Data Bits: Stop Bits:\nEVEN 7 1](.im-connect-user-manual-english/91887e63c8e624ab97154b3146878fc67a4cb48e21be7470114c29a42c276151.jpg)

【Communication Format】：Set the communication format

【Interface】：Select RS232, RS422, or RS485

【Baud rate】：Select 4800, 9600, 19200, 38400, 57600, 115200, or 187500

【Parity】：Select Even, None, or Odd

【Data Bits】：Select 7 Bit or 8 Bit

【Stop Bits】：Select 1 Bit or 2 Bit

When the port is selected as Ethernet, only drivers that support Ethernet would be displayed, and the interface would be changed to the settings for Ethernet accordingly.
![IM-CONNECT » PLC Setting\nCommunicator Port Setting\nAdd Link\nDelete Link\nAdd Node\nDelete Node\nLink\nEnabled\nDisplay Name:\nLink 1\nLink Type: (1-to-1)(Direct Link)\nPort:\nETHERNET\nData Refresh Rate:\n30 msec\nSelect controller Box\nVendor\nModel\nAlien Bradley\nModbus RTU Slave over TCP\nFacon\nModbus TCP Slave\nHitachi\nModbus RTU Slave over TCP (Not Optimized)\nKEYENCE\nModbus TCP Slave (Not Optimized)\nMitsubishi\nModbus\nOmron\nEthernet Setting\nUse Multiple IP Address\nIP Address:\n192.168.0.15&\nPort:\n502\nUse default port\nNOVAKON\niM - Your Intelligent IoT Gateway Solutions](.im-connect-user-manual-english/357a866f016c83d96ec9b283adb85c00b2c53e1da42e02eb3d4c135c62d74a5b.jpg)

【Ethernet Setting】：The IP switching through multiple groups of controllers can be set up here, so that the GATEWAY can be connected to controllers with different IPs.

# 3.3 Node Setting

Node Setting is mainly used as auxiliary settings for connections, including information such as 【Command Delay】, 【Station No】, 【Retry】 and 【Timeout】.
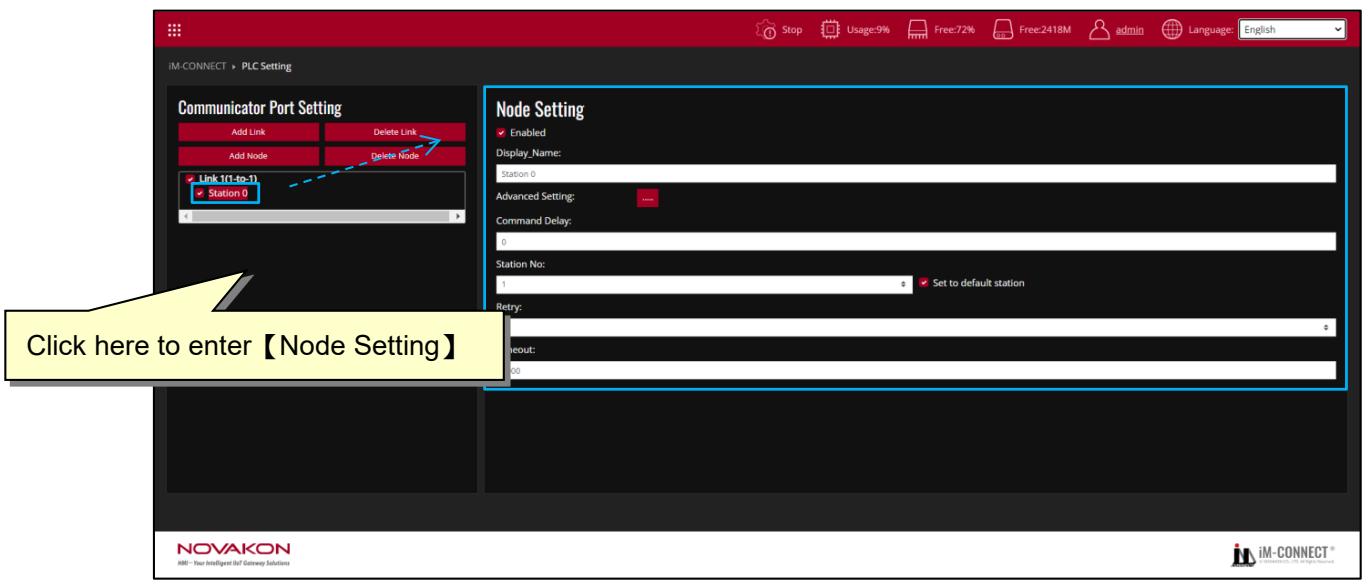
![iM-CONNECT ) PLC Setting\nCommunicator Port Setting\nAdd Link\nDelete Link\nAdd Node\nDelete Node\nLink 1(1-to-1)\nStation 0\nNode Setting\nEnabled\nDisplay_Name:\nStation 0\nAdvanced Setting:\nCommand Delay:\n0\nStation No:\nSet to default station\nRetry:\n0\nOutput:\n00\nClick here to enter【Node Setting】\nNOVAKON\niM - Your Intelligent Rail Gateway Solutions\nStop\nUsage:9%\nFree:72%\nFree:2418M\nadmin\nLanguage: English](.im-connect-user-manual-english/d14762ccffdb78026be8466106698de1c52228f6c97bc85b7765f772b84e1c13.jpg)

Double Click【Link1】to display【Station 0】. Click【Station 0】to enter Node Setting page.
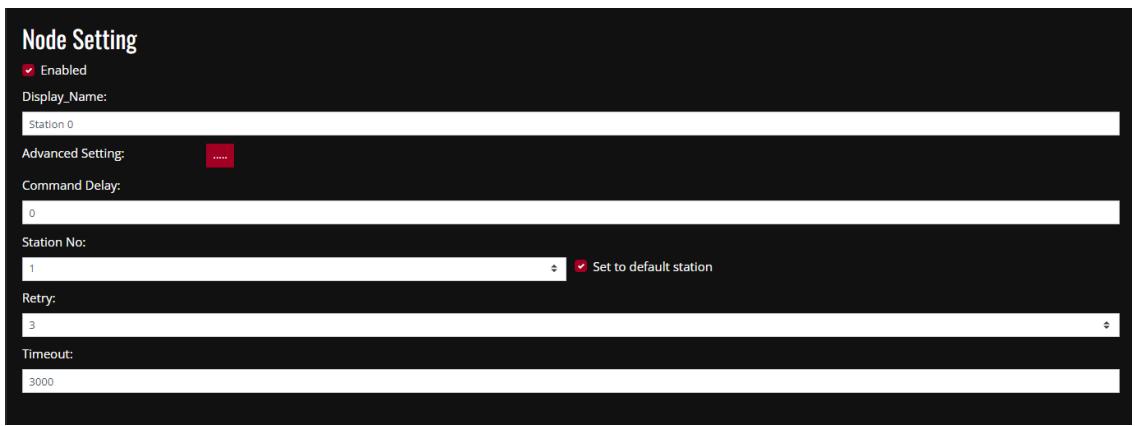
![Node Setting\nEnabled\nDisplay_Name:\nStation 0\nAdvanced Setting:\nCommand Delay:\n0\nStation No:\n1\nSet to default station\nRetry:\n3\nTimeout:\n3000](.im-connect-user-manual-english/c790ff59a8ebc9bcd724aabe2329d56c42e8af848afa0fe7866ca0dcfd965634.jpg)

【Enable】：Check this box to activate the node. This 【Enable】 box is checked by default when a node is created.

【Display\_Name】：Set the name of selected node. Default name is Station 0.

【Advanced Setting】：Set the system to show connection status when there’s error.
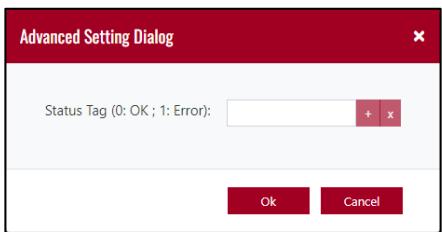
![Advanced Setting Dialog\nStatus Tag (0: OK ; 1: Error):\n+ x\nOk Cancel](.im-connect-user-manual-english/9862739afc47b5df11fa6af09c69a06d3b1ec721309b510056867ee692f1cfc2.jpg)

【Status Tag】：Status of connection (0 means connected; 1 means disconnected)

【Command Delay】：The delay time for sending and receiving of commands to the

controller. The unit is milliseconds.

【Station No】：The station number corresponding to the controller connected to each node. This station number can be set as the preset station number, which is convenient for linking with the tag.

【Retry】：The number of times the confirmation signal would be automatically resent when the communication is abnormal.

【Timeout】：The waiting time before the connection is terminated and an error occurs when the communication is abnormal. The unit is milliseconds.

# 4. Tag Setting

Tag is closely related to each service, and almost all functions need well-defined tags. The way of using a tag is different for each function; however, setting a tag is quite similar. There are many benefits of using tags. One of them is to allow users to effectively summarize and organize the registers used by the controller.

Each ID represents a tag, which can correspond to the register address of a PLC or controller. If the registration number is not set, an error message would appear when entering the registered address and compiling.
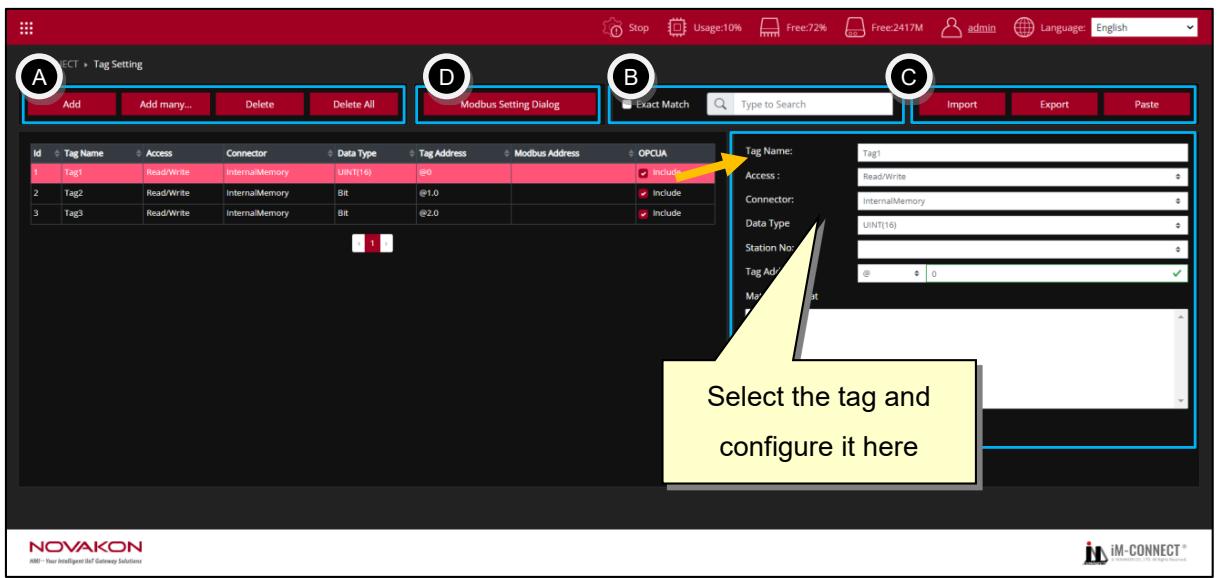
![A\nB\nC\nSelect the tag and\nconfigure it here\nAdd\nAdd many...\nDelete\nDelete All\nModbus Setting Dialog\nExact Match\nType to Search\nImport\nExport\nPaste\nId Tag Name Access Connector Data Type Tag Address Modbus Address OPCUA\n1 Tag1 Read/Write Internal/Memory UINT(16) @0 Include\n2 Tag2 Read/Write Internal/Memory Bit @1.0 Include\n3 Tag3 Read/Write Internal/Memory Bit @2.0 Include\nTag Name: Tag1\nAccess: Read/Write\nConnector: Internal/Memory\nData Type: UINT(16)\nStation No:\nTag Ad: @ 0\nMake a list\nNOVAKON\nHMI - Your Intelligent Do Gateway Solutions\niM-CONNECT®](.im-connect-user-manual-english/d1cc3bb2130b0d4faeb1435d594fc5306f8ab0fbc84d515cd68696490f668869.jpg)

# ○A . Tag operation：

【Add】：One tag can be added at a time. After pressing the 【Add】 button, the complete content of the tag can be created in sequence.

【Tag\_Name】：Each tag can be assigned a tag name. The name supports multi-language input, and the name in English is case-sensitive (for example, Apple and apple represent two different tag names). The tag name must not be duplicated.

【Access】：Set the tag to be【Read/Write】or【Write Only】.

【Connector】：Select the controller or the InternalMemory of Gateway to be used.

【Data Type】：Select the data type, including【Bit】【, INT(8)】【, UINT(8)】, 【INT(16)】, 【UINT(16)】,【INT(32)】,【UINT(32)】,【FLOAT】,【Ascii】,【DOUBLE】,【Ascii】, 【INT(64)】,【UINT(64)】.

【Station No】：The station number of the controller to be used. Some controllers have different station numbers, such as thermostats that use the Modbus protocol.

【Modbus Address】：The value of this address can be copied to the specified Modbus address.

【Tag Address】：The address of the register. If the format or range of the register is unknown, please refer to the prompt in the 【Matched Format】 window below, which display such information for the input of 【Tag Address】.

The figure below shows that a green frame would appear if the entered address meets the format.

![\$ ⇆ 1.1](.im-connect-user-manual-english/f7bea8352160d113ff9e38ef6055d54810fd02e50e4e55aa117899c96ff8f4bb.jpg)

The figure below shows that a red frame would appear if the entered address does not meet the format.

![\$ ♦ a\n!](.im-connect-user-manual-english/3515026ed914d29cb53343156b8855db6a1a0e650e870b8325c2a69b8f583cbf.jpg)

If the selected connection is 【InternalMemory】, it means that no external controller is connected, and only the internal register provided by GATEWAY is used. There are currently two register codes that can be used：

A. 【\$】：This code represents the memory retaining with power off. When GATEWAY is restarted, the original data is still saved. The range is from \$0 to \$1048574, of which \$2048 to \$1048574 are stored in Flash.
B. 【@】：This code represents the memory not retaining with power off. When GATEWAY is restarted, the original data is not saved. The range is from @0～@65535.

The above-mentioned two register codes can be used without actual connection to external controller as long as the setting conforms to the data type format.

For example, when @0 (16-bit) is presented as a bit type, the expression is @0.0～@0.f. It can be understood that it is a squad of the troop. The left side of the decimal (integer place) means the number of squads, and the right side of the decimal (decimal place) is the squad number in the squad.

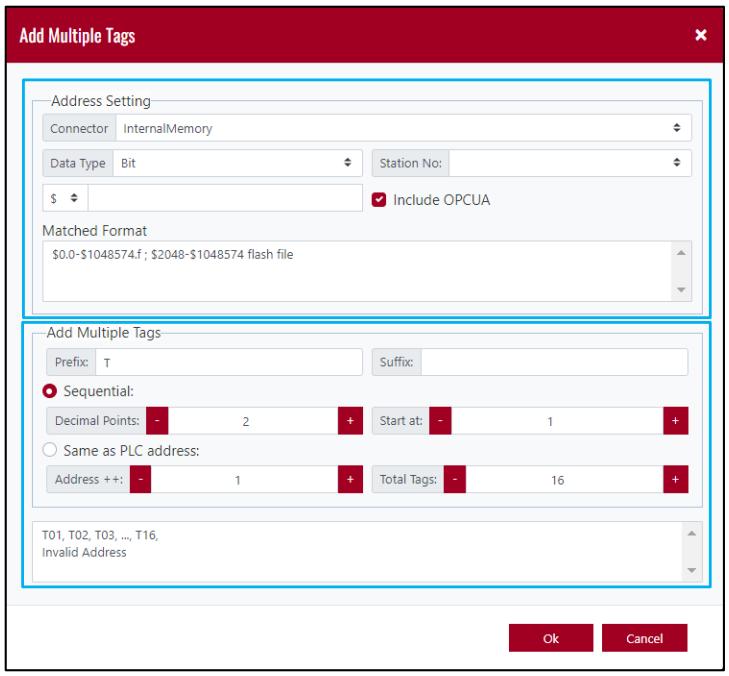
【Add many…】：Multiple consecutive tags can be added at one time.
![Add Multiple Tags\nAddress Setting\nConnector InternalMemory\nData Type Bit Station No:\n\$ Include OPCUA\nMatched Format\n\$0.0-\$1048574.f; \$2048-\$1048574 flash file\nAdd Multiple Tags\nPrefix: T Suffix:\nSequential:\nDecimal Points: - 2 + Start at: - 1 +\nSame as PLC address:\nAddress ++: - 1 + Total Tags: - 16 +\nT01, T02, T03, ..., T16,\nInvalid Address\nOk Cancel](.im-connect-user-manual-english/bd381aa535bbbc15f17aac457e20ca2facb6e748e532459100d6baa94b9fc2ed.jpg)

【Address Setting】：Selection of Connector, Data type, Station No, and address.

【Connector】：Selection of the controller to be used when adding new addresses.

【Data Type】：Selection of the type of data to be used when adding new addresses.

【Station No】：Selection of the station number of the controller to be used when adding new addresses.

【Address】：Enter the starting register address of the new tag.

【Matched Format】：This displays the format of the register address that the user can reference.

【Add Multiple Tags】：Set the format of add multiple tags

【Prefix】：Set the prefix of tag name

【Suffix】：Set the suffix of tag name

【Sequential】：The setting of custom prefixes and suffixes for the names of consecutively added multiple tags...

【Decimal Points】：The setting of the number of digits in the middle of the prefix and suffix.

【Start at】：The starting number of 【Decimal Points】

【Address ++】：The number of increments of the register number in each step.

【Total Tags】：The total number of tags to be added.

【Same as PLC address】：Check this box, and the new tag name would be the same as the address of the PLC register.
![Add Multiple Tags\nAddress Setting\nConnector InternalMemory\nData Type Bit Station No:\n\$ 0.0 Include OPCUA\nMatched Format\n\$0.0-\$1048574.f; \$2048-\$1048574 flash file\nAdd Multiple Tags\nPrefix: T Suffix:\nSequential:\nDecimal Points: - 2 + Start at: - 1 +\nSame as PLC address:\nAddress ++: - 1 + Total Tags: - 16 +\nT01, T02, T03, ..., T16,\nOk Cancel](.im-connect-user-manual-english/5ee544845b15720288d63b9165aa45da9e833d32577636b3dcb4a7abace22a3a.jpg)

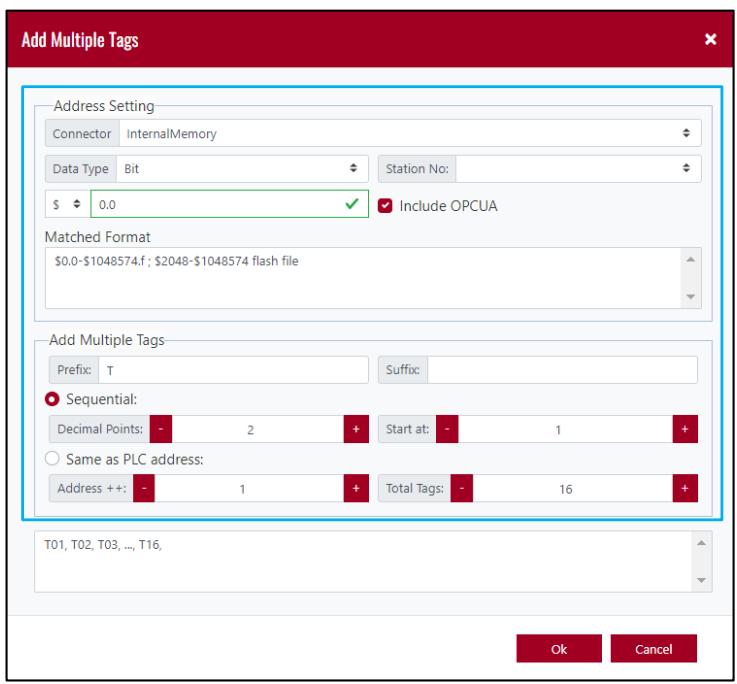
For example, in the figure shown above, the controller is set a 【InternalMemory】 (internal memory), and the data type is 【Bit】, the address is 【\$0.0】. The prefix is set to 【T】, the suffix is not set, the number of digits is 【2】, and the initial value is 【1】, the address increment is 【1】, and the number of tags is 【16】.

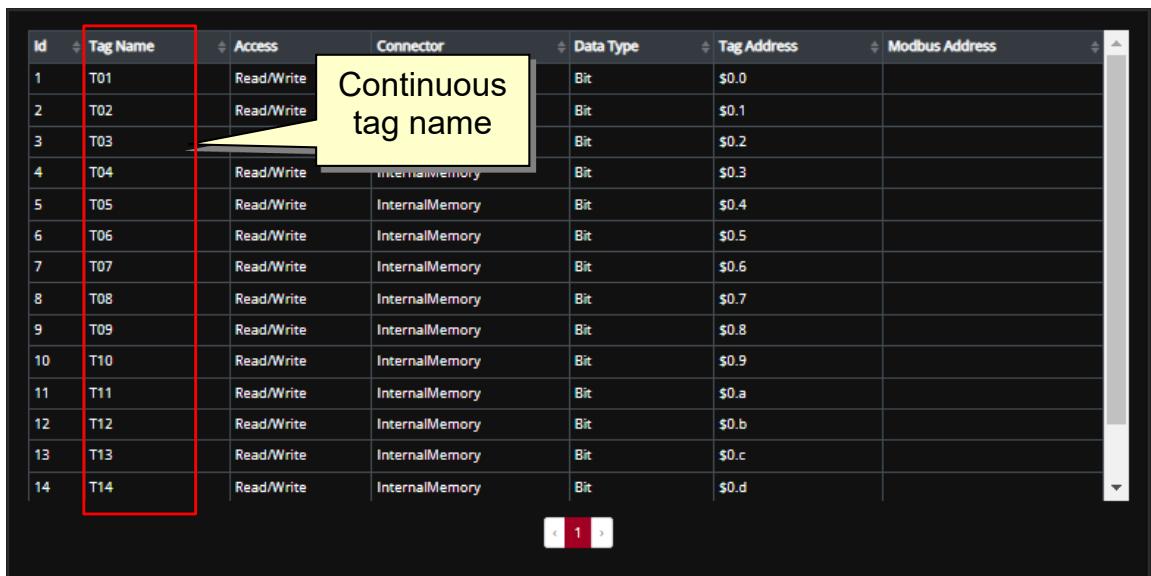
When 【Continuous】 is selected, the tag name is set in the sequence of T01, T02, T03,..., T16, and the corresponding address is \$0.0,\$0.1,\$0.2,...,\$0.f.
![Add Multiple Tags\nAddress Setting\nConnector InternalMemory\nData Type Bit Station No:\n\$ 0.0 Include OPCUA\nMatched Format\n\$0.0-\$1048574.f; \$2048-\$1048574 flash file\nAdd Multiple Tags\nPrefix: T Suffix:\nSequential:\nDecimal Points: - 2 + Start at: - 1 +\nSame as PLC address:\nAddress ++: - 1 + Total Tags: - 16 +\nT01, T02, T03, ..., T16,\nOk Cancel](.im-connect-user-manual-english/d2024e7984aa6bcdc535e420a01122df638b5bfe6bb060f069ccffba93a19dc9.jpg)

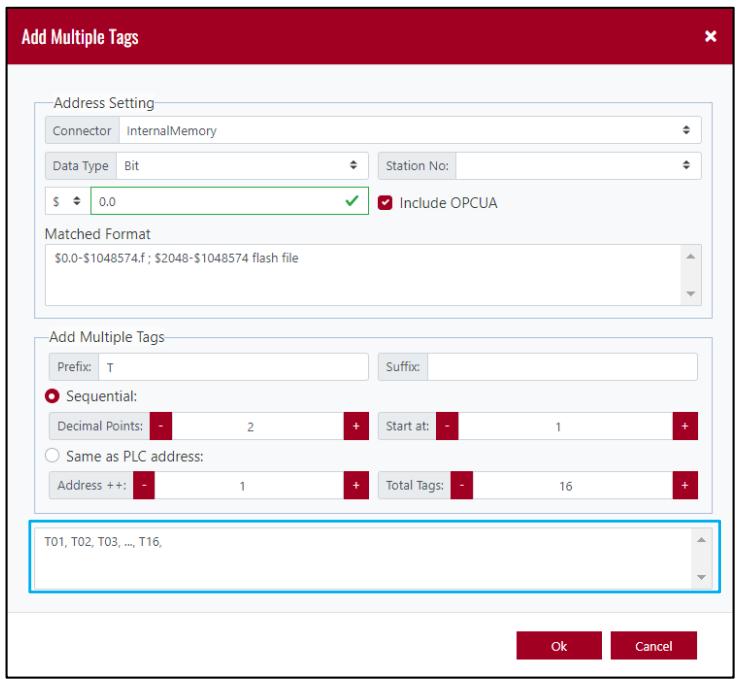
According to the new tag content set, the added tag name would be generated immediately to provide a preview at the bottom of the dialog box. If the setting is wrong, the preview window prompts the message of 【Invalid Address】.

Click 【OK】 after completion, and GATEWAY would automatically add consecutive tags.

Note： All objects in the edit correspond to the tag name, not the address of the controller.

The following figure shows the content of the tag created when 【Continuous】 is selected.
![Id Tag Name Access Connector Data Type Tag Address Modbus Address\n1 T01 Read/Write Continuous\n2 T02 Read/Write Bit \$0.0\n3 T03 Bit \$0.1\n4 T04 Read/Write InternalMemory Bit \$0.2\n5 T05 Read/Write InternalMemory Bit \$0.3\n6 T06 Read/Write InternalMemory Bit \$0.4\n7 T07 Read/Write InternalMemory Bit \$0.5\n8 T08 Read/Write InternalMemory Bit \$0.6\n9 T09 Read/Write InternalMemory Bit \$0.7\n10 T10 Read/Write InternalMemory Bit \$0.8\n11 T11 Read/Write InternalMemory Bit \$0.9\n12 T12 Read/Write InternalMemory Bit \$0.a\n13 T13 Read/Write InternalMemory Bit \$0.b\n14 T14 Read/Write InternalMemory Bit \$0.c\n( 1 )](.im-connect-user-manual-english/2fdb8788fa107b29f8d31173c8ecf8f8a0067febbf4d002264c0784ed058737a.jpg)

If 【Same as PLC address】 is selected, the tag name would be the same as the PLC address, as shown in the figure below.
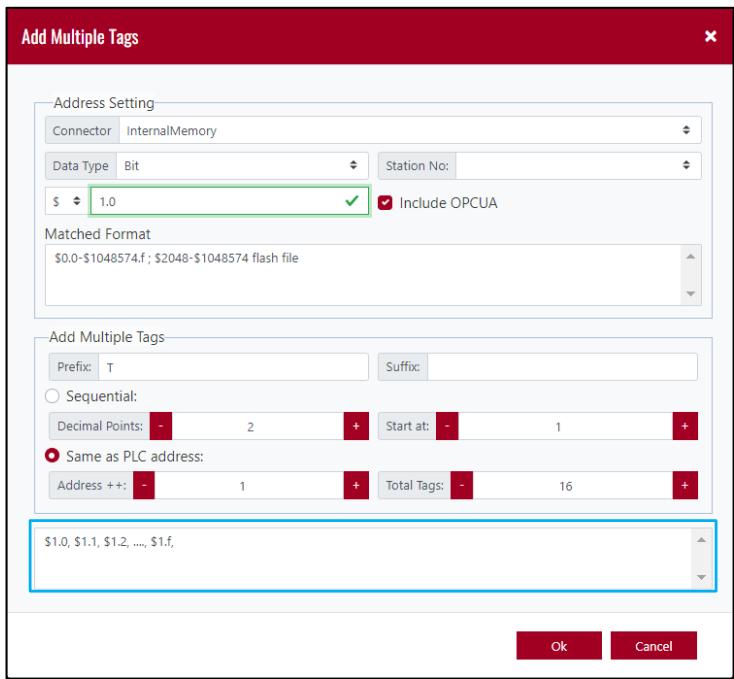
![Add Multiple Tags\nAddress Setting\nConnector InternalMemory\nData Type Bit Station No:\n\$ 1.0 Include OPCUA\nMatched Format\n\$0.0-\$1048574.f ; \$2048-\$1048574 flash file\nAdd Multiple Tags\nPrefix: T Suffix:\nSequential:\nDecimal Points: - 2 Start at: - 1 +\nSame as PLC address:\nAddress ++: - 1 Total Tags: - 16 +\n\$1.0, \$1.1, \$1.2, ..., \$1.f.\nOk Cancel](.im-connect-user-manual-english/2247be227b9d3177640588bfe01c16f2de290403ab4de7cc0b872e3c1871663a.jpg)

The following figure shows the created tag.
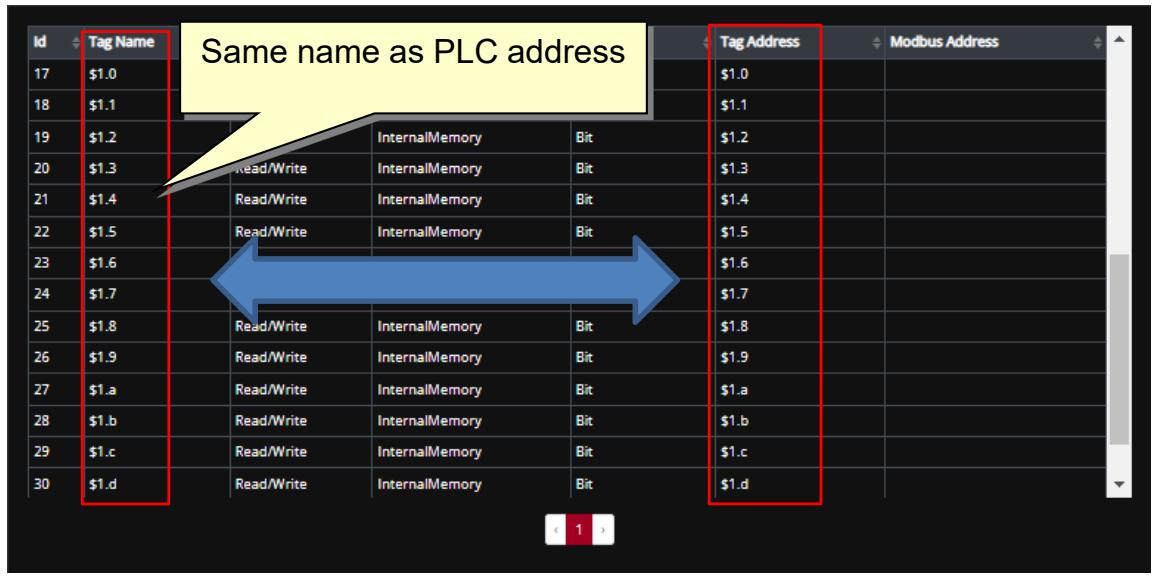
![Same name as PLC address\n| Id | Tag Name | Tag Address (\$) | Modbus Address (\$) |\n|---|---|---|---|\n| 17 | \$1.0 | 1.0 | |\n| 18 | \$1.1 | 1.1 | |\n| 19 | \$1.2 | 1.2 | |\n| 20 | \$1.3 | 1.3 | |\n| 21 | \$1.4 | 1.4 | |\n| 22 | \$1.5 | 1.5 | |\n| 23 | \$1.6 | 1.6 | |\n| 24 | \$1.7 | 1.7 | |\n| 25 | \$1.8 | 1.8 | |\n| 26 | \$1.9 | 1.9 | |\n| 27 | \$1.a | 1.a | |\n| 28 | \$1.b | 1.b | |\n| 29 | \$1.c | 1.c | |\n| 30 | \$1.d | 1.d | |](.im-connect-user-manual-english/c1deb253f155356a2076e9efd36f7c98ecdae9e1f91cc25fbae887d83ddda773.jpg)

【Delete】：Click this button to delete a tag(s). Move the cursor to the leftmost serial number column, press, hold and drag the mouse's left button to select multiple tags, and click 【Delete】 to delete multiple tags simultaneously.

【Delete All】：Click this button to delete all the tags

○B .【Search】：This is used for searching for tags that are the same as the keywords according to the input content, including tag name, type, address, etc.

![Exact_Match\nType to Search](.im-connect-user-manual-english/0355636f39b803394b6d236d99301ce178be9b30493a30dab6a7e1adb39cb9db.jpg)

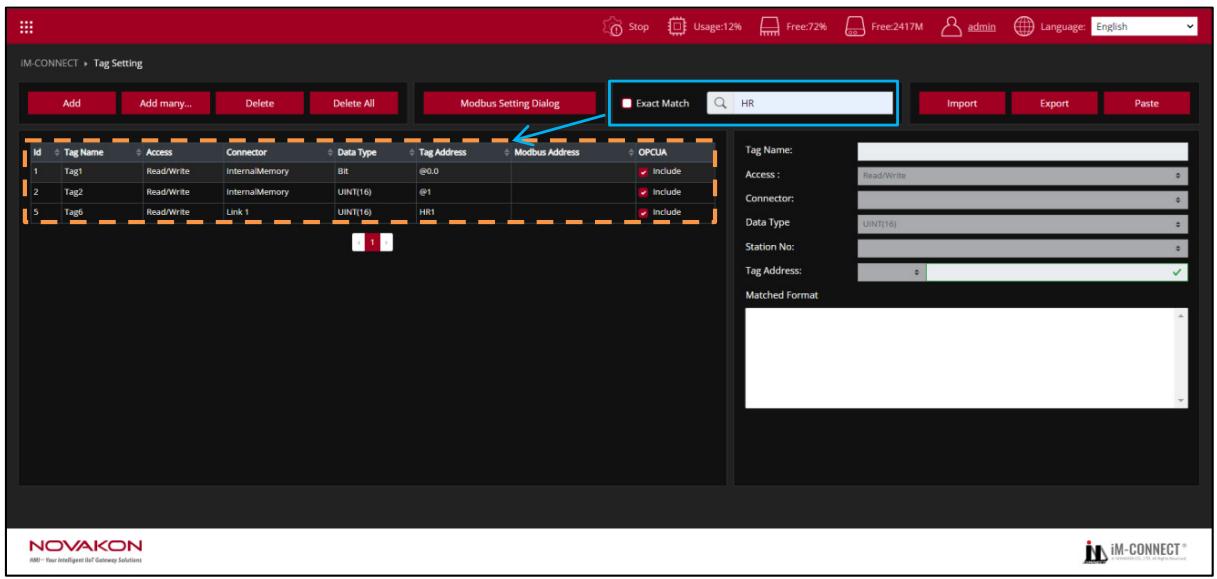
GATEWAY would automatically help us search for all matching tag content when we enter the text to be searched.

For example, after entering the search 【HR】in the figure below, all tags containing 【H】 or 【R】 would be displayed, regardless of the order in which they are arranged.
![IM-CONNECT ) Tag Setting\nAdd\nAdd many...\nDelete\nDelete All\nModbus Setting Dialog\nExact Match\nHR\nImport\nExport\nPaste\nId\nTag Name\nAccess\nConnector\nData Type\nTag Address\nModbus Address\nOPCUA\n1\nTag1\nRead/Write\nInternalMemory\nBit\n@0.0\nInclude\n2\nTag2\nRead/Write\nInternalMemory\nUINT(16)\n@1\nInclude\n5\nTag6\nRead/Write\nLink 1\nUINT(16)\nHR1\nInclude\nTag Name:\nAccess:\nRead/Write\nConnector:\nData Type:\nUINT(16)\nStation No:\nTag Address:\nMatched Format\nNOVAKON\niM-Your Intelligent Bit Gateway Solutions](.im-connect-user-manual-english/d92d775be6d197aee9f42dfde80b6e9c9d26cd7de05bfbb2eee9d0bbb7c3f131.jpg)

But when 【Exact\_Match】is checked, GATEWAY would automatically list all the tag names that meet the 【HR】 conditions, and the arrangement position must be correct.
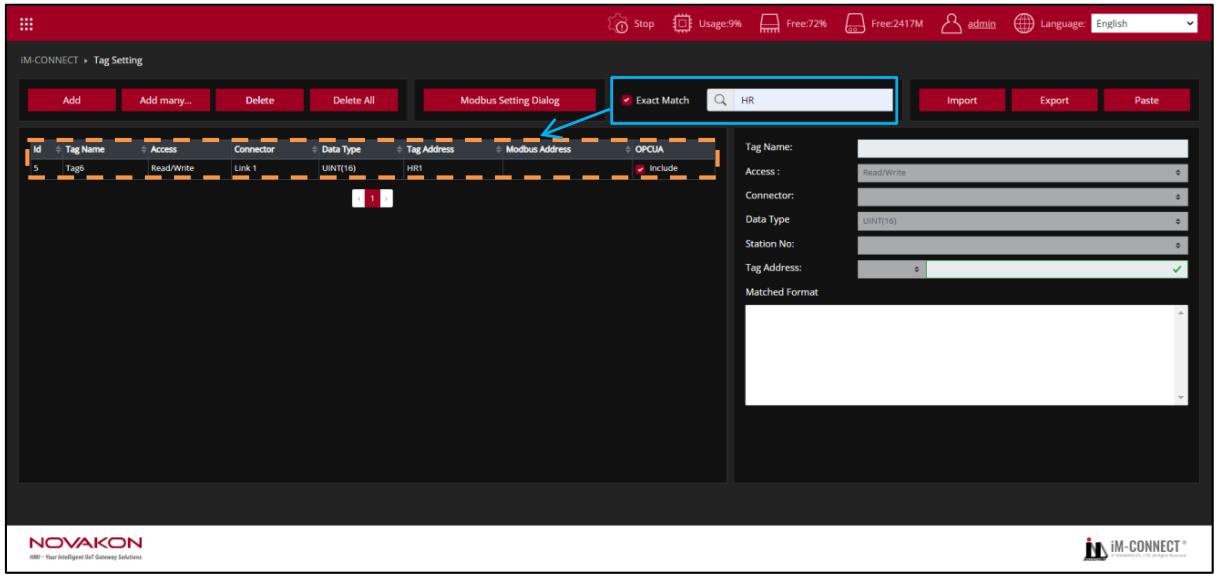
![IM-CONNECT ) Tag Setting\nAdd\nAdd many...\nDelete\nDelete All\nModbus Setting Dialog\nExact Match\nHR\nImport\nExport\nPaste\nId\nTag Name\nAccess\nConnector\nData Type\nTag Address\nModbus Address\nOPCUA\n5\nTag6\nRead/Write\nLink 1\nUINT(16)\nHR1\nInclude\nTag Name:\nAccess:\nRead/Write\nConnector:\nData Type:\nUINT(16)\nStation No:\nTag Address:\nMatched Format\nNOVAKON\nHMI - Your Intelligent Diet Gateway Solutions\nIM-CONNECT®](.im-connect-user-manual-english/b102f3354d8770f71a8709a6cf8f80196d69e5b8536284d08b0c72238a5c3695.jpg)

○C .【Import/Export】：Export is to output the data content of the tag into a text file (default as fileName.TXT). Import is to read the text file (\*xml, \*njnx, \*.TXT) back into the tag content.

![Import\nExport\nPaste](.im-connect-user-manual-english/650357d1aab291ee6a8c264851697212b845e1cd2bb4acaae38d99aba47db398.jpg)

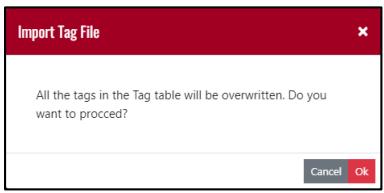
Click the 【Import】 button, and a confirmation window as shown in the figure below

would pop up.
![Import Tag File\nAll the tags in the Tag table will be overwritten. Do you want to proceed?\nCancel	Ok](.im-connect-user-manual-english/80f46b3d05a0190e044c3d1bd7336a980fb6f24bda17937c270fb8c7b79ad6f9.jpg)

Click 【YES】 to confirm to execute the action of importing tags, select the file you wantto import, and then press 【Open】.

Click 【NO】 to exit from executing the action of importing tag.

Click the 【Output】button, the system will output the data content of the tags into a text file (\*.TXT) as backup or for user to edit then import later.

The 【Paste】button is for OMRON PLC NJ/NX series, click the button to import the tag lists copied from OMRON PLC program.

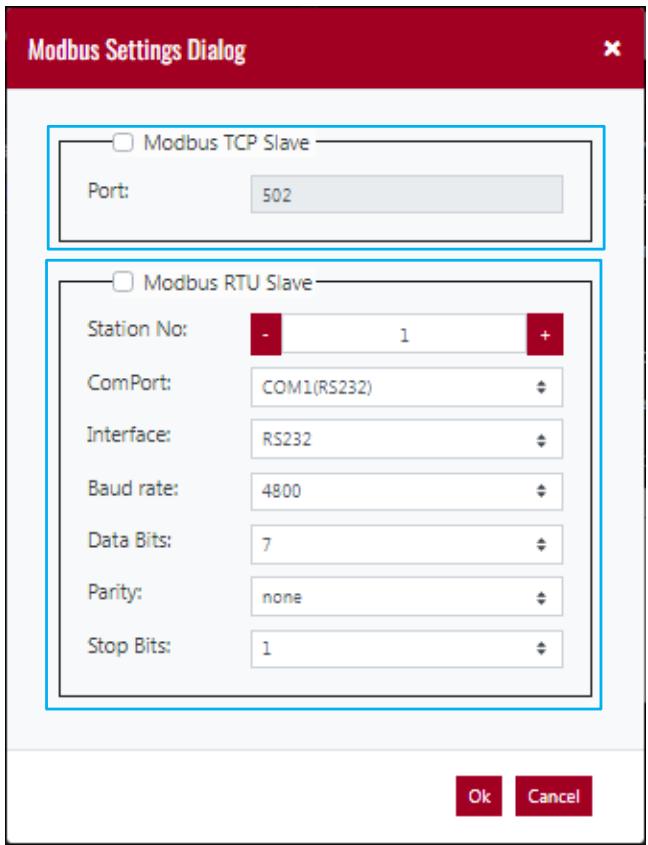
○D . 【Modbus Setting Dialog】：Set GATEWAY as Modbus slave.

Note：When setting the Modbus slave controller in 【PLC Setting】, it means GATEWAY itself is Modbus Master, and the controller is Modbus slave.
![Modbus Settings Dialog\nModbus TCP Slave\nPort: 502\nModbus RTU Slave\nStation No: - 1 +\nComPort: COM1(RS232)\nInterface: RS232\nBaud rate: 4800\nData Bits: 7\nParity: none\nStop Bits: 1\nOk Cancel](.im-connect-user-manual-english/c02d6a270aa30d069c8e1f589da2772e027dc96a0c20ed7aefd7fb47b7618f1b.jpg)

【Modbus TCP Slave】：Check the box to activate GATEWAY as【Modbus TCP Slave】.

【Modbus RTU Slave】：Check the box to activate GATEWAY as【Modbus RTU Slave】.

# 5. Data Logger

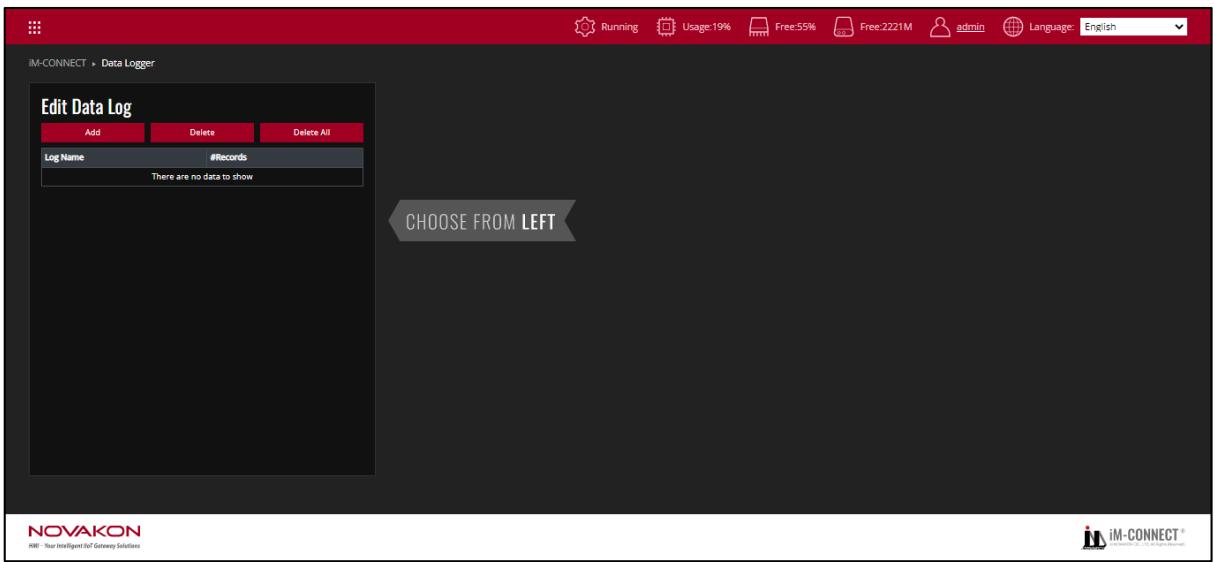
【Data Log】：Store the historical data in flash memory and move to database at the defined timing.
![iM-CONNECT » Data Logger\nEdit Data Log\nAdd	Delete	Delete All\nLog Name	#Records\nThere are no data to show\nCHOOSE FROM LEFT\nNOVAKON\niM® Your Intelligent Hot Gateway Solutions\nRunning\nUsage:19%\nFree:55%\nFree:221M\nadmin\nLanguage: English\niM-CONNECT®](.im-connect-user-manual-english/403f952cda879b3c81dca78032aad8e9f6a922c452c34c111278bbe5014f060d.jpg)

【Edit data log】：Set the basic parameters of the data record. A buffer is created for each data record, and historical data can be stored in the buffer.

【Add】：Add a set of record. The records can be added up to 100 sets in maximum.

【Delete】：Delete the selected record name.

【Delete All】：Delete all the records at once.

【LogName】：Define the name of the data record.

【#Records】：Set the limit of the number of backups in the data recording buffer. The maximum number is 65535.

【Log Name】 and 【# Records】 are located at the same position as shown in the above-edited data record content.

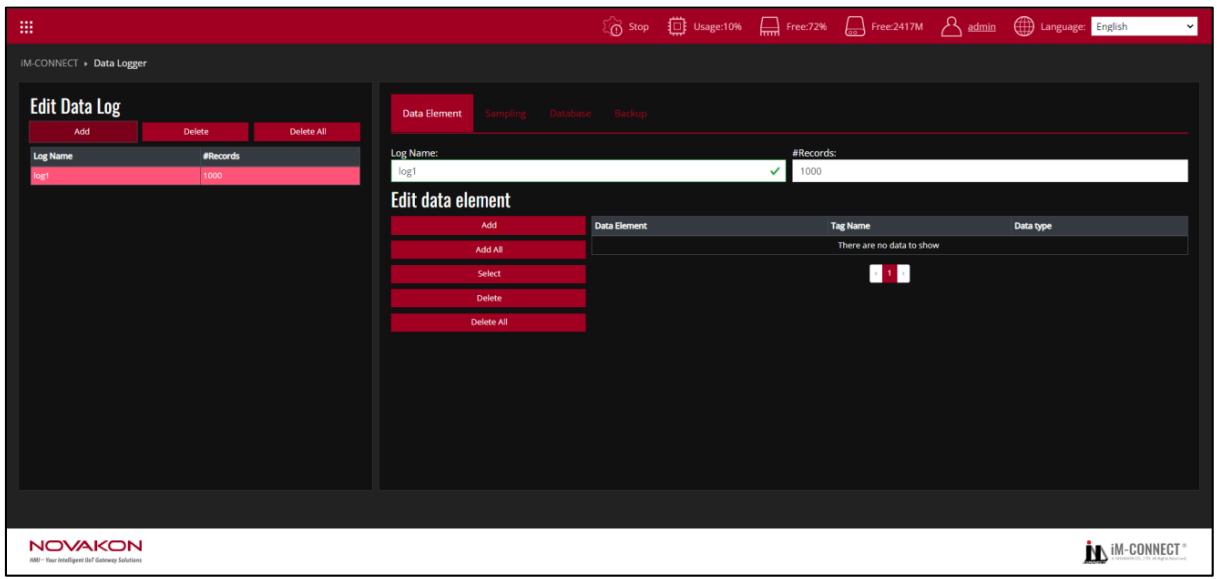
【Data Element】：Set the constituent items of the data record, including project uyname, tag, data format.
![IM-CONNECT ) Data Logger\nEdit Data Log\nAdd Delete Delete All\nLog Name #Records\nlog1 1000\nData Element Sampling Database Backup\nLog Name: #Records:\nlog1 1000\nEdit data element\nAdd Data Element Tag Name Data type\nAdd All There are no data to show\nSelect\nDelete\nDelete All\nNOVAKON\niMi - Your Intelligent Data Gateway Solutions\nStop Usage:10% Free:72% Free:2417M admin Language: English](.im-connect-user-manual-english/d461c757a4bfd6bc7b2c3048785744cbd13caa01151643e6a6bee837a75cc463.jpg)

【Edit data element】：Set the items and conditions of data records.

【Add】：Add a data element. The added items can contain 32 items in maximum.

【Select】：Select the existing tags as the item contents.

【Delete】：Delete the selected item.

【Delete All】：Delete all item at once.

【Data Element】：Set the item name. The name would be displayed in the database, and it supports multiple languages editing. Nevertheless, using English for naming is suggested.

【Tag Name】：Set the designated tag for each item. The tag type supports all formats.

【Data type】：Display the data type of each tags.

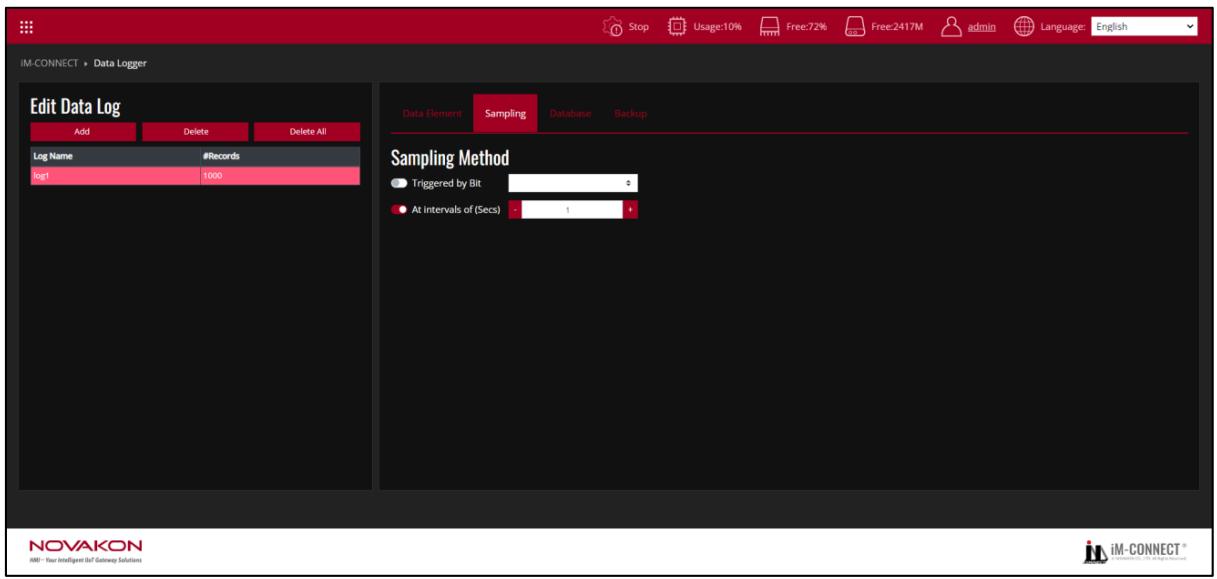
![iM-CONNECT ) Data Logger\nEdit Data Log\nAdd Delete Delete All\nLog Name #Records\nLog1 1000\nData Element Sampling Database Backup\nSampling Method\nTriggered by Bit \$+\nAt intervals of (Secs) 1 +\nNOVAKON\nHMI - Your Intelligent Do Gateway Solutions\nStop Usage:10% Free:72% Free:2417M admin Language: English\niM-CONNECT®](.im-connect-user-manual-english/eeb620b4dfa4d8f44c3f4b10c472bdb1b59ddb184313ce5796c78e8cc5c2868e.jpg)

【Sampling】：Set the sampling conditions and the corresponding action.

【Triggered by Bit】：Trigger the sampling based on Bit ON or Bit OFF.

【At intervals of】：Set the fixed time interval of seconds for sampling records. The default value is 1.0 seconds.

# 【Communication】

【Default value (communication error)】：Set the value to indicate communication error.
![IM-CONNECT ) Data Logger\nEdit Data Log\nAdd	Delete	Delete All\nLog Name	#Records\nlog1	1000\nData Element	Sampling	Database	Backup\nDatabase Type:	MySQL\nHost:	Database server IP\nPort:	3306\nSchema:LoadTable\nName:	Name\nPassword:Password\nTest Database\nNovakon\nHMI - Your Intelligent Do! Gateway Solutions](.im-connect-user-manual-english/51e5d63ce9166de3d557509efe7cddabef9d25d76f0b5c89549a3df251f1f980.jpg)

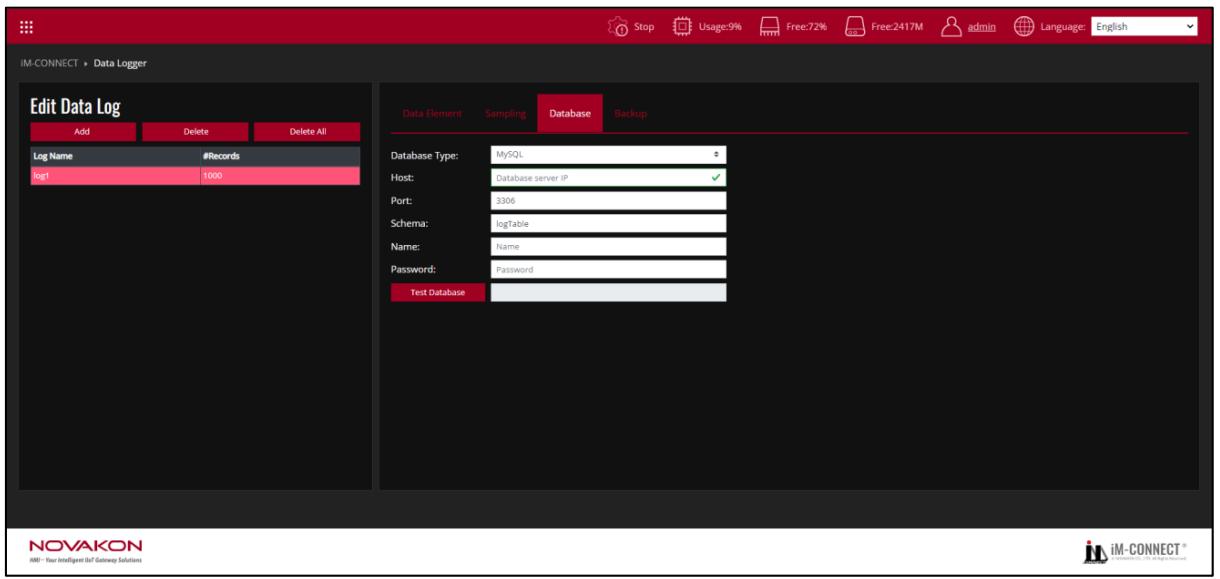
【Database】：Set the uploaded database information.

【Database Type】：Set the database type. 【MySQL】and【MS SQL】are currently available in the latest version.

【Host】：Set the name or IP of the server for the uploaded database.

【Port】：Set the Port number of the uploaded database.

【Schema】：Set the name of the uploaded database.

【Name】：Enter the database username.

【Password】：Enter the database user password.

【Test Database】：Test the settings of the database. You can test the connection with database here as long as the boxes of【Enable Backup Datalog】and

【Enable Database Backup】are checked.
![iM-CONNECT ) Data Logger\nEdit Data Log\nAdd	Delete	Delete All\nLog Name	#Records\nlog1	1000\nData Element	Sampling	Database	Backup\nEnable Backup DataLog\nAutomatic Backup\nBackup when log full\nAt intervals of (Min)	1\nBackup Location\nEnable Backup to gateway	Local\nEnable Database Backup\nNOVAKON\nHMI: Your Intelligent Data Gateway Solutions\nRunning	Usage:37%.Free:69%Free:2154M adultsLanguage: English](.im-connect-user-manual-english/b9d33b3ac426a37fe3765025406dbe63d214090d9ea6cf6c56ad81fdb3405533.jpg)

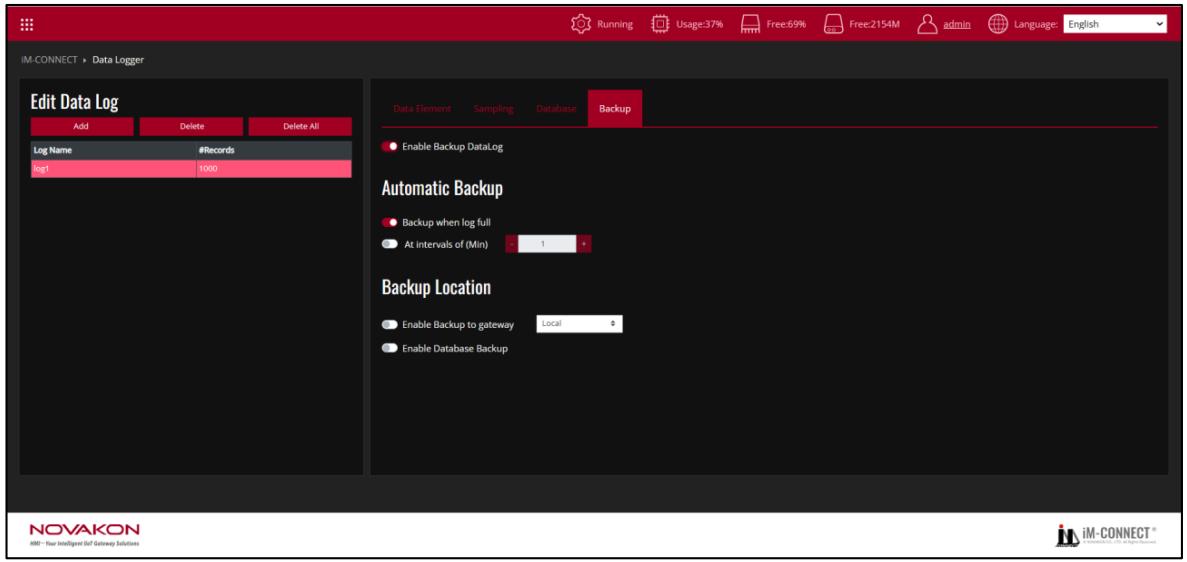
【Backup】：Set the backup time and device.

【Enable Database Backup】：Activate the database backup function.

【Automatic Backup】：Set the condition to trigger automatic backup

【Backup when log full】：When this option is activated, the data record is backed up when it is full.

【At intervals of】：Set a fixed time interval for performing the sampling. Default setting is 1.0 minute.

【Backup Location】：Set the location to store datalogs

【Enable Backup to gateway】：When the data record is full, save the data into a file,which can be accessed through【FTP】and【USB】.

【Enable Database Backup】：When the data record is full, backup to the set database.

# 6. Alarm

【Alarm】enables the set tag to send alarm messages through Line Notify, Email, or MQTT when the defined condition is met. (e.g. value falls in the predefined range, or bit turns on, etc.).
![iM-CONNECT ) Alarm\nEdit Alarm Event\nAdd	Duplicate	Delete	Delete All\nAlarm Name	Tag Name	Trigger Condition	Value\nalarm1\nCHOOSE FROM LEFT\nNOVAKON\nHR - Your Intelligent Jet Gateway Solutions\niM-CONNECT®](.im-connect-user-manual-english/95eb9a5c621c34d7fb325daafac0434ccbc34c54b953f4bca70b5afc87c8b6d1.jpg)

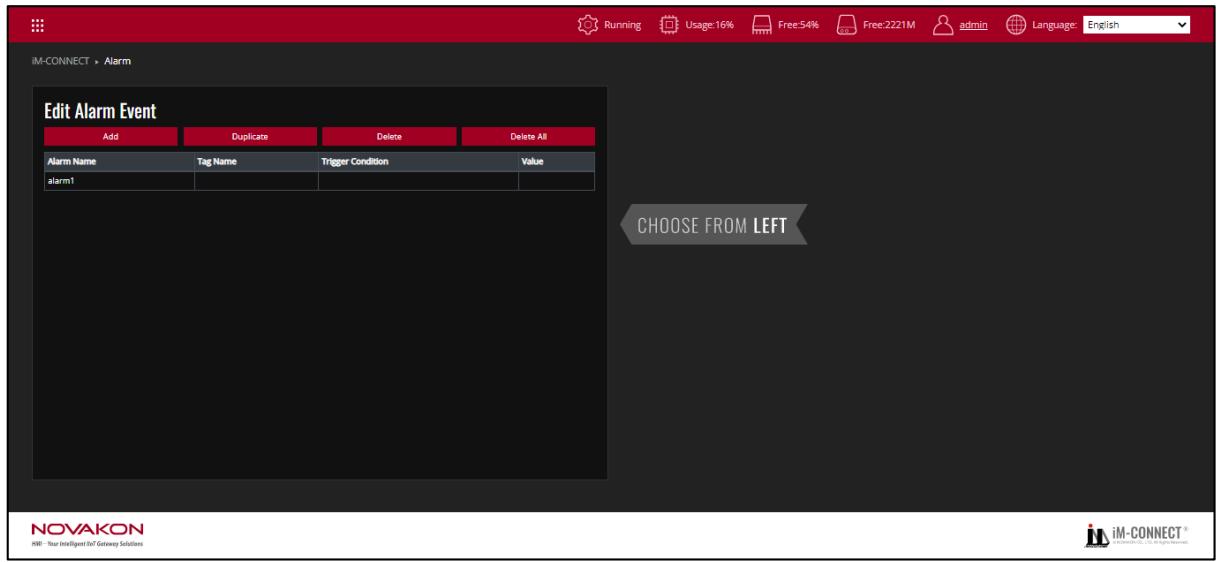
【Edit Alarm Event】 can be used to edit the content of the alarm data, including 【Add】, 【Duplicate】,【Delete】, and 【Delete All】.

【Add】 ：Add an alarm. One alarm content can be added at a time.

【Delete】：Delete an alarm. Move the mouse cursor to an alarm and press 【Delete】 to delete the selected alarm.

【Duplicate】：Copy an alert. After moving the mouse cursor to an alarm, press

【Duplicate】to duplicate the same alarm. The name of the duplicated alarm would be incremented by the default name (alarm). The rest of the content is the same.

【Delete All】：Delete all alarms at once.

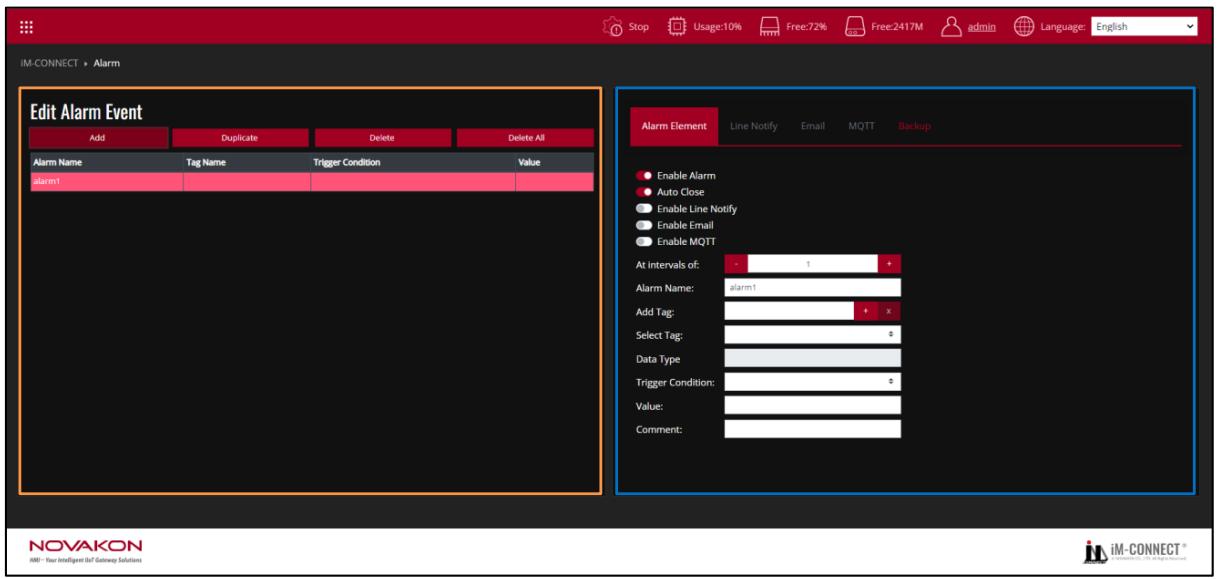
![Stop\nUsage:10%\nFree:72%\nFree:2417M\nadmin\nLanguage: English\niM-CONNECT ) Alarm\nEdit Alarm Event\nAdd\nDuplicate\nDelete\nDelete All\nAlarm Name\nTag Name\nTrigger Condition\nValue\nalarm1\nAlarm Element\nLine Notify\nEmail\nMQTT\nBackup\nEnable Alarm\nAuto Close\nEnable Line Notify\nEnable Email\nEnable MQTT\nAt intervals of:\n-\n1\n+\nAlarm Name:\nalarm1\nAdd Tag:\n+\nx\nSelect Tag:\n#\nData Type\nTrigger Condition:\n#\nValue:\nComment:\nNOVAKON\niIM - Your Intelligent Hot Gateway Solutions](.im-connect-user-manual-english/cfe915f2e3e7f7e57c9ccadb21f075ab4414f4127b9dc67f0ba5c296683f5221.jpg)

In the above figure, the orange frame on the left shows all the alarms that have been set.

【Alarm Name】：Set the name of the alarm, which can be used to describe the content of the alarm.

【Tag Name】：Set the connected tag to determine whether an alarm occurs.

【Trigger Condition】：Display the trigger conditions.

【Value】：Display the condition value of the alarm.

The blue frame on the right side of the figure above is the dialog box for the alarm setting.

【Enable Alarm】：Activate the alarm. If this option is not activated, the alarm content would not be displayed regardless of whether the conditions are met.

【Auto Close】：When the alarm is cleared (the trigger condition is not met), the alarm is automatically closed. If this option is not activated, the alarm continues to be triggered even if the alarm condition has been removed.

【Enable Line Notify】：Set the Line Notify Messenger APP function when the alarm is triggered.

【Enable Email】：Set the function of sending email to a specified mailbox when the alarm is triggered.

【Enable MQTT】：Set the function of publishing message to the designated MQTT Broker when the alarm is triggered.

【At intervals of】：The interval between alarm sampling. The unit is seconds.

【Alarm Name】：Set the name of the alarm, which can be used to describe the content of the alarm.

【Add Tag】 ：Set the tag to determine whether an alarm has occurred. If the tag hasnot been created, press 【+】 on the right to add a tag.

【Select Tag】：The set tag can be selected as the one to judge the alarm.

In the same alarm, 【Add Tag】 and 【Select Tag】 would have the same selected tag.

【Data Type】：Display the specified tag type.

【Trigger Condition】 ：Display the trigger conditions. When the trigger tag type is

【Bit】, 【Set】 or 【Clear】 can be selected to trigger an alarm. The various types ofjudgment mechanisms, including 【=】, 【!=】 (not equal to), 【>】, 【>=】, 【<】 and【<=】 are available for selection.

【Value】：The value of the condition that the alarm is established. When the content of the 【tag】meets the 【value】of the 【Trigger Condition】, the alarm would be triggered. If the source type is 【Bit】, this field does not need to be set.

【Comment】：Set the description of the alarm.

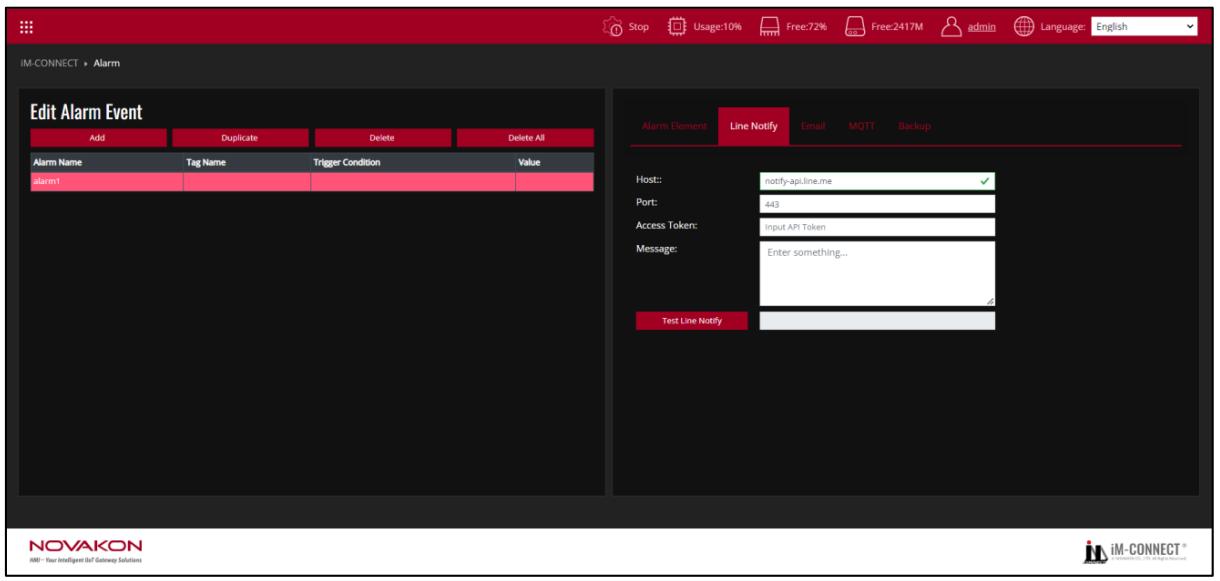
![Stop\nUsage:10%\nFree:72%\nFree:2417M\nadmin\nLanguage: English\nIM-CONNECT ) Alarm\nEdit Alarm Event\nAdd\nDuplicate\nDelete\nDelete All\nAlarm Name\nTag Name\nTrigger Condition\nValue\nalarm1\nAlarm Element\nLine Notify\nEmail\nMQTT\nBackup\nHost:\nnotify-api.line.me\nPort:\n443\nAccess Token:\nInput API Token\nMessage:\nEnter something...\nTest Line Notify\nNOVAKON\nIMI - Your Intelligent IoT Gateway Solutions\niM-CONNECT®](.im-connect-user-manual-english/bafa3f2b986bca615972f9da2ab6577864a995375948ce5891dc91be35198dc7.jpg)

【Line Notify】：Set the line group and message to be sent when the alarm is triggered.

【Host】：Display the default server address of Line Messenger App.

【Port】 ：Displays the default Port of Line Messenger App.

【Access Token】：Enter the access token for Line. For the line access token setting method, please refer to 【Appendix：LINE Push Broadcast Setting】.

【Message】：Enter the content of the message to be pushed. Input【#{tag name}】in the Message Body if the message should contain Tag content.

【Test Line Notify】：Show the content of the response message after the push.
![Stop\nUsage:9%\nFree:72%\nFree:2417M\nadmin\nLanguage: English\niM-CONNECT ) Alarm\nEdit Alarm Event\nAdd\nDuplicate\nDelete\nDelete All\nAlarm Name\nTag Name\nTrigger Condition\nValue\nalarm1\nAlarm Element\nLine Notify\nEmail\nMQTT\nBackup\nEmail From:\nenter Email address\nEmail To:\nenter Email address\nSMTP Server Name:\nsmtp.gmail.com\nPort:\n\$87\nAuth Mode:\n●\nName:\nName\nPassword:\nPassword\nSubject:\nEnter Subject\nBody Format:\nText\nMessage Body:\nEnter something...\nTest Mail Server\nNOVAKON\niMI - Your Intelligent Hot Gateway Solutions](.im-connect-user-manual-english/db6e9a51e979920877e9dffaf9607f8791073b29aad555cc329c17c7a006520f.jpg)

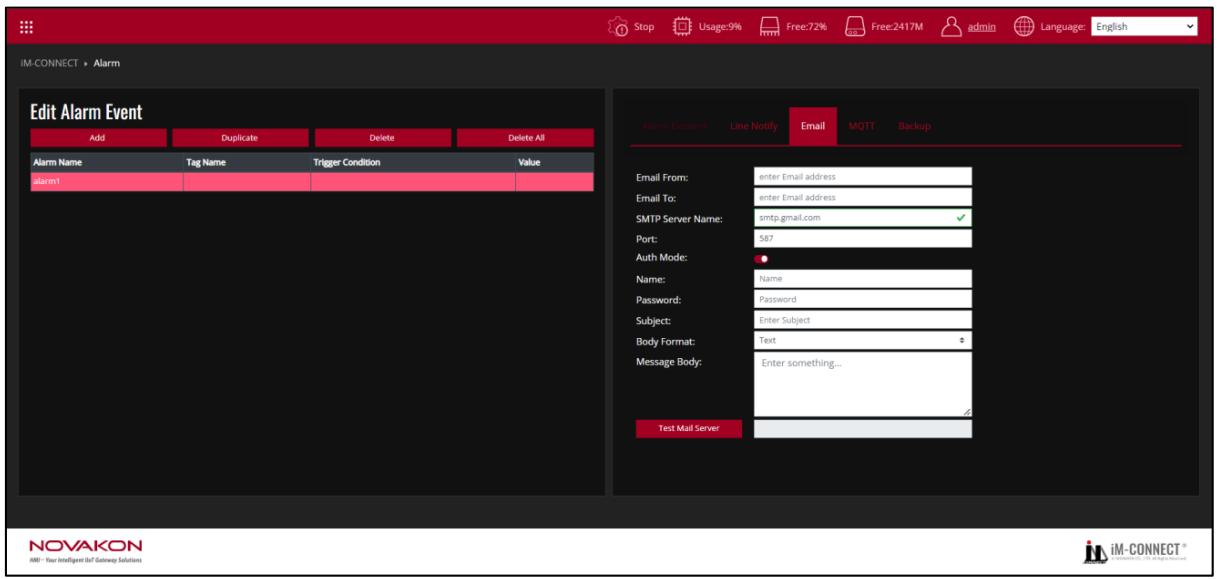
【Email】：Set the email message to be sent when the alarm is triggered.

【Email From】：Enter the email address of the sender.

【Email To】：Enter the email address of the recipient. If multiple groups of emails need to be set up, please separate each group of emails with a comma.

【SMTP Server Name】：Enter the name of the SMTP server to be used.

【Port】 ：Display the port number to be used.

【Auth Mode】：Confirm whether to log in for verification.

【Name】：Enter the email address of the sender.

【Password】：Enter the sender's email password.

【Subject】：Enter the subject of the message.

【Message Body】：Enter the content body in 【Text】 or 【Html】 format of the emailto be sent.

【Test Mail Server】：The content of the response message to be shown after the email is sent. Input【#{tag name}】in the Message Body if the message should contain Tag content.

# Note：

Please set up the above settings in accordance with the specifications of each email server. For example of Gmail, please set the 【Allow Low-Security Applications】 of the Google account to be 【Enabled】.
![iM-CONNECT ) Alarm\nEdit Alarm Event\nAdd	Duplicate	Delete	Delete All\nAlarm Name	Tag Name	Trigger Condition	Value\nalarm1\nAlarm Element工程项目线 notify	Email	MQTT	Backup\nMQTT Host Ip: brokert.emqx.io\nPort: 1883\nAuth Mode:\nSSU/TLS\nClient ID: mqtjfs_e08373c3\nTopic:\nQoS: 1\nMessage Body: Edit Publish Message\nTest MQTT\nNOVAKON\nAMR - Your Intelligent IoT Gateway Solutions\niM-CONNECT®](.im-connect-user-manual-english/fc65b9e691c85579ab8db5ef8edb2a791c3d6fad57c99e48f0d5451ff2e5ca36.jpg)

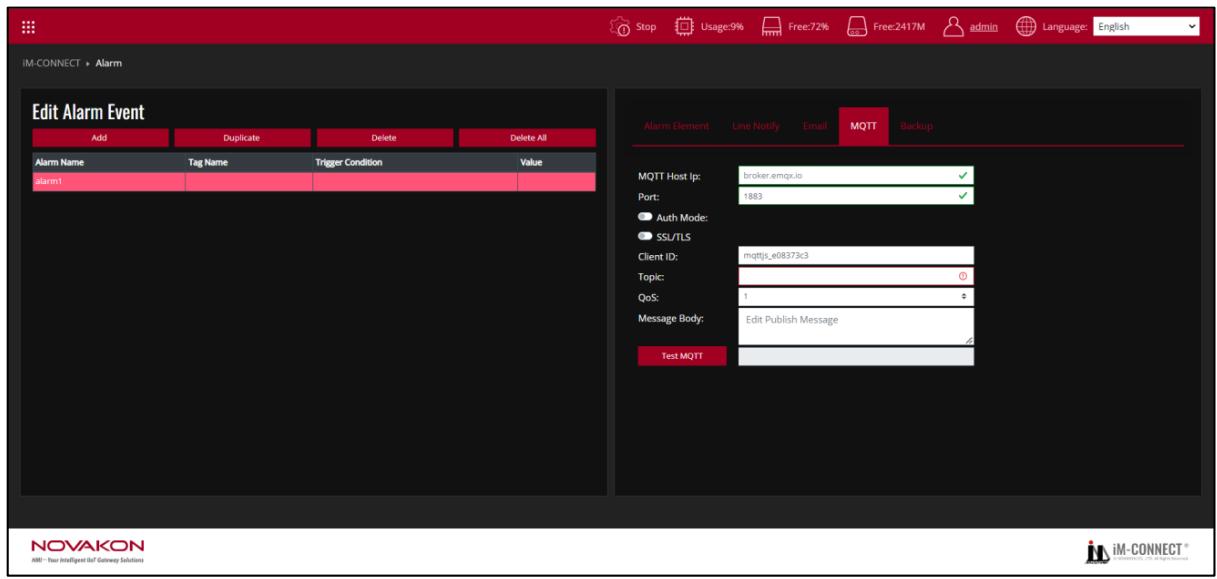
【MQTT】：Set the designated MQTT client that receives the alarm message when the alarm is triggered.

【MQTT Host IP】：Set the MQTT Broker IP that receives the messages.

【Auth Mode】：Confirm whether authentication is required. If it is selected, the account name and password must be input.

【SSL/TLS/Port】：Set SSL/TLS port number.

【Require Certificate】：Confirm whether the certificate file is required or not.

【Upload Cert File】：Import the certificate provided by the Server.

【Upload Key File】：Import the key provided by the Server.

【SSL Secure】：After selecting it, the validity of the certificate file provided by the Server will be verified.

【Client ID】 ：Set the user’s ID. Every MQTT user needs a unique ID. MQTT Broker identifies the users through the Client IDs, and records the status of the users individually, such as subscription topics and communication quality setting.

【Topic】：Set the topic name. The name must comply with MQTT naming principles.

【QoS】：The quality of service is divided into three levels： 0, 1 and 2. The greater the number, the better the quality.

0 ：Sent once at most (in charge of sending messages only, suitable for less critical situations).

1 ：Sent once successfully at least (the data is correctly sent but message repetition may occur).

2 ：Sent once properly (rigorous delivery with the feedback of “message delivered”).

【Message body】：Input the message to be sent. If a tag is needed in the message, add【#{tag name}】 in the message body.

【Test MQTT】：The response message sent after MQTT is published.
![iM-CONNECT ) Alarm\nEdit Alarm Event\nAdd	Duplicate	Delete	Delete All\nAlarm Name	Tag Name	Trigger Condition	Value\nalarm1\nAlarm Element工程项目 Line Notify Email MQTT Backup\nEnable Backup History\nAutomatic Backup\nHistory backup count: 100\nSave History: Local\nNOVAKON\nHMI - Your Intelligent Do Gateway Solutions\niM-CONNECT®](.im-connect-user-manual-english/4ebeb59ef6c2ae5d0a8bdcb226198408b1349f3a79c69827961230030e6e8185.jpg)

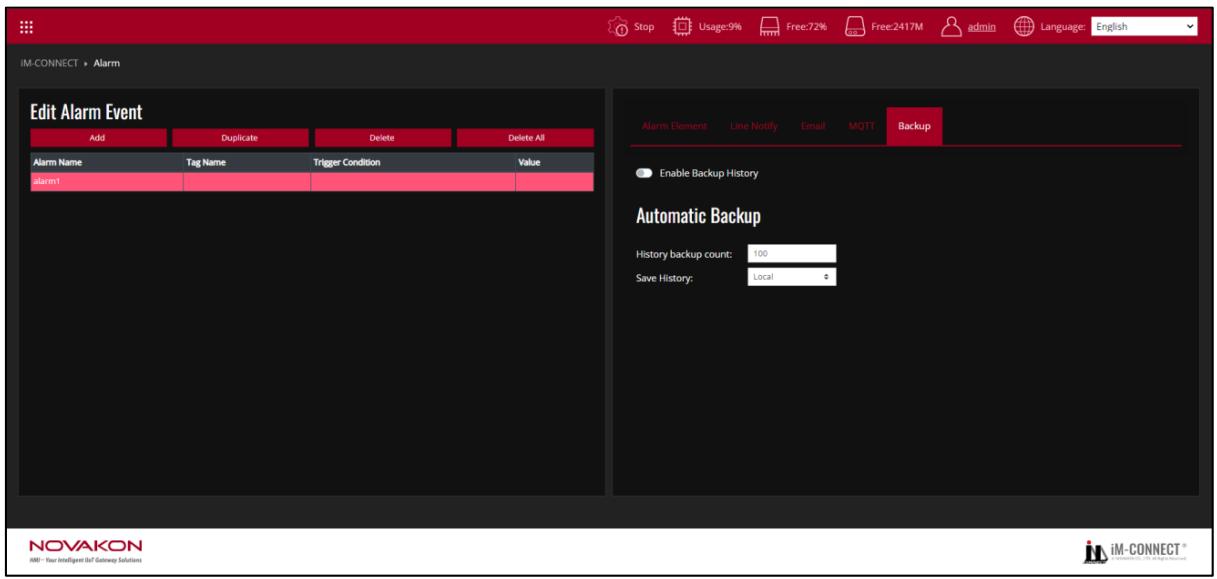
【Backup】：Set the number of alarm history to be backup and the destination where the log to be saved. When 【Enable Backup History】is on, the condition of Automatic Backup can be set.

【History backup count】：Set how many alarm history to be automatically backup to the appointed storage.

【Save History】 ：Set where to backup the history. 【Local】for Gateway local storageor【USB】for external USB disk.

# 7. MQTT

MQTT is generally used as a messaging protocol in IoT (Internet of Things), with the main features of lightweight, openness, and easiness. When the program capacity is limited or the network bandwidth is limited, such advantages become more explicit. It is suitable to be used on the continuous monitoring of the data such as temperature, humidity, pressures, electricity, water level, and others.
![iM-CONNECT ) MQTT\nEdit MQTT Data\nAdd	Duplicate	Delete	Delete All\nMqtt Name	Host	Client ID	Role	Topic	QoS	Format\nThere are no data to show\nCHOOSE FROM LEFT\nNOVAKON\nHMI - Your Intelligent Do Gateway Solutions\niM-CONNECT®](.im-connect-user-manual-english/5e72b56a8ada3aae8f4bb545ad49668ea4338b6a2560818fcded65e48bd6101a.jpg)

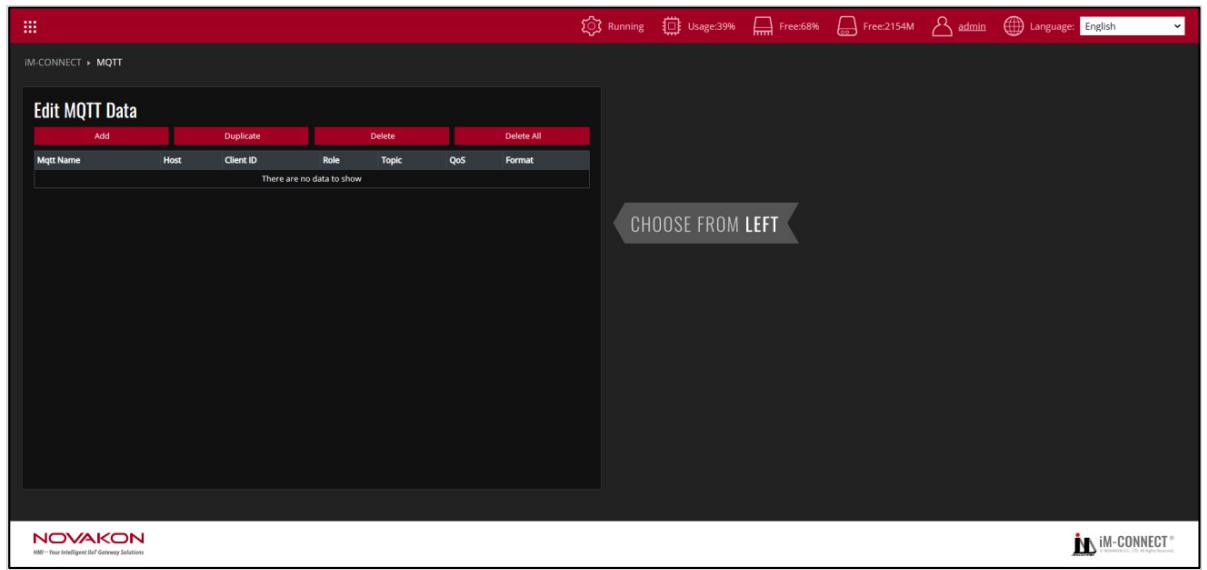
【Add】 ：Add a set of MQTT items.

【Delete】：Delete the selected MQTT item.

【Duplicate】：Duplicate the selected set of MQTT items.

【Delete All】：Delete all the MQTT items.

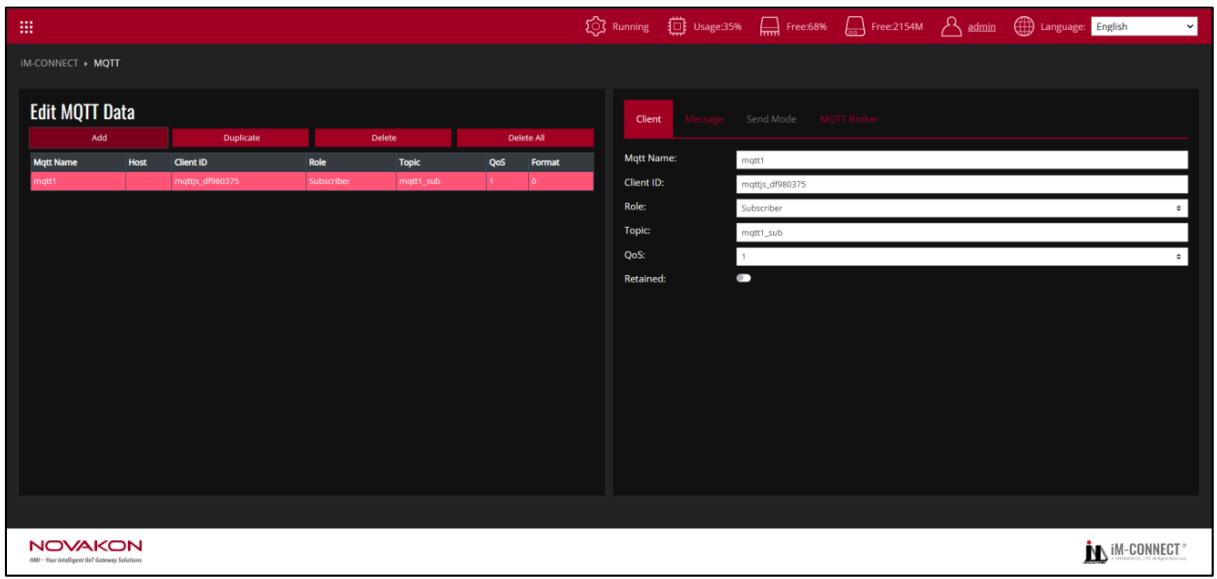
![iM-CONNECT ) MQTT\nEdit MQTT Data\nAdd	Duplicate	Delete	Delete All\nMqtt Name	Host的小计_id	Role	Topic	QoS	Format\nmqtt1	mntjs_dft80375	Subscriber	mqtt1_sub	1	0\nClient Message Send Mode MQTT Broker\nMqtt Name:	mqtt1\nClient ID:	mntjs_dft80375\nRole:	Subscriber\nTopic:	mqtt1_sub\nQoS:	1\nRetained:	●\nNOVAKON\niMI - Your Intelligent Hot Gateway Solutions](.im-connect-user-manual-english/cf21354801fdcb1c6687928d6c52b12a79ccdced28526834f2827594ef26a834.jpg)

【Client】：

【MQTT name】：Assign a MQTT name.

【Client ID】 ：Set the User’s ID. Every MQTT user needs a unique ID. MQTT Broker identifies the users through the Client IDs, and records the status of the users individually, such as subscription topics and communication quality setting.

【Role】：Set the role in MQTT. There two major roles in the MQTT protocol： Publisher and Subscriber. The Subscriber must subscribe the topics that it needs. Then, when the Publisher publishes messages to the topic, the broker sends such messages to Subscribers who subscribed to the same topic.

Publisher：To set as a Publisher. The tag body will be published to the designated broker.

Subscriber：To set as a Subscriber. Subscribe the designated broker and set a value to the tag when receiving the data.

When the Role is set as the Publisher, the tag to be sent must be set up; otherwise, no tag will be sent as default.

【Topic】：Topic name to be used.

【QoS】：The quality of service is divided into three levels： 0, 1 and 2. The greater the number, the better the quality.

0 ：Sent once at most (in charge of sending messages only, suitable for less critical situations).

1 ：Sent once successfully at least (the data is correctly sent but

message repetition may occur).

2 ：Sent once properly (rigorous delivery with the feedback of “message delivered”).

【Retained】：Retain the last message successfully sent.
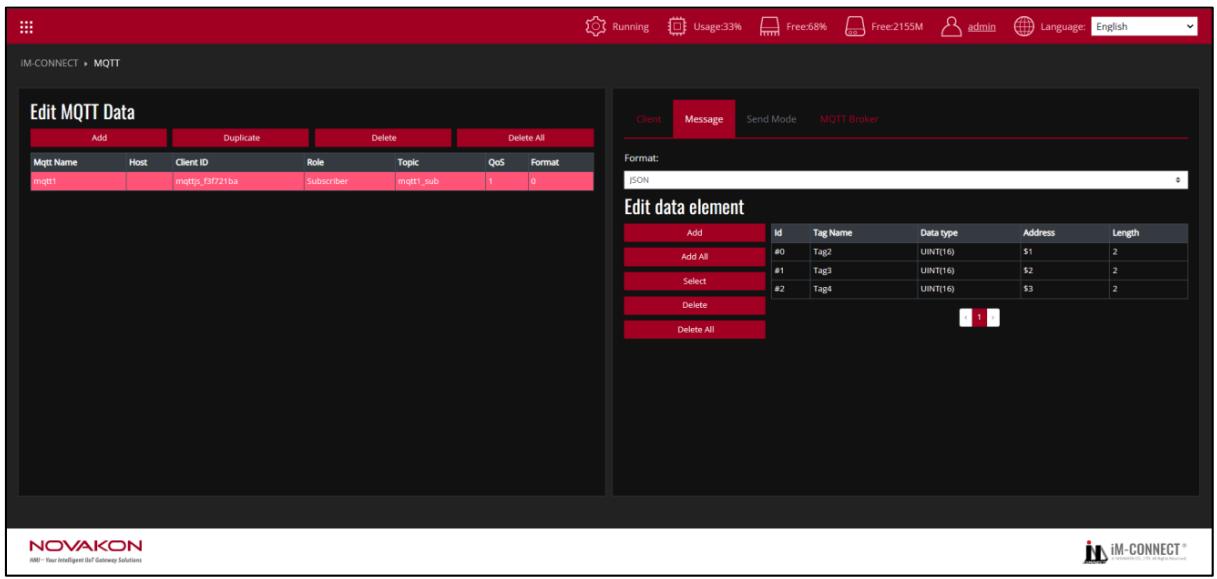
![IM-CONNECT ) MQTT\nEdit MQTT Data\nAdd	Duplicate	Delete	Delete All\nMqt Name	Host人類 ID	Role	Topic	QoS	Format\nmgtt1	mqttjs_dPI80375	Subscriber	mgtt1_sub	1	0\nClientiberMessage	Send Mode	MQTT Broker\nFormat:\nJSON\nEdit data element\nAdd Id Tag Name	Data type	Address	Length\nAdd All\nSelect\nDelete\nDelete All\nThere are no data to show\n1\nNOVAKON\nAMI: Your Intelligent IT Gateway Solutions\niM-CONNECT®](.im-connect-user-manual-english/a3e903b08a58c02de36e7a16825b0eeacb8ba70d03ede91079e6b59b102a64c9.jpg)

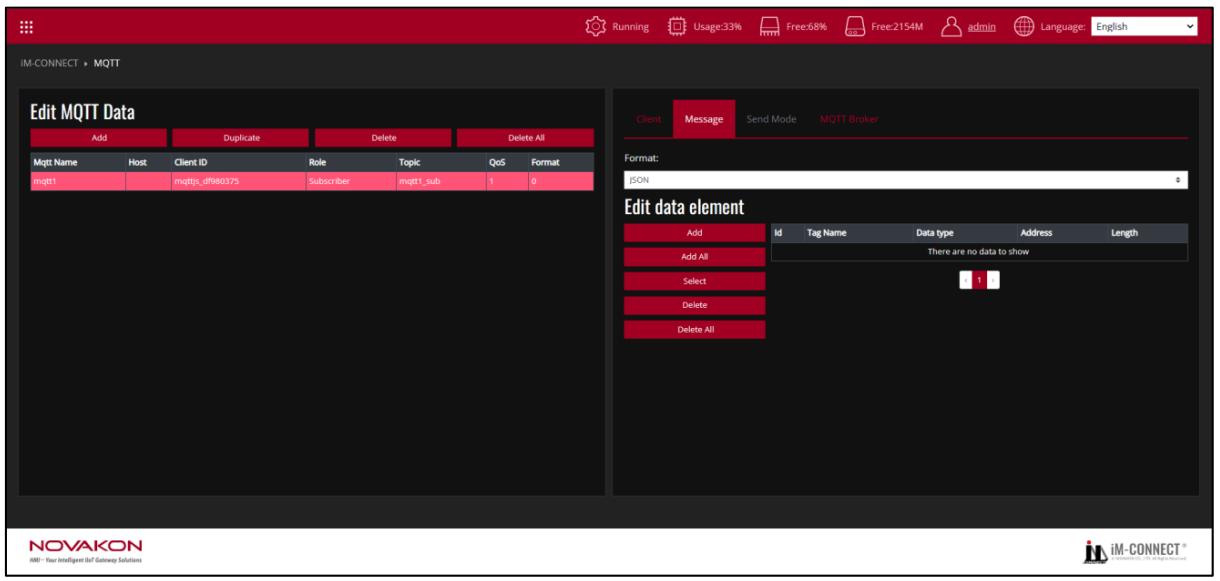
【Edit the message】：

【Data format】：Designate the MQTT format. Select 【JSON】(default), 【Binary】or【Customize】.

【JSON】：Through the JSON standard format, the tag content set according to the Publisher is output.

As shown in the following diagram, when the sending condition is established, the Publisher sends the content to the Subscriber(s) according to the content values of the set tags T01, T02, and T03.

The format consists of： {“Publisher\_Tag name1”： Send value1,“Publisher\_Tag name2”： Send value 2,” Publisher\_Tag name3”： Send value 3 , and so on.}

Thus, the input format shall be： {“T01”：value,“T02”： value,”T03”： value }

![iM-CONNECT × MQTT\nEdit MQTT Data\nAdd	Duplicate	Delete	Delete All\nMqtt Name	Host人類 ID	Role	Topic	QoS	Format\nmqtt1	mgttp_59721ba	Subscriber	mqtt1_sub	1	0\nEdit data element\nAdd Id Tag Name Data type Address Length\nAdd All #0 Tag2 UINT(16) \$1 2\nSelect #1 Tag3 UINT(16) \$2 2\nDelete #2 Tag4 UINT(16) \$3 2\nDelete All\nNOVAKON\nHIV - Your Intelligent Data Gateway Solutions\nRunning Usage:33% Free:68% Free:2155M admin Language: English\nClient Message Send Mode MQTT Broker\nFormat:\nJSON 8](.im-connect-user-manual-english/00a5f16f44933e38bb81b07b28acd447fbf94f2afbc66ffe1bdcf93f1b0a01ea.jpg)

【Binary】：The tag content set according to the Publisher will be reorganized into binary format and output
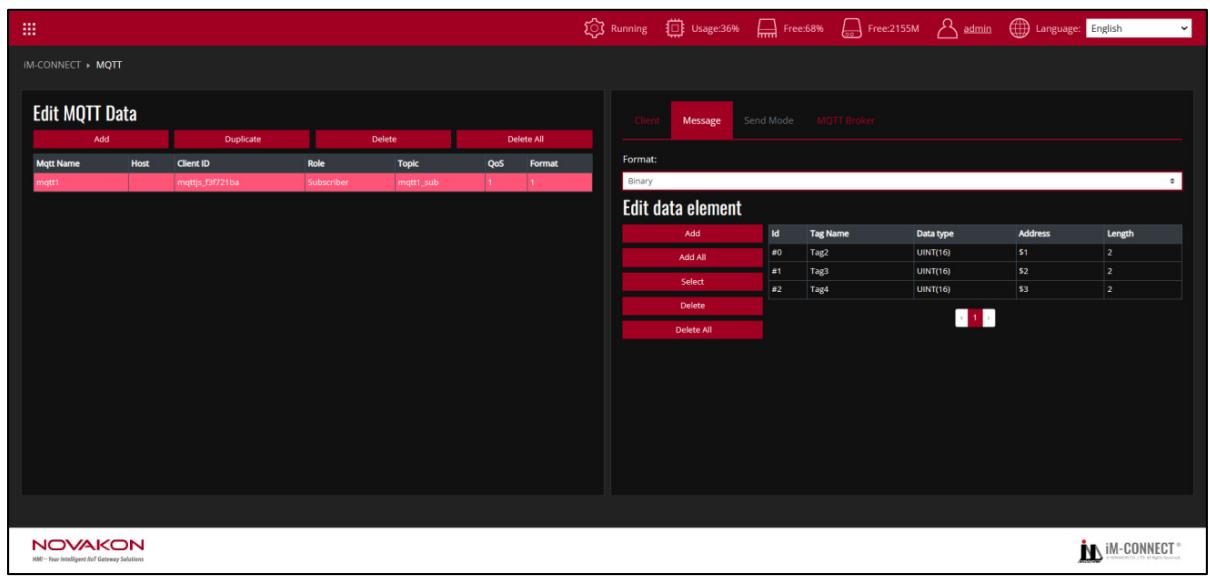
![IM-CONNECT ) MQTT\nEdit MQTT Data\nAdd	Duplicate	Delete	Delete All\nMgtt Name	Host的小gtp_09721ba	Role	Topic	QoS	Format\nmgtt1	\$mgtp_09721ba	Subscriber\$mgtt_sub	1	1\nClient Message Send Mode MQTT Broker\nFormat:\nBinary\nEdit data element\nAdd Id Tag Name Data type Address Length\nAdd All #0 Tag2 UINT(16) \$1 2\nSelect #1 Tag3 UINT(16) \$2 2\nDelete #2 Tag4 UINT(16) \$3 2\nDelete All 1\nNOVAKON\niM - Your Intelligent IoT Gateway Solutions\nRunning Usage:36% Free:68% Free:2155M admin Language: English\niM-CONNECT®](.im-connect-user-manual-english/ee7d8bd34e8876a7cc1321ccfc0a3f22cff0d5b2679a107877ac60cd1115803c.jpg)

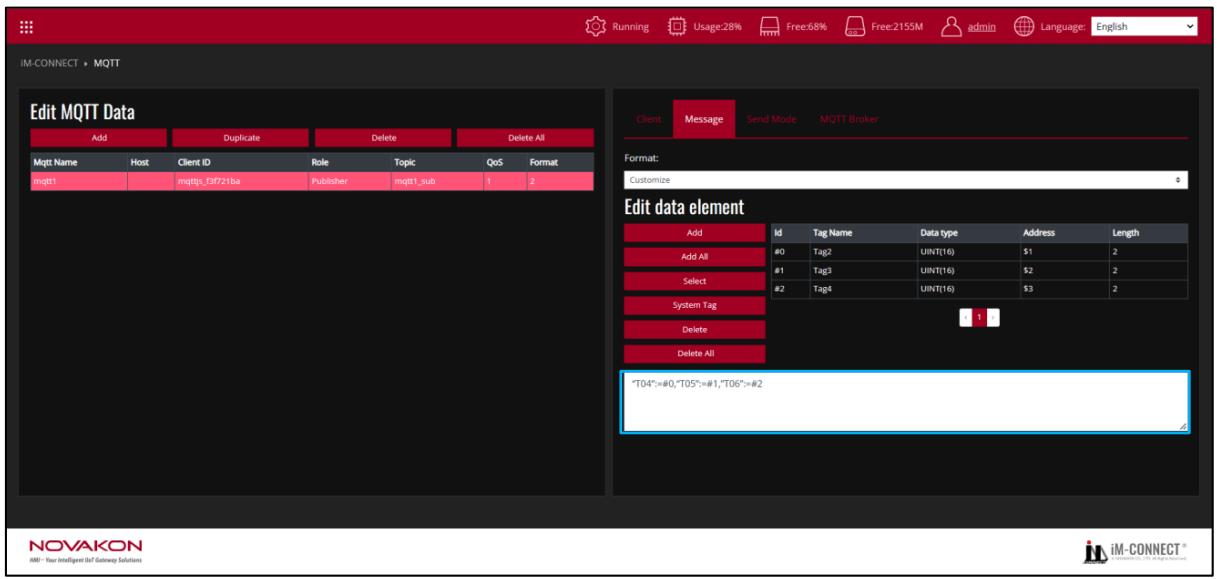
【Customize】：The tag content is output based on the user’s customized format. (Only as Publisher)

As shown in the following diagram, when the sending condition is established, the Publisher sends the content of tags T04, T05, and T06 to the Subscriber(s) according to the content values of the set tags T01, T02, and T03.

The format consists of： {“Subscriber\_Tag name1”：

Publisher\_ID1,“Subscriber\_Tag name2”： Publisher\_ID2,” Subscriber\_Tag name3”：

Publisher\_ID3 , and so on.}

Thus, the input format in this case shall be： {“T04”:=#0,“T05”:=#1,”T06”:=#2}

![iM-CONNECT » MQTT\nEdit MQTT Data\nAdd	Duplicate	Delete	Delete All\nMqtt Name	Host人類 ID	Role	Topic	QoS	Format\nmqtt1	mqttj_5f721ba	Publisher	mqtt1_sub	1	2\nClient(Message	Send Mode	MQTT Broker)\nFormat:\nCustomize	8\nEdit data element\nAdd Id Tag Name Data type Address Length\nAdd All #0 Tag2 UINT(16) \$1 2\nSelect #1 Tag3 UINT(16) \$2 2\nSystem Tag #2 Tag4 UINT(16) \$3 2\nDelete\nDelete All\n'T04':=#0,'T05':=#1,'T06':=#2\nNOVAKON\nHIV: Your Intelligent Data Gateway Solutions\niM-CONNECT®](.im-connect-user-manual-english/f28b31ba90fa70ebed86076517bdfd372595e907955d7a53bad9275f32724fd3.jpg)

【Add】 ：Add a MQTT item.

【Add All】：Add all tags to MQTT items.

【Select】：Select a MQTT item.

【System tag】：Use the system tag to obtain Gateway system time and other information.

【Delete】：Delete the selected MQTT item.

【Delete all】：Delete all the MQTT items.

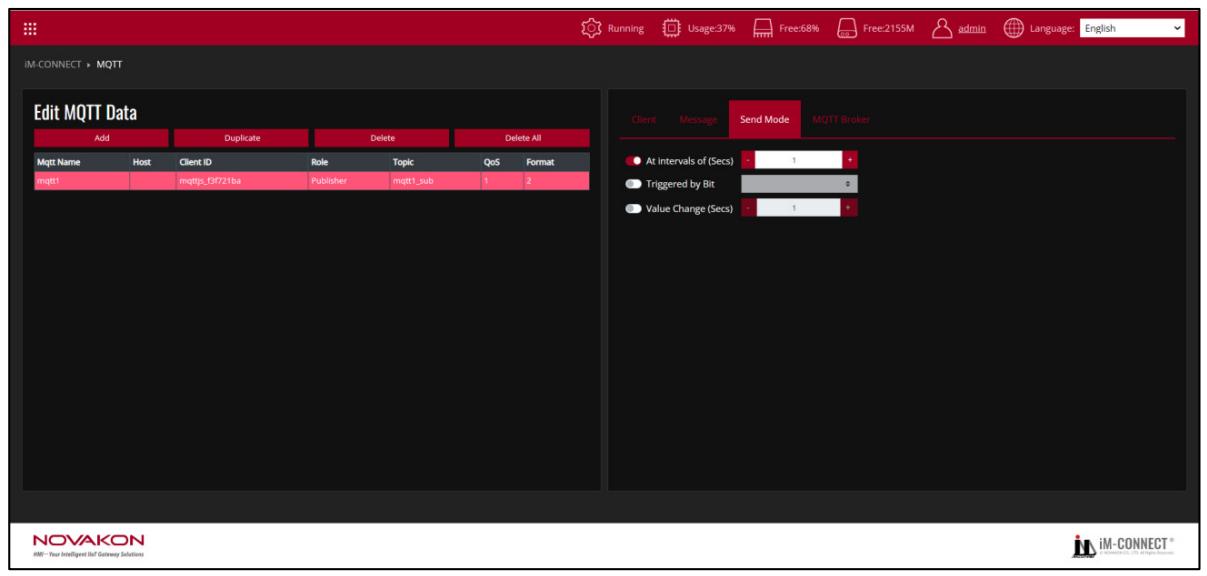
![iM-CONNECT + MQTT\nEdit MQTT Data\nAdd	Duplicate	Delete	Delete All\nMqtt Name	Host	Client_ID	Role	Topic	QoS	Format\nmqtt1	mqttjs_Eff721ba	Publisher	mqtt1_sub	1	2\nClient生产设备Send Mode	MOTT Broker\nAt intervals of (Secs)	1 +\nTriggered by Bit	\nValue Change (Secs)	1 +\nNOVAKON\nHMI: Your Intelligent IoT Gateway Solutions\niM-CONNECT®](.im-connect-user-manual-english/32ac657fefe9d2fae957a93ed146b3dcae0520c914fcf46987404622704e39bb.jpg)

【Send Mode】：Set the method or condition for sending MQTT message.

【At Intervals of(Secs)】：Set to send MQTT message in a fixed interval in seconds. The default is 1 second.

【Triggered by Bit】：Set to send MQTT message when the status is triggered by bit, from

OFF to ON.

【Value Change(Secs)】：Set to send MQTT message when the designated tag status is changed.
![IM-CONNECT ) MQTT\nEdit MQTT Data\nAdd	Duplicate	Delete	Delete All\nMqtt Name	Host人類_ID	Role	Topic	QoS	Format\nmqtt1	mqttjs_Emf721ba	Publisher	mqtt1_sub	1	2\nClient生产设备Send Mode	MQTT Broker\nCloud Service:	Normal\nMQTT Host Ip:	broker.emqx.io\nPort:	1883\nMQTT Version:	MQTT v3.1.1\n● Always Connected:\n○ Auth Mode:\n○ SSL/TLS:\nTest MQTT\nNOVAKON\nHMI - Your Intelligent Do Gateway Solutions\niM-CONNECT®](.im-connect-user-manual-english/09d579c8119f5f48ac4f543715be06a05eabc54ce5096ccc857fc5822538c16d.jpg)

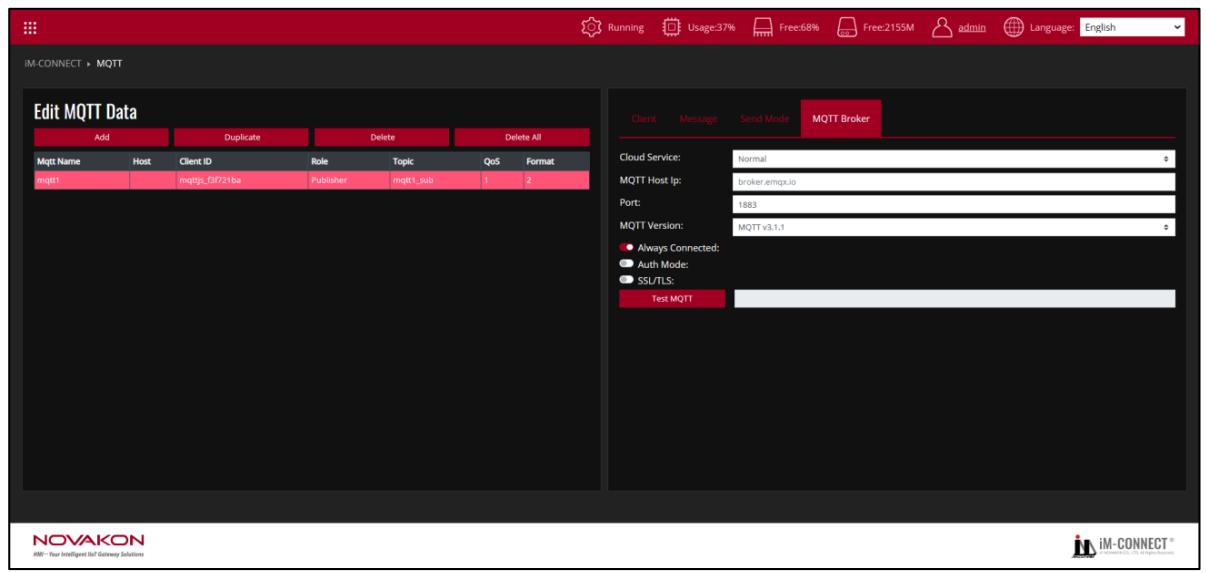
【MQTT Broker】：

【Cloud Service】：Select【Normal】,【AWS IoT】,【Azure IoT Hub】,【Google CloudIoT】 according to the requirement.

【Normal】：

【MQTT Host IP】：Set the MQTT broker’s IP, to receive the messages.

【Port】：Set the port number that allows the connection with an external device.

【MQTT Version】：Set the version of MQTT.

【Auth Mode】：Confirm whether authentication is required. If it is selected, the account name and password must be input.

【SSL/TLS】：Enable SSL/TLS encryption mechanism.

【Require Certificate】：Confirm whether the certificate file is required or not.

【Upload Cert File】：Import the certificate file provided by the Server.

【Upload Key File】：Import the key file provided by the Server.

Note：Enable either【SSL/TLS】or【Require Certificate】at one time according to actual use case requirement.

【SSL Secure】：After selecting it, the validity of the certificate provided by the Server is verified.

【Test MQTT】：It shows the response message sent by MQTT.
![IM-CONNECT ) MQTT\nEdit MQTT Data\nAdd	Duplicate	Delete	Delete All\nMqtt Name	Host人類 ID	Role	Topic	QoS	Format\nmqtt1	mqttip_fSF21ba	Publisher	mqtt1_sub	1	2\nClientväve-MQT Broker\nCloud Service:	AWS IoT\nMQTT Host Ip:\nMQTT Version:	MQTT v3.1.1\n● Always Connected:\nThing Name:\nShadow Name:	Classic Shadow\nUpload CA File	Root CA File\nUpload Cert File	Client Certificate File\nUpload Key File	Private Key File\nTest MQTT](.im-connect-user-manual-english/db206426ed603f06c2b0a41561fc91859d6db8d10ea7b175cd85cb31caedb93a.jpg)

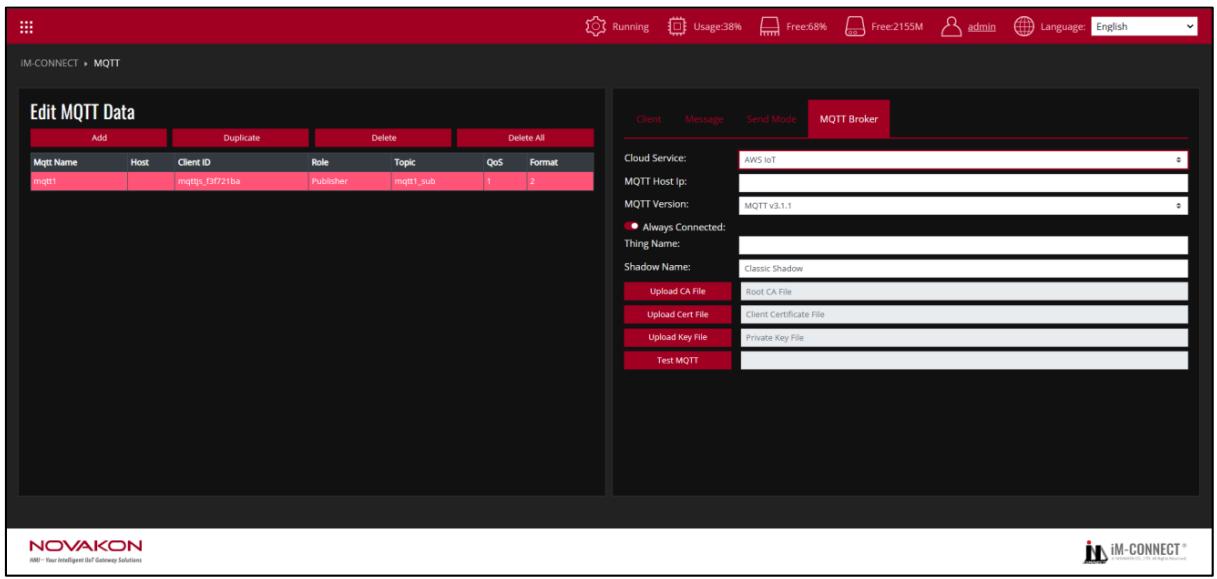
【AWS IoT】：Choose AWS IoT as Broker by using Thing to send message with Shadow support.

【MQTT Host IP】：Set the IP address of MQTT Broker in use.

【MQTT Version】：Set the version of MQTT Broker in use.

【Always Connected】：Set the MQTT to be always connected.

【Thing Name】：Set the name of AWS IoT Thing.

【Shadow Name】：Set the Shadow name that AWS IoT Thing corresponds to. Shadows can make a device’s state available to apps and other services whether the device is connected to AWS IoT or not.

【Upload CA File】：Upload the client certificate signed by Certificate Authorities (CA) verified by Amazon.

【Upload Cert File】：Upload the certificate file.

【Upload Key File】：Upload the key file.

【Test MQTT】：Show the message received after MQTT publish.
![IM-CONNECT × MQTT\nEdit MQTT Data\nAdd	Duplicate	Delete	Delete All\nMqtt Name	Host人類 ID	Role	Topic	QoS	Format\nmqtt1	mqttj_5F721ba	Publisher	mqtt1_sub	1	2\nClient生产设备Send Mode	MQTT Broker\nCloud Service:	Azure IoT Hub\nConnection String:\nMQTT Version:	MQTT v3.1.1\n● Always Connected:\nTest MQTT\nNOVAKON\niMI - Your Intelligent Hot Gateway Solutions\niM-CONNECT®](.im-connect-user-manual-english/90f160983af36f4798543c51056d4c5b3eac49b11679563944c411cba09337f8.jpg)

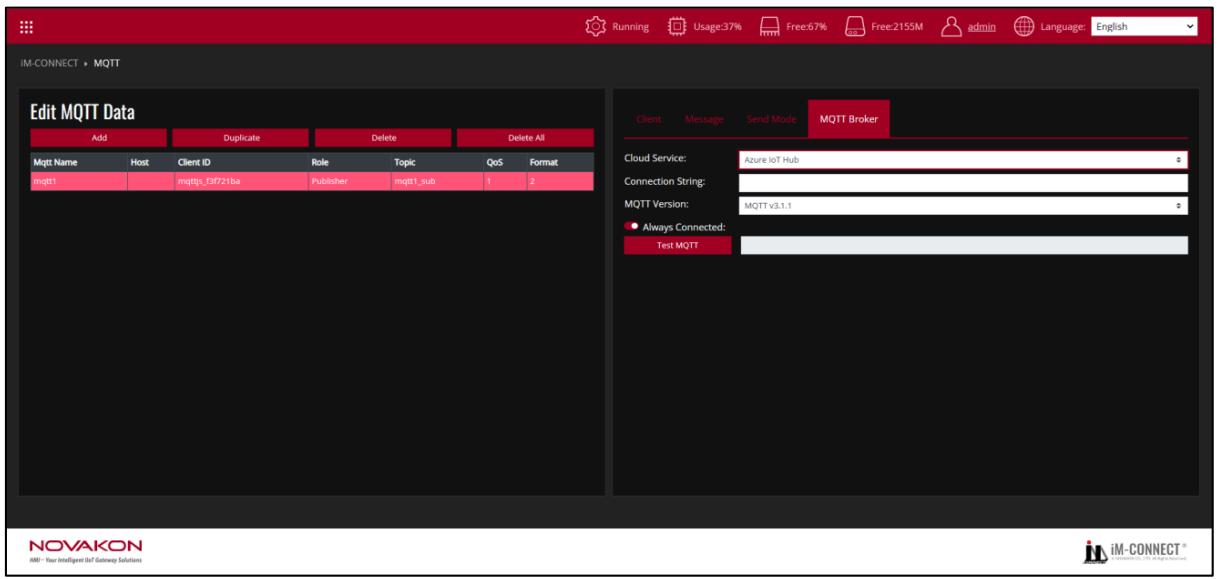
【Azure IoT Hub】：Set Microsoft Azure IoT Hub as Broker, input the correct connection string.

【Connection String】 ：Input the 【Connection String】 acquired from Microsoft AzureIoT Hub.

【MQTT Version】：Set the corresponding MQTT version.

【Always Connected】：Set the MQTT to be always connected.

【Test MQTT】：Show the messaged received after MQTT publish.
![iM-CONNECT × MQTT\nEdit MQTT Data\nAdd	Duplicate	Delete	Delete All\nMqtt Name	Host	Client ID	Role	Topic	QoS	Format\nmqtt1	mqtt.googleapis.com	mqttys_0ff721ba	Publisher	mqtt1_sub	1	2\nClient İş	Message Send Mode	MQTT Broker\nCloud Service:	Google Cloud IoT\nMQTT Version:	MQTT v3.1.1\n● Always Connected:\nProject Id:	\nRegion:	\nRegistry Id:	\nDevice Id:	\nKey Type:	RS256\nUpload Key File	Private Key File\nTest MQTT	\nNOVAKON\nMM - Your Intelligent Hot Gateway Solutions\niM-CONNECT®](.im-connect-user-manual-english/e8aaafa86b61bc6e140f596933f98d34c73e37c5259b952c1f4607b111d718c6.jpg)

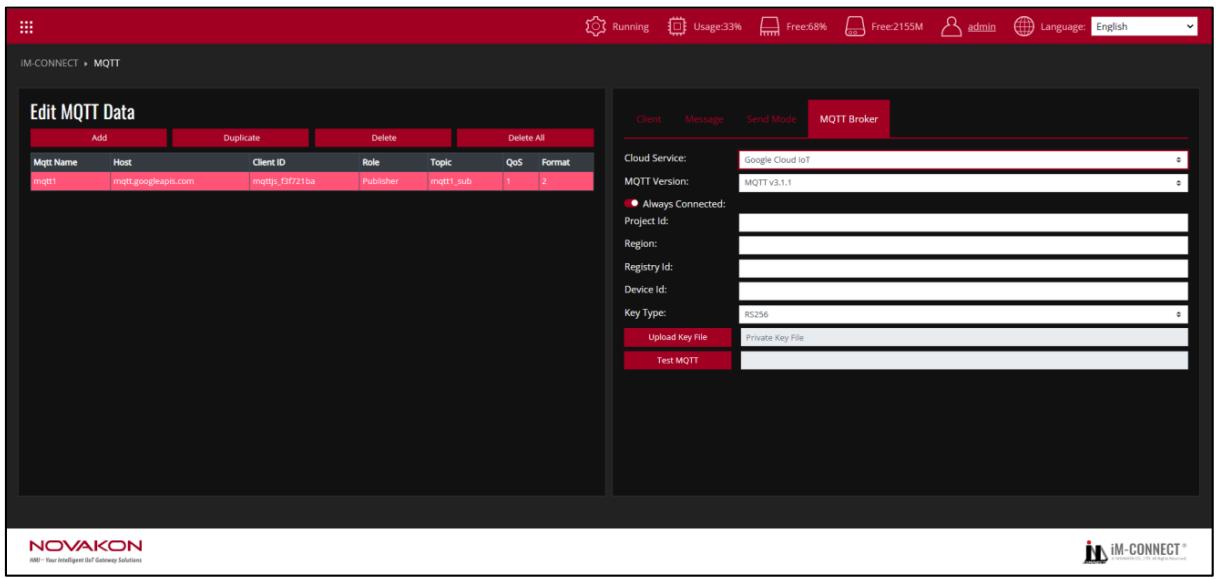
【Google Cloud IoT】：Set Google Cloud IoT Core as Broker, input the required parameters and certificate for connection.

【MQTT Version】：Set the corresponding MQTT version.

【Always Connected】：Set the MQTT to be always connected.

【Project ID】：Input the Project ID to be used.

【Region】：Select the region of cloud service. Now only 【us-central1】【, europe-west1】 and【asia-east1】are available.

【Registry ID】：Input the registry ID created in Google Cloud

【Device ID】：Input the device ID.

【Key Type】：Select the key type between【RS256】and【ES256】

【Upload Key File】：Upload the assigned key file.

【Type MQTT】：Show the message received after MQTT publish

# 8. Edit Macro

Edit Marco can perform arithmetic operation, data transfer , and other actions for the Gateway’s tag.
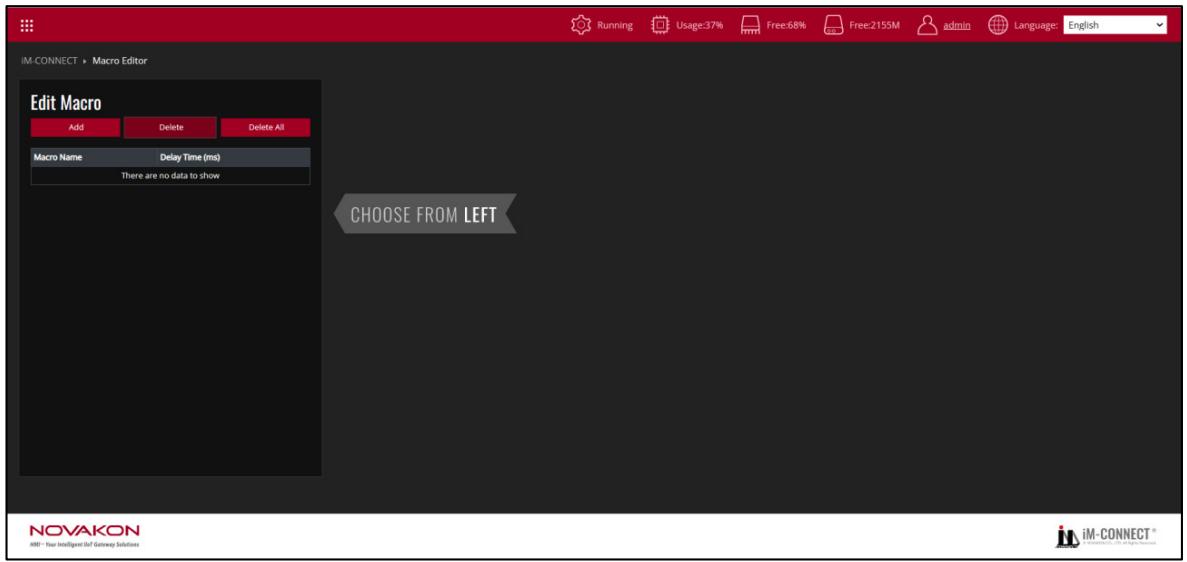
![IM-CONNECT ) Macro Editor\nEdit Macro\nAdd	Delete	Delete All\nMacro Name	Delay Time (ms)\nThere are no data to show\nCHOOSE FROM LEFT\nNOVAKON\nMM - Your Intelligent Info Gateway Solutions\niM-CONNECT®](.im-connect-user-manual-english/a15ce4d89da13fa22bebe2323132ff7905417784f365e199925c8bc9217b1921.jpg)

【Add】：Add a set of macro programming.

【Delete】：Delete the selected macro programming.

【Delete All】：Delete all the macros.

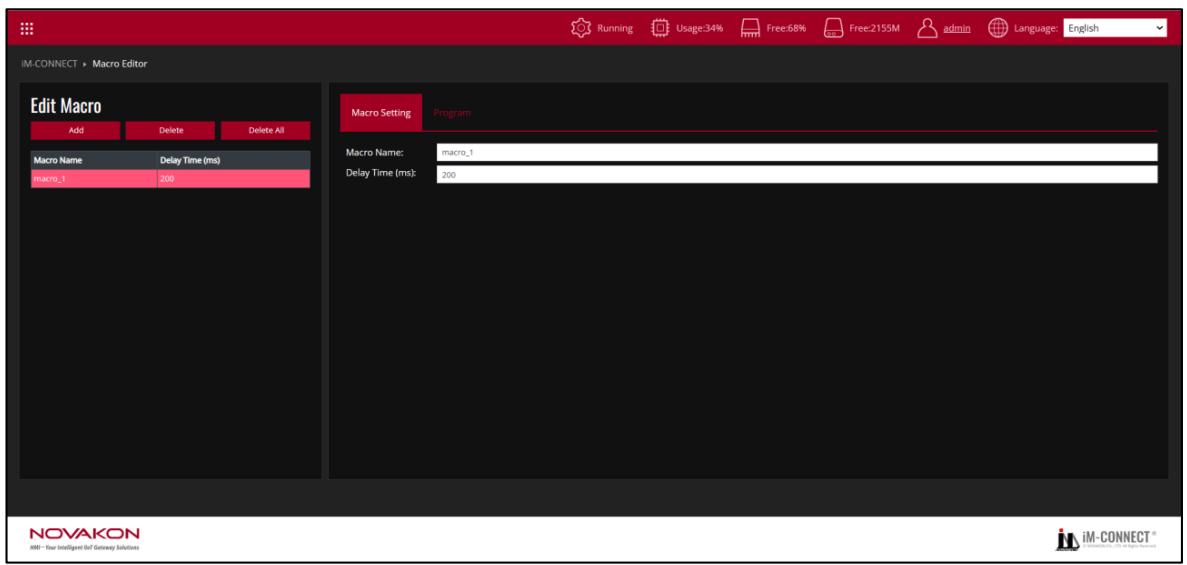
Start writing a set of macro programming after selecting【Add】.
![IM-CONNECT ) Macro Editor\nEdit Macro\nAdd	Delete	Delete All\nMacro Name	Delay Time (ms)\nmacro_1	200\nMacro Setting	Program\nMacro Name:	macro_1\nDelay Time (ms):	200\nNOVAKON\nMM -- Your Intelligent Info Gateway Solutions\niM-CONNECT®](.im-connect-user-manual-english/4b3ba5b5cede3f9c8e88f993002684b68a8c18e117707d2e9d47effd656ed2ad.jpg)

【Macro Setting】

【Macro Name】：Set the name of the set of macro programming.

【Time (Secs)】：Set how long it delays after a regular loop of macro programming complete before starting the next loop.
![IM-CONNECT ) Macro Editor\nEdit Macro\nAdd	Delete	Delete All\nMacro Name	Delay Time (ms)\nmacro_1	200\nMacro Setting	Program\nEdit data element\nAdd Id Tag Name Data type Edit Macro\nAdd All\nSelect\nSystem Tag\nDelete\nDelete All\nText Macro\nDisplay Tag Name\nOutput Message ...\nNOVAKON\nHW: New Intelligent DFT Gateway Solutions\nRunning Usage:33% Free:68% Free:215M admin Language: English\nIM-CONNECT®](.im-connect-user-manual-english/7328d789150c819f8c73d9e8a3e45ac4bd5b23ff7b8502431cf1b85106b8fb3a.jpg)

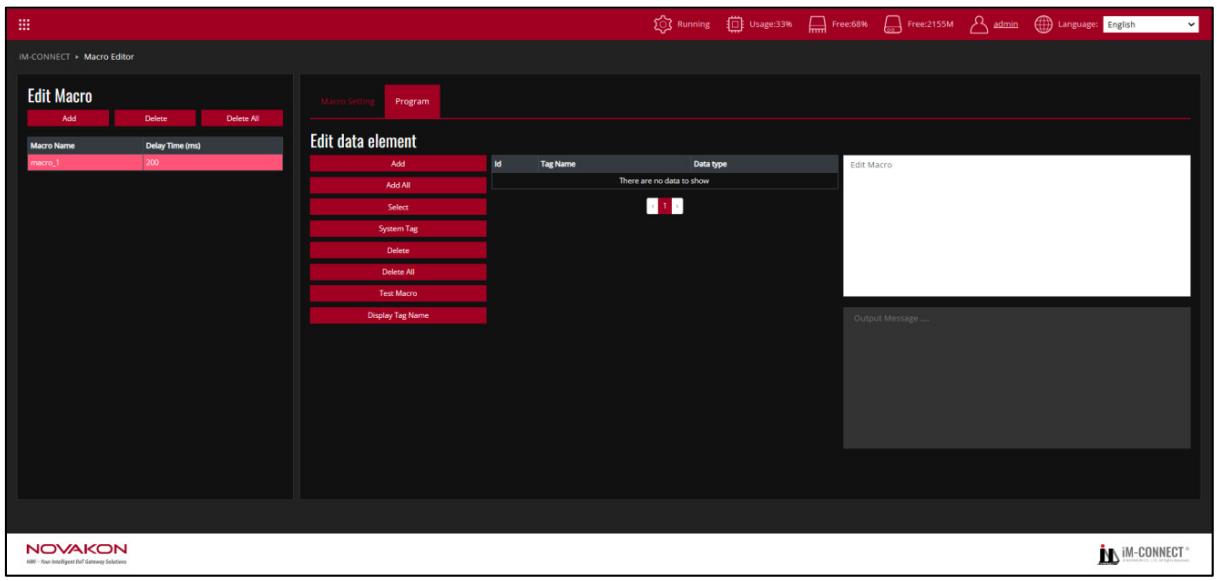
# 【Edit data element】

【Add】 ：Add the tag(s) needed in the macro programming. The newly added tag(s) will also be set in the Tag Setting page.
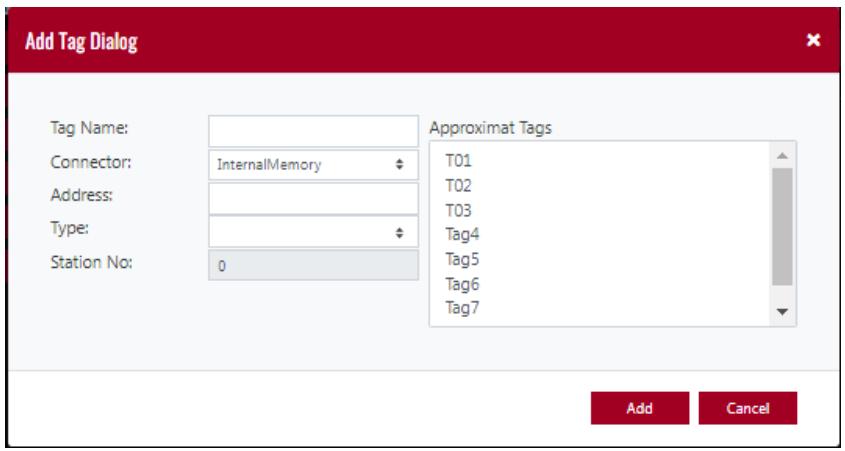
![Add Tag Dialog\nTag Name:\nConnector: InternalMemory\nAddress:\nType: \nStation No: 0\nApproximat Tags\nT01\nT02\nT03\nTag4\nTag5\nTag6\nTag7\nAdd Cancel](.im-connect-user-manual-english/ff8bcd4ee69944032848a2fe2aebe3787bd5d16624342e528bdfe5fe2a4674e1.jpg)

【Add All】：Add all the tags existing in the project.

【Select】：Select the tag(s) needed in the Macro Programming from the list of tags.
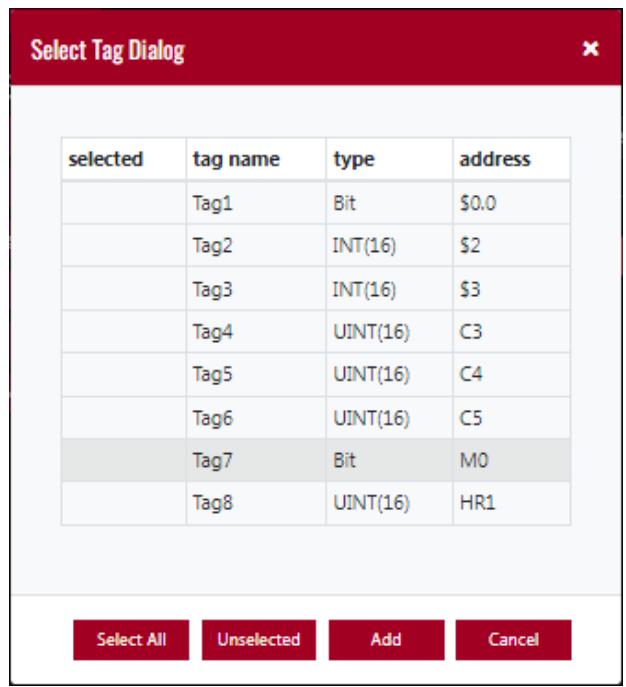
![Select Tag Dialog\nselected tag name type address\nTag1 Bit \$0.0\nTag2 INT(16) \$2\nTag3 INT(16) \$3\nTag4 UINT(16) C3\nTag5 UINT(16) C4\nTag6 UINT(16) C5\nTag7 Bit M0\nTag8 UINT(16) HR1\nSelect All Unselected Add Cancel](.im-connect-user-manual-english/82d604fe08c8b5e9d0a6021ac13f4434f8d1fc5b6711ba1eef9781d0109a5ccf.jpg)

【System Tag】：Select the system tag(s) required in the macro programming from the list of tags.
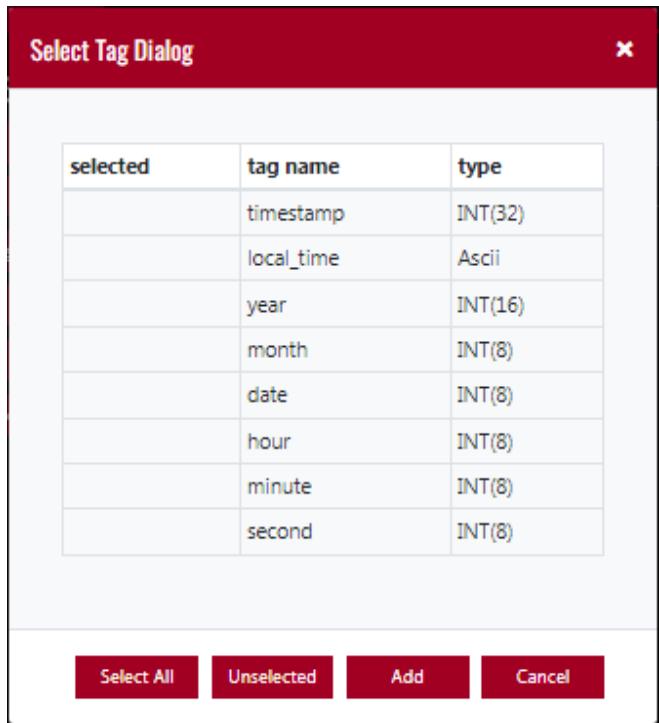
![Select Tag Dialog\nselected tag name type\ntimestamp INT(32)\nlocal_time Ascii\nyear INT(16)\nmonth INT(8)\ndate INT(8)\nhour INT(8)\nminute INT(8)\nsecond INT(8)\nSelect All Unselected Add Cancel](.im-connect-user-manual-english/dba976678f4a902edd8dcf89808223d2713e81a0775c11223191f95e5e82c564.jpg)

【Delete】：Delete the selected set of macro programming.

【Delete all】：Delete all the macro programming.

【Test Macro】：Verify the results of the macro programming performance test.

【Display Tag Name】：Change the display from ID number to Tag Name in Macro Edit

Area (Marco Edit Area becomes read only when it is changed to display Tag Name)
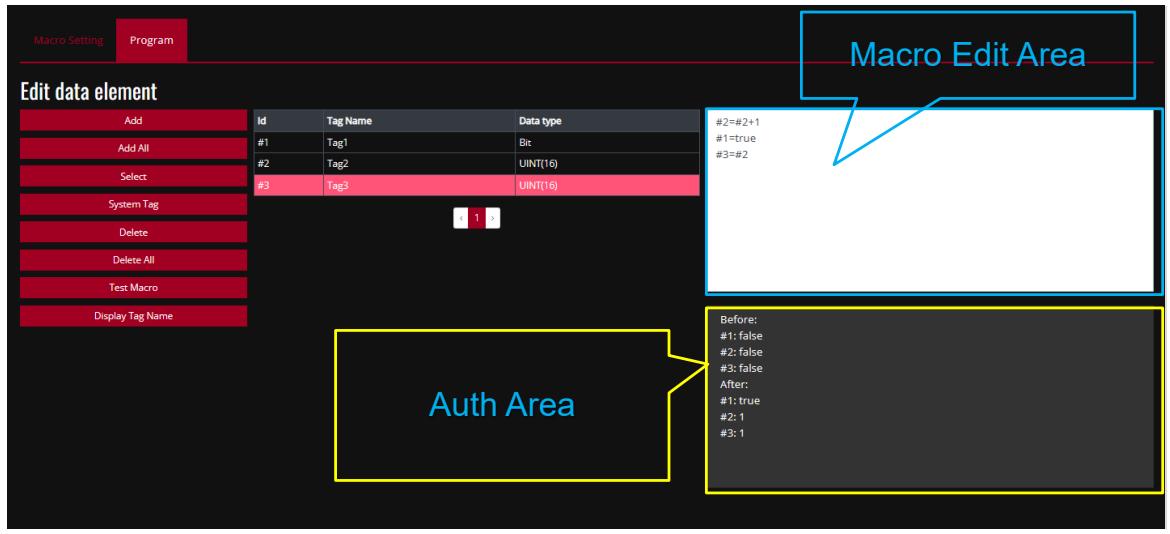
![Macro Setting\nProgram\nEdit data element\nAdd\nAdd All\nSelect\nSystem Tag\nDelete\nDelete All\nTest Macro\nDisplay Tag Name\nId\nTag Name\nData type\n#1\nTag1\nBit\n#2\nTag2\nUINT(16)\n#3\nTag3\nUINT(16)\n#2=#2+1\n#1=true\n#3=#2\nAuth Area\nBefore:\n#1: false\n#2: false\n#3: false\nAfter:\n#1: true\n#2: 1\n#3: 1](.im-connect-user-manual-english/1d1e728772a263be3f871aba96aa17380a34769a781365118e2a9894548f4b61.jpg)

【Macro Edit Area】：The user can write the macro programming here.

【Auth Area】：The results from the macro programming performance can be learned in the Auth Area after the【Test Macro】is selected.

For example：As shown in the diagram above, it can edit simple expressions. For the variables (tags), the corresponding ID must be input. At the same time, if the data type is Bit (Boolean), the condition must be expressed in 【true】(lower case) or【false】(lower case).

To add Notes, express it with 【//】.

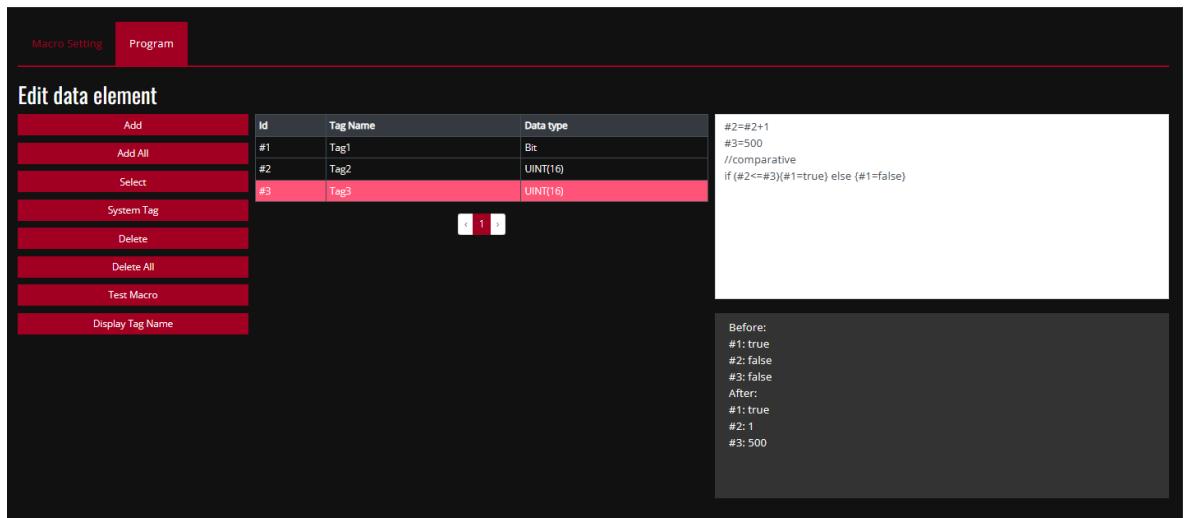
To add conditional execution, express it with 【if (conditional execution body){Results executed after the conditional execution statement is set up } else {Results executed after the conditional execution statement is not set up }】

For example：

![Macro Setting\nProgram\nEdit data element\nAdd\nAdd All\nSelect\nSystem Tag\nDelete\nDelete All\nTest Macro\nDisplay Tag Name\nId\nTag Name\nData type\n#1\nTag1\nBit\n#2\nTag2\nUINT(16)\n#3\nTag3\nUINT(10)\n#2=#2+1\n#3=500\n//comparative\nif (#2(=#3)(#1=true) else (#1=false)\nBefore:\n#1: true\n#2: false\n#3: false\nAfter:\n#1: true\n#2: 1\n#3: 500](.im-connect-user-manual-english/4f23b9d386ba4df525567a221de65f609d19fb17bd30efb6ea6dd2bc1d868fc4.jpg)

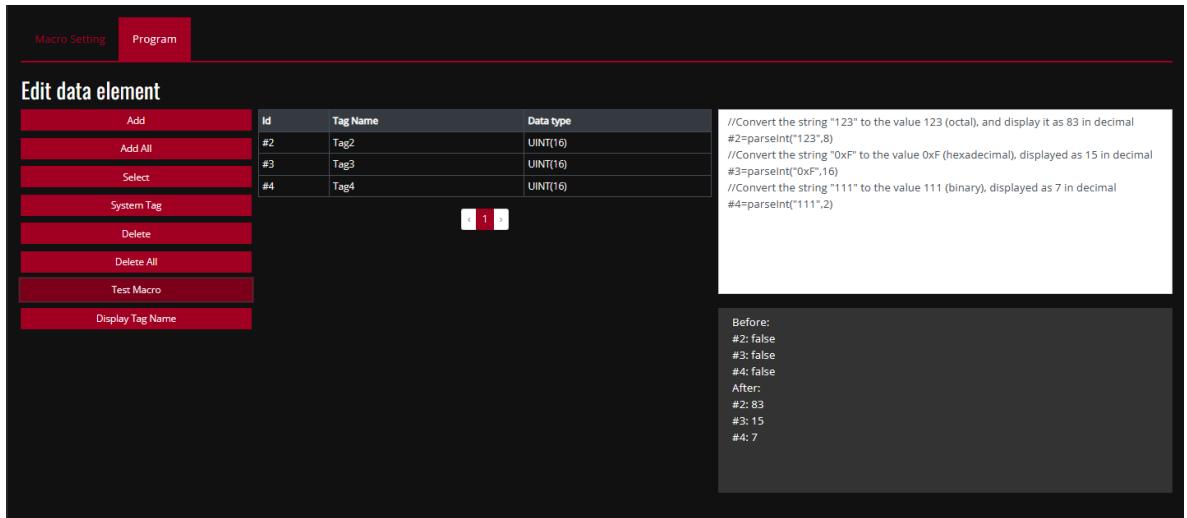
iM-connect can support elements of JavaScript, such as Number, Date, Math, etc.

The following is an example of base conversion by using JavaScript function 【parseInt】：

![Macro Setting	Program\nEdit data element\nAdd Id Tag Name Data type\nAdd All #2 Tag2 UINT(16)\nSelect #3 Tag3 UINT(16)\n#4 Tag4 UINT(16)\nSystem Tag\nDelete\nDelete All\nTest Macro\nDisplay Tag Name\n//Convert the string '123' to the value 123 (octal), and display it as 83 in decimal\n#2=parseInt('123',8)\n//Convert the string '0xF' to the value 0xF (hexadecimal), displayed as 15 in decimal\n#3=parseInt('0xF',16)\n//Convert the string '111' to the value 111 (binary), displayed as 7 in decimal\n#4=parseInt('111',2)\nBefore:\n#2: false\n#3: false\n#4: false\nAfter:\n#2: 83\n#3: 15\n#4: 7](.im-connect-user-manual-english/bf74850c1d0cbb2232d5d3c7df90fe3cf46d6de8d96feeb30929ff98ed7e7a5a.jpg)

① 【Add】 or 【Select】 the needed tag.
② Write the program.
③ Go to【Project Setting】to execute【Save & Compile】 and 【Enable Service】.
④ After selecting 【Test Macro】, you get the correct result.
⑤ Enter 【Online Monitor】 to monitor the actual tag values. The results must be consistent with the results of Test Macro.

![IM-CONNECT ) Online Monitor\nType to filter...\nInternalMemory\nT01\nT02\nT03\nT04\nT05\nId Name Value Data Type Status Code Actions\n2 T02 83 Uint16 Good Edit\n3 T03 15 Uint16 Good Edit\n4 T04 7 Uint16 Good Edit](.im-connect-user-manual-english/2ee97081d94af290b81da26b30f5fc42cc0ae7a2a1edf239477065a2c0f14fb2.jpg)

# 9. OPCUA Client

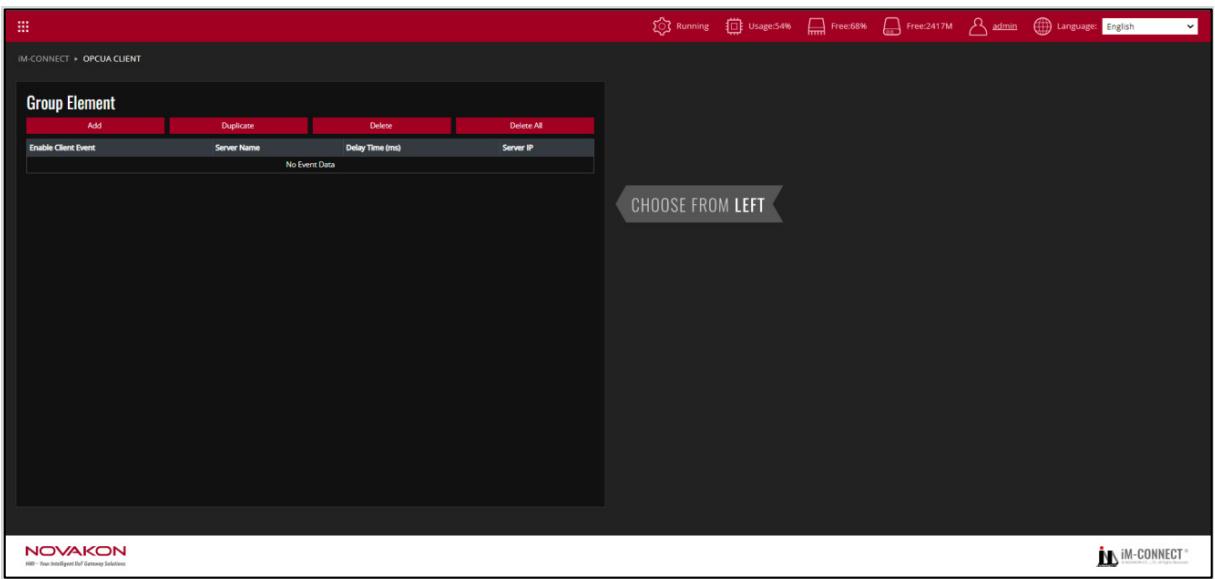
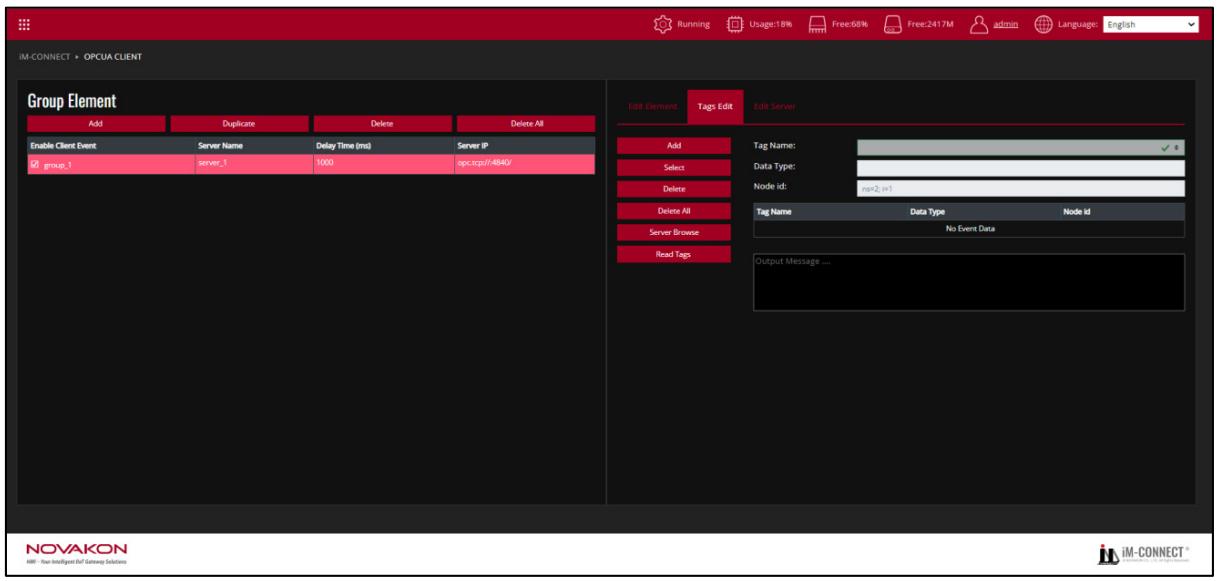
![iM-CONNECT + OPCUA CLIENT\nGroup Element\nAdd	Duplicate	Delete	Delete All\nEnable Client Event	Server Name	Delay Time (ms)	Server IP\nNo Event Data\nCHOOSE FROM LEFT\nNOVAKON\nHIV - Two Intelligent You Eatlog Solutions\niM-CONNECT®](.im-connect-user-manual-english/c0129bd955440c3e727fb8940a8f871ec43bf164b3b0f4a8719ceb56491ac3e6.jpg)

【Add】：Add a set of OPCUA Client.

【Duplicate】：Duplicate the selected setting of the set of OPCUA Client.

【Delete】：Delete the selected setting of the set of OPCUA Client.

【Delete All】：Delete all the events of OPCUA Client.

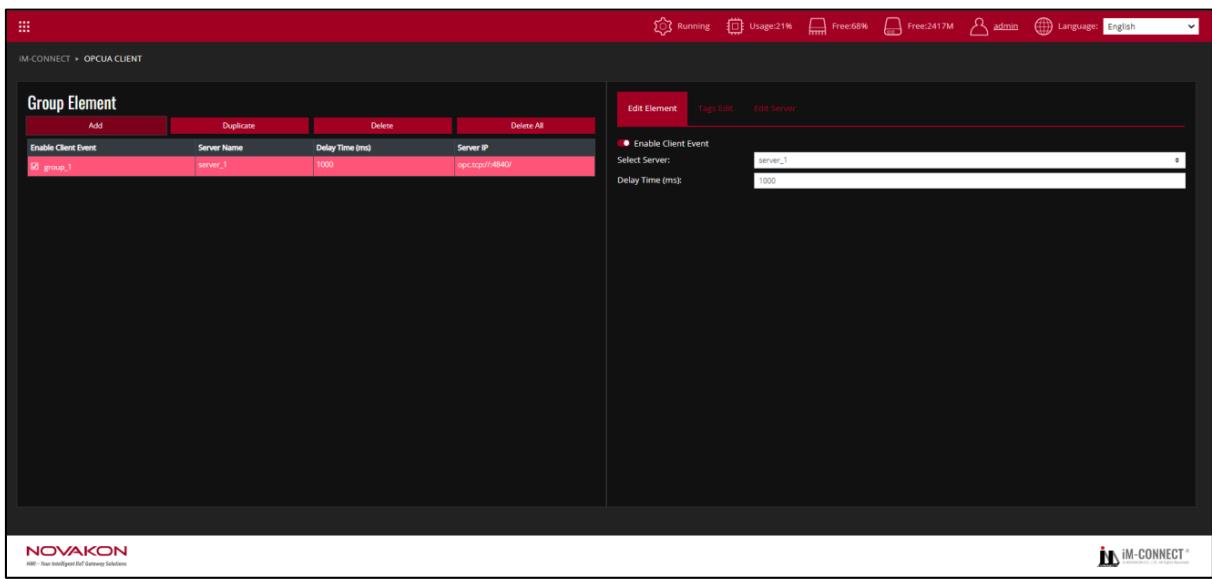
Start the OPCUA Client setting after selecting 【Add】.
![IM-CONNECT ) OPCUA CLIENT\nGroup Element\nAdd	Duplicate	Delete	Delete All\nEnable Client Event	Server Name	Delay Time (ms)	Server IP\ngroup_1	server_1	1000(opc.tcp://4840/\nEdit Element	Tags Edit	Edit Server\nEnable Client Event\nSelect Server:DIR_1\nDelay Time (ms):	1000\nNOVAKON\niMi - You Intelligent Do Satayou Solutions\niM-CONNECT®](.im-connect-user-manual-english/0c2a6073d3d94d0247443686c18c1cc23578ce7f6469b39950470f12107107f5.jpg)

【Edit Element】：Definite a OPCUA event.

【Enable Client Event】：Enable a OPCUA Client item.

【Select Server】：Select the name of the OPCUA Server to be connected with.

【Delay Time】：Set OPCUA delay time.

![IM-CONNECT + OPCUA CLIENT\nGroup Element\nAdd	Duplicate	Delete	Delete All\nEnable Client Event	Server Name	Delay Time (ms)	Server IP\ngroup_1	server_1	1000	opc.tcp//4846/\nEdit Element	Tags Edit	Update Server\nAdd	Tag Name:	✓\nSelect	Data Type:	\nDelete Nanode Id: Idaho2, i=1\nDelete All Tag Name	Data Type Nanode Id\nServer Browse	No Event Data\nRead Tags\nOutput Message ...\nNOVAKON\nMW - Free Intelligent Do Security Solutions\nRunning	Usage:18%.Free:68%Free:2417M adultsLanguage:English\niM-CONNECT®](.im-connect-user-manual-english/7dad9eaf227400fd3e42ba55e0f76feb49ad214276d72886ac8bf15d4916adf4.jpg)

# 【Tags Edit】

【Add】 ：Add a tag as the monitor of OPCUA Client.

【Select】：Select an already established tag as the OPCUA Client.

【Delete】：Delete the selected tag(s).

【Delete All】：Delete all the tag(s) of this event.

【Server Browse】：Import the selected tags from OPCUA server.

【Tag name】：It shows the tag name of the OPCUA Client.

【Data Type】：It shows the tag type of the OPCUA Client.

【Node ID】：Input the Node ID of the element address on the OPCUA Client. The names defined by each equipment may differ, so it shall be input based on each of the definitions.

The established Tag Name, Data Type, Node ID, Output Message, and other data are listed in sequence below.
![IM-CONNECT + OPCUA CLIENT\nGroup Element\nAdd	Duplicate	Delete	Delete All\nEnable Client Event	Server Name	Delay Time (ms)	Server IP\nIP group_1	server_1	1000	opc.tcp//4840/\nEdit Element	Tags Edit	Update Server\nSelect Server:	server_1\nEdit Server Name:	server_1	Save	Delete\nServer IP:.Input Server IP\nPort:	4840\nSecurity Settings:	None -NONE	Rebrowse\n● Auth Mode:\nName:	Name\nPassword:	Password\nTest Server Login\nNOVAKON\niM - Two Intelligent Data Source Solutions\nRunning	Usage:33%	Free:67%	Free:2138M adults admin	Banguage:English](.im-connect-user-manual-english/2bef09cd56f5a62c687376ca98d359e2d78918e3345fa01995e024fa5559e66c.jpg)

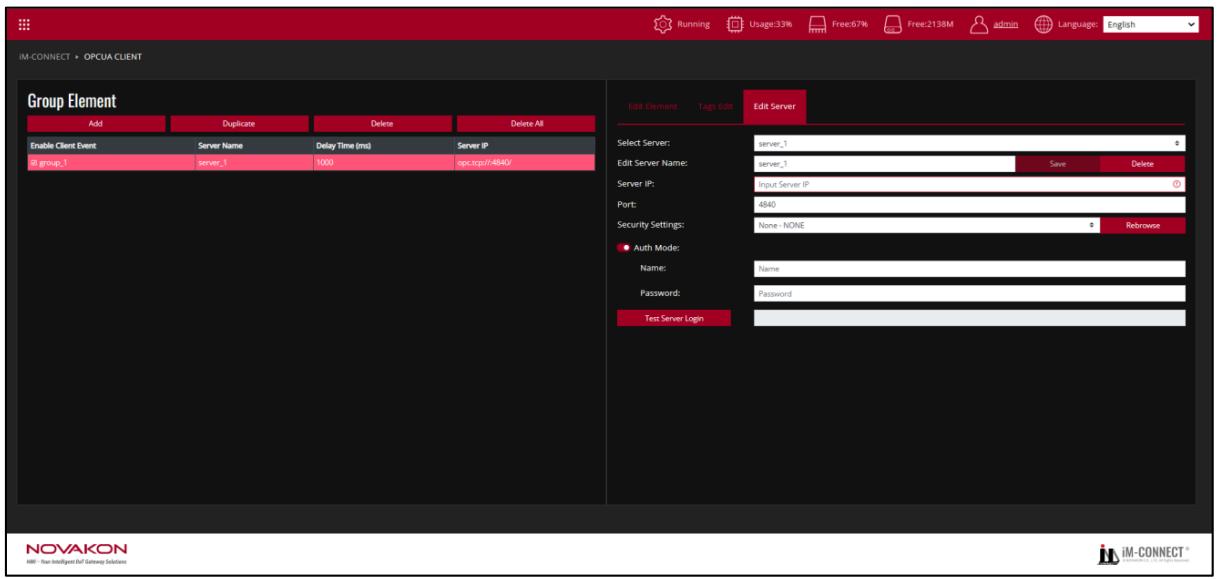
【Edit Server】：Define the relevant data of the OPCUA Server.

【Select Server】：Select the name of the OPCUA Server to be connected with.

【Edit Server Name】：Edit the name of the OPCUA Server.

【Server IP】：Input the IP of the OPCUA Server to be connected with.

【Port】：Set the port number of the OPCUA Server.

【Security Settings】：Set the security mode for communication according to the connected Server.

【Auth Mode】：Select whether the to-be-logged-in OPCUA Server needs an authentication. If it needs authentication, input the account name and password to be logged in.

【Test OPC UA Server】：Test connection status after selecting it.

# 10. Online Monitor

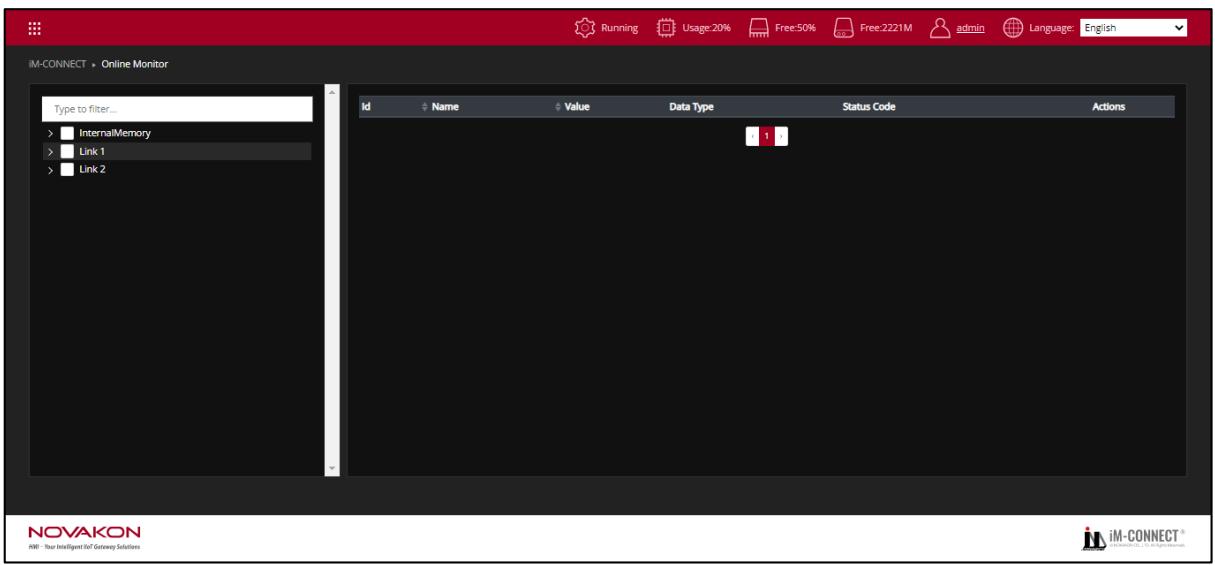
The main function of 【Online Monitor】 is to monitor the current tag values from the controller that connected to GATEWAY.
![iM-CONNECT ) Online Monitor\nType to filter...\nInternalMemory\nLink 1\nLink 2\nId Name Value Data Type Status Code Actions\n1\nNOVAKON\niM - Your Intelligent Hot Gateway Solutions\niM-CONNECT®](.im-connect-user-manual-english/1e5d572164ef437ec4328fbee53dfd50219d1cc39c0d08402e84b73c8000ef24.jpg)

First, enter 【OPCUA】 from the 【iM-CONNECT Menu】.

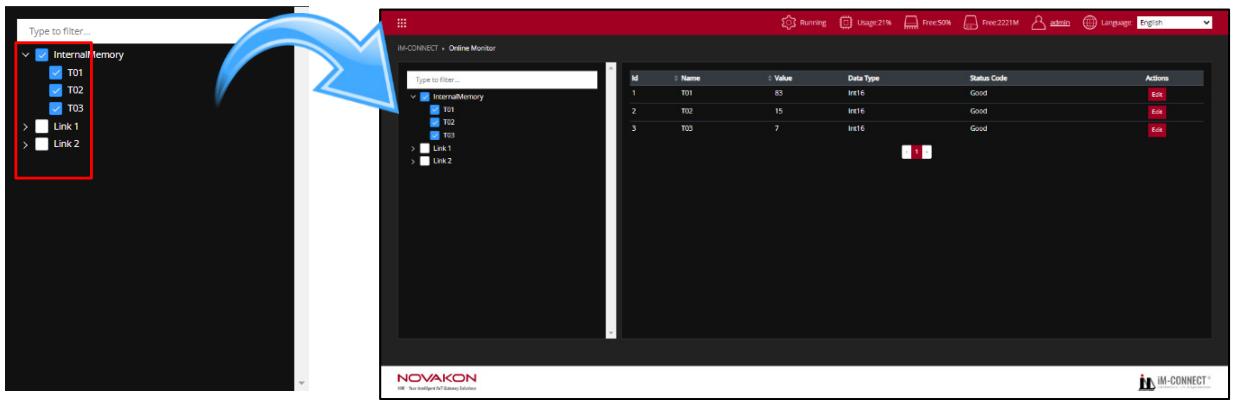
The left window displays a list of all tags of the current project.

Click 【 】 to expand or collapse the list. Next, click the box 【 】 next to the tag tomonitor the tag's current value in the right window.
![Type to filter...\nInternal Memory\nT01\nT02\nT03\nLink 1\nLink 2\nIM-CONNECT + Online Monitor\nType to filter...\nInternalMemory\nT01\nT02\nT03\nLink 1\nLink 2\nId Name Value Data Type Status Code Actions\n1 T01 83 Int16 Good Edit\n2 T02 15 Int16 Good Edit\n3 T03 7 Int16 Good Edit\nNOVAKON\nIM-CONNECT®](.im-connect-user-manual-english/52d514a934e8aa260e3f186f22aef7f1508bcd89e521b277bf0d0ce7b39a3f16.jpg)

The current tag value can be monitored in the right window. To update the GATEWAY data during the monitoring process, click 【Edit】 at 【Actions】 to modify the tag status value.
![The image shows a vertical section of a user interface. The top part is a dark grey rectangular area containing the word 'Actions' in white text. Directly below it, within a black area, is a bright red rectangular button containing the word 'Edit' in white text.](.im-connect-user-manual-english/1abc159569a6c6d88591e2f276ad62bccb0cf0a1238ac8e9b89008dce2257947.jpg)

If the modified tag is 【int16】, after clicking 【Edit】 at 【Actions】, set the value to be modified in the box 【Value】. After finishing, click 【Save】to write the value to GATEWAY. To cancel writing the value to GATEWAY, click 【Cancel】.

After modifying the status or value of the tag, click the blank space next to it to complete the modification setting.

![Id\nName\nValue\nData Type\nStatus Code\nActions\n1\nT01\n83\nInt16\nGood\nSave Cancel\n4\nTag4\ntrue\nBoolean\nGood\nEdit\n( 1 )](.im-connect-user-manual-english/afe63a528108aac9e176c2cf60d043e777f2710f344f3a9bac968aa703bdcf07.jpg)

If the modified tag is 【Bit】, after clicking 【Edit】 at 【Actions】, the 【Value】 can bechecked as 【true】 (1, ON) or unchecked as 【false】 (that is, Is 0, OFF). After finishing,click 【Save】 to write the value to GATEWAY. To cancel writing the value to GATEWAY,click 【Cancel】.

![Id\nName\nValue\nData Type\nStatus Code\nActions\n1\nT01\n83\nInt16\nGood\nEdit\n4\nTag4\n✓ true\nBoolean\nGood\nSave\nCancel\n( 1 )](.im-connect-user-manual-english/d87a79b493da6af3051e7799b7609bb037d7a64817e93a344db3eb3af57be46c.jpg)

# 11. Project Setting

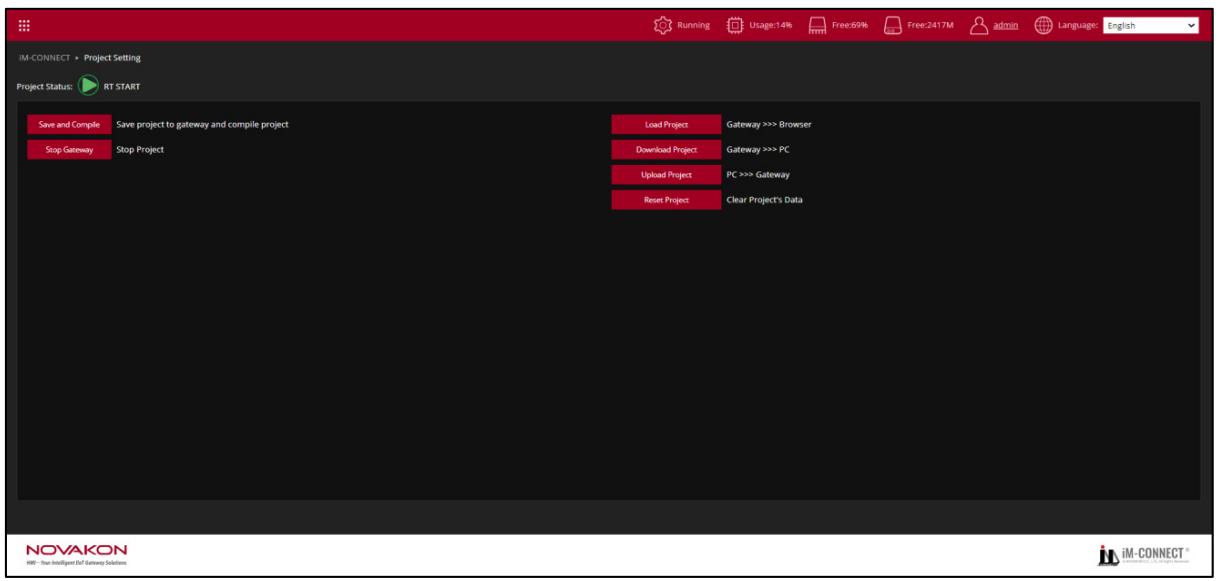
The project setting is mainly used to perform related actions such as 【Save and Compile】, 【Run & Stop】, 【Load Project】 , and【Download/Upload】of the project.
![IM-CONNECT ) Project Setting\nProject Status: RT START\nSave and Compile Save project to gateway and compile project\nStop Gateway Stop Project\nLoad Project Gateway ))) Browser\nDownload Project Gateway ))) PC\nUpload Project PC ))) Gateway\nReset Project Clear Project's Data\nNOVAKON\nHR - Your Intelligent RF Gateway Solutions\nRunning Usage:14% Free:59% Free:2417M admin Language: English\nIM-CONNECT®](.im-connect-user-manual-english/cbb71b3fa92e9fc681e8089c4676bb79ea5fb230028d7040cd808ef98bb018f5.jpg)

【Project Status】：Display the current status of GATEWAY (RT) operation.

【Save and Compile】：Save the edited tag data to GATEWAY for verification.

【Run/Stop Gateway】：Run or stop the GATEWAY (RT) operation

【Load Project】：Load the GATEWAY data into the web page for later tag edit, modification or add action.

【Download Project】：Load all current data back to the computer.

【Upload Project】：Return all current data to GATEWAY.

【Reset Project】：Clear all the settings and parameters of the project (Username, password, and IP address will not be affected).

Note： Please remember to press 【Load Project】 to load the returned data to the Web page after downloading the previous data to the computer with 【Download】 or after updating the originally set IP. Otherwise, the content seen on the web page would not be updated synchronously.

# 12. System Setting

This is where to view current GATEWAY-related information and settings, including network settings, date & time settings, security settings, etc.

# 12.1 System Information

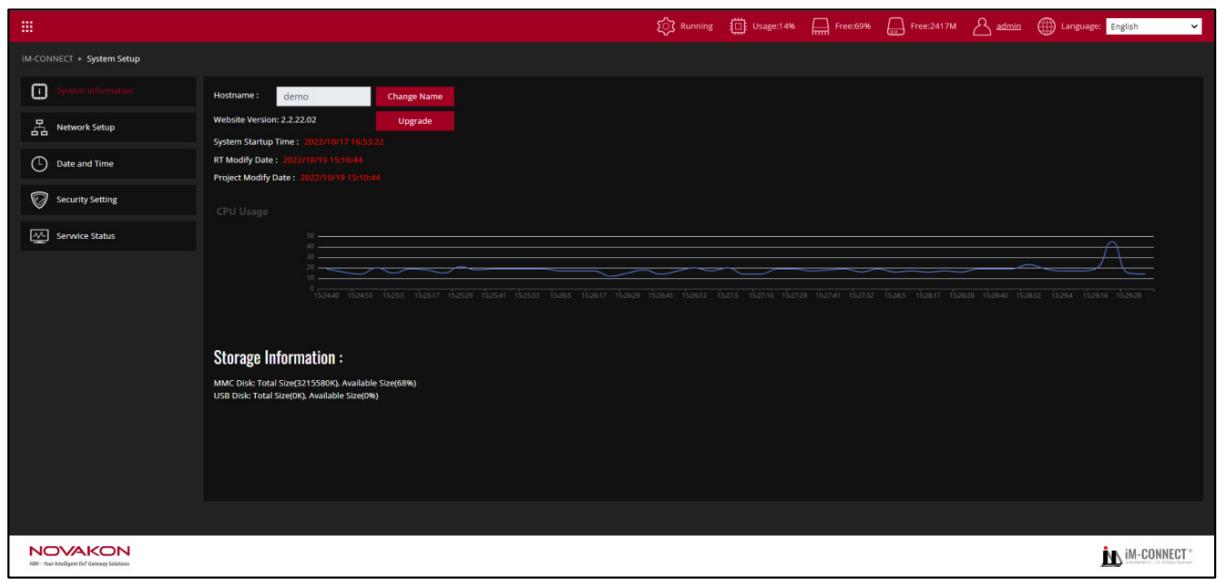
Click on each page to view information about the currently connected GATEWAY.
![iM-CONNECT ) System Setup\nSystem information\nNetwork Setup\nDate and Time\nSecurity Setting\nService Status\nHostname: demo\nChange Name\nWebsite Version: 2.2.22.02\nUpgrade\nSystem Startup Time : 2022/10/17 16:53:22\nRT Modify Date : 2022/10/19 15:10:44\nProject Modify Date : 2022/10/19 15:10:44\nCPU Usage\nStorage Information :\nMMC Disk: Total Size(3215580K), Available Size(68%)\nUSB Disk: Total Size(0K), Available Size(0%)\nNOVAKON\nHW: Your Intelligent RF Survey Solutions\nRunning\nUsage:14%\nFree:69%\nFree:2417M\nadmin\nLanguage: English](.im-connect-user-manual-english/a4829f7776f41b57c30c62ed80874a5aee6816c1fb89422e0e118e825209f66b.jpg)

【Hostname】：Click the button of【Change Name】to modify the host name. After modification, click 【Submit】to complete. This host name can be used for log in IP address for the web browser. For instance, if the host name is set as 【demo】, enter 【http：//demo.local】on the browser to access the webpage.

【Website Version】：Display the current website version. By clicking the button of 【Upgrade】, you can upgrade the system to the latest version.

【System Startup Time】：The last startup time of this system.

【RT Modify Date】：The time when RT is last modified.

【Project Modify Date】：The time when project is last modified. If this time is consistent with RT Modify Date, it means the project content on the server and your webpage are aligned. If this time is different from RT Modify Date, it means you have modified the project content during the RT operation, you need to compile and save and compile and

re-start the project.

【CPU Usage】：Display the CPU usage with trend chart.

【Storage Information】：Display total and remaining capacity of eMMC (Embedded MMC) and USB Disk

# 12.2 Network Setup

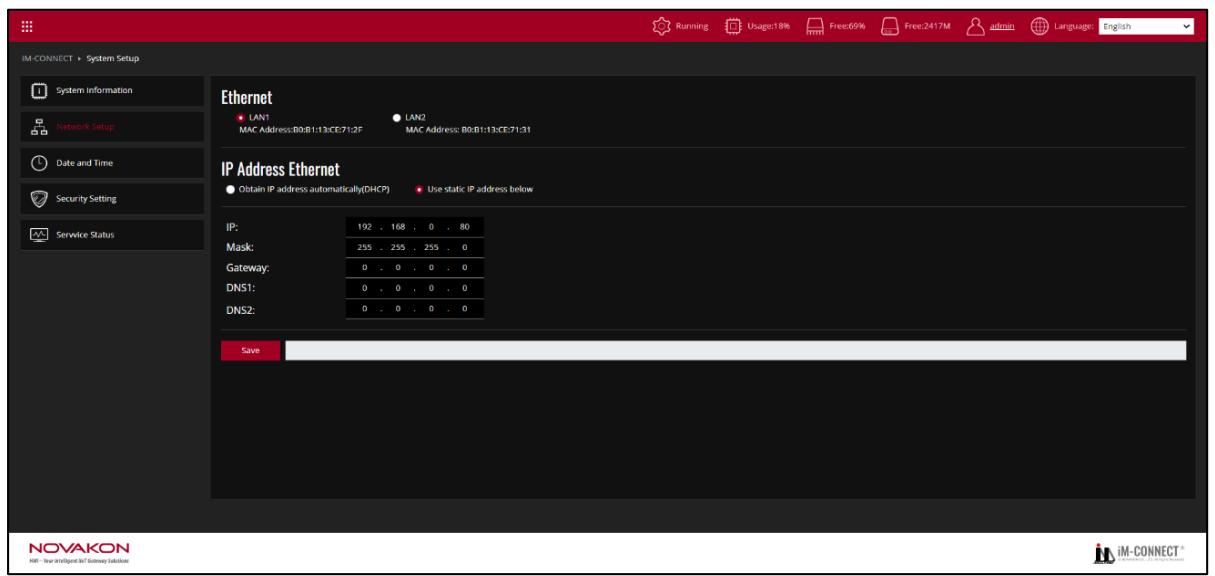
Press 【Network Setup】 to set the network parameters of GATEWAY.
![IM-CONNECT ) System Setup\nSystem Information\nNetwork Setup\nDate and Time\nSecurity Setting\nService Status\nEthernet\nLAN1\nMAC Address: 80/81:13/CE7:1:2F\nLAN2\nMAC Address: 80/81:13/CE7:1:31\nIP Address Ethernet\nObtain IP address automatically(DHCP)\nUse static IP address below\nIP:\n192 . 168 . 0 . 80\nMask:\n255 . 255 . 255 . 0\nGateway:\n0 . 0 . 0 . 0\nDNS1:\n0 . 0 . 0 . 0\nDNS2:\n0 . 0 . 0 . 0\nSave\nNOVAKON\nRF - Your Intelligent Bit Gateway Solution\nRunning Usage:1.8% Free:69% Free:2417M admin Language: English](.im-connect-user-manual-english/126f9eea0750870aa2132ae1d96ee7e874719d1ad05566f023939ac1507dcd3a.jpg)

# Ethernet

Set the IP Address, Mask, Gateway, DNS for【LAN1】and【LAN2】respectively.

After finishing the setting, press 【Save】 to save the contents of the current setting.

# IP Address Ethernet

【Obtain IP address automatically (DHCP)】：IP address assigned by system.

【Use static IP address below】：IP address defined by user.

After the IP setting of each group is completed, press 【Save】 to save the setting value to GATEWAY.

# 12.3 Date and Time

Set the date and time of the GATEWAY.
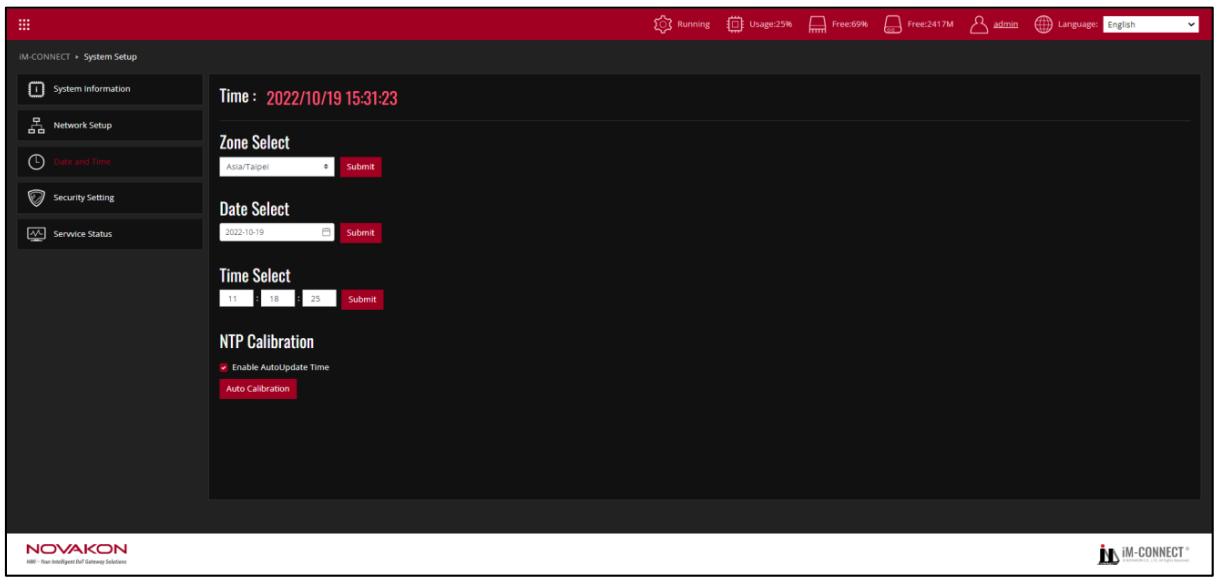
![IM-CONNECT ) System Setup\nSystem Information\nNetwork Setup\nDate and Time\nSecurity Setting\nService Status\nTime: 2022/10/19 15:31:23\nZone Select\nAsia/Taipei\nSubmit\nDate Select\n2022-10-19\nSubmit\nTime Select\n11 18 25\nSubmit\nNTP Calibration\nEnable AutoUpdate Time\nAuto Calibration\nNOVAKON\nIM - Your Intelligent Data Security Solutions\nRunning\nUsage:25%\nFree:69%\nFree:2417M\nadmin\nLanguage: English\nIM-CONNECT®](.im-connect-user-manual-english/ed2e03f9379deb02bc5e98a27fd5008f34224e68f03b8f3f5b4f3917c29f84b0.jpg)

【TIME】：Displays current time and date of the system

【Zone Select】：Choose the current location and country. After setting, press 【Submit】 to save the current setting.

【Date Select】：Set the current system date of GATEWAY. After finishing the setting, press 【Submit】 to save the current setting.

【Time Select】：Set the current system time of GATEWAY. After finishing the setting, press 【Submit】 to save the current setting.

【NTP Calibration】：Check the box to synchronize with network time. Press 【Auto Calibration】to synchronize the date and time of the GATEWAY system with the network time.

# 12.4 Security Setting

Set the login GATEWAY username and password of the account and 【FTP】, relevant settings of MQTT【Broker】and OpenVPN.
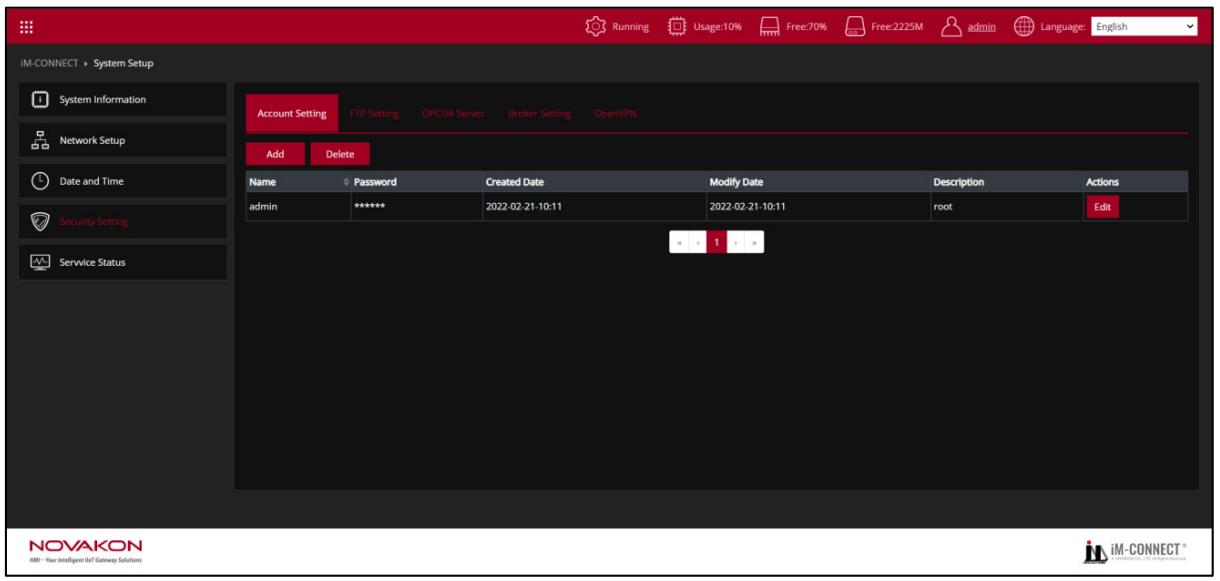
![IM-CONNECT ) System Setup\nSystem Information\nNetwork Setup\nDate and Time\nSecurity Setting\nService Status\nAccount Setting FTP Setting OPCUA Server Broker Setting OpenVPN\nAdd Delete\nName Password Created Date Modify Date Description Actions\nadmin ***** 2022-02-21-10:11 2022-02-21-10:11 root Edit\nx 1 2 a\nNOVAKON\nHMI - Your Intelligent Do! Gateway Solutions\nRunning Usage:10% Free:70% Free:2225M admin Language: English](.im-connect-user-manual-english/671896bf6923bb1c44b6a408367f83a4decbb0801f7b349ca8a15b30ca67fec4.jpg)

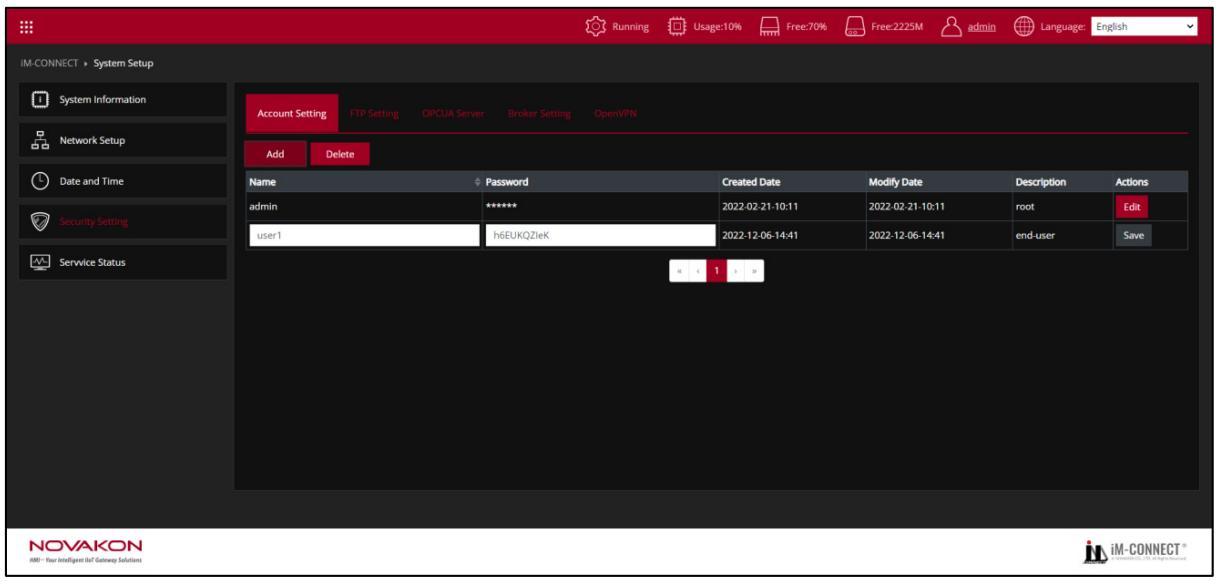
【Account Setting】：Add or Delete usernames and passwords. Username can be set as 【root】or【end-user】. Log in as【root】can access all the functions；as【end-user】only display basic functions.

【Add】 ：Add a new set of username and password with【end-user】access.

【Delete】：Delete a set of username and password.

![IM-CONNECT ) System Setup\nSystem Information\nNetwork Setup\nDate and Time\nSecurity Setting\nService Status\nAccount Setting FTP Setting OPCUA Server Broker Setting OpenVPN\nAdd Delete\nName Password Created Date Modify Date Description Actions\nadmin ****** 2022-02-21-10:11 2022-02-21-10:11 root Edit\nuser1 h6EUKQZIeK 2022-12-06-14:41 2022-12-06-14:41 end-user Save\nx 1 2\nNOVAKON\nHMI - Your Intelligent Do! Gateway Solutions\niM-CONNECT®](.im-connect-user-manual-english/8e9368ada3ce3c964678aa74347952bd6b3f1c85e2300c3989f30e0e58f218df.jpg)

【Edit】：Modify username and password. Press【Save】when editing is completed. System will automatically log out for user to log in with modified username and password.
![IM-CONNECT ) System Setup\nSystem Information\nNetwork Setup\nDate and Time\nSecurity Setting\nService Status\nAccount Setting FTP Setting OPCUA Server Broker Setting OpenVPN\nFtp Server Ftp Client\nEnable server at startup\nAdd Delete\nName Password Created Date Modify Date Description Actions\nuser1 WhizerHfUQY 2022-11-29-15:7 2022-11-29-15:7 FTP Edit\ne 1 x\nNOVAKON\niMI - Your Intelligent Info Gateway Solutions](.im-connect-user-manual-english/77e939165b8ea5b9e47f2f983ad5c3136cddf1bd410aeaa37c01f97a6c89549d.jpg)

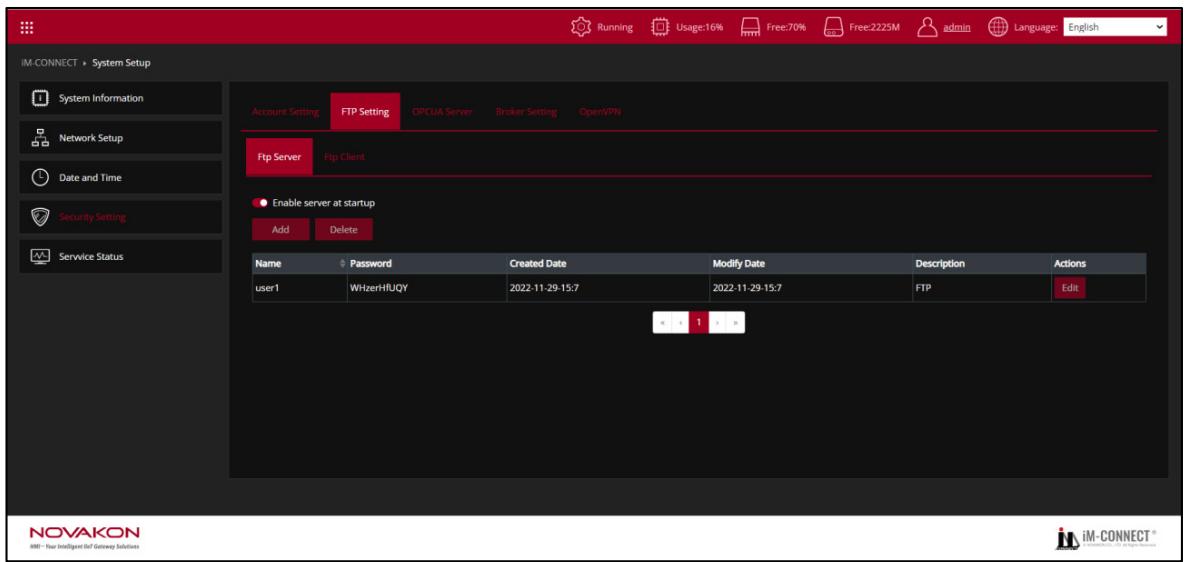
【FTP Setting】：Add or Delete FTP username and password.

【FTP Server】：Set the gateway as FTP Server with related information.

【Enable Server at project Startup】：Check the box to enable FTP, in which data log file can be accessed.

【Add】 ：Add a new set of FTP username and password.

【Delete】：Delete a set of FTP username and password.

【Edit】：Modify FTP username and password. Press【Save】to complete the modification.
![iM-CONNECT ) System Setup\nSystem Information\nNetwork Setup\nDate and Time\nSecurity Setting\nService Status\nAccount Setting	FTP Setting	OPCUA Server	Broker Setting	OpenVPN\nFtp Server	Ftp Client\nEnable Daily Upload\nTime Select:	-\nHost:	\nPort:	\nName:	\nPassword:	\nRemote Directory:	\nTest Ftp Server\nNOVAKON\nHMI - Your Intelligent Do Gateway Solutions\nRunning	Usage:10%	Free:70%	Free:2225M adults Homino Language: English](.im-connect-user-manual-english/381d124bd4350f53524ef083b5470d6bdfb027648c35270accedcc37a7c2597d.jpg)

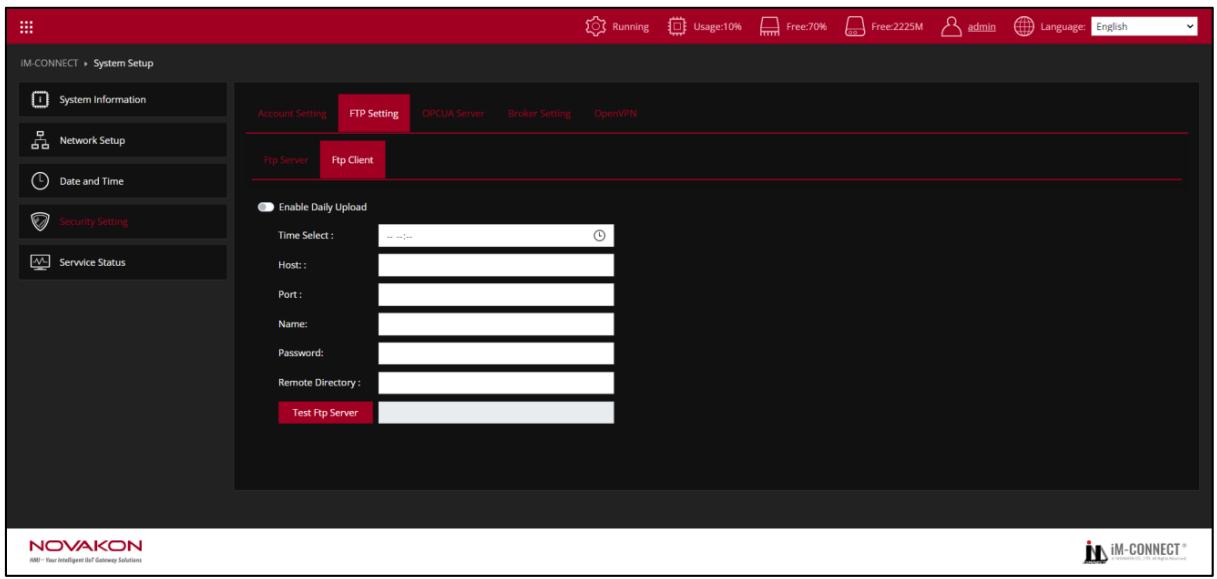
【FTP Client】：Set gateway as FTP Client with the condition and related information of FTP Server, to which gateway send data through Internet.

【Enable Daily Upload】：Set the time that gateway uploads data (Datalog/Alarm History) to FTP server everyday.

【Time Select】：Click the Clock icon to set the time

【Host】：Input the server’s name for connection

【Port】：Input the port number of the server to connect.

【Name】：Input the FTP client username.

【Password】：Input the FTP client password.

【Remote Directory】：Input the remote directory of FTP server for upload.

【Test Ftp Server】：Click to test the connection to FTP server
![IM-CONNECT ) System Setup\nSystem Information\nNetwork Setup\nDate and Time\nSecurity Setting\nService Status\nAccount Setting	FTP Setting	OPCUA Server	Broker Setting	OpenVPN\nEnable OPC UA Server\nEnable Authentication Mode\nListen for connections on port: 4840\nNOVAKON\nHMI - Your Intelligent IoT Gateway Solutions\nRunning	Usage:9%.Free:70%Free:2225M-adminLanguage: English](.im-connect-user-manual-english/95751e2a68f5bea79c932a8fbfe7f84d5359847e75a9d3c7b3ca1e2be40e3119.jpg)

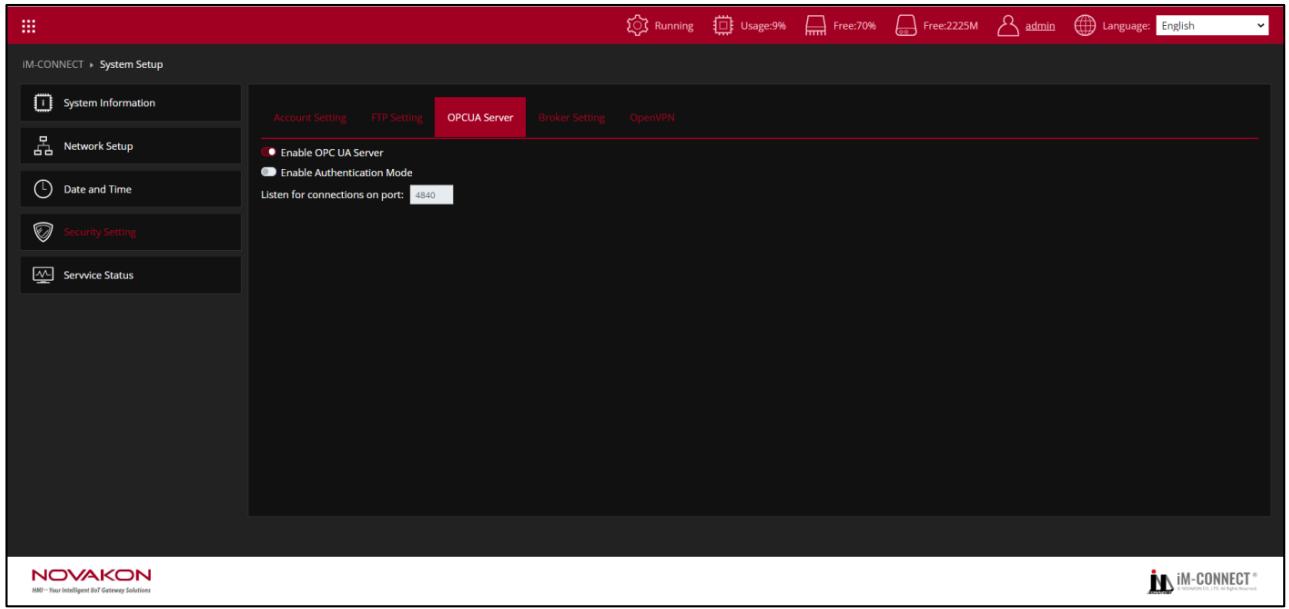
【OPCUA Server】：Set GW-01 as a OPCUA Server.

【Enable OPC UA Server】：Enable the OPCUA Server.

【Enable Authentication Mode】：Input the username and passcode when it is enabled.

【Listen for connections on port】：Set the port on which the OPC UA Server is listening for connection requests of OPC UA Clients. The default port is【4840】.

【Example】Take two GW-01, one as OPCUA Server, another one as OPCUA Client to test the connection.

A. OPCUA Server Settings (IP address 192.168.90.94)

⑴ Click upper left corner to open the menu. Click【System Setup】.
Click【Security Setting】→【OPCUA Server】, Click 【Enable OPC UA Server】, Listen for connections on port to default【4840】.

(Before changing the state of 【Enable OPC UA Server】, make sure the Project is stopped first.)
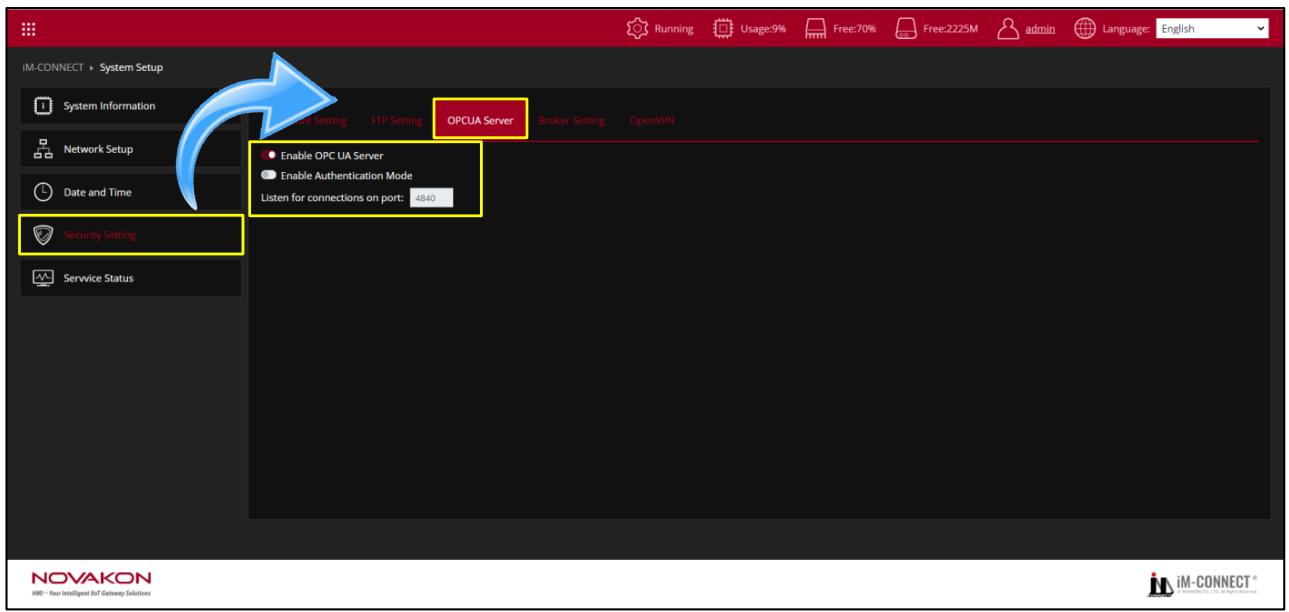
![IM-CONNECT ) System Setup\nSystem Information\nNetwork Setup\nDate and Time\nSecurity Setting\nService Status\nOPCUA Server\nEnable OPC UA Server\nEnable Authentication Mode\nListen for connections on port: 4940\nRunning\nUsage:9%\nFree:70%\nFree:2225M\nadmin\nLanguage: English\nBroker Setting\nOpenVPN\nNOVAKON\nHMI - Your Intelligent IoT Gateway Solutions\niM-CONNECT®](.im-connect-user-manual-english/30ebb643286e326a5eb7a4c2b6daf5765c5f93298683567616893c290315db9e.jpg)

Click upper left corner to open the menu. Click【Tag Setting】. Add three new tags with datatypes of Bit/INT(16)/UINT(32). For the details of Tag setting, please refer to Chapter 4【Tag Setting】.
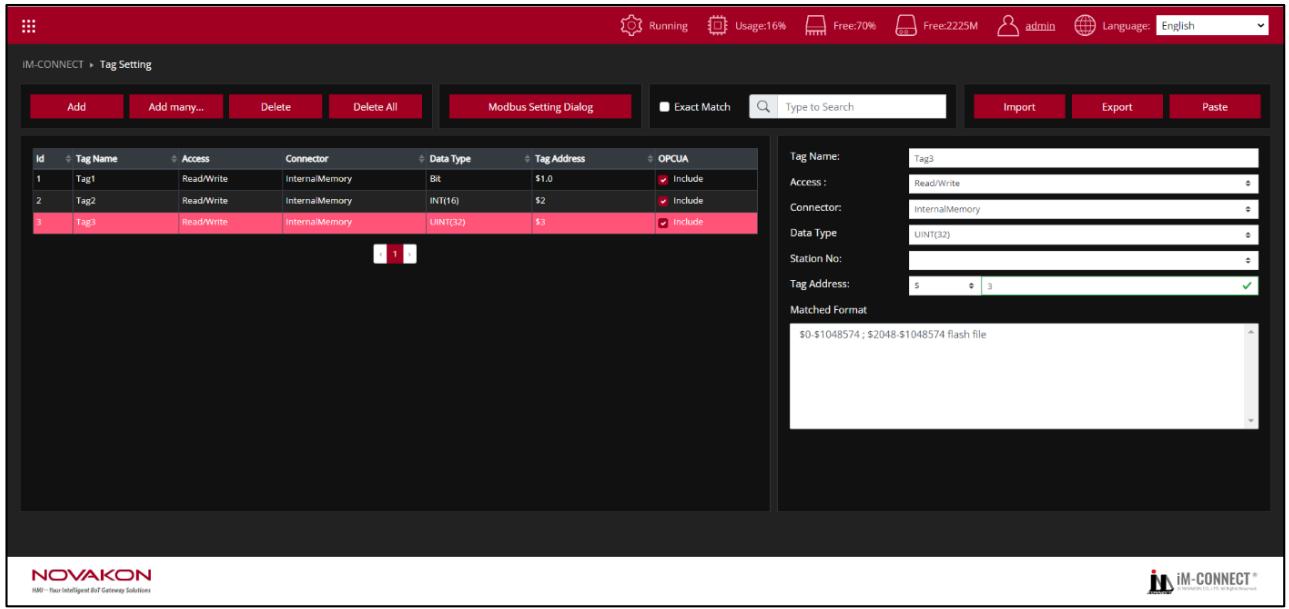
![IM-CONNECT ▶ Tag Setting\nAdd	Add many...	Delete	Delete All	Modbus Setting Dialog	Exact Match	Type to Search	Import	Export	Paste\nId	Tag Name	Access	Connector	Data Type	Tag Address	OPCUA\n1	Tag1	Read/Write	Internal/Memory	Bit	\$1.0	Include\n2	Tag2	Read/Write	Internal/Memory(INT(16)	\$2	Include\n3	Tag3	Read/Write	Internal/Memory	UINT(32)	\$3	Include\nTag Name: Tag3\nAccess: Read/Write\nConnector: Internal/Memory\nData Type: UINT(32)\nStation No: \nTag Address: 5 3\nMatched Format\n\$0-\$1048574; \$2048-\$1048574 flash file\nNOVAKON\nHMI - Your Intelligent Bit Gateway Solutions\niM-CONNECT®](.im-connect-user-manual-english/37f45533d5f7bd5f970ea8ef568ccd19d1837dae55aaa9b976f8950635c456d3.jpg)

After setting, go to【Project Setting】, click【Save and Compile】to GW-01 and 【Start Project】。
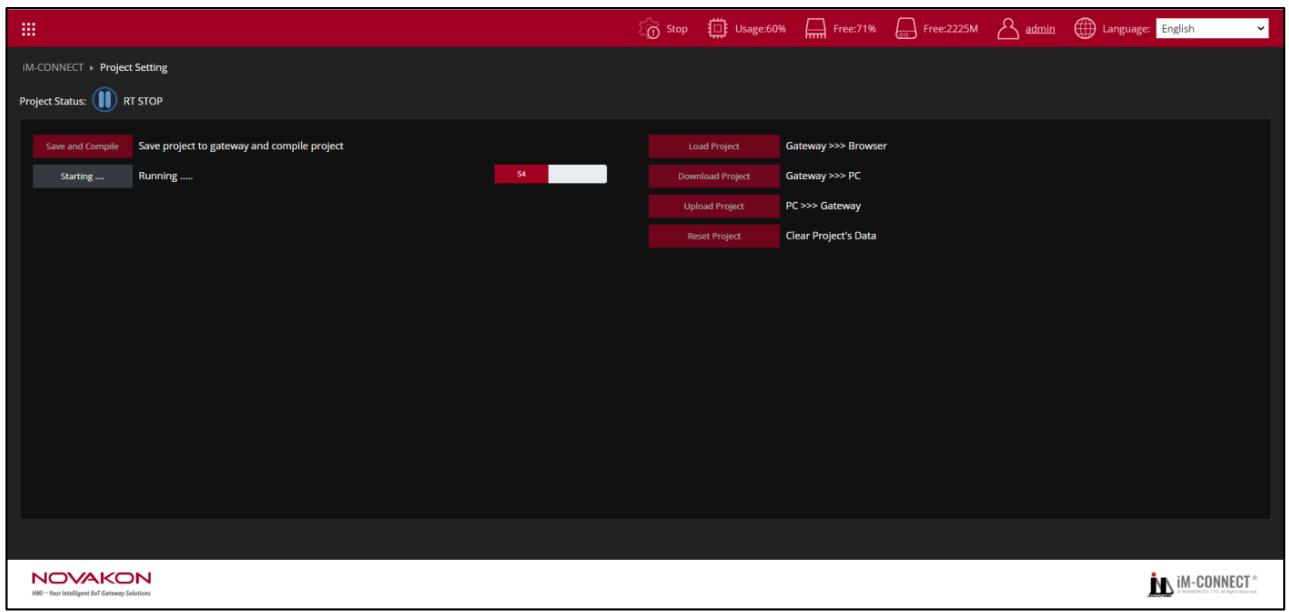
![IM-CONNECT » Project Setting\nProject Status: RT STOP\nSave and Compile Save project to gateway and compile project\nStarting ... Running ..... 54 Load Project Gateway ))) Browser\nDownload Project Gateway ))) PC\nUpload Project PC ))) Gateway\nReset Project Clear Project's Data\nNOVAKON\nHMI - Your Intelligent IoT Gateway Solutions](.im-connect-user-manual-english/3497e68c739bf69de9a6e811356c1b4ebeaa3190c4ac470119b6bf58a1b90632.jpg)

B. OPCUA CLIENT Settings (IP address 192.168.90.118)

Click upper left corner to open the menu, Click【OPCUA CLIENT】.
⑵ Click【Add】to add an OPCUA item.
Go to the right column 【Edit Element】, click【Enable Client Event】.
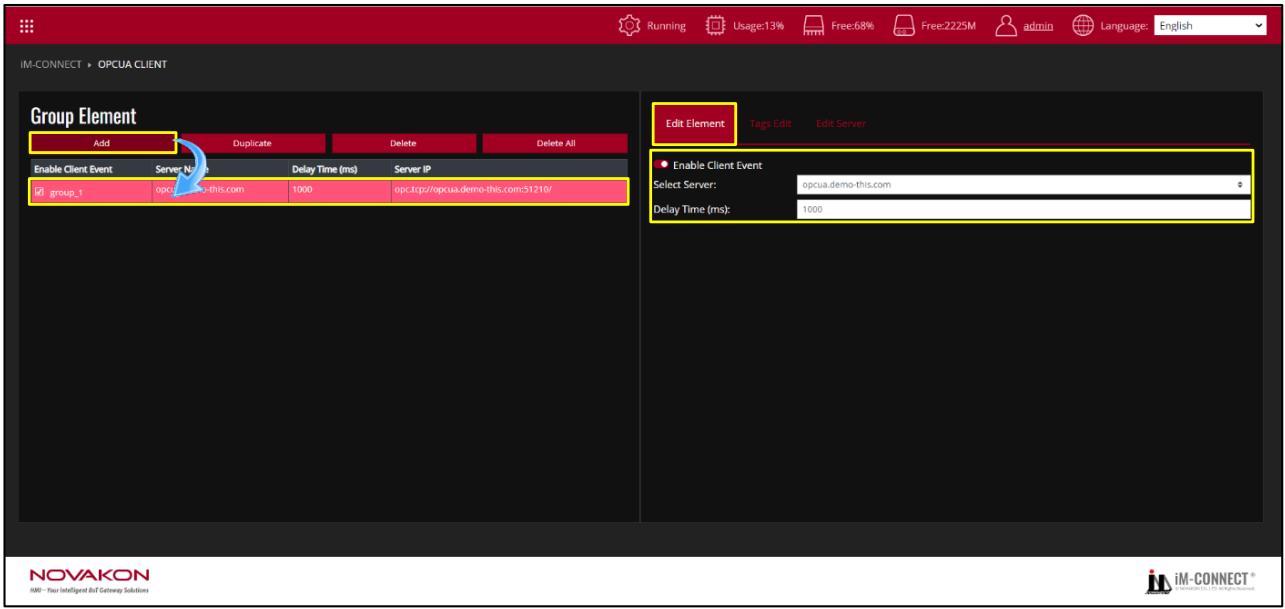
![IM-CONNECT ) OPCUA CLIENT\nGroup Element\nAdd\nDuplicate\nDelete\nDelete All\nEnable Client Event\nServer Name\nDelay Time (ms)\nServer IP\ngroup_1\nopc. http://opcua.demo-this.com:51210/\nEdit Element\nTags Edit\nEdit Server\nEnable Client Event\nSelect Server:\nopcua.demo-this.com\nDelay Time (ms):\n1000\nNOVAKON\nIMI - Your Intelligent IoT Gateway Solutions\niM-CONNECT®](.im-connect-user-manual-english/0ee9eec0ccceca0061c9b41b22fdb2a8fc29fa3bfb38244742c096d78f817bae.jpg)

⑷ Click 【Edit Server】, set the connection to OPCUA SERVER.

For the details of OPCUA CLIENT settings, please refer to Chapter 9【OPCUA CLIENT】
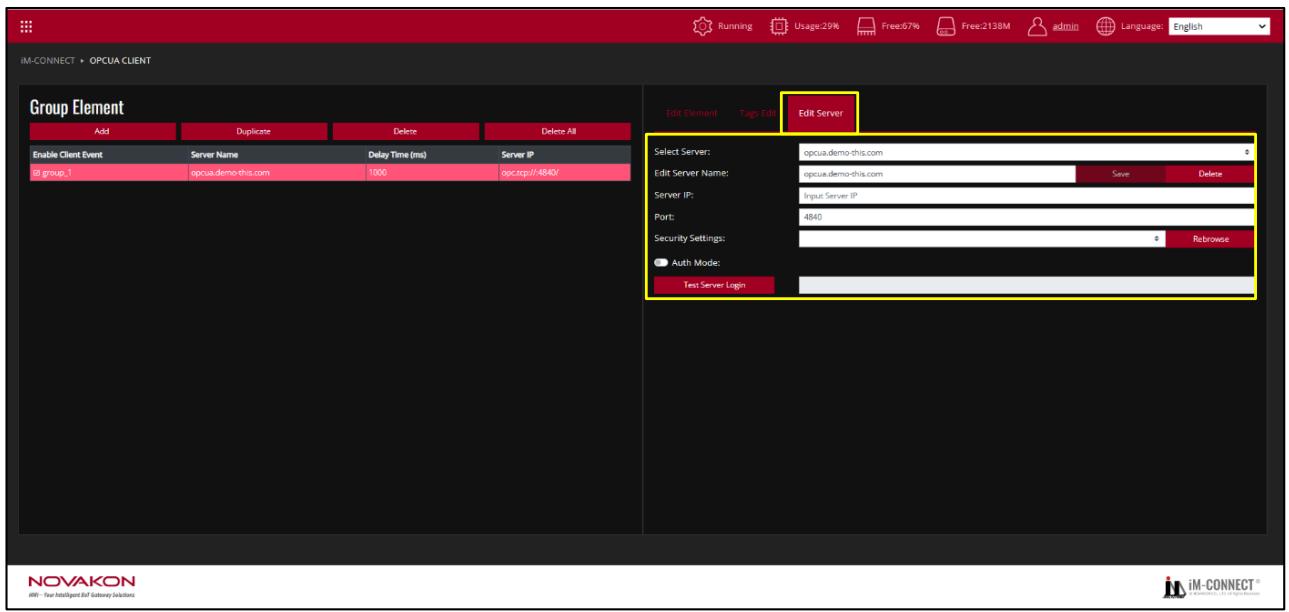
![IM-CONNECT ) OPCUA CLIENT\nGroup Element\nAdd	Duplicate	Delete	Delete All\nEnable Client Event	Server Name	Delay Time (ms)	Server IP\n@ group_1(opcua.demo.this.com	1000(opc.tcp//4840)\nEdit Server\nSelect Server:(opcua.demo.this.com\nEdit Server Name:(opcua.demo.this.com	Save	Delete\nServer IP:.Input Server IP\nPort:	4840\nSecurity Settings:\n* Rebrowse\nAuth Mode:\nTest Server Login\nEdit Element	Tags Edit\nNOVAKON\niM - Your Intelligent RF Gallery Solutions\nRunning	Usage:29%	Free:67%	Free:213BM adultsLanguage:English](.im-connect-user-manual-english/8cad7bd162f53c63421dad0070ee446087d48067c3af1ee7c64e64b8f8cefe97.jpg)

⑸ Click 【Edit Server】, set the connection to OPCUA SERVER.

For the details of OPCUA CLIENT settings, please refer to Chapter 9【OPCUA CLIENT】

After the setting is completed, press 【Test Server Login】. If the test is correct, 【Server connect successfully】 will be displayed.
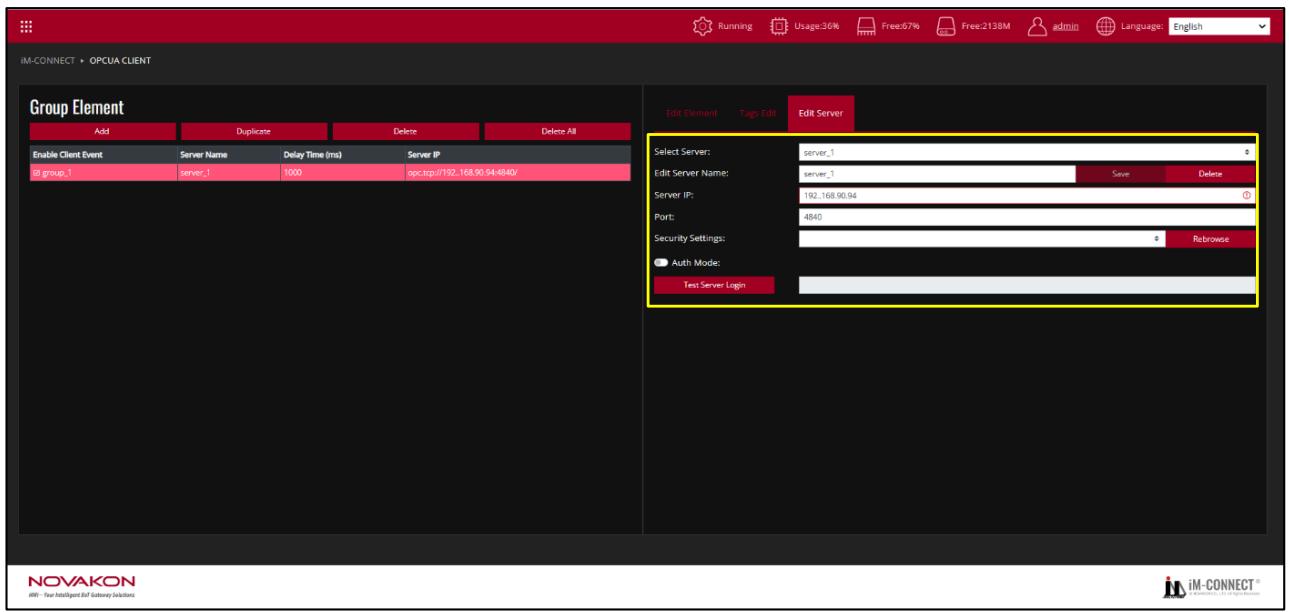
![IM-CONNECT ) OPCUA CLIENT\nGroup Element\nAdd\nDuplicate\nDelete\nDelete All\nEnable Client Event\nServer Name\nDelay Time (ms)\nServer IP\ngroup_1\nserver_1\n1000\nopc tcp/192.168.90.94:4840/\nEdit Element\nTags Edit\nEdit Server\nSelect Server:\nserver_1\nEdit Server Name:\nserver_1\nSave\nDelete\nServer IP:\n192.168.90.94\nPort:\n4840\nSecurity Settings:\n*\nRebrowse\nAuth Mode:\nTest Server Login\nNOVAKON\niW-- Your Intelligent IoT Gateway Solutions\nRunning\nUsage:36%\nFree:67%\nFree:213BM\nadmin\nLanguage: English](.im-connect-user-manual-english/fce5a50238c4325c2899bc98b9e476c829775867ee17657ea83da17f8d752b40.jpg)

⑹ Switch to 【Tags Edit】. After clicking 【Server Browse】, you can see the tagscreated in OPCUA SERVER. Check the required tags and press 【OK】 toautomatically add the tags of OPCUA SERVER to the OPCUA CLIENT device.
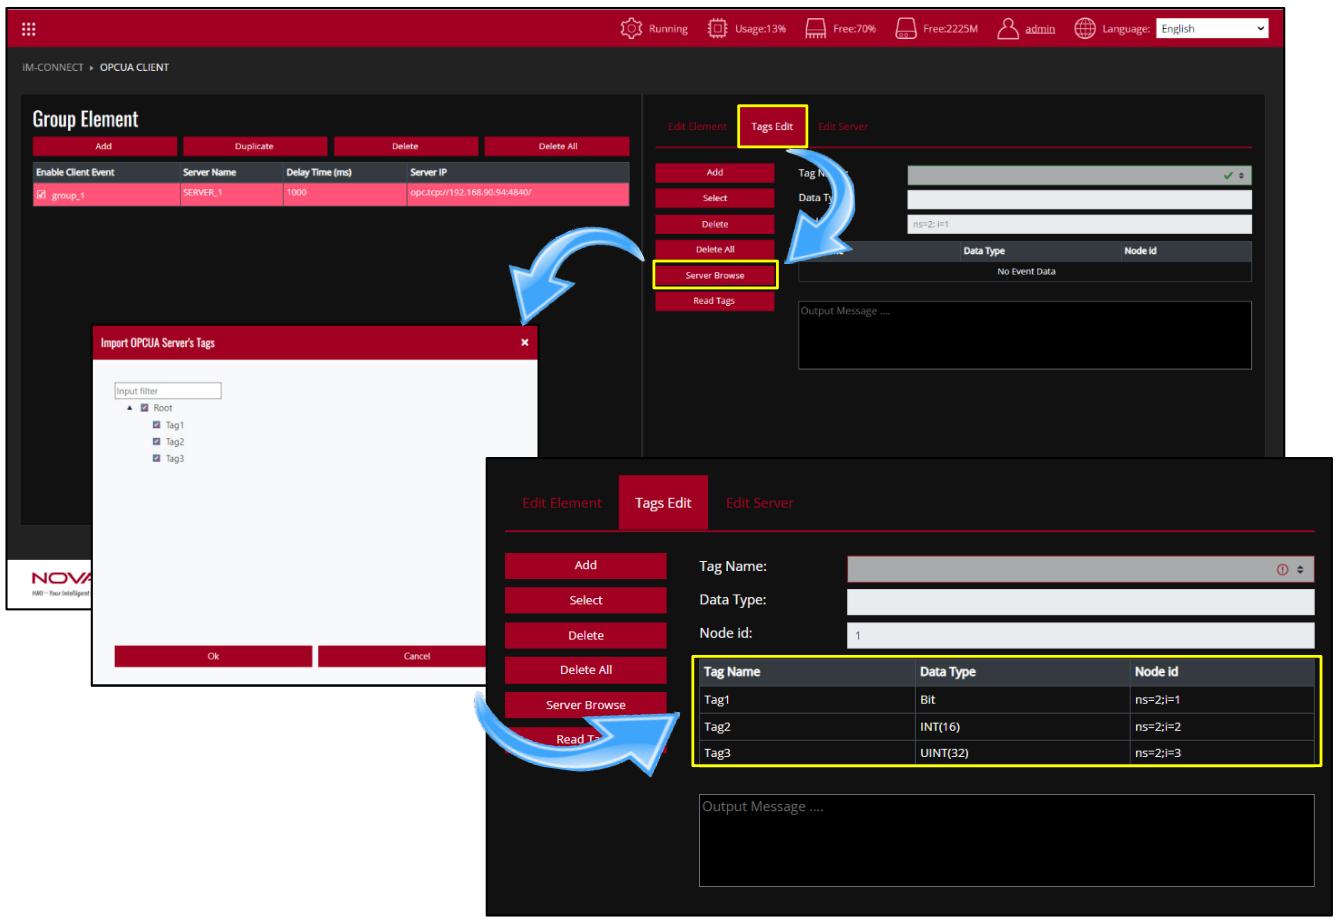
![**Blocks:**\n\n*   **Group Element:** Contains buttons 'Add', 'Duplicate', 'Delete', 'Delete All'. A table with headers 'Enable Client Event', 'Server Name', 'Delay Time (ms)', 'Server IP'. A row contains 'group_1', 'SERVER_1', '1000', 'opc.tcp://192.168.00.04:4840/'.\n*   **Tags Edit (Top Right Panel):** Tabs 'Edit Element', 'Tags Edit', 'Edit Server'. Buttons 'Add', 'Select', 'Delete', 'Delete All', 'Server Browse', 'Read Tags'. Fields 'Tag Name', 'Data Type', 'Node id'. A table with headers 'Data Type', 'Node id' showing 'No Event Data'.\n*   **Import OPCUA Server's Tags:** An input box 'Input filter'. A tree list 'Root', 'Tag1', 'Tag2', 'Tag3'. Buttons 'Ok', 'Cancel'.\n*   **Tags Edit (Bottom Right Panel):** Tabs 'Edit Element', 'Tags Edit', 'Edit Server'. Buttons 'Add', 'Select', 'Delete', 'Delete All', 'Server Browse', 'Read Tags'. Fields 'Tag Name', 'Data Type', 'Node id'. A table with headers 'Tag Name', 'Data Type', 'Node id'. Rows: 'Tag1', 'Bit', 'ns=2;i=1'; 'Tag2', 'INT(16)', 'ns=2;i=2'; 'Tag3', 'UINT(32)', 'ns=2;i=3'. An output box 'Output Message ....'.\n\n**Connections:**\n\n*   A blue arrow connects the 'Group Element' section (specifically the row with 'group_1') to the 'Tags Edit' tab area.\n*   A blue arrow connects the 'Server Browse' button to the 'Import OPCUA Server's Tags' window.\n*   A blue arrow connects the 'Read Tags' button to the bottom-right 'Tags Edit' table.](.im-connect-user-manual-english/2ca4ab1fd8f97346a32b939a293b58ab8d28690a24fa1eb155edc6d1de34a7fc.jpg)

After the setting is completed, you can go to【Project Setting】 to execute 【Saveand Compile】 to GW01 and 【Start Project】.
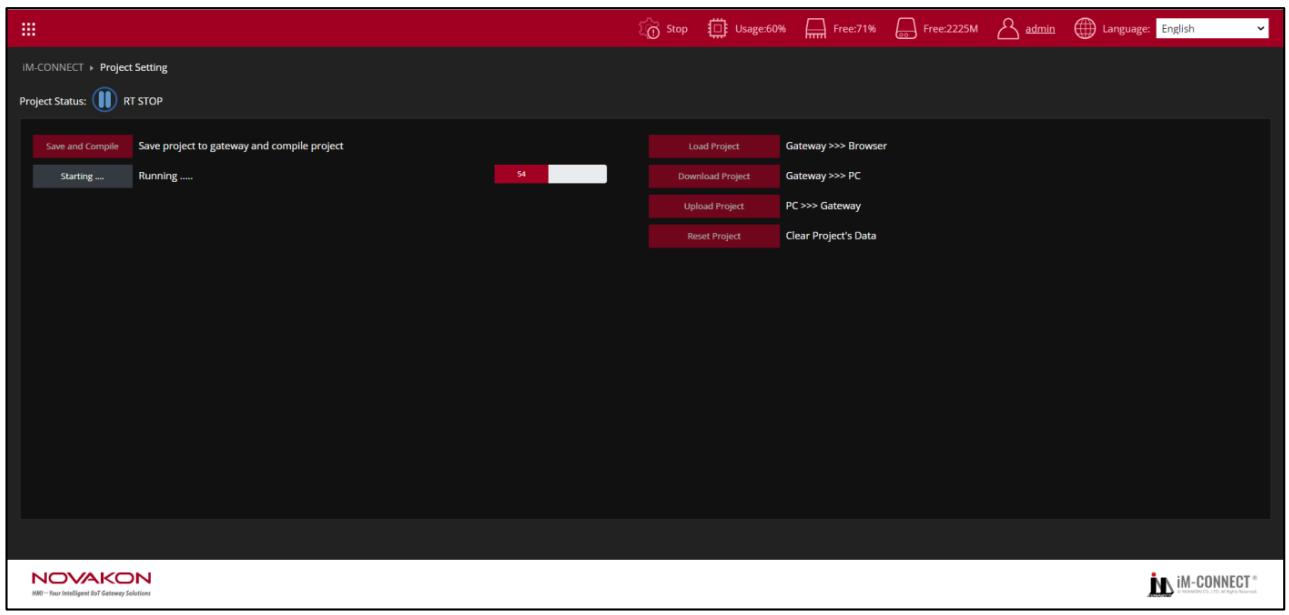
![IM-CONNECT » Project Setting\nProject Status: RT STOP\nSave and Compile Save project to gateway and compile project\nStarting .... Running ..... 54 Load Project Gateway ))) Browser\nDownload Project Gateway ))) PC\nUpload Project PC ))) Gateway\nReset Project Clear Project's Data\nNOVAKON\nIMI - Your Intelligent Bot Gateway Solutions](.im-connect-user-manual-english/7b79e24d1c95f59d1214f3e6bf3546bc258def2336988a3aebae2fccd123bb1f.jpg)

# C. Connection Test

⑴ Connect two GW01 separately, click on the upper left to open the menu, and click 【Online Monitor】 to enter the monitoring screen.
It can be seen from the 【Online Monitor】 that the two devices can monitor the tag value synchronously, which means that the connection through OPCUA has been successful.
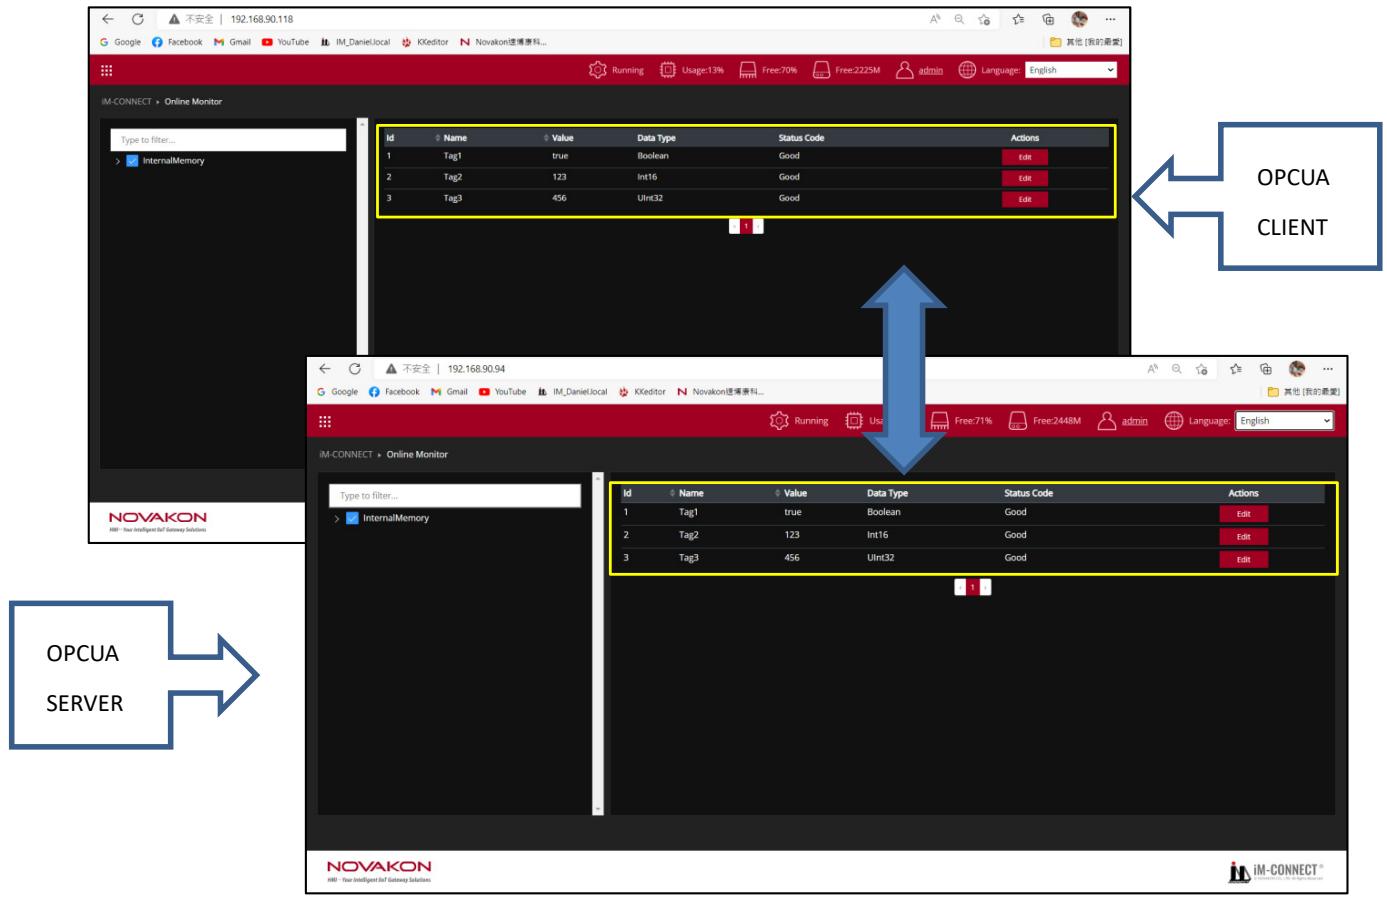
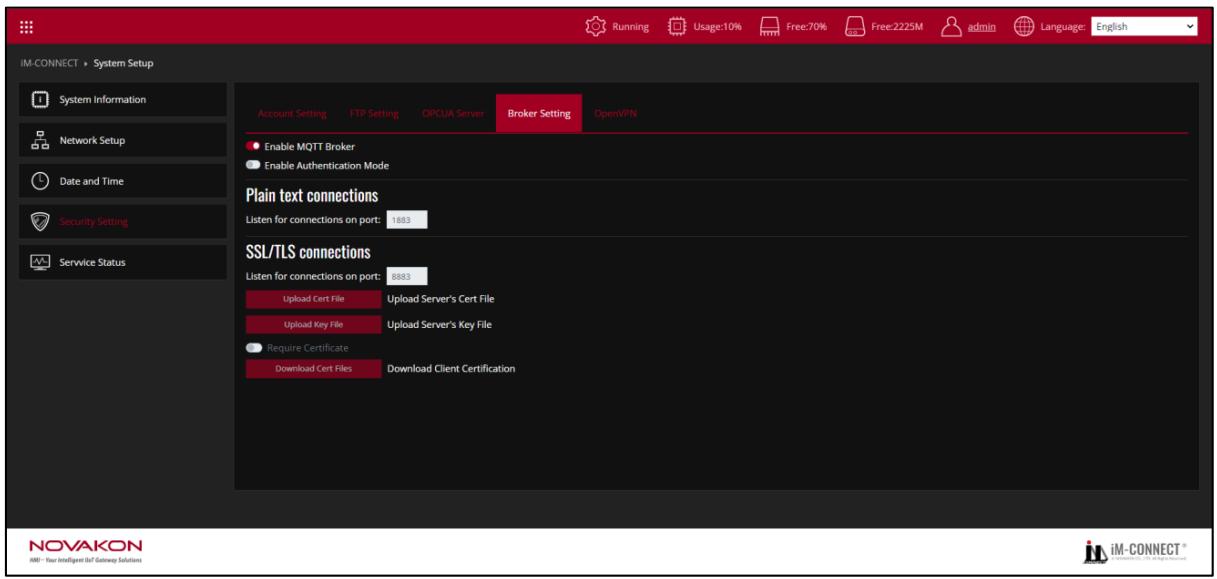
![192.168.90.118\nGoogle Facebook Gmail YouTube IM_Daniel.local KKeditor Novakon逻辑百科...\nRunning Usage:13% Free:70% Free:2225M admin Language: English\nIM-CONNECT ) Online Monitor\nType to filter...\nInternalMemory\nid Name Value Data Type Status Code Actions\n1 Tag1 true Boolean Good Edit\n2 Tag2 123 Int16 Good Edit\n3 Tag3 456 Int32 Good Edit\nOPCUA CLIENT\niM-CONNECT ) Online Monitor\nType to filter...\nInternalMemory\nid Name Value Data Type Status Code Actions\n1 Tag1 true Boolean Good Edit\n2 Tag2 123 Int16 Good Edit\n3 Tag3 456 Int32 Good Edit\nOPCUA SERVER\nNOVAKON\nHR - Your Intelligent Of Gateway Solutions\niM-CONNECT®](.im-connect-user-manual-english/43f8c2e931946268611865786ebc628e8fbc789b03007966b96f508607fc3b5c.jpg)

![IM-CONNECT ) System Setup\nSystem Information\nNetwork Setup\nDate and Time\nSecurity Setting\nService Status\nAccount Setting	FTP Setting	OPCJA Server	Broker Setting	OpenVPN\nEnable MQTT Broker\nEnable Authentication Mode\nPlain text connections\nListen for connections on port: 1,883\nSSL/TLS connections\nListen for connections on port: 8883\nUpload Cert File	Upload Server's Cert File\nUpload Key File	Upload Server's Key File\nRequire Certificate\nDownload Cert Files	Download Client Certification\nNOVAKON\nMM - Your Intelligent Bit Gateway Solutions\nRunning	Usage:10%.Free:70%Free:2225M adultsLanguage: English](.im-connect-user-manual-english/7a133b18c73c4f2c6fd3101e4856b712190c2997ee1756fceda84f44542ad924.jpg)

【Broker Setting】：When using the MQTT protocol for data transmission, GW01 can be set as a Broker (must be set as the Publisher).

【Enable MQTT Broker at RT Startup】：Enable MQTT Broker after clicking on it.

【Enable Authentication Mode】：To enable the MQTT Log In Verification Mechanism, click on it and enter the account name and password for authentication.

【Plain text connections】：Designate the listening port with unencrypted connection. The default is【1883】.

【SSL/TLS connections】：Designate the listening port with SSL encrypted connection. The default is【8883】.

【Upload Cert File】：Import the verification certificate provided by the Server.

【Upload Key File】：Import the key provided by the Server.

【Require Certificate】：Download the certificate required for the log in.

【Save Setting】：Save the MQTT Broker setting.

【Example】 Take two GW-01 as an example, one is MQTT Subscriber and the other is MQTT Publisher.

A. Click on the upper left to open the menu, click 【Tag Setting】 to enter the setting.

Add three new tags with the data types of Bit/INT(16)/UINT(32).

Both GW-01 must create these tags separately.

For instructions on tag setting, please refer to 【4. Tag Setting】 in this manual.
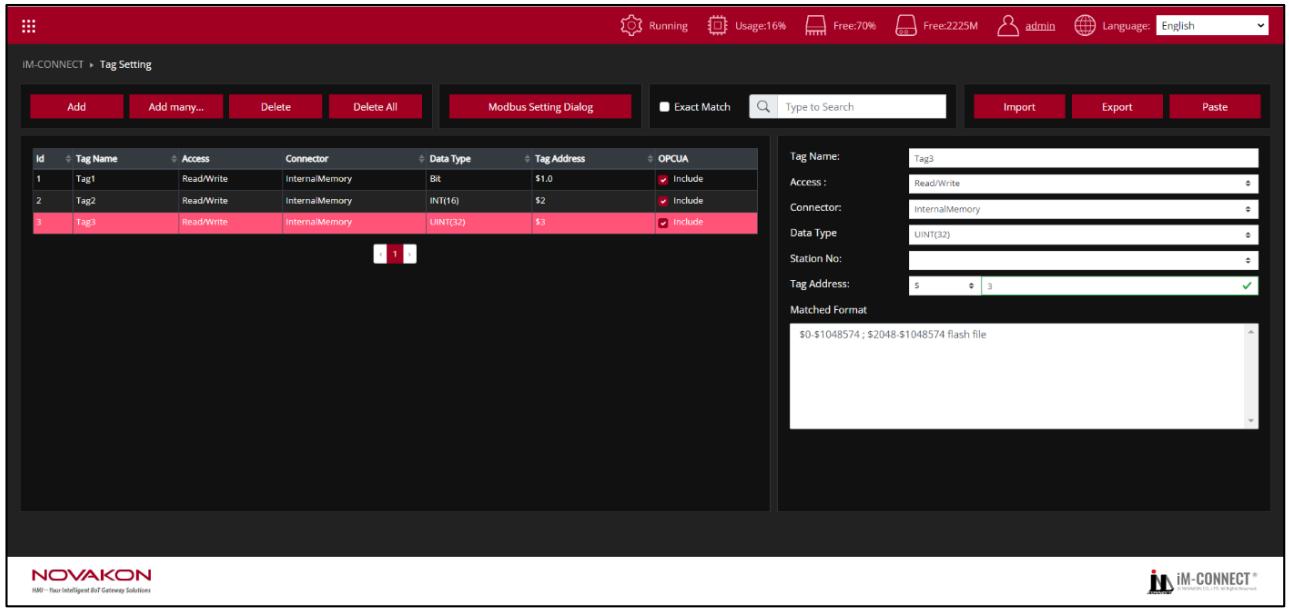
![IM-CONNECT ▶ Tag Setting\nAdd	Add many...	Delete	Delete All	Modbus Setting Dialog	Exact Match	Type to Search	Import	Export	Paste\nId	Tag Name	Access	Connector	Data Type	Tag Address	OPCUA\n1	Tag1	Read/Write	Internal/Memory	Bit	\$1.0	Include\n2	Tag2	Read/Write	Internal/Memory(INT(16)	\$2	Include\n3	Tag3	Read/Write	Internal/Memory	UINT(32)	\$3	Include\nTag Name: Tag3\nAccess: Read/Write\nConnector: Internal/Memory\nData Type: UINT(32)\nStation No: \nTag Address: 5 3\nMatched Format\n\$0-\$1048574; \$2048-\$1048574 flash file\nNOVAKON\nHMI - Your Intelligent Bit Gateway Solutions\niM-CONNECT®](.im-connect-user-manual-english/1cd762ca99bcf53fb25deb17bcc5b75ba905f8146825d86523d522ed0a76dd60.jpg)

B. MQTT Subscriber setting (the IP of GW01 is 192.168.90.129)

Click on the upper left 用 to open the menu and click 【MQTT】 to enter the settings.
Click 【Add】 and go to 【Client】 to set the role to 【Subscriber】, and the topicmust be consistent with the Publisher setting. In this example, set it to 【ABC】.
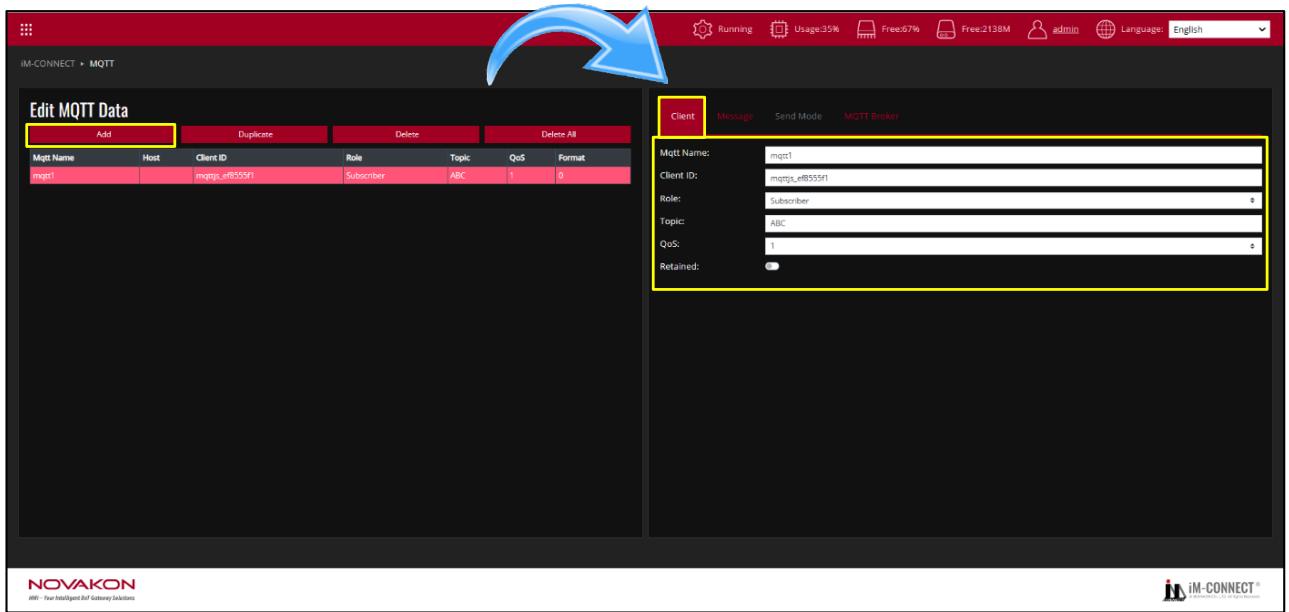
![IM-CONNECT ) MQTT\nEdit MQTT Data\nAdd	Duplicate	Delete	Delete All\nMqtt Name	Host人類 ID	Role	Topic	QoS	Format\nmqt1	mqmts_e8555F1	Subscriber	ABC	1	0\nClientAsia	Message	Send Mode	MQTT Broker\nMqtt Name:	mqt1\nClient ID:	mqmts_e8555F1\nRole:	Subscriber\nTopic:	ABC\nQoS:	1\nRetained:\nNOVAKON\niIM-CONNECT®](.im-connect-user-manual-english/3b1532d51749b974ddb1c3bb58229f9d3ceb64f6e68eff44a5da5c436426ccba.jpg)

⑶ Click 【Message】 and press 【Add All】 to add all the three tags created.
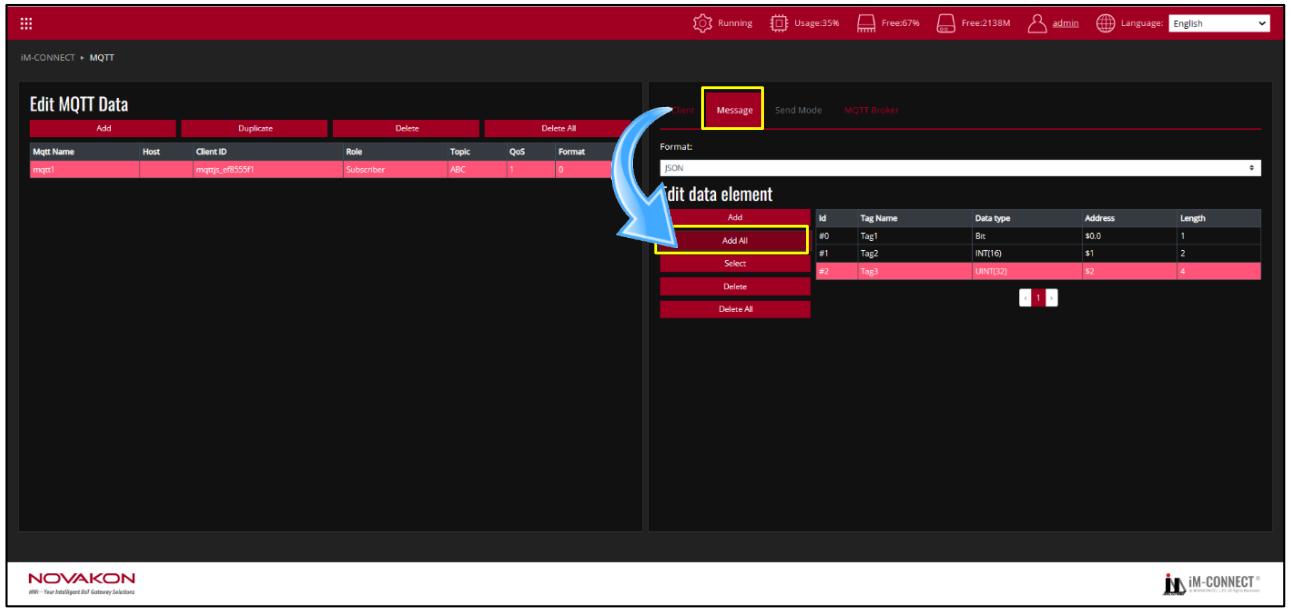
![iM-CONNECT + MQTT\nEdit MQTT Data\nAdd	Duplicate	Delete	Delete All\nMqtt Name	Host的小Client ID	Role	Topic	QuS	Format\nmgt1	Image_d85591	Subscriber	ABC	1	8\nEdit data element\nAdd	Add All	Add\nSelect	Delete	Delete All\nName Id Tag Name Data type Address Length\n#0 Tag1 Bit \$0.0 1\n#1 Tag2 INT(16) \$1 2\n#2 Tag3 UINT(32) \$2 4\n1 7\nNOVAKON\niIM - Your Intelligent RF Gallery Solutions\nRunning Usage:35% Free:67% Free:213BM admin Language: English](.im-connect-user-manual-english/71cbed6fa5d704b6f9fd615c275cf64a4c4d75732e499ae40a8a5120c1075ee8.jpg)

Click 【MQTT Broker】 and set 【Cloud Service】 (this example is set to 【Normal】) / 【MQTT Host ip】 (in this example the command is sent by the Publisher, so Host ip must be set to the IP address of the Publisher 【192.168.90.118 】) /【Port】(in this example, the default is 【1883】).
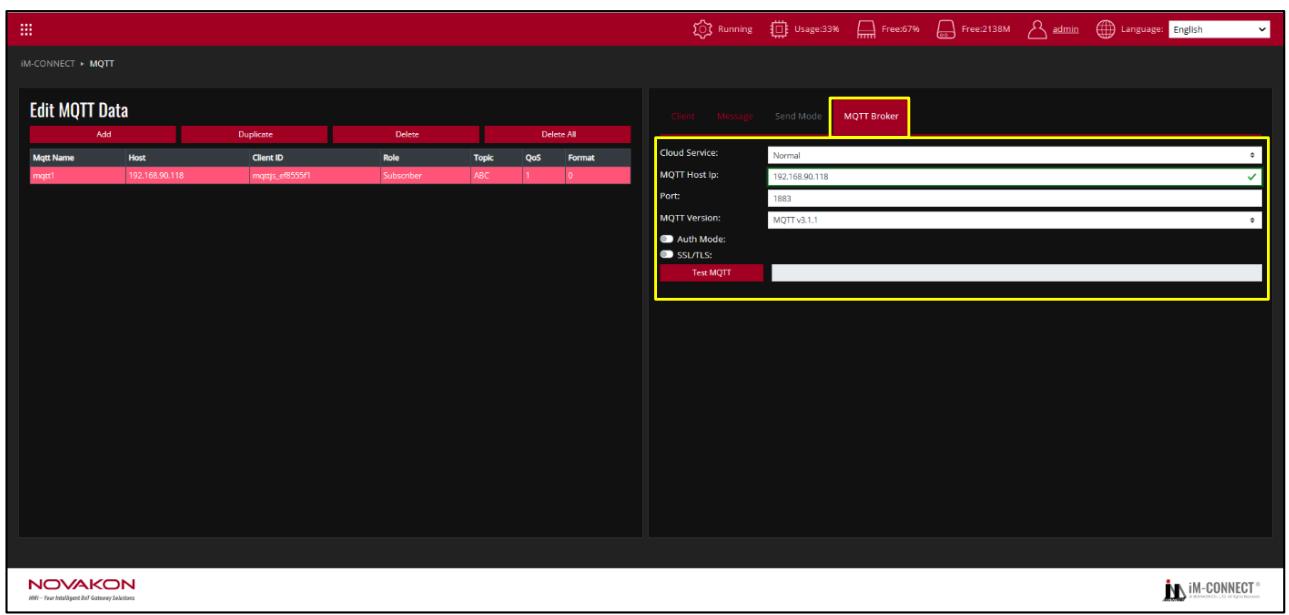
![IM-CONNECT ) MQTT\nEdit MQTT Data\nAdd	Duplicate	Delete	Delete All\nMqtt Name	Host	Client ID	Rule	Topic	QoS	Format\nimgt1	192.168.90.118	imgqs_e#555F1	Subscriber	ABC	1	0\nClient生产设备 Send Mode MQTT Broker\nCloud Service: Normal\nMQTT Host ip: 192.168.90.118\nPort: 1883\nMQTT Version: MQTT v3.1.1\nAuth Mode:\nSSL/TLS:\nTest MQTT\nNOVAKON\niM - Your Intelligent RF Gateway Solutions\nRunning Usage:33% Free:57% Free:213BM admin Language: English](.im-connect-user-manual-english/a363cea2650b2c86fd0202e9ab2dfae643bda51784fd75bf271a7972ea798d1b.jpg)

After the setting is completed, you can go to 【Project Setting】to execute 【Save and Compile】 to GW01 and then 【Start Project】.
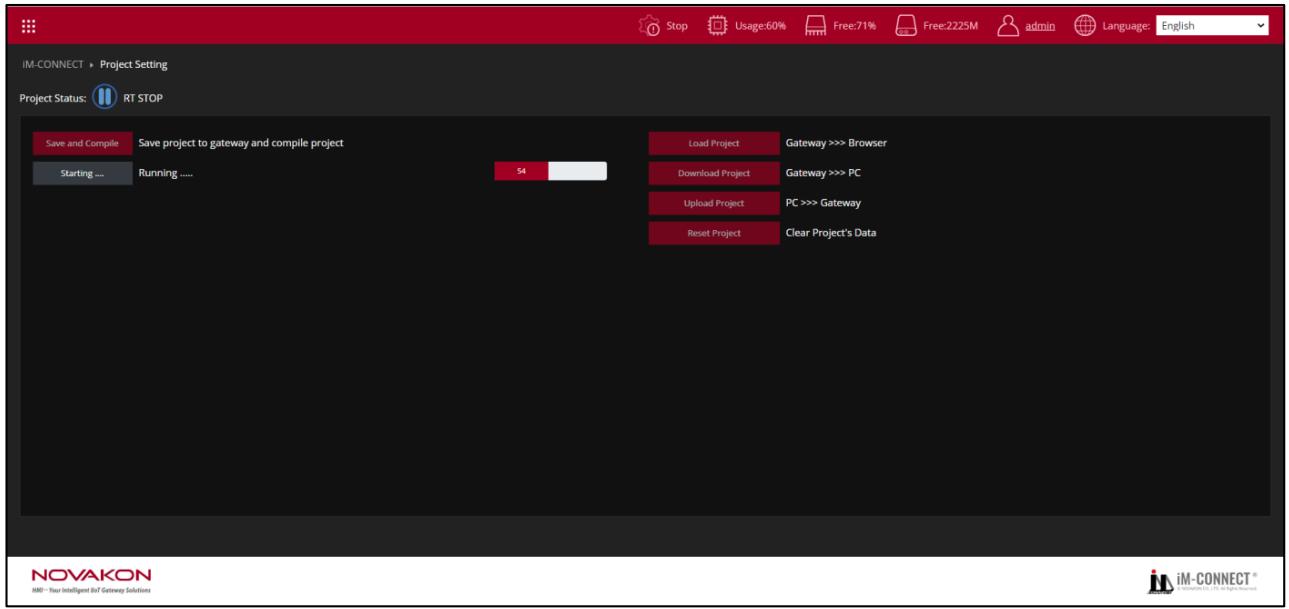
![IM-CONNECT » Project Setting\nProject Status: RT STOP\nSave and Compile Save project to gateway and compile project\nStarting ... Running ..... 54 Load Project Gateway ))) Browser\nDownload Project Gateway ))) PC\nUpload Project PC ))) Gateway\nReset Project Clear Project's Data\nNOVAKON\nHMI - Your Intelligent IoT Gateway Solutions\nStop Usage:60% Free:71% Free:2225M admin Language: English](.im-connect-user-manual-english/cbe90bbc5558afea29ab19d818ef86d3ed1ea527a1eba5fc376f1d52d3c1199e.jpg)

# C. MQTT Publisher settings (the ip of GW01 is 192.168.90.118)

Click on the upper left to open the menu, and click 【MQTT】 to enter thesettings.
【Client】 set the role to 【Publisher】, and the topic should be consistent with the Subscriber setting. In this example, it is set to 【ABC】
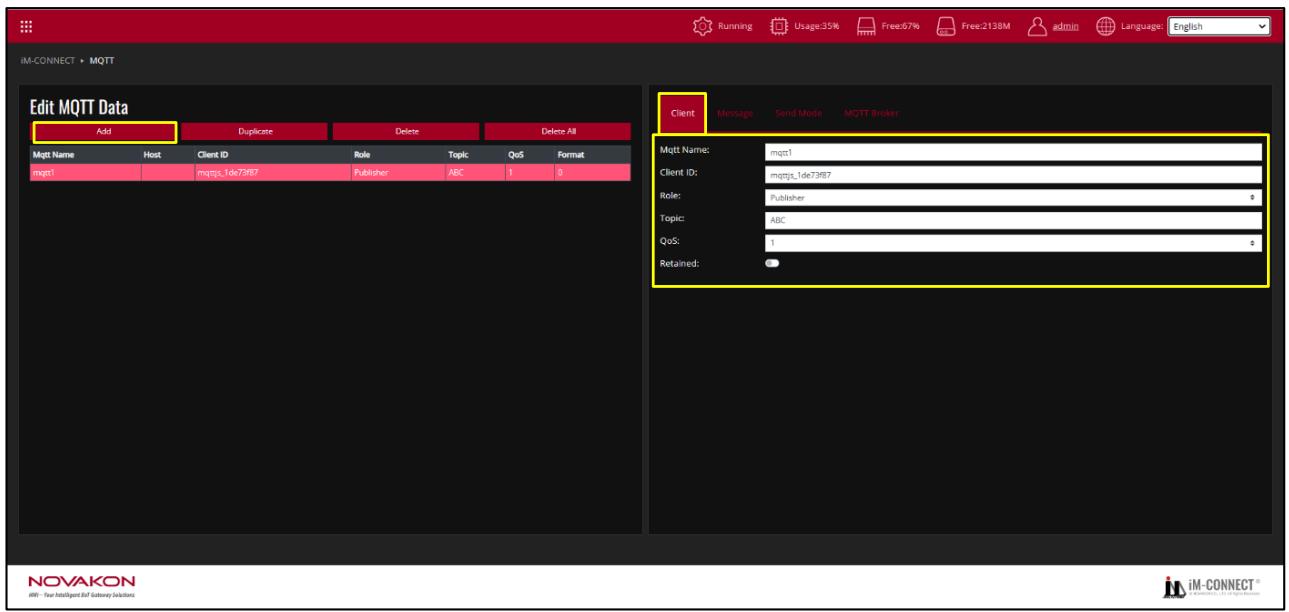
![IM-CONNECT ) MQTT\nEdit MQTT Data\nAdd	Duplicate	Delete	Delete All\nMqtt Name	Host的小计ID	Rule	Topic	QoS	Format\nmqt1	mqqs_1de73867	Publisher	ABC	1	0\nClient Message Send Mode MQTT Broker\nMqtt Name:	mqt1\nClient ID:	mqqs_1de73867\nRole:	Publisher\nTopic:	ABC\nQoS:	1\nRetained:\nNOVAKON\niM - Your Intelligent RF Gallery Solutions\nRunning Usage:35% Free:67% Free:213BM admin Language: English](.im-connect-user-manual-english/e9f7eff4e5b2ec904632b4cf4ac7d47ddbe2823731a84048a131502bc5616c52.jpg)

⑶ Click 【Message】 and press 【Add All】 to add all the three tags created.
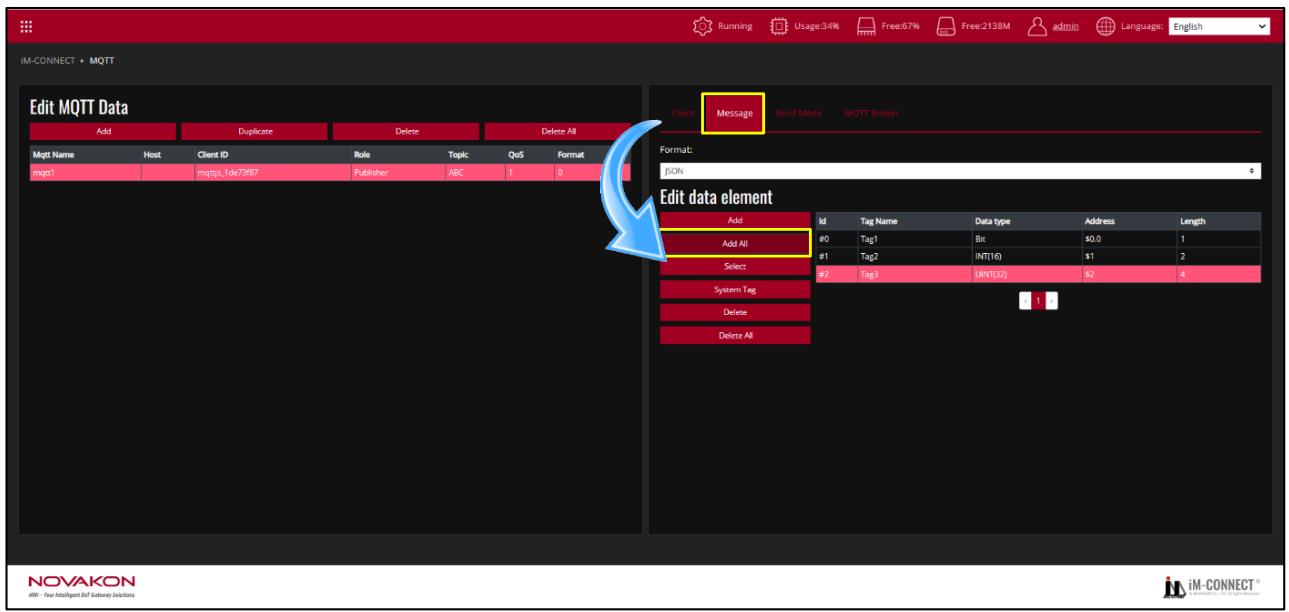
![IM-CONNECT ) MQTT\nEdit MQTT Data\nAdd	Duplicate	Delete	Delete All\nMqtt Name	Host的小计ID	Role	Topic	QoS	Format\nmqq1	mqqs_1de7387	Publisher	ABC	1	0\nEdit data element\nAdd Id Tag Name Data type Address Length\n#0 Tag1 Bit #0.0 1\n#1 Tag2 INT(16) \$1 2\n#2 Tag3 UNT(32) \$2 4\nSystem Tag\nDelete\nDelete All\nClient Message Send Mode MQTT Broker\nFormat:\njsON\nNOVAKON\n## - Your Intelligent Bit Gallery Solutions\niM-CONNECT®](.im-connect-user-manual-english/94f497d4f12cf4a20d824db0853560d44c47e5b1e447564244b0d186472bb5cf.jpg)

Click 【Send Mode】, and set the conditions for transmitting data according to actual needs (in this example, set 【At intervals of (Secs)】 to transmit once per second).
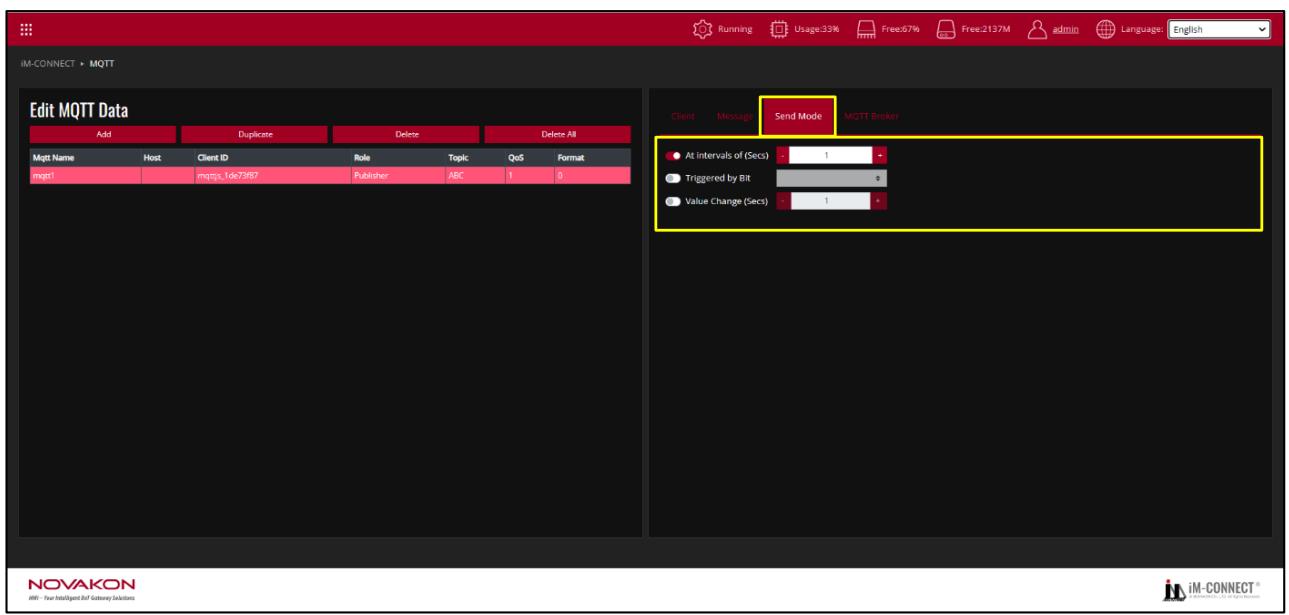
![IM-CONNECT ) MQTT\nEdit MQTT Data\nAdd	Duplicate	Delete	Delete All\nMqtt Name	Host的小计ID	Role	Topic	QoS	Format\nmqtt	mqpps_1de7387	Publisher	ABC	1	0\nSend Mode	MQTT Broker\nAt intervals of (Secs)	1\nTriggered by Bit	\nValue Change (Secs)	1\nNOVAKON\niM-Connect®](.im-connect-user-manual-english/6cf23e32d81ecb2a6b3dd9b6a013ffca03aa97c282770ded3737c84bba808555.jpg)

⑸ Click 【MQTT Broker】 and set 【Cloud Service】 (this example is set to【Normal】) / 【MQTT Host Ip】 (because this gateway is the Publisher, so enterthe IP of this gateway 【192.168.90.118】 here) /【Port】(in this example, thedefault is 【1883】).
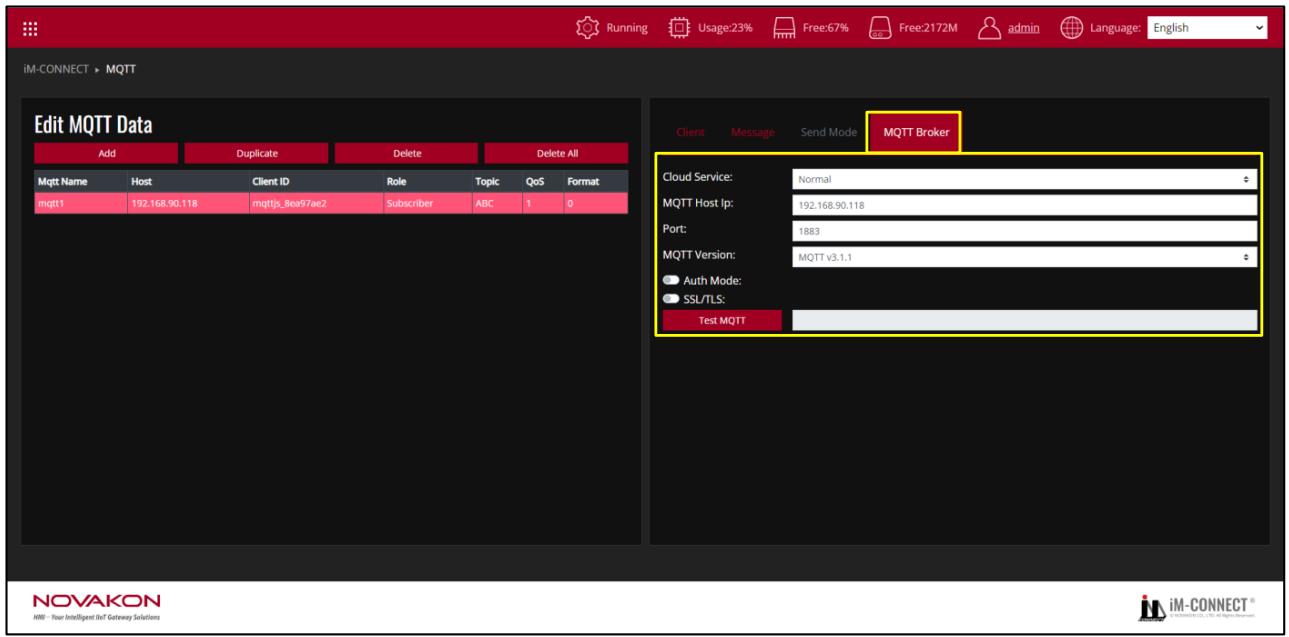
![iM-CONNECT ) MQTT\nEdit MQTT Data\nAdd	Duplicate	Delete	Delete All\nMqtt Name	Host人類 ID	Role	Topic	QoS	Format\nmqtt1	192.168.90.118	mqttjs_8ea97ae2	Subscriber	ABC	1	0\nClientAsia	MessageSend Mode	MQTT Broker\nCloud Service:	Normal\nMQTT Host Ip:	192.168.90.118\nPort:	1883\nMQTT Version:	MQTT v3.1.1\n● Auth Mode:\n● SSL/TLS:\nTest MQTT\nNOVAKON\nHMI - Your Intelligent It? Gateway Solutions\niM-CONNECT®](.im-connect-user-manual-english/e1ad659c51e0e9f5f604a9cf878943b670063b65358587210715b6ea7879672d.jpg)

Click on the upper left to open the menu, and click 【System Setup】 to enterthe settings.
Click 【Security Setting】 → 【Broker Setting】. Press 【Enable MQTT Broker】and specify it as MQTT Broker.
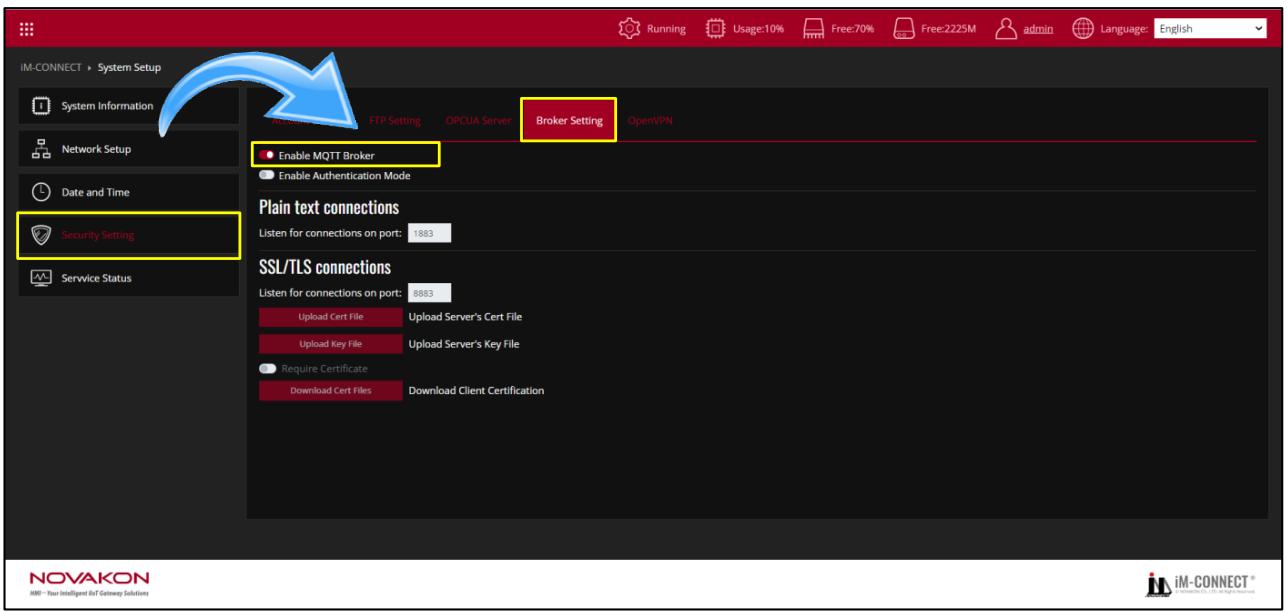
![IM-CONNECT ) System Setup\nSystem Information\nNetwork Setup\nDate and Time\nSecurity Setting\nService Status\nFTP Setting OPCUA Server Broker Setting OpenVPN\nEnable MQTT Broker\nEnable Authentication Mode\nPlain text connections\nListen for connections on port: 1883\nSSL/TLS connections\nListen for connections on port: 8883\nUpload Cert File Upload Server's Cert File\nUpload Key File Upload Server's Key File\nRequire Certificate\nDownload Cert Files Download Client Certification\nRunning Usage:10% Free:70% Free:2225M admin Language: English\nNOVAKON\niMM - Your Intelligent IoT Gateway Solutions](.im-connect-user-manual-english/8a6ee7c5999ca8f5788d1ea8069b2bfed441aa6a5066fbe642b9d0e10e3ef20f.jpg)

After the setting is completed, you can go to 【Project Setting】to execute 【Saveand Compile】 to GW01 and 【Start Project】
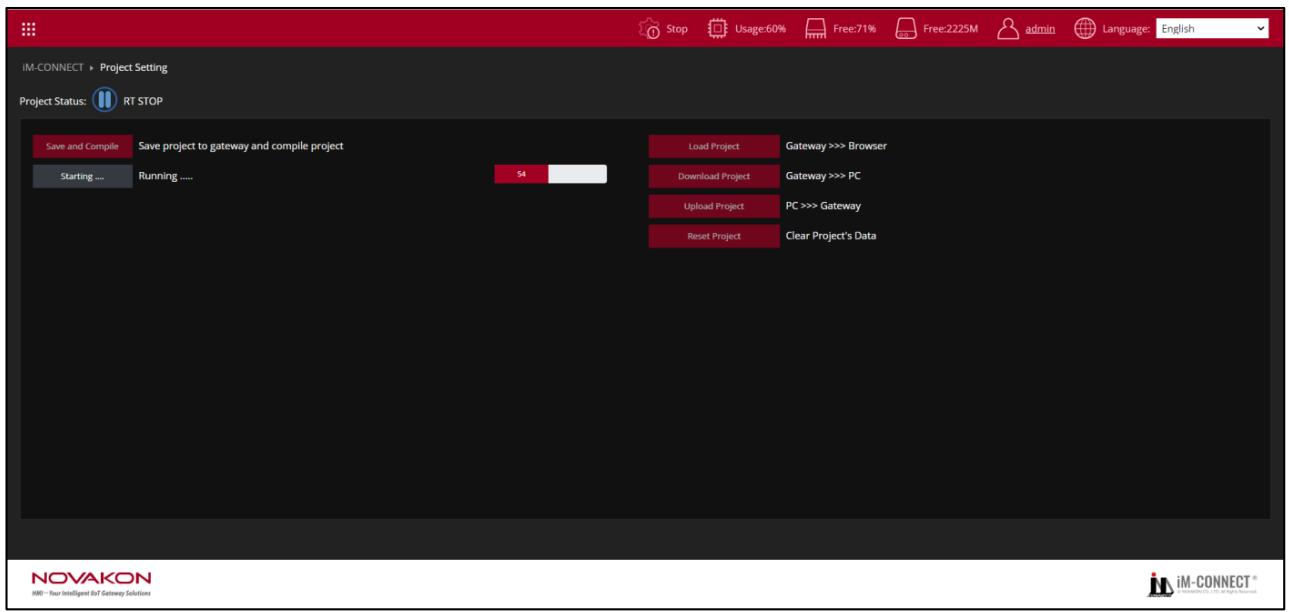
![IM-CONNECT » Project Setting\nProject Status: RT STOP\nSave and Compile Save project to gateway and compile project\nStarting .... Running ..... 54 Load Project Gateway ))) Browser\nDownload Project Gateway ))) PC\nUpload Project PC ))) Gateway\nReset Project Clear Project's Data\nNOVAKON\nHMI - Your Intelligent IoT Gateway Solutions](.im-connect-user-manual-english/6b0beb9d5eb7da30955998defb8ffd882b88f6154f12e5f9ed7401dda7fe4692.jpg)

# D. Connection Test

⑴ Connect two GW01 respectively, click on the upper left to open the menu, and click 【Online Monitor】 to enter the monitoring screen.
⑵ It can be seen from the webpage that when the Publisher modifies the tag value, it will be sent to the Subscriber after one second, which means that the connection through MQTT has been successful.
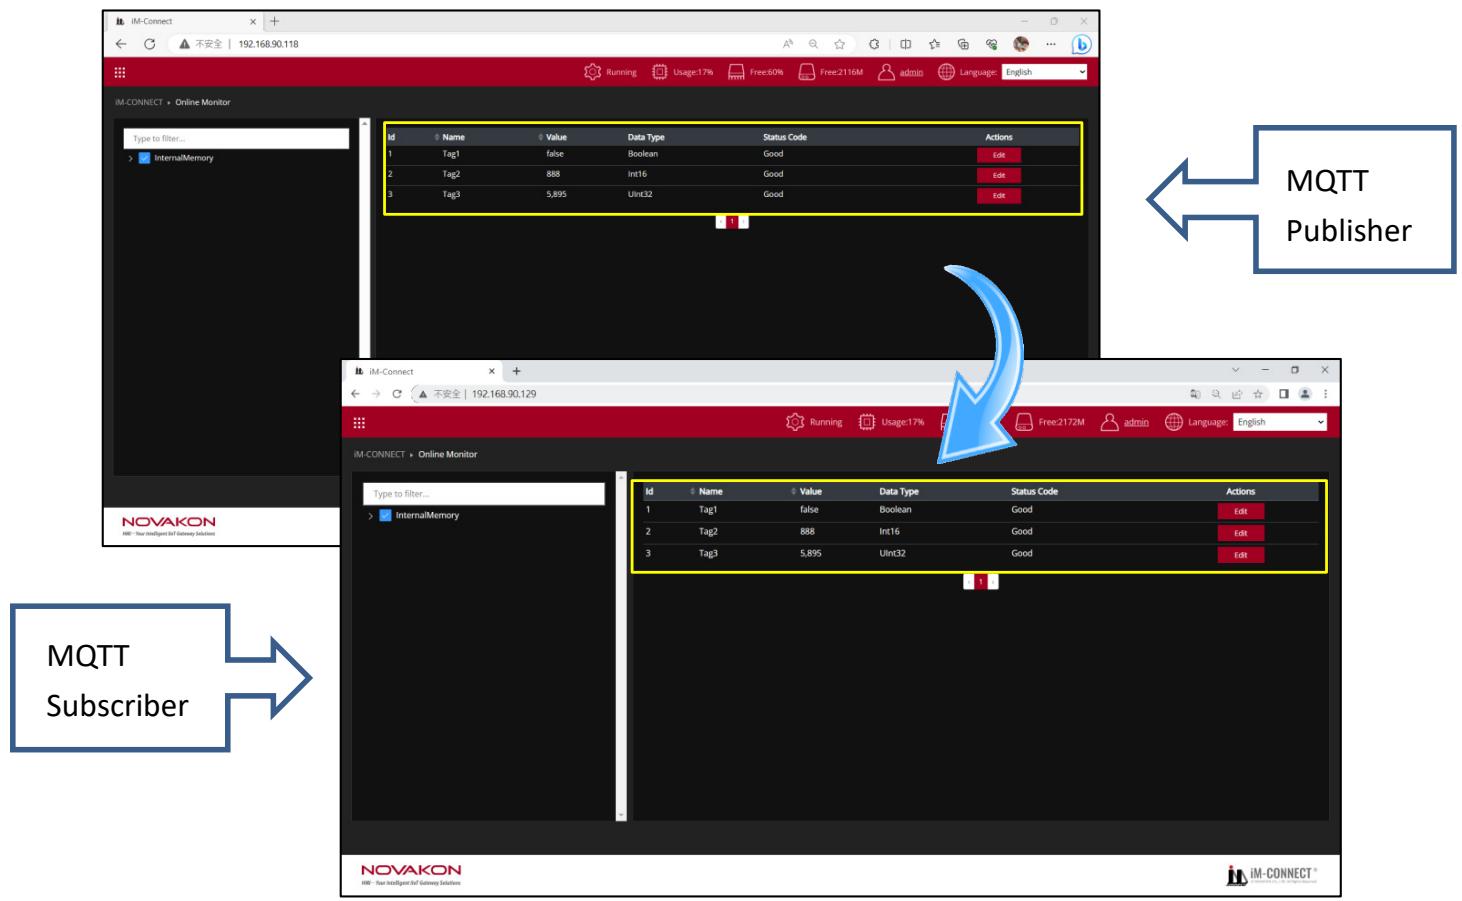
![IM-CONNECT\n192.168.90.118\nRunning\nUsage:17%\nFree:50%\nFree:2116M\nadmin\nLanguage: English\nIM-CONNECT + Online Monitor\nType to filter...\nInternalMemory\nid Name Value Data Type Status Code Actions\n1 Tag1 false Boolean Good Edit\n2 Tag2 888 Int16 Good Edit\n3 Tag3 5,895 Int32 Good Edit\nIM-Connect +\n192.168.90.129\nRunning Usage:17% Free:2172M admin Language: English\nIM-CONNECT + Online Monitor\nType to filter...\nInternalMemory\nid Name Value Data Type Status Code Actions\n1 Tag1 false Boolean Good Edit\n2 Tag2 888 Int16 Good Edit\n3 Tag3 5,895 Int32 Good Edit\nNOVAKON\nIM-Connect®\nMQTT Publisher\nMQTT Subscriber\nNOVAKON\nIM-Connect®](.im-connect-user-manual-english/232928481ca89d4a95abd0461e06f0567c34ad94d6a142b30e1c17df17fa5a4e.jpg)

# Remark：

The MQTT server host URL of 【Subscriber】 should be consistent with 【Publisher】, so that the data can be sent from 【Publisher】to 【Subscriber】 smoothly.
1 The MQTT Broker used in this example is built inside the same GW01 as the 【Publisher】, so you should go to 【System Setup】 → 【Security Setting】 → 【Broker Setting】, and press 【Enable MQTT Broker】, to specify it as an MQTT Broker.
⑶ After the setting is complete, you can enter the 【MQTT Broker】 tab and press 【Test MQTT】 to check whether it is correct.
MQTT is a one-way data transmission method, that is, 【Publisher】 sends data to 【Subscriber】.
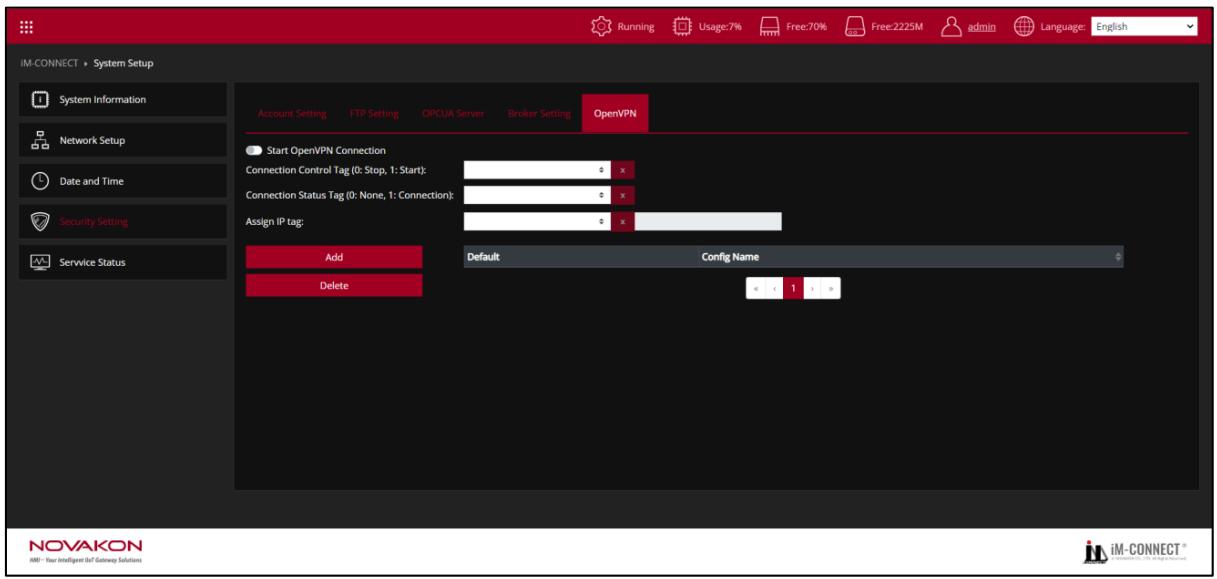
![IM-CONNECT ) System Setup\nSystem Information\nNetwork Setup\nDate and Time\nSecurity Setting\nService Status\nAccount Setting	FTP Setting	OPCUA Server	Broker Setting	OpenVPN\nStart OpenVPN Connection\nConnection Control Tag (0: Stop, 1: Start):\nConnection Status Tag (0: None, 1: Connection):\nAssign IP tag:\nAdd	Default	Config Name\nDelete\nNOVAKON\niM - Your Intelligent Hot Gateway Solutions\nRunning	Usage:7%	Free:70%	Free:2225M adultsLanguage: English](.im-connect-user-manual-english/7a0c85eefc21e1f9499863372df69ef30ac52ba8b22fd67457d96a84d7844404.jpg)

【OpenVPN】：Set OpenVPN for remote control and monitoring

【Start OpenVPN Connection】：Enable to start OpenVPN connection.

【Connection Control Tag】：Assign a bit tag to trigger the OpenVPN connection. (e.g. false： disconnect；true：connect)

【Connection Status Tag】：Assign a bit tag to show the OpenVPN connection status. (false： disconnected；true：connected)

【Assign IP tag】：Assign a string tag to show the assigned IP address of the OpenVPN Client.

【Add】：Add a (\*.ovpn) file. Click 【Add】to open the dialogue to select the (\*.ovpn) file.

【Delete】：Delete the (\*.ovpn) file is not needed.

# 12.5 Service Status

Display current status of each services in the project.
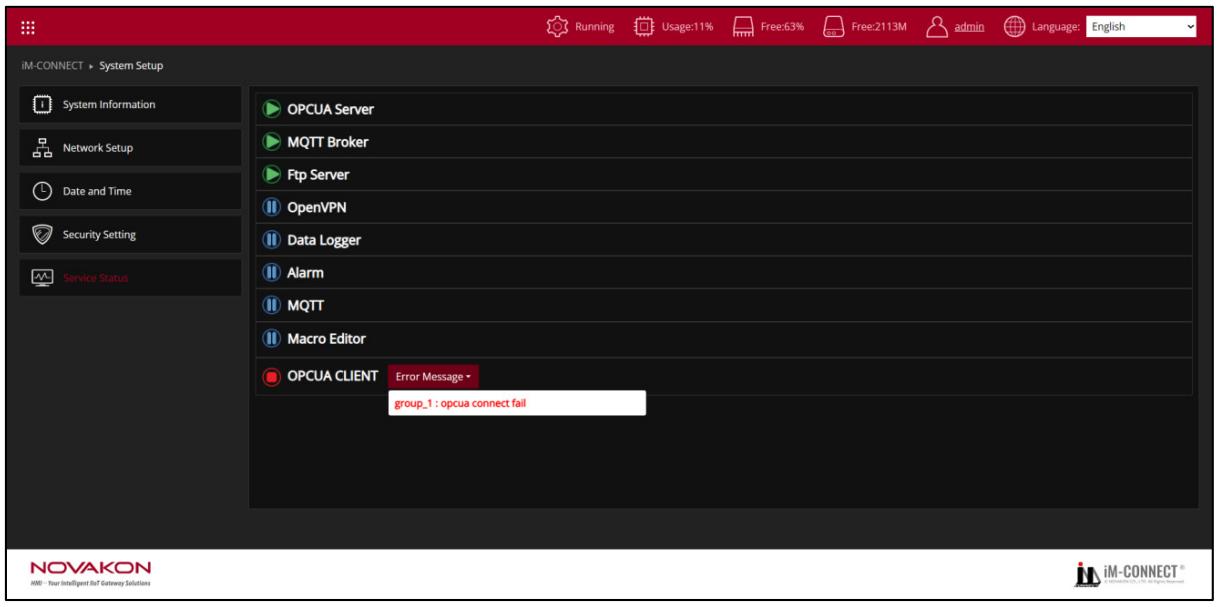
![iM-CONNECT ) System Setup\nSystem Information\nNetwork Setup\nDate and Time\nSecurity Setting\nService Status\nOPCUA Server\nMQTT Broker\nFtp Server\nOpenVPN\nData Logger\nAlarm\nMQTT\nMacro Editor\nOPCUA CLIENT Error Message *\ngroup_1 : opcua connect fail\nNOVAKON\nHMO: Your Intelligent Rolf Gateway Solutions](.im-connect-user-manual-english/224cb12c28ae2c9e1f9093d0a7e648d95be3baa7e9b98c3581b28b67c2d46094.jpg)

indicates the service is started; shows the service is stopped.

When there is an error in the service, will be displayed, and when the red 【Error Message】 button is pressed, a drop-down window will be displayed to show error-related messages.

# 13. About

【About】displays company and product related information. Users can access to NOVAKON official website for resources, including download the user manual.
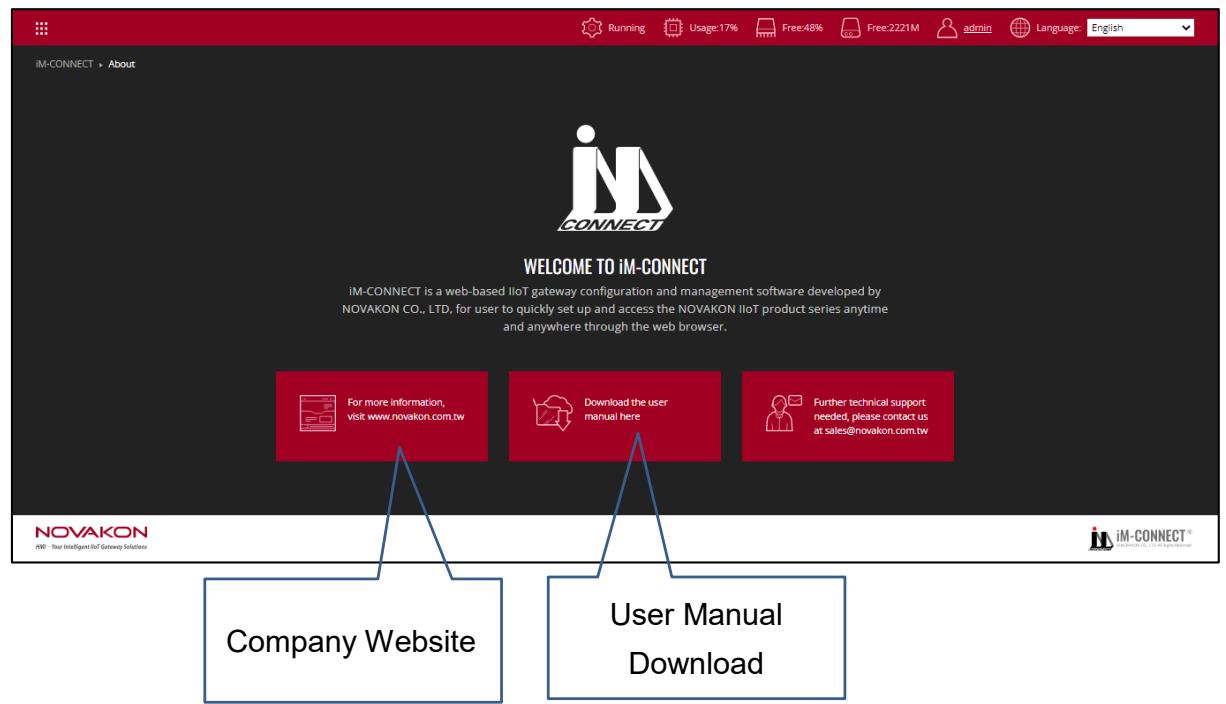
![IM-CONNECT • About\nWELCOME TO iM-CONNECT\nIM-CONNECT is a web-based IIoT gateway configuration and management software developed by\nNOVAKON CO., LTD, for user to quickly set up and access the NOVAKON IIoT product series anytime\nand anywhere through the web browser.\nFor more information,\nvisit www.novakon.com.tw\nDownload the user\nmanual here\nFurther technical support\nneeded, please contact us\nat sales@novakon.com.tw\nCompany Website\nUser Manual\nDownload\niM-CONNECT®](.im-connect-user-manual-english/cdc310703cc04bb35169a6a4e6c5884bddfe2148e0c3d4a7b6d8c5351fa46b88.jpg)

# 14. FAQ

【FAQ】is mainly for Q&A related information inquiries.

The content of FAQ will be updated through the updated version from time to time, and the relevant content can also be queried on the NOVAKON official website.
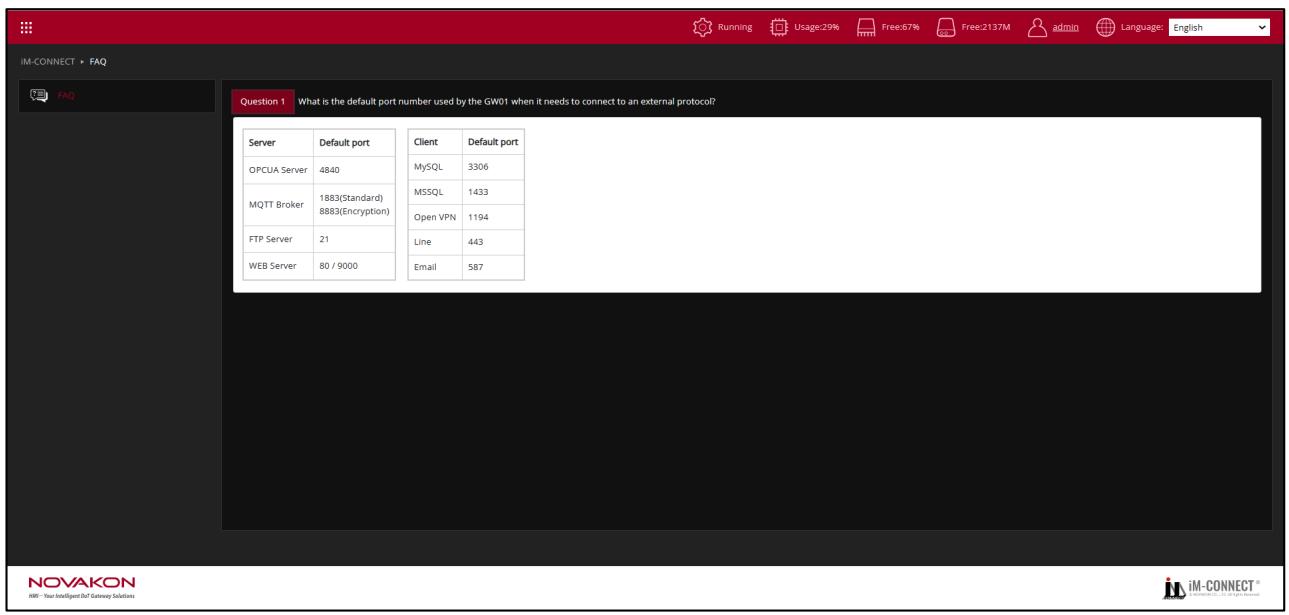
![IM-CONNECT ) FAQ\nFAQ\nQuestion 1 What is the default port number used by the GW01 when it needs to connect to an external protocol?\nServer	Default port	Client	Default port\nOPCUA Server	4840	MySQL	3306\nMQTT Broker	1883(Standard)	MSQL	1433\n8883(Encryption)	Open VPN	1194\nFTP Server	21	Line	443\nWEB Server	80 / 9000	Email	587\nNOVAKON\niM-Your Intelligent DoF Gateway Solutions](.im-connect-user-manual-english/9bf78466f376ab4583b6abd5403478e44ba1665ca8ab2149c23d2d1b81f362a2.jpg)

# 15. Connection Setup Example

# 15.1 Add Station and Link

# 15.1.1 Add Station

If same devices are using the same IP, press 【Add Note】 to add a Station; otherwise,press 【Delete Note】 to delete a Station.

Each Station can be assigned a different 【Station No】, which means it is already connected to other devices. Likewise, each tag can be assigned to a specified Station No.

A. Click Link 1 (1-to-1) and add 【Station 1】 by clicking 【Add Node】.
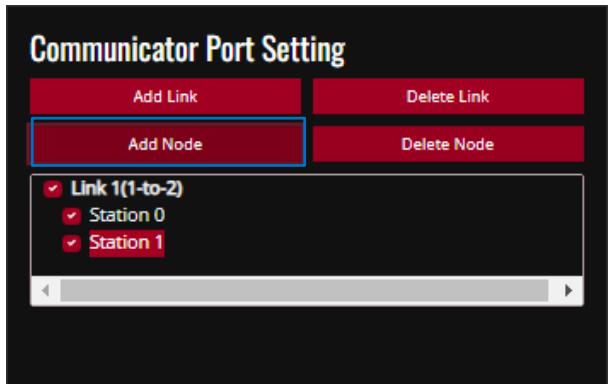
![Communicator Port Setting\nAdd Link\nDelete Link\nAdd Node\nDelete Node\nLink 1(1-to-2)\nStation 0\nStation 1](.im-connect-user-manual-english/afec7dfc8674061cef131d1503b8c14ecc23c42ae9e26cda6d780eed9aae1847.jpg)

Edit the content of 【Station 1】, set 【Station No】 to 2, meaning pairing to Device Id： 2.Repeat the same steps to increase the number of 【Station No】.
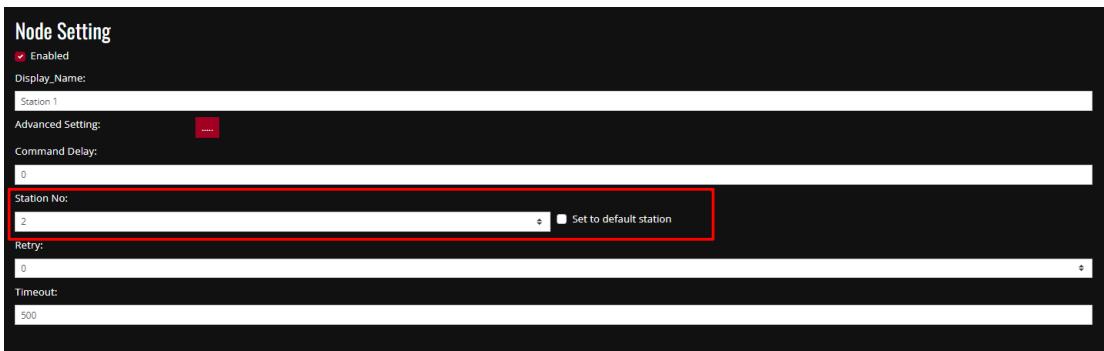
![Node Setting\nEnabled\nDisplay_Name:\nStation 1\nAdvanced Setting:\nCommand Delay:\n0\nStation No:\n2\nSet to default station\nRetry:\n0\nTimeout:\n500](.im-connect-user-manual-english/1598fba01d8eaa5af732077213121b2f3d12a64cff8fe16c283722d4469e0a12.jpg)

Edit the tag, open 【Tag Setting】, and press 【Add】 to add a new Tag. Add tags in sequence

by following the same procedure shown above.

Specify the paring Device Id by selecting the corresponding 【Station No】 with the same number.
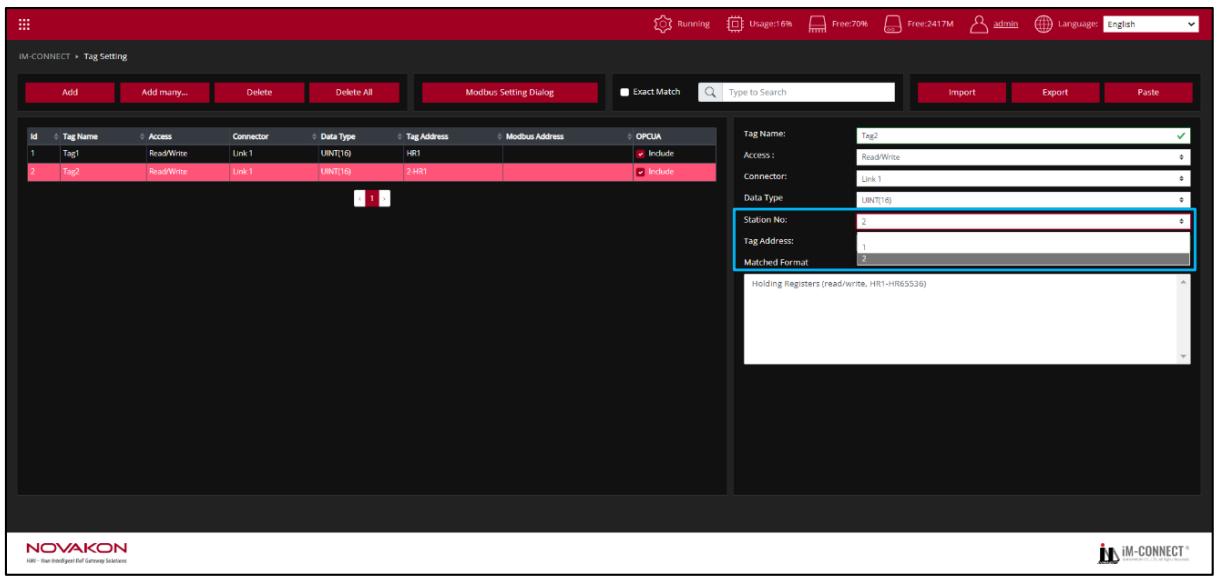
![IM-CONNECT ) Tag Setting\nAdd\nAdd many...\nDelete\nDelete All\nModbus Setting Dialog\nExact Match\nType to Search\nImport\nExport\nPaste\nId\nTag Name\nAccess\nConnector\nData Type\nTag Address\nModbus Address\nOPCUA\n1\nTag1\nRead/Write\nLink 1\nUINT(16)\nHR1\nInclude\n2\nTag2\nRead/Write\nLink 1\nUINT(16)\n2 HR1\nInclude\n1\nTag Name:\nTag2\nAccess :\nRead/Write\nConnector:\nLink 1\nData Type:\nUINT(16)\nStation No:\n2\nTag Address:\n1\nMatched Format:\n2\nHolding Registers (read/write, HR1-HR65536)\nNOVAKON\nHR: New Institute Path Currency Solutions\niM-CONNECT®](.im-connect-user-manual-english/2d7e88f44007ac665f33d2a18bece809f5a1208de203d6e43b1cb589c05438a6.jpg)

# 15.1.2 Add LINK

If a different IP (including the Port number) or COM Port is used, a LINK must be added to establish a different connection. The process is shown as follows：

A. Go back to 【IM-CONNECT Menu】 and enter the 【PLC Setting】 page → click【Add Link】 to add a new set of connections.
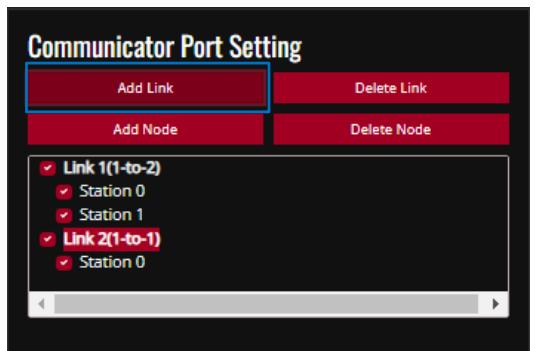
![Communicator Port Setting\nAdd Link\nDelete Link\nAdd Node\nDelete Node\nLink 1(1-to-2)\nStation 0\nStation 1\nLink 2(1-to-1)\nStation 0](.im-connect-user-manual-english/64ac012fbf2df724ae02442e786f015a288924662c15f1f900837be8cadbebe2.jpg)

Please refer to the above section 【8.1】 for the method of choosing a PLC Driver.

Follow the aforementioned process to add tags to be used in sequence.

![Id\nTag Name\nAccess\nConnector\nData Type\nTag Address\nModbus Address\nOPCUA\n1\nTag1\nRead/Write\nLink 1\nUINT(16)\nHR1\nInclude\n2\nTag2\nRead/Write\nLink 1\nUINT(16)\n2-HR1\nInclude\n3\nTag3\nRead/Write\nInternalMemory\nBit\nInclude](.im-connect-user-manual-english/fa1d26d032b5acfc510c6d91d8f4bf43b88f6cd472b8a8bc84d50aa7bd265a32.jpg)

Select Link2 in the drop-down list of 【Connector】.
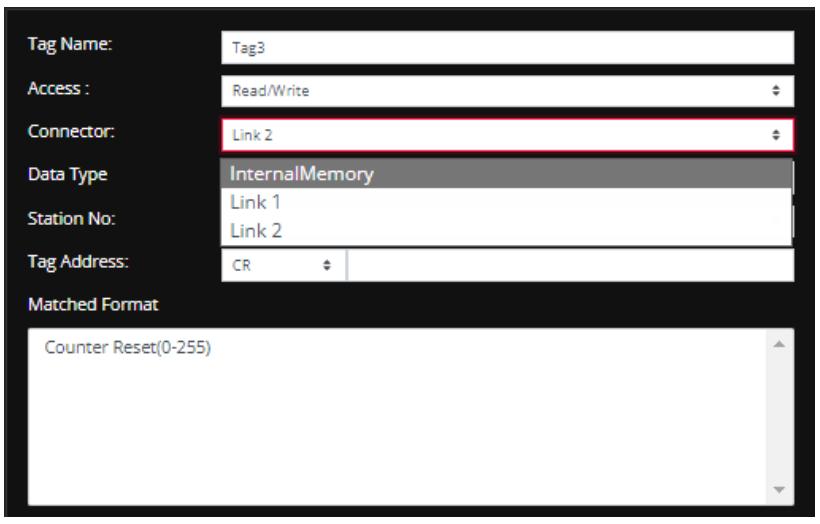
![Tag Name: Tag3\nAccess : Read/Write\nConnector: Link 2\nData Type InternalMemory\nStation No: Link 1\nLink 2\nTag Address: CR\nMatched Format\nCounter Reset(0-255)](.im-connect-user-manual-english/8aa0e76585a60815dadc39a5b162d9a0092afd2d3fd401481e3aa54be54db2c5.jpg)

The setting is complete. Tag3 is now changed as Link2.
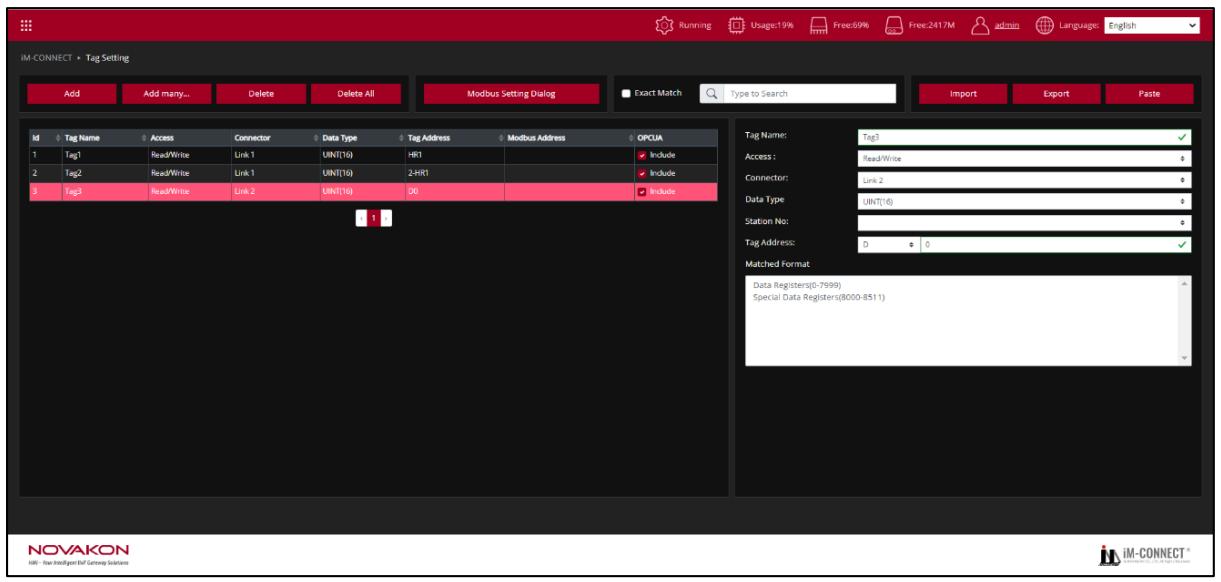
![IM-CONNECT ) Tag Setting\nAdd\nAdd many...\nDelete\nDelete All\nModbus Setting Dialog\nExact Match\nType to Search\nImport\nExport\nPaste\nId\nTag Name\nAccess\nConnector\nData Type\nTag Address\nModbus Address\nOPCJA\n1\nTag1\nRead/Write\nLink 1\nUNIT(16)\nHR1\nInclude\n2\nTag2\nRead/Write\nLink 1\nUNIT(16)\n2-HR1\nInclude\n3\nTag3\nRead/Write\nLink 2\nUNIT(16)\nDO\nInclude\nTag Name:\nTag3\nAccess :\nRead/Write\nConnector:\nLink 2\nData Type:\nUNIT(16)\nStation No:\nTag Address:\nD 0\nMatched Format\nData Registers(0-7999)\nSpecial Data Registers(8000-8511)\nNOVAKON\nHW: New Intelligent IP Currency Solutions\nIM-CONNECT®](.im-connect-user-manual-english/d8bb27060caf2aadc65d023bd3618b74baa3b7388f827203efe1fa20d7b1850e.jpg)

# 15.2 Compile PLC and Tag data, load and start service

After the tag is set, the project is ready to be uploaded to GATEWAY.

A. Go back to 【IM-CONNECT Menu】 and click 【Project Setting】.
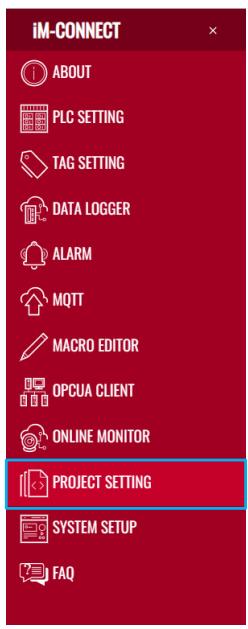
![iM-CONNECT\nABOUT\nPLC SETTING\nTAG SETTING\nDATA LOGGER\nALARM\nMQTT\nMACRO EDITOR\nOPCUA CLIENT\nONLINE MONITOR\nPROJECT SETTING\nSYSTEM SETUP\nFAQ](.im-connect-user-manual-english/76aac09ba4c3d281f77c0c0a369213d2d8c1e2dae31d5086bb0183812ee7fe7e.jpg)

B. Enter 【Save and Compile】to save the previously set content to GATEWAY for compilation.
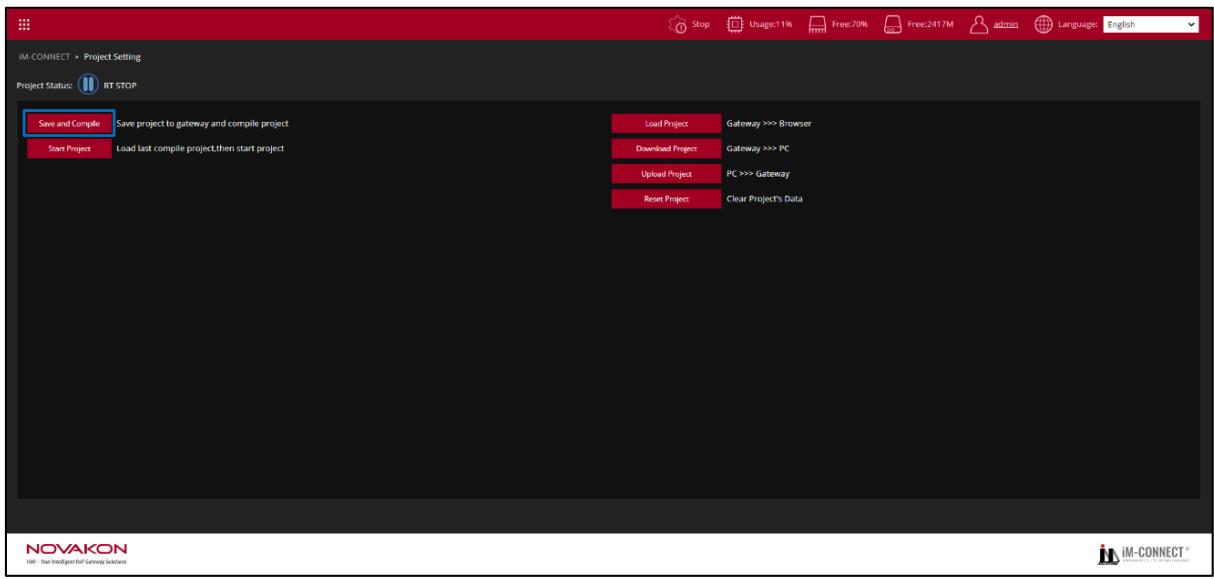
![iM-CONNECT » Project Setting\nProject Status: RT STOP\nSave and Compile\nStart Project\nSave project to gateway and compile project\nLoad last compile project.then start project\nLoad Project\nDownload Project\nUpload Project\nReset Project\nGateway ))) Browser\nGateway ))) PC\nPC ))) Gateway\nClear Project's Data\nNOVAKON\niM - Use Intelligent Of Gateway Solutions\nStop Usage:11% Free:70% Free:2417M admin Language: English](.im-connect-user-manual-english/547118355e2bbb372897abdd27a3ccb6e36cc3b7aa595c6b994fc82f3a629572.jpg)

C. Click 【Start Project】 button to stop the current service, load the new successfully compiled data, and restart the Gateway.
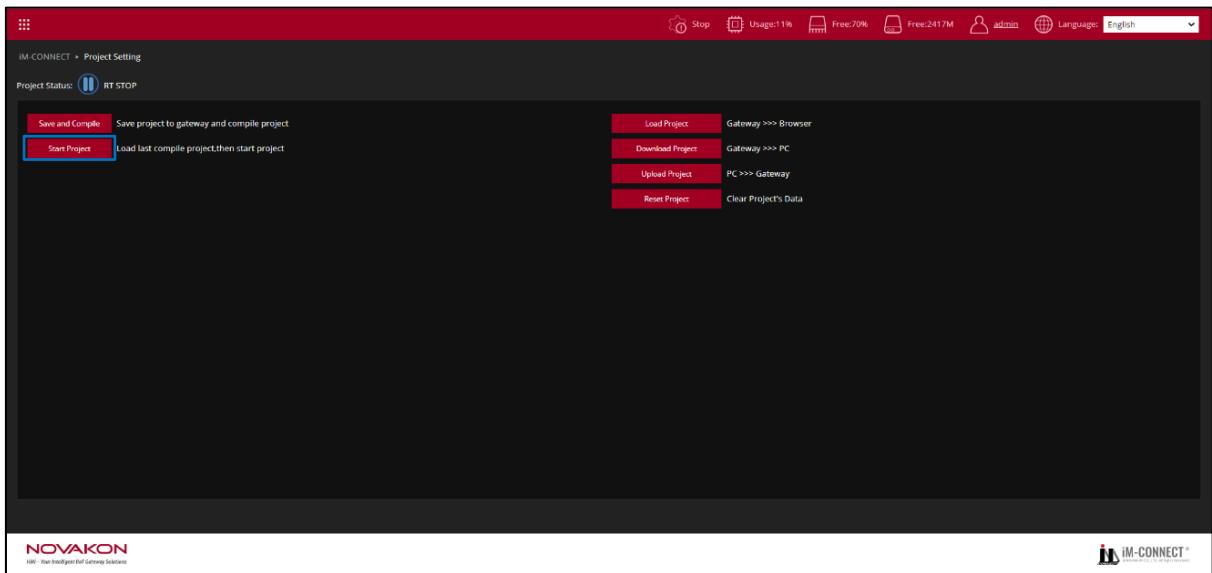
![iM-CONNECT » Project Setting\nProject Status: RT STOP\nSave and Compile Save project to gateway and compile project\nStart Project Load last compile project.then start project\nLoad Project Gateway ))) Browser\nDownload Project Gateway ))) PC\nUpload Project PC ))) Gateway\nReset Project Clear Project's Data\nNOVAKON\niM - Use Intelligent MT Saining business\nStop Usage:1% Free:70% Free:2417M admin Language: English](.im-connect-user-manual-english/65361a43488a158b92e423af429976fee9008df48cfa5757f5ad0a3eb63432a7.jpg)

# 16. Software Upgrade Guide

A. On iM-Connect webpage, click to open system menu, click on “SYSTEM SETUP”.
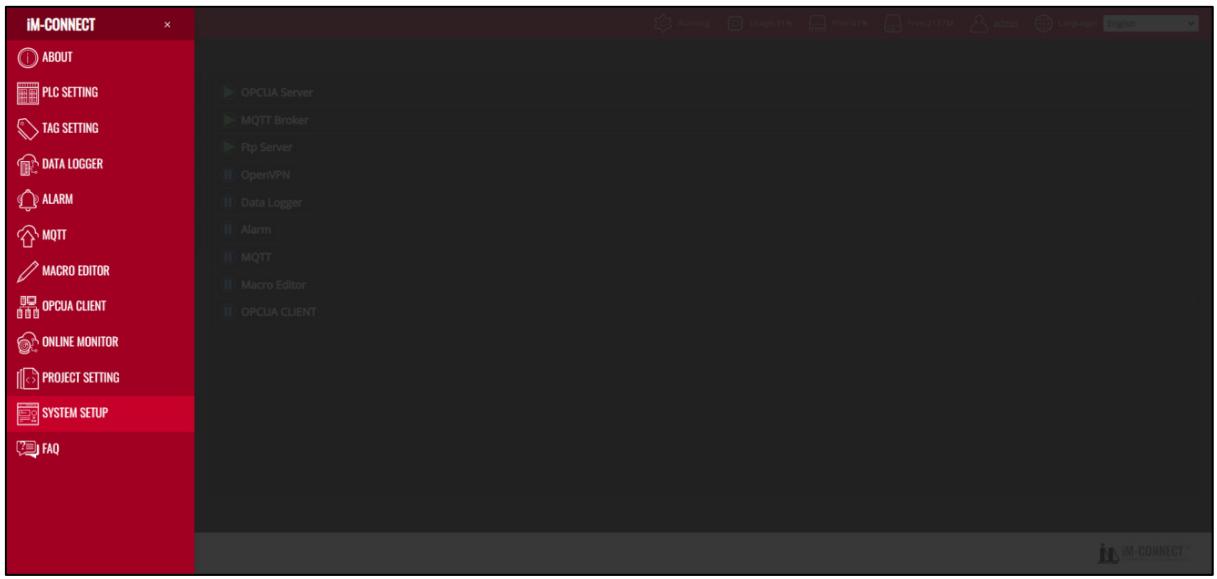
![iM-CONNECT\nABOUT\nPLC SETTING\nTAG SETTING\nDATA LOGGER\nALARM\nMQTT\nMACRO EDITOR\nOPCUA CLIENT\nONLINE MONITOR\nPROJECT SETTING\nSYSTEM SETUP\nFAQ\nOPCUA Server\nMQTT Broker\nRtp Server\nOpenVPN\nData Logger\nAlarm\nMQTT\nMacro Editor\nOPCUA CLIENT](.im-connect-user-manual-english/c7646faf82e312d09b253f82e4939d6400e79e52e6af8af59cbb37b32d713ad8.jpg)

B. Click “System Information” (In this example, website version is 2.2.11), and click “Upgrade”
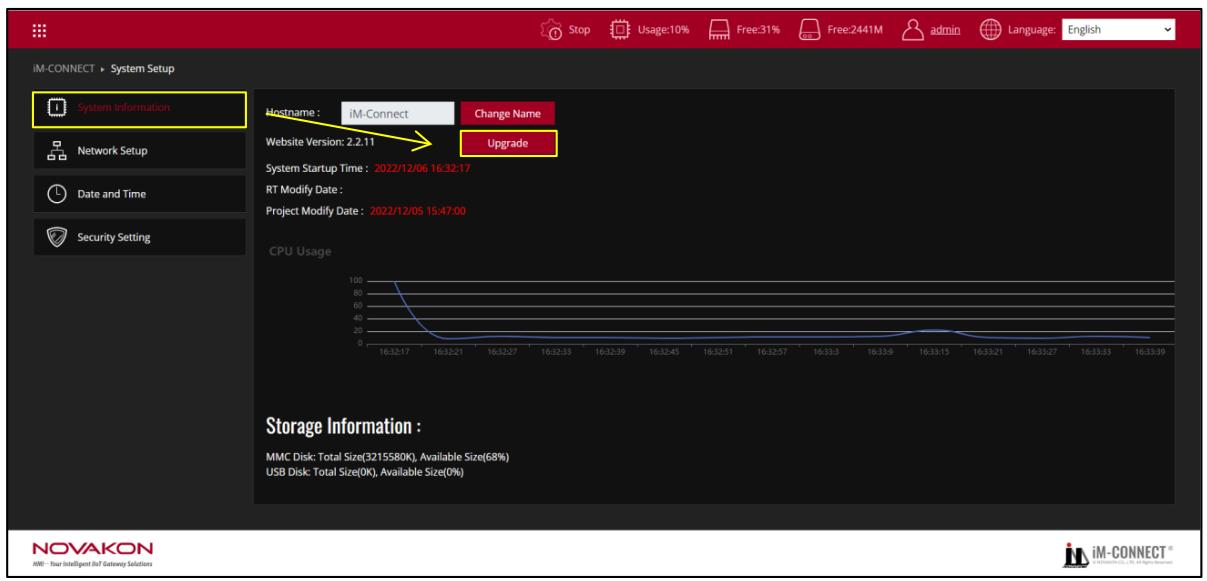
![iM-CONNECT ) System Setup\nSystem Information\nNetwork Setup\nDate and Time\nSecurity Setting\nHostname : iM-Connect\nChange Name\nWebsite Version: 2.2.11\nUpgrade\nSystem Startup Time : 2022/12/06 16:32:17\nRT Modify Date :\nProject Modify Date : 2022/12/05 15:47:00\nCPU Usage\nStorage Information :\nMMC Disk: Total Size(3215580K), Available Size(68%)\nUSB Disk: Total Size(OK), Available Size(0%)\nNOVAKON\nHMI - Your Intelligent IoT Gateway Solutions](.im-connect-user-manual-english/de54dfc031015b45f438c53a46b78dd83428638f9d7d957ed45527a3aee2c96e.jpg)

C. Locate the folder where the upgrade firmware(\*.enc) was saved and click “Open”.
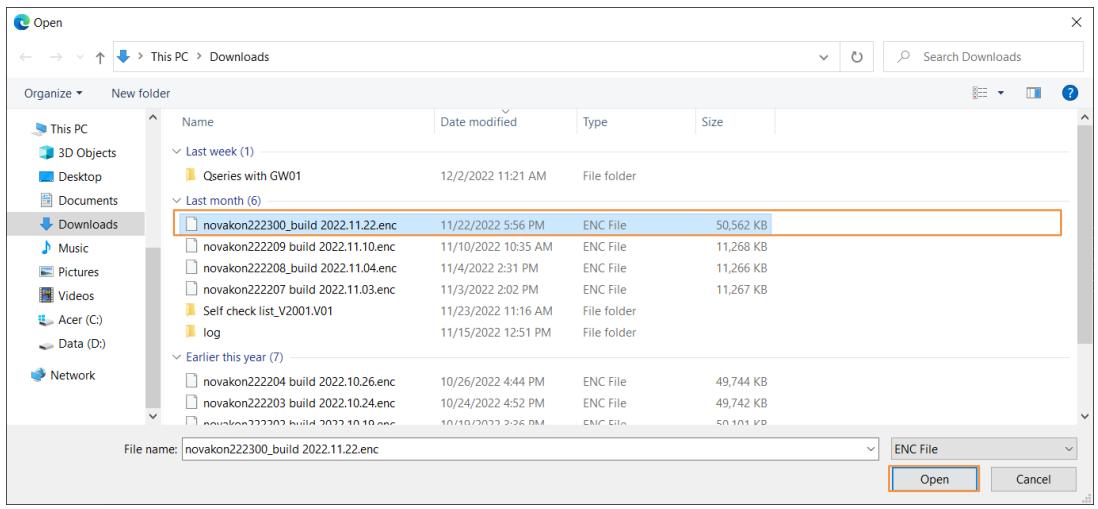
![Open\nThis PC ) Downloads\nOrganize  New folder\nName	Data modified	Type	Size\nLast week (1)\nQseries with GW01	12/2/2022 11:21 AM	File folder\nLast month (6)\nnovakon222300_build 2022.11.22.enc	11/22/2022 5:56 PM	ENC File	50,562 KB\nnovakon222209_build 2022.11.10.enc	11/10/2022 10:35 AM	ENC File	11,268 KB\nnovakon222208_build 2022.11.04.enc	11/4/2022 2:31 PM	ENC File	11,266 KB\nnovakon222207_build 2022.11.03.enc	11/3/2022 2:02 PM	ENC File	11,267 KB\nSelf check list_V2001.V01	11/23/2022 11:16 AM	File folder\nlog	11/15/2022 12:51 PM	File folder\nEarlier this year (7)\nnovakon222204_build 2022.10.26.enc	10/26/2022 4:44 PM	ENC File	49,744 KB\nnovakon222203_build 2022.10.24.enc	10/24/2022 4:52 PM	ENC File	49,742 KB\nnovakon222303_build 2022.10.19.enc	10/10/2023 3:36 PM	ENC File	50,101 KB\nFile name: novakon222300_build 2022.11.22.enc\nENC File\nOpen	Cancel](.im-connect-user-manual-english/0592a28c64cb9466de7bda5b9e9e8e8a46173be4235f0c1c9b63f5a2738398e3.jpg)

# D. You will see “Upgrading……”during the process
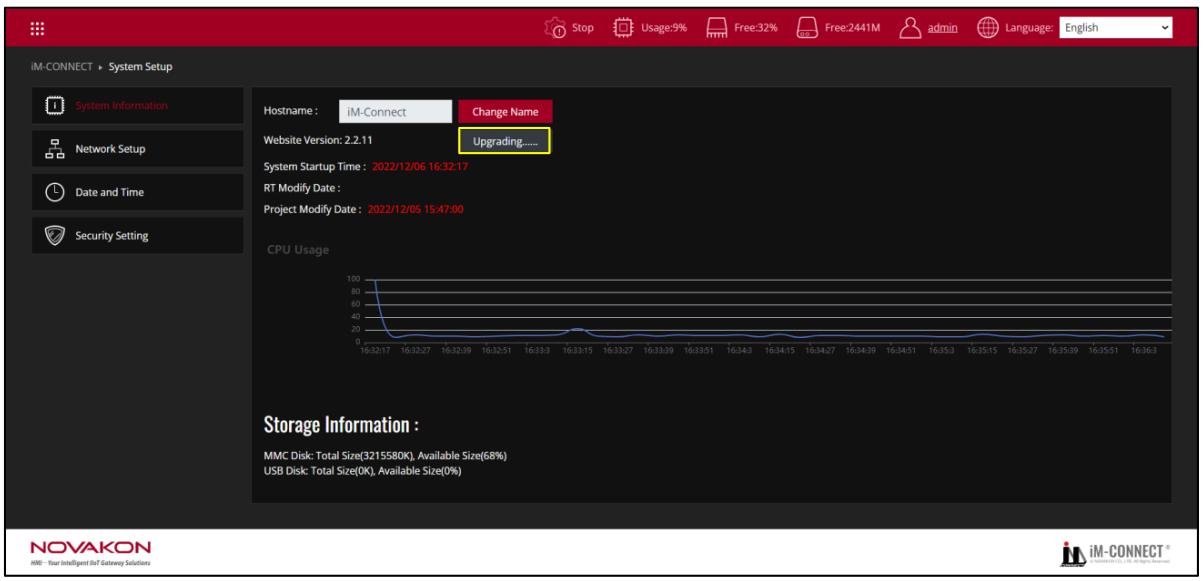
![IM-CONNECT + System Setup\nSystem Information\nNetwork Setup\nDate and Time\nSecurity Setting\nHostname: iM-Connect\nChange Name\nWebsite Version: 2.2.11\nUpgrading......\nSystem Startup Time: 2022/12/06 16:32:17\nRT Modify Date:\nProject Modify Date: 2022/12/05 15:47:00\nCPU Usage\nStorage Information :\nMMC Disk: Total Size(3215580K), Available Size(68%)\nUSB Disk: Total Size(0K), Available Size(0%)\niM-CONNECT®\nMMI - Your Intelligent IoT Gateway Solutions](.im-connect-user-manual-english/d60bd066d58bfb0dfe33002ed02e11c9de4d17a4b6b20bd208578bab81d29110.jpg)

# E. When the upgrade is complete, system will reboot, during which the webpage will show “The site can’t be reached”.
![Stop\nUsage:100%\nFree:68%\nFree:2448M\nadmin\nLanguage: English\nThe site can't be reached\nsite took too long to respond •\nTry :\n• Checking Gateway status\n• Checking the connection\n• Checking the proxy and the firewall\nERR_CONNECTION_TIMED_OUT\nNOVAKON\nHRI: Your Intelligent IT Gateway Solutions\niM-CONNECT®](.im-connect-user-manual-english/5959193a46506b0852f6f7d63fd5a1cb62574fe791381c43b8c09056ee0d9aaa.jpg)

F. Wait until the webpage is reconnected. Now the system has been upgraded but still shows previous website version.
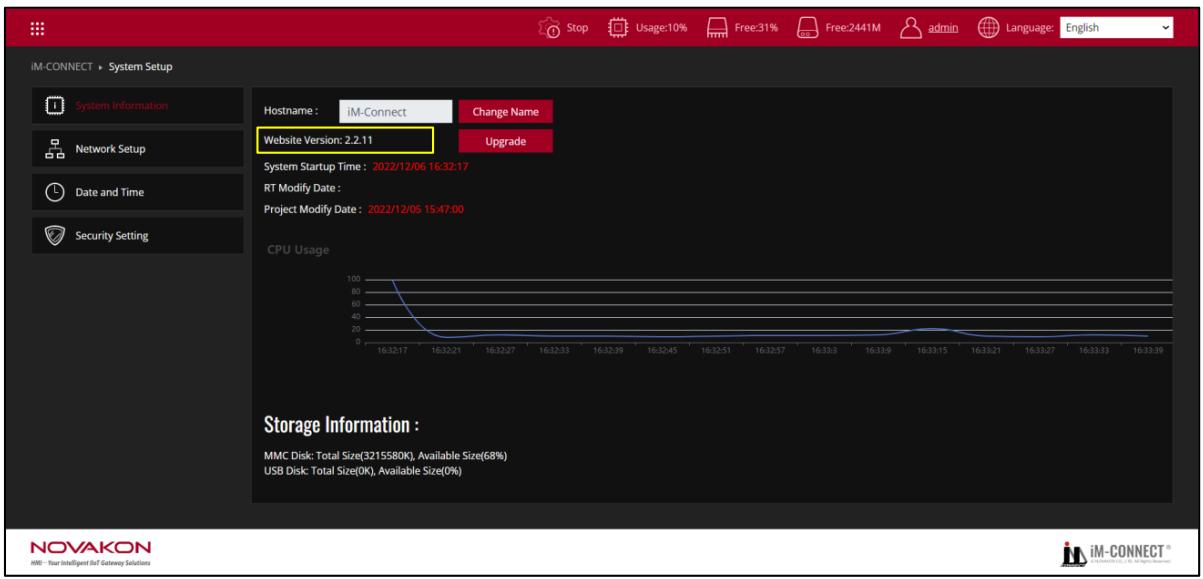
![iM-CONNECT + System Setup\nSystem Information\nNetwork Setup\nDate and Time\nSecurity Setting\nHostname: iM-Connect\nChange Name\nWebsite Version: 2.2.11\nUpgrade\nSystem Startup Time: 2022/12/06 16:32:17\nRT Modify Date:\nProject Modify Date: 2022/12/05 15:47:00\nCPU Usage\nStorage Information :\nMMC Disk: Total Size(3215580k), Available Size(68%)\nUSB Disk: Total Size(0K), Available Size(0%)\nNOVAKON\nHMI - Your Intelligent IoT Gateway Solutions\nStop Usage:10% Free:31% Free:2441M admin Language: English](.im-connect-user-manual-english/8db1fc9b5a1b3893b6986852810f002148776578860930fb92065d73d4255d30.jpg)

G. Click to refresh the webpage. Now the latest website version is re
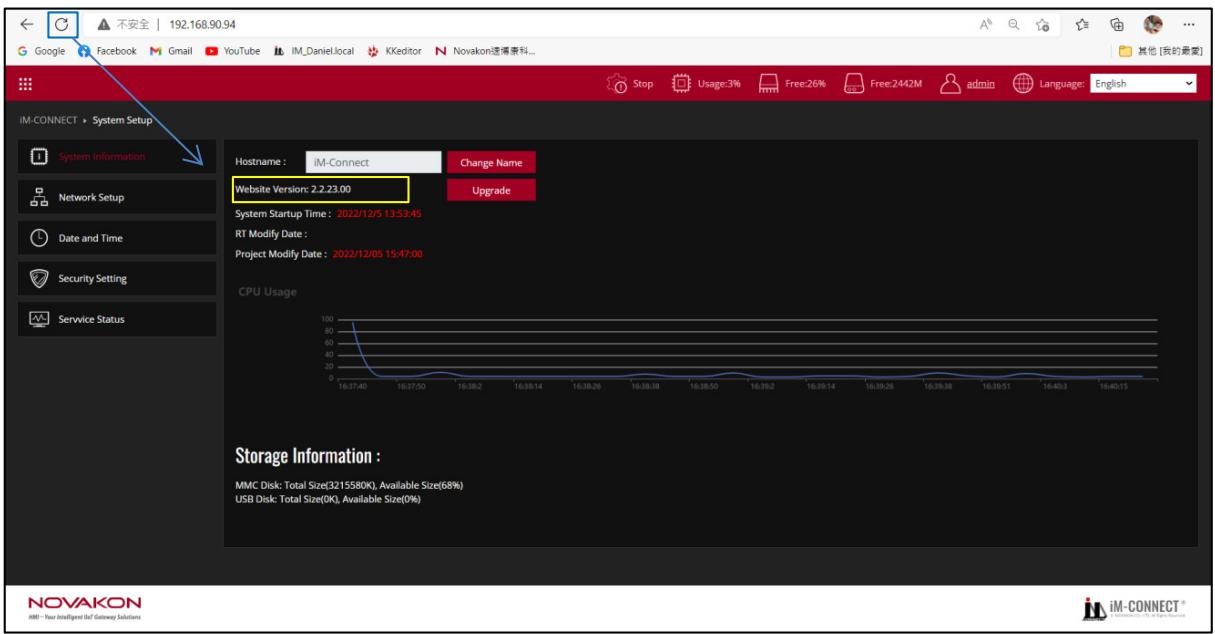
![192.168.90.94\nGoogle\nFacebook\nGmail\nYouTube\nIM_DanielLocal\nKKeditor\nNovakon達博康科...\nStop\nUsage:3%\nFree:26%\nFree:2442M\nadmin\nLanguage: English\nIM-CONNECT ) System Setup\nSystem Information\nNetwork Setup\nDate and Time\nSecurity Setting\nService Status\nHostname : iM-Connect\nWebsite Version: 2.2.23.00\nChange Name\nUpgrade\nSystem Startup Time : 2022/12/5 13:53:45\nRT Modify Date :\nProject Modify Date : 2022/12/05 15:47:00\nCPU Usage\nStorage Information :\nMMC Disk: Total Size(3215580K), Available Size(68%)\nUSB Disk: Total Size(OK), Available Size(0%)\nNOVAKON\niM - Your Intelligent Bit Gateway Solutions](.im-connect-user-manual-english/d29061cec49d2f314c5ec5c1eac0b9f78deb2782111ab30360091f2d94d4092e.jpg)
[🔗 Link to the original document](.im-connect-user-manual-english/im-connect-user-manual-english.pdf)