# MCN-2600T

# Intel® Xeon® Processor E5-2600 v3/v4 CPU Sled User’s Manual

![Internal view of a server rack with multiple CPU racks and a central motherboard (no visible text or labels)](.mcn-2600t-50-1z268-1000-10/584943a7a3bd9fe41f7c42c3e32818f4d7e162cc0bca7f3714dc139265cf26a0.jpg)

Manual Revision: 1.0

Revision Date: November 2, 2018

Part No.: 50-1Z268-1000

# Preface

# Copyright 2018 ADLINK Technology, Inc.

This document contains proprietary information protected by copyright. All rights are reserved. No part of this manual may be reproduced by any mechanical, electronic, or other means in any form without prior written permission of the manufacturer.

# Disclaimer

The information in this document is subject to change without prior notice in order to improve reliability, design, and function and does not represent a commitment on the part of the manufacturer.

In no event will the manufacturer be liable for direct, indirect, special, incidental, or consequential damages arising out of the use or inability to use the product or documentation, even if advised of the possibility of such damages.

# Environmental Responsibility

ADLINK is committed to fulfill its social responsibility to global environmental preservation through compliance with the European Union's Restriction of Hazardous Substances (RoHS) directive and Waste Electrical and Electronic Equipment (WEEE) directive.

Environmental protection is a top priority for ADLINK. We have enforced measures to ensure that our products, manufacturing processes, components, and raw materials have as little impact on the environment as possible. When products are at their end of life, our customers are encouraged to dispose of them in accordance with the product disposal and/or recovery programs prescribed by their nation or company.

![Simple line drawing of a trash bin with two crossed lines indicating no waste or prohibition (no text or symbols)](.mcn-2600t-50-1z268-1000-10/97aec19d10d9de54bd5136e167bca11b8b0678243fe453031e94aea4061736fc.jpg)

![The image features a simple graphic design on a white background consisting of three black horizontal rectangular shapes arranged vertically. The top and bottom shapes are thin horizontal strips that span the width of the image. The middle shape is a large, thick black rectangle that also spans the width, positioned between the top and bottom strips with white spacing separating them.](.mcn-2600t-50-1z268-1000-10/5c720ae8bb98c785cbdf024184a345b0a1375118ddda6531ada75616320aedaa.jpg)

Battery Labels (for products with battery)

![Symbol of a trash bin crossed out by two diagonal lines (no text or numbers present)](.mcn-2600t-50-1z268-1000-10/04bcc78d961a3c4aed3f6e5b700ff5ea2f5b39f63805b7503bf0d0b43fabbd5b.jpg)

![The image displays a standard recycling symbol enclosed within a black square border. It features three black arrows arranged in a triangular loop, with each arrow pointing clockwise to the next. The arrows are stylized as open-ended ribbons. There is no text in the image.](.mcn-2600t-50-1z268-1000-10/f87864a96d94dc3c2886381d6c9ce522a2b6fdbec3a31a94734dab69e8b3b629.jpg)
Li-ion

![RECYCLE\nRBRC\nLi-ion\n7.800.822.8837](.mcn-2600t-50-1z268-1000-10/2c89179122b27f37ab362e29af7461a3f3f93deab2941eb842a3eba1ee6703ec.jpg)

![The image displays a black square with rounded corners containing a white graphic symbol. The symbol consists of four white arrows arranged in a radial pattern, with each arrow pointing diagonally outward toward one of the four corners. The arrows intersect in the center, forming an 'X' shape. This is a common icon used to represent 'expand' or 'maximize.'](.mcn-2600t-50-1z268-1000-10/3da56885cc0b085e7f557e662d20cefbea0774e55d14ee255508fc2207d63735.jpg)
廢電池請回收

# California Proposition 65 Warning

![This image displays a standard warning symbol: a yellow equilateral triangle with a thick black border. Centered inside the triangle is a black exclamation point.](.mcn-2600t-50-1z268-1000-10/d9c84e48b02ee85084b3dd74cc5f323cb46e921c752f80232efb5cec5e2ad513.jpg)

WARNING: This product can expose you to chemicals including acrylamide, arsenic, benzene, cadmium, Tris(1,3-dichloro-2-propyl)phosphate (TDCPP), 1,4- Dioxane, formaldehyde, lead, DEHP, styrene, DINP, BBP, PVC, and vinyl materials, which are known to the State of California to cause cancer, and acrylamide, benzene, cadmium, lead, mercury, phthalates, toluene, DEHP, DIDP, DnHP, DBP, BBP, PVC, and vinyl materials, which are known to the State of California to cause birth defects or other reproductive harm. For more information go to www.P65Warnings.ca.gov.

# Trademarks

Product names mentioned herein are used for identification purposes only and may be trademarks and/or registered trademarks of their respective companies.

Revision History

<table><tr><td>Revision</td><td>Release Date</td><td>Description of Change(s)</td></tr><tr><td>1.0</td><td>2018-11-02</td><td>Initial release</td></tr></table>

# Table of Contents

# Preface ....

# 1 Overview .....

1.1 Introduction . . 6
1.2 CPU Sled Overview ... . 7

1.2.1 CPU Sled Specifications .
1.2.2 CPU Sled Front Panel . . 8
1.2.3 CPU Sled Layout . 9
1.2.4 DPDK Support . . 10

# 2 Getting Started... 11

2.1 Preparing the CPU Sled.. ..11

2.1.1 Installing the CPUs . .11
2.1.2 Installing the Heatsinks. . 13
2.1.3 Installing Memory.. . 14
2.1.4 Installing a SATA Drive..... . 16
2.1.5 Installing an M.2 SSD Module .

2.2 Front Panel Layout.. . 19
2.3 Inserting and Removing the CPU Sled .. . 19

# 3 Powering Up the CPU Sled ........ . 20

3.1 Power-Up Behavior... .. 20
3.2 Health/Status Indicators . . 20

# 4 Using the CPU Sled ................ . 21

4.1 Hot-Swapping the CPU Sled.. .. 21
4.2 Using Serial Console . . 21
4.3 Serial Over LAN via BMC . . 23

4.3.1 Configuring the BMC IP Address .. . 23
4.3.2 Configuring BIOS for SOL . . 24
4.3.3 Configuring OS for SOL. . 24
4.3.4 Establishing SOL . . 24

4.4 Firmware Upgrade . . 25

4.4.1 Updating MCN-2600T BIOS . . 25
4.4.2 Updating BMC . . 26

# 5 BIOS Setup...... 27

5.1 Entering BIOS Setup.. . 27
5.2 Setup Menu.... . 27
5.3 Navigation..
5.4 Main Setup... .. 31

5.4.1 System & Board Info. .. 31
5.4.2 System Date/System Time ... . 32

5.5 Advanced BIOS Setup.. .. 32

5.5.1 ACPI Settings . . 33
5.5.2 AST1010 Super IO Configuration..... . 34
5.5.3 Serial Port Console Redirection.
5.5.4 PCI Subsystem Settings . . 39
5.5.5 Network Stack Configuration .
5.5.6 CSM Configuration . . 41
5.5.7 ADLINK IPMI Settings . . 42
5.5.8 LAN Bypass Settings . . 43

5.6 IntelRCSetup.. . 45

5.6.1 Processor Configuration .
5.6.2 Advanced Power Management Configuration .
5.6.3 Common RefCode Configuration.. . 50
5.6.4 Memory Configuration .. . 50
5.6.5 IIO Configuration.. . 52
5.6.6 PCH Configuration. . 54

5.7 Server Mgmt . . 56
5.8 Security Setup... . 58
5.9 Boot Setup . . 59
5.10 Save & Exit Menu . .. 61

Safety Instructions ..... ... 64

Consignes de Sécurité Importantes ..... . 66

Getting Service ........... ............ 68

# 1 Overview

# 1.1 Introduction

The ADLINK MCN-2600T is a high-performance CPU sled featuring dual Intel® Xeon® E5 processors, interconnected by dual redundant switch modules when installed in the CSA-7400 Network Appliance. It is ideally suited for building next generation high-performance firewalls and virtualized telecom elements.

The main features of the MCN-2600T are summarized as follows:

• Maximum of four MCN-2600T CPU sleds are supported in the CSA-7400
Dual redundant switch modules provide up to 2x 50G data plane links to each MCN-2600T in the CSA-7400
Independent 1G control plane links that connect four MCN-2600T, two switch management CPUs (implemented by COMe module) and two Chassis Management Modules (CMM).
Supports IPMI 2.0 specification, provides web-based intelligent system management via CMM on switch sleds, and supports SOL on compute nodes
Optionally integrates Wind River® Titanium Server or OPNFV software to provide carrier grade NFV service

# 1.2 CPU Sled Overview

# 1.2.1 CPU Sled Specifications

<table><tr><td colspan="2">Core System</td></tr><tr><td>CPU</td><td>Intel® Xeon® processor E5-2620 v3 (6C/12T)Intel® Xeon® processor E5-2630 v3 (8C/16T)Intel® Xeon® processor E5-2628L v3 (10C/20T)Intel® Xeon® processor E5-2658 v3 (12C/24T)Intel® Xeon® processor E5-2680 v3 (12C/24T)Intel® Xeon® processor E5-2699 v3 (18C/36T)Intel® Xeon® processor E5-2628L v4 (12C/24T)Intel® Xeon® processor E5-2680 v4 (14C/28T)</td></tr><tr><td>L2 Cache</td><td>15MB/20MB/25MB/30MB/35MB/45MB dependent on CPU</td></tr><tr><td>Chipset</td><td>Intel® C610 Chipset</td></tr><tr><td>Memory</td><td>12x DDR4-1600/1866/2133 DIMM socket, ECC, up to 192GB</td></tr><tr><td>BIOS</td><td>AMI BIOS on SPI flash memory</td></tr><tr><td>Operating Systems</td><td>Window 7 64bit, Linux Kernel 2.6 or above</td></tr><tr><td colspan="2">I/O Interfaces</td></tr><tr><td>Ethernet</td><td>2x RJ-45 10/100/1000BASE-T Ethernet ports on front panel2x 1G Ethernet ports to two switch boards via mid-plane</td></tr><tr><td>Console</td><td>1x RJ-45 serial port</td></tr><tr><td>USB</td><td>2x USB 3.0</td></tr><tr><td>Graphics</td><td>1x VGA socket onboard</td></tr><tr><td>Storage</td><td>2x 2.5” hot-swappable SATA drive bays &amp; 2x M.2 SSD</td></tr><tr><td>Backplane</td><td>2x PCIe G3 x 8 to Switch nodes</td></tr><tr><td colspan="2">Control Buttons and LEDs</td></tr><tr><td>Power</td><td>1x Power Button (front)</td></tr><tr><td>Reset</td><td>1x Reset Button (front)</td></tr><tr><td>LEDs</td><td>Power, Status, Drive</td></tr><tr><td colspan="2">Mechanical</td></tr><tr><td>Form Factor</td><td>213.9mmx 40.44mm x 432.1mm (W x H x D)</td></tr><tr><td>Operating Temp.</td><td>0°C to +40°C</td></tr><tr><td>Storage Temp.</td><td>-40°C to +70°C</td></tr><tr><td>Humidity</td><td>10% to 80%, non-condensed</td></tr><tr><td>RoHS</td><td>RoHS Compliant</td></tr></table>

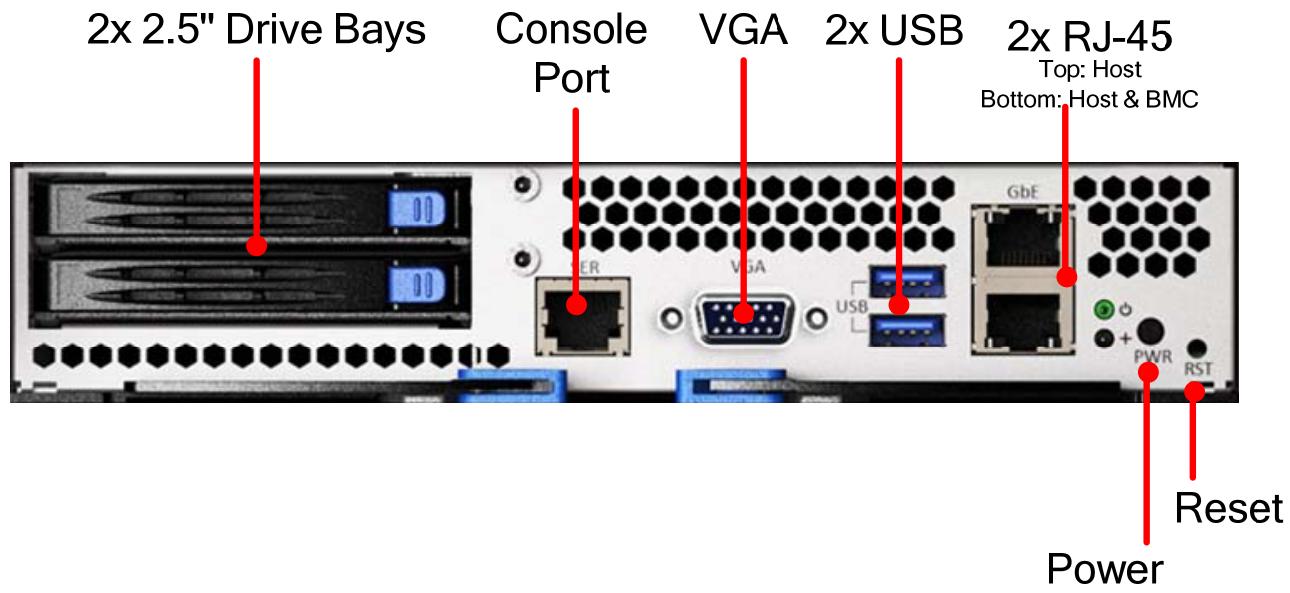
# 1.2.2 CPU Sled Front Panel

![2x 2.5' Drive Bays\nConsole Port\nVGA\n2x USB\n2x RJ-45\nTop: Host\nBottom: Host & BMC\nReset\nPower](.mcn-2600t-50-1z268-1000-10/4eb5801c1fef06f35118fa46c8ed07b92c291825680d396a82811e8327c4c112.jpg)

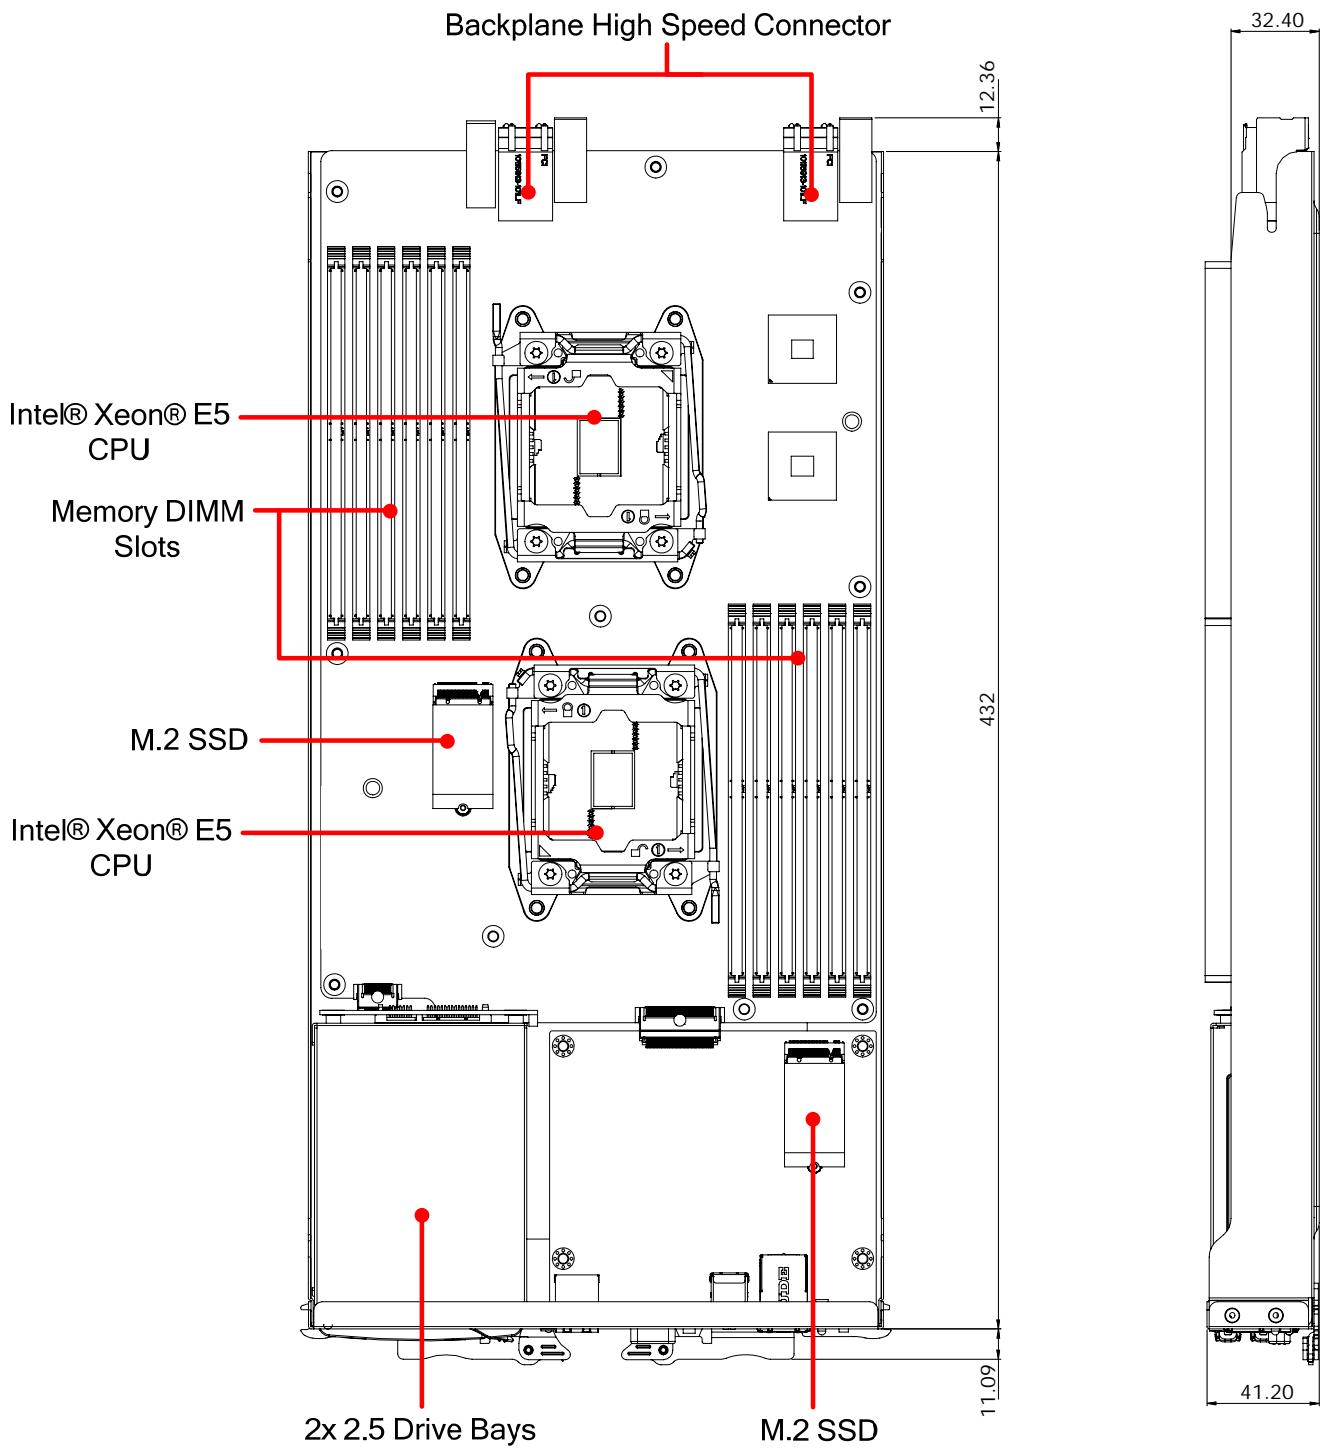
# 1.2.3 CPU Sled Layout

![This image is a technical diagram of a motherboard layout with red lines connecting labels to specific components. The text labels and dimensions include:\n\n*   **Top Center:** 'Backplane High Speed Connector'\n*   **Top Right:** '32.40' and '12.36'\n*   **Left Side (Top):** 'Intel® Xeon® E5 CPU'\n*   **Left Side (Middle):** 'Memory DIMM Slots'\n*   **Left Side (Lower Middle):** 'M.2 SSD'\n*   **Left Side (Bottom):** 'Intel® Xeon® E5 CPU'\n*   **Right Side (Middle Vertical):** '432'\n*   **Bottom Left:** '2x 2.5 Drive Bays'\n*   **Bottom Right:** 'M.2 SSD'\n*   **Bottom Right (Dimensions):** '11.09' and '41.20'](.mcn-2600t-50-1z268-1000-10/fff77ffe87762343e9c8f28ad03df1861a747b9ac54cb1f838fd093cc8f16616.jpg)

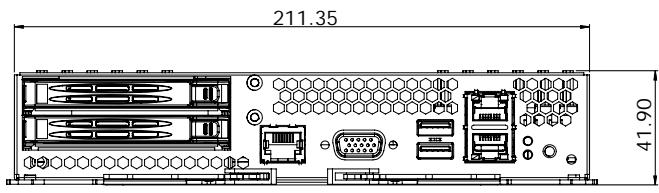
![211.35\n41.90](.mcn-2600t-50-1z268-1000-10/0af615395b3e50ab21c9e3aa6041aa8ae683a55af80fee6ec78255be390caa4f.jpg)

# 1.2.4 DPDK Support

DPDK is a set of libraries and drivers for fast packet processing, and it can improve packet processing performance by up to ten times. The MCN-2600T CPU sled is fully validated with DPDK and can provide a high throughput for data plane packet processing.

# 2 Getting Started

# 2.1 Preparing the CPU Sled

The MCN-2600T is a single-system dual Intel® Xeon® E5 compute node.

Note: See 4.4.1 Updating MCN-2600T BIOS for instructions on how to power down the CPU sled.

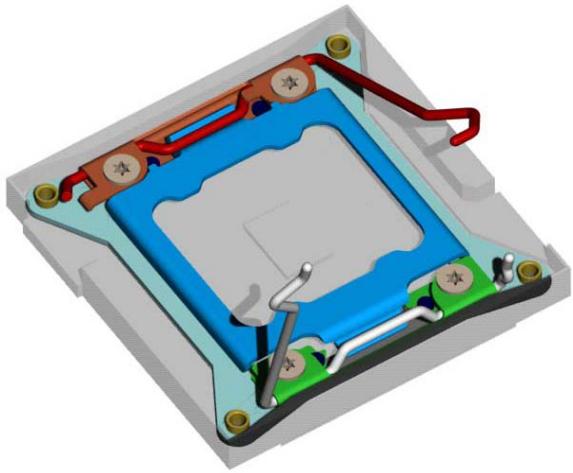
# 2.1.1 Installing the CPUs

# Opening Sequence

# Step-1

By opening red le 1st it creates clea to open the gray lever.
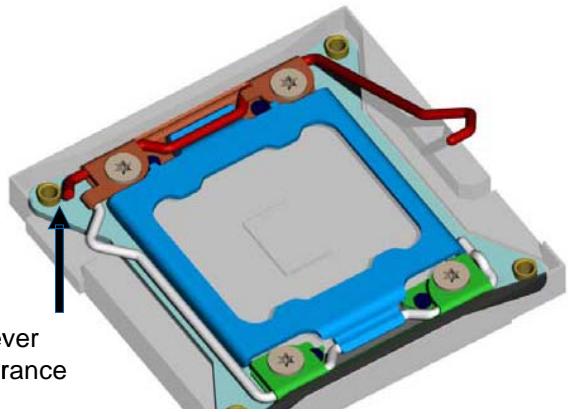
![3D mechanical assembly diagram showing a blue chip with red and green components, no visible text or symbols](.mcn-2600t-50-1z268-1000-10/e43cdbad123f327963c6e7512a5fcc652fb5907c4c221c86071ca951acc39f6a.jpg)

# Step-2

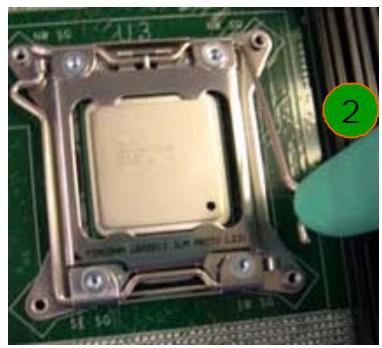
![3D CAD rendering of a mechanical assembly with blue and green components, no visible text or symbols](.mcn-2600t-50-1z268-1000-10/6aacf4e5a738e02562f1bc004d447ce4c0607c32b7ebf375bfa2c6c4a8c0db51.jpg)

Opening Sequence for Independent Load Mechanism (ILM) and Load Plate
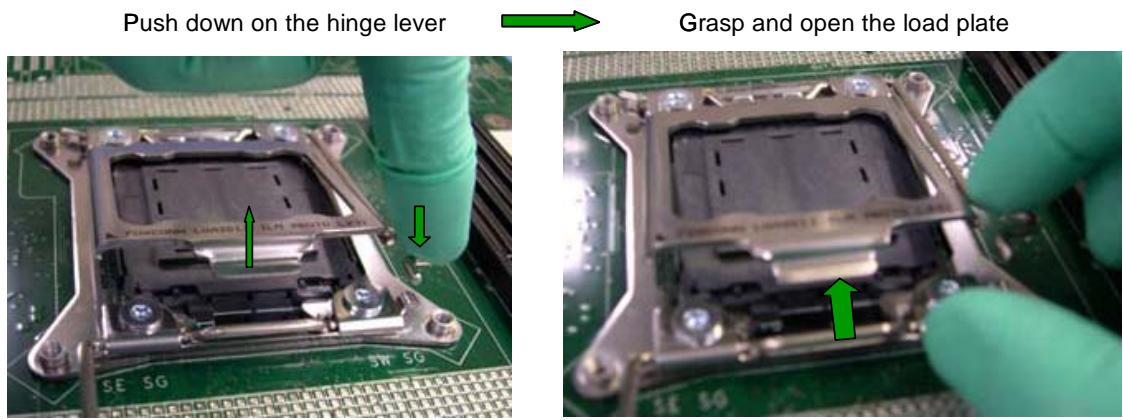
![The image displays two side-by-step photographs providing instructions for manipulating a CPU socket.\n\n**Left Panel:**\n*   **Text:** 'Push down on the hinge lever'\n*   **Visual:** A green-gloved finger presses down on a metal lever on the right side of the socket.\n*   **Arrows:** A green arrow points up at the lever, and another green arrow points down at the finger.\n*   **Bottom Text:** 'S E S G' and 'S H S G' are visible on the circuit board.\n\n**Right Panel:**\n*   **Text:** 'Grasp and open the load plate'\n*   **Visual:** A green-gloved hand lifts the edge of the metal load plate.\n*   **Arrow:** A green arrow points up at the lifted edge of the plate.\n*   **Bottom Text:** 'S E S G' and 'S H S G' are visible on the circuit board.](.mcn-2600t-50-1z268-1000-10/5a22062b3085c7e255c3d99e9a6058f879e755e3d50e383cfacac06dc72306c9.jpg)

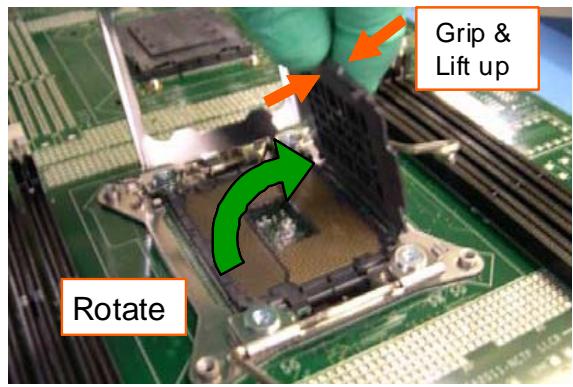
Removing the Pick and Place (PnP) Cap
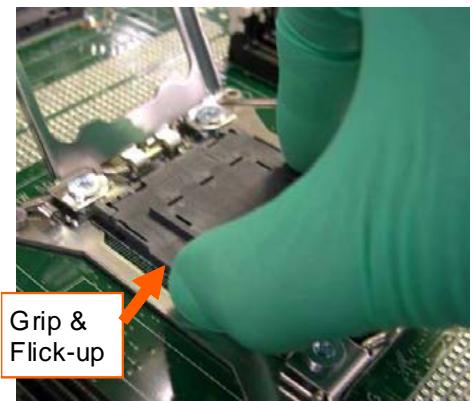
![Grip &\nFlick-up](.mcn-2600t-50-1z268-1000-10/3f8052c37c40e059a63d6e281b5d3b9d439ffcee96132384a7d81e2d4472b116.jpg)

![Grip &\nLift up\nRotate](.mcn-2600t-50-1z268-1000-10/089170e972abc9416d3fa0f7c8a98246a9c84f83522f238d9736dba77424040f.jpg)

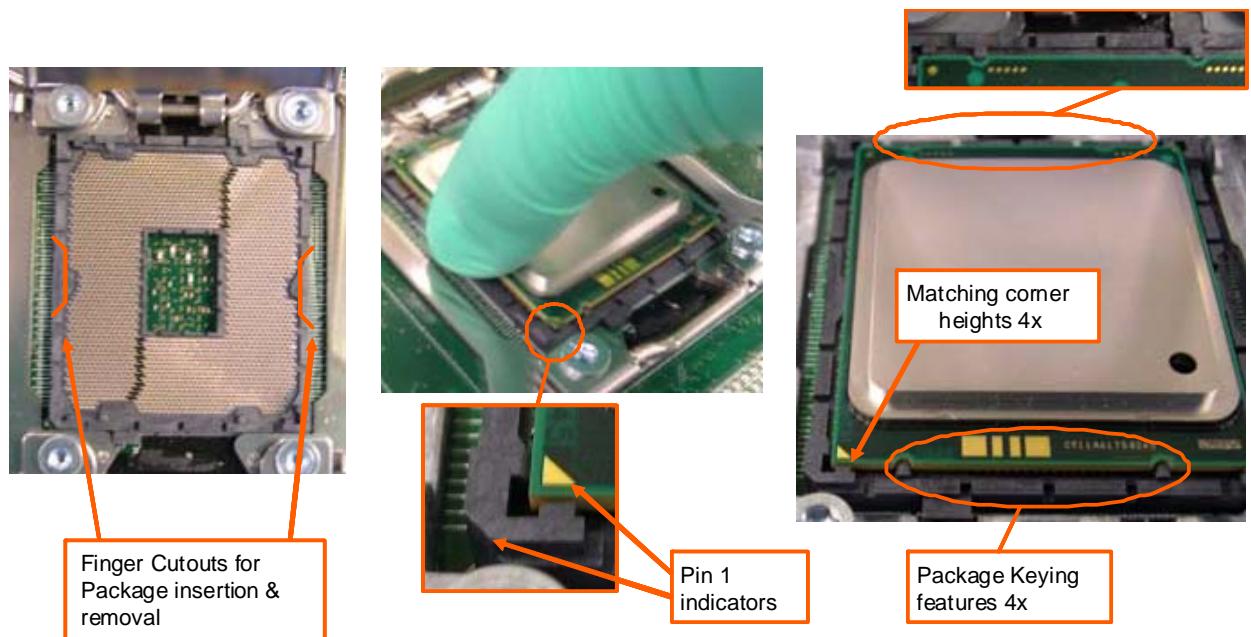
Package Insertion
![The image is a composite of three photographs illustrating the alignment and insertion features of a CPU socket.\n\n*   **Left Panel:** Shows a CPU socket with orange brackets highlighting cutouts on the sides. A text box below reads: 'Finger Cutouts for Package insertion & removal'.\n*   **Center Panel:** Depicts a gloved hand positioning a processor into a socket. An orange circle highlights a corner, which is shown in a magnified inset box below. An arrow points to this inset with the label: 'Pin 1 indicators'.\n*   **Right Panel:** Displays a CPU package seated in the socket. Orange circles highlight the top and bottom edges. A text box pointing to the corners reads: 'Matching corner heights 4x'. Another text box pointing to the bottom edge reads: 'Package Keying features 4x'. A small inset at the very top right shows a close-up of the top edge.](.mcn-2600t-50-1z268-1000-10/dc1041ba276be547c34a8e68ee10d860ddc0f04d8cf726ef8ad38a5fddadf029.jpg)

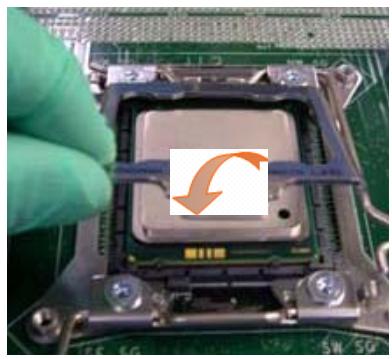
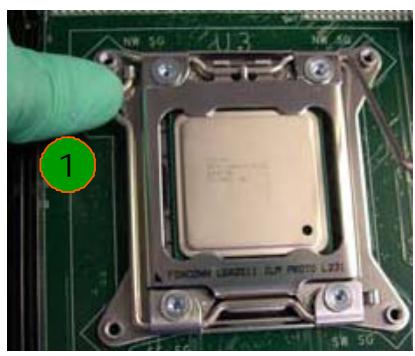
# Closing the ILM and Load Plate

![Close-up of a green CPU socket with a hand adjusting its top panel, showing internal components and a blue circular arrow indicating rotation (no text or symbols)](.mcn-2600t-50-1z268-1000-10/e8e07679dfe7f25bccd57569c4ba107b1cef64d0f50dfd339b2c000f47b7a587.jpg)

![Close-up of a CPU socket mounted on a green circuit board with a green circular indicator labeled '1' (no readable text or symbols beyond labels)](.mcn-2600t-50-1z268-1000-10/27bcb7751e407999703feeb9e50730a56d2f988633c256aae7fa63b7b2b47c77.jpg)

![Close-up of a green-lit computer chip mounted on a green circuit board, with a finger pointing to the component (no visible text or symbols)](.mcn-2600t-50-1z268-1000-10/33df761d4013402ee8d37864cfbf2766baad11d53909b6de86db4f8c420b1230.jpg)

# 2.1.2 Installing the Heatsinks

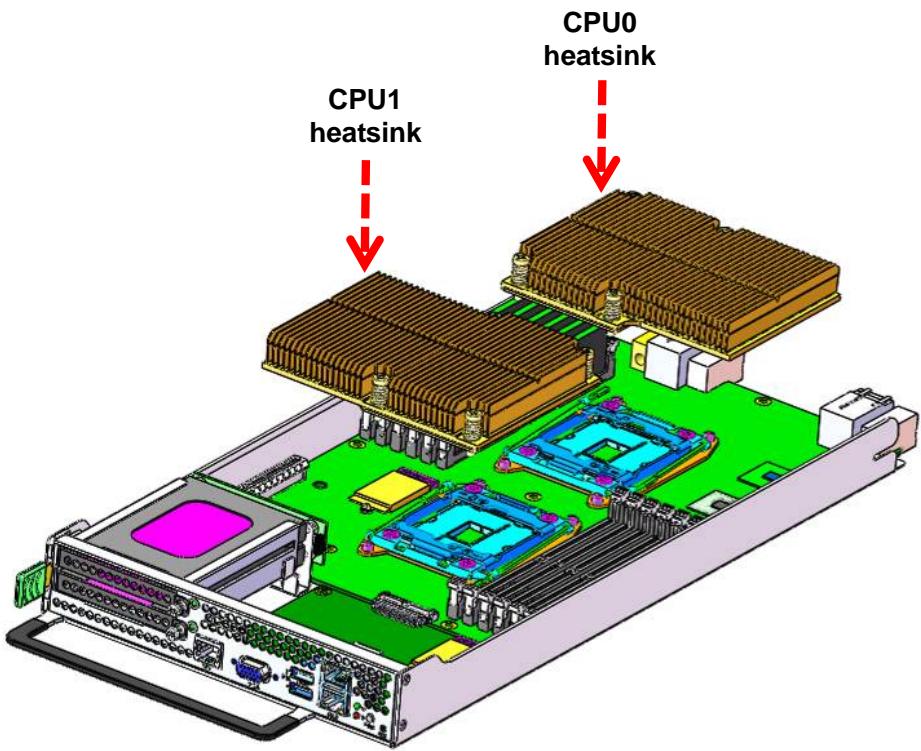
# Heat sink installation

Place the heat sink on top of each CPU and secure it by screwing in the captive screws.
![CPU0 heatsink\nCPU1 heatsink](.mcn-2600t-50-1z268-1000-10/b7ecf40044f7a4772b6ec3037e8548d1320fbfe2b3aed318b72ae0022110e33d.jpg)

# 2.1.3 Installing Memory

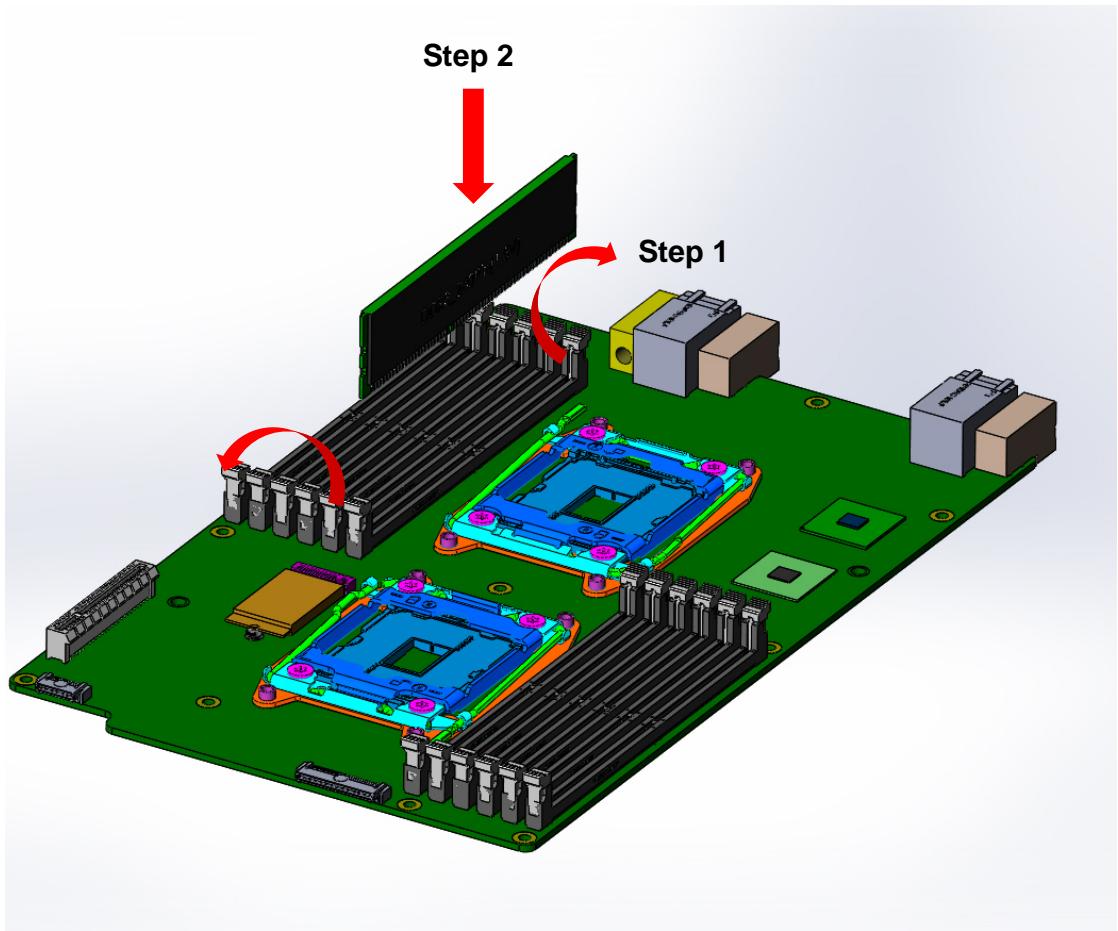
1. Open the locking levers on both sides of each socket.
2. Align the memory module with the keys in the socket and press down firmly until both locking levers click into place.
![Step 2\nStep 1](.mcn-2600t-50-1z268-1000-10/d4123c43353107afc9bd2ac6c7db74f8f44ffe1d0f8b9204305ca289a8632abe.jpg)

# Memory Population

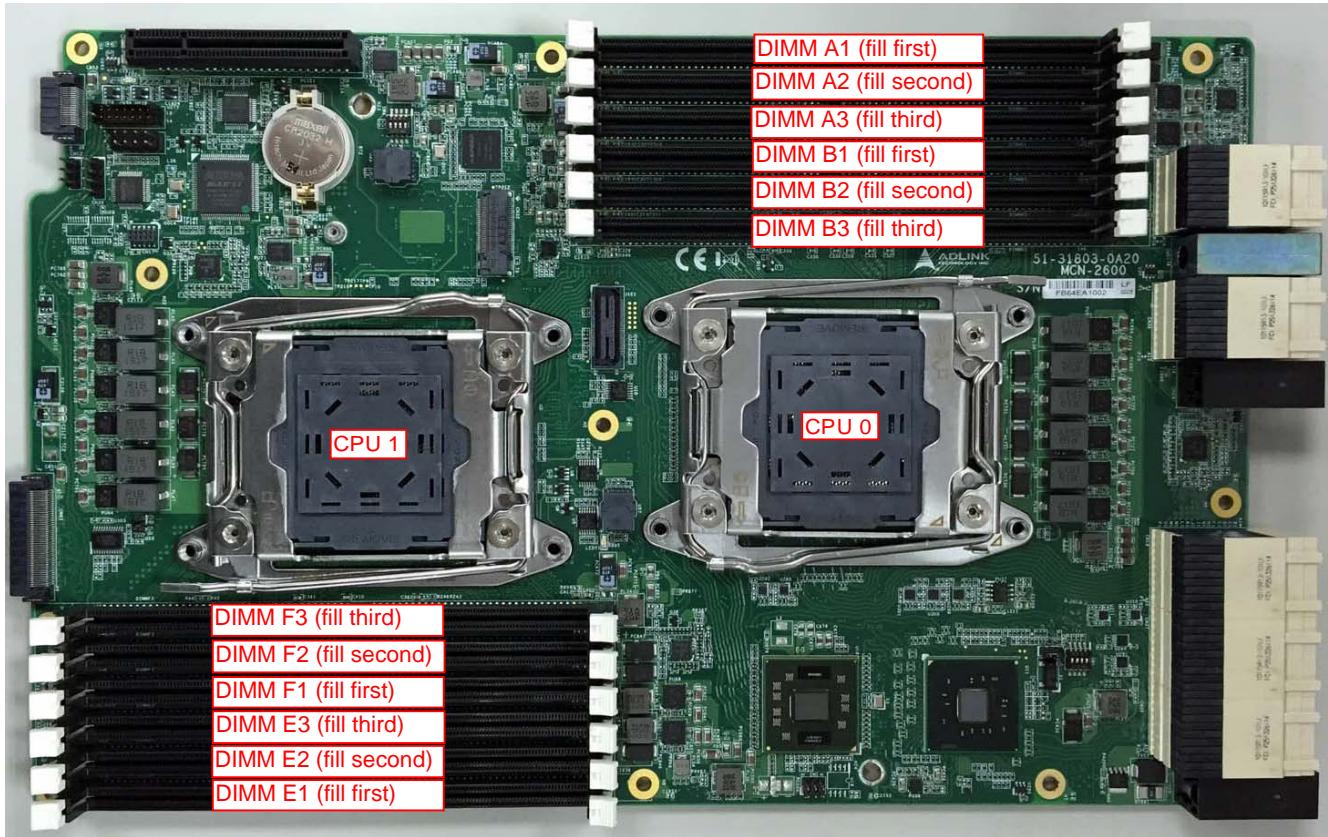
MCN-2600T is equipped with twelve (12) DDR4 (Double-Data-Rate Fourth Generation Synchronous Dynamic Random Access Memory) slots. Each CPU supports two independent channels (CPU0: Channel A/B; CPU1: Channel E/F) with three DIMM slots per channel. The DIMM slots of each channel must be populated starting with the slot farthest from the CPU, as shown in the diagram below. Note: the slots of the two channels do not have to be populated with the same number of DIMMs.
![DIMM A1 (fill first)\nDIMM A2 (fill second)\nDIMM A3 (fill third)\nDIMM B1 (fill first)\nDIMM B2 (fill second)\nDIMM B3 (fill third)\nCPU 1\nCPU 0\nDIMM F3 (fill third)\nDIMM F2 (fill second)\nDIMM F1 (fill first)\nDIMM E3 (fill third)\nDIMM E2 (fill second)\nDIMM E1 (fill first)](.mcn-2600t-50-1z268-1000-10/327a1992d68120ce55375bfc155f9beda37ac0f8df19746316349335c3a97640.jpg)

# 2.1.4 Installing a SATA Drive

1. Unlock the ejector handle of the SATA drive tray by pressing the blue unlocking tab towards the right. The ejector handle will swing outwards.
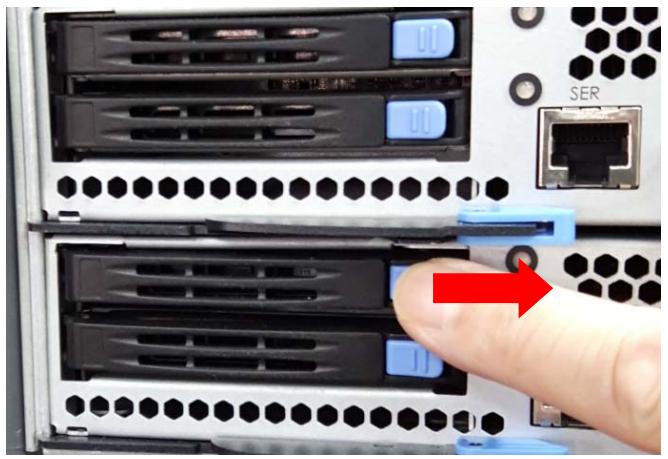
![Close-up of server rack with hexagonal ports and a hand pointing to a server port labeled 'SER' (no readable text beyond label)](.mcn-2600t-50-1z268-1000-10/33570efb6472248459eedd6d61de7cc4dbc64420bd3163516421e8cac8ca2d8c.jpg)

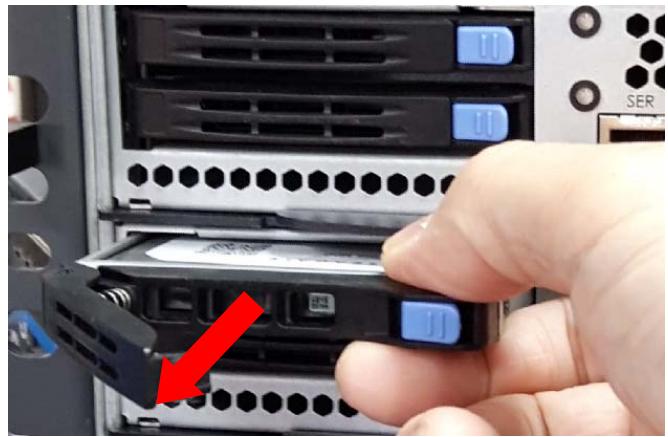
2. Pull outwards on the ejector handle to remove the SATA drive tray.
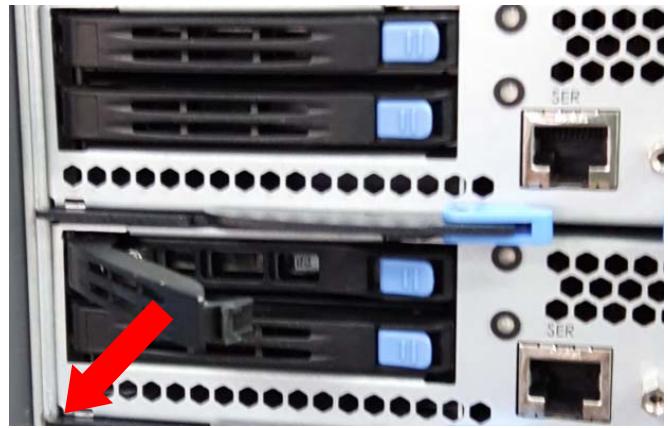
![Close-up of server rack with multiple drive bays and network ports (no visible text or symbols)](.mcn-2600t-50-1z268-1000-10/6ab7ffd9b9fb978a839cda7582196657c252320f8ef9474a87b6c64af7c7c2ca.jpg)

![Hand inserting a USB drive into a server rack with a red arrow indicating the cable attachment (no text or symbols visible)](.mcn-2600t-50-1z268-1000-10/d21d62017dfb6a9a975d0c4a4928ae207839ebac01418d04fccccc8c31199fb2.jpg)

3. Secure the $2 . 5 '$ SATA drive to the drive tray with 4 screws as shown.
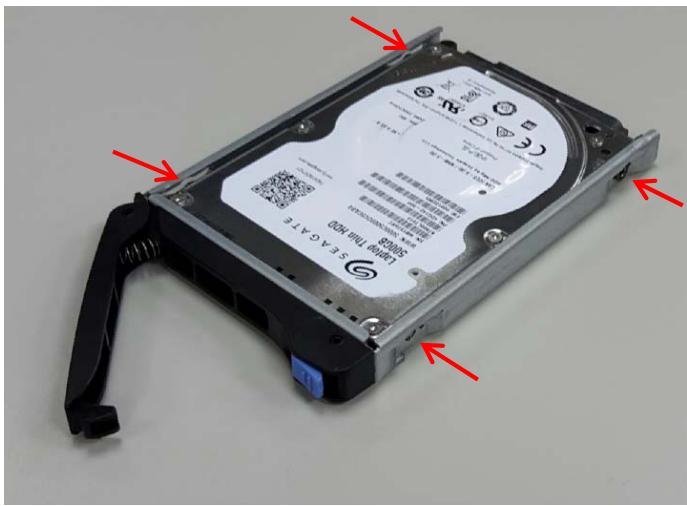
![SE A C4 T6\nLEAMIN TBA NGD\nSUNGB\n2017-03-20 05:00:00:00\nSUNGB\n2017-03-20 05:00:00:00\nSUNGB\n2017-03-20 05:00:00:00\nSUNGB\n2017-03-20 05:00:00:00\nSUNGB\n2017-03-20 05:\nSUNGB\n2017-03-20 05:\nSUNGB\n2017-03-20 05:\nSUNGB\n2017-03-20 05:\nSUNGB\n2017-03-20 05:\nSUNGB\n2017-03-20 05:\nSUNGB\n2017-11-28 19:34:34\nSUNGB\n2017-11-28 19:34:34\nSUNGB\n2017-11-28 19:34:34\nSUNGB\n2017-11-28 19:34:34\nSUNGB\n2017-11-28 19:34:34\nSUNGB](.mcn-2600t-50-1z268-1000-10/f3b186138c3beed1168a7a511f0f65ca65b14f4b2e7327439b676001a0c7caf1.jpg)

4. Insert the drive tray into the drive bay and press inwards until it is firmly seated.
![Close-up of a hand inserting a black USB drive into a server rack with blue connectors (no visible text or symbols)](.mcn-2600t-50-1z268-1000-10/eba7290342fa5211df534ca332b93ad07b554953d52d7ba0df9536acd464810a.jpg)

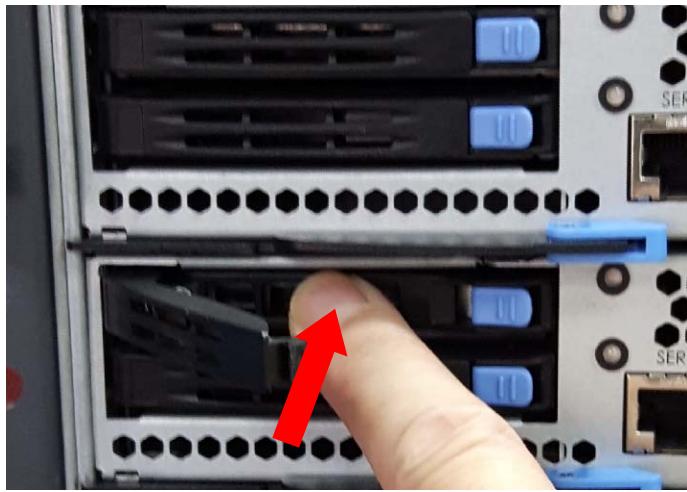
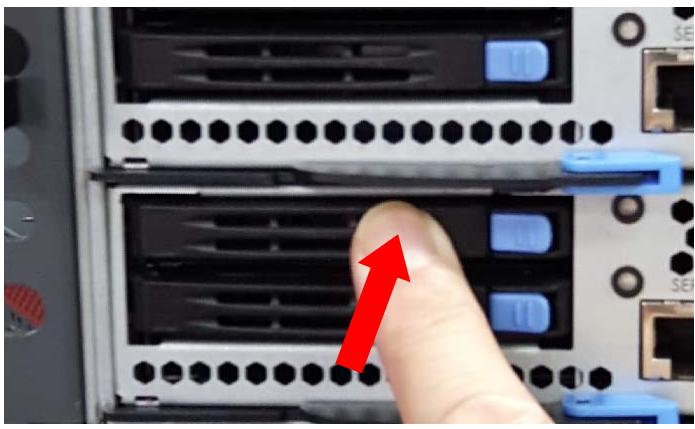
5. Close the ejector handle and press inwards until it locks in place with a “click”.
![Close-up of a server rack with black and blue drive bays, showing a finger pointing to a red arrow (no text or symbols visible)](.mcn-2600t-50-1z268-1000-10/db7fc13e1cd1c27fd0983cec6b79e835fd1ca5fbf75242f874792c23fc0f563d.jpg)

# 2.1.5 Installing an M.2 SSD Module

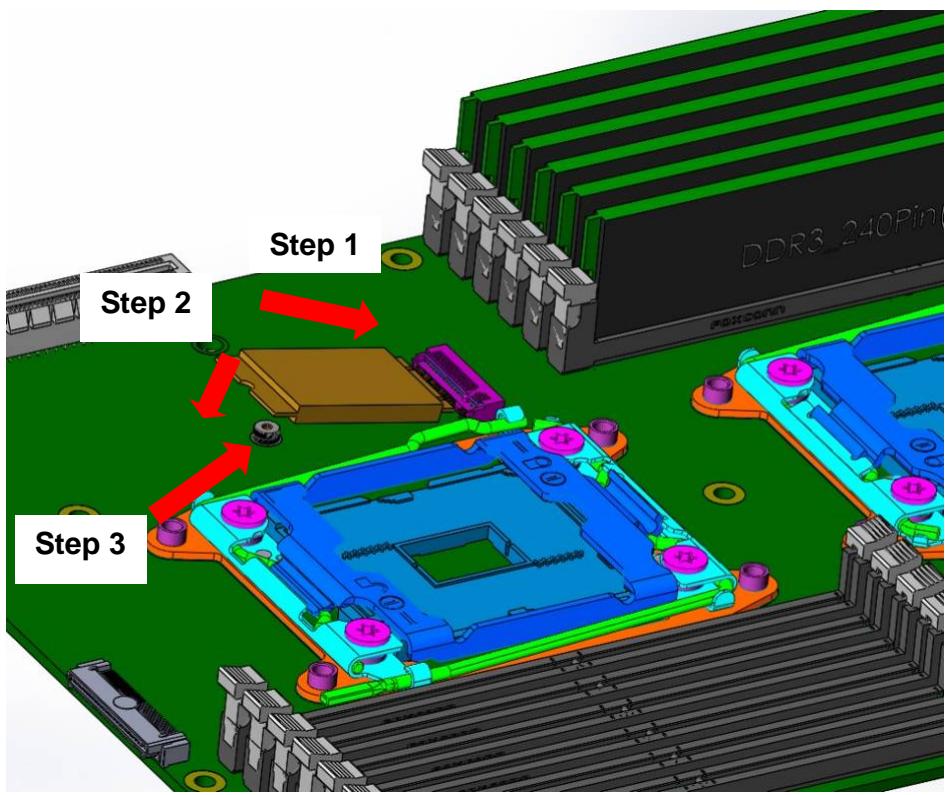
1. Insert the M.2 SSD module into the slot at a 15 degree angle to the board.
2. Gently press down on the module.
3. Use an M2.5 screw to secure the module to the board.
![Step 1\nStep 2\nStep 3\nDDR3_240Pin](.mcn-2600t-50-1z268-1000-10/f79740ba18ef11cb7080bf59c43d97a7179903926e8921bbdf9e942d3e1fc7a1.jpg)

# 2.2 Front Panel Layout

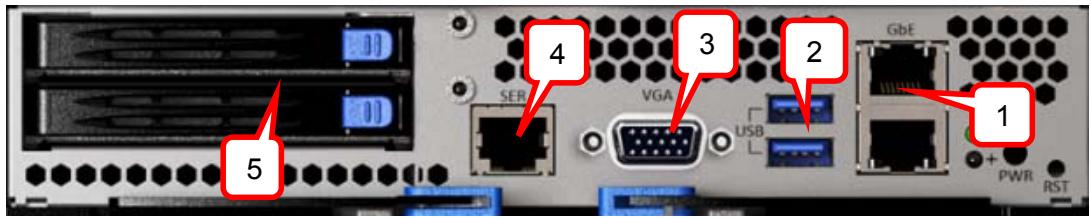
The MCN-2600T provides I/O connections from the front panel. There are two 1GbE RJ-45 LAN ports, two USB 3.0 port, one VGA port, one console port and two 2.5 drive bays, as shown below.
![5\n4\n3\n2\nUSB\nGbeE\n1\nPWR\nRST](.mcn-2600t-50-1z268-1000-10/14697a703470ee500e61dcc9afda5445f546c88e090f44ae945797772d800dd2.jpg)

<table><tr><td>I/O port</td><td>Description</td></tr><tr><td>1</td><td>Two 10/100/1000BASE-T Ethernet ports</td></tr><tr><td>2</td><td>Two USB 3.0 port</td></tr><tr><td>3</td><td>VGA connector</td></tr><tr><td>4</td><td>RJ-45 console port</td></tr><tr><td>5</td><td>Two 2.5” drive bays</td></tr></table>

# 2.3 Inserting and Removing the CPU Sled

Refer to the chapter "Assembling and Powering Up the CSA-7400” in the “CSA-7400 User’s Manual” for instructions on inserting and removing the MCN-2600T CPU Sled.

# 3 Powering Up the CPU Sled

# 3.1 Power-Up Behavior

When power is supplied to the CSA-7400, all components will power up automatically. The behavior of the system when powered up is described below.

1. Cooling fans start speeding up as soon as power is applied to the system.
2. Power LEDs of both CPU and switch nodes turn ON (green).
3. CPU nodes start booting up: The status LED turns ON (red), indicating BIOS POST status. After BIOS POST is completed, the status LED changes from red to green, Indicating system status
Note: The BMC Watchdog timeout will turn off the status LED. If the BMC watchdog is not enabled, the green status LED will stay on.
4. After a few seconds, the switch node A/S LED turns ON (steady or blinking) indicating CM Active/Standby status.

# 3.2 Health/Status Indicators

This section covers all of the LEDs on the MCN-2600T CPU sled.

![3\nVGA\nUSB\nGbE\n1\n2\nPWR\nRST](.mcn-2600t-50-1z268-1000-10/7cdeefa630dea020254393cfce3bc193ccb984b0bc6ccd777e45eff4d70d32a1.jpg)

<table><tr><td></td><td>LED #</td><td colspan="2">Description</td></tr><tr><td rowspan="7">MCN-2600T</td><td>1</td><td colspan="2">Power LED (power on: Green)</td></tr><tr><td>2</td><td colspan="2">Status LED (BIOS POST: Red; POST completed: Green)</td></tr><tr><td rowspan="5">3</td><td colspan="2">SATA Drive LEDs</td></tr><tr><td>Drive Status</td><td>LED (Green)</td></tr><tr><td>Read/Write</td><td>Blinking</td></tr><tr><td>Idle</td><td>On</td></tr><tr><td>Not Present</td><td>Off</td></tr></table>

# 4 Using the CPU Sled

# 4.1 Hot-Swapping the CPU Sled

Before hot-swapping the CPU Sled, the user must first shutdown the OS by executing a command from the OS or holding down the power button more than 4 seconds.

# 4.2 Using Serial Console

The MCN-2600T sled supports one serial console port, which is shared between the host and the BMC. Selection pins are available on DIP switch SW1 to control serial console usage.

![SW1\n003064\n4CDF0C\nMICA-5201\n51-31813-0A10\nS/N\nH484EA8001\nCF\nADLINK\nTECHNOLOGY INC.\nCE\nCN09\nU280\nC1500\nC1301\nU27\nB2\nCN1\nTC3\nC1200\nR218\nR2200\nR2201\nR2202\nR2203\nR2204\nR2205\nR2206\nR2207\nR2208\nR2209\nR2210\nR2211\nR2212\nR2213\nR2214\nR2215\nR2216\nR2217\nR2218\nR2219\nR2220\nR2221\nR2222\nR2223\nR2224\nR2225\nR2226\nR2227\nR2228\nR2229\nR2230\nR2231\nR2232\nR2233\nR2234\nR2235\nR2236\nR2237\nR2238\nR2239\nR2240\nR2241\nR2242\nR2243\nR2244\nR2245\nR2246\nR2247\nR2248\nR2249\nR2250\nR2251\nR2252\nR2253\nR2254\nR2255\nR2256\nR2257\nR2258\nR2259\nR2260\nR2261\nR2262\nR2263\nR2264\nR2265\nR2266\nR2267\nR2268\nR2269\nR2270\nR2271\nU97\nPUMA 1.3 1.3 1.3 1.3 1.3 1.3 1.3 1.3 1.3 1.3 1.3 1.3 1.3 1.3 1.3 1.3 1.3 1.3 1.3 1.3 1.3 1.3 1.3 1.3 1.3 1.4 1.4 1.4 1.4 1.4 1.4 1.4 1.4 1.4 1.4 1.4 1.4 1.4 1.4 1.4 1.4 1.4 1.4 1.4 1.4 1.4 1.4 1.4 1.4 1.4 1.5 1.5 1.5 1.5 1.5 1.5 1.5 1.5 1.5 1.5 1.5 1.5 1.5 1.5 1.5 1.5 1.5 1.5 1.5 1.5 1.5 1.5 1.6 1.6 1.6 1.6 1.6 1.6 1.6 1.6 1.6 1.6 1.6 1.6 1.6 1.6 1.6 1.6 1.6 1.6 1.6 1.6 1.6 1.6 1.6 1.6 1.6 1.7](.mcn-2600t-50-1z268-1000-10/b8cdc9fff6c4de44e9d0a576aa344ffa58db1e8ae9ced4054494b91ddda1ac6d.jpg)

<table><tr><td>Pins</td><td>Setting</td><td>Usage</td></tr><tr><td>1, 2, 3, 4</td><td>On, Off, On, Off</td><td>System console</td></tr><tr><td>1, 2, 3, 4</td><td>Off, On, Off, On</td><td>BMC console</td></tr></table>

The serial console port is RJ45 form factor, and has a standard pin definition for the console port as below.

<table><tr><td>LED #</td><td>Description</td></tr><tr><td>1</td><td>RTS</td></tr><tr><td>2</td><td>DTR</td></tr><tr><td>3</td><td>TXD</td></tr><tr><td>4</td><td>SG</td></tr><tr><td>5</td><td>SG</td></tr><tr><td>6</td><td>RXD</td></tr><tr><td>7</td><td>DSR</td></tr><tr><td>8</td><td>CTS</td></tr></table>

![The image is a diagram showing a rectangular outline containing a smaller, solid grey shape inside. The number '1' is located in the top left corner with a line pointing to the outer rectangular border. The number '8' is located in the top right corner with a line pointing to the inner grey shape.](.mcn-2600t-50-1z268-1000-10/03c8787dc754f06fd323fb81d4acc3521db34b7030a30d6d190e883a236be9f8.jpg)

The serial port is set with the following parameters

<table><tr><td>Type</td><td>RS232 (COM)</td></tr><tr><td>Baud Rate</td><td>115200 bps</td></tr><tr><td>Data Bits</td><td>8</td></tr><tr><td>Parity</td><td>None</td></tr><tr><td>Stop Bits</td><td>1</td></tr><tr><td>Flow Control</td><td>None</td></tr></table>

# 4.3 Serial Over LAN via BMC

The CPU board BMC provides a text-based Serial Over LAN (SOL) console. With SOL redirection system administrators can remotely view the text-based host console from anywhere and perform any task that doesn’t require a GUI.

# 4.3.1 Configuring the BMC IP Address

The default BMC IP address is 192.168.2.101. User can change the IP address by using ipmitool within host OS.

# Configure BMC IP Address via Host

Setting LAN IP Address

\# ipmitool lan set 1 ipaddr xxx.xxx.xxx.xxx

Setting LAN Subnet Mask

\# ipmitool lan set 1 netmask 255.255.255.0

Setting LAN Default Gateway IP

\# ipmitool lan set 1 defgw ipaddr xxx.xxx.xxx.xxx

# 4.3.2 Configuring BIOS for SOL

# Serial Port Console Redirection

You can use this screen to select options for the serial port console redirection settings. Use the up and down &lt; Arrow &gt; keys to select an item. Use the &lt; + &gt; and &lt; - &gt; keys to change the value of the selected option. The Serial Port Console Redirection screen is shown below.

<table><tr><td colspan="2">Aptio Setup Utility - Copyright (C) 2016 American Megatrends, Inc.
Advanced</td></tr><tr><td>COM1
Console Redirection [Disabled]
► Console Redirection Settings</td><td rowspan="3">Console Redirection Enable or Disable.</td></tr><tr><td>COM2
Console Redirection [Disabled]
► Console Redirection Settings</td></tr><tr><td>Legacy Console Redirection
► Legacy Console Redirection Settings</td></tr><tr><td>Serial Port for Out-of-Band Management/
Windows Emergency Management Services (EMS)
Console Redirection [Disabled]
► Console Redirection Settings</td><td>+: Select Screen
↑↓: Select Item
Enter: Select
+/-: Change Opt.
F1: General Help
F2: Previous Values
F3: Optimized Defaults
F4: Save &amp; Exit
ESC: Exit</td></tr><tr><td colspan="2">Version 2.17.1249. Copyright (C) 2016 American Megatrends, Inc.</td></tr></table>

# COM2: console redirection enabled

This port is mapped toBMC vUART.

# 4.3.3 Configuring OS for SOL

# vUART SOL with RHEL 5.6 32-bit

```tcl
# vim /etc/securetty -> Add "ttyS2"
# strace /sbin/agetty ttyS2 115200 vt100 {Enter}
```

# 4.3.4 Establishing SOL

# Activate SOL from client IPMItool

\# ipmitool -H &lt;BMC IP Address&gt; -I lanplus -U root -P superuser sol activate

# 4.4 Firmware Upgrade

# 4.4.1 Updating MCN-2600T BIOS

Users can update the CSA-7400 system BIOS over various interfaces (Gigabit LAN, KCS, console port).

# Updating the BIOS via Network with BMC Tool

1. Login to the OS with root user permission.
2. Update the BIOS over network with the command below:

Example:

```txt
$./Yafuflash -nw -ip 192.168.2.101 -u root -p superuser -bios BIOS.BIN
```

```txt
YAFUFlash - Firmware Upgrade Utility (Version 1.3)
Customized for BMC
```

```txt
(C)Copyright 2013, American Megatrends Inc. [100% ] | Block 256 of 256 | Success
```

# Updating the BIOS via Host with BMC Tool

1. Login to the OS with root user permission
2. Update the BIOS over host with the command below:

Example:

```shell
$ sudo ./Yafuflash -mbox -bios BIOS.BIN
```

```txt
YAFUFlash - Firmware Upgrade Utility (Version 1.3)
Customized for BMC
```

```txt
(C) Copyright 2013, American Megatrends Inc. [100% ] | Block 256 of 256 | Success
```

# Updating BIOS via Host with BIOS Tool

1. Boot/Login to DOS/OS with root user permission
2. Update the BIOS over host with the command below:

Example:

```batch
AFUDOS.exe BIOS.ROM /x /n /b /p (If only updating BIOS part without ME)
AFUDOS.exe BIOS.BIN /x /n /b /p /me (Updating whole BIOS)
```

# 4.4.2 Updating BMC

Use Yafuflash tool to update BMC firmware

• To upgrade bootloader, add -force-boot (recommended)
• To preserve config (/conf), add -preserve-config

# Updating BMC via Network

\$ ./Yafuflash -force-boot -nw -ip 192.168.2.101 -u root -p superuser bmc.ima

YAFUFlash - Firmware Upgrade Utility (Version 1.3) Customized for MiniBMC

(C)Copyright 2013, American Megatrends Inc.

WARNING!

FIRMWARE UPGRADE MUST NOT BE INTERRUPTED ONCE IT IS STARTED. PLEASE DO NOT USE THIS FLASH TOOL FROM THE REDIRECTION CONSOLE.

\*\*\*\*\*\*\*\*\*\*\*\*\*\*\*\*\*\*\*\*\*\*\*\*\*\*\*\*\*\*\*\*\*\*\*\*\*\*\*\*\*\*\*\*\*\*\*\*\*\*\*\*\*\*\*\*\*\*\*\*\*\*\*\*\*\*\*\*\*\*\*\*\*\*\*\*

<table><tr><td>[100% ]</td><td>Upgrading</td><td>boot</td><td>Block</td><td>4 of</td><td>4</td><td>Success</td></tr><tr><td>[100% ]</td><td>Upgrading</td><td>conf</td><td>Block</td><td>8 of</td><td>8</td><td>Success</td></tr><tr><td>[100% ]</td><td>Upgrading</td><td>root</td><td>Block</td><td>14 of</td><td>14</td><td>Success</td></tr><tr><td>[100% ]</td><td>Upgrading</td><td>osimage</td><td>Block</td><td>30 of</td><td>30</td><td>Success</td></tr><tr><td>[100% ]</td><td>Upgrading</td><td>ast1010e</td><td>Block</td><td>1 of</td><td>1</td><td>Success</td></tr></table>

Resetting the firmware..

# Updating BMC via Host

Note: Must be a root user

\$ sudo ./Yafuflash -force-boot -mbox bmc.ima

YAFUFlash - Firmware Upgrade Utility (Version 1.3) Customized for MiniBMC

(C)Copyright 2013, American Megatrends Inc.

WARNING!

FIRMWARE UPGRADE MUST NOT BE INTERRUPTED ONCE IT IS STARTED. PLEASE DO NOT USE THIS FLASH TOOL FROM THE REDIRECTION CONSOLE.

\*\*\*\*\*\*\*\*\*\*\*\*\*\*\*\*\*\*\*\*\*\*\*\*\*\*\*\*\*\*\*\*\*\*\*\*\*\*\*\*\*\*\*\*\*\*\*\*\*\*\*\*\*\*\*\*\*\*\*\*\*\*\*\*\*\*\*\*\*\*\*\*\*\*\*\*

<table><tr><td>[100% ]</td><td>Upgrading</td><td>boot</td><td>Block</td><td>4 of</td><td>4</td><td>Success</td></tr><tr><td>[100% ]</td><td>Upgrading</td><td>conf</td><td>Block</td><td>8 of</td><td>8</td><td>Success</td></tr><tr><td>[100% ]</td><td>Upgrading</td><td>root</td><td>Block</td><td>14 of</td><td>14</td><td>Success</td></tr><tr><td>[100% ]</td><td>Upgrading</td><td>osimage</td><td>Block</td><td>30 of</td><td>30</td><td>Success</td></tr><tr><td>[100% ]</td><td>Upgrading</td><td>ast1010e</td><td>Block</td><td>1 of</td><td>1</td><td>Success</td></tr></table>

Resetting the firmware....

# 5 BIOS Setup

# 5.1 Entering BIOS Setup

To enter the setup screen, follow these steps:

1. Power on the motherboard
2. Press the &lt; Delete &gt; key on your keyboard when you see the following text prompt: &lt; Press DEL to enter Setup &gt;
3. After you press the &lt; Delete &gt; key, the main BIOS setup menu displays. You can access the other setup screens from the main BIOS setup menu, such as Chipset and Power menus.

![A white document icon featuring a large red checkmark on its front surface, with faint horizontal lines visible on the paper.](.mcn-2600t-50-1z268-1000-10/8759247c90454a611e3905ef3e846b9d59002e41ea08428b75a7d9522f8caee1.jpg)
NOTE:

In most cases, the &lt; Delete &gt; key is used to invoke the setup screen. However, there are several cases that use other keys, such as $&lt; \mathsf { F } 1 &gt; , &lt; \mathsf { F } 2 &gt;$ , and so on.

# 5.2 Setup Menu

The Main BIOS setup menu is the first screen that you can navigate to. The Main BIOS setup menu screen has two main frames. The left frame displays all the options that can be configured. “Grayed” options cannot be configured, and “Blue” options can be. The right frame displays the key legend. Above the key legend is an area reserved for a text message. When an option is selected in the left frame, it is highlighted in white. Often a text message will accompany it.

![Aptio Setup Utility - Copyright (C) 2016 American Megatrends, Inc.\nMain Advanced IntelRCSetup Server Mgmt Security Boot Save & Exit\nBIOS Information\nBIOS Vendor American Megatrends\nCore Version 5.11\nCompliancy UEFI 2.4; PI 1.3\nProject Version MCN-2600 0.96.10\nBuild Date and Time 02/04/2016 11:31:30\nAccess Level Administrator\nMemory Information\nTotal Memory 8192 MB\nSystem Language (English)\nSystem Date (Thu 02/04/2016)\nSystem Time (11:38:23)\nChoose the system default language\n++: Select Screen\n↑↓: Select Item\nEnter: Select\n+/-: Change Opt.\nF1: General Help\nF2: Previous Values\nF3: Optimized Defaults\nF4: Save & Exit\nESC: Exit](.mcn-2600t-50-1z268-1000-10/c30ec98f83f3672fe748ef3a4d06c92a1603c599880e2a27305c27afb9c8bbc6.jpg)

# 5.3 Navigation

The BIOS setup/utility uses a key-based navigation system called hot keys. Most of the BIOS setup utility hot keys can be used at any time during the setup navigation process. These keys include &lt; F1 &gt;, &lt; F10 &gt;, &lt; Enter &gt;, &lt; ESC &gt;, &lt; Arrow &gt; keys, and so on.

![**Top Section:**\n*   A top block labeled **'BIOS Setup Utility'** points downward to the text **'Screens'**.\n*   To the left, a block labeled **'Left and Right Keys to Select a Setup Screen'** connects via a dotted line to the main flow.\n*   A horizontal sequence of blocks follows: **'Screen 1'** ↔ **'Screen 2'** ↔ **'Screen 3'** ↔ **'Screen 4'** ↔ **'Screen 5'**.\n\n**Middle Section:**\n*   A downward arrow from the screen area points to the text **'Items'**.\n*   To the left, a block labeled **'Tab Key to Select Fields'** connects via a dotted line toward the items area.\n*   To the right, a block labeled **'+ To Change Field Values'** connects via a dotted line toward the items area.\n*   Below 'Items,' there are three small boxes containing a **±** symbol, connected horizontally by double-headed arrows (↔).\n\n**Bottom Section:**\n*   Below the items row, there are vertical arrows (one pointing down, one pointing up).\n*   Below the vertical arrows, there is a second row of three small boxes containing a **±** symbol, connected horizontally by double-headed arrows (↔).\n*   To the left of this lower structure, the text **'Fields'** has an arrow pointing toward the boxes.\n*   To the right, a block labeled **'Up and Down Keys to Select a Setup Item'** connects via a dotted line to the vertical arrows.](.mcn-2600t-50-1z268-1000-10/dc4144d940c8d031882eee10362b01b722d2aed062030964ca6cfc4443d063c1.jpg)

![The image features a graphic of a document with a large red checkmark. Below this icon, the text 'NOTE:' is displayed in bold, black capital letters.](.mcn-2600t-50-1z268-1000-10/7db45788bb4b587de2a761b751c7ec5f877c4ea14582d7ffbec4c60e5f1dd85c.jpg)

There is a hot key legend located in the right frame on most setup screens.

<table><tr><td>→←</td><td>Left/Right. The Left and Right &lt; Arrow &gt; keys allow you to select a setup screen.For example: Main screen, Advanced screen, Chipset screen, and so on.</td></tr><tr><td>↑↓</td><td>Up/Down The Up and Down &lt; Arrow &gt; keys allow you to select a setup item or sub-screen.</td></tr><tr><td>+-</td><td>Plus/Minus The Plus and Minus &lt; Arrow &gt; keys allow you to change the field value of a particular setup item.For example: Date and Time.</td></tr><tr><td>Tab</td><td>The &lt; Tab &gt; key allows you to select setup fields.</td></tr><tr><td colspan="2"></td></tr><tr><td>Hot Key</td><td>Description</td></tr><tr><td>Enter</td><td>The &lt; Enter &gt; key allows you to display or change the setup option listed for a particular setup item. The &lt; Enter &gt; key can also allow you to display the setup sub-screens.</td></tr></table>

F1 The &lt; F1 &gt; key allows you to display the General Help screen. Press the &lt; F1 &gt; key to open the General Help screen.

![General Help\n↑↓++\nEnter : Move\n+/- : Select\nESC : Value\nF1 : Exit\nF2 : General Help\nF3 : Previous Values\nF4 : Optimized Defaults\nF4 : Save & Exit Setup\nOk](.mcn-2600t-50-1z268-1000-10/b24961f1ade7004f0ade46668a5247a8e414f6d4817fdcb9801764310f665eb8.jpg)

F2 The &lt; F2 &gt; key on your keyboard is the previous values key. It is not displayed on the key legend by default. To set the previous values settings of the BIOS, press the &lt; F2 &gt; key on your keyboard. It is located on the upper row of a standard 101 keyboard. The previous value settings allow the motherboard to boot up with the least amount of options set. This can lessen the probability of conflicting settings.

![Load Previous Values\nLoad Previous Values?\nYes No](.mcn-2600t-50-1z268-1000-10/27e1eb68367ac49aa23b8c4bbdb3c7db44927efabc9543f790b6919115c2f705.jpg)

Press the &lt; Enter &gt; key to load previous values. You can also use the &lt; Arrow &gt; key to select Cancel and then press the &lt; Enter &gt; key to abort this function and return to the previous screen.

<table><tr><td>F3</td><td>The &lt; F3 &gt; key on your keyboard is the optimized defaults key. To set the optimized defaults settings of the BIOS, press the &lt; F3 &gt; key on your keyboard. It is located on the upper row of a standard 101 keyboard. The optimized defaults settings allow the motherboard to boot up with the optimized defaults of options set. This can lessen the probability of conflicting settings.&lt;img src="images/9872eaf00137a07d81f51cd76be1789aa9b8cf734390cefa82dde76ffd81e81e.jpg"/&gt;Press the &lt; Enter &gt; key to load optimized defaults. You can also use the &lt; Arrow &gt; key to select Cancel and then press the &lt; Enter &gt; key to abort this function and return to the previous screen.</td></tr><tr><td>F4</td><td>The &lt; F4 &gt; key allows you to save any changes you have made and exit Setup. Press the &lt; F4 &gt; key to save your changes. The following screen will appear:&lt;img src="images/2d51aa29087c73f6d1f4e87336d918f01656a485caf8e7221720b4746e4a0057.jpg"/&gt;Press the &lt; Enter &gt; key to save the configuration and exit. You can also use the &lt; Arrow &gt; key to select Cancel and then press the &lt; Enter &gt; key to abort this function and return to the previous screen.</td></tr><tr><td>ESC</td><td>The &lt; Esc &gt; key allows you to discard any changes you have made and exit the Setup. Press the &lt; Esc &gt; key to exit the setup without saving your changes. The following screen will appear:&lt;img src="images/ba8ee1dcf6b3d5ac3e61166fd66d8de77849b1e0772d991077fdfa9abd0813c8.jpg"/&gt;Press the &lt; Enter &gt; key to discard changes and exit. You can also use the &lt; Arrow &gt; key to select Cancel and then press the &lt; Enter &gt; key to abort this function and return to the previous screen.</td></tr></table>

# 5.4 Main Setup

When you first enter the Setup Utility, you will find the Main setup screen. You can always return to the Main setup screen by selecting the Main tab. There are two Main Setup options. They are described in this section. The Main BIOS Setup screen is shown below.

<table><tr><td colspan="2">Main Advanced IntelRCSetup Server Mgmt Security Boot Save &amp; Exit</td></tr><tr><td>BIOS Information
BIOS Vendor American Megatrends
Core Version 5.11
Compliancy UEFI 2.4; PI 1.3
Project Version MCN-2600 0.96.10
Build Date and Time 02/04/2016 11:31:30
Access Level Administrator</td><td>Choose the system default language</td></tr><tr><td>Memory Information
Total Memory 8192 MB</td><td></td></tr><tr><td>System Language [English]</td><td></td></tr><tr><td>System Date [Thu 02/04/2016]
System Time [11:38:23]</td><td>+: Select Screen
↑↓: Select Item
Enter: Select
+/-: Change Opt.
F1: General Help
F2: Previous Values
F3: Optimized Defaults
F4: Save &amp; Exit
ESC: Exit</td></tr><tr><td colspan="2">Version 2.17.1249, Copyright (C) 2016 American Megatrends, Inc.</td></tr></table>

# 5.4.1 System & Board Info

The Main BIOS setup screen reports processor, memory and board information.

# BIOS Vendor

Displays the BIOS vendor.

# Core Version

Displays the BIOS core version.

# Compliancy Version

Displays the current UEFI Specification version.

# Project Version

Displays the current BIOS version.

# Build Data and Time

Displays the BIOS build data and time.

# System Language

Displays default system language.

# 5.4.2 System Date/System Time

Use this option to change the system time and date. Highlight System Time or System Date using the &lt; Arrow &gt; keys. Enter new values using the keyboard. Press the &lt; Tab &gt; key or the &lt; Arrow &gt; keys to move between fields. The date must be entered in MM/DD/YY format. The time is entered in HH:MM:SS format.

![The image displays a white document icon with a large red checkmark superimposed on it. Below the icon is the text 'NOTE:' in black, uppercase serif letters.](.mcn-2600t-50-1z268-1000-10/07e9bc748a226ced4968ac8d0b201814887a91c797883ea10afccbea519dd78c.jpg)

The time is in 24-hour format. For example, 5:30 A.M. appears as 05:30:00, and 5:30 P.M. as 17:30:00.

# 5.5 Advanced BIOS Setup

Select the Advanced tab from the setup screen to enter the Advanced BIOS Setup screen. You can select any of the items in the left frame of the screen, (ex: Super IO Configuration), to go to the sub menu for that item. You can display an Advanced BIOS Setup option by highlighting it using the &lt; Arrow &gt; keys. The Advanced BIOS Setup screen is shown below. The sub menus are described on the following pages.

<table><tr><td colspan="2">Aptio Setup Utility - Copyright (C) 2016 American Megatrends, Inc.</td></tr><tr><td colspan="2">Main Advanced IntelRCSetup Server Mgmt Security Boot Save &amp; Exit</td></tr><tr><td rowspan="2">Automatic board power up [Enabled]
►ACPI Settings
►AST1010 Super IO Configuration
►Serial Port Console Redirection
►iSCSI Configuration
►PCI Subsystem Settings
►Network Stack Configuration
►CSM Configuration
►ADLINK IPMI settings
►LAN Bypass Setting</td><td>If enabled, board will auto power up when insert power</td></tr><tr><td>+:-: Select Screen
↑↓: Select Item
Enter: Select
+/-: Change Opt.
F1: General Help
F2: Previous Values
F3: Optimized Defaults
F4: Save &amp; Exit
ESC: Exit</td></tr><tr><td colspan="2">Version 2.17.1249. Copyright (C) 2016 American Megatrends, Inc.</td></tr></table>

# 5.5.1 ACPI Settings

You can use this screen to select options for the ACPI Advanced Configuration Settings. Use the up and down &lt; Arrow &gt; keys to select an item. Use the &lt; + &gt; and &lt; - &gt; keys to change the value of the selected option. A description of the selected item appears on the right side of the screen. The settings are described on this page. The screen is shown below.

<table><tr><td colspan="2">Aptio Setup Utility - Copyright (C) 2016 American Megatrends, Inc. Advanced</td></tr><tr><td>ACPI Settings
Enable ACPI Auto Configuration [Disabled]
Enable Hibernation [Enabled]
Lock Legacy Resources [Disabled]</td><td>Enables or Disables BIOS ACPI Auto Configuration.</td></tr><tr><td></td><td>+: Select Screen
↑↓: Select Item
Enter: Select
+/-: Change Opt.
F1: General Help
F2: Previous Values
F3: Optimized Defaults
F4: Save &amp; Exit
ESC: Exit</td></tr><tr><td colspan="2">Version 2.17.1249. Copyright (C) 2016 American Megatrends, Inc.</td></tr></table>

# Enable ACPI Auto Configuration

Enables or Disables BIOS ACPI Auto Configuration. Set this value to Enabled / Disabled.

# Enable Hibernation

Enables or Disables System ability to Hibernate (OS/S4 Sleep State). This option may be not effective with some OS. Set this value to Enabled / Disabled.

# Lock Legacy Resources

Enables or Disables Lock of Legacy Resources. Set this value to Enabled / Disabled.

# 5.5.2 AST1010 Super IO Configuration

You can use this screen to select options for the AST1010 Super IO Configuration. Use the up and down &lt; Arrow &gt; keys to select an item. Use the &lt; + &gt; and &lt; - &gt; keys to change the value of the selected option. A description of the selected item appears on the right side of the screen. The settings are described on the following pages. An example of the AST1010 Super IO Configuration screen is shown below.

<table><tr><td colspan="2">Aptio Setup Utility - Copyright (C) 2016 American Megatrends, Inc. Advanced</td></tr><tr><td>AST1010 Super IO Configuration
Super IO Chip AST1010
► Serial Port 1 Configuration
► Virtual Serial Port Configuration</td><td>Set Parameters of Serial Port 1 (COMA)</td></tr><tr><td></td><td>+: Select Screen
↑↓: Select Item
Enter: Select
+/-: Change Opt.
F1: General Help
F2: Previous Values
F3: Optimized Defaults
F4: Save &amp; Exit
ESC: Exit</td></tr><tr><td colspan="2">Version 2.17.1249. Copyright (C) 2016 American Megatrends, Inc.</td></tr></table>

# Serial Port 1 Configuration

Set Parameters of Serial Port 1 (COMA). The screen is shown below

![Aptio Setup Utility - Copyright (C) 2016 American Megatrends, Inc.\nAdvanced\nSerial Port 1 Configuration\nSerial Port (Enabled)\nDevice Settings IO=3F8h; IRQ=4;\nChange Settings (Auto)\nEnable or Disable Serial Port\n(COM)](.mcn-2600t-50-1z268-1000-10/d43518819b7d05bfbedae8924f3574d341e9dd13b70473bb91f3c8e4459696b2.jpg)

# Serial Port

Enable or Disable Serial Port (COM). Set this value to Enabled / Disabled Change Settings

Set Parameters Serial Port

# Virtual Serial Port Configuration

Set Parameters of Serial Port 2 (Virtual COM). The screen is shown below

![Aptio Setup Utility - Copyright (C) 2016 American Megatrends, Inc.\nAdvanced\nVirtual Serial Port Configuration\nVirtual Serial Port (Enabled)\nDevice Settings IO=3E8h; IRQ=7;\nChange Settings (Auto)\nEnable or Disable Virtual\nSerial Port\n+: Select Screen\n↑↓: Select Item\nEnter: Select\n+/-: Change Opt.\nF1: General Help\nF2: Previous Values\nF3: Optimized Defaults\nF4: Save & Exit\nESC: Exit\nVersion 2.17.1249. Copyright (C) 2016 American Megatrends, Inc.](.mcn-2600t-50-1z268-1000-10/e2dd3a0ea889862a334de121ab19b615e0e8fc5ac920fecc9466435ea7093086.jpg)

# Virtual Serial Port

Enable or Disable Serial Port (COM). Set this value to Enabled / Disabled Change Settings

Set Parameters Virtual Serial Port

# 5.5.3 Serial Port Console Redirection

You can use this screen to select options for the serial port console redirection settings. Use the up and down &lt; Arrow &gt; keys to select an item. Use the &lt; + &gt; and &lt; - &gt; keys to change the value of the selected option. A description of the selected item appears on the right side of the screen. The settings are described in the following pages. An example of the Serial Port Console Redirection screen is shown below.

<table><tr><td colspan="2">Aptio Setup Utility - Copyright (C) 2016 American Megatrends, Inc.
Advanced</td></tr><tr><td>COM1
Console Redirection [Disabled]
► Console Redirection Settings</td><td rowspan="3">Console Redirection Enable or Disable.</td></tr><tr><td>COM2
Console Redirection [Disabled]
► Console Redirection Settings</td></tr><tr><td>Legacy Console Redirection
► Legacy Console Redirection Settings</td></tr><tr><td>Serial Port for Out-of-Band Management/
Windows Emergency Management Services (EMS)
Console Redirection [Disabled]
► Console Redirection Settings</td><td>+: Select Screen
↑↓: Select Item
Enter: Select
+/-: Change Opt.
F1: General Help
F2: Previous Values
F3: Optimized Defaults
F4: Save &amp; Exit
ESC: Exit</td></tr><tr><td colspan="2">Version 2.17.1249. Copyright (C) 2016 American Megatrends, Inc.</td></tr></table>

# Console Redirection

The BIOS Console Redirection feature is here. Set this value to Enabled/Disabled.

# Console Redirection Settings

The settings specify how the host computer and the remote computer (which the user is using) will exchange data. Both computers should have the same or compatible settings. The screen is shown below.

Aptio Setup Utility - Copyright (C) 2016 American Megatrends， Inc.
Advanced

<table><tr><td rowspan="5" colspan="2">COM1Console Redirection SettingsTerminal Type [ANSI]Bits per second [115200]Data Bits [8]Parity [None]Stop Bits [1]Flow Control [None]VT-UTF8 Combo Key Support [Enabled]Recorder Mode [Disabled]Resolution 100x31 [Disabled]Legacy OS Redirection Resolution [80x24]Putty KeyPad [VT100]Redirection After BIOS POST [Always Enable]</td><td rowspan="5">Emulation: ANSI: ExtendedASCII char set. VT100: ASCIIchar set. VT100+: ExtendsVT100 to support color, function keys, etc. VT-UTF8:Uses UTF8 encoding to mapUnicode chars onto 1 or more bytes.++: Select Screen↑↓: Select ItemEnter: Select+/-: Change Opt.F1: General HelpF2: Previous ValuesF3: Optimized DefaultsF4: Save &amp; ExitESC: Exit</td></tr><tr></tr><tr></tr><tr></tr><tr></tr></table>

Version 2.17.1249.Copyright (C)2016American Megatrends，Inc.

# Terminal Type

VT100+ is the preferred terminal type for out-of-band management. Configuration options are: VT100, VT100+, VT-UTF8, ANSI.

# Bits per second

Select the bits per second you want the serial port to use for console redirection. The options are 115200, 57600, 38400, 19200, and 9600.

# Data Bits

Select the data bits you want the serial port to use for console redirection. Set this value to 7, 8.

# Parity

Set this option to select Parity for console redirection. The settings for this value are None, Even, Odd, Mark, and Space.

# Stop Bits

Stop bits indicate the end of a serial data packet. (A start bit indicates the beginning). The standard setting is 1 stop bit. Communication with slow devices may require more than 1 stop bit. Set this value to 1 and 2.

# Flow Control

Set this option to select Flow Control for console redirection.

The settings for this value are None and Hardware RTS/CTS.

# VT-UTF8 Combo Key Support

Enable VT-UTF8 Combination Key support for ANSI/VT100 terminals.

The settings for this value are Enabled and Disabled.

# Recorder Mode

When this mode is enabled, only text will be sent. This is to capture terminal data.

Set this value to Enabled/Disabled.

# Resolution 100x31

Set this option to extended terminal resolution. Set this value to Enabled/Disabled.

# Legacy OS Redirection

On Legacy OS, the number of rows and columns support redirection. Set this value to 80x24, 80x25.

# Putty KeyPad

Select function key and keypad on putty. Set this value to VT100, LINUX, XTERMR6, SCO, ESCN, VT400.

# Redirection After BIOS POST

The settings specify if BootLoader is selected then legacy console redirection is disabled before booting to legacy OS. Default value is Always Enable which means legacy console redirection is enabled for legacy OS. Set this value to Always Enable, BootLoader.

# 5.5.4 PCI Subsystem Settings

You can use this screen to select options for the PCI Subsystem Settings. Use the up and down &lt; Arrow &gt; keys to select an item. Use the &lt; + &gt; and &lt; - &gt; keys to change the value of the selected option. A description of the selected item appears on the right side of the screen. The settings are described on the following pages. An example of the PCI Subsystem Settings screen is shown below.

<table><tr><td>PCI Bus Driver Version A5.01.05
PCI Devices Common Settings:
SR-IOV Support [Disabled]</td><td>If system has SR-IOV capable
PCIe Devices, this option
Enables or Disables Single
Root IO Virtualization Support.</td></tr><tr><td></td><td>+: Select Screen
↑↓: Select Item
Enter: Select
+/-: Change Opt.
F1: General Help
F2: Previous Values
F3: Optimized Defaults
F4: Save &amp; Exit
ESC: Exit</td></tr><tr><td colspan="2">Version 2.17.1249. Copyright (C) 2016 American Megatrends, Inc.</td></tr></table>

# SR-IOV Support

If system has SR-IOV capable PCIe Devices, this option Enables or Disables Single Root IO Virtualization Support. Set this value to Enabled/Disabled.

# 5.5.5 Network Stack Configuration

You can use this screen to select options for the Network Stack Configuration Settings. Use the up and down &lt; Arrow &gt; keys to select an item. Use the &lt; + &gt; and &lt; - &gt; keys to change the value of the selected option. A description of the selected item appears on the right side of the screen. The settings are described on the following pages. An example of the Network Stack Configuration screen is shown below.

<table><tr><td colspan="2">Aptio Setup Utility - Copyright (C) 2016 American Megatrends, Inc. Advanced</td></tr><tr><td>Network Stack [Enabled]
Ipv4 PXE Support [Enabled]
Ipv6 PXE Support [Enabled]
PXE boot wait time 0
Media detect count 1</td><td>Enable/Disable UEFI Network Stack</td></tr><tr><td></td><td>+: Select Screen
↑↓: Select Item
Enter: Select
+/-: Change Opt.
F1: General Help
F2: Previous Values
F3: Optimized Defaults
F4: Save &amp; Exit
ESC: Exit</td></tr><tr><td colspan="2">Version 2.17.1249. Copyright (C) 2016 American Megatrends, Inc.</td></tr></table>

# Network Stack

Enable/Disable UEFI Network Stack. Set this value to Enabled/Disabled.

# Ipv4 PXE Support

Enable Ipv4 PXE Boot Support. If disabled IPV4 PXE boot option will not be created. Set this value to Enabled/Disabled.

# Ipv6 PXE Support

Enable Ipv6 PXE Boot Support. If disabled IPV6 PXE boot option will not be created. Set this value to Enabled/Disabled.

# PXE boot wait time

Wait time to press ESC key to abort the PXE boot. Set this value to desired time.

# Media detect count

Number of times presence of media will be checked.

# 5.5.6 CSM Configuration

You can use this screen to select options for the CSM Configuration Settings. Use the up and down &lt; Arrow &gt; keys to select an item. Use the &lt; + &gt; and &lt; - &gt; keys to change the value of the selected option. A description of the selected item appears on the right side of the screen. The settings are described on the following pages. An example of the CSM Configuration screen is shown below.

<table><tr><td colspan="2">Aptio Setup Utility - Copyright (C) 2016 American Megatrends, Inc.
Advanced</td></tr><tr><td>Compatibility Support Module Configuration</td><td>Enable/Disable CSM Support.</td></tr><tr><td>CSM Support [Enabled]</td><td></td></tr><tr><td>CSM16 Module Version 07.79</td><td></td></tr><tr><td>Boot option filter [UEFI and Legacy]</td><td></td></tr><tr><td>Option ROM execution</td><td></td></tr><tr><td>Network [Do not launch]</td><td></td></tr><tr><td>Storage [Legacy]</td><td></td></tr><tr><td></td><td>+: Select Screen
↑↓: Select Item
Enter: Select
+/-: Change Opt.
F1: General Help
F2: Previous Values
F3: Optimized Defaults
F4: Save &amp; Exit
ESC: Exit</td></tr><tr><td colspan="2">Version 2.17.1249. Copyright (C) 2016 American Megatrends, Inc.</td></tr></table>

# CSM Support

Enable/Disable Compatibility Support Module. Set this value to Enabled/Disabled.

# Boot option filter

This option controls whether Legacy/UEFI boot options will be enabled. Set this value to UEFI and Legacy/Legacy only/UEFI only.

# Network

This option Controls the execution of UEFI and Legacy PXE OpROM. Set this value to Do not launch/UEFI/Legacy.

# Storage

This option Controls the execution of UEFI and Legacy Video OpROM. Set this value to Do not launch/UEFI/Legacy.

# 5.5.7 ADLINK IPMI Settings

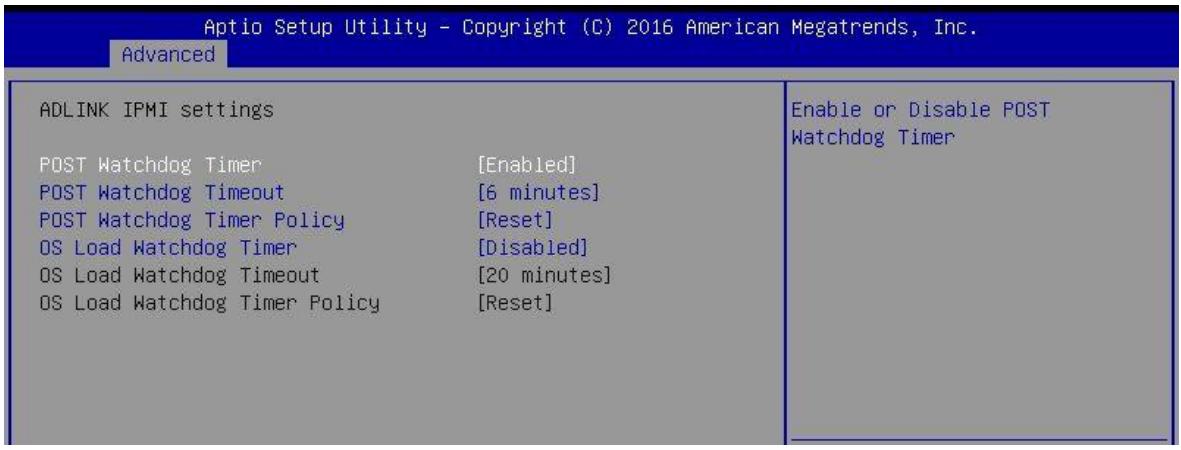
You can use this screen to select options for the ADLINK IPMI Settings. Use the up and down &lt; Arrow &gt; keys to select an item. Use the &lt; + &gt; and &lt; - &gt; keys to change the value of the selected option. A description of the selected item appears on the right side of the screen. The settings are described on the following pages. An example of the ADLINK IPMI Settings screen is shown below.
![Aptio Setup Utility - Copyright (C) 2016 American Megatrends, Inc.\nAdvanced\nADLINK IPMI settings\nPOST Watchdog Timer	(Enabled)\nPOST Watchdog Timeout	(6 minutes)\nPOST Watchdog Timer Policy	(Reset)\nOS Load Watchdog Timer	(Disabled)\nOS Load Watchdog Timeout	(20 minutes)\nOS Load Watchdog Timer Policy	(Reset)\nEnable or Disable POST\nWatchdog Timer](.mcn-2600t-50-1z268-1000-10/564a7bfdbb23e8bcf2dc3d3f3bb013ca0361704f3bb150495b8ad76192d508cf.jpg)

# POST Watchdog Timer

Enable or Disable POST Watchdog Timer. Set this value to Enabled/Disabled.

# POST Watchdog Timeout

Select the time value for POST Watchdog Timer Expiration value. Set this value to 3 minutes/4 minutes/5 minutes/6 minutes.

# POST Watchdog Timer Policy

Configure how the system should respond if the POST Watchdog Timer expires. Not available if POST Watchdog Timer is disabled. Set this value to Reset/Power Down/ Do Nothing.

# OS Load Watchdog Timer

Enable or Disable OS Watchdog Timer. Set this value to Enabled/Disabled.

# OS Load Watchdog Timeout

Select the time value for OS Watchdog Timer Expiration value. Set this value to 5 minutes/10 minutes/15 minutes/20 minutes.

# OS Load Watchdog Timer Policy

Configure how the system should respond if the OS Watchdog Timer expires. Not available if OS Watchdog Timer is disabled. Set this value to Reset/Power Down/ Do Nothing.

# 5.5.8 LAN Bypass Settings

You can use this screen to select options for the LAN Bypass Setting. Use the up and down &lt; Arrow &gt; keys to select an item. Use the &lt; + &gt; and &lt; - &gt; keys to change the value of the selected option. A description of the selected item appears on the right side of the screen. The settings are described on the following pages. An example of the LAN Bypass Setting screen is shown below.

<table><tr><td colspan="2">Aptio Setup Utility - Copyright (C) 2016 American Megatrends, Inc.
Advanced</td></tr><tr><td>Global LAN Bypass Setting [All Bypass Off]
NIM Card Generation [1st Generation]
Global Power On LAN Segment Mode [By Segment]
Global Power Off LAN Segment Mode [By Segment]</td><td>All Bypass On: set all LAN segment to &quot;Bypass On&quot;
All Bypass Off: Set all LAN segment to &quot;Bypass Off&quot;
By Segment: Go on to handle items</td></tr><tr><td>▶ LAN Segment Power On Mode Configuration
▶ LAN Segment Power Off Mode Configuration</td><td>+: Select Screen
↑↓: Select Item
Enter: Select
+/-: Change Opt.
F1: General Help
F2: Previous Values
F3: Optimized Defaults
F4: Save &amp; Exit
ESC: Exit</td></tr><tr><td colspan="2">Version 2.17.1249. Copyright (C) 2016 American Megatrends, Inc.</td></tr></table>

# Global LAN Bypass Setting

This option controls all LAN Bypass settings. All Bypass On: set all LAN segment to “Bypass On”; All Bypass Off: Set all LAN segment to “Bypass Off”; By Segment: Set LAN Bypass for each LAN segment

# NIM Card Generation

Select NIM Card Generation. Set this value to 1st Generation/2nd Generation.

# Global Power On LAN Segment Mode

This option controls Power On Mode LAN Bypass settings for all LAN segments globally. Set this value to All Bypass On/All Bypass Off/By Segment.

# Global Power Off LAN Segment Mode

This option controls Power Off Mode LAN Bypass settings for all LAN segments globally Set this value to All Bypass On/All Bypass Off/By Segment.

# LAN Segment Power On Mode Configuration
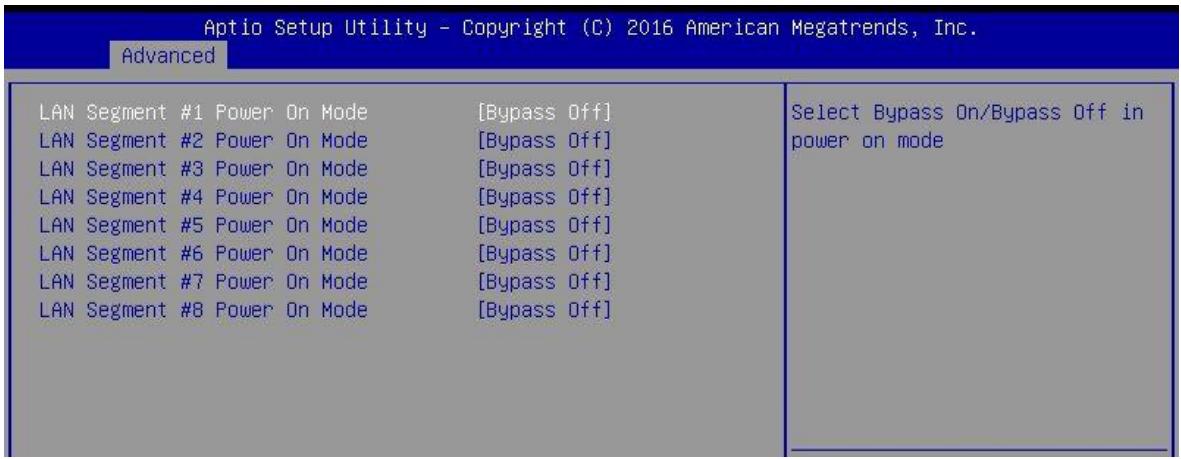
![Aptio Setup Utility - Copyright (C) 2016 American Megatrends, Inc.\nAdvanced\nLAN Segment #1 Power On Mode (Bypass Off)\nLAN Segment #2 Power On Mode (Bypass Off)\nLAN Segment #3 Power On Mode (Bypass Off)\nLAN Segment #4 Power On Mode (Bypass Off)\nLAN Segment #5 Power On Mode (Bypass Off)\nLAN Segment #6 Power On Mode (Bypass Off)\nLAN Segment #7 Power On Mode (Bypass Off)\nLAN Segment #8 Power On Mode (Bypass Off)\nSelect Bypass On/Bypass Off in power on mode](.mcn-2600t-50-1z268-1000-10/ecc0a80979c5e22d39fba85054d9f183b96cdb96af28c55407c84c81d78ea1ce.jpg)

# LAN Segment #1-8 Power On Mode

This option controls the LAN Bypass setting in Power On Mode for each segment. Set this value to Bypass On/Bypass Off.

# LAN Segment Power Off Mode Configuration
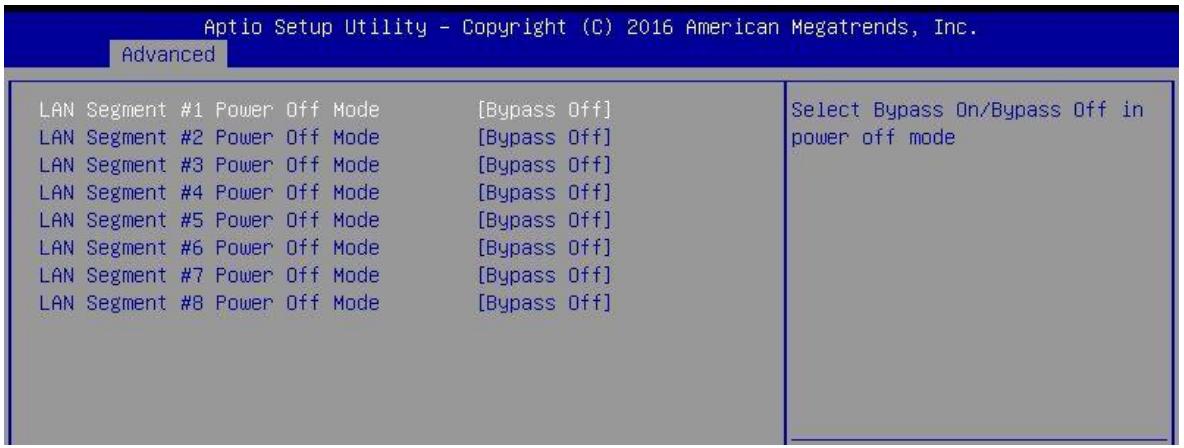
![Aptio Setup Utility - Copyright (C) 2016 American Megatrends, Inc.\nAdvanced\nLAN Segment #1 Power Off Mode (Bypass Off)\nLAN Segment #2 Power Off Mode (Bypass Off)\nLAN Segment #3 Power Off Mode (Bypass Off)\nLAN Segment #4 Power Off Mode (Bypass Off)\nLAN Segment #5 Power Off Mode (Bypass Off)\nLAN Segment #6 Power Off Mode (Bypass Off)\nLAN Segment #7 Power Off Mode (Bypass Off)\nLAN Segment #8 Power Off Mode (Bypass Off)\nSelect Bypass On/Bypass Off in\npower off mode](.mcn-2600t-50-1z268-1000-10/2e44a097bcd0a89a180bf0a33bcff583c23c2f663b8155003cf0d7ce7eda6770.jpg)

# LAN Segment #1-8 Power Off Mode

This option controls the LAN Bypass setting in Power Off Mode for each segment. Set this value to Bypass On/Bypass Off.

# 5.6 IntelRCSetup

Select the IntelRCSetup tab from the setup screen to enter the IntelRCSetup BIOS Setup screen. You can select any of IntelRCSetup BIOS Setup options by highlighting an option using the &lt; Arrow &gt; keys. The IntelRCSetup BIOS Setup screen is shown below.

<table><tr><td colspan="2">Aptio Setup Utility - Copyright (C) 2016 American Megatrends, Inc.
Main Advanced IntelRCSetup Server Mgmt Security Boot Save &amp; Exit</td></tr><tr><td rowspan="2">RC Revision 03.00.00
► Processor Configuration
► Advanced Power Management Configuration
► Common RefCode Configuration
► Memory Configuration
► IIO Configuration
► PCH Configuration
----------------------
Setup Warning:
Setting items on this Screen to incorrect values may cause system to malfunction!</td><td>Displays and provides option to change the Processor Settings</td></tr><tr><td>+:-: Select Screen
↑↓: Select Item
Enter: Select
+/-: Change Opt.
F1: General Help
F2: Previous Values
F3: Optimized Defaults
F4: Save &amp; Exit
ESC: Exit</td></tr><tr><td colspan="2">Version 2.17.1249. Copyright (C) 2016 American Megatrends, Inc.</td></tr></table>

# 5.6.1 Processor Configuration

You can use this screen to select options for the Processor Configuration. Use the up and down &lt; Arrow &gt; keys to select an item. Use the &lt; + &gt; and &lt; - &gt; keys to change the value of the selected option. A description of the selected item appears on the right side of the screen. The settings are described on the following pages. An example of the Processor Configuration screen is shown below.

Aptio Setup Utility - Copyright (C) 2016 American Megatrends，Inc. IntelRcsetup

<table><tr><td colspan="3">Processor Configuration———————▶ Per-Socket Configuration</td><td rowspan="12">Change Per-Socket Settings</td></tr><tr><td>Processor Socket</td><td>Socket 0</td><td>Socket 1</td></tr><tr><td>Processor ID</td><td>000306F2* |</td><td>N/A</td></tr><tr><td>Processor Frequency</td><td>2.200GHz |</td><td>N/A</td></tr><tr><td>Processor Max Ratio</td><td>16H | 00H</td><td></td></tr><tr><td>Processor Min Ratio</td><td>0CH | 00H</td><td></td></tr><tr><td>Microcode Revision</td><td>00000036 |</td><td>N/A</td></tr><tr><td>L1 Cache RAM</td><td>768KB |</td><td>N/A</td></tr><tr><td>L2 Cache RAM</td><td>3072KB |</td><td>N/A</td></tr><tr><td>L3 Cache RAM</td><td>30720KB |</td><td>N/A</td></tr><tr><td>Processor 0 Version</td><td colspan="2">Intel(R) Xeon(R) CPU E5-2658 v3 @ 2.20GHz</td></tr><tr><td>Processor 1 Version</td><td colspan="2">Not Present</td></tr><tr><td>Hyper-Threading [ALL]</td><td colspan="2">[Enable]</td><td rowspan="5">+: Select Screen↑↓: Select ItemEnter: Select+/-: Change Opt.F1: General HelpF2: Previous ValuesF3: Optimized DefaultsF4: Save &amp; ExitESC: Exit</td></tr><tr><td>Check CPU BIST Result</td><td colspan="2">[Disabled]</td></tr><tr><td>Monitor/Mwait</td><td colspan="2">[Enable]</td></tr><tr><td>Enable Intel TXT Support</td><td colspan="2">[Disable]</td></tr><tr><td>VMX</td><td colspan="2">[Enable]</td></tr></table>

Version2.17.1249.Copyright (C) 2016 American Megatrends，Inc.

# Hyper-threading

Enabled for Windows XP and Linux (OS optimized for Hyper-Threading Technology) and Disabled for other OS (OS not optimized for Hyper-Threading Technology).

<table><tr><td colspan="2">Options</td></tr><tr><td>Enabled</td><td>For Windows XP and Linux (OS optimized for Hyper-Threading Technology).</td></tr><tr><td>Disabled</td><td>For other OS (OS not optimized for Hyper-Threading Technology).</td></tr></table>

# Check CPU BIST Result

Disable failed BIST core when enable, otherwise, ignore BIST result. Set this value to Set this value to Enabled/Disabled.

# Monitor/Mwait

Enable or Disable the Monitor/Mwait instruction. Set this value to Enabled/Disabled.

# Enable Intel TXT Support

Enables Intel Trusted Execution Technology Configuration. Please disable "EV DFX Features" when TXT is enabled. Set this value to Enabled/Disabled.

# VMX

Enables the Vanderpool Technology, takes effect after reboot. Set this value to Enabled/Disabled.

# Per-Socket Configuration

You can use this screen to select options for Per-Socket Configuration. The screen is shown below.

![Aptio Setup Utility - Copyright (C) 2016 American Megatrends, Inc.\nIntelRCSetup\nCPU Socket 0 Configuration\nCPU Socket 1 Configuration](.mcn-2600t-50-1z268-1000-10/dbf7c1e10e4f4843c4429a9f4107a6f6202492a875e541f9d57b0cc719555e3e.jpg)

# CPU Socket 0/1 Configuration

You can use this screen to select options for CPU Socket 0/1 Configuration. The screen is shown below.

![Aptio Setup Utility - Copyright (C) 2016 American Megatrends, Inc.\nIntelRCSetup\nCPU Socket 0 Configuration\n----_\nCores Enabled          0\nNumber of Cores to Enable. 0\nmeans all cores. 12 Cores\navailable.](.mcn-2600t-50-1z268-1000-10/4bcc7faefebaaed8e64cdc78b090a8b0a60d245d6f8cdc74b8aabe64ac9057e5.jpg)

# Cores Enabled

Number of Cores to Enable. 0 means all cores. Set this value to Desired number.

# 5.6.2 Advanced Power Management Configuration

You can use this screen to select options for the Advanced Power Management Configuration. Use the up and down &lt; Arrow &gt; keys to select an item. Use the &lt; + &gt; and &lt; - &gt; keys to change the value of the selected option. A description of the selected item appears on the right side of the screen. The settings are described on the following pages. An example of the Advanced Power Management Configuration screen is shown below.

<table><tr><td colspan="2">Optio Setup Utility - Copyright (C) 2016 American Megatrends, Inc.
IntelRCSetup</td></tr><tr><td colspan="2">Advanced Power Management Configuration
Power Technology [Custom]
Config TDP [Disable]
IOTG Setting [Disable]
Uncore CLR Freq OVRD [Auto]</td></tr><tr><td>CPU P State Control
CPU T State Control</td><td>Enable the power management features.</td></tr><tr><td></td><td>+: Select Screen
↑↓: Select Item
Enter: Select
+/-: Change Opt.
F1: General Help
F2: Previous Values
F3: Optimized Defaults
F4: Save &amp; Exit
ESC: Exit</td></tr><tr><td colspan="2">Version 2.17.1249. Copyright (C) 2016 American Megatrends, Inc.</td></tr></table>

# Power Technology

This option controls the power management features. Set this value to Disable/ Energy Efficient/Custom.

# Config TDP

This option can disable/enable Config TDP. Set this value to Disable/Enable.

# Config TDP Level

This option can select Config TDP level. Set this value to Nominal/Level 1/Level 2. Note:This option will not be shown if “Config TDP” is not “Enable”

# IOTG Setting

This option controls IOTG Setting via sticky scratch pad register. Set this value to Disable/Enable.

# CPU P State Control

You can use this screen to select options for CPU P State Control. The screen is shown below.

![Aptio Setup Utility - Copyright (C) 2016 American Megatrends, Inc.\nIntelRCSetup\nCPU P State Control\nEIST (P-states) (Enable)\nTurbo Mode (Enable)\nWhen enabled, OS sets CPU frequency according load. When disabled, CPU frequency is set at max non-turbo.](.mcn-2600t-50-1z268-1000-10/65373b4560aa2d9747cf3f31f5318ac43362dc0dfe22a3f5ffdb497c3d44ea1b.jpg)

# EIST (P-states)

When enabled, OS sets CPU frequency according load. When disabled, CPU frequency is set at max non-turbo. Set this value to Disable/Enable.

# Turbo Mode

This option enable or disable CPU Turbo mode. Set this value to Disable/Enable.

# CPU T State Control

You can use this screen to select options for CPU T State Control. The screen is shown below.

![Aptio Setup Utility - Copyright (C) 2016 American Megatrends, Inc.\nIntelRCSetup\nCPU T State Control\nACPI T-States (Enable)\nEnable/Disable CPU throttling\nby OS. Throttling reduces\npower consumption.](.mcn-2600t-50-1z268-1000-10/7a2ee1030a672d659757e8d956f58f0ea2f0d9eaa6c33474d7defde00f5bd4ed.jpg)

# ACPI T-States

This option enable/disable CPU throttling by OS. Throttling reduces power consumption. Set this value to Disable/Enable.

# 5.6.3 Common RefCode Configuration

You can use this screen to select options for the Common RefCode Configuration. Use the up and down &lt; Arrow &gt; keys to select an item. Use the &lt; + &gt; and &lt; - &gt; keys to change the value of the selected option. A description of the selected item appears on the right side of the screen. The settings are described on the following pages. An example of the Common RefCode Configuration screen is shown below.

![Aptio Setup Utility - Copyright (C) 2016 American Megatrends, Inc.\nIntelRCSetup\nCommon RefCode Configuration\n--------(Disable)\nNuma\nEnable or Disable Non uniform\nMemory Access (NUMA).](.mcn-2600t-50-1z268-1000-10/b5409fa7b23773f80a4dfa7d8db7a46d583c8c26473768937dbf47910cc0d82c.jpg)

# Numa

This option enable or disable Non uniform Memory Access (NUMA).Set this value to Disable/Enable.

# 5.6.4 Memory Configuration

You can use this screen to select options for the Memory Configuration. Use the up and down &lt; Arrow &gt; keys to select an item. Use the &lt; + &gt; and &lt; - &gt; keys to change the value of the selected option. A description of the selected item appears on the right side of the screen. The settings are described on the following pages. An example of the Memory Configuration screen is shown below.

<table><tr><td colspan="2">Aptio Setup Utility - Copyright (C) 2016 American Megatrends, Inc.
IntelRCSetup</td></tr><tr><td>-------- Integrated Memory Controller (iMC)
---------- Memory Topology
      Memory Map</td><td>Displays memory topology with Dimm population information. Each socket has 2 Nodes/iMC&#x27;s(numbered from 0-7),each node supports upto 2 channels(0&amp;1) and 3 DIMM&#x27;s per channel(0,1&amp;2) on EP platforms.</td></tr></table>

# Memory Topology

You can use this screen to select options for Memory Topology. The screen is shown below.

![Aptio Setup Utility - Copyright (C) 2016 American Megatrends, Inc.\nIntelRCSetup\nSocket0.Cho0.Dimm0: 2133MT/s UNKNOWN SRx8 4GB RDIMM\nSocket0.Cho0.Dimm1: 2133MT/s UNKNOWN SRx8 4GB RDIMM](.mcn-2600t-50-1z268-1000-10/85381cb6ee7c8a4c9ba8d67e69826310d5ac4a925b40f0d866ebdee2318dd18e.jpg)

# Memory Map

You can use this screen to select options for Memory Map. The screen is shown below.

![Aptio Setup Utility - Copyright (C) 2016 American Megatrends, Inc.\nIntelRCSetup\nSocket Interleave Below 4GB (Disable)\nChannel Interleaving (Auto)\nRank Interleaving (Auto)\nSplits the 0-4GB address space\nbetween two sockets, so that\nboth sockets get a chunk of\nlocal memory below 4GB](.mcn-2600t-50-1z268-1000-10/ce6ca9269d8bb803d045b7d6f344cf90aceeb8386dd0108d184ead00ddfe52ba.jpg)

# Socket Interleave Below 4GB

Splits the 0-4GB address space between two sockets, so that both sockets get a chunk of local memory below 4GB.Set this value to Disable/Enable.

# Channel Interleaving

Select Channel Interleaving setting.Set this value to AUTO/1-way Interleave/2-way Interleave/3-way Interleave/4-way Interleave.

# Rank Interleaving

Select Rank Interleaving setting.Set this value to AUTO/1-way Interleave/2-way Interleave/4-way Interleave/8-way Interleave.

# 5.6.5 IIO Configuration

You can use this screen to select options for the IIO Configuration. Use the up and down &lt; Arrow &gt; keys to select an item. Use the &lt; + &gt; and &lt; - &gt; keys to change the value of the selected option. A description of the selected item appears on the right side of the screen. The settings are described on the following pages. An example of the IIO Configuration screen is shown below.

![Aptio Setup Utility - Copyright (C) 2016 American Megatrends, Inc.\nIntelRCSetup\nIIO Configuration\nIIOO Configuration\nIntel VT for Directed I/O (VT-d)](.mcn-2600t-50-1z268-1000-10/5fe11d32afdcea23f461062633d31ead8b207e82aa385b9865a904bc4c8ca18f.jpg)

# IIO0/1 Configuration

You can use this screen to select options for IIO0/1 Configuration. The screen is shown below.

![Aptio Setup Utility - Copyright (C) 2016 American Megatrends, Inc.\nIntelRCSetup\nIOU2 (IIO PCIe Port 1) (x8)\nIOU0 (IIO PCIe Port 2) (x8x8)\nIOU1 (IIO PCIe Port 3) (x8x8)\n► Socket 0 PcieD01F0 - Port 1A\n► Socket 0 PcieD02F0 - Port 2A\n► Socket 0 PcieD02F2 - Port 2C\n► Socket 0 PcieD03F0 - Port 3A\n► Socket 0 PcieD03F2 - Port 3C\nSelects PCIe port Bifurcation\nfor selected slot(s)](.mcn-2600t-50-1z268-1000-10/410ab01a2a89400d39f729c31985a15eb136ee7595ad380eea3d82890c7f11ea.jpg)

# IOU2 (IIO PCIe Port 1)

Selects PCIe port Bifurcation for selected slot(s).Set this value to AUTO/x8/x4x4.

# IOU0 (IIO PCIe Port 2)

Selects PCIe port Bifurcation for selected slot(s).Set this value to AUTO/x16/x8x8/x8x4x4/x4x4x8/x4x4x4x4.

# IOU1 (IIO PCIe Port 3)

Selects PCIe port Bifurcation for selected slot(s).Set this value to AUTO/x16/x8x8/x8x4x4/x4x4x8/x4x4x4x4.

# Socket 0 PcieD01F0 - Port 1A

You can use this screen to select options for Socket 0 PcieD01F0 - Port 1A Configuration. The screen is shown below.

Note: Other Port screen are similar to this screen

![Aptio Setup Utility - Copyright (C) 2016 American Megatrends, Inc.\nIntelRCSetup\nSocket 0 PcieD01F0 - Port 1A\nLink Speed (Auto)\nPCI-E Port Link Status Link Did Not Train\nPCI-E Port Link Max Max Width x8\nPCI-E Port Link Speed Link Did Not Train](.mcn-2600t-50-1z268-1000-10/d23fd72dfd5daca31d7ededfc8f458bfc47372af15b47e239bcc7fd8adac6231.jpg)

# Link Speed

Selects PCIe link speed.Set this value to AUTO/Gen 1 (2.5 GT/s)/ Gen 2 (5 GT/s)/ Gen 3 (8 GT/s).

Note: Socket 0/1 PcieD01F0 - Port 1A doesn’t have Gen3 option

# Intel VT for Directed I/O (VT-d)

You can use this screen to select options for Intel VT for Directed I/O (VT-d) Configuration. The screen is shown below.

![Aptio Setup Utility - Copyright (C) 2016 American Megatrends, Inc.\nIntelRCSetup\nIntel VT for Directed I/O (VT-d)\n------(Disable)\nIntel VT for Directed I/O (VT-d)](.mcn-2600t-50-1z268-1000-10/c2ed2a7523d09e928efffea156b307d068d383ad57bcddd798c21cf47849ed32.jpg)

# Intel VT for Directed I/O (VT-d)

Enable/Disable Intel Virtualization Technology for Directed I/O (VT-d) by reporting the I/O device assignment to VMM through DMAR ACPI Tables.Set this value to Disable/Enable.

# 5.6.6 PCH Configuration

You can use this screen to select options for the PCH Configuration. Use the up and down &lt; Arrow &gt; keys to select an item. Use the &lt; + &gt; and &lt; - &gt; keys to change the value of the selected option. A description of the selected item appears on the right side of the screen. The settings are described on the following pages. An example of the PCH Configuration screen is shown below.

![Aptio Setup Utility - Copyright (C) 2016 American Megatrends, Inc.\nIntelRCSetup\nPCH Configuration\n-------- PCH sSATA Configuration\n▶ PCH SATA Configuration\nsSATA devices and settings](.mcn-2600t-50-1z268-1000-10/863b9debce1b9a55ca10005fd5ead14335f3d85b1f716d260b70432f95d95b8b.jpg)

# PCH sSATA Configuration

You can use this screen to select options for PCH sSATA Configuration. The screen is shown below.

<table><tr><td colspan="2">Aptio Setup Utility - Copyright (C) 2016 American Megatrends, Inc.
IntelRCSetup</td></tr><tr><td colspan="2">PCH sSATA Configuration
----
----</td></tr><tr><td>sSATA Controller
Configure sSATA as</td><td>[Enabled]
[AHCI]</td></tr><tr><td>sSATA Port 0
Port 0
Hot Plug</td><td>[Not Installed]
[Enabled]
[Disabled]</td></tr><tr><td>sSATA Port 1
Port 1
Hot Plug</td><td>WDC WD3200BEKT - 320.0 G
[Enabled]
[Disabled]</td></tr><tr><td>sSATA Port 2
Port 2
Hot Plug</td><td>ASD26-MT1064-C - 64.0 GB
[Enabled]
[Disabled]</td></tr><tr><td>sSATA Port 3</td><td>[Not Installed]</td></tr></table>

# sSATA Controller

Enable or disable sSATA Controller.Set this value to Disable/Enable.

# Configure sSATA as

This will configure sSATA as IDE ,RAID or AHCI.Set this value to IDE/AHCI/RAID.

# Port 0/1/2/3

Enable or disable the sSATA port.Set this value to Disable/Enable.

# Hot Plug

Designates this port as Hot Pluggable.Set this value to Disable/Enable.

# PCH SATA Configuration

You can use this screen to select options for PCH SATA Configuration. The screen is shown below.

<table><tr><td colspan="2">Aptio Setup Utility - Copyright (C) 2016 American Megatrends, Inc.
IntelRCSetup</td></tr><tr><td colspan="2">PCH SATA Configuration
----
SATA Controller [Enabled]
Configure SATA as [RAID]</td></tr><tr><td colspan="2">SATA Port 0 [Not Installed]
Port 0 [Enabled]
Hot Plug [Disabled]
SATA Port 1 [Not Installed]
Port 1 [Enabled]
Hot Plug [Disabled]
SATA Port 2 [Not Installed]
Port 2 [Enabled]</td></tr><tr><td colspan="2">SATA Port 2 DevSlp [Disabled]
Hot Plug [Disabled]
SATA Port 3 [Not Installed]
Port 3 [Enabled]
Hot Plug [Disabled]</td></tr><tr><td colspan="2">SATA Port 4 TS64GMTS400 - 64.0 GB
Port 4 [Enabled]
Hot Plug [Disabled]
SATA Port 5 [Not Installed]
Port 5 [Enabled]
Hot Plug [Disabled]</td></tr><tr><td></td><td>Enable or Disable SATA
Controller</td></tr><tr><td></td><td></td></tr><tr><td></td><td>+: Select Screen
↑↓: Select Item
Enter: Select
+/-: Change Opt.
F1: General Help
F2: Previous Values
F3: Optimized Defaults
F4: Save &amp; Exit
ESC: Exit</td></tr><tr><td colspan="2">Version 2.17.1249. Copyright (C) 2016 American Megatrends, Inc.</td></tr></table>

# SATA Controller

Enable or disable SATA Controller.Set this value to Disable/Enable.

# Configure SATA as

This will configure SATA as IDE ,RAID or AHCI.Set this value to IDE/AHCI/RAID.

# Port 0/1/2/3/4/5

Enable or disable the SATA port.Set this value to Disable/Enable.

# Hot Plug

Designates this port as Hot Pluggable.Set this value to Disable/Enable.

# 5.7 Server Mgmt

Select the Server Mgmt tab from the setup screen to enter the Server Mgmt BIOS Setup screen. You can select any of the items in the left frame of the screen.The Server Mgmt Settings screen is shown below:

<table><tr><td colspan="2">Aptio Setup Utility - Copyright (C) 2016 American Megatrends, Inc.</td></tr><tr><td colspan="2">Main Advanced IntelRCSetup Server Mgmt Security Boot Save &amp; Exit</td></tr><tr><td>BMC Self Test Status PASSED
BMC Device ID 32
BMC Device Revision 1
BMC Firmware Revision 0.4
IPMI Version 2.0</td><td>logs the report returned by
BMC self test command</td></tr><tr><td rowspan="2">► Bmc self test log
► BMC network configuration
BMC Warm Reset</td><td></td></tr><tr><td>+: Select Screen
↑↓: Select Item
Enter: Select
+/-: Change Opt.
F1: General Help
F2: Previous Values
F3: Optimized Defaults
F4: Save &amp; Exit
ESC: Exit</td></tr></table>

# Bmc self test log

You can use this screen to select options for Bmc self test log. The screen is shown below.

![Aptio Setup Utility - Copyright (C) 2016 American Megatrends, Inc.\nServer Mgmt\nLog area usage = 00 out of 20 logs\nErase Log (Yes, On every reset)\nWhen log is full (Clear Log)\nLog Empty\nErase Log Options](.mcn-2600t-50-1z268-1000-10/eb05ab47c3a8c38cb4857e82ed97578409c471c5438bf6840af4612f0eeb5a0f.jpg)

# Erase Log

Erase Log Options.Set this value to No/Yes, On every reset.

# When log is full

Select the action to be taken when log is full.Set this value to Clear Log/ Do not log any more.

# BMC network configuration

You can use this screen to select options for BMC network configuration. The screen is shown below.

<table><tr><td colspan="2">BMC network configuration</td><td rowspan="9">Select to configure LAN channel parameters statically or dynamically(by BIOS or BMC). Unspecified option will not modify any BMC network parameters during BIOS phase</td></tr><tr><td>Lan channel 1Configuration Address source</td><td>[Unspecified]</td></tr><tr><td>Current Configuration Address sour</td><td>DynamicAddressBmcDhcp</td></tr><tr><td>Station IP address</td><td>0.0.0.0</td></tr><tr><td>Subnet mask</td><td>0.0.0.0</td></tr><tr><td>Station MAC address</td><td>00-11-22-33-55-66</td></tr><tr><td>Router IP address</td><td>0.0.0.0</td></tr><tr><td>Router MAC address</td><td>00-00-00-00-00-00</td></tr><tr><td>Lan channel 2Configuration Address source</td><td>[Unspecified]</td></tr><tr><td>Current Configuration Address sour</td><td>Unspecified</td><td rowspan="6">++: Select Screen↑↓: Select ItemEnter: Select+/-: Change Opt.F1: General HelpF2: Previous ValuesF3: Optimized DefaultsF4: Save &amp; ExitESC: Exit</td></tr><tr><td>Station IP address</td><td>0.0.0.0</td></tr><tr><td>Subnet mask</td><td>0.0.0.0</td></tr><tr><td>Station MAC address</td><td>00-00-00-00-00-00</td></tr><tr><td>Router IP address</td><td>0.0.0.0</td></tr><tr><td>Router MAC address</td><td>00-00-00-00-00-00</td></tr></table>

# Configuration Address source

Select to configure LAN channel parameters statically or dynamically (by BIOS or BMC). Unspecified option will not modify any BMC network parameters during BIOS phase.Set this value to Unspecified/Static/DynamicBmcDhcp/ DynamicBmcNonDhcp.

# 5.8 Security Setup

<table><tr><td colspan="2">Aptio Setup Utility - Copyright (C) 2016 American Megatrends, Inc.Main Advanced IntelRCSetup Server Mgmt Security Boot Save &amp; Exit</td></tr><tr><td rowspan="27">Password DescriptionIf ONLY the Administrator&#x27;s password is set,then this only limits access to Setup and isonly asked for when entering Setup.If ONLY the User&#x27;s password is set, then thisis a power on password and must be entered toboot or enter Setup. In Setup the User willhave Administrator rights.The password length must bein the following range:Minimum length 3Maximum length 20Administrator PasswordUser PasswordHDD Security Configuration:P1:WDC WD3200BEP2:ASD26-MT1064P4:TS64GMTS400</td><td rowspan="26">Set Administrator Password++: Select Screen↑↓: Select ItemEnter: Select+/-: Change Opt.F1: General HelpF2: Previous ValuesF3: Optimized DefaultsF4: Save &amp; ExitESC: Exit</td></tr><tr></tr><tr></tr><tr></tr><tr></tr><tr></tr><tr></tr><tr></tr><tr></tr><tr></tr><tr></tr><tr></tr><tr></tr><tr></tr><tr></tr><tr></tr><tr></tr><tr></tr><tr></tr><tr></tr><tr></tr><tr></tr><tr></tr><tr></tr><tr></tr><tr></tr><tr><td></td></tr></table>

# Administrator / User Password

If only the administrator’s password is set, then this limits access to setup and is only asked for when entering setup.

If only the user’s password is set, then this is a power on password and must be entered to boot or enter setup. In setup the user will have administrator rights.

# 5.9 Boot Setup

Select the Boot tab from the setup screen to enter the Boot BIOS Setup screen. You can select any of the items in the left frame of the screen, such as Boot Device Priority, to go to the sub menu for that item. You can display a Boot BIOS Setup option by highlighting it using the &lt; Arrow &gt; keys. The Boot Settings screen is shown below:

<table><tr><td colspan="2">Aptio Setup Utility - Copyright (C) 2016 American Megatrends, Inc.
Main Advanced IntelRCSetup Server Mgmt Security Boot Save &amp; Exit</td></tr><tr><td>Boot Configuration
Setup Prompt Timeout 1
Bootup NumLock State [On]</td><td rowspan="3">Number of seconds to wait for setup activation key.
65535(0xFFFF) means indefinite waiting.</td></tr><tr><td>Quiet Boot [Disabled]</td></tr><tr><td>Boot Option Priorities
Boot Option #1 [UEFI: Sony Storage ...]
Boot Option #2 [sSATA P1: WDC WD32...]
Boot Option #3 [UEFI: Built-in EFI ...]
New Boot Option Policy [Default]</td></tr><tr><td>Hard Drive Boot Order Priorities</td><td>+: Select Screen
↑↓: Select Item
Enter: Select
+/-: Change Opt.
F1: General Help
F2: Previous Values
F3: Optimized Defaults
F4: Save &amp; Exit
ESC: Exit</td></tr><tr><td colspan="2">Version 2.17.1249. Copyright (C) 2016 American Megatrends, Inc.</td></tr></table>

# Setup Prompt Timeout

Set the number of seconds that the system will wait for the setup activation key. The number of 65535(0xFFFF) means indefinite waiting.

# Bootup NumLOck State

Select the keyboard NumLock state. Set this value to On, Off.

# Quiet Boot

Disabled - Set this value to allow the computer system to display the POST messages.

Enabled - Set this value to allow the computer system to display the OEM logo.

# Fast Boot

Enables or disables boot with initialization of a minimal set of devices required to launch active boot option. Has no effect for BBS boot options. Set this value to Enable / Disable.

# Boot Option Priorities

Set Boot Option #1 -2 boot priority.

# Hard Drive BBS Priorities

Specifies the boot device priority sequence from available hard drives.

<table><tr><td colspan="2">Aptio Setup Utility - Copyright (C) 2016 American Megatrends, Inc. Boot</td></tr><tr><td>Boot Option #1 [SSATA P1: WDC WD32...]
Boot Option #2 [SSATA P2: ASD26-MT...]
Boot Option #3 [SATAO P4: TS64GMTS4...]
Boot Option #4 [Sony Storage Media ...]</td><td>Sets the system boot order</td></tr><tr><td></td><td>+: Select Screen
↑↓: Select Item
Enter: Select
+/-: Change Opt.
F1: General Help
F2: Previous Values
F3: Optimized Defaults
F4: Save &amp; Exit
ESC: Exit</td></tr><tr><td colspan="2">Version 2.17.1249. Copyright (C) 2016 American Megatrends, Inc.</td></tr></table>

# 5.10 Save & Exit Menu

Select the Exit tab from the setup screen to enter the Exit BIOS Setup screen. You can display an Exit BIOS Setup option by highlighting it using the &lt; Arrow &gt; keys. The Exit BIOS Setup screen is shown below.

<table><tr><td colspan="2">Aptio Setup Utility - Copyright (C) 2016 American Megatrends, Inc.
Main Advanced IntelRCSetup Server Mgmt Security Boot Save &amp; Exit</td></tr><tr><td>Save Options
Save Changes and Exit
Discard Changes and Exit
Save Changes and Reset
Discard Changes and Reset
Save Changes
Discard Changes
Default Options
Restore Defaults
Save as User Defaults
Restore User Defaults
Boot Override
UEFI: Sony Storage Media 0100, Partition 1
sSATA P1: WDC WD3200BEKT-22PVM
sSATA P2: ASD26-MT1064-CT
SATAO P4: TS64GMTS400
Sony Storage Media 0100
UEFI: Built-in EFI Shell</td><td>Exit system setup after saving the changes.
+: Select Screen
↑↓: Select Item
Enter: Select
+/-: Change Opt.
F1: General Help
F2: Previous Values
F3: Optimized Defaults
F4: Save &amp; Exit
ESC: Exit</td></tr><tr><td colspan="2">Version 2.17.1249. Copyright (C) 2016 American Megatrends, Inc.</td></tr></table>

# Save Changes and Exit

Exit system setup after saving the changes.

![Save & Exit Setup\nSave configuration and exit?\nYes	No](.mcn-2600t-50-1z268-1000-10/47d1974dc5fa6dd106a1c35db2165b3020861957f161ab5b209db23322da8d8f.jpg)

# Discard Changes and Exit

Exit system setup without saving any changes.

![Exit Without Saving\nQuit without saving?\nYes No](.mcn-2600t-50-1z268-1000-10/b5044b55976d005a0b298869ab71900d41115c3918f8a4514479708a3aa45aeb.jpg)

# Save Changes and Reset

Reset the system after saving the changes.

![Save & reset\nSave configuration and reset?\nYes	No](.mcn-2600t-50-1z268-1000-10/4efef509e5a0a7b07581f4239f3c090b3848273cc2d948f3abaef877c0f2cca2.jpg)

# Discard Changes and Reset

Reset system setup without saving any changes.

![Reset Without Saving\nReset without saving?\nYes No](.mcn-2600t-50-1z268-1000-10/acc21fdb9bff5528a048e3b603280c2d491b2162db28affe887b8a8843ae5fdf.jpg)

# Save Changes

Save changes done so far to any of the setup options.

![Save Setup Values\nSave configuration?\nYes No](.mcn-2600t-50-1z268-1000-10/3cb03614c52006d390202528861bf739acd84c4dc4aff4fc28922b252fcc1238.jpg)

# Discard Changes

Discard Changes done so far to any of the setup options.

![Load Previous Values\nLoad Previous Values?\nYes No](.mcn-2600t-50-1z268-1000-10/8fbabd397517e21db379b261c25a25d3f37a04cb3604943d13a816192ab2fb49.jpg)

# Restore Defaults

Restore/Load Defaults values for all the setup options.

![Load Optimized Defaults\nLoad Optimized Defaults?\nYes No](.mcn-2600t-50-1z268-1000-10/0fb3d1472bd6c19bbaa5b320fde3ab3a51e409914d8af0c7188e657629bd87d4.jpg)

# Save as User Defaults

Save the changes done so far as user defaults.

![Save Values as User Defaults\nSave configuration?\nYes	No](.mcn-2600t-50-1z268-1000-10/cb80bb00fb213406b9e50492fa87c6dbbca85f4530d0cca3ca3e7dadb0cabe2d.jpg)

# Restore User Defaults

Restore the user defaults to all the setup options.

![Restore User Defaults\nRestore User Defaults?\nYes	No](.mcn-2600t-50-1z268-1000-10/ad5a6130560bf4c371ae7cd77f9673cac289766e0e2717af975c8f1068f294fd.jpg)

# Safety Instructions

For user safety, please read and follow all instructions, WARNINGS, CAUTIONS, and NOTES marked in this manual and on the associated equipment before handling/operating the equipment.

1. Read these safety instructions carefully.
2. Keep this user’s manual for future reference.
3. Read the specifications section of this manual for detailed information on the operating environment of this equipment.
4. The equipment can be operated at an ambient temperature of $40 \textdegree$
5. When installing/mounting or uninstalling/removing equipment; or when removal of the chassis lid required for user servicing (Section 3.1-3.5):
• Turn off power and unplug any power cords/cables, and
• Reinstall the chassis lid before restoring power.

6. To avoid electrical shock and/or damage to equipment:

• Keep equipment away from water or liquid sources;
• Keep equipment away from high heat or high humidity;
Keep equipment properly ventilated (do not block or cover ventilation openings);
• Make sure to use recommended voltage and power source settings;
• Always install and operate equipment near an easily accessible electrical socketoutlet;
• Secure the power cord (do not place any object on/over the power cord);
Only install/attach and operate equipment on stable surfaces and/or recommended mountings;
If the equipment will not be used for long periods of time, turn off and unplug the equipment from its power source.

7. Never attempt to fix the equipment. Equipment should only be serviced by qualified personnel.

8. A Lithium-type battery may be provided for uninterrupted, backup or emergency power.

CAUTION! Risk of explosion if battery is replaced with one of an incorrect type. Please dispose of used batteries appropriately.

9. Equipment must be serviced by authorized technicians when:

The power cord or plug is damaged;
Liquid has penetrated the equipment;
It has been exposed to high humidity/moisture;
• It is not functioning or does not function according to the user’s manual;
• It has been dropped and/or damaged; and/or,
It has an obvious sign of breakage.

10. Please pay strict attention to all warnings and advisories appearing on the device, to avoid injury or damage.

11. The equipment may have more than one power supply input. To reduce the risk of electrical shock, trained personnel should disconnect all power supply inputs before servicing.

CAUTION! Disconnect all power supply inputs before servicing.

12. It is recommended that equipment be installed only in a server room or computer room where access is:

Restricted to qualified service personnel or users familiar with restrictions applied to the location, reasons therefor, and any precautions required;
Only afforded by the use of a tool or lock and key, or other means of security, and is controlled by the authority responsible for the location.

# Consignes de Sécurité Importantes

Pour assurer la sécurité de l’utilisateur, veuillez lire et suivre toutes les directives, ainsi que les AVERTISSEMENTS, MISES EN GARDE et REMARQUES de ce manuel et indiqués sur l’équipement associé avant de manipuler ou utiliser l’équipement.

1. Veuillez lire attentivement ces instructions de sécurité avec soin.
2. Veuillez conserver ce manuel pour référence future.
3. Veuillez lire la section des spécifications de ce manuel pour avoir des informations détaillées sur l’environnement d’exploitation de cet équipement.
4. L’équipement peut être utilisé à une température ambiante de 40 °C.
5. Lors de l’installation ou du montage et de la désinstallation ou de la dépose de l’équipement; ou lors de la dépose du couvercle du châssis pour procéder à l’entretien par l’utilisateur (Sections 3.1-3.5):

• Coupez l’alimentation et débranchez les cordons et les câbles d’alimentation, et
• Reposez le couvercle du châssis avant de remettre l’alimentation.

6. Pour éviter un risque d’électrocution et pour éviter d’endommager l’équipement :

• Éloignez l’équipement de l’eau et de toute source liquide;
• Éloignez l’équipement de toute source de chaleur ou d’humidité élevée;
Gardez l’équipement correctement ventilé (ne pas bloquer ou couvrir les ouvertures de ventilation);
Veillez à utiliser la tension recommandée et les réglages adéquats pour la source d’alimentation;
Veuillez toujours installer et exploiter l’équipement à proximité d’une prise de courant facilement accessible;
Assurez-vous que le cordon d’alimentation est acheminé de manière sécuritaire (ne déposez aucun objet dessus);
Installez, fixez et utilisez l’équipement sur des surfaces stables ou sur les fixations recommandées uniquement;
Si l’équipement n’est pas utilisé pendant une longue période, éteignez-le et débranchez-le de sa source d’alimentation.

7. N’essayez jamais de réparer l’équipement. L’équipement ne doit être réparé que par du personnel qualifié.

8. Une pile au lithium peut être installée pour assurer l’alimentation de secours ou d’urgence en continu.

ATTENTION! Risque d’explosion si la pile est remplacée par une autre de type incorrect. Veuillez jeter les piles usagées de façon appropriée.

9. L’équipement doit être entretenu par des techniciens agréés lorsque :

le cordon d’alimentation est endommagé ou lorsque la fiche électrique est endommagée;
du liquide a pénétré à l’intérieur de l’équipement;
• l’équipement a été exposé à un taux d’humidité élevé;
• l’équipement ne fonctionne pas ou ne fonctionne pas conformément au manuel de l’utilisateur;
• l’équipement est tombé ou lorsqu’il a été endommagé;
• l’équipement présente un signe évident de défaillance.

10. Veuillez porter une attention rigoureuse à tous les avertissements et à tous les avis figurant sur l’appareil, pour éviter des blessures ou des dommages.

11. ATTENTION! L’équipement peut avoir plus d’une entrée d’alimentation. Pour réduire le risque d’électrocution, le personnel qualifié devrait déconnecter toutes les entrées d’alimentation avant de procéder à l’entretien.

12. Il est recommandé que l'équipement soit installé que dans une salle de serveur ou de la salle informatique où:

• L'accès est limité au personnel de maintenance qualifié ou utilisateurs familiers avec les restrictions appliquées à l'emplacement, motifs, et tout les précautions nécessaires, et;
• L'accès est uniquement assurée par l'utilisation d'un outil ou clé, ou d'autres moyens de sécurité, et est contrôlé par l'autorité responsable de l'emplacement.

# Getting Service

Ask an Expert: http://askanexpert.adlinktech.com

# ADLINK Technology, Inc.

Address: 9F, No.166 Jian Yi Road, Zhonghe District

New Taipei City 235, Taiwan

新北市中和區建一路 166 號 9 樓

Tel: +886-2-8226-5877

Fax: +886-2-8226-5717

Email: service@adlinktech.com

# Ampro ADLINK Technology, Inc.

Address: 5215 Hellyer Avenue, #110, San Jose, CA 95138, USA

Tel: +1-408-360-0200

Toll Free: +1-800-966-5200 (USA only)

Fax: +1-408-360-0222

Email: info@adlinktech.com

# ADLINK Technology (China) Co., Ltd.

Address: 上海市浦东新区张江高科技园区芳春路 300 号 (201203)

300 Fang Chun Rd., Zhangjiang Hi-Tech Park, Pudong New Area

Shanghai, 201203 China

Tel: +86-21-5132-8988

Fax: +86-21-5132-3588

Email: market@adlinktech.com

# ADLINK Technology GmbH

Address: Hans-Thoma-Straße 11, D-68163, Mannheim, Germany

Tel: +49-621-43214-0

Fax: +49-621 43214-30

Email: emea@adlinktech.com

Please visit the Contact page at www.adlinktech.com for information on how to contact the ADLINK regional office nearest you.
[🔗 Link to the original document](.mcn-2600t-50-1z268-1000-10/mcn-2600t-50-1z268-1000-10.pdf)