# NeuronBot User’s Manual

Rapid Robotic Development Platform

![Exterior view of a black NEURONBOT autonomous delivery robot with ADLINK branding (no text or symbols on the device itself)](.neuronbot-50-1z334-1000-10/d385acf5f9b28af6eb99be45fc443d85843d5d41c09b968f15888f3935cf57aa.jpg)

Manual Rev.: 1.0

Revision Date: October 29, 2020

Part Number: 50-1Z334-1000

# Preface

# Copyright

Copyright © 2020 ADLINK Technology, Inc. This document contains proprietary information protected by copyright. All rights are reserved. No part of this manual may be reproduced by any mechanical, electronic, or other means in any form without prior written permission of the manufacturer.

# Disclaimer

The information in this document is subject to change without prior notice in order to improve reliability, design, and function and does not represent a commitment on the part of the manufacturer. In no event will the manufacturer be liable for direct, indirect, special, incidental, or consequential damages arising out of the use or inability to use the product or documentation, even if advised of the possibility of such damages.

# Environmental Responsibility

ADLINK is committed to fulfill its social responsibility to global environmental preservation through compliance with the European Union's Restriction of Hazardous Substances (RoHS) directive and Waste Electrical and Electronic Equipment (WEEE) directive. Environmental protection is a top priority for ADLINK. We have enforced measures to ensure that our products, manufacturing processes, components, and raw materials have as little impact on the environment as possible. When products are at their end of life, our customers are encouraged to dispose of them in accordance with the product disposal and/or recovery programs prescribed by their nation or company.

![Symbol of a trash bin crossed with a diagonal line and a horizontal bar below (no text or labels)](.neuronbot-50-1z334-1000-10/e7745411a24e9a3aa7e6888258f7a67d3b3945f07a78fe88b3cc50cbec66666f.jpg)

Battery Labels (for products with battery)

![Symbol of a trash bin crossed out by two diagonal lines (no text or labels)](.neuronbot-50-1z334-1000-10/d4afba02f8b7ff4add8dd93bf1a32137c1c78c8dbe5759be540666311b033694.jpg)

![Li-ion](.neuronbot-50-1z334-1000-10/c166f80e39ba0eb4f8d9ba2b8510cf676378e1589000566e23f3432881d3f6d4.jpg)

![RECYCLE\nRBRC\nLi-ion\n7.800.822.8837](.neuronbot-50-1z334-1000-10/b6b69dc8f4420049bf6ff84dae4c73f452a5a8fb6cfafe50e34942e5dd8d3e41.jpg)

![廢電池請回收](.neuronbot-50-1z334-1000-10/1a7ea1dedde929b2ad450a7179e32cfa81ed4475ff86c94d9dc1817dfb262038.jpg)

# California Proposition 65 Warning

![The image displays a standard warning symbol: a yellow equilateral triangle with a thick black border containing a central black exclamation mark, set against a plain white background.](.neuronbot-50-1z334-1000-10/8cd3527b40d8fecee504f04908fb66f5f6c62dbbe473b3bda33af930cd94a669.jpg)

WARNING: This product can expose you to chemicals including acrylamide, arsenic, benzene, cadmium, Tris(1,3-dichloro-2-propyl)phosphate (TDCPP), 1,4-Dioxane, formaldehyde, lead, DEHP, styrene, DINP, BBP, PVC, and vinyl materials, which are known to the State of California to cause cancer, and acrylamide, benzene, cadmium, lead, mercury, phthalates, toluene, DEHP, DIDP, DnHP,

DBP, BBP, PVC, and vinyl materials, which are known to the State of California to cause birth defects or other reproductive harm. For more information go to www.P65Warnings.ca.gov.

# Trademarks

Product names mentioned herein are used for identification purposes only and may be trademarks and/or registered trademarks of their respective companies.

Revision History

<table><tr><td>Revision</td><td>Description</td><td>Date</td><td>By</td></tr><tr><td>1.0</td><td>Initial release</td><td>2020-10-29</td><td>TS</td></tr></table>

# Table of Contents

Preface .....

List of Figures ....

1. Introduction......
2. Product Overview ....

2.1. Main Specifications..
2.2. Power Specifications .. .9
2.3. Software... .9
2.4. Package Contents ...... 9
2.5. Optional Accessories.. .9
2.6. Mechanical Dimensions... ..10
2.7. System Layout.. .12

3. Hardware Accessory Installation ... ..16

3.1. Support Plate Installation... ..16
3.2. Top Camera Installation..... ..18
3.3. Front Camera Installation .. ..21
3.4. Top Camera Cable Routing........ .22
3.5. Front Camera Cable Routing........ .23

4. Controls and I/O... .25

4.1. Power Button .. .25
4.2. Battery Status Indicator .. .25
4.3. GPIO Pinouts.... .25

5. Operating Instructions ... .26

5.1. Getting Started... .26
5.2. Remote Control and Monitoring... .35
5.3. ROS 1 Applications... .42
5.4. ROS 2 Applications.. .50

6. Troubleshooting ............ ..60

6.1. Self-diagnosis . ..60
6.2. FAQ . ..61

7. System Backup and Restore ...... ...64

7.1. Preparation ... ..64
7.2. Full Disk Backup ........ ..67
7.3. Full Disk Restoration.... ..74

8. Safety Instructions ................. ..76
9. Getting Service ................. .77

# List of Figures

Figure 1: Front View Dimensions (No Accessories).. ...10

Figure 2: Front View Dimensions (with Accessories). ..10

Figure 3: Side View Dimensions (No Accessories). ..11

Figure 4: Side View Dimensions (with Accessories) .. ..11

Figure 5: Front View Layout (No Accessories).. ..12

Figure 6: Front View Layout (with Accessories).. ..13

Figure 7: Rear View Panel Layout (Rear Cover Attached) . ..14

Figure 8: Rear View I/O Layout (Rear Cover Not Attached) .. ...15

Figure 9: Isometric View with Accessories.. ...16

This page is intentionally left blank.

# 1. Introduction

The NeuronBot is an affordable, miniature, autonomous rapid robotic development platform with integrated computational unit, LiDAR sensor, high payload capacity and dynamic motion capability, and is ideal for enabling a wide range of exciting research, training, and educational activities.

# 2. Product Overview

# 2.1. Main Specifications

<table><tr><td colspan="2">NeuronBot NB-SK</td></tr><tr><td colspan="2">Main System</td></tr><tr><td>Processor</td><td>Intel® Celeron® Processor G3900TE</td></tr><tr><td>Memory</td><td>2x 4G DDR4</td></tr><tr><td>Storage</td><td>64GB mSATA</td></tr><tr><td>Inertial Motion Sensor</td><td>GY85 9-axis IMU3-axis gyroscope, 3-axis accelerometer, 3-axis magnetometer</td></tr><tr><td>Motor Control Unit</td><td>Arduino Mega 2560</td></tr><tr><td>Encoder</td><td>7N14P 2-channel for motor control</td></tr><tr><td colspan="2">Laser Distance Sensor</td></tr><tr><td>Sensor Model</td><td>2D 360° RPLIDAR A1, 12 meters</td></tr><tr><td>Sample Frequency</td><td>8000Hz</td></tr><tr><td>Scan Rate Range</td><td>1-10Hz, 5.5Hz typical</td></tr><tr><td>Communication Interface</td><td>USB/UART</td></tr><tr><td colspan="2">Front Side</td></tr><tr><td>Status LED Bar (front)</td><td>The status LED bar lights one of the following colors according to the system status:Amber: NeuronBot is powered on.Blue: Base driver is active.Off: NeuronBot is powered off.</td></tr><tr><td>Camera Area</td><td>For Intel® RealSenseTM Depth Camera D435(optional side stand bracket required for installation)</td></tr><tr><td colspan="2">Rear Side</td></tr><tr><td>Battery Panel</td><td>Battery status display</td></tr><tr><td>Power Button</td><td>Power On/Off button</td></tr><tr><td>GPIO</td><td>1x GPIO connector</td></tr><tr><td colspan="2">Power Requirements</td></tr><tr><td>Motherboard DC Input</td><td>24V DC ±5% via ATX power connector</td></tr><tr><td>Battery</td><td>Provided by user if required</td></tr><tr><td colspan="2">Mechanical</td></tr><tr><td>Payload</td><td>3 kg</td></tr><tr><td>Wheel Diameter</td><td>83 ±2 mm</td></tr><tr><td>Wheel Center Distance</td><td>218 ±3 mm</td></tr><tr><td>Translational Velocity Max.</td><td>0.6 m/s</td></tr><tr><td>Rotational Velocity Max.</td><td>0.6 m/s</td></tr><tr><td>Climbing Threshold</td><td>0° ±1°</td></tr><tr><td>Actuator</td><td>DC carbon-brush motor (1:139)</td></tr><tr><td>Dimensions</td><td>260 x 270 x 260 mm (10.24 x 10.63 x10.24 inches)</td></tr><tr><td>Weight</td><td>7.8 kg</td></tr><tr><td colspan="2">Environmental</td></tr><tr><td>Operating Temperature</td><td>0°C to 50°C (32°F to 122°F)</td></tr><tr><td>Operating Humidity</td><td>10% to 95%, non-condensing</td></tr><tr><td>Storage Temperature</td><td>-20°C to 80°C (-4°F to 176°F)</td></tr><tr><td>EMC</td><td>Compliant with CE, FCC Class B</td></tr><tr><td>Vibration</td><td>Package random vibration: IEC 60068-2-64, 5-500Hz, 5Grms, 1hr/axis</td></tr><tr><td>Drop</td><td>ISTA-1A</td></tr><tr><td colspan="2">Software</td></tr><tr><td>SDK</td><td>Neuron SDK (optional)</td></tr><tr><td>Environment</td><td>Ubuntu 18.04 LTS</td></tr><tr><td>Middleware</td><td>ROS/ROS 2Intel® OpenVINOTM</td></tr></table>

# 2.2. Power Specifications

<table><tr><td>Motherboard Power Input</td><td>12VDC ±5% with ATX power connector</td></tr><tr><td rowspan="2">EOS1300-PWBDPower Board</td><td>Input: 24VDC ±5%,Output: 12VDC ±5%, 24VDC ±10%, 5Vsb ±5%</td></tr><tr><td>Output protection: 12V and 5Vsb short protection by DC-DC converter</td></tr></table>

# 2.3. Software

<table><tr><td>Environment</td><td>Ubuntu 18.04 LTS</td></tr><tr><td>Middleware</td><td>ROS/ROS2</td></tr><tr><td>SDK</td><td>Neuron SDK (optional)</td></tr></table>

# 2.4. Package Contents

<table><tr><td>Device</td><td>1x NeuronBot Rapid Robotic Development Platform</td></tr><tr><td>Documentation</td><td>1x Quick Start Guide</td></tr><tr><td>Cable</td><td>1x DisplayPort to HDMI adapter cable</td></tr></table>

# 2.5. Optional Accessories

ADLINK provides all the necessary parts and accessories for NeuronBot. You can purchase additional accessories according to your needs.

<table><tr><td>Item</td><td>Description</td></tr><tr><td>Camera</td><td>Intel® RealSenseTM Depth Camera D435</td></tr><tr><td>Support Plate</td><td>Attachable top plate for LIDAR protection, object transport, and top camera installation</td></tr><tr><td rowspan="2">Brackets</td><td>Front bracket for Intel® RealSenseTM Depth Camera D435</td></tr><tr><td>Top bracket for Intel® RealSenseTM Depth Camera D435</td></tr><tr><td rowspan="2">Stand-offs</td><td>M3 stand-offs for attaching support plate</td></tr><tr><td>Large, top-side stand-off for attaching top camera</td></tr></table>

# 2.6. Mechanical Dimensions

Note: All are dimensions shown in millimeters.

# 2.6.1. Front View Dimensions

![218\n101.5\n30\n25\nHoles for\nM4 screws\n23](.neuronbot-50-1z334-1000-10/8d2ab9b8d450afb5d97d36ce983a72bb9d1990133c0bcae8f4a6e874088a31f4.jpg)

Figure 1: Front View Dimensions (No Accessories)

Note: M4 screw holes are for attaching the front camera bracket to the chassis (see Front Camera Installation on page 21).

![256\n218\n480\n23](.neuronbot-50-1z334-1000-10/e280ec28422807d341036d7529770be4813f0d117880d121b191bf7da9f4375f.jpg)

Figure 2: Front View Dimensions (with Accessories)

# 2.6.2. Side View Dimensions

![266.5\n248](.neuronbot-50-1z334-1000-10/afd09f4e27a4b3566205f0f1fcf3255b251dedda0b84abc4dc296202150d7e35.jpg)

Figure 3: Side View Dimensions (No Accessories)

![480\n315](.neuronbot-50-1z334-1000-10/288c18cb19cf6e42032c9419fd809de06b2b9319cd5be5795ea8fcfad40d173c.jpg)

Figure 4: Side View Dimensions (with Accessories)

# 2.7. System Layout

# 2.7.1. Front View Layout (No Accessories)

![A\nB\nC\nD\nE](.neuronbot-50-1z334-1000-10/892e267b7895ea193c487c2982683f45e25eca2142e08db98173146aae8cab57.jpg)

Figure 5: Front View Layout (No Accessories)

<table><tr><td>A</td><td>Status LED bar</td><td>D</td><td>Wheel</td></tr><tr><td>B</td><td>LIDAR component</td><td>E</td><td>Screw holes for front camera bracket</td></tr><tr><td>C</td><td>Wheel</td><td>-</td><td>-</td></tr></table>

# 2.7.2. Front View Layout (with Accessories)

![A\nB\nC\nD\nE](.neuronbot-50-1z334-1000-10/9ecca504f7d921235722dbaade5e3d61c73bbeac5a08e77fb919c585eced622f.jpg)

Figure 6: Front View Layout (with Accessories)

<table><tr><td>A</td><td>Support plate</td><td>D</td><td>RealSense camera</td></tr><tr><td>B</td><td>Top-side stand-off</td><td>E</td><td>Front bracket for RealSense camera</td></tr><tr><td>C</td><td>RealSense camera</td><td>-</td><td>-</td></tr></table>

# 2.7.3. Rear View Layout

![A B C\nD\nE](.neuronbot-50-1z334-1000-10/a3bda87bab499c9bdc17bb374e5e2e48e3452b1924995d39f31fc14442a91c91.jpg)

Figure 7: Rear View Layout

<table><tr><td>A</td><td>Battery status indicator</td><td>D</td><td>Rear cover knob</td></tr><tr><td>B</td><td>Power button</td><td>E</td><td>Rear cover</td></tr><tr><td>C</td><td>GPIO connector</td><td>-</td><td>-</td></tr></table>

Note: The rear cover is attached to the chassis by two magnetic fasteners. To access the rear panel I/O, remove the rear cover by grasping the knob and gently pulling the cover away from the chassis.

For details on I/O connectors and internal components, refer to the AmITX-SL-G User’s Manual, downloadable from the ADLINK website.

# 2.7.4. Rear View I/O Layout (Rear Cover Removed)

![A\nB\nC\nD\nE](.neuronbot-50-1z334-1000-10/998229d5d4a5aedc42056267e2fce1df963066fb12d657d9c082847f546abdf1.jpg)

Figure 8: Rear View I/O Layout (Rear Cover Not Attached)

<table><tr><td>A</td><td>USB 3.0 ports (4x)</td><td>D</td><td>LAN ports (2x)</td></tr><tr><td>B</td><td>DisplayPorts (3x)</td><td>E</td><td>Magnetic fasteners for rear cover</td></tr><tr><td>C</td><td>USB 2.0 ports (4x)</td><td>-</td><td>-</td></tr></table>

# 3. Hardware Accessory Installation

This section describes how to install the following accessories on the NeuronBot:

• Support plate
• Intel® RealSense™ Depth Camera D435

Note: You can install up to two cameras according to your needs.

![Intel® RealSense™\nDepth Camera D435\n(Top-Mounted)\nSupport Plate\nIntel® RealSense™\nDepth Camera D435\n(Front-Mounted)](.neuronbot-50-1z334-1000-10/d7f2accdb13838c80c5b954415d94e67eecbc973edeeb670babc97e2b0cb99bf.jpg)

Figure 9: Isometric View with Accessories

# 3.1. Support Plate Installation

1. Attach the support plate stand-offs to the NeuronBot.

![Technical line drawing of a mechanical device with mounting base and internal components (no text or symbols)](.neuronbot-50-1z334-1000-10/a0b70889b8d232e8f5b66ff182cb8aeba9548306ecfd42f1621bc5de481adf95.jpg)

2. Align the holes on the support plate with the stand-offs and place the support plate on top of the stand-offs.

![Technical line drawing of a mechanical housing or enclosure with a red downward arrow indicating force or motion (no text or symbols present)](.neuronbot-50-1z334-1000-10/efe346bee6700be5eb9df6511a96318c7a8747da604b1cc5e6610a64f980c91c.jpg)

3. Attach the screws to the support plate.

![Technical line drawing of a mechanical housing or enclosure with mounting holes and red arrows indicating assembly or force directions (no text or symbols present)](.neuronbot-50-1z334-1000-10/bd341d68111791e2f7d06add5f006d4031a0f634b490cfd5d7d2d799107d0954.jpg)

# 3.2. Top Camera Installation

1. Attach the support plate to the NeuronBot.

a. Attach the support plate standoffs to the NeuronBot.

![Technical line drawing of a mechanical assembly with mounting base and cylindrical component (no text or symbols)](.neuronbot-50-1z334-1000-10/394eacef582741132de1a565f7dc000ca0aec7d3f38e744be40589a24f450fd4.jpg)

b. Attach the large, top-side stand-off to the support plate.

![Technical line drawing of a mechanical assembly with a hexagonal base plate and a cylindrical component inserted into it (no text or symbols)](.neuronbot-50-1z334-1000-10/5c2fa3ce8fc9387ebc28e8a87309edee4c2054f60b3ea1dd27b2c74ae99db252.jpg)

c. Place the attached stand-off and support plate on the NeuronBot.

![Technical line drawing of a mechanical housing with a red downward arrow indicating compression or disassembly (no text or symbols present)](.neuronbot-50-1z334-1000-10/faf22c134cb0ebc4fb2b559fc4bdcb786229f9613c6f1aaad136750bcf65274e.jpg)

d. Align the holes on the support plate with the stand-offs and attach the screws.

![Technical line drawing of a mechanical housing with mounting holes and red arrows indicating assembly or force directions (no text or symbols present)](.neuronbot-50-1z334-1000-10/c737940682f1ad0ba08c7a9761235982e8b0769088794404648f8d500b24ad39.jpg)

2. Attach the top bracket to the large, top-side stand-off.

![Technical line drawing of a mechanical assembly with a cylindrical component and mounting base (no text or symbols)](.neuronbot-50-1z334-1000-10/ded1c73fd0d909935efb8f76662ae5471ee87d4c17c8d2a956565c3884c21686.jpg)

3. Assemble the camera by screwing the camera head onto the camera base.

![Technical diagram showing a mechanical component being lowered into a base (no text or symbols present)](.neuronbot-50-1z334-1000-10/aef384d750f92c60913874b2fbe40fe7f8433997ea7d9ff21169f90c48f3be93.jpg)

4. Attach the assembed camera to the top bracket using the adhesive sticker provided with the NeuronBot.

![Technical diagram of a mechanical assembly with a vertical rod and base platform, showing a downward force arrow (no text or symbols present)](.neuronbot-50-1z334-1000-10/36e35d8882da63153f66e6a64b2a837caa292b2e99d743d394fdbfd015ab4eb0.jpg)

# 3.3. Front Camera Installation

1. Attach the front bracket to the NeuronBot.

![Technical line drawing of a mechanical device with red arrows indicating direction of motion or force (no text or symbols present)](.neuronbot-50-1z334-1000-10/ff8df3b2c2095682bcfae003240a5558d72fde7a26416e996c1cb2536df56df0.jpg)

2. Assemble the camera by screwing the camera head onto the camera base.

![Technical diagram showing a mechanical component being lifted by a red arrow, with no visible text or symbols.](.neuronbot-50-1z334-1000-10/ce29fa2f012896314127f3639ece22802951bcdb5139414aec9854d577b59159.jpg)

3. Attach the assembled camera to the front bracket using the adhesive sticker provided with the NeuronBot.

![Technical line drawing of a mechanical device with a red downward arrow indicating a component (no text or symbols present)](.neuronbot-50-1z334-1000-10/9bee5395ea984bfe0e9e1cfbcc7b4efcae9f112a1325dae88dcddfb0561a1b3b.jpg)

# 3.4. Top Camera Cable Routing

1. Connect a USB cable to a USB 3.0 port on the rear I/O panel (see Rear View Layout on page 14).
2. Route the cable through the top-side stand-off, from the bottom of the support plate to the top bracket, and connect the USB cable to the top camera.

![Technical diagram of a device assembly with labeled components and a red arrow indicating direction or force.](.neuronbot-50-1z334-1000-10/84d5667e213822d80f30120db3034ec77439e2b1c6350a87328a77453331691b.jpg)

# 3.5. Front Camera Cable Routing

1. Remove the top cover from the chassis.

Note: Ensure that the LiDAR module is disconnected from the I/O before removing the top cover.

a. Remove the screws that secure the top cover to the chassis.

![Technical line drawing of a mechanical device with mounting holes and a central component (no text or symbols)](.neuronbot-50-1z334-1000-10/ca2da23309b005443a162019ca96b4f973728fa57e2affa763d5790d7b26af88.jpg)

b. Lift the cover off.

![Technical line drawing of a mechanical device with a red upward arrow indicating motion or force (no text or symbols present)](.neuronbot-50-1z334-1000-10/4e74b6802345d5670461994f164d76ee53801ab9c545d3a02519c16f04ddcbf1.jpg)

2. Remove the plug from the front opening of the chassis.

![Technical line drawing of a mechanical housing or enclosure with mounting brackets and a red arrow indicating direction (no text or symbols)](.neuronbot-50-1z334-1000-10/97a59b46650dde8c0b478ef0f2fba43eb5864aff371d6bc32071846fcdb87313.jpg)

3. Connect a USB cable to a USB 3.0 port on the rear I/O panel (see Rear View I/O Layout on page 15).
4. Route the cable to the front of the chassis internally and connect the cable to the front-mounted camera.

![Top-down view of an electronic device showing internal components and wiring (no text or symbols visible)](.neuronbot-50-1z334-1000-10/4b2c6f9c43964bac1d37c633e2598e558aefa81780e699c88cf3728f379ae617.jpg)

Note: When connecting the RealSense camera, do not allow the connector cable to pass over the main board. As shown in the image above, ensure that you run the cable along the interior edge of the chassis between the USB port and the front opening of the chassis.

# 4. Controls and I/O

# 4.1. Power Button

The power button is a non-latched push button located on the rear side of the NeuronBot (see Rear View Layout on page 14). The system powers on when the button is pressed and the LED status bar lights (see Front View Layout on page 12). When depressed, the power button lights white.

If the system hangs, depressing the power button for five seconds turns the system off completely.

# 4.2. Battery Status Indicator

The battery status indicator is located on the rear side of the NeuronBot (see Rear View Layout on page 14). The indicator displays the battery charge percentage as follows:

![Simple line drawing of a battery with no text or symbols](.neuronbot-50-1z334-1000-10/347e447be54f74a019d1d6a020c4525202c7bfb7faa5b48d8e92cc5e7775a14a.jpg)

![Simple line drawing of a battery with two black segments (no text or symbols)](.neuronbot-50-1z334-1000-10/8f0fd8ea866bc00c01064cf05559b469052bcc22488607461638b92eee7fd46f.jpg)

50%

![Simple black-and-white icon of a battery with three vertical segments (no text or symbols)](.neuronbot-50-1z334-1000-10/544bcedc2826e2052fe4d09645633f7650930c1cd40a967ab5c5bfa289d572d6.jpg)

75%

![Simple black-and-white icon of a battery with four vertical segments (no text or symbols)](.neuronbot-50-1z334-1000-10/5384038ac7e9fc42ae1d8651915c56b223411b9a196600db8a83898ad89af655.jpg)

100%
Note: Ensure that you charge the battery when the charge drops below 25%.

# 4.3. GPIO Pinouts

The GPIO connector is located on the rear side of the NeuronBot (see Rear View Layout on page 14). The NeuronBot connects GPIO, I2C, and GND pins from the internal computer to the external D-Sub connector.

![19\n1\n190\n370\n20\n37\n20](.neuronbot-50-1z334-1000-10/e69f224c39870befb92366f97a32721aebb97a1127fda2450ee06d6e2fd184a6.jpg)

<table><tr><td>Pin</td><td>Signal</td><td>Pin</td><td>Signal</td><td>Pin</td><td>Signal</td><td>Pin</td><td>Signal</td><td>Pin</td><td>Signal</td></tr><tr><td>1</td><td>GND</td><td>9</td><td>GPIO3</td><td>17</td><td>NC</td><td>25</td><td>NC</td><td>33</td><td>NC</td></tr><tr><td>2</td><td>I2CC</td><td>10</td><td>GPIO4</td><td>18</td><td>NC</td><td>26</td><td>NC</td><td>34</td><td>NC</td></tr><tr><td>3</td><td>I2CD</td><td>11</td><td>GPIO5</td><td>19</td><td>NC</td><td>27</td><td>NC</td><td>35</td><td>NC</td></tr><tr><td>4</td><td>GND</td><td>12</td><td>GPIO6</td><td>20</td><td>NC</td><td>28</td><td>NC</td><td>36</td><td>NC</td></tr><tr><td>5</td><td>GND</td><td>13</td><td>GPIO7</td><td>21</td><td>NC</td><td>29</td><td>NC</td><td>37</td><td>NC</td></tr><tr><td>6</td><td>GPIO0</td><td>14</td><td>GPIO8</td><td>22</td><td>NC</td><td>30</td><td>NC</td><td>-</td><td>-</td></tr><tr><td>7</td><td>GPIO1</td><td>15</td><td>GPIO9</td><td>23</td><td>NC</td><td>31</td><td>NC</td><td>-</td><td>-</td></tr><tr><td>8</td><td>GPIO2</td><td>16</td><td>GND</td><td>24</td><td>NC</td><td>32</td><td>NC</td><td>-</td><td>-</td></tr></table>

# 5. Operating Instructions

# 5.1. Getting Started

Before installation, you must create an Ubuntu USB installation stick on a Windows PC. To install Ubuntu and ROS on the NeuronBot, you need to connect a USB keyboard, mouse, and monitor to the DisplayPort connector. ROS has many different distributions, each requiring a different Ubuntu version. For example, if you want to use ROS 1 Kinetic, you have to install Ubuntu 16.04. For ROS 1 Melodic, Ubuntu 18.04 is required. Confirm the ROS distribution and required Ubuntu version before starting the development of your ROS application.

Refer to the ROS wiki (http://wiki.ros.org/Distributions) to find the right Ubuntu version for your ROS 1 application:

3. List of Distributions
![| Project | Release Date | Poster | Tuturtle, turtle in tutorial | EOL date |\n| :--- | :--- | :--- | :--- | :--- |\n| ROS Noelic Ninjemys (Recommended) | May 23rd, 2020 | NINJEMYS NOETIC | | May, 2025 (Focal EOL) |\n| ROS Melodic Morena | May 23rd, 2018 | NINJEMYS Melodic | | May, 2023 (Bionic EOL) |\n| ROS Lunar Loggerhead | May 23rd, 2017 | LUMAR-LOGGERHEAD RO9 | | May, 2019 |](.neuronbot-50-1z334-1000-10/e5b0510a06f8a955c7e2e8b34bf1b3194d4feaf2e01a5e3ffaed91563b1a0c4f.jpg)

melodic

# ROS Melodic Morenia

ROS Melodic Morenia is the twelfth ROS distribution release. It was released on May 23rd, 2018.

![The image displays a section of a table of contents with the following text:\n\n**目录**\n**1. ROS Melodic Morenia**\n1. Platforms\n2. Installation\n3. Release Planning\n4. Changes](.neuronbot-50-1z334-1000-10/791f8e3fdc7742f95a8a12c13fe03e404c496fc6a147471c63ae76db1f793ca5.jpg)

![Melodic\nMolenia\nROS](.neuronbot-50-1z334-1000-10/e4e0f8a1ff9df38f2d75ad22d6b397e26ace0333cf33b0bb208aec3bf0cda03b.jpg)

# 1. Platforms

ROS Melodic Morenia is primarily argeted atthe Ubuntu 18.04 (Bionic)elease, tough other Linux systems as wellas Mac OS X,Android,and Windowsaresupported toangdegrees.Formoreinformationoncompatibiltyonotherpatfoms, please see REP 3: Target Platforms. It willalso support Ubuntu 17.10 Artful and Debian Stretch.

You can also check https://index.ros.org/doc/ros2/Releases/ to to find the right Ubuntu version for your ROS 2 application.

# 5.1.1. Ubuntu Installation

Follow the steps below to install Ubuntu on the NeuronBot.

1. Download an Ubuntu desktop image to your Windows PC:
a. Get ubuntu-18.04.4-desktop-amd64.iso from https://releases.ubuntu.com/18.04/ b. Or, get ubuntu-20.04-desktop-amd64.iso from https://releases.ubuntu.com/20.04/

2. Create a bootable Ubuntu USB installation stick on your Windows PC. Refer to the following tutorial: https://ubuntu.com/tutorials/create-a-usb-stick-on-windows

3. Insert the USB stick into the NeuronBot and power it on.

4. When the ADLINK logo appears onscreen, press the Delete key to enter the BIOS menu.

5. In the BIOS menu, select the USB stick as the boot device, and then press the Enter key to boot from the device.

![Aptio Setup Utility - Copyright (C) 2019 American Megatrends\nMain Advanced Chipset Security Boot Save & Exit\nSave Changes and Exit\nDiscard Changes and Exit\nSave Changes and Reset\nDiscard Changes and Reset\nSave Options\nSave Changes\nDiscard Changes\nRestore Defaults\nSave as User Defaults\nRestore User Defaults\nBoot Override\nubuntu (MMC - W52532)\nUEFI: USB Flash Disk 1100, Partition 1\nUEFI: Built-in EFI Shell\nLaunch EFI Shell from filesystem device\nExit syste\nthe change\n+: Select\n↑↓: Select\nEnter: Sel\n+/-: Chang\nF1: Genera\nF8: Previo\nF9: Optimi](.neuronbot-50-1z334-1000-10/7bc897416ec0a1e9f69b25d05fe87d952aa98447c3e11fa657113ba96d7097ed.jpg)

6. Select “Install Ubuntu” and press the Enter key to start the installation.

![Try Ubuntu without installing\n*Install Ubuntu\nOEM install (for manufacturers)\nCheck disc for defects](.neuronbot-50-1z334-1000-10/174784532c22f5582aee8111ae8570cb8d4efb6153475d09ee9fa6f702de9e18.jpg)

7. When the installation wizard appears, follow the instructions on the Ubuntu website to complete installation: https://ubuntu.com/tutorials/install-ubuntu-desktop#5-prepare-to-install-ubuntu

# 5.1.2. ROS Installation

After installing Ubuntu on the NeuronBot, follow the instructions below to set up the ROS environment.

# 5.1.2.1. ROS Distributions

Please visit the ROS official website to get the latest installation guide for both ROS 1 and ROS 2.

• For Ubuntu 18.04 Desktop:

ROS 1 Melodic – http://wiki.ros.org/melodic/Installation/Ubuntu

ROS 2 Dashing – https://index.ros.org/doc/ros2/Installation/Dashing/Linux-Install-Debians/

ROS 2 Eloquent – https://index.ros.org/doc/ros2/Installation/Eloquent/Linux-Install-Debians/

• For Ubuntu 20.04 Desktop:

ROS 1 Noetic – http://wiki.ros.org/noetic/Installation/Ubuntu

ROS 2 Foxy – https://index.ros.org/doc/ros2/Installation/Foxy/Linux-Install-Debians/

Because different ROS distributions are installed in different paths (e.g., /opt/ros/melodic, /opt/ros/dashing, and /opt/ros/eloquent), installing different ROS distributions on the same disk will not cause any issues. This means that you can use one of the installed ROS distributions as long as you “source” the specific setup.bash. For example, if you have installed Melodic, Dashing, and Eloquent, and you want to run ROS applications with Eloquent, you can start with the following:

source /opt/ros/eloquent/setup.bash

# 5.1.2.2. Verifying the ROS 1 Installation

To verify the ROS 1 installation, you need to open three terminals and execute the following commands.

Note: &lt;YOUR\_ROS\_DISTRO&gt; here stands for the ROS distribution (e.g., /opt/ros/melodic/setup.bash for ROS 1 Melodic; /opt/ros/dashing/setup.bash for ROS 2 Dashing.

• Terminal 1: Load the ROS 1 environment and execute roscore (ROS Master).

```txt
source /opt/ros/&lt;YOUR_ROS_DISTRO&gt;/setup.bash
roscore
```

• Terminal 2: Load the ROS 1 environment and execute the turtlesim program.

```txt
source /opt/ros/&lt;YOUR_ROS_DISTRO&gt;/setup.bash
rosrun turtlesim turtlesim_node
```

![Cartoon character with green body and brown tail running on blue background (no text or symbols)](.neuronbot-50-1z334-1000-10/9ef4cdc545e1996ab0f8da5c50dc5f0cd5b596633ad53e13c7004133a8876254.jpg)

• Terminal 3: Load the ROS 1 environment and use the arrow keys to tele-opreate the turtle.

```txt
source /opt/ros/&lt;YOUR_ROS_DISTRO&gt;/setup.bash
rosrun turtlesim turtle_teleop_key
```

# 5.1.2.3. Verifying the ROS 2 Installation

To verify the ROS 2 installation, you need to open two terminals and execute the following commands.

• Terminal 1: Load the ROS 2 environment and execute the turtlesim program.

```shell
source /opt/ros/&lt;YOUR_ROS_DISTRO&gt;/setup.bash
ros2 run turtlesim turtlesim_node
```

If you see the error “Package 'turtlesim' not found”, then you have not installed turtlesim for ROS 2. You can manually install turtlesim by executing the following command:

```txt
sudo apt install ros-&lt;YOUR_ROS_DISTRO&gt;-turtlesim
```

After installation, you can execute turtlesim\_node again to check that the turtlesim program opened successfully.

• Terminal 2: Load the ROS 2 environment and use the arrow keys to tele-opreate the turtle

```txt
source /opt/ros/&lt;YOUR_ROS_DISTRO&gt;/setup.bash
ros2 run turtlesim turtle teleop key
```

# 5.1.2.4. Verifying the ROS Bridge

ROS 1 and ROS 2 can share the same topics if their message types are the same. To bridge ROS 1 and ROS 2, you have to install ros1\_bridge for your ROS 2 distribution. Execute the following command to install ros1\_bridge:

```txt
sudo apt install ros-&lt;YOUR_ROS_DISTRO&gt;-ros1-bridge
```

To bridge ROS 1 Listener and ROS 2 Talker, enter the commands in four terminals. For example:

• Terminal 1: Execute ROS 1 roscore

```shell
source /opt/ros/&lt;YOUR_ROS1_DISTRO&gt;/setup.bash
roscore
```

• Terminal 2: Execute ROS 1 Listener

```shell
source /opt/ros/&lt;YOUR_ROS1_DISTRO&gt;/setup.bash
rosrun roscpp_tutorials listener
```

• Terminal 3: Execute ROS 2 Talker

```txt
source /opt/ros/&lt;YOUR_ROS2_DISTRO&gt;/setup.bash
ros2 run demo_nodes_cpp talker
```

• Terminal 4: Execute ROS Bridge

```shell
source /opt/ros/&lt;YOUR_ROS1_DISTRO&gt;/setup.bash
source /opt/ros/&lt;YOUR_ROS2_DISTRO&gt;/setup.bash
ros2 run ros1_bridge dynamic_bridge
```

If done correctly, ROS 1 Listener will successfully receive the messages from ROS 2 Talker.

# 5.1.3. Linux Tools Installation

After the ROS environment is verified, it is recommended that you install the following tools for help developing ROS applications.

```shell
sudo apt update && sudo apt install -y \
build-essential \
cmake \
git \
libbullet-dev \
python3-colcon-common-extensions \
python3-flake8 \
python3-pip \
python3-pytest-cov \
python3-rosdep \
python3-setuptools \
python3-vcstool \
openssh-server \
wget \
curl \
byobu
```

# 5.1.4. Neuron Startup Menu

You may notice that when you execute ROS commands, you have to source the ROS environment for each terminal. This is not an ideal solution, so ADLINK provides an easy way to load different development environments using the Neuron Startup Menu.

UNIX based systems often store parameters in a format of "shell variables", or more commonly, "environmental variables". Scripts and programs constantly load these variables either as execution parameters or for internal usage. Configuring environmental variables can be tedious, especially when there are conflicting settings between ROS/ROS 2, Python 2/Python 3, OpenCV 2/OpenCV 3, etc. The Neuron Startup Menu prepares the environment for you.

After installing the Neuron Startup Menu, a menu appears at each terminal startup, allowing you to select ROS/ROS 2/ROS Bridge. This way, you will no longer need to set ROS environmental variables every time you open the terminal.

```txt
Note: If you want to use the ADLINK Neuron Startup Menu, you should remove the line "source /opt/ros/&lt;ROS_DISTROS&gt;/setup.bash" from ~/.bashrc, which you may have added when installing ROS.
```

For more information, please visit our GitHub: https://github.com/Adlink-ROS/ros\_menu

# 5.1.4.1. Menu Installation

Clone the repository and execute the install command:

```shell
cd ~
sh -c "MENU_VERSION=v1.4.0 $(curl -fsSL
https://raw.githubusercontent.com/Adlink-ROS/ros_menu/master/scripts/setup.sh)"
```

# 5.1.4.2. Menu Usage

After installation, the terminal will display the following menu:

```txt
************************** Neuron Startup Menu for ROS **************************
* Usage: To set ROS env to be auto-loaded, please    *
* assign ros_option in ros_menu/config.yaml  *
**************************
0) Do nothing
1) ROS 1 melodic
2) ROS 2 dashing
3) ROS2/ROS1_bridge
Please choose an option:
```

The menu items perform the following actions, respectively:

# • Do nothing:

o Does not set up any environment.

# • ROS 1 melodic:

o Sets up the ROS 1 environment.
o Sets the ROS\_IP and ROS\_MASTER\_URI, which is your host IP.

# • ROS 2 dashing:

o Sets up the ROS 2 environment.
o Loads the DDS settings and select the DDS you want to use.

# • ROS2/ROS1\_bridge:

o Sets up the ROS bridge environment.
o Runs ROS bridge automatically.

After selecting an option, you can view the settings via environmental variables:

# Check the ROS version (1 or 2):

```shell
echo $ROS_VERSION
```

#  Check the ROS distribution:

```shell
echo $ROS_DISTRO
```

# Check the DDS implementation (only for ROS 2):

```shell
echo $RMW_IMPLEMENTATION
```

# 5.1.4.3. Menu Configuration

You can configure the menu by modifying \~/.ros\_menu/config.yaml. You can perform the following actions:

# Enable the menu:

menu\_enable: "true" to enable the menu, “false” to disable the menu

# Set the default ROS option:

ros\_option: "menu" to show all the options of the menu.

Note: You can also set an option number to this variable and the menu will automatically apply the option every time you open the terminal.

# Modify ROS options separately:

The following parameters are needed to create a new option for the menu:

# ROS 1:

ROS\_version: 1

distro\_name: the name of the ROS 1 version you are using

ros1\_path: the path where ROS 1 is located

master\_ip: sets the IP address of the master if the master isn't on the current computer

cmds: source your ROS 1 workspace here

# ROS 2:

ROS\_version: 2

distro\_name: the name of the ROS 2 version you are using

ros2\_path: the path where ROS 2 is located

domain\_id: sets the Domain ID for DDS communication. Keep this empty to use \$default\_ros\_domain\_id(30)

cmds: source your ROS 2 workspace here. Remarks: source\_plugin dds\_bashrc is necessary every time you use ROS 2

# ROS2/ROS1\_bridge:

ROS\_version: bridge

ros1\_version\_name: the name of the ROS 1 version you are using

ros2\_version\_name: the name of the ROS 2 version you are using

ros1\_path: the path where ROS 1 is located

ros2\_path: the path where ROS 2 is located

master\_ip: sets the IP address of the master if master isn't on the current computer

domain\_id: sest the Domain ID for DDS communication. Keep empty to use \$default\_ros\_domain\_id(30)

cmds: any command you want to run every time using ROS Bridge. Remarks: source\_plugin

dds\_bashrc and ros2 run ros1\_bridge dynamic\_bridge --bridge-all-topics is necessary

every time using ROS Bridge

# 5.1.4.4. Menu Upgrade

You can upgrade the Neuron Startup Menu by executing the following command:

ros\_menu\_upgrade

The new version will load the next time you open the terminal.

# 5.1.4.5. Menu Uninstallation

You can uninstall the Neuron Startup Menu by executing the following command:

```txt
ros_menu_uninstall
```

Note: Remember to remove the Neuron Startup Menu configuration in \~/.bashrc.

# 5.1.5. NeuronBot Setup

NeuronBot source code is available on our GitHub. Visit the following webpage to get the latest updates: https://github.com/Adlink-ROS/neuronbot2

# 5.1.5.1. Getting the NeuronBot Software

# For ROS 1 Melodic:

1. Create a workspace:

```shell
mkdir -p ~/neuronbot2_ros1_ws/src
cd ~/neuronbot2_ros1_ws/src
```

2. Git-clone the package with a melodic-devel branch:

```batch
git clone https://github.com/Adlink-ROS/neuronbot2.git -b melodic-devel
```

3. Install dependencies:

```shell
cd ~/neuronbot2_ros1_ws/
rosdep update
rosdep install --from-paths src --ignore-src -r -y --rosdistro melodic
```

# For ROS 2 Eloquent:

1. Create a workspace:

```shell
mkdir -p ~/neuronbot2_ros2_ws/src
cd ~/neuronbot2_ros2_ws/
```

2. Get the latest packages with an eloquent-devel branch:

```txt
wget https://raw.githubusercontent.com/Adlink-ROS/neuronbot2_ros2.repos/eloquent-devel/neuronbot2_ros2.repos
vcs import src &lt; neuronbot2_ros2.repos
```

3. Install dependencies:

```batch
cd ~/neuronbot2_ros2_ws/
source /opt/ros/eloquent/setup.bash
rosdep update
rosdep install --from-paths src --ignore-src -r -y --rosdistro eloquent
```

# 5.1.5.2. LiDAR and TTY Initialization

Find neuronbot2\_init.sh and run the following script with root permission:

```shell
cd ~/neuronbot2_ros1_ws/src/neuronbot2/neuronbot2_tools/neuronbot2_init/# or
cd ~/neuronbot2_ros2_ws/src/neuronbot2/neuronbot2_tools/neuronbot2_init/sudo ./neuronbot2 init.sh
```

# 5.1.5.3. NeuronBot Installation

For ROS 1 Melodic:

```shell
source /opt/ros/melodic/setup.bash
cd ~/neuronbot2_ros1_ws/
catkin_make
```

Use catkin\_make to compile NeuronBot under the ROS 1 Melodic environment.

After successful compilation, the NeuronBot environment is created. Afterward, if you want to run NeuronBot applications, you have to “source” setup.bash in ROS 1 Melodic and the NeuronBot workspace.

```shell
source /opt/ros/melodic/setup.bash
cd ~/neuronbot2_ros1_ws/
source devel/setup.bash
```

```shell
source /opt/ros/eloquent/setup.bash
cd ~/neuronbot2_ros2_ws/
colcon build --symlink-install --cmake-args -DCMAKE_BUILD_TYPE=Release
source ~/neuronbot2_ros2_ws/install/local_setup.bash
```

# For ROS 2 Eloquent:

Use colcon to compile NeuronBot under the ROS 2 Eloquent environment.

After successful compilation, the NeuronBot environment is created. Afterward, if you want to run NeuronBot applications, you have to “source” setup.bash in ROS 2 Eloquent and local\_setup.bash in the NeuronBot workspace.

```shell
source /opt/ros/eloquent/setup.bash
cd ~/neuronbot2_ros2_ws
source install/local_setup.bash
```

We highly recommend that you add the above “source” command to the ADLINK Neuron Start Menu so the environment loads automatically.

# 5.1.5.4. NeuronBot Verification

Go to the self-diagnosis section for instructions on verifying and diagnosing NeuronBot.

# 5.2. Remote Control and Monitoring

Before teaching ROS to control and monitor NeuronBot, you must remove the keyboard, mouse, and monitor from the NeuronBot. To get started, install Ubuntu and set up the ROS environment on your computer and connect the NeuronBot and computer to the same WiFi router.

Note: We recommend using a portable computer (i.e., a laptop) to remotely control the NeuronBot for added mobility and accessibility.

# 5.2.1. Wireless Setup

After connecting the NeuronBot and computer to the same WiFi router, you need to obtain the IP address of the NeuronBot and computer to remotely control the NeuronBot.

1. Power on the NeuronBot and connect it to a monitor and keyboard.
2. Connect to the WiFi.
3. Execute the following command to obtain the IP address of the NeuronBot:

ip address show
The IP address is at the following location:
```txt
1: lo: &lt;LOOPBACK,UP,LOWER_UP&gt; mtu 65536 qdisc noqueue state UNKNOWN group default qlen 1000
    link/loopback 00:00:00:00:00:00 brd 00:00:00:00:00:00
    inet 127.0.0.1/8 scope host lo
    valid_lft forever preferred_lft forever
    inet6 ::1/128 scope host
    valid_lft forever preferred_lft forever

2: enp0s31f6: &lt;NO-CARRIER,BROADCAST,MULTICAST,UP&gt; mtu 1500 qdisc fq_codel state DOWN group default qlen 1000
    link/ether 84:7b:eb:43:c2:03 brd ff:ff:ff:ff:ff:ff

3: wlp1s0: &lt;BROADCAST,MULTICAST,UP,LOWER_UP&gt; mtu 1500 qdisc noqueue state UP group default qlen 1000
    link/ether e4:b3:18:2b:c3:a2 brd ff:ff:ff:ff:ff:ff
    inet 172.16.202.148/22 brd 172.16.203.255 scope global dynamic noprefixroute wlp1s0
    valid_lft 22934sec preferred_lft 22934sec
    inet6 fe80::1621:3a66:495b:d8b2/64 scope link noprefixroute
    valid_lft forever preferred_lft forever
```

Use the same command to get the IP address of the computer. Take note of these IP addresses for use in the following sections.

Note: NeuronBot has multiple network interfaces because it comes installed with a wireless card (wlp1s0) and wired (enp0s31f6) card. The IP address obtained from the WiFi router must be aligned with the wlpXXX interface.

# 5.2.2. ROS 1 Remote Control Settings

In ROS 1, the IP address is needed to tell ROS 1 applications (e.g., rviz and rqt) where to find NeuronBot. Therefore, when you want to connect NeuronBot remotely, make sure that ROS\_MASTER\_URI and ROS\_IP are set correctly.

 ROS\_MASTER\_URI

This is a required setting that tells nodes where they can locate the ROS Master. In this example, NeuronBot is the Master because we will run roscore on the NeuronBot.

 ROS\_IP

This tells other nodes where they can locate themselves.

Use the following commands to set up ROS\_MASTER\_URI and ROS\_IP.

• NeuronBot:

```txt
export ROS_MASTER_URI=http://&lt;IP_OF_NEURONBOT&gt;:11311
```

```txt
export ROS_IP=&lt;IP_OF_NEURONBOT&gt;
```

• Computer:

```txt
export ROS_MASTER_URI=http://&lt;IP_OF_NEURONBOT&gt;:11311
export ROS_IP=&lt;IP_OF_LAPTOP&gt;
```

For example, if the IP address of the NeuronBot is 192.168.50.26, and the IP address of the computer is 192.168.50.110, then you should execute the following commands:

• NeuronBot:

```shell
export ROS_MASTER_URI=http://192.168.50.26:11311
export ROS_IP=192.168.50.26
```

• Computer:

```shell
export ROS_MASTER_URI=http://192.168.50.26:11311
export ROS_IP=192.168.50.110
```

To make this easier, you can set up the ADLINK Neuron Startup Menu on the NeuronBot and computer. Use the following command to edit the Neuron Startup Menu. Here, we used gedit as as the editor; however, you can use any editor you want.

```txt
gedit ~/.ros_menu/config.yaml
```

The Master IP addresses of the NeuronBot and computer are the same. Modify the Neuron Startup Menu on both the NeuronBot and computer as follows:

```txt
Menu:
ROS 1 melodic:
option_num: 1
ROS_version: 1
distro_name: melodic
ros1_path: /opt/ros/melodic
master_ip: 192.168.50.26
cmds:
# - source ${HOME}/catkin_ws/devel/setup. ${shell}
```

# 5.2.3. ROS 2 Remote Control Settings

ROS 2 uses DDS as the underlying transport protocol, and DDS supports physical segmentation of the network based on the Domain ID. The ROS\_DOMAIN\_ID helps keep each machine group’s ROS 2 nodes from interfering with other groups. The function of ROS\_DOMAIN\_ID is similar to the principle of a walkie-talkie. Execute the following command to set up the ROS\_DOMAIN\_ID:

```txt
export ROS_DOMAIN_ID=&lt;YOUR_DOMAIN_ID&gt;
```

For example, if you choose “30” for the ROS\_DOMAIN\_ID, enter the following command on both the NeuronBot and the computer:

• NeuronBot:

```javascript
export ROS_DOMAIN_ID=30
```

• Computer:

```javascript
export ROS_DOMAIN_ID=30
```

To make this easier, you can set up the ADLINK Neuron Startup Menu on the NeuronBot and computer. Use the following command to edit the Neuron Startup Menu. Here, we used gedit as the editor; however, you can use any editor you want.

```txt
gedit ~/.ros_menu/config.yaml
```

The Domain ID of the NeuronBot and computer should be the same for DDS communication. Modify the Neuron Startup Menu on both the NeuronBot and computer as follows:

```yaml
Config:
    menu_enable: true
    ros_option: menu
    default_ros_domain_id: 30
Menu:
    ROS 2 dashing:
    option_num: 2
    ROS_version: 2
    distro_name: dashing
    ros2_path: /opt/ros/dashing
    domain_id: # set if you don't want to use default domain id
    cmds:
    # - source ${HOME}/ros2_ws/install/local_setup. ${shell}
    - source_plugin dds_bashrc 1
```

# 5.2.4. SSH Remote Session

Typically, it is not convenient to connect a mouse, keyboard, and monitor to the NeuronBot while the NeuronBot is moving around. To address this, you can connect to an SSH server, which is a secure shell for network connections. An SSH server will allow you to remotely connect to a NeuronBot for the secure transfer of files or to perform administrative tasks like teleoperating the NeuronBot. First you must install an SSH server on NeuronBot.

· • NeuronBot:

```txt
sudo apt install openssh-server
```

Before you connect to the SSH server, make sure that the NeuronBot and computer are connected to the same WiFi router. Then, execute the following command on the computer to remotely connect to the Neuronbot.

• Computer:

```batch
ssh -X &lt;USER_NAME&gt;@&lt;IP_ADDRESS&gt;
```

For example, the USER\_NAME of the NeuronBot is “ros” and the IP\_ADDRESS is “192.168.50.1.23”:

```batch
ssh -X ros@192.168.1.23 # add capital -X to enable Linux X11 forwarding
```

Before connecting to the SSH server, your host name will be your computer. For example, in the following picture, the host name of the computer is “rostest”.

![ros@rostest: ~\nFile Edit View Search Terminal Tabs Help\nros@rostest: ~ ×\nros@rostest:~\$ ssh ros@192.168.1.23](.neuronbot-50-1z334-1000-10/f89034c56f63c24fd3b868514f49dff1743f32f3be653551ef28c94adcadb56b.jpg)

After connecting to the SSH server, the host name will change to the NeuronBot’s name. For example, in the following picture, the host name of NeuronBot is “neuronbot”.

![ros@neuronbot: ~\nFile Edit View Search Terminal Tabs Help\nros@neuronbot: ~ × ros@rostest: ~\nros@neuronbot:~\$](.neuronbot-50-1z334-1000-10/75ef100964a59ffe062d65ea42778fb961c128557abf4a5e9a86d5b7321e18d2.jpg)

# 5.2.5. Byobu

Byobu is an easy-to-use wrapper for the tmux terminal multiplexer and can open multiple windows within a single terminal. With Byobu, you can open new windows without having to connect to an SSH server again and again. To install Byobu on the NeuronBot, execute the following command:

• NeuronBot:

```txt
sudo apt install byobu
```

After installing, type “byobu” on NeuronBot to start Byobu.

![ros@neuronbot: ~\nFile Edit View Search Terminal Tabs Help\nros@neuronbot: ~ × ros@rostest: ~\nros@neuronbot:~\$ byobu](.neuronbot-50-1z334-1000-10/73072a89f12b6c24de21aeb2cb67f03eed70955a2d67b57e59222d33c29e7a88.jpg)

In Byobu, press F1 to open the Byobu Help window for detailed instructions on using Byobu.

Press ESC to exit the Byobu Help menu.

<table><tr><td colspan="2">Byobu is a suite of enhancements to tmux, as a command line tool providing live system status, dynamic window management, and some convenient keybindings:</td></tr><tr><td>F1</td><td>* Used by X11 *</td></tr><tr><td>Shift-F1</td><td>Display this help</td></tr><tr><td>F2</td><td>Create a new window</td></tr><tr><td>Shift-F2</td><td>Create a horizontal split</td></tr><tr><td>Ctrl-F2</td><td>Create a vertical split</td></tr><tr><td>Ctrl-Shift-F2</td><td>Create a new session</td></tr><tr><td>F3/F4</td><td>Move focus among windows</td></tr><tr><td>Alt-Left/Right</td><td>Move focus among windows</td></tr><tr><td>Alt-Up/Down</td><td>Move focus among sessions</td></tr><tr><td>Shift-Left/Right/Up/Down</td><td>Move focus among splits</td></tr><tr><td>Shift-F3/F4</td><td>Move focus among splits</td></tr><tr><td>Ctrl-F3/F4</td><td>Move a split</td></tr><tr><td></td><td>&lt;Menu&gt;</td></tr></table>

We highly recommend that you run all ROS commands except RVIZ in the terminal with SSH connections. Run RVIZ in a new terminal using a local terminal on a computer.

Note: “Session” means a window in a single terminal with an SSH connection to a NeuronBot. You can confirm your session number at the bottom of the window.

![Run all the ROS commands in this tab\nTo remotely control NeuronBot\nTerminal 1\nTerminal 2\nRun rviz in this tab\nTo monitor NeuronBot on local computer\nros@neuronbot:~\$ roscore\nFile Edit View Search Terminal Tabs Help\nros@neuronbot (172.16.8.119) - byobu\nros@rostest:~\nByobu usage:\nF1 – Help of Byobu\nF2 – New remote session\nF3 – Go back\nF4 – Go next\nSession numbers\nu 18.04 0:-- 1:--\n505! 5d2h 1.22 4x3.3GHz 15.4G7% 2020-03-25 14:19:00](.neuronbot-50-1z334-1000-10/58dbe5ce41599d9432b5b925fc6f41f36451ae6825481fff9c6a7a68d8feeeaa.jpg)

# 5.2.6. ROS 1 Remote Control Verification

To verify whether you have successfully setup remote control parameters for ROS 1, you can run a talker on NeuronBot and a listener on the host computer.

 Terminal 1:

1. Open the terminal.
2. Set up the SSH connection to access the NeuronBot remotely on your computer.

```batch
ssh -X ros@192.168.50.26
```

3. Start Byobu to run multiple sessions on a single SSH connection.

Note: “Session” means a window in a single terminal with an SSH connection to a NeuronBot.

# byobu

• Session 0:

4. Source the environment.

```txt
source /opt/ros/&lt;YOUR_ROS1_DISTRO&gt;/setup.bash
```

5. Launch the roscore.

Note: The “roscore” is the “core” of the ROS. We recommend manually starting the core in a separate window for improved access and control.

# roscore

6. Press F2 to create a new session in Byobu.

• Session 1:

7. Source the environment.

```txt
source /opt/ros/&lt;YOUR_ROS1_DISTRO&gt;/setup.bash
```

8. Start the talker.

After starting the talker on NeuronBot, it will publish “hello world” messages continuously.

```txt
rosrun roscpp_tutorials talker
```

You should see messages similar to those in Session 1:

<table><tr><td>[INFO]</td><td>[1596772167.770081]:</td><td>hello world</td><td>1596772167.77</td></tr><tr><td>[INFO]</td><td>[1596772167.870652]:</td><td>hello world</td><td>1596772167.87</td></tr><tr><td>[INFO]</td><td>[1596772167.972095]:</td><td>hello world</td><td>1596772167.97</td></tr><tr><td>[INFO]</td><td>[1596772168.071039]:</td><td>hello world</td><td>1596772168.07</td></tr><tr><td>[INFO]</td><td>[1596772168.170968]:</td><td>hello world</td><td>1596772168.17</td></tr><tr><td>[INFO]</td><td>[1596772168.271473]:</td><td>hello world</td><td>1596772168.27</td></tr><tr><td>[INFO]</td><td>[1596772168.370915]:</td><td>hello world</td><td>1596772168.37</td></tr><tr><td>[INFO]</td><td>[1596772168.471067]:</td><td>hello world</td><td>1596772168.47</td></tr><tr><td>[INFO]</td><td>[1596772168.570971]:</td><td>hello world</td><td>1596772168.57</td></tr><tr><td>[INFO]</td><td>[1596772168.671001]:</td><td>hello world</td><td>1596772168.67</td></tr><tr><td>[INFO]</td><td>[1596772168.771006]:</td><td>hello world</td><td>1596772168.77</td></tr><tr><td>[INFO]</td><td>[1596772168.870979]:</td><td>hello world</td><td>1596772168.87</td></tr><tr><td>[INFO]</td><td>[1596772168.971656]:</td><td>hello world</td><td>1596772168.97</td></tr><tr><td>[INFO]</td><td>[1596772169.070738]:</td><td>hello world</td><td>1596772169.07</td></tr></table>

9. Press Ctrl+Alt+T to create a new terminal on the host computer.
You can also press Ctrl+Shift+T to create a new terminal tab.

 Terminal 2:

10. Source the environment.

```txt
source /opt/ros/&lt;YOUR_ROS2_DISTRO&gt;/setup.bash
```

11. Run the listener.

The listener will run on the computer and subscribe to messages from the talker.

```txt
rosrun roscpp_tutorials listener
```

You should see messages similar to those in Terminal 2:

<table><tr><td>[INFO]</td><td>[1596772167.771804]:</td><td>/listener_27816_1596772161347I</td><td>heard</td><td>hello</td><td>world</td><td>1596772167.77</td></tr><tr><td>[INFO]</td><td>[1596772167.876104]:</td><td>/listener_27816_1596772161347I</td><td>heard</td><td>hello</td><td>world</td><td>1596772167.87</td></tr><tr><td>[INFO]</td><td>[1596772167.978625]:</td><td>/listener_27816_1596772161347I</td><td>heard</td><td>hello</td><td>world</td><td>1596772167.97</td></tr><tr><td>[INFO]</td><td>[1596772168.077289]:</td><td>/listener_27816_1596772161347I</td><td>heard</td><td>hello</td><td>world</td><td>1596772168.07</td></tr><tr><td>[INFO]</td><td>[1596772168.177649]:</td><td>/listener_27816_1596772161347I</td><td>heard</td><td>hello</td><td>world</td><td>1596772168.17</td></tr><tr><td>[INFO]</td><td>[1596772168.277493]:</td><td>/listener_27816_1596772161347I</td><td>heard</td><td>hello</td><td>world</td><td>1596772168.27</td></tr><tr><td>[INFO]</td><td>[1596772168.377027]:</td><td>/listener_27816_1596772161347I</td><td>heard</td><td>hello</td><td>world</td><td>1596772168.37</td></tr><tr><td>[INFO]</td><td>[1596772168.476484]:</td><td>/listener_27816_1596772161347I</td><td>heard</td><td>hello</td><td>world</td><td>1596772168.47</td></tr><tr><td>[INFO]</td><td>[1596772168.577383]:</td><td>/listener_27816_1596772161347I</td><td>heard</td><td>hello</td><td>world</td><td>1596772168.57</td></tr><tr><td>[INFO]</td><td>[1596772168.677679]:</td><td>/listener_27816_1596772161347I</td><td>heard</td><td>hello</td><td>world</td><td>1596772168.67</td></tr><tr><td>[INFO]</td><td>[1596772168.777763]:</td><td>/listener_27816_1596772161347I</td><td>heard</td><td>hello</td><td>world</td><td>1596772168.77</td></tr><tr><td>[INFO]</td><td>[1596772168.878287]:</td><td>/listener_27816_1596772161347I</td><td>heard</td><td>hello</td><td>world</td><td>1596772168.87</td></tr><tr><td>[INFO]</td><td>[1596772168.977759]:</td><td>/listener_27816_1596772161347I</td><td>heard</td><td>hello</td><td>world</td><td>1596772168.97</td></tr><tr><td>[INFO]</td><td>[1596772169.073819]:</td><td>/listener_27816_1596772161347I</td><td>heard</td><td>hello</td><td>world</td><td>1596772169.07</td></tr><tr><td>[INFO]</td><td>[1596772169.173241]:</td><td>/listener_27816_1596772161347I</td><td>heard</td><td>hello</td><td>world</td><td>1596772169.17</td></tr><tr><td>[INFO]</td><td>[1596772169.277652]:</td><td>/listener_27816_1596772161347I</td><td>heard</td><td>hello</td><td>world</td><td>1596772169.27</td></tr><tr><td>[INFO]</td><td>[1596772169.377547]:</td><td>/listener_27816_1596772161347I</td><td>heard</td><td>hello</td><td>world</td><td>1596772169.37</td></tr></table>

If the listener successfully subscribed to the messages, then the remote control parameters have been successfully set for ROS 1.

# 5.2.7. ROS 2 Remote Control Verification

To verify that remote control parameters have been set up for ROS 2, you can run a talker on NeuronBot and a listener on the computer.

 Terminal 1:

1. Open the terminal.
2. Setup the SSH connection to access the NeuronBot remotely.

```batch
ssh -X ros@192.168.50.26
```

3. Start Byobu to run multiple sessions on a single SSH connection.

Note: “Session” means a window in a single terminal with an SSH connection to a NeuronBot.

# byobu

• Session 0:

4. Source the environment.

```txt
source /opt/ros/&lt;YOUR_ROS2_DISTRO&gt;/setup.bash
```

5. Start the talker.

After starting the talker on NeuronBot, it will publish “hello world” messages continuously.

```txt
ros2 run demo_nodes_cpp talker
```

You should see messages similar to those in Session 0:

```ini
[INFO] [talker]: Publishing: 'Hello World: 1'
[INFO] [talker]: Publishing: 'Hello World: 2'
[INFO] [talker]: Publishing: 'Hello World: 3'
[INFO] [talker]: Publishing: 'Hello World: 4'
[INFO] [talker]: Publishing: 'Hello World: 5'
[INFO] [talker]: Publishing: 'Hello World: 6'
[INFO] [talker]: Publishing: 'Hello World: 7'
[INFO] [talker]: Publishing: 'Hello World: 8'
[INFO] [talker]: Publishing: 'Hello World: 9'
[INFO] [talker]: Publishing: 'Hello World: 10'
[INFO] [talker]: Publishing: 'Hello World: 11'
[INFO] [talker]: Publishing: 'Hello World: 12'
[INFO] [talker]: Publishing: 'Hello World: 13'
```

6. Press Ctrl+Alt+T to create a new terminal on the host computer You can also press Ctrl+Shift+T to create a new terminal tab.

 Terminal 2:

7. Source the environment.

```txt
source /opt/ros/&lt;YOUR_ROS2_DISTRO&gt;/setup.bash
```

8. Run the listener.

The listener will run on the computer and subscribe to messages from the talker.

```txt
ros2 run demo_nodes_cpp listener
```

You should see messages similar to those in Terminal 2:

```txt
[INFO] [listener]: I heard: [Hello World: 1]
[INFO] [listener]: I heard: [Hello World: 2]
[INFO] [listener]: I heard: [Hello World: 3]
[INFO] [listener]: I heard: [Hello World: 4]
[INFO] [listener]: I heard: [Hello World: 5]
[INFO] [listener]: I heard: [Hello World: 6]
[INFO] [listener]: I heard: [Hello World: 7]
[INFO] [listener]: I heard: [Hello World: 8]
[INFO] [listener]: I heard: [Hello World: 9]
[INFO] [listener]: I heard: [Hello World: 10]
[INFO] [listener]: I heard: [Hello World: 11]
[INFO] [listener]: I heard: [Hello World: 12]
[INFO] [listener]: I heard: [Hello World: 13]
```

If the listener successfully subscribed to the messages, then the remote control parameters have been successfully set for ROS 2.

# 5.3. ROS 1 Applications

This section describes how to build, compile, and run several applications with ROS 1 on NeuronBot, and provides instructions on configuring NeuronBot for the following applications:

 Teleoperation: Move the NeuronBot using a keyboard and scan the surrounding environment using 2D LiDAR.
 RViz (ROS-VIsualiZation) monitoring: Monitor Neuronbot during movement and laser scanning using RViz, a powerful 3D visualization environment for ROS.
 Simultaneous Localization And Mapping (SLAM): Configure NeuronBot to build a map during teleoperation.
 Guided navigation: Navigate NeuronBot from a starting point to a destination using a map created with a SLAM package.

# 5.3.1. Driver Startup and Teleoperation

To begin teleoperating NeuronBot, you must start the ROS driver in addition to all IO connections and sensory devices such as the motor controller, encoder odometry, laser scanner, and IMU state estimation.

 Terminal 1:

1. Open the terminal.
2. Set up the SSH connection to access the NeuronBot remotely on your computer.

```batch
ssh -X ros@192.168.50.26
```

3. Start Byobu to run multiple sessions on a single SSH connection.

Note: “Session” means a window in a single terminal with an SSH connection to a NeuronBot.

```txt
byobu
```

• Session 0:

4. Source the environment.

```txt
source /opt/ros/&lt;YOUR_ROS1_DISTRO&gt;/setup.bash
```

5. Launch the roscore.

Note: The “roscore” is the “core” of the ROS. We recommend manually starting the core in a separate window for improved access and control.

```txt
roscore
```

• Session 1:

6. Source the environment.

```txt
source /opt/ros/&lt;YOUR_ROS1_DISTRO&gt;/setup.bash
```

```txt
source ~/neuronbot2_ros1_ws/devel/setup.bash
```

7. Launch NeuronBot.

Note: This launch file contains multiple nodes and enables communication between the motor controller, laser SLAM, and all NeuronBot TF definitions. If you end the node with ctrl + c, remember only to press once and allow it to shut down automatically. The rplidarNode node requires some time to shut down the serial port.

```batch
roslaunch neuronbot2_bringup bringup.launch
```

• Session 2:

8. Source the environment.

```txt
source /opt/ros/&lt;YOUR_ROS1_DISTRO&gt;/setup.bash
```

# 9. Start teleoperation.

Note: The manual driver used for this scenario is teleop\_twist\_keyboard. The default command is a little too fast, so press x and c to decrease the linear speed to 0.4 m/s and the angular speed to 0.4 rad/s. Press k or s to immediately stop.

rosrun teleop\_twist\_keyboard teleop\_twist\_keyboard
```txt
Reading from the keyboard and Publishing to Twist!
Moving around:
    u i o
    j k l
    m , .
For Holonomic mode (strafing), hold down the shift key:
    U I O
    J K L
    M &lt; &gt;
t : up (+z)
b : down (-z)
anything else : stop
q/z : increase/decrease max speeds by 10%
w/x : increase/decrease only linear speed by 10%
e/c : increase/decrease only angular speed by 10%
CTRL-C to quit
currently: speed 0.5 turn 1.0
```
Figure 4-1-3-1: teleop\_twist\_keyboard

 Terminal 2:

10. Set up the environment by setting ROS\_MASTER\_URI to the NeuronBot’s IP address.

```shell
source /opt/ros/&lt;YOUR_ROS1_DISTRO&gt;/setup.bash
export $ROS_MASTER_URI=http://192.168.50.26:11311
```

11. Launch RViz.

```txt
rviz
```

 RViz:

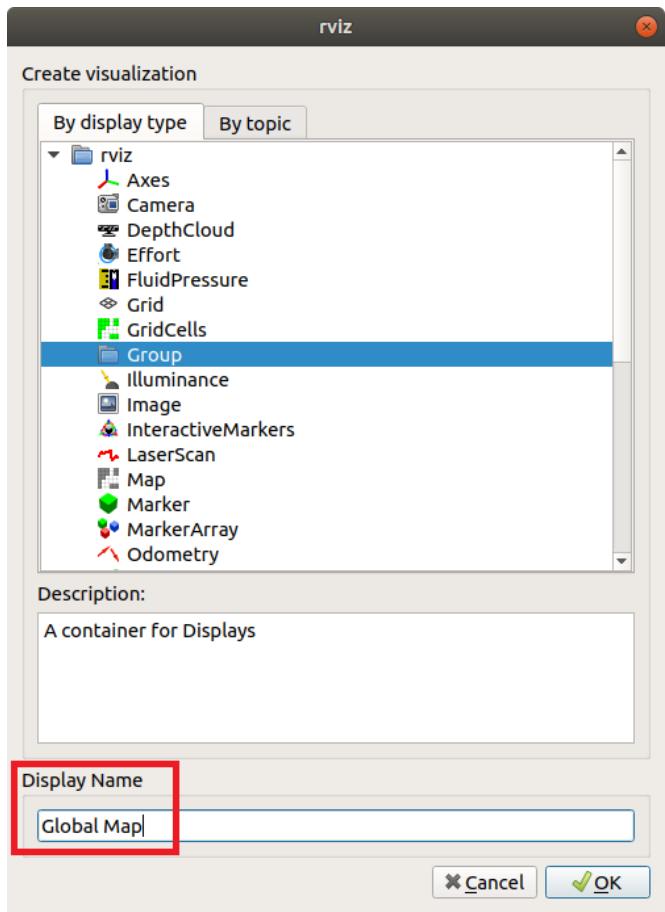
12. Click the Add button in the lower left.
![Files Panels Help\nInteract Move Camera Select Focus Camera Measure 2D Pose Estimate 2D Nav Goal Publish Point\nDisplays\nGlobal Options\nFixed Frame map\nBackground Color 48; 48; 48\nFrame Rate 30\nDefault Light ✓\nGlobal Status: Ok\n✓ Fixed Frame OK\nGrid ✓\nAdd Duplicate Remove Rename\nView\nType: Orbit (rviz) Zero\nCurrent View Orbit (rviz)\nNear Clip ... 0.01\nInvert Z Axis □\nTarget Fra... (Fixed Frame)\nDistance 10\nFocal Shap... 0.05\nFocal Shap... ✓\nYaw 0.785398\nPitch 0.785398\n► Focal Point 0; 0; 0\nSave Remove Rename\nTime\nROS Time: 1594606393.42 ROS Elapsed: 47.29 Wall Time: 1594606393.45 Wall Elapsed: 47.22 Experimental\nReset Left-Click: Rotate. Middle-Click: Move X/Y. Right-Click/Mouse Wheel:: Zoom. Shift: More options.\n31 fps](.neuronbot-50-1z334-1000-10/bde7c01bb8dfd11efe385d86d69390a28b4b0e39f55c60d293627080d6aa8a3c.jpg)

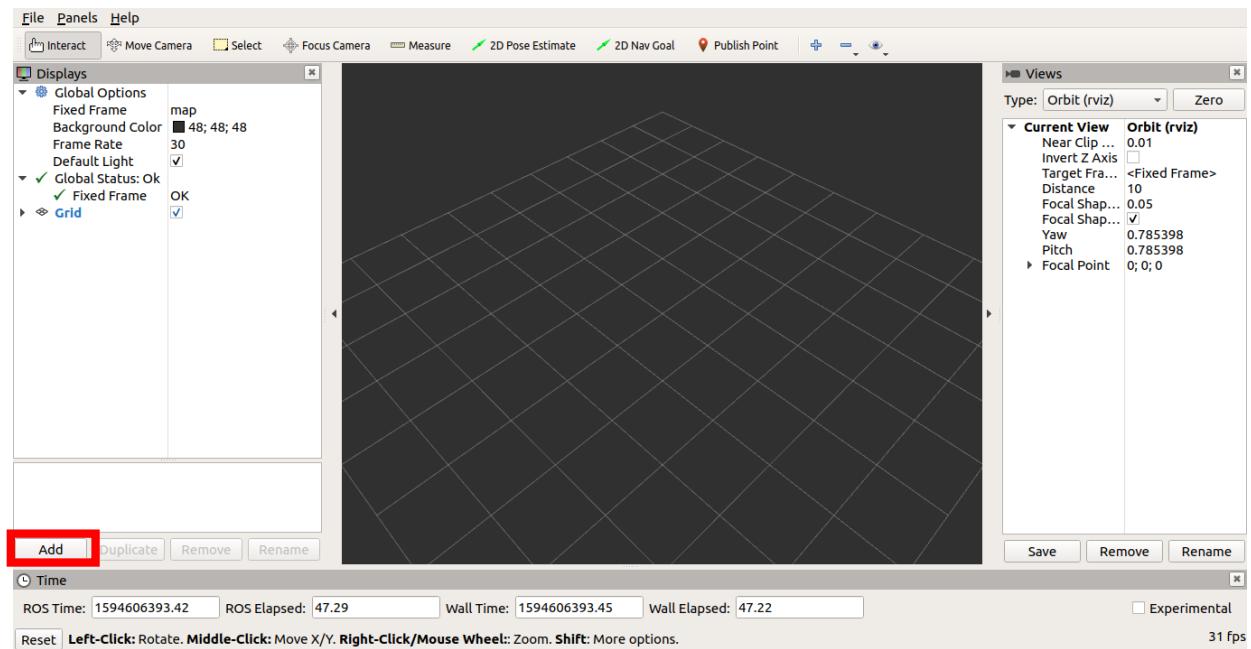
13. Select TF and click OK to display the frames.
![rviz\nCreate visualization\nBy display type	By topic\nPointStamped\nPolygon\nPose\nPoseArray\nPoseWithCovariance\nRange\nRelativeHumidity\nPolyModel\nTF\nTemperature\nWrenchStamped\nDescription:\nDisplays the TF transform hierarchy. More Information.\nDisplay Name\nTF\nCancel	OK](.neuronbot-50-1z334-1000-10/56a0a05d702b844232ce26d99df7ab47215c1249c6c66bb28f1952132cc78ac3.jpg)

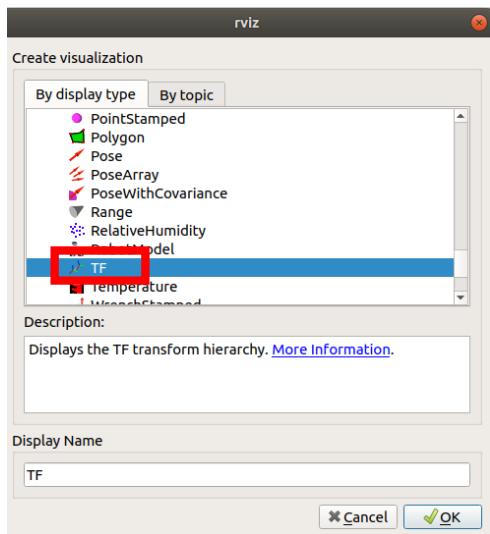
14. Click the Add button again in the lower left.
15. Click the By topic tab to display available topics.
16. Select LaserScan and click OK to display 2D LiDAR data.
![Create visualization\nBy display type	By topic\n/move_base\n/current_goal\n/Pose\n/move_base_simple\n/goal\n/Pose\n/odom\nOdometry\n/scan\nLaserScan\nShow unvisualizable topics\nDescription:\nDisplay Name\nCancel	OK](.neuronbot-50-1z334-1000-10/454dfa6f790a76d6c81b83bc6f9ba66f1f3fba17b01a013266568cfd13babeaf.jpg)

Tip: In ros\_menu/config.yaml in the ADLINK Neuron Startup Menu, you can add commands to the “cmds” section. For example, in ROS 1 Melodic, we added a “source” command so that every time a new session and terminal is opened, the menu automatically loads the NeuronBot workspace environment. This way, there is no longer a need to “source” ROS and NeuronBot anymore.

```yaml
Menu:
ROS 1 melodic:
option_num: 1
ROS_version: 1
distro_name: melodic
ros1_path: /opt/ros/melodic
master_ip: 192.168.50.26
cmds:
- source ~/neuronbot2_ros1_ws/devel/setup.bash
```

# 5.3.2. Laser SLAM

This section describes how to build a map using a 2D laser scanner.

Note: Ensure that everything in the base driver has been launched before running SLAM.

 Terminal 1, Session 3:

1. Source the environment.

```shell
source /opt/ros/&lt;YOUR_ROS1_DISTRO&gt;/setup.bash
source ~/neuronbot2_ros1_ws/devel/setup.bash
```

2. Start the laser localization and mapping procedure with gmapping by executing the following command.

```txt
roslaunch neuronbot2_slam gmapping.launch
```

 RViz:

3. Click the Add button in the lower left.
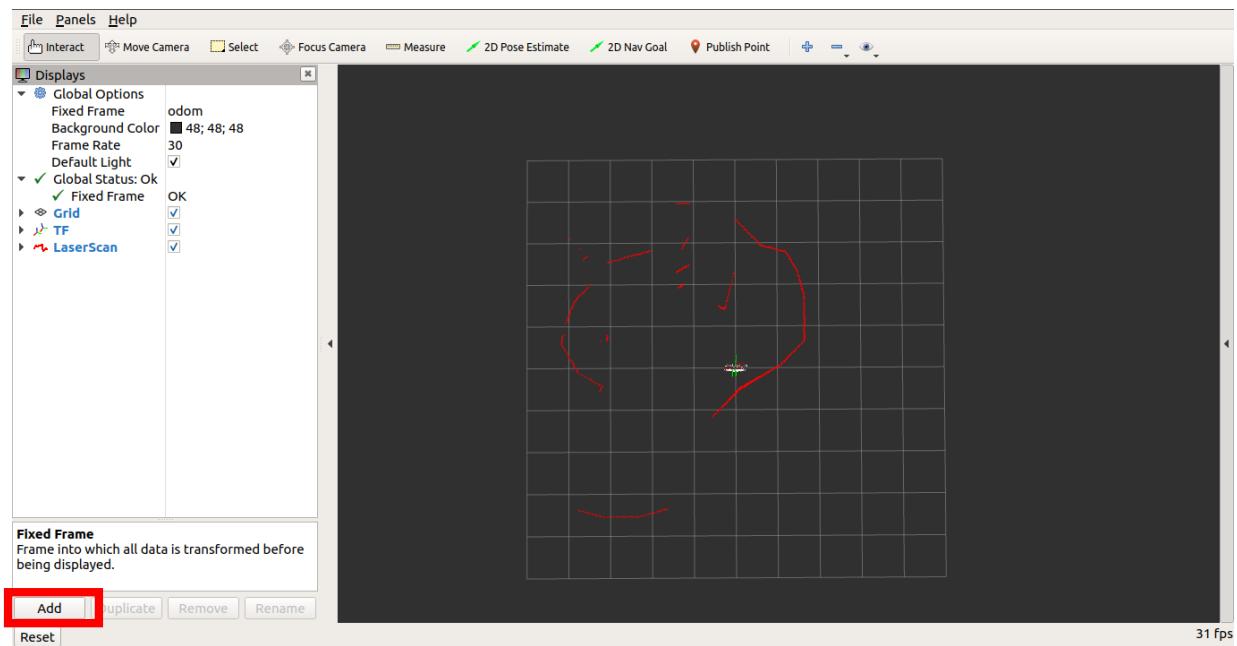
![File Panels Help\nInteract Move Camera Select Focus Camera Measure 2D Pose Estimate 2D Nav Goal Publish Point\nDisplays\nGlobal Options\nFixed Frame odom\nBackground Color 48; 48; 48\nFrame Rate 30\nDefault Light ✓\n✓ Global Status: Ok\n✓ Fixed Frame OK\nGrid ✓\nTF ✓\nLaserScan ✓\nFixed Frame\nFrame into which all data is transformed before being displayed.\nAdd Duplicate Remove Rename\nReset\n31 fps](.neuronbot-50-1z334-1000-10/9be819a307f43bf9519e302ef56d905e5d998055fd4dd0500e38a9edeac8c7e4.jpg)

4. Click the By topic tab to display available topics.
5. Select Map and click OK to display the map created using gmapping.
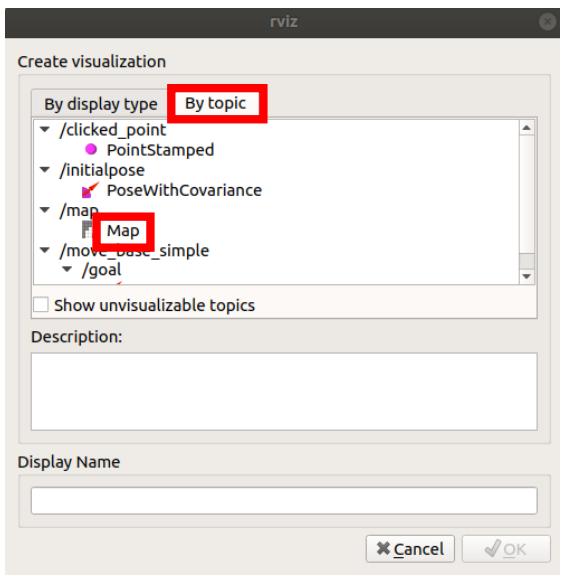
![rviz\nCreate visualization\nBy display type	By topic\n✓ /clicked_point\n● PointStamped\n✓ /initialpose\n■ PoseWithCovariance\n✓ /map\n■ Map\n✓ /move_base_simple\n✓ /goal\nShow unvisualizable topics\nDescription:\nDisplay Name\nCancel	OK](.neuronbot-50-1z334-1000-10/9774ab61c0f22e171e7322ee94c2e61beaf6a5872814b85749cafb6704cc6add.jpg)

• Session 2:

6. Go back to the teleop\_twist\_keyboard session. Press x and c to decrease the linear speed to 0.3 m/s the angular speed to 0.2 rad/s, and then drive the NeuronBot around using the keyboard driver. After mapping the environment, remember to save the map before closing gmapping.

• Session 4:

7. Source the environment.

```shell
source /opt/ros/&lt;YOUR_ROS1_DISTRO&gt;/setup.bash
source ~/neuronbot2_ros1_ws/devel/setup.bash
roscd neuronbot2_nav/maps/
```

8. Save the map.

A map file and a config file will be saved to neuronbot2\_nav/maps.

```txt
rosrun map_server map_saver -f map_name
```

9. Stop gmapping by pressing ctrl + c in the gmapping session (Session 3).

# 5.3.3. Navigation

After getting a static map, running a SLAM package is not recommended due to its computational load. This section describes how to use an AMCL package to locate the NeuronBot using a previously generated map and existing laser scan. This will allow you to move the NeuronBot from one location to a specified destination.

Note: Ensure that everything in the base driver has been launched before running SLAM.

 Terminal 1, Session 3:

1. Source the environment.

```shell
source /opt/ros/&lt;YOUR_ROS1_DISTRO&gt;/setup.bash
source ~/neuronbot2_ros1_ws/devel/setup.bash
```

2. Start the navigation procedure by executing the following command.

```txt
roslaunch neuronbot2_nav bringup.launch map:=map_name
```

 RViz:

3. Click the Add button in the lower left.
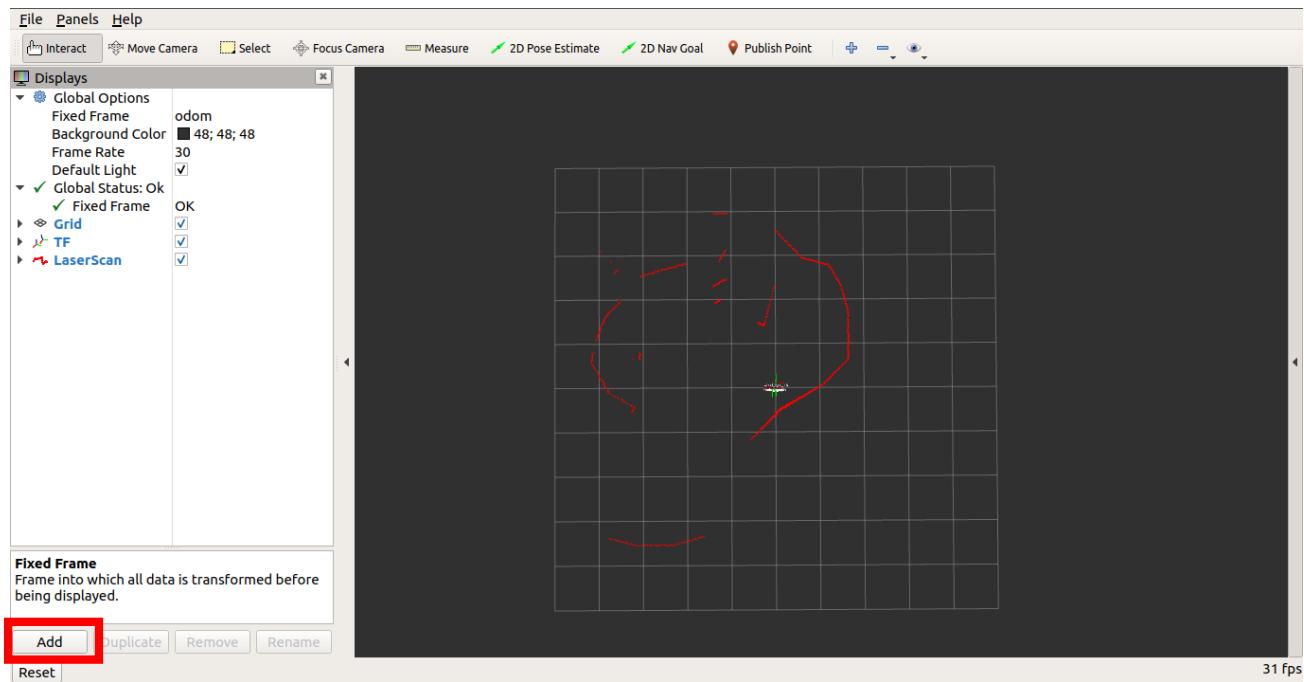
![Files\nInteract\nMove Camera\nSelect\nFocus Camera\nMeasure\n2D Pose Estimate\n2D Nav Goal\nPublish Point\nDisplays\nGlobal Options\nFixed Frame odom\nBackground Color 48; 48; 48\nFrame Rate 30\nDefault Light ✓\n✓ Global Status: Ok\n✓ Fixed Frame OK\n✓ Grid ✓\n✓ TF ✓\n✓ LaserScan ✓\nFixed Frame\nFrame into which all data is transformed before\nbeing displayed.\nAdd\nDuplicate Remove Rename\nReset\n31 fps](.neuronbot-50-1z334-1000-10/b3f835ffecaa14b47ffda227ef93a06ae343dec07c9060d1543df209ed1c3368.jpg)

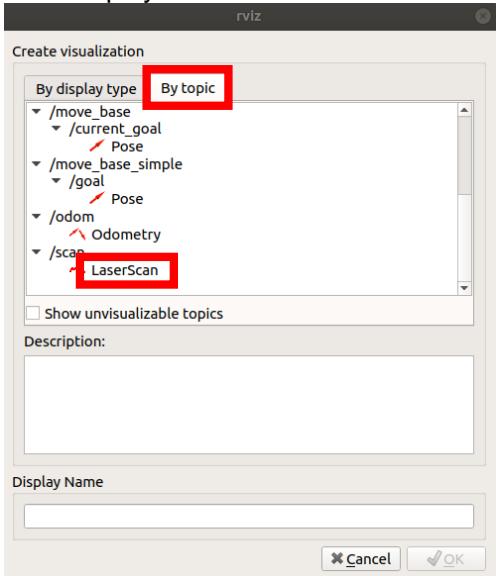
# 4. Rename Group to Global Map.

![rviz\nCreate visualization\nBy display type	By topic\nrviz\nAxes\nCamera\nDepthCloud\nEffort\nFluidPressure\nGrid\nGridCells\nGroup\nIlluminance\nImage\nInteractiveMarkers\nLaserScan\nMap\nMarker\nMarkerArray\nOdometry\nDescription:\nA container for Displays\nDisplay Name\nGlobal Map](.neuronbot-50-1z334-1000-10/a1f8cc01d90bc069cbfb8e37060f2e885cbe9ff2feaafd0e4aa2a6747bde58fa.jpg)

5. Click OK.
6. Click the Add button in the lower left again.
7. Rename Map to Costmap.
8. Drag Costmap into Global Map and set the parameters as follows.
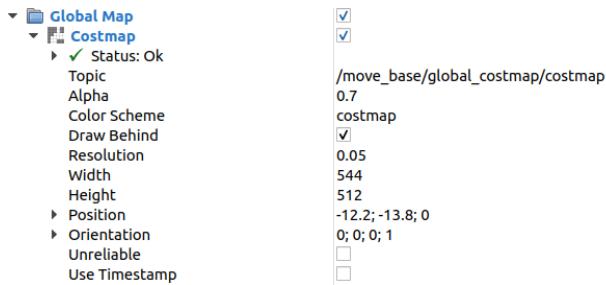
![Global Map\nCostmap\n✓ Status: Ok\nTopic /move_base/global_costmap/costmap\nAlpha 0.7\nColor Scheme costmap\nDraw Behind ✓\nResolution 0.05\nWidth 544\nHeight 512\n✓ Position -12.2; -13.8; 0\n✓ Orientation 0; 0; 0; 1\nUnreliable \nUse Timestamp](.neuronbot-50-1z334-1000-10/ae925ac3afbcdae6177d293d89468b9f3372ab2ef65923a383a3c1b197e5bb2c.jpg)

9. Click Add, rename Path to Planner, drag Planner into Global Map, and set the parameters as follows.
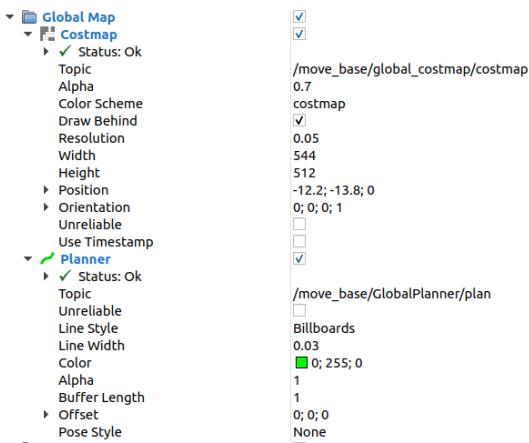
![Global Map\n✓ Costmap\n✓ Status: Ok\nTopic	/move_base/global_costmap/costmap\nAlpha	0.7\nColor Scheme	costmap\nDraw Behind	✓\nResolution	0.05\nWidth	544\nHeight	512\nPosition	-12.2;-13.8; 0\nOrientation	0; 0; 0; 1\nUnreliable	\nUse Timestamp	\n✓ Planner	✓\n✓ Status: Ok\nTopic	/move_base/GlobalPlanner/plan\nUnreliable	\nLine Style	Billboards\nLine Width	0.03\nColor	0; 255; 0\nAlpha	1\nBuffer Length	1\nOffset	0; 0; 0\nPose Style	None](.neuronbot-50-1z334-1000-10/299031cd424f5980e1d28a98dfc7b728f49c56b87599973d9a35cdc35fb642fb.jpg)

10. Click Add, rename Group to Local Map, and click OK.
11. Click Add, rename Map to Costmap, drag Costmap into Local Map, and set the parameters as follows.
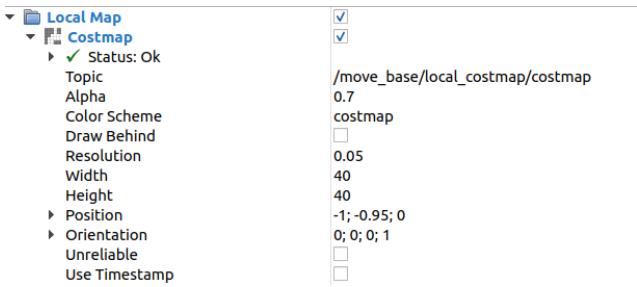
![Local Map\n✓\n✓\n✓ Costmap\n✓ Status: Ok\nTopic /move_base/local_costmap/costmap\nAlpha 0.7\nColor Scheme costmap\nDraw Behind \nResolution 0.05\nWidth 40\nHeight 40\n✓ Position -1; -0.95; 0\n✓ Orientation 0; 0; 0; 1\nUnreliable \nUse Timestamp](.neuronbot-50-1z334-1000-10/57c4bdaed9073f81ed720c7365bebabae0257db99ba800940634735a9a2be491.jpg)

12. Click Add, rename Path to Planner, drag Planner into Local Map, and set the parameters as follows.

<table><tr><td>Local Map</td><td>✓</td></tr><tr><td>Costmap</td><td>✓</td></tr><tr><td>✓ Status: Ok</td><td></td></tr><tr><td>Topic</td><td>/move_base/local_costmap/costmap</td></tr><tr><td>Alpha</td><td>0.7</td></tr><tr><td>Color Scheme</td><td>costmap</td></tr><tr><td>Draw Behind</td><td>☐</td></tr><tr><td>Resolution</td><td>0.05</td></tr><tr><td>Width</td><td>40</td></tr><tr><td>Height</td><td>40</td></tr><tr><td>Position</td><td>-1; -0.95; 0</td></tr><tr><td>Orientation</td><td>0; 0; 0; 1</td></tr><tr><td>Unreliable</td><td>☐</td></tr><tr><td>Use Timestamp</td><td>☐</td></tr><tr><td>Planner</td><td>✓</td></tr><tr><td>✓ Status: Ok</td><td></td></tr><tr><td>Topic</td><td>/move_base/DWAPlannerROS/local_plan</td></tr><tr><td>Unreliable</td><td>☐</td></tr><tr><td>Line Style</td><td>Billboards</td></tr><tr><td>Line Width</td><td>0.03</td></tr><tr><td>Color</td><td>237; 212; 0</td></tr><tr><td>Alpha</td><td>1</td></tr><tr><td>Buffer Length</td><td>1</td></tr><tr><td>Offset</td><td>0; 0; 0</td></tr><tr><td>Pose Style</td><td>None</td></tr></table>

13. Click Add, rename PoseArray to Amcl Particle Swarm, and set the parameters as follows.

![Amcl Particle Swarm\n✓ Status: Ok\nTopic /particlecloud\nUnreliable\nShape Arrow (Flat)\nColor 0; 192; 0\nAlpha 1\nArrow Length 0.2](.neuronbot-50-1z334-1000-10/79fff46434c2affd1d2dfeeffbdd8a3ee932c48962a30608e998a71e6aef47a7.jpg)

14. Click Add, select Odometry, click OK, and set the parameters as follows.

![Odometry\n✓ Status: Ok\nTopic /odom\nUnreliable\nPosition Tolerance 0.1\nAngle Tolerance 0.1\nKeep 1\nShape Arrow\nCovariance](.neuronbot-50-1z334-1000-10/7ed8397c480e091ea30e6dcdfe633948b0e5d86fb1379d3dda65a7d11380f152.jpg)

15. Perform pose estimation.

a. Click "2D Pose Estimate", and set the pose estimation to the approximate location of the NeuronBot on the map.

Note: By default, the localization package will initialize the NeuronBot at (x,y)=(0,0); i.e., the same as the starting position when the mapping process started. You can also manually assign the starting position by using the "set 2D pose estimation" function in RViz. Select the tool, click on the position, and drag the arrow to its initial heading as shown in the following figure. "2D pose estimation" is marked by a red square in the upper banner.

![File Panels Help\nMove Camera Interact Select 2D Pose Estimate 2D Nav Goal Measure Publish Point\nDisplays\nGlobal Options\nGlobal Status: Ok\nGrid\nTF\nMap\nGlobal Map\nLocal Map\nAmcl Particle ...\nOdometry\nRobotModel\nLaserScan\nAdd Duplicate Remove Rename\nReset\n31 fps](.neuronbot-50-1z334-1000-10/c96d3a94887d075bbab744b4e5401fd1f3c7d32151a7c145e64d33a13988f46e.jpg)

16. Set the goal.

b. Click and drag "2D Nav Goal" to set the goal and orientation to any free space on the map. The NeuronBot should drive toward the goal by itself.

![File Panels Help\nMove Camera Interact Select 2D Pose Estimate 2D Nav Goal Measure Publish Point\nDisplays\nGlobal Options\nGlobal Status: Ok\nGrid\nTF\nMap\nGlobal Map\nLocal Map\nAmcl Particle ...\nOdometry\nRobotModel\nLaserScan\nAdd Duplicate Remove Rename\nReset\n31 fps](.neuronbot-50-1z334-1000-10/da285082bf6e51566e04e549e08f9acf378f5c44241de90c6eaef2a4a10579c7.jpg)

Tip: Save time by opening the RViz config file in:
\~/neuronbot2\_ros1\_ws/src/neuronbot2/neuronbot2\_nav/rviz/view\_navigation.rviz
![File Panels Help\nOpen Config Ctrl+O\nSave Config Ctrl+S\nSave Config As Ctrl+Shift+S\nRecent Configs\nSave Image\nPreferences Ctrl+P\nQuit Ctrl+Q\nGlobal Status: Warr\nFixed Frame No tf data. Actual error: ...\nGrid\nCancel Choose a file to open\nRecent Home\nDesktop Documents Downloads Music Pictures Videos Other Locations\nName demo_2d.rviz view_lidar.rviz view_navigation.rviz view_navigation_all.rviz)](.neuronbot-50-1z334-1000-10/bffee4e64bf637c9f04d5d72b6acd3d4f7f477c7d8efb5b8a567e2127660c958.jpg)

# 5.4. ROS 2 Applications

This section describes how to build, compile, and run several applications with ROS 2 on NeuronBot, and provides instructions on configuring NeuronBot for the following applications:

 Teleoperation: Move the NeuronBot using a keyboard and scan the surrounding environment using 2D LiDAR.
 RViz (ROS-VIsualiZation) monitoring: Monitor Neuronbot during movement and laser scanning using RViz, a powerful 3D visualization environment for ROS.
 Simultaneous localization and mapping (SLAM): Configure NeuronBot to build a map during teloperation.
 Guided navigation: Navigate NeuronBot from a starting point to a destination with a map created using a SLAM package.

# 5.4.1. Driver Startup and Teleoperation

To begin teleoperating NeuronBot, you must start the ROS driver in addition to all IO connections and sensory devices such as the motor controller, encoder odometry, laser scanner, and IMU state estimation.

 Terminal 1:

1. Open the terminal.
2. Set up the SSH connection to access the NeuronBot remotely on your computer.

```batch
ssh -X ros@192.168.50.26
```

3. Start Byobu to run multiple sessions on a single SSH connection.

Note: “Session” means a window in a single terminal with an SSH connection to a NeuronBot.

byobu

• Session 0:

4. Source the environment.

```shell
source /opt/ros/&lt;YOUR_ROS2_DISTRO&gt;/setup.bash
source ~/neuronbot2_ros2_ws/install/local_setup.bash
```

5. Launch NeuronBot.

Note: This launch file contains multiple nodes and enables communication between the motor controller, laser SLAM, and all NeuronBot TF definitions. If you end the node with ctrl + c, remember only to press once and allow it to shut down automatically. The rplidarNode node requires some time to shut down the serial port.

```txt
ros2 launch neuronbot2_bringup bringup_launch.py
```

• Session 1:

6. Source the environment.

```txt
source /opt/ros/&lt;YOUR_ROS2_DISTRO&gt;/setup.bash
```

7. Start teleoperation.

Note: The manual driver used for this scenario is teleop\_twist\_keyboard. The default command is a little too fast, so press x and c to decrease the linear speed to 0.4 m/s and the angular speed to 0.4 rad/s. Press k or s to immediately stop.

```batch
ros2 run teleop_twist_keyboard teleop_twist_keyboard
```

![Reading from the keyboard and Publishing to Twist!\n----------------\nMoving around:\n    u    i    o\n    j    k    l\n    m    ,    .\nFor Holonomic mode (strafing), hold down the shift key:\n----------------\n    U    I    0\n    J    K    L\n    M    (    )\nt : up (+z)\nb : down (-z)\n\nanything else : stop\n\nq/z : increase/decrease max speeds by 10%\nw/x : increase/decrease only linear speed by 10%\ne/c : increase/decrease only angular speed by 10%\n\nCTRL-C to quit\n\ncurrently:      speed 0.5      turn 1.0](.neuronbot-50-1z334-1000-10/63ee6b910d7fdba4ddbdc1290948dfa1dae7525a76980ea5a364030ba6dd17dc.jpg)

Figure 4-1-4-1: teleop\_twist\_keyboard

 Terminal 2:

8. Set up the environment.

source /opt/ros/&lt;YOUR\_ROS2\_DISTRO&gt;/setup.bash

# 9. Launch RViz.

rviz2

#  RViz2:

# 10. Click the Add button in the lower left.

![File Panels Help\nInteract\nMove Camera\nSelect\nFocus Camera\nMeasure\n2D Pose Estimate\n2D Nav Goal\nPublish Point\nDisplays\nGlobal Options\nFixed Frame\nBackground Color\n48; 48; 48\nFrame Rate\n30\nDefault Light\n✓ Global Status: Ok\n✓ Fixed Frame\nOK\nGrid\nAdd\nDuplicate\nRemove\nRename\nViews\nType: Orbit (rvlz)\nZero\nCurrent View\nOrbit (rvlz)\nNear Clip...\n0.01\nInvert Z Axis\nTarget Fra...\n(Fixed Frame)\nDistance\n10\nFocal Shap...\n0.05\nFocal Shap...\n✓\nYaw\n0.785398\nPitch\n0.785398\nFocal Point\n0; 0; 0\nSave\nRemove\nRename\nTime\nROS Time: 1594606393.42\nROS Elapsed: 47.29\nWall Time: 1594606393.45\nWall Elapsed: 47.22\nExperimental\nReset\nLeft-Click: Rotate. Middle-Click: Move X/Y. Right-Click/Mouse Wheel: Zoom. Shift: More options.\n31 fps](.neuronbot-50-1z334-1000-10/32d871914403b982698eeb10302d850ab26d4435cd4e651352de92899c43d488.jpg)

# 11. Select TF and click OK to display the frames.

![rviz\nCreate visualization\nBy display type	By topic\nPointStamped\nPolygon\nPose\nPoseArray\nPoseWithCovariance\nRange\nRelativeHumidity\nPoly-NModel\nTF\nTemperature\nWrenchStamped\nDescription:\nDisplays the TF transform hierarchy. More Information.\nDisplay Name\nTF\nCancel	OK](.neuronbot-50-1z334-1000-10/815c4ba81a6e3a8f190b22672ac527ab7061c7d026a8d680c7bab4779c72e2f3.jpg)

12. Click the Add button again in the lower left.
13. Click the By topic tab to display available topics.
14. Select LaserScan and click OK to display 2D LiDAR data.

![Create visualization\nBy display type	By topic\n/move_base\n/current_goal\n/Pose\n/move_base_simple\n/goal\n/Pose\n/odom\nOdometry\n/scan\nLaserScan\nShow unvisualizable topics\nDescription:\nDisplay Name\nCancel	OK](.neuronbot-50-1z334-1000-10/2cf9b6cf049e219437fb1e0facc26afeb7afcbc5dcc472543f7f8bdd22b1defb.jpg)

Tip: In ros\_menu/config.yaml in the ADLINK Neuron Startup Menu, you can add commands to the “cmds” section. For example, in ROS 2 Dashing, we added a “source” command so that every time a new session and terminal is opened, the menu automatically loads the NeuronBot workspace environment. This way, there is no longer a need to “source” ROS and NeuronBot anymore.

```yaml
Menu:
ROS 2 dashing:
option_num: 2
ROS_version: 2
distro_name: dashing
ros2_path: /opt/ros/dashing
domain_id: # set if you don't want to use default domain id
cmds:
- source_plugin dds_bashrc 1
- source ~/neuronbot2_ros2_ws/install/local_setup.bash
```

# 5.4.2. Laser SLAM

This section describes how to build a map using a 2D laser scanner.

Note: Ensure that everything in the base driver has been launched before running SLAM.

 Terminal 1, Session 2:

1. Source the environment.

```shell
source /opt/ros/&lt;YOUR_ROS2_DISTRO&gt;/setup.bash
source ~/neuronbot2_ros2_ws/install/local_setup.bash
```

2. Start the laser localization and mapping procedure with the Slam Toolbox by executing the following command.

```batch
ros2 launch neuronbot2_slam slam_toolbox_launch.py
```

 RViz2:

3. Click the Add button in the lower left.

![File Panels Help\nInteract Move Camera Select Focus Camera Measure 2D Pose Estimate 2D Nav Goal Publish Point\nDisplays\nGlobal Options\nFixed Frame odom\nBackground Color 48; 48; 48\nFrame Rate 30\nDefault Light ✓\n✓ Global Status: Ok\n✓ Fixed Frame OK\n✓ Grid ✓\n✓ TF ✓\n✓ LaserScan ✓\nFixed Frame\nFrame into which all data is transformed before\nbeing displayed.\nAdd Duplicate Remove Rename\nReset\n31 fps](.neuronbot-50-1z334-1000-10/12be1f27afff9b04d0ef57a3da32259e48cb46c63e5765dcd3469a81792c94af.jpg)

4. Click the By topic tab to display available topics.
5. Select Map and click OK to display the map created using the Slam Toolbox.

![Create visualization\nBy display type By topic\n✓ /clicked_point\n● PointStamped\n✓ /initialpose\n✓ PoseWithCovariance\n✓ /map\n■ Map\n✓ /move_bale_simple\n✓ /good\nShow unvisualizable topics\nDescription:\nDisplay Name\nCancel ✓ OK](.neuronbot-50-1z334-1000-10/b48578549f01287d68490f45d322309aab67206192d60c9d13ad8ae93bdba6d7.jpg)

• Session 2:

6. Use x and c to decrease the linear to 0.3 m/s as well as angular speed to 0.2 rad/s, and then drive the NeuronBot around using the keyboard driver. After mapping the environment, remember to save the map before closing the Slam Toolbox.

• Session 3:

7. Source the environment.

```txt
source /opt/ros/&lt;YOUR_ROS2_DISTRO&gt;/setup.bash
source ~/neuronbot2_ros2_ws/install/local_setup.bash
cd ~/neuronbot2_ros2_ws/src/neuronbot2/neuronbot2_nav/map/
```

8. Save the map.

A map file and a config file will be saved under neuronbot2\_nav/map.

```txt
# for dashing and eloquent
ros2 run nav2_map_server map_saver -f &lt;map_name&gt;
or
# for foxy:
ros2 run nav2_map_server map_saver_cli -f &lt;map_name&gt;
```

9. Stop the Slam Toolbox by pressing ctrl + c in the Slam Toolbox session (Session 3).

# 5.4.3. Navigation

After getting a static map, running a SLAM package is not recommended due to its computational load. This section describes how to use an AMCL package to locate the NeuronBot using a previously generated map and existing laser scan. This will allow you to move the NeuronBot from one location to a specified destination.

Note: Ensure that everything in the base driver has been launched before running SLAM.

 Terminal 1, Session 2:

1. Source the environment.

```shell
source /opt/ros/&lt;YOUR_ROS2_DISTRO&gt;/setup.bash
source ~/neuronbot2_ros2_ws/devel/local_setup.bash
```

2. Start the navigation procedure by executing the following command.

```erb
ros2 launch neuronbot2_nav bringup_launch.py map:=&lt;full_path_to_your_map_name.yaml&gt;
```

#  RViz2:

# 3. Click the Add button in the lower left.

![File Panels Help\nInteract Move Camera Select Focus Camera Measure 2D Pose Estimate 2D Nav Goal Publish Point\nDisplays\nGlobal Options\nFixed Frame odom\nBackground Color 48; 48; 48\nFrame Rate 30\nDefault Light ✓\n✓ Global Status: Ok\n✓ Fixed Frame OK\nGrid ✓\n✓ TF ✓\nLaserScan ✓\nFixed Frame\nFrame into which all data is transformed before\nbeing displayed.\nAdd Duplicate Remove Rename\nReset\n31 fps](.neuronbot-50-1z334-1000-10/c0b4c4d6c20d82884976ce3fa1cf61278014fe793cbff1ae6322997d0db30a5e.jpg)

# 4. Rename Group to Global Planner.

![rviz2\nCreate visualization\nBy display type	By topic\nrviz_common\nGroup\nrviz_default_plugins\nAxes\nCamera\nFluidPressure\nGrid\nGridCells\nIlluminance\nImage\nInteractiveMarkers\nLaserScan\nMap\nMarker\nMarkerArray\nOdometry\nPath\nDescription:\nA container for Displays\nDisplay Name\nGlobal Planner](.neuronbot-50-1z334-1000-10/3a4d882bafc5afb092fbfa895fd13496f8ac9a0428115096e503a514628d3d08.jpg)

5. Click OK.
6. Click the Add button in the lower left again.
7. Rename Map to Global Costmap.

8. Drag Global Costmap into Global Planner and set the parameters as follows.

![Global Planner\nGlobal Costmap\n✓ Status: Ok\nTopic /global_costmap/costmap\nUnreliable\nAlpha 0.3\nColor Scheme costmap\nDraw Behind\nResolution 0.05\nWidth 544\nHeight 512\nPosition -12.2; -13.8; 0\nOrientation 0; 0; 0; 1\nUse Timestamp](.neuronbot-50-1z334-1000-10/0ad6877433f2fc0e4d7c62331acc25be6db88a592a9f7afaf92e1545d2c3b950.jpg)

9. Click Add, select Path, drag Path into Global Planner, and set the parameters as follows.

![Global Planner\nGlobal Costmap\nPath\n✓ Status: Ok\nTopic /plan\nUnreliable\nLine Style Lines\nColor ■ 255; 0; 0\nAlpha 1\nBuffer Length 1\nOffset 0; 0; 0\nPose Style Arrows\nPose Color ■ 255; 85; 255\nShaft Length 0.02\nHead Length 0.02\nShaft Diameter 0.005\nHead Diameter 0.02](.neuronbot-50-1z334-1000-10/4937f19e01b0535d7b24899b9df68c1570cfb47864eeb3c14c7b38b348a092be.jpg)

10. Click Add, select Group, click OK, and then rename Group to Local Planner.

11. Click Add, rename Map to Local Costmap, and then drag it into Local Planner and set the parameters as follows.

![Local Planner\n✓ Local Costmap\n✓ Status: Ok\nTopic /local_costmap/costmap\nUnreliable\nAlpha 0.7\nColor Scheme costmap\nDraw Behind\nResolution 0.05\nWidth 40\nHeight 40\nPosition -0.95; -0.95; 0\nOrientation 0; 0; 0; 1\nUse Timestamp](.neuronbot-50-1z334-1000-10/d1b1ca427394b4afb15778ada53a27f4e14ddb7fa82a3aef69acd3cf3857350d.jpg)

12. Click Add, rename Path to Local Plan, drag Local Plan into Local Planner, and set the parameters as follows.

![Local Planner\nLocal Costmap\nLocal Plan\n✓ Status: Ok\nTopic /local_plan\nUnreliable\nLine Style Lines\nColor 0; 12; 255\nAlpha 1\nBuffer Length 1\nOffset 0; 0; 0\nPose Style None](.neuronbot-50-1z334-1000-10/cd029d943cc99a18a47a9e3cce6b92a4d4d6b8a59e4784f32b51f460e13aa615.jpg)

13. Click Add, rename PoseArray to Amcl Particle Swarm, and set the parameters as follows.

![Amcl Particle Swarm\n✓ Status: Ok\nTopic /particlecloud\nUnreliable ✓\nShape Arrow (Flat)\nColor 0; 180; 0\nAlpha 1\nArrow Length 0.02](.neuronbot-50-1z334-1000-10/45f8d3790736df92f1d4053616c0a649db35e6cf3a9a674a8590b3086cf032cf.jpg)

14. Click Add, select PointCloud2, click OK, and set the parameters as follows.

15. Rename PointCloud2 to Bumper Hit and set the parameters as follows.

![Bumper Hit\n✓ Status: Ok\nTopic /mobile_base/sensors/bumper_pointcloud\nUnreliable\nQueue Size 10\nSelectable ✓\nStyle Spheres\nSize (m) 0.08\nAlpha 1\nDecay Time 0\nPosition Transformer\nColor Transformer](.neuronbot-50-1z334-1000-10/c17b54df8ea2dc104fd04c3f128e9aa4048c0b07cc4a649e417cdf6dc067c8c0.jpg)

# 16. Set the estimation.

a. Click "2D Pose Estimate", and set the estimation to the approximate location of the NeuronBot on the map.

Note: By default, the localization package will initialize the NeuronBot at (x,y)=(0,0); i.e., the same as the starting position when the mapping process started. You can also manually assign the starting position by using the "set 2D pose estimation" function in RViz2. Select the tool, click on the position, and drag the arrow to its initial heading as shown in the following figure. "2D pose estimation" is marked by a red square in the upper banner.

![File Panels Help\nMove Camera Select Focus Camera Measure 2D Pose Estimate Publish Point Navigation2 Goal\nDisplays\nGlobal Options\nFixed Frame map\nBackground Color 48; 48; 48\nFrame Rate 30\nGlobal Status: Ok\nGrid\nTF\nRobotModel\nLaserScan\nBumper Hit\nMap\nAmcl Particle Swarm\nGlobal Planner\nLocal Planner\nAdd Duplicate Remove Rename\nNavigation 2\nStartup\nReset\n31 fps](.neuronbot-50-1z334-1000-10/26296a326d6b45e4e53a9a11f923971028d9629e7f180c6416201529b3ebfa8d.jpg)

# 17. Set the goal.

a. Click and drag "2D Nav Goal" to set the goal and orientation to any free space on the map. The NeuronBot should drive toward the goal by itself.

![File Panels Help\nMove Camera Select Focus Camera Measure 2D Pose Estimate Publish Point Navigation2 Goal\nDisplays\nGlobal Options\nFixed Frame map\nBackground Color 48; 48; 48\nFrame Rate 30\nGlobal Status: Ok\nGrid\nTF\nRobotModel\nLaserScan\nBumper Hit\nMap\nAmcl Particle Swarm\nGlobal Planner\nLocal Planner\nAdd Duplicate Remove Rename\nNavigation 2\nStartup\nReset\n31 fps](.neuronbot-50-1z334-1000-10/38435e8aa63009da60c9bb9dc0136cecd69a7d6cb8db4419ad3bc92f77f7f8a3.jpg)

# Tip: You can save time by opening the RViz2 config file in

\~/neuronbot2\_ros2\_ws/src/neuronbot2/neuronbot2\_nav/rviz/nav2\_default\_view.rviz

![File Panels Help\nOpen Config Ctrl+O\nSave Config Ctrl+S\nSave Config As Ctrl+Shift+S\nRecent Configs\nSave Image\nPreferences Ctrl+P\nQuit Ctrl+Q\nGlobal Status: Wurr\nFixed Frame No tf data. Actual error: ...\nGrid](.neuronbot-50-1z334-1000-10/0d1529bb105cea2c2a49a01c9d9c99d06d55f987bf114621a5ac0b0e3ea01540.jpg)

![Choose a file to open\nName\nnav2.rviz\nnav2_default_view.rviz\nnav2_namespaced_view.rviz](.neuronbot-50-1z334-1000-10/0902d082f057d13579f3235c4bd161b9b7dc35275f20d25734c84a3db99e00bd.jpg)

# 6. Troubleshooting

# 6.1. Self-diagnosis

This section illustrates how to determine whether your NeuronBot is running normally or abnormally. The test scripts provided in this section leverage the NeuronBot ROS 1 package.

Note: Ensure that you download and build the latest source code before troubleshooting.

# 6.1.1. Motor Test

Execute the motor test diagnostic command as follows:

```shell
cd ~/neuronbot2_ros1_ws/src/neuronbot2/neuronbot2_tools/neuronbot2_init/. /neuronbot2_test.sh 1
```

“Motor controller version” and non-zero “RobotParameters” will appear, and NeuronBot will automatically spin a few times.

```txt
ROS_MASTER_URI=http://localhost:11311

process[neuronbot2_driver-1]: started with pid [3683]
process[joint_state_publisher-2]: started with pid [3684]
process[robot_state_publisher-3]: started with pid [3685]
process[rplidarNode-4]: started with pid [3691]
[ INFO] [1596795865.029211873]: [NeuronBot2] port: /dev/neuronbot2 baudrate: 115200
[ INFO] [1596795865.036691030]: [NeuronBot2] out_pid_debug_enable: 1
[ INFO] [1596795865.041410704]: [NeuronBot2] BaseDriver startup
process[led_control-5]: started with pid [3693]
[ INFO] [1596795865.050643410]: [NeuronBot2] Connected to main board
[ INFO] [1596795865.077069458]: RPLIDAR running on ROS package rplidar_ros. SDK Version:1.7.0
[led_control-5] process has finished cleanly
log file: /home/ros/.ros/log/2817bff8-d898-11ea-969c-00051bd1a109/led_control-5*.log
[ INFO] [1596795867.057327250]: [NeuronBot2] Motor controller version: v1.NB2.1 build time: 20200730
[ INFO] [1596795867.065932517]: [NeuronBot2] RobotParameters: 84 225 1428 10 75 2500 0 10 250 40 0 150 69
[ INFO] [1596795867.090422353]: [NeuronBot2] Subscribe CMD topic on [CMD_Vet]
[ INFO] [1596795867.097385566]: [NeuronBot2] Advertise odom topic on [odom]
[ INFO] [1596795867.105268619]: [NeuronBot2] Advertise imu topic on [raw_imu]
RPLIDAR S/N: 75E99A87C5E392D2A5E49EF0E53C3D64
[ INFO] [1596795867.593538987]: Firmware Ver: 1.25
[ INFO] [1596795867.593573185]: Hardware Rev: 5
[ INFO] [1596795867.594950618]: RPLidar health status : 0
[ INFO] [1596795868.195467061]: current scan mode: Boost, max_distance: 12.0 m, Point number: 8.0K , angle_compensate: 2
```

If you do not see “Motor controller version” and non-zero “RobotParameters”, try the following:

• Perform TTY initialization again. For details, see NeuronBot Setup on page 33.
• Disconnect and reconnect all USB cables and restart NeuronBot.
• Execute the following command:

```txt
ls /dev/neuronbot2 -l
```

You should find /dev/neuronbot2 linked to /dev/ttyUSB\*.

# 6.1.2. LiDAR Test

Execute the LiDAR diagnostic command as follows:

```batch
cd ~/neuronbot2_ros1_ws/src/neuronbot2/neuronbot2_tools/neuronbot2_init/. /neuronbot2_test.sh 2
```

RViz will open automatically:

![view_lidar.rviz - RViz\nFile Panels Help\nMove Camera Interact Select 2D Pose Estimate 2D Nav Goal Measure Publish Point\nDisplays\nGlobal Options\nFixed Frame laser_frame\nBackground Color 48; 48; 48\nFrame Rate 30\nDefault Light ✓\nGlobal Status: ...\n✓ Grid ✓\n✓ TF ✓\n✓ LaserScan ✓\nAdd Duplicate Remove Rename\nReset Left-Click: Rotate. Middle-Click: Move X/Y. Right-Click/Mouse Wheel:: Zoom. Shift: More options.\n31 fps](.neuronbot-50-1z334-1000-10/404942ee0d04a7c73717b15d1db23f571df30adaa1bed2bed66a21cacb4f8beb.jpg)

If the LiDAR-generated red lines which do not appear, try the following:

1. Perform LiDAR initialization again. For details, see NeuronBot Setup on page 33.
2. Disconnect and reconnect all USB cables and restart NeuronBot.
3. Execute the following command:

```txt
ls /dev/rplidar -l
```

You should find /dev/rplidar linked to /dev/ttyUSB\*.

# 6.1.3. LED Test

Execute the LED diagnostic command as follows:

```batch
cd ~/neuronbot2_ros1_ws/src/neuronbot2/neuronbot2_tools/neuronbot2_init/. /neuronbot2_test.sh 3
```

The LED color will change.

# 6.2. FAQ

1. Q: What causes “Could not contact ROS master…”?

![RViz: waiting for master\nCould not contact ROS master at (http://172.16.8.72:11311),\nretrying...\nCancel](.neuronbot-50-1z334-1000-10/236712b45c0ede2f27278aee1ba2317f62b8c7e57c656208492beb9ff8560937.jpg)

A: The program cannot locate the ROS Master. Please verify that roscore is running and that ROS\_IP and ROS\_MASTER\_URI are correctly set. For details, see ROS 1 Remote Control Settings on page 35.

2. Q: What causes “Command ‘XXX’ not found”?

```txt
ros@rostest:~/nb2_melodic_ws$ roslaunch neuronbot2_bringup bringup.launch
Command 'roslaunch' not found, but can be installed with:
sudo apt install python-roslaunch
```

or

```txt
ros@rostest:~/nb2_melodic_ws$ ros2 launch neuronbot2_bringup bringup.launch
ros2: command not found
```

A: The ROS environment may not be sourced. Source the environment or use the Neuron Startup Menu.

```txt
source /opt/ros/&lt;YOUR_ROS_DISTRO&gt;/setup.bash
```

3. Q: What causes “[xxx.launch] is neither a launch file …”?

```txt
ros@rostest:~/nb2_metodic_ws$ roslaunch neuronbot2_bringup bringup.launch
RLException: [bringup.launch] is neither a launch file in package [neuronbot2_bringup] nor is [neuronbot2_bringup] a launch file name
The traceback for the exception was written to the log file
```

A: The NeuronBot ROS 1 environment may not be sourced. Source the environment to fix this issue.

```txt
source ~/neuronbot2_ros1_ws/devel/setup.bash
```

4. Q: What causes “Package ‘neuronbot2\_xxx’ not found …”?

```txt
ros@rostest:~/nb2_eloquent_ws$ ros2 launch neuronbot2_bringup bringup_launch.py Package 'neuronbot2_bringup' not found: "package 'neuronbot2_bringup' not found, searching: [/opt/ros/eloquent']"
```

A: The NeuronBot ROS 2 environment may not be sourced. Source the environment to fix this issue.

```shell
source ~/neuronbot2_ros2_ws/install/local_setup.bash
```

5. Q: Why won’t RViz display anything?

A: Please ensure that you have added topics in RViz:

![Files Panels Help\nInteract Move Camera Select Focus Camera Measure 2D Pose Estimate 2D Nav Goal Publish Point\nDisplays\nGlobal Options\nFixed Frame map\nBackground Color 48; 48; 48\nFrame Rate 30\nDefault Light ✓\n✓ Global Status: Ok\n✓ Fixed Frame OK\nGrid ✓\nAdd Duplicate Remove Rename\nViews\nType: Orbit (rviz) Zero\nCurrent View Orbit (rviz)\nNear Clip ... 0.01\nInvert Z Axis \nTarget Fra... (Fixed Frame)\nDistance 10\nFocal Shap... 0.05\nFocal Shap... ✓\nYaw 0.785398\nPitch 0.785398\n► Focal Point 0; 0; 0\nSave Remove Rename\nTime\nROS Time: 1594606393.42 ROS Elapsed: 47.29 Wall Time: 1594606393.45 Wall Elapsed: 47.22 Experimental\nReset Left-Click: Rotate. Middle-Click: Move X/Y. Right-Click/Mouse Wheel:: Zoom. Shift: More options.\n31 fps](.neuronbot-50-1z334-1000-10/3aa53a7c922c5b8d8541a0d6b59495cead38f81cfbbae3961cc98ed8bb87bb01.jpg)

![rviz\nCreate visualization\nBy display type	By topic\n✓ /clicked_point\n		PointStamped\n✓ /initialpose\n			PoseWithCovariance\n✓ /map\n			Map\n✓ /move_base_simple\n	✓ /goal\nShow unvisualizable topics\nDescription:\nDisplay Name\nCancel	OK](.neuronbot-50-1z334-1000-10/0b62809624f44529323cec38fdd67333664b0a2982ad5f66b8e9d4b543d87bfd.jpg)

Click Add, and then click the By topic tab. If you can’t find the topics you expect to see, try the following:

• For ROS 1, ensure that ROS\_MASTER\_URI and ROS\_IP are correctly set on both the host computer and NeuronBot.
• For ROS 2, ensure that ROS\_DOMAIN\_ID is correctly set on both the host computer and NeuronBot.

See ROS 1 Remote Control Settings and ROS 2 Remote Control Settings for details on setting environment variables.

# 7. System Backup and Restore

This section explains how to create a bootable USB drive for backing up and restoring the system.

# 7.1. Preparation

# 7.1.1. Clonezilla

Clonezilla is an open source tool for backup and restoration.

1. Download the stable version from the official website: https://clonezilla.org/downloads.php

![Clonezilla Live Download\nLive release\nalternative stable - 20200428-focal\nstable - 2.6.6-15\nalternative testing -\n20200616-focal\n20200616-groovy.\ntesting - 2.6.7-21](.neuronbot-50-1z334-1000-10/be013e346e53aa70beb7fcaefd5cb9f12dc3197cfc6b8a166d2070bf0690076f.jpg)

2. Select amd64 for CPU architecture and iso for file type, and then click Download. Clonezilla will automatically start to download.

![1. Select CPU architecture: amd64\n2. Select file type: iso\n3. Select repository: auto\nDownload](.neuronbot-50-1z334-1000-10/1ca0b358a8ccb3134f10a15afecfc2cf40416bab7df6ffd2b89f129d3a5bf9de.jpg)

3. After downloading the Clonezilla ISO file, load the ISO file onto your USB drive and make it bootable. If you’re unable to do this, we recommend using Rufus instead.

# 7.1.2. Rufus

Rufus is a Windows program for creating bootable USB drives. This section illustrates how to create a bootable Clonezilla USB drive.

# Note:

• Ensure that you have downloaded the Clonezilla ISO before performing the following procedure.
• We recommend using an empty USB drive with at least 32GB of free space. Creating a bootable USB drive erases all data on the drive.

1. Download Rufus from the official website: https://rufus.ie/

2. Start Rufus.

3. Select the USB device and Clonezilla ISO

4. Specify a name for Volume label.

5. Click the START button to load the ISO onto the USB drive.

![Rufus 3.11.1678\nDrive Properties\nDevice\nMY USB DRV (E:) (32 GB)\nBoot selection\nclonezilla-live-2.6.6-15-amd64.iso\nSELECT\nPersistent partition size\n0 (No persistence)\nPartition scheme\nMBR\nTarget system\nBIOS or UEFI\nShow advanced drive properties\nFormat Options\nVolume label\nMyClonezilla\nFile system\nFAT32 (Default)\nCluster size\n16 kilobytes (Default)\nShow advanced format options\nStatus\nREADY\nSTART\nCLOSE\nUsing image: clonezilla-live-2.6.6-15-amd64.iso](.neuronbot-50-1z334-1000-10/2cdc8df39cdfa0dd13bbad00b460b06ee49e8599d0f0cc0003eef8d8e5527d54.jpg)

The ISOHybrid image detected window will appear.

6. Select Write in ISO image mode (Recommended) and click OK.

![ISOHybrid image detected\nThe image you have selected is an 'ISOHybrid' image. This means it can be written\neither in ISO Image (file copy) mode or DD Image (disk image) mode.\nRufus recommends using ISO Image mode, so that you always have full access to\nthe drive after writing it.\nHowever, if you encounter issues during boot, you can try writing this image again in\nDD Image mode.\nPlease select the mode that you want to use to write this image:\nWrite in ISO Image mode (Recommended)\nWrite in DD Image mode\nOK	Cancel](.neuronbot-50-1z334-1000-10/7d897887844cb889361d261a06477f8dbfc066da051a5c1004b6f9a1b3755dcf.jpg)

A warning message will appear to notify you that all data on the USB drive will be erased.

7. Click OK.

![Rufus\nWARNING: ALL DATA ON DEVICE 'MY USB DRV (E:) (32 GB)' WILL\nBE DESTROYED.\nTo continue with this operation, click OK. To quit click CANCEL.\n確定 取消](.neuronbot-50-1z334-1000-10/c881fdd7abb7d3e6eed915e0320559b3e54bce5c7cae38cb015b6d0ae3e94d3b.jpg)

Rufus will being writing to the USB drive.

![Rufus 3.11.1678\nDrive Properties\nDevice\nMY USB DRV (E:) (32 GB)\nBoot selection\nclonezilla-live-2.6.6-15-amd64.iso\nSELECT\nPersistent partition size\n0 (No persistence)\nPartition scheme\nMBR\nTarget system\nBIOS or UEFI\nShow advanced drive properties\nFormat Options\nVolume label\nMyClonezilla\nFile system\nFAT32 (Default)\nCluster size\n16 kilobytes (Default)\nShow advanced format options\nStatus\nCopying ISO files: 2.7%\nSTART	CANCEL\nE:\boot\grub\i386-efi\test.mod (5.2 KB)	00:00:15](.neuronbot-50-1z334-1000-10/c3c459af647d630dd389c3ac6d170f1828d1c92342f85bf704fca41483aeba53.jpg)

When the process is completed, the Status will show READY.

![Rufus 3.11.1678\nDrive Properties\nDevice\nMYCLONEZILL (E:) (32 GB)\nBoot selection\nclonezilla-live-2.6.6-15-amd64.iso\nSELECT\nPersistent partition size\n0 (No persistence)\nPartition scheme\nMBR\nTarget system\nBIOS or UEFI\nShow advanced drive properties\nFormat Options\nVolume label\n2.6.6-15-amd64\nFile system\nFAT32 (Default)\nCluster size\n16 kilobytes (Default)\nShow advanced format options\nStatus\nREADY\nSTART\nCLOSE\n1 device found\n00:00:39](.neuronbot-50-1z334-1000-10/ac78a770bdc4ffd58f2fe04e7fde0b7b440535014caef24af560e43606e36088.jpg)

8. Click CLOSE to exit the program.

The bootable Clonezilla USB drive is now ready. You can use the Clonezilla USB drive to back up and restore the system.

# 7.2. Full Disk Backup

The following steps describe how to create a compressed backup image.

1. Insert the Clonezilla USB drive into the USB port on NeuronBot
2. Power on Neuronbot.
3. When the ADLINK boot logo appears on the screen, press the Delete key a few times. NeuronBot will enter BIOS mode.

4. Go to the Save & Exit tab and select UEFI: &lt;YOUR-CLONEZILLA-USB-DRIVE&gt;.

![Aptio Setup Utility - Copyright (C) 2018 American Megatrends, Inc\nMain Advanced Security Breaks Save & Exit\n\nSave Options\nSave Changes and Exit\nDiscard Changes and Exit\n\nSave Changes and Reset\nDiscard Changes and Reset\n\nSave Changes\nDiscard Changes\n\nDefault Options\nRestore Defaults\nSave as User Defaults\nRestore User Defaults\n\nBoot Override\nUEFI: Built-in EFI Shell\nubuntu (P3: InnoDisk Corp. - mSATA 3ME3)\nubuntu (P3: InnoDisk Corp. - mSATA 3ME3)\nUEFI: ADATA ADATA UFD 1.00, Partition 1\nP3: InnoDisk Corp. - mSATA 3ME3\nADATA ADATA UFD 1.00\n\n++: Select Scr\n1↓: Select Ite\nEnter: Select\n+/-: Change Op\nF1: General He\nF2: Previous V\nF9: Optimized\nF10: Save & Ex\nESC: Exit](.neuronbot-50-1z334-1000-10/2853066e6a46d9e3cacfcb37bfbcaadaa0ce4333849d74ae35e958adc3688de6.jpg)

NeuronBot will boot using the inserted Clonezilla USB drive. The screen will display the Clonezilla GNU GRUB.

5. Select Clonezilla live (To RAM, boot media can be removed later) in the menu that appears.

![GNU GRUB version 2.02+dfsg1-9\nClonezilla live (Default settings, VGA 800x600)\nClonezilla live (Default settings, VGA 1024x768)\nClonezilla live (Default settings, VGA 640x480)\nClonezilla live (Default settings, KNS)\n*Clonezilla live (To RAM, boot media can be removed later)\nClonezilla live (Failsafe mode)\nClonezilla live (speech synthesis)\nLocal operating system (if available)\nIPXE\nFree\nClonezilla National Center for High-Performa](.neuronbot-50-1z334-1000-10/20d6d46b72bb5528b1ec7a5460ca2c251e64a35268b7349ac617670ab8750bda.jpg)

6. Select your language.

![Which language do you prefer:\nca_ES.UTF-8 Catalan | Català\nde_DE.UTF-8 German | Deutsch\nh_US.UTF-8 English\nhu_HU.UTF-8 Hungarian | Magyar\nes_ES.UTF-8 Spanish | Español\nfr_FR.UTF-8 French | Français\nit_IT.UTF-8 Italian | Italiano\nja_JP.UTF-8 Japanese | 日本語\npl_PL.UTF-8 Polish | Polski\npt_BR.UTF-8 Brazilian Portuguese | Português do Brasil\nru_RU.UTF-8 Russian | Русский\nsk_SK.UTF-8 Slovak | Slovenský\ntr_TR.UTF-8 Turkish | Türkçe\nzh_CN.UTF-8 Chinese (Simplified) | 简体中文\nzh_TW.UTF-8 Chinese (Traditional) | 正體中文 - 臺灣\n(Ok)](.neuronbot-50-1z334-1000-10/90b0f05b5b5c2e1cc440177a598fd98806fdf3f6a4bd11fdd81e95de70def9de.jpg)

7. Select Start\_Clonezilla.

![Start Clonezilla\nStart Clonezilla or enter login shell (command line)?\nSelect mode:\nStart_Clonezilla Start Clonezilla\nEnter_shell Enter command line prompt\n(OK) (Cancel)](.neuronbot-50-1z334-1000-10/d81a516bb85b1114161197717cf1f1e3617a8361962e9378304886ea260defaf.jpg)

8. Select device-image (for creating a backup image).

Tip: Use the arrow keys to change options and press the spacebar to confirm your selection.

![*Clonezilla is free (GPL) software, and comes with ABSOLUTELY NO WARRANTY* \n///Hint! From now on, if multiple choices are available, you have to press space key to mark your selection. An asterisk (*)\nwill be shown when the selection is done/// \nTwo modes are available, you can \n(1) clone/restore a disk or partition using an image \n(2) disk to disk or partition to partition clone/restore.\nBesides, Clonezilla lite server and client modes are also available. You can use them for massive deployment\nSelect mode:\ndevice-image work with disks or partitions using images\ndevice-device work directly from a disk or partition to a disk or partition\nremote-source Enter source mode of remote device cloning\nremote-dest Enter destination mode of remote device cloning\nlite-server Enter_Clonezilla_live_lite_server\nlite-client Enter_Clonezilla_live_lite_client\n(OK) (Cancel)](.neuronbot-50-1z334-1000-10/c8a0adac9795c7fd4ab8278ade75ddf79ce5bd8d1f37390e97448d069f13c3e5.jpg)

9. Select local\_dev (to store the image on the USB drive).

![Mount Clonezilla image directory\nBefore cloning, you have to assign where the Clonezilla image will be saved to or read from. We will mount that device or\nremote resources as /home/partimag. The Clonezilla image will be saved to or read from /home/partimag.\nSelect mode:\nlocal_dev Use local device (E.g.: hard drive, USB drive)\nssh_server Use SSH server\nsamba_server Use SAMBA server (Network Neighborhood server)\nnfs_server Use NFS server\nwebdav_server Use_NebDAV_server\ns3_server Use_AWS_S3_server\nswift_server Use_OpenStack_swift_server\nenter_shell Enter command line prompt. Do it manually\nskip Use existing /home/partimag (Memory! *NOT RECOMMENDED*)\n(Ok) (Cancel)](.neuronbot-50-1z334-1000-10/049d3dd3e600e4deacf4a15b2ffa38d7aca4c8f0473ea70b4603f0b9447dade5.jpg)

10. (Optional) Insert another USB drive to store the image. To save the image onto the same USB drive as Clonezilla, press Ctrl-C.

![ASUS\nevery 3.US: ocs-scan-disk\ndevian: Sat Jun 20 18:5\n2020/06/20 18:52:36\nYou can insert storage device into this machine now if you want to use that, then wait for it to be detected.\nScanning devices... Available disk(s) on this machine:\n====================\nExcluding busy partition or disk...\n/dev/sda: InnoDisk_Corp._- InnoDisk_Corp._-_mSATA_3ME3_20190121AA10026B30C4 64.0GB\n/dev/sdb: ADATA_UFD_ ADATA_ADATA_UFD_F460314280001716-0:0 16.6GB\n/dev/sdc: USB_Flash_Drive_ ADATA_USB_Flash_Drive_28A0320130020063-0:0 31.0GB\n====================\nUpdate periodically. Press Ctrl-C to exit this window.](.neuronbot-50-1z334-1000-10/69880618af258d0c96d3e98e405f52d3695521c86770d7e0569f5141e8f09132.jpg)

11. Select the disk where you want to store the image.

Tip: You can use the Clonezilla USB drive if it has enough free space.

![Clonezilla - Opensource Clone System (OCS) | Mode:\nNow we need to mount a device as /home/partimag (Clonezilla image(s) repository) so that we can read or save the image in\n/home/partimag.\n///NOTE/// You should NOT mount the partition you want to backup as /home/partimag\nThe partition name is the device name in GNU/Linux. The first partition in the first disk is 'hda1' or 'sda1', the 2nd\npartition in the first disk is 'hda2' or 'sda2', the first partition in the second disk is 'hdb1' or 'sdb1'... If the system\nyou want to save is MS windows, normally C: is hda1 (for PATA) or sda1 (for PATA, SATA or SCSI), and D: could be hda2 (or\nsda2), hda5 (or sda5)...\nsda1 512M_vfat_NO_NAME(In_InnoDisk_Corp._)-InnoDisk_Corp._-mSATA_3ME3_20190121AA10026B30C4\nsda2 51.3G_ext4(In_InnoDisk_Corp._)-InnoDisk_Corp._-mSATA_3ME3_20190121AA10026B30C4\nsdb1 15.4G_vfat_0x41: Dirty (In_ADATA_UFD_) ADATA_ADATA_UFD_F460314280001716-0:0\nsdc1 28.9G_vfat_0x41: Dirty (In_USB_Flash_Drive_) ADATA_USB_Flash_Drive_28A0320130020063-0:0\n(OK)\n(Cancel)](.neuronbot-50-1z334-1000-10/2b1d32adb817e69d538715765eb41f4b59b2b048e2dc2c0e5d735cc6cb098ca9.jpg)

The files on the disk will display to indicate that you selected the correct disk.

12. Press the right arrow key to highlight &lt;Done&gt;, and then press the spacebar to confirm.

![Directory Browser for Clonezilla image repository\nWhich directory is for the Clonezilla image repository? (If there is a space in the directory name, it will _NOT_ be shown)\nWhen the 'Current selected dir name' is what you want, use 'Tab' key to choose 'Done'\n//NOTE// You should not choose the directory tagged with CZ_IMG. They are just for you to know the images list in the\ncurrent dir.\nPath on the resource: /dev/sdc1(/)\nCurrent selected dir name: '/'\nbackup\nboot\nbsp\ndataset\nDDS\nefi\ngigabyte_bios\nimages\nintel\nperformance_test\nROScube-I_old\nslides\nsupport\n2019-12-02-NeuronBot-1804Dec_2_CZ_IMG\n2020-06-08-01-NB2-bak-imgJun_8_CZ_IMG\n(ABORT)\n(Browse)\n(sub)Jun_iu(/sub)\n(sub)Jul_20(/sub)\n(sub)Nov_15(/sub)\n(sub)Mar_3_NO_SUBDIR(/sub)\n(sub)Mar_4(/sub)\n(sub)Jul_20(/sub)\n(sub)Jun_2_NO_SUBDIR(/sub)\n(sub)Mar_25_NO_SUBDIR(/sub)\n(sub)Dec_1_NO_SUBDIR(/sub)\n(sub)Jan_8(/sub)\n(sub)Feb_27(/sub)\n(sub)Mar_17_NO_SUBDIR(/sub)\n(sub)Jul_20(/sub)\nExit_directory_browsing\n(Done)](.neuronbot-50-1z334-1000-10/c43503a4ae6df587ae92dc40b60ed101204c6706cd213a4f75159c2945faa71a.jpg)

13. Select Beginner (to use default options).

![Clonezilla - Opensource Clone System (OCS)\nChoose the mode to run the following wizard about advanced parameters:\nBeginner Beginner mode: Accept the default options\nExpert    Expert mode: Choose your own options\nExit    Exit. Enter command line prompt\n(Ok)    (Cancel)](.neuronbot-50-1z334-1000-10/a1baef4a10afe7a23cf5e762a81ce6863005a6b27f22a58423c2c4f368b1a6e0.jpg)

14. Select savedisk (to back up the entire disk).

![Clonezilla - Opensource Clone System (OCS): Select mode\n*Clonezilla is free (GPL) software, and comes with ABSOLUTELY NO WARRANTY*\nThis software will overwrite the data on your hard drive when restoring! It is recommended to backup important files\nbefore restoring!***\n///Hint! From now on, if multiple choices are available, you have to press space key to mark your selection. An\nasterisk (*) will be shown when the selection is done///\n\nsavedisk Save_local_disk_as_an_image\nsaveparts Save_local_partitions_as_an_image\nexit Exit. Enter command line prompt\n\n(0k)\n(Cancel)](.neuronbot-50-1z334-1000-10/54f8139ce13ab3ded74fcdfad0788b9b0e2c53c16649d8aa8ffd111b5fd3c65a.jpg)

15. Specify a name for the image file.

![Clonezilla - Opensource Clone System (OCS) | Mode: savedisk\nInput a name for the saved image to use\n2020-06-29-NeuronBot-backup\n(Ok)\n(Cancel)](.neuronbot-50-1z334-1000-10/a0cd8b5e4e1e7f61dbbab8a05bec8993fca2ba80fd538e0541e91475164a1f7f.jpg)

16. Select the disk where you want to save the image file.

![Clonezilla - Opensource Clone System (DCS) | Mode: savedisk\nChoose local disk as source.\nThe disk name is the device name in GNU/Linux. The first disk in the system is 'hda' or 'sda', the 2nd disk is 'hdb'\nor 'sdb'... Press space key to mark your selection. An asterisk (*) will be shown when the selection is done\n(×) sda 256GB_InnoDisk_Corp._-_InnoDisk_Corp._-_mSATA_3ME3_BCA11901220800009\n( ) sdb 31.0GB_USB_Flash_Drive__ADATA_USB_Flash_Drive_28A0320130020063-0:0\n(Ok)\n(Cancel)](.neuronbot-50-1z334-1000-10/4719c4d95b63f6e80494cd3c461d0c76408329bf24ceb9bf4992df8ff5cabaa5.jpg)

17. Select the default compression option.

![Clonezilla advanced extra parameters | Mode: savedisk\nChoose the compression option. If you have no idea keep the default value and do NOT change anything.\n-z1p Use parallel gzip compression, for multicore/CPU\n-z9p zstdmt_compression_(Very_fast_and_small_image_like_gzip,_for_multicore/CPU)\n(Ok)\n(Cancel)](.neuronbot-50-1z334-1000-10/638eb9c58ada13041718ec06e15892ac92f771217093f95bd4f8416a01bd9b3b.jpg)

18. Select -sfsck to skip checking the file system.

Note: If you want to check the file system, select -fsck.

![Clonezilla advanced extra parameters | Mode: savedisk\nChoose if you want to check and repair the file system before saving it. This option is only for certain file systems which are well supported by fsck on GNU/Linux, like ext2/3/4, reiserfs, xfs, jfs, vfat. Not for NTFS.\n-sfsck Skip checking/repairing source file system\n-fsck Interactively check and repair source file system before saving\n-fsck-y Auto (Caution!) check and repair source file system before saving\n(0k)\n(Cancel)](.neuronbot-50-1z334-1000-10/5d7a0861998f70ee18aa16df8a505b24261f3355b410d5739c04d67a88133697.jpg)

19. Select Yes to check whether the saved image is restorable.

![Clonezilla advanced extra parameters | Mode: savedisk\nAfter the image is saved, do you want to check if the image is restorable? ///NOTE/// This action will only check\nthe image is restorable, and it will not write any data to the harddrive.\nYes, check the saved image\n-scs No, skip checking the saved image\n(0k)\n(Cancel)](.neuronbot-50-1z334-1000-10/ea6ebd6ce9ac93c04a04d8da24e0f45b64844c6dde93e0fd806f538a00d707d8.jpg)

20. Select reboot.

![The action to perform when everything is finished:\n-p choose Choose reboot/shutdown/etc when everything is finished\n-p cmd Enter command line prompt\n-p reboot Reboot\n-p poweroff Shutdown\n(0k) (Cancel)](.neuronbot-50-1z334-1000-10/c1dbcc80ba9c8fff91672ccfd503e3e01764a2f855354764c0c8538fa7cbab30.jpg)

# 21. Select -senc to skip image encryption.

![Clonezilla advanced extra parameters | Mode: savedisk\nDo you want to encrypt the image?\nIf yes, eCryptfs program will be used to encrypt the image. It uses industry-standard cryptographic ciphers, key generation, and passphrase protection mechanisms. Without your salt/passphrase or private key, nobody will be able to retrieve your data.\n//NOTE// You have to remember the passphrase, otherwise the image will _NOT_ be usable in the future.\n-senc Not to encrypt the image\n-enc Encrypt the image\n(Ok)\n(Cancel)](.neuronbot-50-1z334-1000-10/b39db7c78f82263daa0c672f9a6154cc3be4f43ed87e2e08ebf56b2ba4b436a4.jpg)

# 22. Press y to confirm savedisk.

![**********************************************************************\nPS. Next time you can run this command directly:\n/usr/sbin/ocs-sr -q2 -c -j2 -z1p -i 4096 -sfsck -senc -p reboot savedisk 2020-06-29-NeuronBot-backup sda\nThis command is also saved as this file name for later use if necessary: /tmp/ocs-2020-06-29-NeuronBot-backup-28\n-02-38\n**********************************************************************\nPress 'Enter' to continue...\nActivating the partition info in /proc... done!\nSelected device (sda) found!\nThe selected devices: sda\nSearching for data/swap/extended partition(s)...\nExcluding busy partition or disk...\nUnmounted partitions (including extended or swap): sda1\nCollecting info.. done!\nThe data partition to be saved: sda1\nActivating the partition info in /proc... done!\nSelected device (sda1) found!\nThe selected devices: sda1\nGetting /dev/sda1 info...\n**********************************************************************\nThe following step is to save the hard disk/partition(s) on this machine as an image:\n**********************************************************************\nMachine: AmITX-SL-G\nsda (256GB_InnoDisk_Corp,_-_InnoDisk_Corp,_-_mSATA_3ME3_BCA11901220800009)\nsda1 (238.5G_ext4(In_InnoDisk_Corp,_-_InnoDisk_Corp,_-_mSATA_3ME3_BCA11901220800009)\n**********************************************************************\n-) '/home/partimag/2020-06-29-NeuronBot-backup'.\nAre you sure you want to continue (y/n)](.neuronbot-50-1z334-1000-10/4037e6b71c0547abb4f57420ad0857f2b1bd8fe9fb122a5bc0ec51995dd67596.jpg)

Clonezilla will back up the disk backup to an image file. Please wait while the disk is backed up.

![| Metric | Value (%) |\n| :--- | :--- |\n| Partclone v0.3.13 http://partclone.org |  |\n| Starting to clone device (/dev/sda1) to image (-) | |\n| Reading Super Block | |\n| Calculating bitmap... Please wait... | |\n| done! | |\n| File system: EXTFS | |\n| Device size: 255.1 GB = 62514432 Blocks | |\n| Space in use: 24.9 GB = 6089236 Blocks | |\n| Free Space: 231.1 GB = 56425196 Blocks | |\n| Block size: 4096 Byte | |\n| Elapsed: 00:01:46 Remaining: 00:04:09 Rate: 4.21GB/min | |\n| Current Block: 2347008 Total Block: 62514432 | |\n| Data Block Process: | 29.83% |\n| Total Block Process: | 3.75% |](.neuronbot-50-1z334-1000-10/a4eb2be041a9b5058ad6817b94fa04773ba67de37dee28a130d1dbe61fdcd24a.jpg)

# 7.3. Full Disk Restoration

Restoring the system from a backup image is similar to the Full Disk Backup process. The following instructions contain only the steps that differ from the backup process.

1. Select the disk where the image is saved.

![Clonezilla - Opensource Clone System (OCS) | Mode:\nNow we need to mount a device as /home/partimag (Clonezilla image(s) repository) so that we can read or save the image in\n/home/partimag.\n///NOTE/// You should NOT mount the partition you want to backup as /home/partimag\nThe partition name is the device name in GNU/Linux. The first partition in the first disk is 'hda1' or 'sda1', the 2nd\npartition in the first disk is 'hda2' or 'sda2', the first partition in the second disk is 'hdb1' or 'sdb1'... If the system\nyou want to save is MS windows, normally C: is hda1 (for PATA) or sda1 (for PATA, SATA or SCSI), and D: could be hda2 (or\nsda2), hda5 (or sda5)...\nsda1 512M_vfat_NO_NAME(In_InnoDisk_Corp._)-InnoDisk_Corp._-mSATA_3ME3_20190121AA10026B30C4\nsda2 51.3G_ext4(In_InnoDisk_Corp._)-InnoDisk_Corp._-mSATA_3ME3_20190121AA10026B30C4\nsdb1 15.4G_vfat_0x41: Dirty (In_ADATA_UFD_) ADATA ADATA_UFD_F460314280001716-0:0\nsdc1 28.9G_vfat_0x41: Dirty (In_USB Flash_Drive_) ADATA_USB Flash_Drive_28A0320130020063-0:0\n(Ok)\n(Cancel)](.neuronbot-50-1z334-1000-10/9122fbaee29827c5ea2a7f0cb69fb31769f81b6e763c81a434639254c299ac94.jpg)

2. Select restoredisk to restore the system.

![Clonezilla - Opensource Clone System (OCS): Select mode\n*Clonezilla is free (GPL) software, and comes with ABSOLUTELY NO WARRANTY*\nThis software will overwrite the data on your hard drive when restoring! It is recommended to backup important files before restoring!**\n///Hint! From now on, if multiple choices are available, you have to press space key to mark your selection. An asterisk (*) will be shown when the selection is done///\n\nsavedisk Save_local_disk_as_an_image\nsaveparts Save_local_partitions_as_an_image\nrestoredisk Restore_an_image_to_local_disk\n\nrestoreparts Restore_an_image_to_local_partitions\n1-2-mdisks Restore_an_image_to_multiple_local_discs\nrecovery-iso-zip Create_recovery_Clonezilla_live\nchk-img-restorable Check_the_image_restorable_or_not\ncvt-img-compression Convert_image_compression_format_as_another_image\nencrypt-img Encrypt_an_existing_unencrypted_image\ndecrypt-img Decrypt_an_existing_encrypted_image\nexit Exit. Enter command line prompt\n\n(0k) (Cancel)](.neuronbot-50-1z334-1000-10/067614651727d2d29501caed3e3e18cc4ff7e790381aabd365027700e523e097.jpg)

3. Select the image source.

![Clonezilla - Opensource Clone System (OCS) | Mode: restoredisk\nChoose the image file to restore:\n2019-12-02-NeuronBot-1804 2019-1202-0403_sda_64.0GB\n2020-06-08-01-NB2-bak-img 2020-0608-0153_sda_120GB\n(OK)\n(Cancel)](.neuronbot-50-1z334-1000-10/c35a8d182e25ef7a2a6c71820d9eec264a51168bb1d1f26a77165ea64fa003a1.jpg)

4. Select the target disk to be restored.

![Clonezilla - Opensource Clone System (OCS) | Mode: restoredisk\nChoose the target disk(s) to be overwritten (ALL DATA ON THE ENTIRE DISK WILL BE LOST AND REPLACED!!)\nThe disk name is the device name in GNU/Linux. The first disk in the system is 'hda' or 'sda', the 2nd disk is 'hdb' or\n'sdb'... Press space key to mark your selection. An asterisk (*) will be shown when the selection is done\nsda 64.0GB_InnoDisk_Corp._InnoDisk_Corp._mSATA_3ME3_20190121AA10025B30C4\nsdb 16.5GB_ADATA_UFD__ADATA_ADATA_UFD_F460314280001716-0:0\n(OK)\n(Cancel)](.neuronbot-50-1z334-1000-10/7736a90ed1f09611cf8a9bc213e1daa984b00f7f1c18a0035850bba3791b9cb3.jpg)

5. Select Yes to check the image before restoring (recommended if the image has not been used for a long time); otherwise, choose No to skip the check.

![Clonezilla advanced extra parameters | Mode: restoredisk\nBefore restoring the image, do you want to check if the image is restorable or not? ///NOTE/// This action will only check\nthe image is restorable or not, and it will not write any data to the harddrive.\nYes, check the image before restoring\n-scr No, skip checking the image before restoring\n(Ok)\n(Cancel)](.neuronbot-50-1z334-1000-10/7662150d239279a4be6a002453e0d5ef0955ca0e55924e9a09baff54dedcc7bc.jpg)

Clonezilla will ask you to confirm (the disk to be restored will be erased).

![PS. Next time you can run this command directly:\nAusr/sbin/ocs-sr -g auto -e1 auto -e2 -r -j2 -c -scr -p reboot restoredisk 2019-12-02-NeuronBot-1804 sda\nThis command is also saved as this file name for later use if necessary: /tmp/ocs-2019-12-02-NeuronBot-1804-2020-06-20-18-56\n**********************************************************************\nPress 'Enter' to continue...\nActivating the partition info in /proc... done!\nGetting /dev/sda1 info...\nGetting /dev/sda2 info...\nGetting /dev/sda3 info...\n**********************************************************************\nThe following step is to restore an image to the hard disk/partition(s) on this machine: '/home/partimag/2019-12-02-NeuronBot-18\n04' -) 'sda sda1 sda3'\nThe image was created at: 2019-1202-0403\nWARNING!!! WARNING!!! WARNING!!!\nWARNING. THE EXISTING DATA IN THIS HARODISK/PARTITION(S) WILL BE OVERWRITTEN! ALL EXISTING DATA WILL BE LOST:\n**********************************************************************\nMachine: AmITX-SL-G\nsda (64.0GB_InnoDisk_Corp._InnoDisk_Corp._mSATA_3ME3_20190121AA10026B30C4)\nsda1 (512N_vfat_NO_NAME(In_InnoDisk_Corp._InnoDisk_Corp._mSATA_3ME3_20190121AA10026B30C4)\nsda2 (51.3G_ext4(In_InnoDisk_Corp._InnoDisk_Corp._mSATA_3ME3_20190121AA10026B30C4)\n**********************************************************************\nAre you sure you want to continue? (y/n) y\nOK, let's do it!!\nThis program is not started by clonezilla server.\n**********************************************************************\nLet me ask you again.\nThe following step is to restore an image to the hard disk/partition(s) on this machine: '/home/partimag/2019-12-02-NeuronBot-18\n04' -) 'sda sda1 sda3'\nThe image was created at: 2019-1202-0403\nWARNING!!! WARNING!!! WARNING!!!\nWARNING. THE EXISTING DATA IN THIS HARODISK/PARTition(S) WILL BE OVERWRITTEN! ALL EXISTING DATA WILL BE LOST:\n**********************************************************************\nMachine: AmITX-SL-G\nsda (64.0GB_InnoDisk_Corp._InnoDisk_Corp._mSATA_3ME3_20190121AA10026B30C4)\nsda1 (512N_vfat_NO_NAME(In_InnoDisk_Corp._Inno Disk_Corp._mSATA_3ME3_20190121AA10026B30C4)\nsda2 (51.3G_ext4(In_InnoDisk_Corp._InnoDisk_Corp._mSATA_3ME3_20190121AA10026B30C4)\n**********************************************************************\nAre you sure you want to continue? (y/n) y](.neuronbot-50-1z334-1000-10/4cc1504010fe92f44fd762891375f6677fe0c68d8ed92971ae0afdabfba39d6e.jpg)

6. Type y and press Enter to confirm.

Clonezilla will restore the disk from the backup image. Please wait while the disk is restored.

![Partclone\nPartclone v0.3.12 http://partclone.org\nStarting to restore image (-) to device (/dev/sda3)\nCalculating bitmap... Please wait...\ndone!\nFile system: EXTFS\nDevice size: 55.7 GB = 13604352 Blocks\nSpace in use: 26.6 GB = 6493842 Blocks\nFree Space: 29.1 GB = 7110510 Blocks\nBlock size: 4096 Byte\n\nElapsed: 00:05:16 Remaining: 00:00:06 Rate: 4.95GB/min\nCurrent Block: 13439573 Total Block: 13604352\n\nData Block Process:\n98.00%\nTotal Block Process:\n98.79%](.neuronbot-50-1z334-1000-10/4fe73b04cf6f18ceef8781abf9ae11850680c8d953762bfe4e5b4b444b0f4916.jpg)

# 8. Safety Instructions

For user safety, please read and follow all instructions marked on the product and documentation before handling/operating the device. Please retain all safety and operating instructions for future reference.

Read these safety instructions carefully
Keep this User‘s Manual for future reference
Read the Specifications section of this manual for detailed information on the recommend operating environment for this equipment.
• When installing/mounting or uninstalling/removing equipment, turn off the power and unplug any power cords/cables.
• To avoid electrical shock and/or damage to equipment:

o Keep equipment away from water or liquid sources.
o Keep equipment away from high heat or high humidity.
o Keep equipment properly ventilated (do not block or cover ventilation openings).
o Make sure to use recommended voltage and power source settings.
o Always install and operate equipment near an easily accessible electrical socket-outlet.
o Secure the power cord (do not place any object on/over the power cord).
o Only install/attach and operate equipment on stable surfaces and/or recommended mountings.
o If the equipment will not be used for long periods of time, turn off and unplug the equipment from its power source.

• Never attempt to fix the equipment. Equipment should only be serviced by qualified personnel.

# 9. Getting Service

Ask an Expert: http://askanexpert.adlinktech.com

# ADLINK Technology, Inc.

<table><tr><td>Address:</td><td>9F, No.166 Jian Yi Road, Zhonghe District New Taipei City 235, Taiwan</td></tr><tr><td>Tel:</td><td>+886-2-8226-5877</td></tr><tr><td>Fax:</td><td>+886-2-8226-5717</td></tr><tr><td>Email:</td><td>service@adlinktech.com</td></tr></table>

# Ampro ADLINK Technology, Inc.

Address: 5215 Hellyer Avenue, #110, San Jose, CA 95138, USA

Tel: +1-408-360-0200

Toll Free: +1-800-966-5200 (USA only)

Fax: +1-408-360-0222

Email: info@adlinktech.com

# ADLINK Technology (China) Co., Ltd.

Address: 300 Fang Chun Rd., Zhangjiang Hi-Tech Park, Pudong New Area Shanghai, 201203 China

Tel: +86-21-5132-8988

Fax: +86-21-5132-3588

Email: market@adlinktech.com

# ADLINK Technology GmbH

Hans-Thoma-Straße 11

D-68163 Mannheim, Germany

Tel: +49-621-43214-0

Fax: +49-621 43214-30

Email: germany@adlinktech.com

Please visit the Contact page at www.adlinktech.com for information on how to contact the ADLINK regional office nearest you.
[🔗 Link to the original document](.neuronbot-50-1z334-1000-10/neuronbot-50-1z334-1000-10.pdf)