# EGX-TBT-A500

# Pocket AI Portable GPU User’s Manual

![Exterior view of a black and white electronic device labeled 'POCKET IIIAI' with visible ports and branding (no readable text beyond branding)](.pocket-ai-user-manual-202307/3635083fae93db5cf2da6b32c7e1a727ed12b6677c1f14804c0650dcec148095.jpg)

Manual Rev.: 1.0

Revision Date: July 13, 2023

Part No: 50M-7C007-1000

Revision History

<table><tr><td>Revision</td><td>Release Date</td><td>Description of Change(s)</td></tr><tr><td>1.0</td><td>2023-07-13</td><td>Initial Release</td></tr></table>

# Preface

# Copyright © 2023 ADLINK Technology Inc.

This document contains proprietary information protected by copyright. All rights are reserved. No part of this manual may be reproduced by any mechanical, electronic, or other means in any form without prior written permission of the manufacturer.

# Disclaimer

The information in this document is subject to change without prior notice in order to improve reliability, design, and function and does not represent a commitment on the part of the manufacturer.

In no event will the manufacturer be liable for direct, indirect, special, incidental, or consequential damages arising out of the use or inability to use the product or documentation, even if advised of the possibility of such damages.

# Environmental Responsibility

ADLINK is committed to fulfill its social responsibility to global environmental preservation through compliance with the European Union's Restriction of Hazardous Substances (RoHS) directive and Waste Electrical and Electronic Equipment (WEEE) directive. Environmental protection is a top priority for ADLINK. We have enforced measures to ensure that our products, manufacturing processes, components, and raw materials have as little impact on the environment as possible. When products are at their end of life, our customers are encouraged to dispose of them in accordance with the product disposal and/or recovery programs prescribed by their nation or company.

![Symbol of a trash bin crossed out by two diagonal lines (no text or numbers present)](.pocket-ai-user-manual-202307/bfeb715942d1d8111901ed19f7ed5ac3491f3c7b098a2605b64b976078503753.jpg)

![The image is a black rectangle framed by white horizontal lines at the top and bottom. Inside the black area, white text at the bottom reads: 'This is not a valid image.'](.pocket-ai-user-manual-202307/cf2ee264821cf4b7c3f9fbf8ee7af8c570e1e77cf14a393eb20915957cca0445.jpg)

Battery Labels (for products with battery)
![The image displays four black-and-white symbols related to battery disposal and recycling, arranged horizontally from left to right:\n\n1.  A wheeled trash bin crossed out with a large 'X'.\n2.  A square outline containing the standard recycling arrows symbol, with the text '**Li-ion**' below it.\n3.  A circular logo containing the word '**RECYCLE**' in an arc at the top, '**RBRC**' in the center above a small battery icon, '**Li-ion**' below the icon, and the phone number '**1.800.822.8837**' along the bottom curve.\n4.  A square symbol containing an abstract geometric design of four arrows pointing inward, with the text '**廃電池請回收**' below it.](.pocket-ai-user-manual-202307/da49a5c5d97ec10f491eb162e1d46a321e2d14a4a7bcea299191c8f8cd7ac879.jpg)

# California Proposition 65 Warning

![A yellow triangular warning sign with a black border containing a black exclamation mark in the center.](.pocket-ai-user-manual-202307/b1837b804f9f06bd5241f20414305664db0c99d23f6993f17fa1cf55719f466c.jpg)

WARNING: This product can expose you to chemicals including acrylamide, arsenic, benzene, cadmium, Tris(1,3-dichloro-2-propyl) phosphate (TDCPP), 1,4- Dioxane, formaldehyde, lead, DEHP, styrene, DINP, BBP, PVC, and vinyl materials, which are known to the State of California to cause cancer, and acrylamide, benzene, cadmium, lead, mercury, phthalates, toluene, DEHP, DIDP, DnHP, DBP, BBP, PVC, and vinyl materials, which are known to the State of California to cause birth defects or other reproductive harm. For more information go to www.P65Warnings.ca.gov.

# Trademarks

Product names mentioned herein are used for identification purposes only and may be trademarks and/or registered trademarks of their respective companies.

# Conventions

Take note of the following conventions used throughout this manual to make sure that users perform certain tasks and instructions properly.

![The image displays a white document icon featuring a folded upper-left corner and faint horizontal lines. A large, bold red checkmark is drawn diagonally across the document.](.pocket-ai-user-manual-202307/abedb7b85c44acd6e068000e6b8f237d9e2b0d45470c76deed8ac792ba826fdd.jpg)
NOTE:

Additional information, aids, and tips that help users perform tasks.

![The image displays a yellow triangular warning sign with a black border. Centered inside the triangle is a large black exclamation point.](.pocket-ai-user-manual-202307/2eab9aea9acd149274cf58d5015115c444d52dbe0655c559ffb49800d1486e4b.jpg)
CAUTION:

Information to prevent minor physical injury, component damage, data loss, and/or program corruption when trying to complete a task.

![The image displays a red triangular warning sign with a thin white border. Inside the triangle, centered, is a large white exclamation point. The background outside the triangle is white.](.pocket-ai-user-manual-202307/ce7ac8d8dc1b86edcace1e5c5a19e4a20d7149c2c8daba5b19f3492e7befbae8.jpg)
WARNING:

Information to prevent serious physical injury, component damage, data loss, and/or program corruption when trying to complete a specific task.

# Table of Contents

# Revision History........... ii

# Preface ............ iii

# List of Tables......... ... vii

# List of Figures ........ ix

# 1 About your Pocket AI......

1.1 Overview..... 1
1.2 Features.... 2
1.3 Specifications..... 3

1.3.1 Graphics Module . . 3
1.3.2 Software Support.. 3

1.4 Mechanical Layout.. 4
1.5 Pocket AI Ports .... 6
1.6 Thermal Policy ....... 7
1.7 Unpacking Checklist .. 7

# 2 System Requirements........ 9

2.1 Connecting your Pocket AI . 9
2.2 Windows Driver Installation .... 10
2.3 Verifying Windows Driver Installation ..... 13
2.4 Linux Driver Installation . 15
2.5 Verifying Linux Driver Installation . 18
2.6 Certifications & Agencies..... 20

# Important Safety Instructions ....... .. 21

# Getting Service.......... . 23

This page intentionally left blank.

# List of Tables

Table 1-1: Pocket AI Ventilation . 5
Table 1-2: Pocket AI IO .. . 6
Table 1-3: Thermal Policy.....

This page intentionally left blank.

# List of Figures

Figure 1-1: EGX-TBT-A500 Top View .. 4

Figure 1-2: EGX-TBT-A500 Front View . 4

Figure 1-3: EGX-TBT-A500 Bottom and Back Views .......... .. 5

Figure 1-4: Pocket AI ports .. . 6

Figure 2-1: Connecting Pocket AI to power .. . 9

Figure 2-2: Connecting Pocket AI to your computer .... . 9

Figure 2-3: Opening Device Manager.. . 10

Figure 2-4: Checking Device Manager . . 10

Figure 2-5: Agreeing to the license ... .. 11

Figure 2-6: Choosing Installation type . 11

Figure 2-7: Closing the installer .. . 12

Figure 2-8: Opening Device Manager.. . 13

Figure 2-9: Locating Pocket AI in Device Manager.. . 13

Figure 2-10: Opening command prompt as an administrator ....... 14

Figure 2-11: Running NVIDIA Software Management Interface... 14

Figure 2-12: GRUB Bootloader Configuration File... . 15

Figure 2-13: Modifying the GRUB Bootloader Configuration........ 16

Figure 2-14: Adding NVIDIA Driver Repository....... .. 17

Figure 2-15: Accessing the Ubuntu Thunderbolt Settings Menu .. 18

Figure 2-16: Running NVIDIA Software Management Interface... 19

Figure 2-17: Verifying nvidia Module .. . 19

This page intentionally left blank.

# 1 About your Pocket AI

# 1.1 Overview

Pocket AI is an external graphic processing unit (eGPU) with a Thunderbolt 3 interface and powered by an external USB-PD adapter. The device is designed to enhance the processing capability of existing computers, allowing users to develop AI applications or use graphics-intensive rendering without having to replace their hardware.

The EGX-TBT-A500 is equipped with the latest Ampere GPU architecture using the 7 nanometer (nm) chip process, third generation Tensor Cores with structural sparsity to improve AI performance. With its 2048 CUDA core Ampere GPU and Thunderbolt Interface, the EGX-TBT-A500 supports numerous existing computers, delivering the latest leading-edge GPU performance for your system and enabling AI capabilities.

# 1.2 Features

 External Thunderbolt™ 3 GPU
 2048 CUDA cores
 9.3 TFLOPS SP peak performance
 4 GB GDDR6 memory
 Thunderbolt™ 3
 1 year standard warranty, extendable to 1.5 years with optional registration
 NVIDIA RTX A500 GPU

 Base Clock @435 MHz
 Boost Clock @1335 MHz

# 1.3 Specifications

# 1.3.1 Graphics Module

<table><tr><td colspan="2">Graphics Core</td></tr><tr><td>Architecture</td><td>NVIDIA® Ampere GA107</td></tr><tr><td>GPU</td><td>RTX A500</td></tr><tr><td>Signal Interface</td><td>ThunderboltTM 3 (PCI Express 3.0 x 4)</td></tr><tr><td colspan="2">GPGPU Computing</td></tr><tr><td>CUDA Support</td><td>2048 CUDA cores, 9.3 TFLOPS FP32 Performance CUDA Toolkit 8.6, OpenCLTM 3.0, DirectX® 12.2 OpenGL 4.6, Vulkan 1.3 and above</td></tr><tr><td colspan="2">Memory</td></tr><tr><td>GDDR6 Memory</td><td>4GB</td></tr><tr><td>Bandwidth</td><td>64-bit96 GB/s data rate</td></tr><tr><td colspan="2">Status LED</td></tr><tr><td>Color</td><td>Green: NormalRed: Abnormal</td></tr><tr><td colspan="2">Physical</td></tr><tr><td>Dimensions w/case</td><td>110 mm x 76 mm x 32 mm</td></tr><tr><td>Dimensions w/o case</td><td>106 mm x 72 mm x 25 mm</td></tr><tr><td colspan="2">Environmental</td></tr><tr><td>Operating Temp.</td><td>0 to 40°C</td></tr><tr><td>Storage Temp.</td><td>-40°C to 85°C</td></tr><tr><td colspan="2">Operating Systems</td></tr><tr><td>Supported OS</td><td>Windows 10, Windows 11 &amp; Linux Drivers, 64-bit</td></tr></table>

# 1.3.2 Software Support

 CUDA Toolkit 8.6 and higher
 OpenCL™ 3.0
 DirectX® 12.2
 OpenGL 4.6
 Vulkan 1.3

# 1.4 Mechanical Layout

![An icon depicting a white document with a folded top-right corner and faint horizontal lines, overlaid with a large red checkmark.](.pocket-ai-user-manual-202307/bb8285218d8bcd692151bbc5d514594d5483d584e7dda53123a3ef91fb0339fa.jpg)
NOTE:

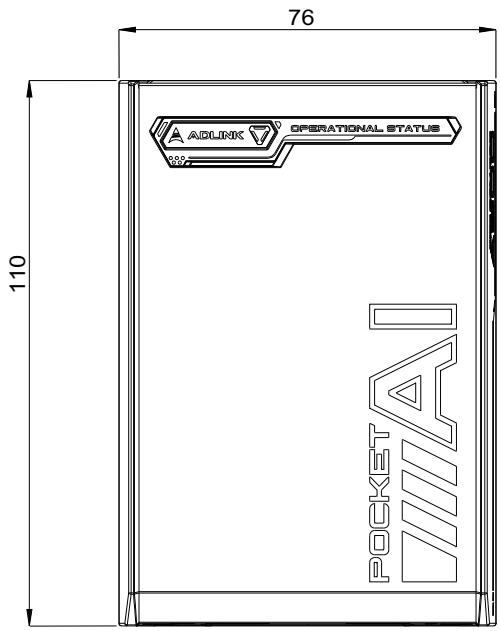
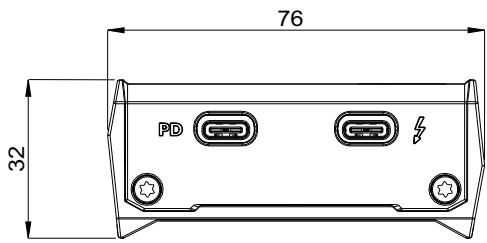
All dimensions shown are in mm

![76\nADLINK OPERATIONAL STATUS\n110\nPOCKET A10](.pocket-ai-user-manual-202307/1f08398d0ee11a3c75199696c3921f0000428150ff483901eeb3dc4b4f345d7f.jpg)

Figure 1-1: EGX-TBT-A500 Top View

![76\n32](.pocket-ai-user-manual-202307/7fa7d6f5a64fdfbb1b550b3786fbd17cb489c7e98e4d92f941097ac3686da2d4.jpg)

Figure 1-2: EGX-TBT-A500 Front View

![A\nPOCKET\n1\nBEXTPTASCO\nBEXTPTASCO\n2](.pocket-ai-user-manual-202307/e5fb554b6b5f2ba0d48be857aeb65eceff7703a760af7da37447e7db113411f3.jpg)

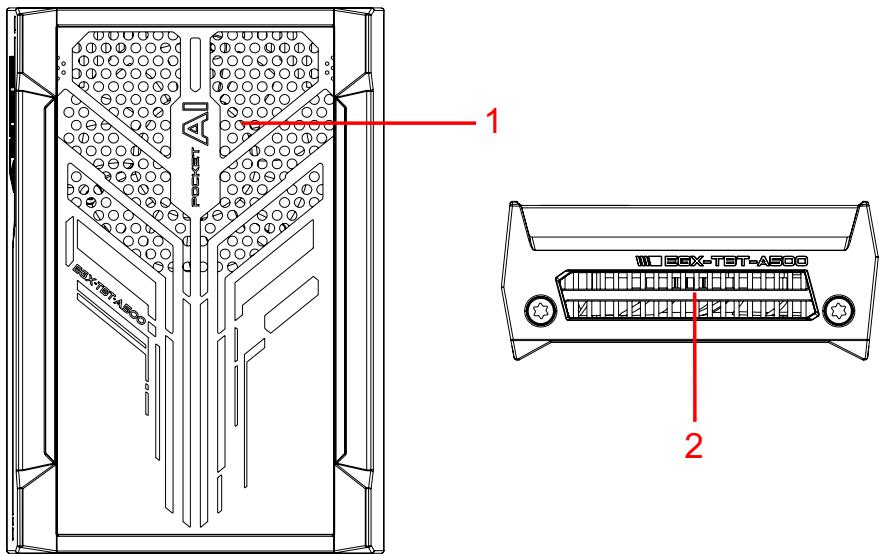
Figure 1-3: EGX-TBT-A500 Bottom and Back Views

<table><tr><td>Item</td><td>Description</td></tr><tr><td>1</td><td>Ventilation intake</td></tr><tr><td>2</td><td>Ventilation outlet</td></tr></table>

Table 1-1: Pocket AI Ventilation

![An icon depicting a white document with a folded top-right corner and faint horizontal grey lines. A large, red checkmark is superimposed over the center of the document.](.pocket-ai-user-manual-202307/b30b274a4de13cab56f82c1244f5e09b284f763bae11d4694d77b05d0cc8afed.jpg)
NOTE:

Make sure that Pocket AI is placed on a hard, flat surface to allow airflow, and that the vents are not blocked. Avoid placement on soft surfaces like bedding or clothing.

![Yellow triangular warning sign with black smoke symbol indicating hot weather](.pocket-ai-user-manual-202307/90c22c45399bce2e7517475f43a2117fb0223f8d7ee01fc22d3f3fe80025377e.jpg)

# BURN HAZARD

Touching this surface could result in bodily injury. To reduce risk, allow the surface to cool before touching.

# RISQUE DE BRÛLURES

Ne touchez pas cette surface, cela pourrait entraîner des blessures. Pour éviter tout danger, laissez la surface refroidir avant de la toucher.

# 1.5 Pocket AI Ports

![PD\n1\n2](.pocket-ai-user-manual-202307/2f579f26abcc3a738f8ae297d0cf5f6eca52a87b10094b5658a61a10535cbcd2.jpg)

Figure 1-4: Pocket AI ports

<table><tr><td>Item</td><td>Description</td></tr><tr><td>1</td><td>USB Type C Power Delivery (Input 15V DC/3A or 20V DC/2.25A)</td></tr><tr><td>2</td><td>Thunderbolt 3 Port</td></tr></table>

Table 1-2: Pocket AI IO

![The image displays a graphic of a white sheet of paper with a folded top-right corner and faint horizontal lines running across it. A large, thick red checkmark is drawn diagonally across the paper, starting from the bottom left and ending near the top right.](.pocket-ai-user-manual-202307/6eee4457f51be07c1c350aefc1fe38d14875c49c065f1f320a29290abe353ad4.jpg)
NOTE:

 Some multi-mode power supplies may support 45 watts at voltages lower than 15 volts, which may not be suitable for Pocket AI. Use a USB Power Delivery (USB-PD) power supply with a minimum output of at least 45W and a voltage of at least 15V to ensure compatibility.

![The image displays a white document icon featuring a folded top-left corner and faint horizontal lines. A large red checkmark is superimposed over the center of the document.](.pocket-ai-user-manual-202307/0dcadb9a2fb955fd54445ab0cd271e265320687fa518f7e43a6f6af8a62645f8.jpg)
NOTE:

 Pocket AI’s Thunderbolt 3 port also works with Thunderbolt 4 computers and cables, but continues to operate at Thunderbolt 3 speeds.

# 1.6 Thermal Policy

The GPU core clock throttles at temperatures (T ) past the thresholds shown with the behaviors as listed. Thermal throttling ensures that the highest temperature on the die does not exceed the sense temperature for prolonged periods of time.

<table><tr><td>Parameter</td><td>Value</td><td>Units</td></tr><tr><td>Thermal Resistance (Junction to Case, RJC)</td><td>0.042</td><td>°C/W</td></tr><tr><td>Thermal Resistance (Junction to PCB Board, RJB)</td><td>2.36</td><td>°C/W</td></tr><tr><td>GPU Maximum Operating Temperature</td><td>89</td><td>°C</td></tr><tr><td>GPU Slowdown Temperature (THERM_ALERT)</td><td>98</td><td>°C</td></tr><tr><td>GPU Shutdown Temperature (OVERT)</td><td>100</td><td>°C</td></tr></table>

Table 1-3: Thermal Policy

![The image displays a white icon resembling a piece of paper with a folded top-right corner and faint horizontal lines. A large red checkmark is centered on top of the paper.](.pocket-ai-user-manual-202307/5ef630874d8952f206da8d4bdae82437187f1be938803da99ae3b307e65fcace.jpg)
NOTE:

 Max.GPU operating temperature is the maximum at which the GPU is guaranteed to operate at target performance (base clock) under total board power level
 THERM\_ALERT generates a 50% (÷2) hardware clock slowdown.
 OVERT generates a 87.5% (÷8) hardware clock slowdown

# 1.7 Unpacking Checklist

Before unpacking, check the shipping carton for any damage. If the shipping carton and/or contents are damaged, inform your dealer immediately. Retain the shipping carton and packing materials for inspection. Obtain authorization from your dealer before returning any product to ADLINK. Ensure that the following items are included in the package.

 EGX-TBT-A500 Pocket AI

This page intentionally left blank.

# 2 System Requirements

# 2.1 Connecting your Pocket AI

To set up your pocket AI for the first time:

1. Plug the USB-PD power adapter into the USB-PD port on the Pocket AI. The green LED will illuminate.

![ADLINK\nPD](.pocket-ai-user-manual-202307/81992b4da03a4b432682fe38f903bc12ef3ad9b2cd6d9173136a1dfa5da55da7.jpg)

Figure 2-1: Connecting Pocket AI to power

2. Power on your computer, and then connect Pocket AI directly to your computer with the Thunderbolt™ cable.

![PD](.pocket-ai-user-manual-202307/b8658839960994b6db149e9884f2216e5574753444ff4dd32066becc752223ec.jpg)

Figure 2-2: Connecting Pocket AI to your computer

![The image displays a white icon of a document or sheet of paper featuring a folded top-right corner and faint, horizontal grey lines. A large, red checkmark is superimposed over the center of the paper.](.pocket-ai-user-manual-202307/37bb3a594ead39cf3232a6d62d9485dc8d9d9bf4acd6f6e161745a31f903c806.jpg)
NOTE:

Pocket AI does not support daisy-chaining or hubs/docks, and should be directly connected to your computer.

3. Follow the instructions in the next section to install the driver.

# 2.2 Windows Driver Installation

Your Pocket AI needs a driver to function properly.

Before you begin, make sure that you’ve fully uninstalled any existing NVIDIA drivers from your computer.

To install the driver:

1. Connect the Pocket AI to power as well as the Thunderbolt 3 port on your computer.

![The image displays an icon of a white sheet of paper or document with its top-left corner folded down (a 'dog-ear'). Faint horizontal gray lines run across the paper, resembling a list or notepad. A large, bold red checkmark is superimposed over the center of the document.](.pocket-ai-user-manual-202307/bc31d30a3f5552b76949bd1f8df351040a5e716c0998b082e219bd3b712ca309.jpg)
NOTE:

Always connect power to Pocket AI first before connecting the Thunderbolt cable. If you accidentally connect the Thunderbolt cable first, disconnect it before connecting power.

2. Open your Device Manager. Click Start and then type Device Manager in the search prompt. Click Device Manager or press the Enter key.

![ADLINK Technology Inc.\nAll	Work	Apps	Documents	Web	More\nBest match\nDevice Manager\nControl panel\nSearch work and web\nDevice Manager - See work and web\nresults\nDevice Manager\nControl panel\nOpen](.pocket-ai-user-manual-202307/1951cca73d0986ecf9f213ec0a38201afe20b3827a08fb818a4f9abe61822c5c.jpg)

Figure 2-3: Opening Device Manager

3. In Device Manager, verify that 3D Video Controller is listed under Other Devices.

![DESKTOP-7NNVLII\nAudio inputs and outputs\nBatteries\nBluetooth\nCameras\nComputer\nDisk drives\nDisplay adapters\nFirmware\nHuman Interface Devices\nKeyboards\nMice and other pointing devices\nMonitors\nNetwork adapters\nOther devices\n3D Video Controller](.pocket-ai-user-manual-202307/cfb28c7b99859e4f787f89efbc3c76b545d79bb2b7397c19c94f76d415f9c36d.jpg)

Figure 2-4: Checking Device Manager

4. Download the driver and double-click to start the installer.

Download drivers from: adlinktech.com/en/pocket-ai-with-nvidia-rtx-a500-egpu

5. When prompted, read and accept the license agreement.

![NVIDIA Graphics Driver\nVersion 528.42\nSystem Check\nLicense Agreement\nOptions\nInstall\nFinish\nNVIDIA software license agreement\nPlease read the following NVIDIA software license agreement carefully.\nLicense For Customer Use of NVIDIA Software\nIMPORTANT NOTICE -- READ CAREFULLY: This License For\nCustomer Use of NVIDIA Software ('LICENSE') is the\nagreement which governs use of the software of NVIDIA\nCorporation and its subsidiaries ('NVIDIA') downloadable\nherefrom, including computer software and associated printed\nmaterials ('SOFTWARE'). By downloading, installing, copying,\nor otherwise using the SOFTWARE, you agree to be bound by\nthe terms of this LICENSE. If you do not agree to the terms of\nthis LICENSE, do not download the SOFTWARE.\nNEXTALS\nClick Agree and Continue if you accept the terms of the agreement.\nAGREE AND CONTINUE\nCANCEL](.pocket-ai-user-manual-202307/123d0b36745affcf789220f84dd5636535d7fb84d68b59316fc0cc38ff4cf419.jpg)

Figure 2-5: Agreeing to the license

6. Choose your installation type, and then click Next.

![NVIDIA Installer\nNVIDIA Graphics Driver\nVersion 528.42\nSystem Check\nLicense Agreement\nOptions\nInstall\nFinish\nInstallation options\nExpress (Recommended)\nUpgrades existing drivers and retains current NVIDIA\nsettings.\nCustom (Advanced)\nAllows you to select the components you want to install and\nprovides the option for a clean installation.\nNote: Some flashing might occur during the installation.\nBACK	NEXT	CANCEL](.pocket-ai-user-manual-202307/73c31f42f9f93e2d38ed67de1006d5e2957993c258b1f5c4561a5c0cdea8dcb5.jpg)

Figure 2-6: Choosing Installation type

7. When the installation is complete, click Close to exit the installer

![NVIDIA Installer\nNVIDIA Graphics Driver\nVersion 528.42\nSystem Check\nLicense Agreement\nOptions\nInstall\nFinish\nNVIDIA Installer has finished\nComponent	Version	Status\nPlayX System Software	9:21:07:11	Installed\nGraphics Driver	528.42	Installed\nCLOSE](.pocket-ai-user-manual-202307/65dee795da9ae8d5cbeb7d7a414bc45fa59a2995f2bbe643d0f05f09068b790f.jpg)

Figure 2-7: Closing the installer

8. The driver is now installed. Restart your computer and verify that Pocket AI is working.

# 2.3 Verifying Windows Driver Installation

To verify that the Windows driver is installed correctly and that your Pocket AI is working properly:

1. Open your Device Manager. Click Start and then type Device Manager in the search prompt. Click Device Manager or press the Enter key.

![ADLINK Technology Inc.\nAll	Work	Apps	Documents	Web	More\nBest match\nDevice Manager\nControl panel\nSearch work and web\nDevice Manager - See work and web\nresults\nDevice Manager\nControl panel\nOpen](.pocket-ai-user-manual-202307/e098e5946077c9ac43eac60ba08f903987284bea76e980105eaa08cf4516a06f.jpg)

Figure 2-8: Opening Device Manager

2. Under Display adapters, verify that NVIDIA RTX A500 Embedded GPU appears..

![Device Manager\nFile	Action	View	Help\nDESKTOP-7NNVII\nAudio inputs and outputs\nBatteries\nBluetooth\nCameras\nComputer\nDisk drives\nDisplay adapters\nMicrosoft Basic Display Adapter\nNVIDIA RTX A500 Embedded GPU](.pocket-ai-user-manual-202307/6f5ce09abdeb001ee4f512e7f45bb6ce742549cbca861e0eafbf1cc2bebc5862.jpg)

Figure 2-9: Locating Pocket AI in Device Manager

3. To run the NVIDIA System Monitor, click Start, type command, and then click Run as administrator.

![ADUNK Technology Inc.\nAll\nWork\nApps\nDocuments\nWeb\nMore\nBest match\nCommand Prompt\nApp\nApps\nText Live command-line\nControl Panel\nIntel® Graphics Command Center\nSettings\nReplace Command Prompt with\nWindows PowerShell in the Web + X\nTurn high contrast on or off\nManage app execution aliases\nSearch work and web\ncommand - See work and web results\nCommand Prompt\nApp\nOpen\nRun as administrator\nOpen file location\nPin to Start\nPin to taskbar](.pocket-ai-user-manual-202307/8506f9bbcb21da461a8e8af25313558a6704db9e12f58a8111c5aa861c936e6b.jpg)

Figure 2-10: Opening command prompt as an administrator

4. In the command prompt, type nvidia-smi and then press the Enter key. If Pocket AI is installed correctly, you will see NVIDIA RTX A500 in the listing.

<table><tr><td colspan="7">NVIDIA-SMI 528.42 Driver Version: 528.42 CUDA Version: 12.0</td></tr><tr><td colspan="7">GPU Name TCC/WDDM Bus-Id Disp.A Volatile Uncorr. ECC Fan Temp Perf Pwr:Usage/Cap Memory-Usage GPU-Util Compute M. MIG M.</td></tr><tr><td colspan="7">0 NVIDIA RTX A500 .. WDDM 00000000:03:00.0 Off N/A N/A 45C P8 3W / 25W 17MiB / 4096MiB 0% Default N/A</td></tr><tr><td colspan="7">Processes:
GPU GI CI PID Type Process name GPU Memory Usage ID ID</td></tr><tr><td colspan="7">0 N/A N/A 488 C+G ...b3d8bbwe\winStore.App.exe N/A
0 N/A N/A 6960 C+G ...5n1h2txyewy\SearchApp.exe N/A</td></tr></table>

Figure 2-11: Running NVIDIA Software Management Interface

# 2.4 Linux Driver Installation

Your Pocket AI needs the Linux driver from NVIDIA to function correctly, as well as a small update to your bootloader to support multiple cards.

Before you begin, make sure that you've fully uninstalled an existing NVIDIA drivers from your computer. This tutorial will guide you through updating your bootloader and installing the driver.

![The image displays a digital icon of a white document. The paper has a folded top-right corner and faint grey horizontal lines running across it. Superimposed over the document is a large, bold red checkmark.](.pocket-ai-user-manual-202307/d2548631ab253cf0ef5f69b8c0586f24d8e7c0580c63e9850bf9ae1141c2f001.jpg)
NOTE:

This guide was written for Ubuntu 20.04. Different distributions or versions may require different steps. Consult your support provider or distribution community for additional information.

# To install the Linux driver:

1. Sign in to Ubuntu using an account with sudo access.

2. Open a terminal window and type: sudo gedit /etc/default/grub and then press the Enter key. A text editor will appear, allowing you to edit bootloader settings.

![1# If you change this file, run 'update-grub' afterwards to update\n2# /boot/grub/grub.cfg.\n3# For full documentation of the options in this file, see:\n4# Info -f grub -n 'Simple configuration'\n5\n6 GRUB_DEFAULT=0\n7 GRUB_TIMEOUT_STYLE=hidden\n8 GRUB_TIMEOUT=0\n9 GRUB_DISTRIBUTOR='lsb_release -i -s 2) /dev/null || echo Debian'\n10 GRUB_CMDLINE_LINUX_DEFAULT='quiet splash'\n11 GRUB_CMDLINE_LINUX Characteristics'\n12\n13 # Uncomment to enable BadRAM filtering, modify to suit your needs\n14 # This works with Linux (no patch required) and with any kernel that obtains\n15 # the memory map information from GRUB (GNU Mach, kernel of FreeBSD ...)\n16 #GRUB_BADRAM='0x01234567,0xffefefe,0x09abcdef,0xffefefef'\n17\n18 # Uncomment to disable graphical terminal (grub-pc only)\n19 #GRUB_TERMINAL=console\n20\n21 # The resolution used on graphical terminal\n22 # note that you can use only modes which your graphic card supports via VBE\n23 # you can see them in real GRUB with the command 'vbeinfo'\n24 #GRUB_GFXMODE=440x480\n25\n26 # Uncomment if you don't want GRUB to pass 'root=UUID=xxx' parameter to Linux\n27 #GRUB_DISABLE_LINUX_UID=true\n28\n29 # Uncomment to disable generation of recovery mode menu entries\n30 #GRUB_DISABLE_RECOVERY='true'\n31\n32 # Uncomment to get a beep at grub start\n33 #GRUB_INIT_TUNE='480 440 1'\nPlain Text   Tab Width: 8 Ln 11, Col 21 INS](.pocket-ai-user-manual-202307/fe2710b66ad9aaeb1859d0ac9b14ceabbc16a9e719d0932b3c355ebf4f410d3f.jpg)

Figure 2-12: GRUB Bootloader Configuration File

3. In the text editor window, add the following text to GRUB\_CMDLINE\_LINUX="" between the quotation marks:

pci=realloc=off
```txt
Open
*grub
/etc/default
Save
1 # If you change this file, run 'update-grub' afterwards to update
2 # /boot/grub/grub.cfg.
3 # For full documentation of the options in this file, see:
4 # info -f grub -n 'Simple configuration'
5
6 GRUB_DEFAULT=0
7 GRUB_TIMEOUT_STYLE=hidden
8 GRUB_TIMEOUT=0
9 GRUB_DISTRIBUTOR=`lsb_release -i -s 2> /dev/null || echo Debian`
10 GRUB_CMDLINE_LINUX_DEFAULT="quiet splash"
11 GRUB_CMDLINE_LINUX="pci=realloc=off"
12
13 # Uncomment to enable BadRAM filtering, modify to suit your needs
14 # This works with Linux (no patch required) and with any kernel that obtains
15 # the memory map information from GRUB (GNU Mach, kernel of FreeBSD...)
16 #GRUB_BADRAM="0x01234567,0xfefefefe,0x89abcdef,0xefefefef"
17
18 # Uncomment to disable graphical terminal (grub-pc only)
```
Figure 2-13: Modifying the GRUB Bootloader Configuration

![A white document icon with a folded top-right corner and faint horizontal lines, featuring a large red checkmark in the center.](.pocket-ai-user-manual-202307/01d5cd262846558beb9119981ff61fc3cf15065e3914a25dc67f24a22bc1dbc5.jpg)
NOTE:

If there are multiple items between the quotation marks, add a space and then add pci=realloc=off to the end before closing the parentheses.

Save the file and close the text editor.

4. From the terminal window, type sudo update-grub2 and press the Enter key to regenerate your bootloader configuration from the file.
5. Once the bootloader has been updated, reboot your computer by typing sudo reboot and press the Enter key. Your computer will reboot.
6. Once you have rebooted, sign in to Ubuntu using an account with sudo access.

# 7. Open a terminal window, and type:

sudo add-apt-repository ppa:graphicsdrivers/ppa -y

and press the Enter key. This step adds the NVIDIA drivers repository to apt so you can install the driver.

![user@ADLINK:~\$ sudo add-apt-repository ppa:graphics-drivers/ppa -y\n(sudo) password for user:\nHit:1 http://tw.archive.ubuntu.com/ubuntu focal InRelease\nHit:2 http://tw/archive.ubuntu.com/ubuntu focal-updates InRelease\nHit:3 http://tw/archive.ubuntu.com/ubuntu focal-backports InRelease\nGet:4 http://ppa.launchpad.net/graphics-drivers/ppa/ubuntu focal InRelease (24.3 kB)\nGet:5 http://security.ubuntu.com/ubuntu focal-security InRelease (114 kB)\nGet:6 http://ppa.launchpad.net/graphics-drivers/ppa/ubuntu focal/main amd64 Pack\nages (31.7 kB)\nGet:7 http://security.ubuntu.com/ubuntu focal-security/main amd64 DEP-11 Metadata (60.0 kB)\nGet:8 http://ppa.launchpad.net/graphics-drivers/ppa/ubuntu focal/main i386 Packages (17.0 kB)\nGet:9 http://security.ubuntu.com/ubuntu focal-security/universe amd64 DEP-11 Metadata (96.7 kB)\nGet:10 http://security.ubuntu.com/ubuntu focal-security/multiverse amd64 DEP-11 Metadata (940 B)\nGet:11 http://ppa.launchpad.net/graphics-drivers/ppa/ubuntu focal/main Translation-on-en (7600 B)\nFetched 352 kB in 3s (118 kB/s)\nReading package lists... Done\nuser@ADLINK:~\$](.pocket-ai-user-manual-202307/832e25dd6eca5b1e06ab1665b495d68c9ccc2dcca2de0cd285952be52fa55f1e.jpg)

Figure 2-14: Adding NVIDIA Driver Repository

# 8. Once the installation completes, type

sudo apt update

and press the Enter key to refresh your repository information.

# 9. Once the repositories are refreshed, type

sudo apt install nvidia-driver-525 -y

and press the Enter key to install version 525 of the

NVIDIA driver..

![The image features a white sheet of paper with its top-left corner folded down. Several horizontal gray lines run across the paper, simulating text. A large, thick red checkmark is drawn diagonally across the document, slanting upwards from left to right.](.pocket-ai-user-manual-202307/9e3731eb647b348768c43d9ee55af08bd1320a40ed6fc5797f08efcf566ec3ed.jpg)
NOTE:

As of this writing, version 525 is the most recent version of the NVIDIA driver tested with Pocket AI. You can check for more recent versions using apt search nvidia-driver-, and replace 525 with the relevant version for your Linux distribution and version.

10.Once the driver has been installed, reboot your computer by typing
sudo reboot
and press the Enter key. Your computer will reboot.

11.Follow the instructions in the next section to verify that Pocket AI is working.

# 2.5 Verifying Linux Driver Installation

To verify that the Linux driver is installed correctly and that your Pocket AI is working properly:

12.Sign in to Ubuntu.

13.Open the Ubuntu settings app, and then select the Thunderbolt menu item. Pocket AI should be listed as ADLINK EGX-TBT-A500.

![Privacy\nConnectivity\nLocation Services\nThunderbolt\nFile History & Trash\nScreen Lock\nDiagnostics\nThunderbolt\nDirect Access\nAllow direct access to devices such as docks and external GPUs.\nDevices\nADLINK EGX-TBT-A500 Authorized](.pocket-ai-user-manual-202307/6b262d24fd955fd3665c335a6d0896cae3a55db12071b348c5a19e18fb332442.jpg)

Figure 2-15: Accessing the Ubuntu Thunderbolt Settings Menu

![The image displays a white document icon with a folded top-right corner and faint horizontal lines running across it. A large, bold red checkmark is superimposed over the left side of the document.](.pocket-ai-user-manual-202307/7e07476f5aad463aace1f36dceeb3654672e7c165c1ea430abbdb8c9da85c88c.jpg)
NOTE:

If you do not see the Thunderbolt menu, you may need to install Thunderbolt support by running sudo apt install bolt in a terminal window. If you still do not see the Thunderbolt options, try starting the Thunderbolt daemon manually by typing boltctl in a terminal window.

14.To verify that the your device is recognized, open a terminal window and type nvidia-smi and then press ENTER. If the device is installed correctly, you will see NVIDIA RTX A500 Embedded GPU listed.

<table><tr><td colspan="7">NVIDIA-SMI 530.41.03 Driver Version: 530.41.03 CUDA Version: 12.1</td></tr><tr><td colspan="7">GPU Name Persistence-M Bus-Id Disp.A Volatile Uncorr. ECC Fan Temp Perf Pwr:Usage/Cap Memory-Usage GPU-Util Compute M. MIG M.</td></tr><tr><td colspan="7">0 NVIDIA RTX A500 Embedded GPU Off 00000000:3B:00.0 Off N/A N/A 37C P8 3W / N/A 0MiB / 4096MiB 0% Default N/A</td></tr><tr><td colspan="7">Processes:
GPU GI CI PID Type Process name GPU Memory Usage</td></tr><tr><td colspan="7">No running processes found</td></tr><tr><td colspan="7">adlink@adlink:~$ □</td></tr></table>

Figure 2-16: Running NVIDIA Software Management Interface

15.To verify that your device is using the correct driver, open a terminal window, and then type:

lsmod | grep nv and then press ENTER. If the driver is installed correctly, you will see nvidia listed as the module for the device.

![adlink@adlink:~\$ lsmod | grep nv\nnvidia_uvm 1437696 0\nnvidia_drm 77824 0\nnvidia_modeset 1273856 1 nvidia_drm\nnvidia 55734272 23 nvidia_uvm,nvidia_modeset\ndrm_kms_helper 307200 2 nvidia_drm,i915\ndrm 618496 15 drm_kms_helper,nvidia,nvidia_drm,i915,ttm\nadlink@adlink:~\$ □](.pocket-ai-user-manual-202307/43986ea696a98c75755392f958f013e48297c3a2bab96aebcb3138c8c1b8cc92.jpg)

Figure 2-17: Verifying nvidia Module

# 2.6 Certifications & Agencies

Windows Hardware Quality Lab (WHQL) certified for Windows 10 and Windows 11
 EU Reduction of Hazardous Substances (EU-RoHS)
 Conformité Européenne (CE)
 Federal Communications Commission (FCC)

# Important Safety Instructions

For user safety, please read and follow all instructions, Warnings, Cautions, and Notes marked in this manual and on the associated device before handling/operating the device, to avoid injury or damage.

S'il vous plaît prêter attention stricte à tous les avertissements et mises en garde figurant sur l'appareil, pour éviter des blessures ou des dommages.

 Read these safety instructions carefully
 Keep the User’s Manual for future reference
Read the Specifications section of this manual for detailed information on the recommended operating environment
 The device can be operated at an ambient temperature of 40ºC

 To avoid electrical shock and/or damage to device:

 Keep device away from water or liquid sources
 Keep device away from high heat or humidity
 Keep device properly ventilated (do not block or cover ventilation openings)
 Always use recommended voltage and power source settings
 Always install and operate device near an easily accessible electrical outlet
 Secure the power cord (do not place any object on/over the power cord)
 Only install/attach and operate device on stable surfaces and/or recommended mountings

? If the device will not be used for long periods of time, turn off and unplug from its power source
Never attempt to repair the device, which should only be serviced by qualified technical personnel using suitable tools
 The device must be serviced by authorized technicians when:

 The power cord or plug is damaged
 Liquid has entered the device interior
 The device has been exposed to high humidity and/or moisture
 The device is not functioning or does not function according to the User’s Manual
 The device has been dropped and/or damaged and/or shows obvious signs of breakage

This product is intended to be supplied by a Listed Power Adapter, with an output that meets LPS(PS2), rated 15VDC or 20VDC, 3A or 2.25A, maximum 45W, TMA = 45ºC, and altitude of operation = 2000m.

 The equipment power supply cord shall be connected to a socket-outlet with grounded connection, or equivalent.

![Yellow triangular warning sign with black smoke symbol indicating hot weather](.pocket-ai-user-manual-202307/74b065889fd41927201aeb1cb0752f05df8f2cbe9dbd13fe488f5a3c4ffe26aa.jpg)

# BURN HAZARD

Touching this surface could result in bodily injury. To reduce risk, allow the surface to cool before touching.

# RISQUE DE BRÛLURES

Ne touchez pas cette surface, cela pourrait entraîner des blessures.

Pour éviter tout danger, laissez la surface refroidir avant de la toucher.

# Getting Service

Ask an Expert: https://www.adlinktech.com/en/Askanexpert

# ADLINK Technology, Inc.

No. 66, Huaya 1st Rd., Guishan District

Taoyuan City 333411, Taiwan

Tel: +886-3-216-5088

Fax: +886-3-328-5706

Email: service@adlinktech.com

# Ampro ADLINK Technology, Inc.

6450 Via Del Oro

San Jose, CA 95119-1208, USA

Tel: +1-408-360-0200

Toll Free: +1-800-966-5200 (USA only)

+1-408-600-1189

Email: info@adlinktech.com

# ADLINK Technology (China) Co., Ltd.

300 Fang Chun Rd., Zhangjiang Hi-Tech Park

Pudong New Area, Shanghai, 201203 China

Tel: +86-21-5132-8988

Fax: +86-21-5132-3588

Email: market@adlinktech.com

# ADLINK Technology GmbH

Hans-Thoma-Straße 11

D-68163 Mannheim, Germany

Tel: +49-621-43214-0

Fax: +49-621 43214-30

Email: emea@adlinktech.com

Please visit the Contact page at www.adlinktech.com for information on how to contact the ADLINK regional office nearest you.
[🔗 Link to the original document](.pocket-ai-user-manual-202307/pocket-ai-user-manual-202307.pdf)