![Abstract composition of teal triangles and a central triangular shape with motion effect, no text or symbols present](.vortex-cafe-user-guide/e436e3d22cdcb440daa5bd7a9a43cac3763f68b59dc194395f9d045ffc2c6c0a.jpg)

# VORTEX

# CAFE

# User Guide

# Release 2.4.0

# Contents

# 1 Introduction 1

# 2 Configuration of your Vortex Café project 2

2.1 Without Apache Maven 2
2.2 With Apache Maven 4

# 3 Vortex Café Usage 6

3.1 DDS ServiceEnvironment initialization 6
3.2 DDS API 6
3.3 Non-standard extensions 7
3.4 Android permissions 8

# 4 Vortex Café runtime configuration 9

4.1 Where to set properties . 9
4.2 How Vortex Café searches for files to load 9
4.3 Android specificities 10
4.4 Properties scope 10
4.5 Units of duration properties 10
4.6 Configuration Properties description . 11

# 5 Network transports configuration 37

5.1 UDP transport configuration 37
5.2 TCP transport configuration 39

# 6 Using Vortex Café with SSL 42

6.1 Enabling SSL 42
6.2 Providing the public/private key pair . . 42
6.3 Providing the trusted participants certificates 42
6.4 SSL with Android 43
6.5 SSL interoperability with OpenSplice DDS 44

# 7 Durability deployment 45

7.1 Configuring the lazy clientdurability . 45

# 8 Google Protocol Buffers 46

8.1 About the Vortex Café Google Protocol Buffers Tutorial 46
8.2 Introduction 46
8.3 Proto message for DDS system 49
8.4 Compiling the datamodel with the GPB compiler . . 53
8.5 Using the generated API in applications 57
8.6 Evolving data models 63

# 9 Support of DDS Security 66

9.1 Introduction to DDS Security 66
9.2 DDS Security Implementation 68
9.3 DDS Security Configuration 68
9.4 Authentication plugin 69
9.5 Access Control plugin 69
9.6 Cryptography plugin 70
9.7 Logging plugin 71
9.8 Data Tagging plugin 71
9.9 Access Control and Authentification plugin configuration example . 71

# 10 Using Vortex Café with Vortex Cloud 73

11 Vortex Café Monitor 74

12 Supported Features 75

12.1 Supported IDL types 75
12.2 Supported DDS Profiles 75
12.3 Supported QoS Policies 76
12.4 Supported DDS Statuses 76

13 Troubleshooting 77

14 Contacts & Notices 78

14.1 Contacts 78
14.2 Notices 78

# 1

# Introduction

Mobile platforms such as Android- and iOS-based smart phones, phablets, and tablets are swiftly becoming established as the target client platforms for a large class of consumer as well as enterprise and mission/business-critical applications. Vortex Café is a pure Java TM DDS implementation optimised for Android and the JVM that provides effective and efficient DDS connectivity to Android based devices–as well as any JVM-enabled device.

Vortex Café is the first peer-to-peer middleware infrastructure designed for Android that allow seamless interoperability with existing DDS systems and provides a powerful infrastructure for next generation peer-to-peer Android applications.

Vortex Café’s main features are:

• It is the only pure Java version of DDS for JVMs including Android.
• It has a networking stack optimized for mobility, compliant with the OMG DDSI v2.1 standard.
• It is compliant with the Java 5 PSM specification for simpler and safer programming that delivers exceptional developer productivity.

This User Guide will get you started with Vortex Café development for the JDK as well as the Android development environment.

If you have any questions, please contact us at ADLINK support.

# 2

# Configuration of your Vortex Café project

Please make sure that your environment is set up as specified in the Vortex Installation Guide.

Your Vortex Café project must include the two following steps:

• Generation of Java code from your IDL file, using the Vortex Café’s idl2j tool.
• Compilation of your Java code using one of the Vortex Café’s jars:
– cafe.jar for non-Android applications
– cafe-android.jar for Android applications without logging
– cafe-android-debug.jar for non-Android applications with logging

The next sections describe how you can perform those steps, depending on the build system in use (with or without Apache Maven).

# Without Apache Maven

# idl2j usage

The idl2j tool parses your IDL file defining your DDS types and generates a set of Java classes for each type. The idl2j tool uses the Oracle JDK’s idlj compiler, and adds specific annotations in the generated classes to identify the DDS key members.

In the VortexCafe-2.4.0/bin directory are two scripts to run idl2j :

idl2j.sh for Linux/Unix platforms

idl2j.bat for Windows platforms

The options accepted by idl2j are the same as for the JDK’s idlj and are described at http://docs. oracle.com/javase/7/docs/technotes/tools/share/idlj.html.

# module-less IDL types

Module-less IDL types are generated in the defaut unnamed package. Thus these types cannot be imported by other applications (importing a simple type without package is a compile time error).

To figure out this problem the option -defaultPkgPrefix &lt;package\_name&gt; is used to make idl2j generate the code for module-less types in a named package.

# Jars to use

In the VortexCafe-2.4.0/lib directory is the jar your project must use in its CLASSPATH for compilation and at runtime.

Depending on your project, you must use a specific jar:

• For a non-Android Java project:
– cafe.jar
• For an Android project in debug mode, with logging activated:
– cafe-android-debug.jar
• For an Android project in release mode, without logging:
– cafe-android.jar

Note that these three jars contain the same core code for Vortex Café, with the same API, options and communication protocol. They differ on only two points:

• Data marshalling/unmarshalling : the implementation of marshalling and unmarshalling of data is based on CORBA classes which are available with the standard JVM, but not with the Android VM. The jars for Android projects contain those classes in addition.

• Android logging back-end : the jar for Android project in debug mode also contains a specific logging backend for Android. This back-end adds extra load to the application. For better performance, it is strongly advised that you use the jar for release mode.

# Logging activation

Vortex Café logging system is based on SL4J ( http://www.slf4j.org ). SL4J is an abstraction layer for various logging frameworks ( e.g. java.util.logging , Log4J, Logback, etc. ) allowing the end user to plug in the desired logging framework at deployment time.

For non-Android platforms, there is no logging by default. You need to add one of the concrete logging frameworks in CLASSPATH , as documented in http://www.slf4j.org/manual.html#swapping.

Note that for Android platforms, the cafe-android-debug.jar already uses the Android logging framework. If you use this jar, you don’t need to add anything. If you use the cafe-android.jar the logging is not active.

# Example with Logback framework

To use the Logback ( http://logback.qos.ch ) logging framework with SLF4j, add the logback-corex.x.x.jar and logback-classic-x.x.x.jar to your CLASSPATH:

```txt
CLASSPATH=/path/to/logback-core-1.1.1.jar:/path/to/logback-classic-1.1.1.jar:$CLASSPATH
```

To configure logback, add a logback.xml file is a directory with is referred by your CLASSPATH.

Here is an example of logback.xml file :

```xml
&lt;?xml version="1.0" encoding="UTF-8"?&gt;
&lt;configuration&gt;
    &lt;appender name="STDOUT" class="ch.qos.logback.core.ConsoleAppender"&gt;
    &lt;encoder&gt;
    &lt;!-- Pattern for output are explain here: --&gt;
    &lt;!-- http://logback.qos.ch/manual/layout.html --&gt;
    &lt;!-- %d{ } : time with format --&gt;
    &lt;!-- %.-1level : level (first character only) --&gt;
    &lt;!-- %18.18thread : thread name (always 18 characters) --&gt;
    &lt;!-- %20.20logger : logger name (always 20 characters) --&gt;
    &lt;!-- %msg : log message --&gt;
    &lt;!-- %n : line separator (platform dependent) --&gt;
    &lt;pattern&gt;%d{HH:mm:ss.SSS} %.-1level [%-18.18thread] %-20.20logger : %msg%n&lt;/pattern&gt;
    &lt;/encoder&gt;
&lt;/appender&gt;
```

# 2.1. Without Apache Maven

```xml
&lt;root level="${log.level:-INFO}"&gt;
    &lt;appender-ref ref="STDOUT" /&gt;
&lt;/root&gt;
&lt;/configuration&gt;
```

# With Apache Maven

Please see the Vortex Installation Guide for a description of installation in an Apache Maven environment.

# idl2j usage

The idl2j tool is also a Maven plugin. You can use it in your POM as follows:

```xml
&lt;plugin&gt;
    &lt;groupId&gt;com.prismtech.cafe&lt;/groupId&gt;
    &lt;artifactId&gt;idl2j&lt;/artifactId&gt;
    &lt;version&gt;2.4.0&lt;/version&gt;
    &lt;executions&gt;
    &lt;execution&gt;
    &lt;id&gt;idl-compile&lt;/id&gt;
    &lt;phase&gt;generate-sources&lt;/phase&gt;
    &lt;goals&gt;
    &lt;goal&gt;idl-compile&lt;/goal&gt;
    &lt;/goals&gt;
    &lt;/execution&gt;
    &lt;/executions&gt;
&lt;/plugin&gt;
```

By default it searches recursively for files with an .idl extension in the src/main/idl directory, and generates Java files in the target/generated-sources/idl directory. Those files are automatically added to the list of Java source files to be compiled by Maven at the compile phase.

In addition, the following optional parameters can be configured:

<table><tr><td>Name</td><td>Type</td><td>Description</td></tr><tr><td>outDir</td><td>File</td><td>The output directory for the generated sources. Default value is: ${project.build.directory}/generated-sources/idl</td></tr><tr><td>includeDirs</td><td>File[]</td><td>Additional include directories containing additional *.idl files required for compilation.</td></tr><tr><td>idlDir</td><td>File</td><td>The source directory containing *.idl files. The plugin will also search for files in sub-directories. Default value is: ${basedir}/src/main/idl</td></tr></table>

# Dependencies to use

If your target platform is not Android, you only need to add a dependency to cafe as follows:

```xml
&lt;dependency&gt;
    &lt;groupId&gt;com.prismtech.cafe&lt;/groupId&gt;
    &lt;artifactId&gt;cafe&lt;/artifactId&gt;
    &lt;version&gt;2.4.0&lt;/version&gt;
&lt;/dependency&gt;
```

If your target platform is Android, you need to add a dependency to either cafe-android or cafe-android-debug . Our advice is to configure different profiles for each. For example:

# 2.2. With Apache Maven

```xml
&lt;profiles&gt;
    &lt;!-- default profile (with logging active for development) --&gt;
    &lt;profile&gt;
    &lt;id&gt;default&lt;/id&gt;
    &lt;activation&gt;&lt;activeByDefault&gt;true&lt;/activeByDefault&gt;&lt;/activation&gt;
    &lt;dependencies&gt;
    &lt;!-- Vortex Cafe for Android (debug) --&gt;
    &lt;dependency&gt;
    &lt;groupId&gt;com.prismtech.cafe&lt;/groupId&gt;
    &lt;artifactId&gt;cafe-android-debug&lt;/artifactId&gt;
    &lt;version&gt;2.4.0&lt;/version&gt;
    &lt;/dependency&gt;
    &lt;/dependencies&gt;
    &lt;/profile&gt;

    &lt;!-- release profile (without logging for better performance --&gt;
    &lt;profile&gt;
    &lt;id&gt;release&lt;/id&gt;
    &lt;dependencies&gt;
    &lt;!-- Vortex Cafe for Android --&gt;
    &lt;dependency&gt;
    &lt;groupId&gt;com.prismtech.cafe&lt;/groupId&gt;
    &lt;artifactId&gt;cafe-android&lt;/artifactId&gt;
    &lt;version&gt;2.4.0&lt;/version&gt;
    &lt;/dependency&gt;
    &lt;/dependencies&gt;
    &lt;/profile&gt;
&lt;/profiles&gt;
```

# Logging activation with maven

Similarly to what’s described previously in std,std-refLogging activation you have to add a dependency to a concrete logging framework to activate logging.

For non-Android platforms, you have to add a dependency to one of the logging frameworks described in http: //www.slf4j.org/manual.html#swapping (each one is present in Maven Central Repository).

For Android platforms, the cafe-android-debug dependency already uses the Android logging framework. If you use this you don’t need to add anything. If you use the cafe-android dependency the logging is not active.

# 3

# Vortex Café Usage

# DDS ServiceEnvironment initialization

In your Java project, before using the Vortex Café API, the ServiceEnvironment needs to be configured to point to the Vortex Café implementation. This is done by setting the property

ServiceEnvironment.IMPLEMENTATION\_CLASS\_NAME\_PROPERTY

(which is equal to "org.omg.dds.serviceClassName" )

with the value

"com.prismtech.cafe.core.ServiceEnvironmentImpl".

For example:
```java
// Set the serviceClassName property
System.setProperty(
    org.omg.dds.core.ServiceEnvironment.
    IMPLEMENTATION_CLASS_NAME_PROPERTY,
    "com.prismtech.cafe.core.ServiceEnvironmentImpl");

// Instantiate a DDS ServiceEnvironment
org.omg.dds.core.ServiceEnvironment env =
    org.omg.dds.core.ServiceEnvironment.createInstance(
    this.getClass().getClassLoader());

// Get the DDS DomainParticipantFactory
org.omg.dds.domain.DomainParticipantFactory dpf =
    org.omg.dds.domain.DomainParticipantFactory.getInstance(env);

// Then you can create your DDS entities...
```

You can also set this property at runtime as any Java SystemProperty using the following command-line option:

```txt
-Dorg.omg.dds.serviceClassName=com.prismtech.cafe.core.ServiceEnvironmentImpl
```

# DDS API

Vortex Café implements the Java 5 Language PSM for DDS standard. For more documentation, see http: //www.omg.org/spec/DDS-Java/.

For a detailed description of this API, see the Javadoc in the product installation at: Vortex-Cafe\_2.4.0/docs/apidocs/index.html

# Non-standard extensions

# Select data to read with a Custom Content Filter

In addition to the standard API, Vortex Café offers a way to use custom filtering for selection of data to be read via a DataReader.

The org.omg.dds.sub.DataReader.Filter&lt;T&gt; interface is defined as follows:

```java
/**
 * Filter class is in charge to determine if a {@link Sample} content
 * is acceptable depending on internal criteria.
 *
 * @param &lt;T&gt; The concrete type of the data to be read.
 */
public static interface Filter&lt;T&gt; {
    /**
    * Operation called during each read/take operation to filter the data.
    * If this operation returns true the data will be returned to the
    * caller.
    *
    * @param data the data to be filtered or not
    * @param params optional parameters
    * @return true if the data must be returned to the read/take operation
    */
    public boolean match(T data, Object... params);
}
```

You can implement this interface as a custom filter of your data type:

```java
// definition of a custom filter
public class MyDataFilter implements Filter&lt;MyDataType&gt; {
    @Override
    public boolean match(MyDataType data, Object... params) {
    // test the ID attribute of MyDataType
    return data.ID == ((Integer) params[0]).intValue();
    }
}
```

Or you can use the com.prismtech.cafe.utils.JavaScriptFilter class to define a Filter in JavaScript:

```txt
Filter&lt;Msg&gt; jsUserIDFilter =
    new JavaScriptFilter&lt;Msg&gt;
    ("data.ID == params[0]") ; // JavaScript code
```

Then, you can use the Filter with a DataReader’s Selector in a read() or take() operation. For example:

```dart
DataReader&lt;DataType&gt; reader = ...;

// create Selector with my custom Content Filter
Selector&lt;DataType&gt; selector =
    reader.select().Content(new MyDataFilter(), 1);

// or with a JavaScriptFilter:
// Selector&lt;DataType&gt; selector =
// reader.select().Content(jsUserIDFilter, 1);
// read data with the Selector
Iterator&lt;DataType&gt; it = reader.read(selector);
while (it.hasNext()) {
    Sample&lt;DataType&gt; data = it.next();
...
}
```

# 3.3. Non-standard extensions

Note that a safer version of the JavaScriptFilter constructor can be used. This constructor performs extra validation of the JavaScript code against an example of data and parameters you have to provide:

```txt
Filter&lt;Msg&gt; jsUserIDFilter =
    new JavaScriptFilter&lt;Msg&gt;("data.ID == params[0]"); // JavaScript code
    new DataType(1, ...), // validation data
    1); // validation params

// Note: the 2 last arguments are used to validate the JavaScript code
// at Filter creation, avoiding runtime errors.
```

# ContentFilter QoS

In addition to the standard API, Vortex Café offers a new ContentFilter QoS (only applicable to DataReader) allowing data at reception to be filtered.

As opposed to content filtering via the DataReader’s Selector (See Select data to read with a Custom Content Filter previously) the data is filtered before insertion in the DataReader history cache. Therefore the rejected data is not counted in history and can never be read by user.

You can define a ContentFilter QoS with the same Filter class as described in Select data to read with a Custom Content Filter:

```java
// definition of a custom filter
public class MyDataFilter implements Filter&lt;MyDataType&gt; {
    @Override
    public boolean match(MyDataType data, Object... params) {
    // test the ID attribute of MyDataType
    return data.ID == ((Integer) params[0]).intValue();
    }
}
```

```txt
// creation of a ContentFilter QoS
ContentFilter filter = PolicyFactory.getPolicyFactory(env)
    .ContentFilter().withFilter(new MyFilter());

// or with a JavaScriptFilter:
// ContentFilter filter =
// PolicyFactory.getPolicyFactory(env)
// .ContentFilter()
// .withFilter(
// new JavaScriptFilter&lt;DataType&gt;("data.ID==params[0 Cuba]);
// creation of a DataReader with ContentFilter QoS
DataReader&lt;DataType&gt; reader =
sub.createDataReader(topic,
sub.getDefaultDataReaderQos().withPolicies(filter));
```

# Android permissions

Vortex Café uses a UDP multicast protocol. Your Android application using Vortex Café will therefore need the following permissions:

• android.permission.INTERNET
• android.permission.CHANGE\_WIFI\_MULTICAST\_STATE

Also, as UDP multicast is usually only available with a WiFi connection, you may want to check if WiFi is active using the following permission:

• android.permission.ACCESS\_NETWORK\_STATE

# 3.4. Android permissions

# 4

# Vortex Café runtime configuration

Vortex Café is configured with the help of java properties.

# Where to set properties

Configuration properties can be specified in 3 different ways :

• Vortex Café will first try to load properties from a default configuration file named: “vortex\_cafe.properties”. This file is searched the classpath as a Java resource. The properties loaded from this file will override default properties.

• Vortex Café will then try to load properties from a file at the location specified with the system property named: “vortex\_cafe.properties”. This property value can be a path to the configuration file, a resource name or an URL (http, https, ftp...) to this file. See “std,std-refHow Vortex Café searches for files to load” for more information on file loading. The properties loaded from this file will override previously loaded properties. Examples :

```javascript
-Dvortex_cafe.properties=/etc/myFile.properties
```

```txt
-Dvortex_cafe.properties=http://10.0.0.1/myVortexCafe-properties
```

```txt
-Dvortex_cafe.properties=ftp://user:password@10.0.0.1/myDir/myFile.properties
```

• Vortex Café will finally try to load properties from java System Properties. These properties will override previously loaded properties.

# How Vortex Café searches for files to load

For all properties defining a file location (e.g. vortex\_cafe.properties or ddsi.security.ssl.keystore.file) Vortex Café will try to open the file in the following order:

• first it tries to consider the specified location as a path to a local file system:

– using the location as an absolute path
– using the location as an relative path starting from “user.dir” Java system property (i.e. the working directory)
– using the location as an relative path starting from “home.dir” Java system property (i.e. the home directory)

• then it tries to consider the specified location as a Java resource name:

– looking for the resource via the ContextClassLoader of the current Thread (see java.lang.Thread.getContextClassLoader())
– looking for the resource via the ClassLoader which loaded the Vortex Café classes
– looking for the resource via the SystemClassLoader (see java.lang.ClassLoader.getSystemResource(String))

• finally it tries to consider the specified location as an URL:

– by default the protocols specified in the java.net.URL constructor are supported (http, https, ftp, file, and jar)
– you can add more protocols using the java.net.URL.setURLStreamHandlerFactory() operation

# Android specificities

# Where to locally store files used for configuration properties ?

You can copy them to your Android project in res/raw/ folder or in assets folder. When looking for a file specified via a configuration property, Vortex Café will search for the file in those 2 folders.

Vortex Café gets access to the stored files via an Android Context. You have the possibility to indicate which Context should be used calling this operation before any Participant creation:

```javascript
// myAndroidContext could be your Application itself or any Activity object com.prismtech.cafe.ddsi.utils.SystemUtilsAndroid.setContext(myAndroidContext);
```

If you don’t call this operation, Vortex Café will try to retrieve the Android Application Context when the first Participant is created. But this requires the Participant to be created from an Activity thread.

# Properties scope

Vortex Café uses a properties set per Participant. Each Participant loads its properties as seen in previous chapter.

Consequently, if you want to specify different properties for different Participants you have to set those as System Properties before each Participant creation.

Examples :
```matlab
System.setProperty("vortex_cafe.properties", "myParticipant1.properties");
DomainParticipant dp1 =
env.getSPI().getParticipantFactory().createParticipant(DOMAIN_ID1);

System.setProperty("vortex_cafe.properties", "myParticipant2.properties");

DomainParticipant dp2 =
env.getSPI().getParticipantFactory().createParticipant(DOMAIN_ID2);

System.setProperty("ddsi.discovery.participant.leaseDuration", "5.0");

DomainParticipant dp1 =
env.getSPI().getParticipantFactory().createParticipant(DOMAIN_ID1);

System.setProperty("ddsi.discovery.participant.leaseDuration", "10.0");

DomainParticipant dp2 =
env.getSPI().getParticipantFactory().createParticipant(DOMAIN_ID2);
```

# Units of duration properties

Durations are expressed in seconds with accuracy up to nanoseconds.

# 4.3. Android specificities

# Example :

• 1.02 = 1 second and 20 milliseconds
• 0.001 = 1 millisecond

# Configuration Properties description

# ddsi.network.interface

Type String

Default “auto”

# Behavior

This indicates the network interface Vortex Cafe uses for both TCP and UDP communications. The default value “auto” will chose a default network card. In addition of “auto” the accepted values are:

- a short “Unix-like” interface name (e.g. eth0, wlan1...)
- the IP address of the interface
- on Windows platforms: a connection name (e.g. “Local Area Connection”)

Note that this option can be overridden by the ddsi.network.tcp.interface or the ddsi.network.udp.interface options.

# ddsi.network.tcp.interface

Type String

Default

# Behavior

This indicates the network interface Vortex Cafe uses for TCP communications.

If both ddsi.network.interface and ddsi.network.tcp.interface options are specified, the ddsi.network.tcp.interface option will have precedence over the ddsi.network.interface option for TCP communications. The default value “auto” will chose a default network card. In addition of “auto” the accepted values are:

- a short “Unix-like” interface name (e.g. eth0, wlan1...)
- the IP address of the interface
- on Windows platforms: a connection name (e.g. “Local Area Connection”)

# ddsi.network.udp.interface

Type String

Default

# Behavior

This indicates the network interface Vortex Cafe uses for UDP communications.

If both ddsi.network.interface and ddsi.network.udp.interface options are specified, the ddsi.network.udp.interface option will have precedence over the ddsi.network.interface option for UDP communications. The default value “auto” will chose a default network card. In addition of “auto” the accepted values are:

# 4.6. Configuration Properties description

- a short “Unix-like” interface name (e.g. eth0, wlan1...)
- the IP address of the interface
- on Windows platforms: a connection name (e.g. “Local Area Connection”)

# ddsi.network.transport

Type String

Default

Behavior

Indicates the transport Vortex Cafe should use for network communications.

Valid values are :

- “udp”
- “tcp”

@deprecated replaced by ddsi.network.tcp.enabled and ddsi.network.udp.enabled.

ddsi.network.transport=tcp is equivalent to

\- ddsi.network.tcp.enabled=true

\- ddsi.network.udp.enabled=false

ddsi.network.transport=udp is equivalent to

\- ddsi.network.tcp.enabled=false

\- ddsi.network.udp.enabled=true

Setting both this deprecated ddsi.network.transport option and one of the new options is considered as an invalid configuration and will throw an exception at participant creation.

# ddsi.network.tcp.enabled

Type boolean

Default true

Behavior

When set to true, VortexCafe will use TCP transport (in addition to other enabled transports).

# ddsi.network.udp.enabled

Type boolean

Default true

Behavior

When set to true, VortexCafe will use UDP transport (in addition to other enabled transports).

# ddsi.network.endianess

Type java.nio.ByteOrder

Default BIG\_ENDIAN

Behavior

Specifies in which byte order messages to be sent will be encoded. BIG\_ENDIAN will require less resources for the local jvm.

# ddsi.network.udp.ttl

Type int

Default 32

Behavior

Time to Live value for emitted UDP multicast packets.

# ddsi.network.udp.join.interfaces

Type String

Default “single”

Behavior

Specifies which network interfaces to use when joining the UDP multicast group. Valid values are :

- “single” : VortexCafe will join the multicast group only via the specified network interface (configured via ddsi.network.interface or ddsi.network.udp.interface options)
- “subnet” : VortexCafe will join the multicast group via all active network interfaces which have an IP address on the same sub-network than the network interface configured via ddsi.network.interface or ddsi.network.udp.interface . This is the default value.

# ddsi.network.ssl.handshake.timeout

Type Duration

Default 1

Behavior

Specifies the maximum amount of time Cafe should wait for a SSL handshake to finish before giving up.

# ddsi.network.receiver.threadPool.size

Type int

Default 4

Behavior

Size of the thread pool used to decode messages. If the value is set to 0, then the thread pool is not created, underlying socket threads are used to decode messages. For better latency, use 0, for better throughput, use a positive value depending on the number of usable cores.

# 4.6. Configuration Properties description

# ddsi.network.receiver.transports.separateThreadPools

Type boolean

Default false

Behavior

If set to true, 2 different thread pools will be used to decode messages received from TCP transport and UDP transport. Otherwise, the same threadpool will be used.

# ddsi.network.receiver.socket.buffer.size

Type int

Default 1048576

Behavior

Size of the socket receive buffer. This option directly drives the SO\_RCVBUF socket option.

# ddsi.network.receiver.udp.buffer.size

Type int

Default 65536

Behavior

Size of the buffers used to read incoming UDP datagrams. The default value is 65536. If a smaller value is used, some big UDP datagrams could be truncated.

# ddsi.network.receiver.udp.threadPool.size

Type int

Default 4

Behavior

Size of the thread pool used to decode messages received from UDP transport. This has an impact only if ddsi.network.receiver.transports.separateThreadPools is explicitly set to true. Note : if ddsi.network.receiver.transports.separateThreadPools is set to true and this property is not set, this property will take the same value as ddsi.network.receiver.threadPool.size.

# ddsi.network.receiver.tcp.threadPool.size

Type int

Default 4

Behavior

Size of the thread pool used to decode messages received from TCP transport. This has an impact only if ddsi.network.receiver.transports.separateThreadPools is explicitly set to true. Note : if ddsi.network.receiver.transports.separateThreadPools is set to true and this property is not set, this property will take the same value as ddsi.network.receiver.threadPool.size.

# ddsi.network.receiver.dataProcessor.threadPool.size

Type int

Default 0

Behavior

Size of the thread pool used to treat data messages. If set to 0, then the thread pool is not created and the underlying thread (receiver thread pool or socket thread) is used to treat message. For better latency, use 0.

# ddsi.network.receiver.acknackProcessor.threadPool.size

Type int

Default 0

Behavior

Size of the thread pool used to treat acknack messages. If set to 0, then the thread pool is not created and the underlying thread (receiver thread pool or socket thread) is used to treat message. For better latency, use 0.

# ddsi.network.receiver.ignoreLocalPublishers

Type boolean

Default false

Behavior

When set to true, then the participant ignores all messages coming from itself. In other words, local writers will not communicate with local readers.

# ddsi.network.receiver.ignoreInfoDst

Type boolean

Default false

Behavior

When set to true, then the participant ignores the INFO\_DST context. So it will interpret messages that do not concern him.

# ddsi.network.receiver.anyMessageAsSPDP

Type boolean

Default true

Behavior

When set to true, any message received from a given Participant will be considered as a SPDP lease renew. In other words, a participant will not be considered dead while some messages are received from it, even if no SPDP messages are received.

# ddsi.network.sender.writeBuffer.highWaterMark

Type int

Default 10000000

# Behavior

Specifies the maximum amount of unacked data in bytes each writer is allowed to send on the network. When a writer sent more than highWaterMark bytes of data on the network, it stops sending data until all the remote reliable readers positively acknowledged part of the data so that the amount of unacked sent data is less than lowWaterMark. The writer can then restart sending data on the network until the highWaterMark is eventually reached again. This allows to manage writers’ data transmission rate in order to prevent a fast sender from overwhelming a slow receiver, or a slow network, or a slow Vortex Cloud/Fog service. If set to a negative value, the highWaterMark will be considered infinite and so the writers will never block because of it.

# ddsi.network.sender.writeBuffer.lowWaterMark

Type int

Default 1000000

# Behavior

Specifies the limit under which the amount of unacked sent data needs to drop down before a writer is allowed to restart sending data on the network after it stopped sending data because the highWaterMark has been reached. This value must be set to a lower value than the highWaterMark.

# ddsi.network.sender.maxMessageSize

Type int

Default 60000

# Behavior

The maximum size of a RTPS message that can be sent as one UDP packet. This value must be >= 512.

# ddsi.network.tcp.sender.queue.enabled

Type boolean

Default true

# Behavior

Specifies if the sending messages queue should be enabled or not.

- When enabled, all RTPS messages to be sent are pushed in a queue. A worker thread then pulls messages from the queue and writes them to a socket.
- When disabled, all RTPS messages to be sent are directly written to a socket. This configuration implies less thread context switches, but may lead to a situation where all threads are blocked writing to a slow TCP connection while other samples could be sent to larger connections.

# ddsi.network.lossDetection

Type boolean

Default false

Behavior

When set to true, Vortex Cafe will log a WARN trace each time it detects that more than ddsi.network.lossDetection.floor messages have been lost among the last 100 messages. It will log an INFO trace when the number of lost messages get’s back to less than ddsi.network.lossDetection.floor messages. Vortex Cafe will also log the amount of lost messages when it exceeds ddsi.network.lossDetection.floor .

# ddsi.network.lossDetection.floor

Type int

Default 20

Behavior

This property is only used when ddsi.network.lossDetection is set to true. It indicates the minimum number of lost messages before starting to log WARN traces and lost statistics.

# ddsi.network.java.io

Type String

Default “auto”

Behavior

This indicates which java IO will Cafe use.

The accepted values are:

- “nio” : Cafe uses NIO sockets.
- “oio” : Cafe uses OIO sockets.
- “auto” : Cafe uses NIO if multicast is available on NIO - otherwise use OIO.

# ddsi.externalNetworkAddresses

Type String (list of locators)

Default local

Behavior

Indicates the list of locators Vortex Cafe should advertise to other participants for both discovery and data communications on both TCP and UDP transports.

Valid values are :

- “none” : No locators are advertised (behind a symmetric NAT)
- “local” : Local address and ports are advertised (public address) [DEFAULT]
- “&lt;locator list&gt;” : List of locators to advertise to other participants (behind a cone NAT)

Where &lt;locator list&gt; is a comma separated list of locators each locator being an IP address and port separated by a semicolon or an IP address only. Example :

1.2.3.4:7400,4.3.2.1

# 4.6. Configuration Properties description

This configuration value may be overridden by :

- ddsi.tcp.externalNetworkAddresses
- ddsi.udp.externalNetworkAddresses
- ddsi.discovery.externalNetworkAddresses
- ddsi.discovery.tcp.externalNetworkAddresses
- ddsi.discovery.udp.externalNetworkAddresses
- ddsi.data.externalNetworkAddresses
- ddsi.data.tcp.externalNetworkAddresses
- ddsi.data.udp.externalNetworkAddresses

# ddsi.tcp.externalNetworkAddresses

Type String (list of locators)

Default local

# Behavior

Indicates the list of TCP locators Vortex Cafe should advertise to other participants for both discovery and data communications.

Valid values are :

- “none” : No locators are advertised (behind a symmetric NAT)
- “local” : Local TCP address and ports are advertised (public address) [DEFAULT]
- “&lt;locator list&gt;” : List of TCP locators to advertise to other participants (behind a cone NAT)

Where &lt;locator list&gt; is a comma separated list of locators each locator being an address and port separated by a semicolon or an IP address only. Example :

1.2.3.4:7400,4.3.2.1

This configuration value may be overridden by :

- ddsi.discovery.externalNetworkAddresses
- ddsi.discovery.tcp.externalNetworkAddresses
- ddsi.data.tcp.externalNetworkAddresses

# ddsi.udp.externalNetworkAddresses

Type String (list of locators)

Default local

# Behavior

Indicates the list of UDP locators Vortex Cafe should advertise to other participants for both discovery and data communications.

Valid values are :

- “none” : No locators are advertised (behind a symmetric NAT)
- “local” : Local UDP address and ports are advertised (public address) [DEFAULT]
- “&lt;locator list&gt;” : List of UDP locators to advertise to other participants (behind a cone NAT)

# 4.6. Configuration Properties description

Where &lt;locator list&gt; is a comma separated list of locators each locator being an address and port separated by a semicolon or an IP address only. Example :

1.2.3.4:7400,4.3.2.1

This configuration value may be overridden by :

- ddsi.discovery.externalNetworkAddresses
- ddsi.discovery.udp.externalNetworkAddresses
- ddsi.data.udp.externalNetworkAddresses

# ddsi.discovery.propagation

Type boolean

Default false

Behavior

If true, when this participant discovers a new remote participant, it sends all the participants it discovered so far to the newly discovered participant. This allows a dynamic discovery in non-multicast environments.

# ddsi.discovery.participant.guidPrefix

Type byte[]

Default []

Behavior

Set the GUID prefix of the Participant.

This GUID prefix MUST be unique in the system. It must be define here as a 12 bytes hexa string (i.e. 24 characters). For instance: “0123456789abcdef0123456789ABCDEF”.

If this option is not specified (this is the case by default), a GUID prefix will be generated, using hostid, process id and a counter (or random numbers if hostid or process id can’t be found).

# ddsi.discovery.participant.leaseDuration

Type Duration

Default 10

Behavior

Other participants should consider this participant as “dead” if they do not receive any SPDP message from it for leaseDuration seconds.

# ddsi.discovery.participant.advertisePeriod

Type Duration

Default 2.5

# 4.6. Configuration Properties description

# Behavior

The participant will send a SPDP discovery message every advertisePeriod seconds. This value must be lesser than ddsi.discovery.participant.leaseDuration value.

# ddsi.discovery.participant.discoveryWaitPeriod

Type Duration

Default 2

Behavior

At participant creation, after initialization, the create\_participant() method will block for discoveryWaitPeriod seconds to allow discovery to complete.

# ddsi.discovery.readersAdvertisementDelay

Type Duration

Default 0.05

Behavior

After discovering a remote participant, the implementation will immediately advertise it’s local writers to the remote participant, but wait readersAdvertisementDelay before it advertise it’s readers. This allows the local readers to set up correctly before the remote writer endpoint starts sending data on the network.

# ddsi.discovery.participant.name

Type String

Default “”

Behavior

Represents the name of the participant. The default is “” which is not sent over DDSI.

# ddsi.discovery.exec.name

Type String

Default “”

Behavior

Represents the name of the application. The default is “” which is replaced by the name of the class defining the main(String[] args) operation, or failing that, the process name.

# ddsi.discovery.tcp.port

Type int

Default -1

Behavior

Indicates the port number the participant should listen on for discovery traffic when using TCP transport. If set to -1 (default value), no port will be open (i.e. the participant will acts as a TCP client only). If set to 0, an available port will be automatically chosen by the operating system.

# 4.6. Configuration Properties description

# ddsi.discovery.externalNetworkAddresses

Type String (list of locators)

Default local

# Behavior

Indicates the list of locators Vortex Cafe should advertise to other participants for discovery communications on both TCP and UDP transports.

Valid values are :

- “none” : No locators are advertised (behind a symmetric NAT)
- “local” : Local address and ports are advertised (public address) [DEFAULT]
- “&lt;locator list&gt;” : List of locators to advertise to other participants (behind a cone NAT)

Where &lt;locator list&gt; is a comma separated list of locators each locator being an IP address and port separated by a semicolon or an IP address only. Example :

1.2.3.4:7400,4.3.2.1

This configuration value may be overridden by :

- ddsi.discovery.tcp.externalNetworkAddresses
- ddsi.discovery.udp.externalNetworkAddresses

# ddsi.discovery.tcp.externalNetworkAddresses

Type String (list of locators)

Default local

# Behavior

Indicates the list of TCP locators Vortex Cafe should advertise to other participants for discovery communications.

Valid values are :

- “none” : No locators are advertised (behind a symmetric NAT)
- “local” : Local TCP address and ports are advertised (public address) [DEFAULT]
- “&lt;locator list&gt;” : List of TCP locators to advertise to other participants (behind a cone NAT)

Where &lt;locator list&gt; is a comma separated list of locators each locator being an address and port separated by a semicolon or an IP address only. Example :

1.2.3.4:7400,4.3.2.1

# ddsi.discovery.udp.externalNetworkAddresses

Type String (list of locators)

Default local

# Behavior

Indicates the list of UDP locators Vortex Cafe should advertise to other participants for discovery communications.

Valid values are :

# 4.6. Configuration Properties description

- “none” : No locators are advertised (behind a symmetric NAT)
- “local” : Local UDP address and ports are advertised (public address) [DEFAULT]
- “&lt;locator list&gt;” : List of UDP locators to advertise to other participants (behind a cone NAT)

Where &lt;locator list&gt; is a comma separated list of locators each locator being an address and port separated by a semicolon or an IP address only. Example :

1.2.3.4:7400,4.3.2.1

# ddsi.discovery.tcp.peers

Type String (list of list of locators)

Default []

Behavior

Indicates the list of tcp endpoints that the participant should try to contact initially when using tcp transport.

# ddsi.discovery.udp.allowMulticast

Type String

Default “full”

Behavior

Indicates when multicast is allowed to be used or not. The accepted values are:

- “full” meaning UDP multicast is used whenever possible, for reception as well as publications. This is the default value.
- “publications” meaning that UDP multicast is only used for discovery (reception and publications of SPDP and SEDP) and for publications of data (not for reception).
- “discovery” meaning that UDP multicast is only used for discovery (reception and publications of SPDP and SEDP).
- “minimal” meaning UDP multicast is only used for the initial participants discovery (SPDP reception and publications). All further communications (SPDP liveliness, SEDP, user DATA) will rely on unicast. The participant will not advertise any UDP multicast locator (multicast messages may still be received but the communications does not rely on them).
- “none” meaning UDP multicast is never used.
- “true” (@deprecated) meaning the same than “full”.
- “false” (@deprecated) meaning the same than “none”.

# ddsi.discovery.udp.peers

Type String (list of locators)

Default []

Behavior

Indicates the list of udp unicast endpoints that the participant should try to contact initially when using udp transport.

# 4.6. Configuration Properties description

# ddsi.discovery.udp.unicast.port

Type int

Default -1

Behavior

Indicates the port number the participant should listen on for discovery traffic when using UDP unicast transport. if not defined by user (-1), port rule computation will be used

# ddsi.data.udp.unicast.port

Type int

Default -1

Behavior

Indicates the port number the participant should listen on for data traffic when using UDP unicast transport. if not defined by user (-1), port rule computation will be used

# ddsi.discovery.udp.multicast.address

Type String (IP address)

Default “238.71.106.190”

Behavior

Indicates the multicast address used for discovery. The default value is the one specified in the RTPS standard and should be used for interoperability.

# ddsi.discovery.udp.port.basenumber

Type int

Default 7400

Behavior

Port Base Number.

This value is used to calculate port numbers to listen on according to the following expressions (where PB is the Port Base Number):

- MetaTraffic-Multicast-port = PB + DG x domainId + d0
- MetaTraffic-Unicast-port = PB + DG x domainId + d1 + PG x participantId
- UserTraffic-Multicast-port = PB + DG x domainId + d2
- UserTraffic-Unicast-port = PB + DG x domainId + d3 + PG x participantId

# ddsi.discovery.udp.port.dg

Type int

Default 250

Behavior

Domain Gain.

# 4.6. Configuration Properties description

This value is used to calculate port numbers to listen on according to the following expressions (where DG is the Domain Gain):

- MetaTraffic-Multicast-port = PB + DG x domainId + d0
- MetaTraffic-Unicast-port = PB + DG x domainId + d1 + PG x participantId
- UserTraffic-Multicast-port = PB + DG x domainId + d2
- UserTraffic-Unicast-port = PB + DG x domainId + d3 + PG x participantId

# ddsi.discovery.udp.port.pg

Type int

Default 2

Behavior

ParticipantId Gain.

This value is used to calculate port numbers to listen on according to the following expressions

- MetaTraffic-Multicast-port = PB + DG x domainId + d0
- MetaTraffic-Unicast-port = PB + DG x domainId + d1 + PG x participantId
- UserTraffic-Multicast-port = PB + DG x domainId + d2
- UserTraffic-Unicast-port = PB + DG x domainId + d3 + PG x participantId

# ddsi.discovery.udp.port.d0

Type int

Default 0

Behavior

Additional offset “d0”.

This value is used to calculate port numbers to listen on according to the following expressions ·

- MetaTraffic-Multicast-port = PB + DG x domainId + d0
- MetaTraffic-Unicast-port = PB + DG x domainId + d1 + PG x participantId
- UserTraffic-Multicast-port = PB + DG x domainId + d2
- UserTraffic-Unicast-port = PB + DG x domainId + d3 + PG x participantId

# ddsi.discovery.udp.port.d1

Type int

Default 10

Behavior

Additional offset “d1”.

# 4.6. Configuration Properties description

This value is used to calculate port numbers to listen on according to the following expressions

- MetaTraffic-Multicast-port = PB + DG x domainId + d0
- MetaTraffic-Unicast-port = PB + DG x domainId + d1 + PG x participantId
- UserTraffic-Multicast-port = PB + DG x domainId + d2
- UserTraffic-Unicast-port = PB + DG x domainId + d3 + PG x participantId

# ddsi.discovery.udp.port.d2

Type int

Default 1

Behavior

Additional offset “d2”.

This value is used to calculate port numbers to listen on according to the following expressions

- MetaTraffic-Multicast-port = PB + DG x domainId + d0
- MetaTraffic-Unicast-port = PB + DG x domainId + d1 + PG x participantId
- UserTraffic-Multicast-port = PB + DG x domainId + d2
- UserTraffic-Unicast-port = PB + DG x domainId + d3 + PG x participantId

# ddsi.discovery.udp.port.d3

Type int

Default 11

Behavior

Additional offset “d3”.

This value is used to calculate port numbers to listen on according to the following expressions

- MetaTraffic-Multicast-port = PB + DG x domainId + d0
- MetaTraffic-Unicast-port = PB + DG x domainId + d1 + PG x participantId
- UserTraffic-Multicast-port = PB + DG x domainId + d2
- UserTraffic-Unicast-port = PB + DG x domainId + d3 + PG x participantId

# ddsi.discovery.sedp.ignoreOrphanEntities

Type boolean

Default false

Behavior

Temporary hack for better interoperability with Twin Oaks CoreDX

# 4.6. Configuration Properties description

# ddsi.discovery.sedp.writers.heartbeat.period

Type Duration

Default 0.1

Behavior

Discovery writers (SEDP) will send a heartbeat message every heartbeat.period seconds until all their data messages have been acknowledged by all known associated readers.

# ddsi.discovery.sedp.writers.nack.responsePeriod

Type Duration

Default 0.1

Behavior

After reception of an AckNack message, discovery writers (SEDP) will wait nack.responsePeriod seconds before sending a repair message.

# ddsi.discovery.sedp.writers.nack.suppressionDuration

Type Duration

Default 0

Behavior

Not implemented. This value has no impact.

# ddsi.discovery.sedp.readers.heartbeat.responseDelay

Type Duration

Default 0.1

Behavior

After reception of a Heartbeat message, discovery readers (SEDP) will wait heartbeat.responseDelay seconds before sending an AckNack message.

# ddsi.discovery.sedp.udp.multicast.address

Type String (IP address)

Default “238.71.106.190”

Behavior

Indicates the multicast address used for discovery of entities (sedp protocol).

# ddsi.discovery.connection.retry.number

Type int

Default 3

Behavior

Connections retry number in case of failure.

# 4.6. Configuration Properties description

# ddsi.discovery.connection.retry.period

Type Duration

Default 15

Behavior

Connections retry period. In case of connection failure the connection may be retried period seconds later.

# ddsi.discovery.publishCMTopics

Type boolean

Default true

Behavior

SEDP writer endpoints should be created.

# ddsi.discovery.subscribeCMTopics

Type boolean

Default false

Behavior

SEDP reader endpoints should be created.

# ddsi.discovery.serviceType

Type String

Default “none”

Behavior

This configuration property should only be used by ADLINK. The valid values are the following:

\- “none” : not a service (default value)

\- “ds” : Discovery Service

\- “rs” : Routing Service

\- “fog” : Fog

# ddsi.data.udp

Type boolean

Default true

Behavior

When set to false, no udp ports are opened to listen for user data. This property is not supposed to be used by a user application exchanging user data, but only for applications performing discovery activities only (such as the Vortex-Cloud DiscoveryService).

# 4.6. Configuration Properties description

# ddsi.data.tcp.port

Type int

Default -1

Behavior

Indicates the port number the participant should listen on for data traffic when using TCP transport. If this option is not specified, then Vortex Cafe will use the same port for both discovery and data traffic.

# ddsi.data.externalNetworkAddresses

Type String (list of locators)

Default local

Behavior

Indicates the list of locators Vortex Cafe should advertise to other participants for data communications on both TCP and UDP transports.

Valid values are :

- “none” : No locators are advertised (behind a symmetric NAT)
- “local” : Local address and ports are advertised (public address) [DEFAULT]
- “&lt;locator list&gt;” : List of locators to advertise to other participants (behind a cone NAT)

Where &lt;locator list&gt; is a comma separated list of locators each locator being an IP address and port separated by a semicolon or an IP address only. Example :

1.2.3.4:7400,4.3.2.1

This configuration value may be overridden by :

- ddsi.data.tcp.externalNetworkAddresses
- ddsi.data.udp.externalNetworkAddresses

# ddsi.data.tcp.externalNetworkAddresses

Type String (list of locators)

Default local

Behavior

Indicates the list of TCP locators Vortex Cafe should advertise to other participants for data communications.

Valid values are :

- “none” : No locators are advertised (behind a symmetric NAT)
- “local” : Local TCP address and ports are advertised (public address) [DEFAULT]
- “&lt;locator list&gt;” : List of TCP locators to advertise to other participants (behind a cone NAT)

Where &lt;locator list&gt; is a comma separated list of locators each locator being an address and port separated by a semicolon or an IP address only. Example :

1.2.3.4:7400,4.3.2.1

# ddsi.data.udp.externalNetworkAddresses

Type String (list of locators)

Default local

# Behavior

Indicates the list of UDP locators Vortex Cafe should advertise to other participants for data communications.

Valid values are :

- “none” : No locators are advertised (behind a symmetric NAT)
- “local” : Local UDP address and ports are advertised (public address) [DEFAULT]
- “&lt;locator list&gt;” : List of UDP locators to advertise to other participants (behind a cone NAT)

Where &lt;locator list&gt; is a comma separated list of locators each locator being an address and port separated by a semicolon or an IP address only. Example :

1.2.3.4:7400,4.3.2.1

# ddsi.data.writers.sendKeyHash

Type boolean

Default true

Behavior

If false, user writers will not send PID\_KEY\_HASH parameter in inlineQoS.

# ddsi.data.writers.reliabilityQueue.size

Type int

Default 256

Behavior

The size of the reliability queue in RELIABLE writers. The reliability queue is used to keep messages and be able to resend them in case of transmission failure. There is one queue per associated reader.

# ddsi.data.writers.heartbeat.period

Type Duration

Default 0.01

Behavior

User writers will send a heartbeat message every heartbeat.period seconds until all their data messages have been acknowledged by all known associated readers.

# ddsi.data.writers.acknack.responseDelay

Type Duration

Default 0.01

# 4.6. Configuration Properties description

# Behavior

After reception of an AckNack message, user writers will wait acknack.responseDelay seconds before sending a repair message.

# ddsi.data.writers.acknack.suppressionDuration

Type Duration

Default 0

Behavior

Not implemented. This value has no impact.

# ddsi.data.writers.ignoreOutOfDateNacks

Type boolean

Default false

Behavior

When true, writers will ignore resend requests for samples that already have been resent since the request was made. This behavior allows to avoid useless resends (and so brings better performances) in environments with a high latency, typically WAN communications peer to peer or through Vortex Cloud and/or Vortex Fog. It should be activated in such cases. But this behavior implies more treatments and may degrade performances when the CPU resource is more constrained than network capacities which is typically the case in LAN environments, and so should be desactivated (default) in such cases.

# ddsi.data.writers.tcp.initiateConnection

Type boolean

Default false

Behavior

Indicates, when using TCP transport, if writers are allowed to connect to remote readers even if they are reachable by remote readers. This value has no effect on UDP communications.

# ddsi.data.readers.orderQueue.size

Type int

Default 2048

Behavior

When messages from a given writer arrive out of order, too recent messages, are kept in an order queue waiting for older messages to arrive. This is the maximum size of this order queue. When this queue is full, then messages are dropped.

# ddsi.data.readers.heartbeat.responseDelay

Type Duration

Default 0.001

Behavior

# 4.6. Configuration Properties description

After reception of a Heartbeat message, user readers will wait heartbeat.responseDelay seconds before sending an AckNack message.

# ddsi.data.readers.heartbeat.suppressionDuration

Type Duration

Default 0

Behavior

Not implemented. This value has no impact.

# ddsi.data.readers.preTimeout

Type Duration

Default 1

Behavior

Used in WaitForHistorical data algorithm : - Check if preTimeout has elapsed since the creation of the Reader - otherwise wait until this preTimout has elapsed : that is to give a chance to reader to discover remote writers preTimeout seconds.

# ddsi.data.readers.timeout

Type Duration

Default 1

Behavior

Timeout used in WaitForHistorical timeout seconds.

# ddsi.interop.pre611FragmentationMode

Type boolean

Default false

Behavior

OpenSpliceDDS fragments encoding changed between version V6.1.0 and V6.1.1. When this property is set to true, then fragments are encoded/decoded to be compatible with OpenSpliceDDS versions older than V6.1.1. Otherwise, fragments are encoded/decoded to be compatible with recent OpenspliceDDS versions.

# ddsi.interop.twinoaksTempHack

Type boolean

Default false

Behavior

Temporary hack for better interoperability with Twin Oaks CoreDX

# ddsi.security.authClassName

Type String

Default

Behavior

Indicates the name of the class implementing the Authentication plugin

# ddsi.security.accessCtrlClassName

Type String

Default

Behavior

Indicates the name of the class implementing the Access Control plugin

# ddsi.security.cryptoClassName

Type String

Default

Behavior

Indicates the name of the class implementing the Cryptographic plugin

# ddsi.security.loggingClassName

Type String

Default

Behavior

Indicates the name of the class implementing the Logging plugin

# ddsi.security.dataTagClassName

Type String

Default

Behavior

Indicates the name of the class implementing the Data Tagging plugin

# ddsi.security.localRetryDelay

Type Duration

Default 1

Behavior

Specifies the maximum amount of time Cafe should wait before retrying local validation.

# 4.6. Configuration Properties description

# ddsi.security.randomGenerator

Type String

Default

Behavior

Make the random generator configurable so that the user can choose a quick generator or a more secure generator. The quick one should be used by default. The possible values are: quick (By default, using SecureRandom) secure (but slower)

# ddsi.security.ssl

Type boolean

Default false

Behavior

When set to true the TCP communications will be secured via a SSL (or TLS) protocol. See all ddsi.security.ssl... options below to configure this.

# ddsi.security.ssl.algorithm

Type String

Default “TLS”

Behavior

The standard name of the requested SSL protocol.

See the SSLContext section in the Java Cryptography Architecture Standard Algorithm Name Documentation for information about standard protocol names.

# ddsi.security.ssl.keystore.file

Type String

Default

Behavior

The keystore file providing credential (private/public keys and certificates) to be used for encryption and authentication. See the Java Secure Socket Extension Reference Guide for more information.

This value could be:

- a path to local file system (absolute or relative)
- a Java resource name (absolute or relative)
- a URL (i.e. a string starting with a protocol scheme as “file:”, “http:” ...)

See User Guide for more information on how Cafe searches for files to load.

# ddsi.security.ssl.keystore.format

Type String

Default “JKS”

# 4.6. Configuration Properties description

# Behavior

The type of the keystore file.

See the KeyStore section in the Java Cryptography Architecture Standard Algorithm Name Documentation for information about standard keystore types.

# ddsi.security.ssl.keystore.password

Type char[]

Default null

Behavior

The password of the keystore file.

# ddsi.security.ssl.keymanager.algorithm

Type String

Default “PKIX”

Behavior

The standard name of the requested SSL Key Manager algorithm.

See the Java Secure Socket Extension Reference Guide for information about standard algorithm names.

# ddsi.security.ssl.truststore.file

Type String

Default

Behavior

The truststore file providing trusted certificates which are used to verify the identity of remote entities. See the Java Secure Socket Extension Reference Guide for more information.

This value could be:

- a path to local file system (absolute or relative)
- a Java resource name (absolute or relative)
- a URL (i.e. a string starting with a protocol scheme as “file:”, “http:” ...)

See User Guide for more information on how Cafe searches for files to load.

# ddsi.security.ssl.truststore.format

Type String

Default “JKS”

Behavior

The type of the truststore file.

# 4.6. Configuration Properties description

See the KeyStore section in the Java Cryptography Architecture Standard Algorithm Name Documentation for information about standard keystore types (Note: a truststore is a specific keystore).

# ddsi.security.ssl.truststore.password

Type char[]

Default null

Behavior

The password of the truststore file.

# ddsi.security.ssl.trustmanager.algorithm

Type String

Default “PKIX”

Behavior

The standard name of the requested SSL Trust Manager algorithm.

See the Java Secure Socket Extension Reference Guide for information about standard algorithm names.

# ddsi.security.ssl.crl.file

Type String

Default null

Behavior

The Certificate Revocation List (CRL) file provides a list of certificates to revoke.

# ddsi.security.ssl.pkix.maxcertpathlength

Type int

Default 5

Behavior

In case the TrustManager algorithm is “PKIX”, this configures the maximum number of non-self-issued intermediate certificates that can exist in a certification path. This field is used only if the Trust Algorithm field is set to PKIX. A value of 0 implies that the path can only contain a single certificate. A value of -1 implies that the path length is unconstrained (there is no maximum). Setting a value less than -1 causes an exception to be thrown.

# ddsi.timer.threadPool.size

Type int

Default 1

Behavior

Size of the threadpool used for all timed actions :

\- periodic actions (heartbeats, etc ...).

# 4.6. Configuration Properties description

\- delayed actions (repair, acknack, etc ...).

WARN : this value must not be set to 0.

# ddsi.durability.alignment.timeout

Type Duration

Default 15

Behavior

Specifies the maximum amount of time Cafe should spend trying to retrieve historical (TRANSIENT and PERSISTENT) data for each local DataReader. Once this timeout is elapsed and if the alignment is still not yet complete, Cafe will stop the alignment process and free all local resources assigned to this alignment. In such situation, even if alignment is partially complete, no historical data will be delivered to the DataReader.

# ddsi.durability.lazyStart

Type boolean

Default true

Behavior

When set to true the communication with the durability server(s) is only established when needed for the first time (when the first durable DataReader is created). Note that when set to true, this may slow down the creation of the first durable DataReader (see ddsi.durability.lazyStart.waitPeriod).

# ddsi.durability.lazyStart.waitPeriod

Type Duration

Default 0.5

Behavior

When durability lazy start is activated, on the first durable DataReader creation, Cafe needs to wait for communication with the durability server(s) to establish before sending requests for historical data. This configuraion property allows to specify the amount of time Cafe should wait for the communication with the durability server(s) to establish.

# 5

# Network transports configuration

Vortex Café supports 2 network transports for network communications : UDP (multicast and unicast) and TCP. It can use both those transports at the same time.

By default, Vortex Café will use both UDP and TCP in the following way:

• using UDP multicast for discovery protocol and to send messages to several remote participants
• using UDP unicast to send messages to a unique remote participant (previously discovered)
• establishing TCP connections with pre-configured peers (see Configuring the TCP peers)

![The image displays a standard warning symbol featuring a red triangle with a thick red border. Inside the triangle, centered against a white background, is a black exclamation point.](.vortex-cafe-user-guide/09790522d66c7f0e00de2975f77d22b61f8f3d490e7c659ef8126e16bf03ba4c.jpg)

Note that by default Vortex Café won’t open any TCP port for incoming connections. This is a change since v2.3.0. In previous versions, when TCP was configured, the port 7400 was open for incoming connections, consuming unnecessary resources for applications that would never be connected from outside (e.g. devices on 3G/4G that are behind a symmetric NAT)

# UDP transport configuration

# DDSI standard

Vortex Café implements the DDSI protocol specified by the O.M.G.(see http://www.omg.org/spec/ DDSI/2.1/). This protocol makes a simultaneous usage of UDP multicast and UDP unicast transports. Multicast is used for the discovery of remote participants and to send a same message to a set of discovered participants. Unicast is used when a message is intended for 1 participant only.

The DDSI specification describes some rules to automatically choose the UDP ports a DDS Participant should open. Vortex Café follows those rules by default, opening 2 UDP multicast ports and 2 UDP unicast ports:

• Discovery Multicast Port = PB + DG \* domainId + d0
• Discovery Unicast Port = PB + DG \* domainId + d1 + PG \* participantId
• User Multicast Port = PB + DG \* domainId + d2
• User data Unicast Port = PB + DG \* domainId + d3 + PG \* participantId

Where the participantId is a counter starting at 0 for the first created Participant in a process, and incremented for each successive Participants. The following table gives the default value of the constants as defined by the DDSI specification. These values can be modified by setting the corresponding configuration property in Vortex Café (see see std,std-refVortex Café runtime configuration).

<table><tr><td>Acronym</td><td>Name</td><td>Value</td><td>Café Property name</td></tr><tr><td>PB</td><td>Port Base Number</td><td>7400</td><td>ddsi.discovery.udp.port.basenumber</td></tr><tr><td>DG</td><td>Domain Id Gain</td><td>250</td><td>ddsi.discovery.udp.port.dg</td></tr><tr><td>PG</td><td>Participant Id Gain</td><td>2</td><td>ddsi.discovery.udp.port.pg</td></tr><tr><td>d0</td><td>Discovery Multicast Port Offset</td><td>0</td><td>ddsi.discovery.udp.port.d0</td></tr><tr><td>d1</td><td>Discovery Unicast Port Offset</td><td>10</td><td>ddsi.discovery.udp.port.d1</td></tr><tr><td>d2</td><td>User Data Multicast Port Offset</td><td>1</td><td>ddsi.discovery.udp.port.d2</td></tr><tr><td>d3</td><td>User Data Unicast Port Offset</td><td>11</td><td>ddsi.discovery.udp.port.d3</td></tr></table>

This means the first Participant created in a process on the DDS domain 0 will open those ports:

• Discovery Multicast Port = 7400
• Discovery Unicast Port = 7410
• User Multicast Port = 7401
• User data Unicast Port = 7411

In case UDP multicast is not supported or desired on the network, Vortex Café supports the usage of UDP unicast only. Using Vortex Café with UDP unicast only requires the setting of some configuration properties. The next chapter describes the main configuration steps that must be applied for this purpose.

# Enabling/Disabling UDP transport

By default, Vortex Café uses both TCP and UDP transports, but UDP transport can be disabled with the help of the ddsi.network.udp.enabled property :

ddsi.network.udp.enabled=false

# Limiting UDP multicast usage

You can make Vortex Café to limit its UDP multicast usage by setting the ddsi.discovery.udp.allowMulticast property. This property accepts the following values:

• "full": This is the default value. This means UDP multicast is used whenever possible, for reception as well as publications.
• "publications": meaning that UDP multicast is only used for discovery (reception and publications) and for publications of data (not for reception).
• "discovery": meaning that UDP multicast is only used for discovery (reception and publications).
• "minimal": meaning UDP multicast is only used for the initial participants discovery (SPDP reception and publications). All further communications (SPDP liveliness, SEDP, user DATA) will rely on unicast. The participant will not advertise any UDP multicast locator (multicast messages may still be received but the communications does not rely on them).
• "none": meaning UDP multicast is never used.
• "true": deprecated; equivalent to "full".
• "false": deprecated; equivalent to "none".

Note that the "minimal" or "discovery" mode is advised on Android for the following reasons:

• Support of UDP multicast can be very bad on some Android devices (loss of messages at reception).
• Some WiFi environments sometime very badly handle multicast.

# Configuring the UDP peers when multicast is disabled

When discovery cannot rely on multicast, each participant must be configured with some peers (in this case UDP peers) : the locators (endpoints) of the remote participants or services the configured participant should try to connect to. A locator is composed of an IP address or a host name and a port number.

There are several ways to configure remote peers :

• either all the remote participants locators are provided in the ddsi.discovery.udp.peers configuration property.

• either a subset only of them is provided and the discovery information propagation is enabled setting the ddsi.discovery.propagation property to true . This latter indicates to the participant to propagate its knowledge about its discovered participants. In this way, the whole participants knowledge (including their locators) will be gradually propagated to all the participants. Note that when discovery propagation is used in a system, it must be activated in all participants of the system.

# Example

ddsi.discovery.udp.peers=192.168.1.50:7570, 192.168.1.51:7560

Note that in the case of a partial listing of remote participants, it is recommended that more than one locator is listed in order to avoid ‘single point of failure’ effects.

# Setting the participant public locator

If the local address (private) of the host on which Vortex Café is running is not the address (public) that should be used to contact it (typically when the host is in a private network and behind a NAT with a public address and ports redirection) its public address must be specified in its configuration by setting the ddsi.discovery.externalNetworkAddresses property. This property accepts three values:

• "none": This indicates that the participant host does not have a public address.
• "local": This is the default value. It indicates that the local host address is the public locator of the hosted participant. This locator will be advertised to indicate the endpoint to which the other participants should connect.
• &lt;list of locators&gt; : This is a comma-separated list of public locators. This is typically the case for an internal host behind a cone NAT that hides the internal host address and exposes a different public address. Multiple locators may be provided to indicate fall-back locators and allow for an automatic failover in case of connection failure.

1 Note that specifying the port of locators is optional (if not specified, the value of ddsi.discovery.udp.unicast.port is used).

Examples

ddsi.discovery.externalNetworkAddresses=192.168.1.50:7570,192.168.1.51:7560

ddsi.discovery.externalNetworkAddresses=192.168.1.50,192.168.1.51

# Setting the participant UDP unicast ports numbers (Optional)

The discovery unicast port number is indicated by the ddsi.discovery.udp.unicast.port property. If this property is not set (or set to -1) the port rule specified by the std,std-refDDSI standard will apply.

The user unicast data port number is indicated by the ddsi.data.udp.unicast.port property. If this property is not set (or set to -1) the port rule specified by the std,std-refDDSI standard will apply.

# Mixing UDP unicast-only participants and UDP multicast participants

UDP unicast-only participants interoperate with multicast participants, but they will communicate with them only via unicast.

# TCP transport configuration

In addition to UDP, Vortex Café supports the TCP protocol as a transport layer for its DDSI stack. Using Vortex Café with TCP requires the setting of some configuration properties. This chapter describes the main configuration steps that must be applied to use TCP. Other configuration options available for fine-tuning of the TCP configuration are described in std,std-refConfiguration Properties description .

# 5.2. TCP transport configuration

# Enabling/Disabling TCP transport

By default, Vortex Café uses both TCP and UDP transports, but TCP transport can be disabled with the help of the ddsi.network.tcp.enabled property :

ddsi.network.tcp.enabled=false

# Opening the TCP listening port (optional)

By default, Vortex Café does not open any listening TCP port to listen for incoming TCP connections from remote participants or services. This is suitable for most deployments when using Vortex Cloud & Fog services and avoids ports reuse problems when deploying several participants on the same host.

Anyway, if the deployment requires several participants to directly connect to each other through TCP, Vortex Café can be configured to open a specific TCP port to listen for incoming TCP connections with the help of the ddsi.discovery.tcp.port property.

If this property is set to 0, the operating system will chose an available TCP port automatically.

Note that if multiple DDS participants are deployed on the same host, they must be configured with different discovery port numbers.

Example

ddsi.discovery.tcp.port=7400

# Configuring the TCP peers

When discovery cannot rely on multicast (which is the case when using TCP), each participant must be configured with some peers (in this case TCP peers) : the locators (endpoints) of the remote participants or services the configured participant should try to connect to. A locator is composed of an IP address or a host name and a port number.

There are several ways to configure remote peers :

• either all the remote participants locators are provided in the ddsi.discovery.tcp.peers configuration property.
• either a subset only of them is provided and the discovery information propagation is enabled setting the ddsi.discovery.propagation property to true . This latter indicates to the participant to propagate its knowledge about its discovered participants. In this way, the whole participants knowledge (including their locators) will be gradually propagated to all the participants. Note that when discovery propagation is used in a system, it must be activated in all participants of the system.

# Example

ddsi.discovery.tcp.peers=192.168.1.50:7570, 192.168.1.51:7560

Note that in the case of a partial listing of remote participants, it is recommended that more than one locator is listed in order to avoid ‘single point of failure’ effects.

# Setting the participant public locator

If the local address (private) of the host on which Vortex Café is running is not the address (public) that should be used to contact it (typically when the host is in a private network and behind a NAT with a public address and ports redirection) its public address must be specified in its configuration by setting the ddsi.discovery.externalNetworkAddresses property. This property accepts three values:

• "none": This indicates that the participant host does not have a public address. This is typically the case for an internal host behind a symmetric NAT that allows only for outgoing connections. Such a participant cannot be connected by remote participants outside the LAN. It can communicate with them only via the TCP connections it initiates itself.

# 5.2. TCP transport configuration

• "local": This is the default value. It indicates that the local host address is the public locator of the hosted participant. This locator will be advertised to indicate the endpoint to which the other participants should connect.
• &lt;list of locators&gt; : This is a comma-separated list of public locators. This is typically the case for an internal host behind a cone NAT that hides the internal host address and exposes a different public address. Multiple locators may be provided to indicate fall-back locators and allow for an automatic failover in case of connection failure.

Note that specifying the port of locators is optional (if not specified, the value of ddsi.discovery.udp.unicast.port is used).

# Examples

ddsi.discovery.externalNetworkAddresses=192.168.1.50:7570,192.168.1.51:7560

ddsi.discovery.externalNetworkAddresses=192.168.1.50,192.168.1.51

# 6

# Using Vortex Café with SSL

Vortex Café supports secure communications inside a DDS domain by using the SSL protocol.

# Enabling SSL

SSL only works over the TCP transport and so requires TCP to be enabled (which is the case by default, unless TCP is explicitly disabled). The ddsi.security.ssl property must be set to true.

```gitattributes
ddsi.security.ssl=true
```

By default, Vortex Café supports the TLS version of SSL. This can be changed by setting the ddsi.security.ssl.algorithm property.

# Providing the public/private key pair

A pair of public/private keys should be provided for each SSL-enabled participant in order to authenticate itself to the other participants and encrypt the data. The same key pair may be provided to each DDS participant using two configuration properties:

• ddsi.security.ssl.keystore.file - Indicates the keystore file name including the private key and its associated public key (wrapped in a certificate).
• ddsi.security.ssl.keystore.password - Indicates the password used to protect the private key of the generated key pair.

Note that the key pair may be generated using the JDK’s keytool utility. See http://docs.oracle.com/ javase/7/docs/technotes/tools/index.html#security for more information about its usage.

# Examples

Generating a key pair using keytool and importing it into a keystore file:

```batch
keytool -genkeypair -alias MyDDSDomain -keyalg RSA -validity 36500 -keypass secret -storepass secret -keystore dds_keystore.jks
```

Configuring the kestore-related configuration properties:

```txt
ddsi.security.ssl.keystore.file=/dds_keystore.jks
ddsi.security.ssl.keystore.password=secret
```

By default, Vortex Café supports the JKS format of keystores. This can be changed by setting the ddsi.security.ssl.keystore.format property to another format.

# Providing the trusted participants certificates

As a support to participants authentication during the SSL handshake, each participant should know who to trust by acquiring its certificate. This is done by setting two configuration properties:

• ddsi.security.ssl.truststore.file - Indicates a truststore file name including the trusted participants certificates.
• ddsi.security.ssl.truststore.password - Indicates a password used to protect the truststore access and guarantee its integrity.

# Examples

• Generating a certificate using the generated key pair (stored in a keystore):
• Importing the certificate into the truststore file:
• Setting the truststore-related configuration properties:

```batch
keytool -export -alias MyDDSDomain -keystore dds_keystore.jks -rfc -file MyDDSDomain.cert
```

```batch
keytool -import -alias MyDDSDomain -file MyDDSDomain.cert -keystore dds_truststore.jks
```

```txt
ddsi.security.ssl.truststore.file=/dds_truststore.jks
ddsi.security.ssl.truststore.password=secret
```

# SSL with Android

Android only accepts BKS (BouncyCastle keystore) keystores. Create the “KeyManager” keystore and the “Trust-Manager” keystore as explained above and convert them to .bks files compatible with Android. Portecle tool can be used to do the conversion.

# Converting the keystore files

• Download the latest version of portecle here http://sourceforge.net/projects/portecle/ files/latest/download
• Run the program (java -jar portecle.jar)
• Open your keystore file (menu File>Open Keystore File)
• Convert it to BKS file : (menu Tools>Change Keystore Type)
– if you use an Android API version > 16: choose BKS
– otherwise: choose BKS-V1
• Save the Keystore as a .bks file

# Using the keystore files

• To access the keystore files locally, embed them in your application .apk file:
– copy them to the Android project in res/raw/ folder or in assets folder. (when looking for a file specified via a configuration property, Vortex Café will search for the file in those 2 folders).
• To access the keystore files remotely, upload them to a server (http, https, ftp)
• Then, set those configuration properties:

```txt
ddsi.security.ssl=true
ddsi.security.ssl.keystore.password=secret
ddsi.security.ssl.keystore.format="BKS"
ddsi.security.ssl.keystore.file=&lt;keystoreURL&gt;
ddsi.security.ssl.keymanager.algorithm="X509"
ddsi.security.ssl.trustmanager.algorithm="X509"
```

• Here is an example of code that selects the correct bks file depending the android version :

# 6.4. SSL with Android

```txt
if (Build.VERSION.SDK_INT > 16)
{
    System.setProperty("ddsi.security.ssl.keystore.file", "my_bks.bks");
}
else
{
    System.setProperty("ddsi.security.ssl.keystore.file", "my_bks_v1.bks");
}
```

# SSL interoperability with OpenSplice DDS

When SSL is used to communicate between Vortex Café and OpenSplice, SSL certificates must be managed either in Java (using the keytool utility) or in OpenSSL (using the openssl utility). To share certificates between both SSL implementations the certificates must be copied from one format to another.

To convert from OpenSSL format ( pem files) to Java key store format, the Java keytool utility can be used.

To convert Java key store format files to OpenSSL pem files, a number of open source utilities can be used, such as Portecle (available from http://sourceforge.net/projects/portecle/ ).

For exact details on how to transform keys and certificates please refer to the specific tool documentation.

# 7

# Durability deployment

The usage of TRANSIENT and PERSISTENT Durability QoS policies requires the durability service provided by Vortex OpenSplice.

If your Vortex Café application uses such QoS policies, at least one Vortex OpenSplice durability service must be deployed in the system. But several Vortex OpenSplice durability services can be deployed for fault tolerance purposes. Vortex OpenSplice durability services can be deployed anywhere in the system.

# Note that :

• The ClientDurability functionnality needs to be activated in Vortex OpenSplice configuration to work with Vortex Café (not activated by default).
• A persistent store needs to be configured in Vortex OpenSplice to allow PERSITENT Durability QoS policy to work correctly (not configured by default).
• If you do not have any Vortex OpenSplice based applications to deploy in your system, the best way to run a durability server is to start a Vortex OpenSplice shared memory federation.

Please refer to Vortex OpenSplice deployment guide for more informations about how to configure and deploy a durability service.

# Configuring the lazy clientdurability

By default, Vortex Café creates ClientDurability entities only when needed for the first time. To make the Client-Durability entities created at the domain participant”s creation set the ddsi.durability.lazyStart property to false :

ddsi.durability.lazyStart=false

# 8

# Google Protocol Buffers

# About the Vortex Café Google Protocol Buffers Tutorial

It describes how to use the Vortex Café Java 5 API in combination with Google Protocol Buffers (GPB) data models.

Intended Audience:

This Guide is intended for anyone who wants to use Google Protocol Buffers for DDS in developing and running applications with Vortex Café.

# Introduction

# Google Protocol Buffers for DDS

Vortex Café is capable of using the Google Protocol Buffer (GPB) system for publishing and subscribing GPB messages in a DDS system. This makes it possible to use GPB as an alternative to OMG-IDL for those who prefer to use GPB rather than IDL. With the seamless integration of GPB and DDS technologies there is no need for OMG-IDL knowledge or visibility when working with GPB data models, and no OMG-DDS data-types are needed in the application (no explicit type-mapping between GPB and DDS types is required).

This results in an easy migration of GPB users to DDS(-based data-sharing) with data-centric GPB with support for keys, filters and (future) QoS-annotations (only a few DDS calls are needed). Also easy migration of DDS applications to GPB(-based data-modeling), only the field accessors change.

This chapter will describe how this is done for the language binding Java5 by defining a GPB message layout which is compiled into proper interfaces for Vortex Café.

# GPB installation and usage with Vortex Café

If you use Apache Maven as build system, there is no need to install Google Protocol Buffers and you don’t have to set any environment variable. As we will detail in Compiling the datamodel with the GPB compiler chapter, Apache Maven is able to automatically download the Google Protocol Buffers libraries and executables, and to extract the DDS specific required files from Vortex Café.

# IDL usage in a DDS system

In a Data Distributed System (DDS) as a Global DataSpace (GDS) for ubiquitous information-sharing in distributed systems as specified by the Object Management Group (OMG), the data is traditionally captured in the platform-and-language-independent OMG-IDL language. The relational model of DDS is supported by the notion of identifying key fields in these data structures where structure/content-awareness by the middleware allows for dynamic querying and filtering of data.

# Google Protocol Buffers

Google Protocol Buffers (GPB) are a flexible, efficient, automated mechanism for serializing structured data; think XML, but smaller, faster, and simpler. One can define how data needs to be structured once, after which languagespecific source code can be generated to easily write and read this structured data to and from a variety of data streams using a variety of languages. The information structure is defined in so-called protocol buffer message types in .proto files. Each protocol buffer message is a small logical record of information, containing a series of name-value pairs. This approach is quite similar to using IDL for data modeling in combination with an IDL compiler (as available in OpenSplice and DDS implementations in general).

Additionally, the GPB data structure can be updated without breaking deployed programs that are compiled against the ‘old’ format, similar to the xTypes concept as defined for DDS.

# Using a GPB data-model instead of an IDL data-model

For an IDL-OMG based application, the IDL file is compiled with the IDL-PP compiler to generate the needed classes.

For Java as an example, Address.idl will (among others) be compiled into:

• Address.java
• AddressTypesSupport.java
• AddressDataWriter.java
• AddressDataReader.java

Using a GPB data-model, it is not necessary to create IDL files. The protoc\_gen\_ddsJava plug-in in Vortex Café will create them from the given .proto data-model.

For the GPB .proto based application, the .proto file is first compiled by the Google protoc compiler. This compiler will call the protoc\_gen\_ddsjava plug-in from Vortex Café with the .proto data parsed into a CodeGeneratorRequest protocol buffer.

The Vortex Café plug-in will generate an IDL file from this data. Any field member that is marked as key or filterable is explicitly mapped to a member in the IDL type.

The complete serialized .proto message is stored in the generic ospl\_protobuf\_data attribute as a sequence of bytes (making it opaque data for DDS). The mapping between data types is given in the table Mapping of GPB types to DDS types.

As the next step the idl2j compiler will generate the previously-named files from the idl file needed for the DDS domain. The Google protoc compiler will generate the classes needed for the GPB domain.

The dds options for the proto file are given in the omg/dds/descriptor.proto file listed below. This proto file shows how the different dds options on the proto file are interpreted, and gives the unique id 1016 to the dds types.

1

Note that the id 1016 has officially been granted to the Vortex product by Google.

This ensures these options are always unique and won’t clash with any options used by users.

omg/dds/descriptor.proto
```proto
import "google/protobuf/descriptor.proto";
package omg.dds;
option java_package = "org.omg.dds.protobuf";
option java_outer_classname = "DescriptorProtos";
```

# 8.2. Introduction

```proto
/* These options are required for any .proto message that needs to be available
* in DDS.
*
* - name: An optional scoped name to allow overriding the name of the type in
* DDS. The dot('.') can be used as a scoping separator. In case the name
* starts with a dot, the name will be interpreted as an absolute scope name.
* If not, the name will be considered relative to the scope of the message
* including its 'package'.
*/
message MessageOptions {
    optional string name = 1 [default = "";
}

extend google.protobuf.MessageOptions {
    optional omg.dds.MessageOptions type = 1016;
}

/* These options are provided to assign specific behaviour to a member of a
* DDS-enabled .proto message in DDS. These options will only be applied in case
* the omg.dds.MessageOptions.type has been applied to the message in which the
* member is modeled.
*
* - key: Make the member part of the key of the type in DDS. Each unique
* key-value will become a separate instance with its own history in DDS. Only
* 'required' members can be made part of the key and key-definitions cannot
* be modified in future versions of the message. Members that are part of the
* key are automatically filterable as well.
*
* - filterable: Ensure the member is filterable in DDS using a so-called
* ContentFilteredTopic or QueryCondition. Only 'required' members can be made
* filterable and filterable definitions cannot be modified in future versions
* of the message.
*
* - name: Override the name of the member in DDS. This only applies to members
* that are marked as key and/or filterable.
*/
message FieldOptions {
    optional bool key = 1 [default = false];
    optional bool filterable = 2 [default = false];
    optional string name = 3 [default = "";
}

extend google.protobuf.FieldOptions {
    optional omg.dds.FieldOptions member = 1016;
}
```

How mapping is done between the different languages is shown below in the table Mapping of GPB types to DDS types.

Mapping of GPB types to DDS types

<table><tr><td>.proto Type</td><td>Notes</td><td>Java Type</td><td>DDS IDL Type</td></tr><tr><td>double</td><td></td><td>double</td><td>double</td></tr><tr><td>float</td><td></td><td>float</td><td>float</td></tr><tr><td>int32</td><td>Uses variable-length encoding. Inefficient for encoding negative numbers; if your field is likely to have negative values, use sint32 instead</td><td>int</td><td>long</td></tr><tr><td>int64</td><td>Uses variable-length encoding. Inefficient for encoding negative numbers; if your field is likely to have negative values, use sint64 instead</td><td>long</td><td>long long</td></tr><tr><td>uint32</td><td>Uses variable-length encoding</td><td>int</td><td>unsigned long</td></tr><tr><td>uint64</td><td>Uses variable-length encoding</td><td>long</td><td>unsigned long long</td></tr><tr><td>sint32</td><td>Uses variable-length encoding. Signed int value. These encode negative numbers more efficiently than regular int32s.</td><td>int</td><td>long</td></tr><tr><td>sint64</td><td>Uses variable-length encoding. Signed int value. These encode negative numbers more efficiently than regular int64s.</td><td>long</td><td>long long</td></tr><tr><td>fixed32</td><td>Always four bytes. More efficient than uint32 if values are often greater than 2^28.</td><td>int</td><td>unsigned long</td></tr><tr><td>fixed64</td><td>Always eight bytes. More efficient than uint64 if values are often greater than 2^56.</td><td>long</td><td>unsigned long long</td></tr><tr><td>sfixed32</td><td>Always four bytes.</td><td>int</td><td>long</td></tr><tr><td>sfixed64</td><td>Always eight bytes.</td><td>long</td><td>long long</td></tr><tr><td>bool</td><td></td><td>boolean</td><td>bool</td></tr><tr><td>string</td><td>A string must always contain UTF-8 encoded or 7-bit ASCII text</td><td>String</td><td>string</td></tr></table>

# Proto message for DDS system

Individual declarations in a .proto file can be annotated with a number of options. Options do not change the overall meaning of a declaration, but may affect the way it is handled in a particular context.

• File-level options: meaning they should be written at the top-level scope, not inside any message, enum, or service definition.
• Message-level options: meaning they should be written inside message definitions.
• Field-level options: meaning they should be written inside field definitions. Enum types, enum values, service types, and service methods.

# Use case: Person

In this use case example, a system capable of describing the personal data of persons must be built using the GPB data-model

The layout can be:

```csv
string name
integer age
sequence phone-number + type
sequence friends
```

# Proto file for the Person example

This use case is described in this .proto file:
```proto
import "omg/dds/descriptor.proto";
package address;

message Person {
    required string name = 1;
    required int32 age = 2;
    optional string email = 3;

    enum PhoneType {
    UNDEFINED = 0;
    MOBILE = 1;
    HOME = 2;
    WORK = 3;
    }

    message PhoneNumber {
    required string number = 1;
    optional PhoneType type = 2 [default = HOME];
    }

    repeated PhoneNumber phone = 4;
    repeated Person friend = 5;
}
```

GPB labels every field as either a required or an optional field. Required fields are always used/filled; optional fields may or may not be.

Different data models are compatible if all required fields are the same. Data models can be extended with extra fields; if those new fields are all optional, then the new model will still be compatible with older applications using the old data model.

In our example the name and age are always required. The email string is optional, as extra information for this person. The sequences with phone numbers and friends are allowed to be empty.

Detailed explanation for the layout of a .proto file can be found in the Google Protocol buffer documentation on https://developers.google.com/protocol-buffers/docs/proto

# Annotating a proto message for use as a type in DDS

For the GPB message to be able to be handled correctly in a DDS system, some options are needed in the .proto file which define how the GPB message shall behave in the DDS system.

At the message level there is an extra option .omg.dds.type. This tells the protocol buffer compiler that this message is also a dds type message. This type option has a optional extra parameter for giving this type a dds type name. By default it has the same name in the DDS domain as it has in GPB.

The Person example with this option:
```proto
import "omg/dds/descriptor.proto";
package address;
message Person {
    option (.omg.dds.type) = {};
    required string name = 1;
    required int32 age = 2;
enum PhoneType {
    UNDEFINED = 0;
```

# 8.3. Proto message for DDS system

```txt
MOBILE = 1;
HOME = 2;
WORK = 3;
}

message PhoneNumber {
    required string number = 1;
    optional PhoneType type = 2 [default = HOME];
}
repeated PhoneNumber phone = 4;
repeated Person friend = 5;
```

# Proto file with omg.dds.member.key option

For support of a key value in the datamodel, the option key can be given as a field-member option. One or more fields containing this option will indicate that these members make a unique key identifier in the data model. A field indicated as a key field must always be a required field for GPB. Also a key field is automatically a filterable field, as described below.

The Person example with name as a unique key (this means that each unique value of the name will lead to a separate instance in DDS with its own history):

```proto
import "omg/dds/descriptor.proto";

package address;

message Person {
    option (.omg.dds.type) = {};
    required string name = 1 [(.omg.dds.member).key = true];
    required int32 age = 2;
    optional string email = 3;
}

enum PhoneType {
    UNDEFINED = 0;
    MOBILE = 1;
    HOME = 2;
    WORK = 3;
}

message PhoneNumber {
    required string number = 1;
    optional PhoneType type = 2 [default = HOME];
}

repeated PhoneNumber phone = 4;
repeated Person friend = 5;
```

# Proto file with omg.dds.member.filterable option

For support of filterable fields in the datamodel, the option filterable can be given as a field-member option.

One or more fields with this option indicates that these members are available for dynamic querying and filtering by means of a ContentFilter QoS on DataReader or a Selector with a Content in Vortex Café (see std,std-refSelect data to read with a Custom Content Filter).

A field marked as a filterable field must always be a required field in GPB. A key field is always filterable, by definition.

The Person example with age as a filterable attribute:

# 8.3. Proto message for DDS system

```proto
import "omg/dds/descriptor.proto";

package address;

message Person {
    option (.omg.dds.type) = {};
    required string name = 1 [(.omg.dds.member).key = true];
    required int32 age = 2 [(.omg.dds.member).filterable = true];
    optional string email = 3;

    enum PhoneType {
    UNDEFINED = 0;
    MOBILE = 1;
    HOME = 2;
    WORK = 3;
    }

    message PhoneNumber {
    required string number = 1;
    optional PhoneType type = 2 [default = HOME];
    }
    repeated PhoneNumber phone = 4;
    repeated Person friend = 5;
}
```

# Proto file with omg.dds.member.name option

The previous examples will result in a DDS type with the directly-mapped fields in IDL with the same name as in proto. (Key fields and filterable fields are directly mapped.)

If a different name is needed in the DDS domain for a fieldname in the generated IDL and dds type, a name can be given as an omg.dds.member option.

Example where the age field will be named AgeInYears in the DDS domain:

```proto
import "omg/dds/descriptor.proto";

package address;

message Person {
    option (.omg.dds.type) = {};
    required string name = 1 [(.omg.dds.member).key = true];
    required int32 age = 2 [(.omg.dds.member) = { name: "AgeInYears" filterable: true }];
    optional string email = 3;

    enum PhoneType {
    UNDEFINED = 0;
    MOBILE = 1;
    HOME = 2;
    WORK = 3;
    }

    message PhoneNumber {
    required string number = 1;
    optional PhoneType type = 2 [default = HOME];
    }
    repeated PhoneNumber phone = 4;
    repeated Person friend = 5;
}
```

# Compiling the datamodel with the GPB compiler

Once you’ve defined your messages, you run the protocol buffer compiler for your application’s language on your .proto file to generate data access classes. These provide simple accessors for each field so, for instance, running the compiler on the above example will generate a class called Person. You can then use this class in your application to populate, serialize, and retrieve Person protocol buffer messages.

# DDS-specific GPB-compiler plugin to generate code

The GPB compiler can be extended to support new languages via so-called plugins. The compiler invokes the plugin while providing the GPB type definition to it in the form of a GPB message. For DDS support the Vortex Café GPB-compiler is delivered with Vortex Café.

The Vortex Café IDL compiler is invoked by the Café GPB-compiler plugin to generate the DDS type including typed DataWriter and DataReader code. Additionally, code is generated to convert an instance of the DDS type to the GPB type and vice versa, which hides the DDS type from the application entirely.

# Compilation example using Apache Maven

For creating the DDS specific code by the GPB compiler using Apache Maven, there is few plugins to add and configure in your pom.xml file. We will describe those in this chapter.

Note that a complete example is delivered with Vortex Café in examples/helloworld-gpb/. Its pom.xml file uses all the plugins we describe here.

# Make Maven detect your platform characteristics

Protoc (the code generator for Google Protocl Buffer) is a binary executable. You need to use the correct binary depending your platform’s OS and architecture. With the os-maven-plugin extension, Apache Maven is able to detect your platform characteristics and then to download the appropriate protoc binary from Maven Central.

Configure this extension adding the following XML tags in your pom.xml file within the &lt;build&gt; tag:

```txt
&lt;build&gt;
    &lt;!-- ... --&gt;
    &lt;extensions&gt;
    &lt;extension&gt;
    &lt;groupId&gt;kr.motd.maven&lt;/groupId&gt;
    &lt;artifactId&gt;os-maven-plugin&lt;/artifactId&gt;
    &lt;version&gt;1.5.0.Final&lt;/version&gt;
    &lt;/extension&gt;
    &lt;/extensions&gt;
    &lt;!-- ... --&gt;
&lt;/build&gt;
```

This extension defines at build time a linux-x86\_64 property that can be used later in the pom.xml

# Make Maven to install protoc binary and the cafe-protoc plugin

Now you need the protoc binary and the cafe-protoc plugin to be installed in the build directory. For this, you have to configure the maven-dependency-plugin to perform 3 tasks:

1. Download and copy protoc binary into the build directory
2. Copy the cafe-protoc plugin into the build directory

3. Extract some required files from the cafe-protoc plugin. (those files are META-INF/\*\*/\*.proto, META-INF/templates/\*\*/\*.java and \*\*/protoc-gen-ddsjava)

To do this, insert the following XML tags in your pom.xml file within the &lt;build&gt;/&lt;plugins&gt; tags:

```xml
&lt;build&gt;
    &lt;!-- ... --&gt;
    &lt;plugins&gt;
    &lt;!-- ... --&gt;
    &lt;plugin&gt;
    &lt;groupId&gt;org.apache.maven.plugins&lt;/groupId&gt;
    &lt;artifactId&gt;maven-dependency-plugin&lt;/artifactId&gt;
    &lt;version&gt;2.9&lt;/version&gt;
    &lt;executions&gt;
    &lt;execution&gt;
    &lt;id&gt;copy-protoc&lt;/id&gt;
    &lt;phase&gt;generate-sources&lt;/phase&gt;
    &lt;goals&gt;
    &lt;goal&gt;copy&lt;/goal&gt;
    &lt;/goals&gt;
    &lt;configuration&gt;
    &lt;artifactItems&gt;
    &lt;!-- copy protoc binary into build directory --&gt;
    &lt;artifactItem&gt;
    &lt;groupId&gt;com.google.protobuf&lt;/groupId&gt;
    &lt;artifactId&gt;protoc&lt;/artifactId&gt;
    &lt;version&gt;2.6.1&lt;/version&gt;
    &lt;classifier&gt;linux-x86_64&lt;/classifier&gt;
    &lt;type&gt;exe&lt;/type&gt;
    &lt;overwrite&gt;true&lt;/overwrite&gt;
    &lt;outputDirectory&gt;${project.build.directory}&lt;/outputDirectory&gt;
    &lt;/artifactItem&gt;
    &lt;!-- copy cafe-protoc plugin for protoc into build directory --&gt;
    &lt;artifactItem&gt;
    &lt;groupId&gt;com.prismtech.cafe.gpb&lt;/groupId&gt;
    &lt;artifactId&gt;cafe-protoc&lt;/artifactId&gt;
    &lt;type&gt;jar&lt;/type&gt;
    &lt;overwrite&gt;true&lt;/overwrite&gt;
    &lt;outputDirectory&gt;${project.build.directory}&lt;/outputDirectory&gt;
    &lt;/artifactItem&gt;
    &lt;/artifactItems&gt;
    &lt;/configuration&gt;
    &lt;/execution&gt;

    &lt;!-- extract some required files from cafe-protoc plugin --&gt;
    &lt;execution&gt;
    &lt;id&gt;unpack-required-files&lt;/id&gt;
    &lt;phase&gt;generate-sources&lt;/phase&gt;
    &lt;goals&gt;
    &lt;goal&gt;unpack&lt;/goal&gt;
    &lt;/goals&gt;
    &lt;configuration&gt;
    &lt;artifactItems&gt;
    &lt;artifactItem&gt;
    &lt;groupId&gt;com.prismtech.cafe.gpb&lt;/groupId&gt;
    &lt;artifactId&gt;cafe-protoc&lt;/artifactId&gt;
    &lt;version&gt;2.4.0&lt;/version&gt;
    &lt;type&gt;jar&lt;/type&gt;
    &lt;outputDirectory&gt;${project.build.directory}/cafe-protoc-files&lt;/outputDirectory&gt;
    &lt;includes&gt;META-INF/**/*.proto,
    **/protoc-gen-ddsjava,
    META-INF/templates/**/*.java&lt;/includes&gt;
    &lt;/artifactItem&gt;
```

```xml
&lt;/artifactItems&gt;
&lt;/configuration&gt;
&lt;/execution&gt;

&lt;/executions&gt;
&lt;/plugin&gt;

&lt;!-- ... --&gt;
&lt;/plugins&gt;
&lt;!-- ... --&gt;
&lt;/build&gt;
```

# Execution of protoc with the cafe-protoc plugin

Finally, you need to make executable the protoc binary and a cafe-protoc script files, and to make Maven to execute the protoc command.

1. Use the maven-antrun-plugin (within the &lt;build&gt;/&lt;plugins&gt; tags) to:

• grant execution rights to protoc binary
• move protoc-gen-ddsjava script along cafe-protoc plugin
• grant execution rights to protoc-gen-ddsjava script

```xml
&lt;build&gt;
    &lt;!-- ... --&gt;
    &lt;plugins&gt;
    &lt;!-- ... --&gt;
    &lt;plugin&gt;
    &lt;groupId&gt;org.apache.maven.plugins&lt;/groupId&gt;
    &lt;artifactId&gt;maven-antrun-plugin&lt;/artifactId&gt;
    &lt;version&gt;1.6&lt;/version&gt;
    &lt;executions&gt;
    &lt;execution&gt;
    &lt;id&gt;prepare-protoc-and-plugin&lt;/id&gt;
    &lt;phase&gt;process-sources&lt;/phase&gt;
    &lt;configuration&gt;
    &lt;target&gt;
    &lt;!-- grant execution rights to protoc binary --&gt;
    &lt;chmod
    file="${project.build.directory}/protoc-2.6.1-linux-x86_64.exe"
    perm="755" /&gt;
    &lt;!-- move protoc-gen-ddsjava script along cafe-protoc plugin --&gt;
    &lt;move
    file="${project.build.directory}/cafe-protoc-files/META-INF/scripts/prot
    todir="${project.build.directory}" /&gt;
    &lt;!-- grant execution rights to protoc-gen-ddsjava script --&gt;
    &lt;chmod
    file="${project.build.directory}/protoc-gen-ddsjava"
    perm="755" /&gt;
    &lt;/target&gt;
    &lt;/configuration&gt;
    &lt;goals&gt;
    &lt;goal&gt;run&lt;/goal&gt;
    &lt;/goals&gt;
    &lt;/execution&gt;
    &lt;/executions&gt;
    &lt;/plugin&gt;
    &lt;!-- ... --&gt;
&lt;/plugins&gt;
```

```txt
&lt;!-- ... --&gt;
&lt;/build&gt;
```

2. Use the exec-maven-plugin (within the &lt;build&gt;/&lt;plugins&gt; tags) to run protoc and it’s cafe-protoc plugin in order to generate GPB data access code.

```xml
&lt;build&gt;
    &lt;!-- ... --&gt;
    &lt;plugins&gt;
    &lt;!-- ... --&gt;
    &lt;plugin&gt;
    &lt;groupId&gt;org.codehaus.mojo&lt;/groupId&gt;
    &lt;artifactId&gt;exec-maven-plugin&lt;/artifactId&gt;
    &lt;version&gt;1.2.1&lt;/version&gt;
    &lt;executions&gt;
    &lt;execution&gt;
    &lt;id&gt;generate-protobuf-descriptor&lt;/id&gt;
    &lt;phase&gt;generate-resources&lt;/phase&gt;
    &lt;goals&gt;
    &lt;goal&gt;exec&lt;/goal&gt;
    &lt;/goals&gt;
    &lt;configuration&gt;
    &lt;executable&gt;${project.build.directory}/protoc-2.6.1-linux-x86_64.exe&lt;/executable&gt;
    &lt;workingDirectory&gt;${project.build.directory}/generated-sources&lt;/workingDirector&gt;
    &lt;commandlineArgs&gt;--java_out=./
    --ddsjava_out=./
    --plugin=${project.build.directory}/protoc-gen-ddsjava
    --proto_path=${project.basedir}/src/main/proto
    --proto_path=${project.build.directory}/cafe-protoc-files/META-INF/proto/
    ${project.basedir}/src/main/proto/address.proto
    &lt;/commandlineArgs&gt;
    &lt;/configuration&gt;
    &lt;/execution&gt;
    &lt;/executions&gt;
    &lt;/plugin&gt;
    &lt;!-- ... --&gt;
    &lt;/plugins&gt;
    &lt;!-- ... --&gt;
&lt;/build&gt;
```

Here are the meanings of used parameters:

• --ddsjava\_out must be given to the compiler. Also the path to the plugin executable must be given.
• --java\_out gives the path where the GDP generated code will be stored.
• --ddsjava\_out gives the path where the DDS-specific generated code will be stored.
• --plugin the protoc needs the path to GPB-Compiler plugin executable, so no environment variable is needed to be set.
• first --proto\_path: the protoc compiler needs the path where the .proto file is located.
• second --proto\_path: the path where the GPB depencies are stored
• the last option is the .proto file to compile.

Note that the code will be generated in &lt;workingDirectory&gt;, i.e.: target/generated-sources.

# Compilation of protoc generated code

For the generated code to be compiled, you just need to add its directory as a source directory using the buildhelper-maven-plugin (within the &lt;build&gt;/&lt;plugins&gt; tags):

# 8.4. Compiling the datamodel with the GPB compiler

```xml
&lt;build&gt;
    &lt;!-- ... --&gt;
    &lt;plugins&gt;
    &lt;!-- ... --&gt;
    &lt;plugin&gt;
    &lt;groupId&gt;org.codehaus.mojo&lt;/groupId&gt;
    &lt;artifactId&gt;build-helper-maven-plugin&lt;/artifactId&gt;
    &lt;version&gt;1.7&lt;/version&gt;
    &lt;executions&gt;
    &lt;execution&gt;
    &lt;id&gt;add-generated-sources&lt;/id&gt;
    &lt;phase&gt;generate-sources&lt;/phase&gt;
    &lt;goals&gt;
    &lt;goal&gt;add-source&lt;/goal&gt;
    &lt;/goals&gt;
    &lt;configuration&gt;
    &lt;sources&gt;
    &lt;source&gt;${project.build.directory}/generated-sources&lt;/source&gt;
    &lt;/sources&gt;
    &lt;/configuration&gt;
    &lt;/execution&gt;
    &lt;/executions&gt;
    &lt;/plugin&gt;

    &lt;!-- ... --&gt;
    &lt;/plugins&gt;
    &lt;!-- ... --&gt;
&lt;/build&gt;
```

# Using the generated API in applications

The DDS API implementation will allow the use of GPB types for DDS transparently, and the generated underlying DDS type will be invisible to the application.

For the comming example the following proto file is used:

```proto
import "omg/dds/descriptor.proto";

package address;

message Organisation {

    required string name = 1 [(.omg.dds.member).key = true];
    required string address = 2 [(.omg.dds.member).filterable = true];
    optional Person.PhoneNumber phone = 3;
}

message Person {

    option (.omg.dds.type) = {name: "dds.Person"};
    required string name = 1 [(.omg.dds.member).key = true];
    required int32 age = 2 [(.omg.dds.member) = {filterable: true}];
    optional string email = 3;
    enum PhoneType {

    MOBILE = 0;
    HOME = 1;
    WORK = 2;
    }

    message PhoneNumber {

    required string number = 1;
    optional PhoneType type = 2 [default = HOME];
```

# 8.5. Using the generated API in applications

```javascript
}
repeated PhoneNumber phone = 4;
required Organisation worksFor = 5;
```

# Java

In this example we will publish a person Jane Doe with one friend, John Doe.

The Subscriber example will read this data and print it to the stdout. This example is delivered with OpenSplice, and is located in examples/helloworld-gpb.

# Publisher

Example Publisher for the generated Person data:

```java
package helloworld;

import java.util.concurrent.TimeoutException;

import org.omg.dds.core.InstanceHandle;
import org.omg.dds.core.ServiceEnvironment;
import org.omg.dds.core.policy.PolicyFactory;
import org.omg.dds.core.status.PublicationMatchedStatus;
import org.omg.dds.domain.DomainParticipant;
import org.omg.dds.domain.DomainParticipantFactory;
import org.omg.dds.pub.DataWriter;
import org.omg.dds.pub.Publisher;
import org.omg.dds.topic.Topic;

import address.Address.Organization;
import address.Address.Person;
import address.Address.Person.PhoneNumber;
import address.Address.Person.PhoneType;

public class HelloworldPublisher {
    public static void main(String[] args) {
    ServiceEnvironment env;
    DomainParticipantFactory domainParticipantFactory;
    DomainParticipant participant;
    Topic&lt;Person&gt; topic;
    Publisher publisher;
    DataWriter&lt;Person&gt; writer;
    Person.Builder janeDoeBuilder;
    PhoneNumber phone;
    Person janeDoe;
    PolicyFactory policyFactory;

    System.setProperty(
    ServiceEnvironment.IMPLEMENTATION_CLASS_NAME_PROPERTY,
    "com.prismtech.cafe.core.ServiceEnvironmentImpl");

    env = ServiceEnvironment.createInstance(HelloworldPublisher.class.getClassLoader());

    policyFactory = PolicyFactory.getPolicyFactory(env);
    participant = null;
    domainParticipantFactory = DomainParticipantFactory.getInstance(env);

    try {
```

```groovy
participant = domainParticipantFactory.createParticipant();
// Creating a Topic for a Protobuf class
topic = participant.createTopic("Person", Person.class);

// Creating a Publisher and DataWriter for the Protobuf Topic
publisher = participant.createPublisher();
writer = publisher.createDataWriter(
    topic,
    publisher.getDefaultDataWriterQos().withPolicy(
    policyFactory.Reliability().withReliableiter

)
waitForSubscriber(writer);

// Creating a builder the Protobuf data structure
janeDoeBuilder = Person.newBuilder();

// Creating Jane Doe
janeDoeBuilder.setName("Jane Doe")
    .setEmail("jane.doe@somedomain.com").setAge(23);
phone = PhoneNumber.newBuilder().setNumber("0123456789").build();
janeDoeBuilder.addPhone(phone);
Organisation.Builder orgBuilder = Organisation.newBuilder();
orgBuilder.setName("Acme Corporation");
orgBuilder.setAddress("Wayne Manor, Gotham City");
orgBuilder.setPhone(PhoneNumber.newBuilder()
    .setNumber("9876543210").setType(PhoneNumber.WORK));
janeDoeBuilder.setWorksFor(orgBuilder);

janeDoe = janeDoeBuilder.build();

System.out.println("Publisher: publishing Person: "
    + janeDoe.getName());

writer.write(janeDoe);
System.out.println("Publisher: sleeping for 5 seconds...");
Thread.sleep(5000);

System.out.println("Publisher: disposing Jane Doe...");
// Disposing the DDS instance
writer.dispose(InstanceHandle.nilHandle(env), janeDoe);

catch (TimeoutException e) {
    System.err.println(e.getMessage());
    e.printStackTrace();
} catch (InterruptedException e) {
    System.err.println(e.getMessage());
    e.printStackTrace();
} finally {
    System.out.println("Publisher: terminating...");
if (participant != null) {
    try{
    participant.close();
    } catch (Exception e) {
    e.printStackTrace();
    }
    }
}

public static void waitForSubscriber(DataWriter&lt;Person&gt; writer)
throws InterruptedException {
```

```java
PublicationMatchedStatus matched;
long millis = System.currentTimeMillis();
long timeout = millis + (30 * 1000);
boolean stop = false;

System.out.println("Publisher: waiting for subscriber... ");
do {
    matched = writer.getPublicationMatchedStatus();

    if (System.currentTimeMillis() > timeout) {
    stop = true;
    }
    if ((matched.getCurrentCount() == 0) && (!stop)) {
    Thread.sleep(500);
    }
} while ((matched.getCurrentCount() == 0) && (!stop));

if (matched.getCurrentCount() != 0) {
    System.out.println("Publisher: Subscriber found");
} else {
    System.out.println("Publisher: Subscriber NOT found");
    throw new InterruptedException(
    "Publisher: subscriber not detected within 30 seconds.");
    }
}
```

# Subscriber

Example Subscriber for the generated Person data:
```java
package helloworld;

import java.util.concurrent.TimeUnit;
import java.util.concurrent.TimeoutException;

import org.omg.dds.core.ServiceEnvironment;
import org.omg.dds.core.WaitSet;
import org.omg.dds.core.policy.PolicyFactory;
import org.omg.dds.domain.DomainParticipant;
import org.omg.dds.domain.DomainParticipantFactory;
import org.omg.dds.sub.DataReader;
import org.omg.dds.sub.DataReader.Filter;
import org.omg.dds.sub.Sample;
import org.omg.dds.sub.Sample.Iterator;
import org.omg.dds.sub.Subscriber;
import org.omg.dds.topic.Topic;

import address.Address.Person;
import address.Address.Person.PhoneNumber;

public class HelloworldSubscriber {
    public static void main(String[] args) {
    ServiceEnvironment env;
    DomainParticipantFactory domainParticipantFactory;
    DomainParticipant participant;
    Topic&lt;Person&gt; topic;
    DataReader&lt;Person&gt; reader;
    Subscriber subscriber;
    WaitSet ws;
```

# 8.5. Using the generated API in applications

```txt
PolicyFactory policyFactory;
int expectedUpdates = 2;

System.setProperty(
    ServiceEnvironment.IMPLEMENTATION_CLASS_NAME_PROPERTY,
    "com.prismtech.cafe.core.ServiceEnvironmentImpl");

env = ServiceEnvironment.createInstance(HelloworldSubscriber.class.getClassLoader());

policyFactory = PolicyFactory.getPolicyFactory(env);
participant = null;
domainParticipantFactory = DomainParticipantFactory.getInstance(env);

try {
    participant = domainParticipantFactory.createParticipant();
    // Creating a Topic for a Protobuf class
    topic = participant.createTopic("Person", Person.class);

    // Creating a Subscriber and DataReader for the Protobuf Topic subscriber = participant.createSubscriber();
    reader = subscriber.createDataReader(
    topic,
    subscriber.getDefaultDataReaderQos().withPolicy(
    policyFactory.Reliability().withReliableiter

    // Creating a WaitSet to block for incoming samples

    ws = env.getSPI().newWaitSet();
    ws.attachCondition(reader.createReadCondition(subscriber.createState().withAnyViewState()
    .withAnyInstanceState().withAnySampleState(l)));

    System.out.println("Subscriber: waiting for incoming samples...");
    int nbTake = 0;
    do {
    // Waiting for data to become available
    ws.waitForConditions(30, TimeUnit.SECONDS);

    // Take all data and print it to the screen
    nbTake = printAllData(reader, args);
    if(nbTake == 0)
    break;
    expectedUpdates -= nbTake;
    } while (expectedUpdates > 0);

    } catch (RuntimeException e) {
    System.err.println(e.getMessage());
    e.printStackTrace();
    } catch (TimeoutException e) {
    System.out.println("Subscriber: time-out while waiting for updates.");
    } finally {
    System.out.println("Subscriber: terminating...");
    if (participant != null) {
    participant.close();
    }
    }
}

public static int printAllData(DataReader&lt;Person&gt; reader, String[] args) {
```

```java
Iterator&lt;Person&gt; iter;
Sample&lt;Person&gt; sample;
Person data;
String states;
int sampleCount = 0;

if(args.length > 0 && "--content-filter-query".equals(args[0]))
{
    Filter&lt;Person&gt; filter = new Filter&lt;Person&gt;() {
    @Override
    public boolean match(Person data, Object... params)
    {
    return data.getName().equals("Jane Doe");
    }
    };
    iter = reader.select().Content(filter).take();
}
else
{
    iter = reader.take();
}

if(!iter.hasNext()) {
    return 0;
}

while (iter.hasNext()) {
    sample = iter.next();
    sampleCount++;

    states = "(" + sample.getSampleState() + ", "
    + sample.getViewState() + ", " + sample.getInstanceState()
    + ")";

    if (sample.getData() != null) {
    System.out
    .println("Subscriber: reading sample " + states + ":");
    printPerson(sample.getData(), "");
    } else {
    data = Person.newBuilder().buildPartial();

    //The first parameter data is immutable so the returned value is used instead
    data = reader.getKeyValue(data, sample.getInstanceHandle());
    System.out.println("Subscriber: reading invalid sample "
    + states + ":");
    System.out.println("- Name = " + data.getName());
    }
}
return sampleCount;
}

public static void printPerson(Person person, String tabs) {

    System.out.println(tabs + "- Name = " + person.getName());
    System.out.println(tabs + "- Age = " + person.getAge());
    System.out.println(tabs + "- Email = " + person.getEmail());

    for (PhoneNumber phone : person.getPhoneList()) {
    System.out.println(tabs + "- Phone = " + phone.getNum()
    + " (" +
    + phone.getType() + ")");

}
```

```txt
System.out.println(tabs + "- Company =");
System.out.println(tabs + " - Name = "
    + person.getWorksFor().getName());
System.out.println(tabs + " - Address = "
    + person.getWorksFor().getAddress());
if (person.getWorksFor().hasPhone()) {
    System.out.println(tabs + " - Phone = "
    + person.getWorksFor().getPhone().getNumber() + " (" +
    + person.getWorksFor().getPhone().getType() + ")");
} else {
    System.out.println(tabs + " - Phone = ");
}
}
```

# Evolving data models

It is likely that over time a data model will change; for example, new fields with extra information are often added to an existing data model.

Normally all applications using that data model need to be recompiled against the new (changed) data model in order to be aware of the extra fields. However, when using a data model based on the GPB system, it is possible to add extra fields to the data model and use applications based on the original data model and applications based on the new data model in a mixed environment.

![The image displays a standard warning symbol consisting of a red triangular outline with a thick border. Centered inside the triangle against a white background is a black exclamation mark.](.vortex-cafe-user-guide/0427285b04c5ee41e3f28ed26a5f0fa5b9e4da97fe272ba017baa0dce5f4d0cb.jpg)

It is only possible to combine old and new applications with different data models as long as the required fields are the same. Remember, a key field or a filterable field is always required, so these fields can not be changed or added if it is necessary to combine old and new data models.

In our example we will make a new data model with some extra fields:

• new phonetype: SKYPE
• new phoneNumber property: secret
• new string for an alias: facebookname

Proto file with new options:
```proto
import "omg/dds/descriptor.proto";
package address;
message Person {
    option (.omg.dds.type); // default type-name will be 'Person'
    required string name = 1 [(.omg.dds.member).key = true];
    required int32 age = 2 [(.omg.dds.member).filterable = true];
    optional string email = 3;

    enum PhoneType {
    UNDEFINED = 0;
    MOBILE = 1;
    HOME = 2;
    WORK = 3;
    SKYPE = 4; // **** added SKYPE phenotype enum-value ****
    }
    message PhoneNumber {
    required string number = 1;
    optional PhoneType type = 2 [default = UNDEFINED];
    optional bool secret = 3 [default = false];
    // **** added a new personNumber property ****
    }
    repeated PhoneNumber phone = 4;
```

```txt
repeated Person friend = 5;
optional string facebookname = 6 [default = "NONE"];
    // **** added alias facebook name ****
}
```

# Old publisher and old subscriber

Data printed by subscriber program:
```txt
Name = Jane Doe
Age = 23
Email = jane.doe@somedomain.com
Phone = 0123456789 (HOME)
Friend:
Name = John Doe
Age = 35
Email = john.doe@somedomain.com
```

# New publisher and new subscriber

Data printed by subscriber program:
```ini
Name = Jane Doe
Facebook = Jane123
Age = 23
Email = jane.doe@somedomain.com
Phone = 0123456789 (HOME) secret=false
Phone = 0612345678 (MOBILE) secret=true
Phone = splicer (SKYPE) secret=false
Friend:
Name = John Doe
Facebook = NONE
Age = 35
Email = john.doe@somedomain.com
```

# Old publisher and new subscriber

New subscriber gets default values for absent fields:
```ini
Name = Jane Doe
Facebook = NONE
Age = 23
Email = jane.doe@somedomain.com
Phone = 0123456789 (HOME) secret=false
Friend:
Name = John Doe
Facebook = NONE
Age = 35
Email = john.doe@somedomain.com
```

# New publisher and old subscriber

Old subscriber doesn’t understand the SKYPE phonetype so reverts to the default UNDEFINED phonetype.

Read data in old subscriber:

```txt
Name = Jane Doe
Age = 23
Email = jane.doe@somedomain.com
Phone = 0123456789 (HOME)
Phone = 0612345678 (MOBILE)
Phone = splicer (UNDEFINED)
Friend:
    Name = John Doe
    Age = 35
    Email = john.doe@somedomain.com
```

# 9

# Support of DDS Security

# Introduction to DDS Security

Many of Internet of Things systems are being built using DDS. These systems need to secure their data exchange, especially when data is sensitive. However, prior to the DDS Security standard, there was no multi-vendor interoperable mechanism for DDS applications to communicate securely. Prior to the DDS Security

There are several existing approaches to secure communication between objects within the same network such as Transport Layer Security (TLS) and Datagram Transport Layer Security (DTLS). These approaches have some limitations for Industrial Internet applications such as :

• They work only with unicast and not with multicast.
• They encrypt all data flowing through the network.
• As mentioned above, they are not interoperable.

DDS Security overcomes these limitations. Most importantly, it is standard and interoperable.

# Security Threats

In order to understand some of the specific threats impacting applications that use DDS and DDS Interoperability Wire Protocol (RTPS), let introduce two imaginary friends, Alice and Bob. They wish to communicate with each other and with other existing users in the network.

• Alice. An authorized publisher. Allowed to publish topic T
• Bob. An authorized subscriber. Allowed to subscribe to topic T
• Eve. An unauthorized subscriber (eavesdropper). Non-authorized eavesdropper
• Trudy. An unauthorized publisher (intruder).
• Trent. Trusted infrastructure service. However, he is not trusted to see the content of the information.
• Mallory. Malicious insider (an authorized subscriber and unauthorized publisher).

As shown in the following figure, there are several threats that can occur if there is no DDS security.
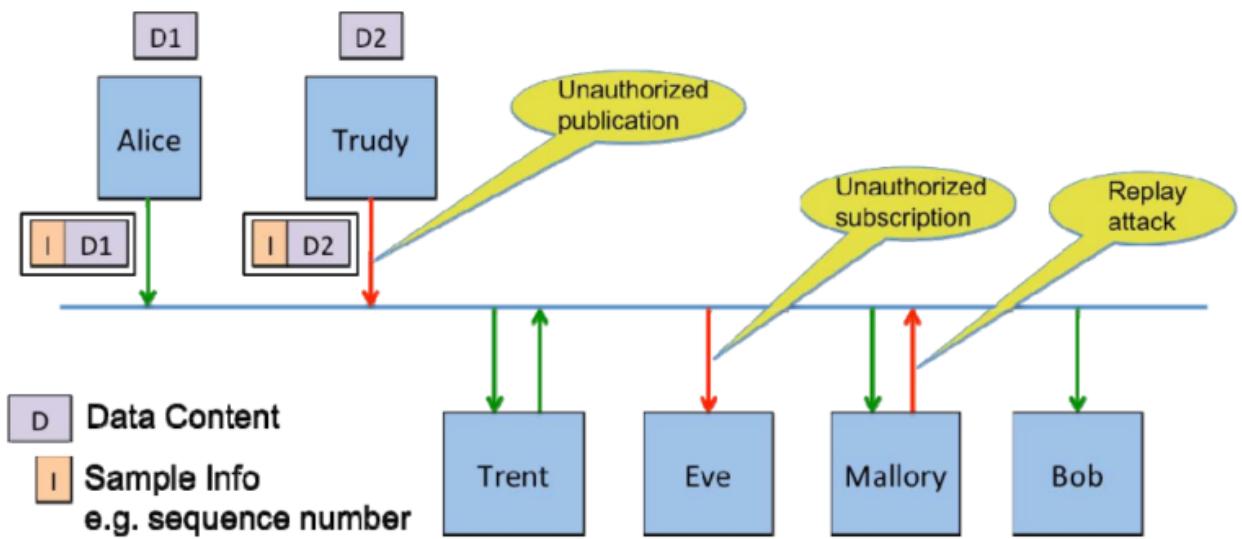
![The diagram features a legend defining 'D Data Content' and 'I Sample Info e.g. sequence number'.\n\n**Top Section:**\n*   'D1' is positioned above the block 'Alice'.\n*   'D2' is positioned above the block 'Trudy'.\n*   Below 'Alice' is a box containing 'I' and 'D1'.\n*   Below 'Trudy' is a box containing 'I' and 'D2'.\n\n**Connections to Central Line:**\nA blue horizontal line spans the center.\n*   A green arrow extends downward from 'Alice' to the line.\n*   A red arrow extends downward from 'Trudy' to the line.\n*   'Trent' connects via bidirectional green arrows.\n*   'Eve' connects via a red arrow pointing downward.\n*   'Mallory' connects via a green arrow pointing downward and a red arrow pointing upward.\n*   'Bob' connects via a green arrow pointing downward.\n\n**Annotations:**\nThree yellow speech bubbles indicate specific events:\n*   'Unauthorized publication' points from the 'Trudy' area.\n*   'Unauthorized subscription' points from the area above 'Eve'.\n*   'Replay attack' points from the area above 'Mallory'.](.vortex-cafe-user-guide/3b3beded2535f37234cf142fb77c740569da390bcabcc00a4bceddb8d3ec157b.jpg)

• Unauthorized Subscription: Eve is connected to the same network infrastructure and is able to observe the network packets. In situations where Alice and Bob are communicating over multicast, Eve could simply subscribe to the same multicast address.
• Unauthorized Publication: Trudy is connected to the same network infrastructure and is able to inject network packets with any data contents, headers and destination she wishes (e.g., Bob).
• Tampering and Replay: Mallory can use the shared secret key to create messages on the network and pretend it came from Alice. She has the secret key used to compute the Hash-based Message Authentication Code (HMACs) so she can also create a valid HMAC for the new message.
• Unauthorized Access to Data by Infrastructure Services: Infrastructure services are allowed to store and forward the data, but not to read the content of data. Trent is an example of such a service, he can see the headers and sample information (writer global unique identifier (GUID), sequence numbers, key hash and such) but not the message contents.
• Constraints of the DomainParticipant BuiltinTopicKey\_t (GUID): In addition to these threats, there is an attack based on GUID. The DomainParticipant GUID is communicated as part of DDS Discovery. An attacker with legit Identity can authenticate using the GUID of another Participant. An accepted attacker will block legitimate Participant from using its GUID because its GUID would be detected as a duplicate of the already existing one.

# DDS Security Architecture

Based on the threats described above, the DDS security specification defines five Service Plugin Interfaces (SPIs) that when combined together provide Information Assurance to DDS systems:

• Authentication. Alice checks Bob’s identity.
• Access Control. Alice checks Bob’s permissions.
• Cryptography. Implements all cryptographic operations including encryption, decryption, hashing, digital signatures, etc.
• Logging. Log all security-relevant events.
• Data Tagging. Add a tag for each data sample.

DDS Security specification models these plugins in the following architecture:
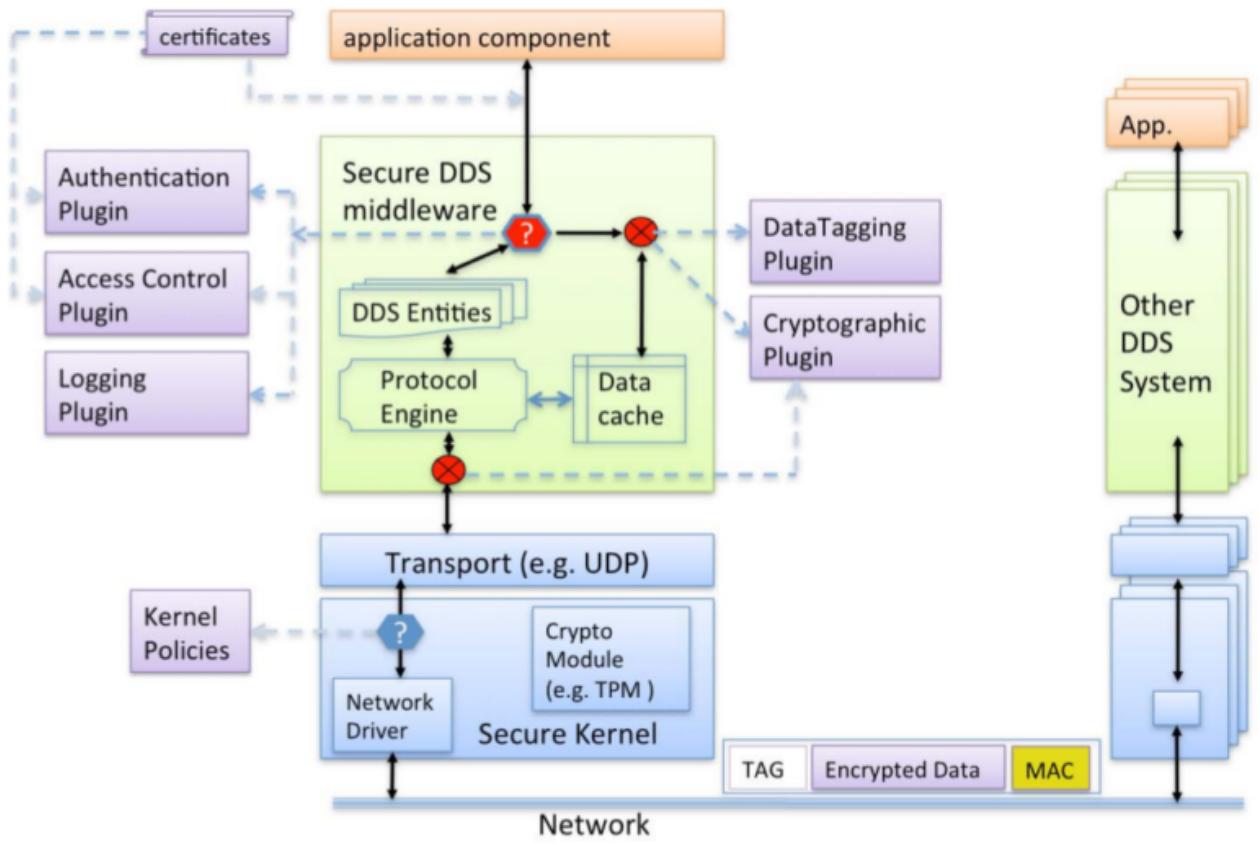
![The diagram illustrates a system architecture centered around a **Secure DDS middleware** block.\n\n**Labeled Blocks:**\n*   **Top:** `certificates`, `application component`\n*   **Left Plugins:** `Authentication Plugin`, `Access Control Plugin`, `Logging Plugin`\n*   **Center Block:** `Secure DDS middleware` (containing `DDS Entities`, `Protocol Engine`, `Data cache`)\n*   **Right Plugins:** `DataTagging Plugin`, `Cryptographic Plugin`\n*   **Far Right Stack:** `App.`, `Other DDS System` (and a stack of blue layers below it)\n*   **Bottom Section:** `Transport (e.g. UDP)`, `Secure Kernel` (containing `Network Driver`, `Crypto Module (e.g. TPM)`), `Kernel Policies`\n*   **Bottom Legend:** `TAG`, `Encrypted Data`, `MAC`\n\n**Connections:**\n*   **application component** connects bidirectionally to **Secure DDS middleware**.\n*   **certificates** connects via dashed arrows to **Authentication Plugin** and **Secure DDS middleware**.\n*   **Secure DDS middleware** connects via dashed arrows to **Authentication Plugin**, **Access Control Plugin**, **Logging Plugin**, **DataTagging Plugin**, **Cryptographic Plugin**, and the **Other DDS System** stack.\n*   Inside **Secure DDS middleware**:\n    *   **DDS Entities** and **Protocol Engine** are connected bidirectionally.\n    *   **Protocol Engine** and **Data cache** are connected bidirectionally.\n    *   A path flows from **DDS Entities** to a red question mark icon, then to a red 'X' icon, which connects bidirectionally to **Data cache**.\n    *   The red 'X' icon connects downward to **Transport (e.g. UDP)**.\n*   **Transport (e.g. UDP)** connects bidirectionally to **Secure Kernel**.\n*   **Kernel Policies** connects via a dashed arrow to **Secure Kernel**.\n*   **Network Driver** (inside **Secure Kernel**) connects downward to the **Network**.\n*   The stack of blue layers on the far right connects downward to the **Network**.](.vortex-cafe-user-guide/5065f1910ed665c229dc77f685c74ea36eafd886128c0b0cb783103d6a44a64b.jpg)

# DDS Security Implementation

Vortex Café partially implements the DDS Security specification.

Currently, only the Authentication, Access Control and the Cryptographic plugins are supported. However, the full DDS Security API is described in the Javadoc at: VortexCafe\_2.4.0/docs/apidocs/index.html (package org.omg.dds.security)

Note that Vortex Café doesn’t provide any implementation of the security plugins data tagging and logging plugins are not implemented.

# DDS Security Configuration

The implementation classes of the plugins to be loaded by a Participant must be specified via configuration properties (see std,std-refVortex Café runtime configuration). Those configuration properties are:

• Authentication plugin class: ddsi.security.authClassName
• Access Control plugin class: ddsi.security.accessCtrlClassName
• Cryptographic plugin class: ddsi.security.cryptoClassName
• Logging plugin class: ddsi.security.loggingClassName
• Data Tagging plugin class: ddsi.security.dataTagClassName

To enable DDS Security, the implementation classes of Authentication, Access Control and Cryptographic plugins are mandatory. Logging and Data Tagging plugins are not yet supported.

For the need of the security implementation, we use a cryptographically strong random number generator. Initializing this number could take a time, depending on the generator class. That’s why we make the usage of the random generator configurable: the user can choose a quick generator or a more secure generator which is slower. The quick one is used by default.

The configuration key is ddsi.security.randomGenerator and its possible values are:

• secure (more secure but slower)
• quick (default value)

# Authentication plugin

Authetication is the process of determining if a DomainParticipant is who it claims to be. The authentication plugin configures the DomainParticipant to authenticate a newly discovered remote participant before initiating endpoint discovery with that participant. The authentication is implemented using a trusted Certificate Authority (CA). It performs mutual authentication between dicovered participants using the RSA Digital Signature Algorithm (i.e RSASSA-PSS-SHA256) and establishes a shared secret using Diffie-Hellman (DH) or Elliptic Curve Diffie-Hellman (ECDH) Key Agreement methods.

Vortex Café fully supports the Authentication plugin for:

• authentication a local Participant at creation
• authentication of a remote Participant at discovery
• establishment of a shared secret between 2 authentified Participants via a handshake protocol

Note: The Authentication plugin class referred by the ddsi.security.authClassName configuration property must implement the org.omg.dds.security.Authentication interface.

# Authentication plugin configuration

Prior to a Domain Participant (DP) being enabled the Authentication plugin associated with it must be configured with three things:

• The X.509 Certificate that defines the Shared Identity CA. This certificates contains the Public Key of the CA.
• The Private Key of the Domain Participant (DP)
• An X.509 Certificate that chains up to the Shared Identity CA, that binds the Public Key of the Domain Participant to the Distinguished Name (subject name) for the Domain Participant.

The builtin authentication plugin should be configured using PropertyQosPolicy of the DomainParticipantQos with the following properties:

<table><tr><td>Property Name (all properties have “dds.sec.auth” prefix)</td><td>Property Value Description</td></tr><tr><td>identity_ca</td><td>Required. URI to the X509 certificate [39] of the Identity CA. Example: identity_ca.pem</td></tr><tr><td>private_key</td><td>Required. URI to access the private Private Key for the DomainParticipant. Example: identity_ca_private_key.pem</td></tr><tr><td>password</td><td>Optional. A password used to decrypt the Private Key. If the password property is not present, then the value supplied in the private_key property must contain the unencrypted private key.</td></tr><tr><td>identity_certificate</td><td>Required. URI to a X509 certificate signed by the IdentityCA in PEM format containing the signed public key for the DomainParticipant. Example: participant1_identity_cert.pem</td></tr></table>

# Access Control plugin

The Access Control plugin performs two process: the governance and permissions checking. This plugin is implemented using a permission document signed by a shared Certificated Authority (CA). The shared CA could

# 9.4. Authentication plugin

be an existing one (including the same CA used for the Authentication plugin described before) or a new one could be created for the purpose of assigning permissions to the applications on a DDS Domain. The nature or manner in which the CA is selected is not important because the way it is used enforces a shared recognition by all particpating applications.

• Governance checking: is the process of configuring locally created DomainParticipants, Topics, DataWriters and DataReaders to perform the right amount of security for the right use case.
• Permissions checking: is the process of making sure locally create and remotely discovered entities are allowed to communicate and do what they need to to.

Both governance and permission checking are enforced by XML documents that are signed by a permission certificate authority CA. Each DomainParticipant has an associated instance of the Access Control plugin.

# Access Control plugin configuration

The Access Control plugin is configured with three documents:

• The Permissions CA certificate.
• The Domain governance signed by the Permissions CA.
• The DomainParticipant permissions signed by the Permissions CA.

The Access Control plugin should be configured using the following properties:

<table><tr><td>Property Name (all properties have “dds.sec.access” prefix)</td><td>Property Value Description</td></tr><tr><td>permissions_ca</td><td>Required. URI to the X509 certificat for the permissions CA which is in PEM format. Example: permissions_ca.pem</td></tr><tr><td>governance</td><td>Required. URI to the signed XML governance document Example: governance_signed.p7s</td></tr><tr><td>permissions</td><td>Required. URI to the signed XML permissions document. Example: permissions_signed.p7s</td></tr></table>

Vortex Café only supports the part of Access Control plugin which is related to the Participant. This implies that Vortex Café supports all operations of the org.omg.dds.security.AccessControl interface.

Note: The Access Control plugin class referred by the ddsi.security.accessCtrlClassName configuration property must implement the org.omg.dds.security.AccessControl interface.

# Cryptography plugin

Cryptography is the process of making sure no third-party participant can manipulate or eavesdrop a communication between two authenticated participants.

Vortex Café supports keys generation and exchange, as well as encoding/decoding of payload, submessages and of whole RTPS messages.

The Cryptography plugin provides authenticated encryption using Advanced Encryption Standard (AES) in Galois Counter Mode (AES-GCM). It supports the decryption of two AES key sizes: 128 bits and 256 bits, for encryption, it is done in AES key size of 256 bits.

Notes: Temporarly, Cafe does not support the decryption of local entities (i.e. a message that was send from a local DataWriter).

The Cryptography plugin class referred by the ddsi.security.cryptoClassName configuration property must implement the org.omg.dds.security.Cryptography interface.

# Cryptography plugin configuration

Cryptography plugin configuration is not alterable with configuration property keys.

# 9.6. Cryptography plugin

# Logging plugin

Vortex Café doesn’t support the Logging plugin.

Instead, Vortex Café uses the SLF4J library (http://www.slf4j.org/) for all logging messages. This library is a “facade” offering a unified API over various logging libraries such as Log4J, Logback... Therefore, the usage of SLF4J allows Vortex Café to benefit lot of features from various logging library such as logging to a console, to a file or to a server.

For DDS Security logs, uses Logger objects with different names, depending the plugin related to the log:

• Authentication plugin: “cafe.ddsi.security.auth“
• Access Control plugin: “cafe.ddsi.security.access“
• Cryptographic plugin: “cafe.ddsi.security.crypto“
• Data Tagging plugin: “cafe.ddsi.security.tag“

The log levels defined by the DDS Security specification are mapped as following using SLF4J:

• FATAL\_LEVEL: a log at ERROR level with the message prefixed by “FATAL: “
• SEVERE\_LEVEL: a log at ERROR level with the message prefixed by “FATAL: “
• ERROR\_LEVEL: a log at ERROR level with non-prefixed message
• WARNING\_LEVEL: a log at WARN level with non-prefixed message
• NOTICE\_LEVEL: a log at INFO level with the message prefixed by “NOTICE”
• INFO\_LEVEL: a log at INFO level with non-prefixed message
• DEBUG\_LEVEL: a log at DEBUG level with non-prefixed message
• TRACE\_LEVEL: a log at TRACE level with non-prefixed message

# Data Tagging plugin

Vortex Café doesn’t support the Data Tagging plugin.

# Access Control and Authentification plugin configuration example

# Signing access control documents:

Let’s assume we already have the non-signed XML governance document(governance.xml) and permissions document(permissions.xml). It remains to sign these files with OpenSSL. The following is the command lines in Bash.

# Generation of Permissions CA private key:

```batch
openssl genrsa -out permissions_ca_private_key.pem 2048
```

# Generation of Certificate for the Permissions CA

```txt
openssl x509 -req -days 3650 -in permissions_ca.csr \
-signkey permissions_ca_private_key.pem \
-out permissions_ca_cert.pem
```

# 9.7. Logging plugin

# Signing the governance document

```shell
openssl smime -sign -in governance.xml -text -out governance_signed.p7s \
-signer permissions_ca_cert.pem \
-inkey permissions_ca_private_key.pem
```

# Signing the permissions documents

```shell
openssl smime -sign -in permissions.xml -text -out permissions_signed.p7s \
-signer permissions_ca_cert.pem \
-inkey permissions_ca_private_key.pem
```

# Where the permissions\_ca.csr comes from ?

In this example, it’s the self-signed certificate request for the permissions CA, an OpenSSL Certificate Authority configuration file (cnf extension) is required to generate this csr file. Please see the OpenSSL documentation for more details about cnf files. Here is a command line example of csr generation from cnf

```txt
openssl req -config permissions_ca_openssl.cnf \
-new -key permissions_ca_private_key.pem \
-out permissions_ca.csr
```

Please see OpenSSL documentation for more details.

After running the commands above, we now have all needed documents:

• permissions\_ca\_cert.pem: the Permissions CA
• governance\_signed.p7s: the signed XML goverance document
• permissions\_signed.p7s: the signed XML goverance document

# Use signed files in code:

Somewhere in your application code, you could set the properties described above like this in Java:

```javascript
PropertyQoS propertyQoS = PolicyFactory.getPolicyFactory(environment).PropertyQoS();
Collection&lt;Property&gt; properties = new ArrayList&lt;Property&gt;();
properties.add(new Property("dds.sec.access.permissions_ca", "/permissions_ca_cert.pem"));
properties.add(new Property("dds.sec.access.governance", "/governance_signed.p7s"));
properties.add(new Property("dds.sec.access.permissions", "/permissions_signed.p7s"));
```

At the participant creation, you could do as following:

```java
return participant_factory.createParticipant(
    domain_id,
    participant_factory.getDefaultParticipantQos().withPolicy(propertyQoS),
    null,
    (Collection&lt;Class&lt;? extends Status&gt;>)null);
```

# 10

# Using Vortex Café with Vortex Cloud

If Vortex Café is deployed in a LAN or a private cloud (multicast-enabled cloud) and Vortex Cloud is configured to discover user applications using UDP-multicast in the LAN/private cloud, then Vortex Café does not need to be configured with any particular configuration property. Vortex Cloud will discover and communicate with Vortex Café using the standardized multicast IP address and UDP ports. The only constraint is that both Vortex Café and Vortex Cloud are configured to participate to the same DDS domain (same domain id).

If Vortex Café is deployed in a WAN (without multicast support), then it needs to be configured to use TCP transport (which is the case by default, unless TCP is explicitly disabled). It also needs to be configured with the peers of one of the services of the Vortex Cloud & Fog system.

Example:

ddsi.discovery.tcp.peers=1.1.1.1:7400

#

# Vortex Café Monitor

The Vortex Café Monitor is a tool that can be executed with an application (embedded in the application’s process). It enables a user to remotely connect to an application with the help of a web-browser and to display the state of all topics, local entities, and discovered entities.

See VortexCafe\_2.4.0/docs/monitor.html for more information.

# 12

# Supported Features

# Supported IDL types

All IDL types are supported, except wchar and wstring.

Note that as per DDS specification, the IDL types char and string can only include characters that are defined in the ISO-8859-1 character set (see https://en.wikipedia.org/wiki/ISO/IEC\_8859-1#Codepage\_ layout).

Supported DDS Profiles

<table><tr><td>Profile</td><td>Support</td><td>Limitations</td></tr><tr><td>Minimum profile</td><td>Partial</td><td>Global:Listeners and statuses are not supported on DomainParticipants, Topics, Publishers and Subscribers.Statuses are partially supported in DataReaders and DataWriters.QoS are not supported on DomainParticipants and Topics.Participant:findTopic and lookupTopicDescription are not supported.Publisher:waitForAcknowledgements is not supported.DataWriter:waitForAcknowledgements is not supported.getMatchedSubscriptions and getMatchedSubscription-Data are not supported.getKeyValue is not supported.cast is not supported.Subscriber:getDataReaders and lookupDataReaders are not supported.DataReader:getMatchedPublications and getMatchedPublicationData are not supported.readNextSample and takeNextSample are not supported.cast is not supported.WaitSet:QueryCondition is not supported.</td></tr><tr><td>Content-subscription profile</td><td>Partial</td><td>Only a non-standard custom filter is available via the DataReader.Selector (See std,std-refSelect data to read with a Custom Content Filter)</td></tr><tr><td>Persistence profile</td><td>YES</td><td></td></tr><tr><td>Ownership profile</td><td>YES</td><td></td></tr><tr><td>Object model profile</td><td>NO</td><td></td></tr></table>

Supported QoS Policies

<table><tr><td>QoS Category</td><td>QoS Policy</td><td>Supported</td></tr><tr><td rowspan="6">Data Availability</td><td>DURABILITY</td><td>YES</td></tr><tr><td>DURABILITY_SERVICE</td><td>YES</td></tr><tr><td>LIFESPAN</td><td>NO</td></tr><tr><td>HISTORY</td><td>YES</td></tr><tr><td>WRITER_DATA_LIFECYCLE</td><td>YES</td></tr><tr><td>READER_DATA_LIFECYCLE</td><td>YES</td></tr><tr><td rowspan="6">Data Delivery</td><td>PRESENTATION</td><td>NO</td></tr><tr><td>RELIABILITY</td><td>YES</td></tr><tr><td>PARTITION</td><td>YES</td></tr><tr><td>DESTINATION ORDER</td><td>YES</td></tr><tr><td>OWNERSHIP</td><td>YES</td></tr><tr><td>OWNERSHIP_STRENGTH</td><td>YES</td></tr><tr><td rowspan="3">Data Timeliness</td><td>DEADLINE</td><td>YES</td></tr><tr><td>LATENCY_BUDGET</td><td>YES</td></tr><tr><td>TRANSPORT_PRIORITY</td><td>YES</td></tr><tr><td rowspan="2">Resources</td><td>TIME_BASED_FILTER</td><td>YES</td></tr><tr><td>RESOURCE_LIMITS</td><td>YES</td></tr><tr><td rowspan="4">Configuration</td><td>USER_DATA</td><td>NO</td></tr><tr><td>TOPIC_DATA</td><td>NO</td></tr><tr><td>GROUP_DATA</td><td>NO</td></tr><tr><td>ENTITY_FACTORY</td><td>YES</td></tr><tr><td>System Availability</td><td>LIVELINESS</td><td>AUTOMATIC only</td></tr></table>

Supported DDS Statuses

<table><tr><td>Entity</td><td>Status Name</td><td>Supported</td></tr><tr><td>Topic</td><td>INCONSISTENT_TOPIC</td><td>NO</td></tr><tr><td>Subscriber</td><td>DATA_ON_READERS</td><td>NO</td></tr><tr><td rowspan="7">DataReader</td><td>SAMPLE_REJECTED</td><td>NO</td></tr><tr><td>LIVELINESS_CHANGED</td><td>YES</td></tr><tr><td>REQUESTED_DEADLINE_MISSE</td><td>YES</td></tr><tr><td>REQUESTED_INCOMPATIBLE_Q</td><td>NO</td></tr><tr><td>DATA_AVAILABLE</td><td>YES</td></tr><tr><td>SAMPLE_LOST</td><td>NO</td></tr><tr><td>SUBSCRIPTION_MATCHED</td><td>YES</td></tr><tr><td rowspan="4">DataWriter</td><td>LIVELINESS_LOST</td><td>NO</td></tr><tr><td>OFFERED_DEADLINE_MISSED</td><td>YES</td></tr><tr><td>OFFERED_INCOMPATIBLE_QOS</td><td>NO</td></tr><tr><td>PUBLICATION_MATCHED</td><td>NO</td></tr></table>

# 13

# Troubleshooting

If you experience any problems with Vortex Café installation or usage then you can contact ADLINK support. Please provide a full description of your platform, including the versions of tools you are using (such as JDK, Ant, Maven, Android SDK, etc... ).

# 14

# Contacts & Notices

# Contacts

# ADLINK Technology Corporation

400 TradeCenter

Suite 5900

Woburn, MA

01801

USA

Tel: +1 781 569 5819

# ADLINK Technology Limited

The Edge

5th Avenue

Team Valley

Gateshead

NE11 0XA

UK

Tel: +44 (0)191 497 9900

# ADLINK Technology SARL

28 rue Jean Rostand

91400 Orsay

France

Tel: +33 (1) 69 015354

Web: http://ist.adlinktech.com

E-mail: ist\_info@adlinktech.com

# Notices

Copyright © 2018 ADLINK Technology Limited. All rights reserved.

This document may be reproduced in whole but not in part. The information contained in this document is subject to change without notice and is made available in good faith without liability on the part of ADLINK Technology Limited or ADLINK Technology Corporation. All trademarks acknowledged.
[🔗 Link to the original document](.vortex-cafe-user-guide/vortex-cafe-user-guide.pdf)
