| Icon | Meaning |
| Item of special significance or where caution needs to be taken. | |
| Item contains helpful hint or special information. | |
| Windows | Information applies to Windows (e.g. XP, 2003, Windows 7) only. |
| Unix | Information applies to Unix-based systems (e.g. Solaris) only. |
| Linux | Information applies to Linux-based systems (e.g. Ubuntu) only. |
| C | C language specific. |
| C++ | C++ language specific. |
| C# | C# language specific. |
| Java | Java language specific. |
| Features | Advantages | Benefits | =+! |
| GENERAL | |||
| Information-centric | Enable dynamic, loosely-coupled system | Simplified and better scalable architectures | = |
| Open standard | ‘Off-the-shelf’ solutions | Lower cost, no vendor lock-in | = |
| Built on proven technology | Intended for the most demanding situations | Assured quality and applicability | ++ |
| TNN/PT ‘inheritance’ | Decade of ‘DDS’ experience | Proven suitability in mission-critical domain | !!! |
| Open Source model | Strong and large user community | Security of supply of most widely-used DDS | !!! |
| FUNCTIONAL | |||
| Real-time pub/sub | Dynamic/asynchronous data communication | Autonomous decoupled applications | = |
| Persistence profile | Fault-tolerant data persistence | Application fault tolerance and data high availability | !!! |
| Content-sub. Profile | Reduced complexity and higher performance | Easier application design and scalable systems | !!! |
| PERFORMANCE | |||
| Shared memory | Small footprint, instant data availability | Processor scalability | ++ |
| Smart networking | Efficient data transport | Network scalability | ++ |
| Extensive IDL support | Includes unbounded strings and sequences | Data scalability | ++ |
| USABILITY | |||
| Multiple languages | Any (mix) of C, C++, Java, C# | Supports legacy code, allows hybrid systems | ++ |
| Multiple platforms | Any (mix) of Enterprise and RTE OSs | Intercons, Enterprise and embedded systems | = |
| INTEROPERABILITY | |||
| DDSI/RTPS | Interoperability between DDS vendors | Smooth integration with non-OpenSplice (legacy) DDS systems | !!! |
| TOOLING AND EASE OF USE | |||
| All metadata at runtime | Dynamic discovery of all ‘entity info’ | Guaranteed data integrity | = |
| Powerful tooling | Support for complete system lifecycle | Enhanced productivity and System Integration | !!! |
| Remote connect | Web-based remote access and control | Remote diagnostics using standard protocols | !!! |
| Legend: | Equal to the competitionBetter than the competitionFar superior to the competition | =++!!! | |
-VortexOpenSplice<version>-<E>-<platform>.<os>-<comp>-<type>-<target>-install
```
where, some being optional,
```txt
- ADLINK's code for the platform <version> - the Vortex OpenSplice version number, for example V6.0
```
<E> - the environment, either HDE or RTS
```txt
<platform> - the platform architecture, for example sparc or x86
```
```txt
<os> - the operating system for example solaris8 or linux2.6
```
<comp> - the compiler or glibc version
```txt
<type> - release, debug or dev, which is release with symbols
```
<target> - the target architecture for host/target builds.
```txt
<ext> - the platform executable extension, either run or exe
```
The directories in the Vortex OpenSplice distribution are named after the installation package they contain. Each package consists of an archive and its installation procedure.
# Step 2
# Unix
Configure the Vortex OpenSplice environment variables.
(This is only necessary on UNIX, as the Windows environment is configured by the Vortex Open-Splice installer.)
Go to the <install\_dir>/<E>/<platform> directory, where <E> is HDE or RTS and <platform> is, for example, x86.linux2.6.
Source the release.com file from the shell command line.
This step performs all the required environment configuration.
# Step 3
Usually not required, but install your desired ORB when the C++ language mapping is used with CORBA cohabitation. Ensure your chosen ORB and compiler is appropriate for the CCPP library being used (either Vortex OpenSplice’s default library or other custom-built library). Refer to the Release Notes for ORB and compiler information pertaining to Vortex OpenSplice’ default CCPP library.
# 5.3 Installation on Other Platforms
Please refer to Platform-specific Information for information about using Vortex OpenSplice on platforms other than Unix/Linux and Windows.
# 5.4 Configuration
Vortex OpenSplice is configured using an XML configuration file, as shown under Example XML Configuration Settings . It is advisable to use the osplconf tool (UNIX) or Vortex OpenSplice Configurator Tool (Windows Start Menu ) to edit your xml files. The configurator tool provides explanations of each attribute and also validates the input.
The default configuration file is ospl.xml located in \$OSPL\_HOME/etc/config (alternative configuration files may also be available in this directory, to assist in other scenarios). The default value of the environment variable OSPL\_URI is set to this configuration file.
The configuration file defines and configures the following Vortex OpenSplice services:
spliced The default service, also called the domain service; the domain service is responsible for starting and monitoring all other services.
durability This service is responsible for storing non-volatile data and keeping it consistent within the domain (optional).
networking This service realizes user-configured communication between the nodes in a domain.
tuner This service provides a SOAP interface for the Vortex OpenSplice Tuner to connect to the node remotely from any other reachable node.
The default deployment specified by the XML configuration file is for a Single Process deployment. This means that the Vortex OpenSplice Domain Service, database administration and associated services are all started within the DDS application process. This is implicitly done when the user’s application invokes the DDS create\_participant operation.
The deployment mode and other configurable properties can be changed by using a different OSPL\_URI file. Several sample configuration files are provided at the same location.
# 5.3. Installation on Other Platforms
If using a shared memory configuration, a <Database> attribute is specified in the XML configuration. The default Database Size that is mapped on a shared memory segment is 10 Megabytes.
A Note: The maximum user-creatable shared-memory segment is limited on certain machines, including Solaris, so it must either be adjusted or Vortex OpenSplice must be started as root.
A complete configuration file that enables durability as well as Real Time Native Networking is shown below. (The relevant lines are not enabled in the default configuration file, but editing them will allow you to enable support for PERSISTENT data (instead of just TRANSIENT or VOLATILE data) and to use multicast instead of broadcast.)
Adding support for PERSISTENT data requires you to add the <Persistent> element to the <DurabilityService> content (see the relevant lines in the XML example shown below). In this <Persistent> element you can then specify the actual path to the directory for persistent-data storage (if it does not exist, the directory will be created). In the example below this directory is /tmp/Pdata.
For the networking service, the network interface-address that is to be used is specified by the <NetworkInterfaceAddress> element. The default value is set to first available , meaning that Vortex OpenSplice will determine the first available interface that is broadcast or multicast enabled. However, an alternative address may be specified as well (specify as a.b.c.d).
The network service may use separate channels, each with their own name and their own parameters (for example the port-number, the queue size, and, if multicast enabled, the multicast address). Channels are either reliable (all data flowing through them is delivered reliably on the network level, regardless of QoS settings of the corresponding writers) or not reliable (all data flowing through them is delivered at most once, regardless of QoS settings of the corresponding writers). The idea its that the network service chooses the most appropriate channel for each DataWriter, i.e. the channel that fits its QoS settings the best.
Usually, networking shall be configured to support at least one reliable and one non-reliable channel. Otherwise, the service might not be capable of offering the requested reliability. If the service is not capable of selecting a correct channel, the message is sent through the default channel. The example configuration defines both a reliable and a non-reliable channel.
The current configuration uses broadcast as the networking distribution mechanism. This is achieved by setting the Address attribute in the GlobalPartition element to broadcast, which happens to be the default value anyway. This Address attribute can be set to any multicast address in the notation a.b.c.d in order to use multicast.
A If multicast is required to be used instead of broadcast, then the operating system’s multicast routing capabilities must be configured correctly.
See the Vortex OpenSplice Deployment Manual for more advanced configuration settings. Example XML Configuration Settings
```xml
<OpenSpliceDDS>
<Domain>
<Name>OpenSpliceDDSV6.6</Name>
<Database>
<Size>10485670</Size>
</Database>
<Lease>
<ExpiryTime update_factor="0.05">60.0</ExpiryTime>
</Lease>
<Service name="networking">
<Command>networking</Command>
</Service>
<Service name="durability">
<Command>durability</Command>
</Service>
</Domain>
<NetworkService name="networking">
<General>
<NetworkInterfaceAddress>
```
# 5.4. Configuration
```xml
first available
</NetworkInterfaceAddress>
</General>
<Partitioning>
<GlobalPartition Address="broadcast"/>
</Partitioning>
<Channels>
<Channel name="BestEffort" reliable="false"
default="true">
<PortNr>3340</PortNr>
</Channel>
<Channel name="Reliable" reliable="true">
<PortNr>3350</PortNr>
</Channel>
</Channels>
</NetworkService>
<DurabilityService name="durability">
<Network>
<InitialDiscoveryPeriod>2.0</InitialDiscoveryPeriod>
<Alignment>
<RequestCombinePeriod>
<Initial>2.5</Initial>
<Operational>0.1</Operational>
</RequestCombinePeriod>
</Alignment>
<WaitForAttachment maxWaitCount="10">
<ServiceName>networking</ServiceName>
</WaitForAttachment>
</Network>
<NameSpaces>
<NameSpace durabilityKind="Durable"
alignmentKind="Initial_and_Aligner">
<Partition>*</Partition>
</NameSpace>
</NameSpaces>
<Persistent>
<StoreDirectory>/tmp/Pdata</StoreDirectory>
</Persistent>
</DurabilityService>
</OpenSplice>
```
# 5.4.1 Example configuration files
Vortex OpenSplice is delivered with a set of ready-made configuration files which provide a quick way of achieving different setups.
ospl\_shmem\_ddsi.xml Federated deployment using shared-memory and standard DDSI networking.
ospl\_shmem\_ddsi2e.xml Federated deployment using shared-memory and extended DDSI networking.
ospl\_shmem\_nativeRT.xml Federated deployment using shared-memory and RTNetworking.
ospl\_shmem\_no\_network.xml Federated deployment using shared-memory only (i.e. without networking).
ospl\_shmem\_secure\_nativeRT.xml Federated deployment using shared-memory and secure RTNetworking.
ospl\_sp\_ddsi.xml Stand-alone ‘single-process’ deployment and standard DDSI networking.
ospl\_sp\_ddsi\_nativeRT\_cohabitation.xml Stand-alone ‘single-process’ deployment using DDSI and RTNetworking in cohabitation mode.
ospl\_sp\_nativeRT.xml Stand-alone ‘single-process’ deployment using RTNetworking.
# 5.4. Configuration
ospl\_sp\_ddsi\_statistics.xml Stand-alone ‘single-process’ deployment with DDSI networking and enabled statistics.
ospl\_sp\_no\_network.xml Stand-alone ‘single-process’ deployment without networking connectivity.
# 5.5 Examples
A great way to get started with Vortex OpenSplice is to try running the examples provided with the product. There are many examples in different languages and some with the CORBA cohabitation, showing different aspects of the DCPS API. To give you a feel for how powerful DDS is then we recommend trying PingPong and the Tutorial, as well as the RoundTrip and Throughput.
The way to build and run the examples is dependent on the Platform you are using. Each example has HTML documentation explaining how to build and run it on Unix/Linux and Windows systems.
For VxWorks and Integrity, please refer to VxWorks 5.5.1, VxWorks 6.x RTP, and Integrity in this Guide.
# 5.5.1 Using the Vortex OpenSplice Tools

Note: The following instructions apply only to the shared memory deployment of Vortex OpenSplice. When deploying in single process configuration, there is no need to manually start the Vortex OpenSplice infrastructure prior to running a DDS application process, as the administration will be created within the application process. Please refer to the Vortex OpenSplice Deployment Guide for a discussion of these deployment architectures.
The Vortex OpenSplice infrastructure can be stopped and started from the Windows Start Menu , as well as the Tuner and Configurator.
# Step 1
Manually start the Vortex OpenSplice infrastructure
1. Enter ospl start on the command line 1. This starts the Vortex OpenSplice services.
These log files may be created in the current directory when Vortex OpenSplice is started:
ospl-info.log - contains information and warning reports
ospl-error.log - contains error reports

If Vortex OpenSplice is used as a Windows Service then the log files are re-directed to the path specified by OSPL\_LOGPATH. (Use the set command in the Vortex OpenSplice command prompt to see the OSPL\_LOGPATH value.)
# Step 2
Start the Vortex OpenSplice Tuner Tool
1. Read the Vortex OpenSplice Tuner Guide (TunerGuide.pdf) before running the Tuner Tool.
2. Start the tool by entering ospltun on the command line.

The URI required to connect is set in the OSPL\_URI environment variable (the default URI is: file://\$OSPL\_HOME/etc/config/ospl.xml).
The Vortex OpenSplice system can now be monitored.
# Step 3
Experiment with the Vortex OpenSplice tools and applications
Use the Vortex OpenSplice Tuner to monitor all DDS entities and their (dynamic) relationships.
# Step 4
Manually stop the Vortex OpenSplice infrastructure
1. Choose File > Disconnect from the Vortex OpenSplice Tuner menu.
2. Enter ospl stop on the command line; this stops all Vortex OpenSplice services.
# 6
# Using Vortex OpenSplice with Vortex Cloud and Vortex Fog
If Vortex OpenSplice is deployed using the DDSI2/DDSI2E network-services in a LAN or a private cloud (multicast-enabled cloud) and Vortex Fog is configured to discover user applications using UDP-multicast in the LAN/private cloud, then Vortex OpenSplice does not need to be configured with any particular configuration property as Vortex Fog will discover and communicate with Vortex OpenSplice using the standardized multicast IP address and UDP ports. The only constraint is that both Vortex OpenSplice and Vortex Cloud are configured to participate in the same DDS domain (domainID).
If Vortex OpenSplice is deployed in a WAN (without multicast-support), then it needs to be configured to use the TCP transport. It also needs to be configured with the peers of one or several Discovery Services (DS) of the deployed Vortex Cloud. If multiple DS’s are available, Vortex OpenSplice may be configured with several discovery service peers in a peers group.
Example with a single discovery service locator:
```xml
<DDSI2Service name="ddsi2">
<General>
.....
</General>
<TCP>
<Enable>True</Enable>
</TCP>
<Discovery>
<Peers>
<Peer>1.1.1.1:7400</Peer>
</Peers>
</Discovery>
```
Example with two discovery service locators:
```xml
<Discovery>
<Peers>
<Peer>1.1.1.1:7400</Peer>
<Peer>2.2.2.2:7400</Peer>
</Peers>
</Discovery>
```
NOTE: Unlike when deployed on a multicast LAN (where the domainID determines the multicast-address used for discovery), the addressed DS of Vortex Cloud will discover (and subsequently match) data from any DDS-domain utilized by Vortex OpenSplice. Utilizing multiple Vortex Cloud discovery services in the WAN (i.e. one per domain) allows for domain-specific discovery and subsequent routing if required.
# 7
# Licensing Vortex OpenSplice
Vortex OpenSplice uses Reprise License Manager (RLM) to manage licenses. This section describes how to install a license file for Vortex OpenSplice and how to use the license manager.
# 7.1 General
The licensing software is automatically installed on the host machine as part of the Vortex OpenSplice distribution. The software consists of two parts:
• Vortex OpenSplice binary files
which are installed in <OpenSplice\_Install\_Dir>/<E>/<platform>.<os>/bin,
where OpenSplice\_Install\_Dir is the directory
where Vortex OpenSplice is installed.
• License files
which determine the terms of the license.
These will be supplied by ADLINK.

Licenses: ADLINK supplies an Vortex OpenSplice license file, license.lic. This file is not included in the software distribution, but is sent separately by ADLINK.
# 7.2 Development and Deployment Licenses
Development licenses are on a per Single Named Developer basis. This means that each developer using the product requires a license. Vortex OpenSplice is physically licensed for development purposes. Vortex OpenSplice is also physically licensed on enterprise platforms for deployment.

Some Vortex OpenSplice components are licensed individually and you will need the correct feature to be unlocked for you to use them.
# 7.3 Installing the License File
Copy the license file to <OpenSplice\_Install\_Dir>/etc/license.lic on the machine that will run the license manager. <OpenSplice\_Install\_Dir> is the directory where Vortex OpenSplice is installed.
This is the recommended location for the license file but you can put the file in any location that can be accessed by the license manager rlm.
If another location is used or the environment has not been setup, then an environment variable, either RLM\_LICENSE or ADLINK\_LICENSE, must be set to the full path and filename of the license file (either variable can be set; there is no need to set both). For example:
$\mathtt { A D L T N K \_ L I C E N S E } { = } / \mathtt { m y } / \mathtt { l i c } / \mathtt { d i r } / \mathtt { l i c e n s e . l i c }$
If licenses are distributed between multiple license files, the RLM\_LICENSE or ADLINK\_LICENSE variable can be set to point to the directory which contains the license files.
# 7.4 Running the License Manager Daemon
It is only necessary to run the License Manager Daemon for floating or counted licenses. In this case, the license manager must be running before Vortex OpenSplice can be used. The license manager software is responsible for allocating licenses to developers and ensuring that the allowed number of concurrent licenses is not exceeded.
For node-locked licenses, as is the case with all evaluation licenses, then it is not necessary to run the License Manager Daemon but the RLM\_LICENSE or ADLINK\_LICENSE variable must be set to the correct license file location.
To run the license manager, use the following command:
```txt
rlm -c <location>
```
where <location> is the full path and filename of the license file. If licenses are distributed between multiple files, <location> should be the path to the directory that contains the license files.
The rlm command will start the ADLINK vendor daemon prismtech, which controls the licensing of the Vortex OpenSplice software.
To obtain a license for Vortex OpenSplice from a License Manager Daemon that is running on a different machine, set either the RLM\_LICENSE or ADLINK\_LICENSE environment variable to point to the License Manager Daemon, using the following syntax:
```txt
RLM_LICENSE=<port>@<host>
```
where <port> is the port the daemon is running on and <host> is the host the daemon is running on.
The port and host values can be obtained from the information output when the daemon is started. The format of this output is as shown in the following example:
```txt
07/05 12:05 (rlm) License server started on rhel4e
07/05 12:05 (rlm) Server architecture: x86_12
07/05 12:05 (rlm) License files:
07/05 12:05 (rlm) license.lic
07/05 12:05 (rlm)
07/05 12:05 (rlm) Web server starting on port 5054
07/05 12:05 (rlm) Using TCP/IP port 5053
07/05 12:05 (rlm) Starting ISV servers:
07/05 12:05 (rlm) ... prismtech on port 35562
07/05 12:05 (prismtech) RLM License Server Version 9.1BL3 for ISV "prismtech"
07/05 12:05 (prismtech) Server architecture: x86_12
Copyright (C) 2006-2011, Reprise Software, Inc. All rights reserved.
RLM contains software developed by the OpenSSL Project
for use in the OpenSSL Toolkit (http://www.openssl.org)
Copyright (c) 1998-2008 The OpenSSL Project. All rights reserved.
Copyright (c) 1995-1998 Eric Young (eay@cryptsoft.com) All rights reserved.
07/05 12:05 (prismtech)
07/05 12:05 (prismtech) Server started on rhel4e (hostid: 0025643ad2a7) for:
07/05 12:05 (prismtech) opensplice_product1 opensplice_product2
07/05 12:05 (prismtech)
07/05 12:05 (prismtech) License files:
07/05 12:05 (prismtech) license.lic
07/05 12:05 (prismtech)
```
The <port> value should be taken from the first line of the output. The <server> value should be taken from the last line. From this example, the value for RLM\_LICENSE or ADLINK\_LICENSE would be:
35562@rhel4e
# 7.5 Utilities
A utility program, rlmutil, is available for license server management and administration. One feature of this utility is its ability to gracefully shut down the license manager. To shut down the license manager, preventing the checkout of licenses for the Vortex OpenSplice software, run either of the following commands:
```txt
rlmutil rlmdown -vendor prismtech
rlmutil rlmdown -c <location>
```
where <location> is the full path and filename of the license file.
The rlmutil program is also used to generate a host identification code which is used to generate your license key. To generate the code, run the following command on the license server:
# Linux
```txt
rlmutil rlmhostid
```
# Windows
```txt
rlmutil rlmhostid ether
```
This returns an ID code for the server, which will look similar to:
Hostid of this machine: 0025643ad2a7
This ID code must be supplied to ADLINK so that your license key can be generated.
# 8
# Launcher
The Launcher application provides easy access to all of the tools, documentation, configurations, and examples bundled with Vortex OpenSplice.
# 8.1 The Launcher utility
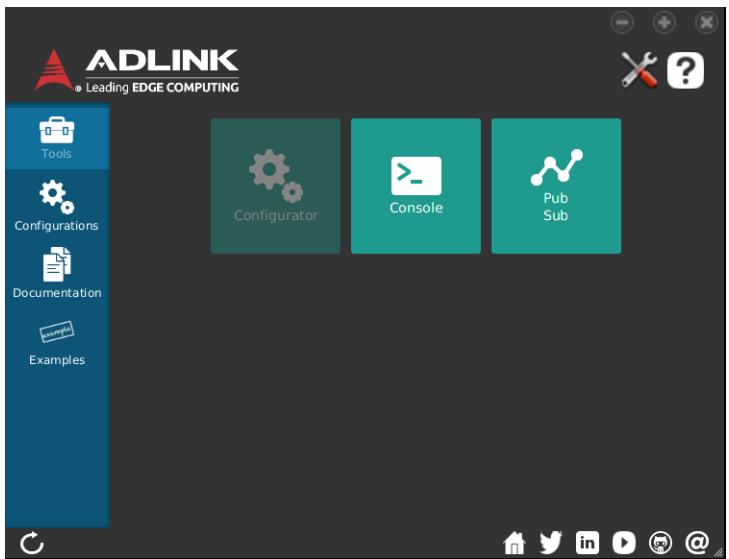
Figure 8.1: The Launcher utility
# 8.2 Starting the Launcher
The Launcher’s content is populated based on the environment variables available at the time it is started. If the command line is used then the correct release script must be sourced from the Vortex OpenSplice home directory before starting the Launcher.
# Unix and Linux
Unix
Linux
Source the release.com file from the shell command line to set up the Vortex OpenSplice environment.
To start Launcher, enter the following command in the shell:
ospllauncher
Windows
Windows
Open an Vortex OpenSplice Command Prompt and enter the following command:
```batch
ospllauncher.bat
```
You can also start Launcher from the Windows Start Menu, which will set the environment variables of the Vortex OpenSplice instance appropriately.
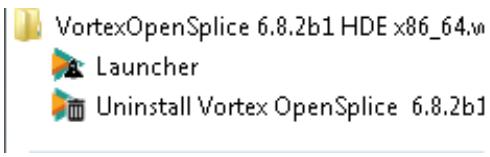
Figure 8.2: Starting the Launcher from Windows Start menu
# 8.3 Stopping the Launcher
Unix and Linux

In the terminal where the ospllauncher file was executed, enter CTRL+C, or close the Launcher application windows using the X button.
Windows

Close the Launcher application windows using the X button.
# 8.4 Troubleshooting Improper Startup
Launcher starts up with incorrect, missing, or no content at all
Check the following:

On Linux, ensure that the release.com was called prior to starting the Launcher.

On Windows, ensure you use the Vortex OpenSplice Command Prompt , or you can use the Windows mand prompt if you call the release.bat script prior to starting the Launcher.
If previous versions of Vortex OpenSplice were used with Launcher, verify that USER\_HOME.olauncherprefs does not contain any overridden values pointing to non-existent directories or files.
Launcher starts up but cannot compile or clean example code
Ensure that you have permissions to modify the permissions of OSPL\_HOME/examples and any user-specified configuration directories, or start Launcher with elevated privileges.
Launcher starts up but cannot save edited configuration files opened in Configurator that has been started from Launcher
Ensure taht you have modify permissions in the OSPL\_HOME/etc/config/ directory, or start Launcher with elevated privileges.
Launcher starts up but cannot write log files
Ensure that you have modify permissions in the OSPL\_HOME/ and its subdirectories, start Launcher with elevated privileges, or start ospllauncher from a non-write-protected directory.
# 8.3. Stopping the Launcher
# 9
# Platform-specific Information
The remainder of this Guide contains information about using Vortex OpenSplice on platforms other than Unix/Linux and Windows.
VxWorks 5.5.1
VxWorks 6.x RTP
VxWorks 6.x Kernel Mode
Integrity
Windows CE
PikeOS POSIX
ELinOS
# 10
# VxWorks 5.5.1
This chapter provides a brief description of how to deploy Vortex OpenSplice on VxWorks 5.5.1.
# 10.1 VxWorks and Tornado
This chapter provides a brief description of how to build the kernel and the supplied examples, and how to run those examples, using VxWorks 5.5.1 and the Tornado ‘front end’. For more information about VxWorks 5.5.1 and Tornado, please refer to WindRiver’s documentation.

NOTE: The examples given here assume that a Solaris-hosted system is being used, and that Vortex Open-Splice is installed in /usr/local/vxworks5.5.1.
# 10.2 Building a VxWorks Kernel
# Required modules
The following modules are the core system components needed to build the Vortex OpenSplice runtime. Please refer to WindRiver’s documentation for additional information describing how VxWorks kernels can be built.
• Operating system components
– POSIX components
\* POSIX timers
POSIX threads
– File System and Disk Utilities
File System and Disk Utilities
# Additional modules
The modules listed below are optional but are useful for HDE (Host Development Environment) development. These modules are required if deploying from the Tornado front end:
• Development tool components
– WDB agent components
WDB agent services
– WDB target server file system
\* symbol table components
• Platform-specific Information
– synchronize host and target symbol tables
– target shell components
\* target shell
# 10.3 Scenarios for Building the OpenSplice Examples
There are two scenarios included for building and deploying the OpenSplice examples.
• You can build one DKM (Downloadable Kernel Module) containing the example, OpenSplice, and all of its required services and support libraries, as well as a default configuration file. (This is the recommended approach.)
• Alternatively, separate DKMs are supplied for each of the OpenSplice libraries and services, and each example can be built as a separate DKM (containing only the example), which we refer to as ‘AppOnly’ style.
# 10.4 The OpenSplice Examples (All linked in one complete DKM - recommended)
To build the standalone C PingPong example
C
At the prompt, cd to examples/dcps/PingPong/c/standalone/‘ and run make.
# 10.4.1 Note about the example projects
The example builds by linking the object produced by compiling the output of osplconf2c along with the example application, the splice deamon, and services enabled in the configuration XML, into one single downloadable kernel module.
Users producing their own application could of course decide to link the object and library files into a monolithic kernel image instead.
# 10.4.2 The osplconf2c tool
osplconf2c is required for example and user applications.
osplconf2c is a tool which processes the OpenSplice configuration XML, and produces a source file to be compiled and linked into the final image. It contains the data from the XML file, as well as any environment variables that you require to configure OpenSplice and references to the symbols for the entry points of the OpenSplice services.
Environment variables can be added using the -e option. For example, you would use the option -e "OSPL\_LOGPATH=/xxx/yyy" if you wanted the logs to be placed in /xxx/yyy.
The example makefiles runs osplconf2c automatically.
# 10.5 Overriding OpenSplice configuration at runtime
You can override the OpenSplice configuration XML provided to osplconf2c at runtime by specifying the URI of a file when starting ospl\_spliced on the target. For example:
```txt
ospl_spliced "file:///tgtsvr/ospl.xml"
```
It should be noted, however, that the osplconf2c will have generated references to the symbols for the services which are specified in the xml file when it started, and only those services may be used in the new configuration, as other services will not be included in the image. As an exception to this, if the -d option is specified then dynamic loading is supported, and DKMs for additional services will be automatically loaded; DKMs for any required ‘libraries’ must be pre-loaded by the user.

NOTE: Symbol table support will be required in the kernel if the -d option is used. Without the -d option it should still be possible to statically link OpenSplice with a kernel even if symbol table support is not included, for example for final deployment.
# 10.6 Running the Examples
If you included the additional modules listed above (see Building a VxWorks Kernel) in the kernel, deployment is done via the target server setup from the Tornado shell connection.
# 10.7 Background
All Vortex OpenSplice tools or services have unique entry points. These entry points all take a string; the string is parsed into the necessary arguments and passed on.
To start ospl on a Unix system, the command would be:
```batch
ospl start file:///ospl.xml
```
and on VxWorks:
```batch
ospl "start file:///ospl.xml"
```
Note that the arguments are separated by spaces.
Other commands:
```txt
ospl -> ospl(char *)
spliced -> ospl_spliced(char *)
networking -> ospl_networking(char *)
durability -> ospl_durability(char *)
cmsoap -> ospl_cmsoap(char *)
mmstat -> ospl_mmstat(char *)
shmdump -> ospl_shmdump(char *)
```
The standard ‘main’ equivalent entry points are:
```txt
ospl -> ospl_unique_main(int argc, char ** argv)
spliced -> ospl_spliced_unique_main(int argc, char ** argv)
networking -> ospl_networking_unique_main(int argc, char ** argv)
durability -> ospl_durability_unique_main(int argc, char ** argv)
cmsoap -> ospl_cmsoap_unique_main(int argc, char ** argv)
mmstat -> ospl_mmstat_unique_main(int argc, char ** argv)
shmdump -> ospl_shmdump_unique_main(int argc, char ** argv)
```
You can use the standard argv argc version entry when you need to use arguments with embedded spaces. For example, for ospl you would use:
```txt
osplArgs = malloc(12)
* osplArgs = "ospl"
*(osplArgs+4) = "start"
*(osplArgs+8) = "file:///tgtsvr/etc/config/ospl.xml"
ospl_unique_main (2, osplArgs)
```
# 10.8 How to start spliced and related services
For the example below the target server filesystem must be mounted as /tgtsvr on the target.
To start the spliced service and other additional OpenSplice services open a windsh and enter the following commands.
```txt
cd "$OSPL_HOME/examples/dcps/PingPong/c/standalone"
ld 1,0,"sac_pingpong_kernel.out"
ospl_spliced
```
Note that spliced will block when invoked by ospl\_spliced so open a new windsh to run the following Pong command:
```autoit
pong ("PongRead PongWrite")
```
After the Pong application has started you can open another windsh and start Ping. However, if you are running the Ping application on another target board you must load and start spliced on that target also, as described above.
```lua
ping("100 100 m PongRead PongWrite")
ping("100 100 q PongRead PongWrite")
ping("100 100 s PongRead PongWrite")
ping("100 100 b PongRead PongWrite")
ping("100 100 f PongRead PongWrite")
ping("1 10 t PongRead PongWrite")
```
The ospl-info.log file can be inspected to check the deployment has been successful. By default, this is written to the /tgtsvr directory.
The moduleShow command can be used within the VxWorks shell to see that the service modules have loaded, and the i command should show that tasks have started for these services.
# 10.9 The osplconf2c command
# Usage
```txt
osplconf2c -h
osplconf2c [-d [-x]] [-u <URI>] [-e <env=var> ]... [-o <file>]
```
# Options
-h, -? List available command line arguments and give brief reminders of their functions.
-u <URI> Specifies the configuration file to use (default: \${OSPL\_URI}).
-o <file> Name of the generated file.
-e <env=var> Environment setting for configuration of OpenSplice; e.g. -e "OSPL\_LOGPATH=/xxx/yyy".
-d Enable dynamic loading.
-x Exclude xml.
# 10.10 The OpenSplice Examples (Alternative scenario, with multiple DKMs)

Loading separate DKMs is not recommended by ADLINK.
# Note about the example projects
Please ensure that any services called by a configuration XML contain an explicit path reference within the command tag; for example:
```txt
<Command>/tgtsvr/networking</Command>
```
# 10.10.1 To build the standalone C pingpong example
#
At the prompt, cd to examples/dcps/PingPong/c/standalone/ and run
```batch
make -f Makefile\_AppOnly
```
# 10.10.2 How to start spliced and related services
To start the spliced service and other additional OpenSplice services, load the core OpenSplice shared library that is needed by all Vortex OpenSplice applications, and then the ospl utility symbols. This can be done using a VxWorks shell on as many boards as needed. The ospl entry point can then be invoked to start OpenSplice.
```txt
cd "$OSPL_HOME"
ld 1,0, "lib/libddscore.so"
ld 1,0, "bin/ospl"
os_putenv("OSPL_URI=file:///tgtsvr/etc/config/ospl.xml")
ospl("start")
```

Please note that in order to deploy the cmsoap service for use with the Vortex OpenSplice Tuner, it must be configured in ospl.xml and the libraries named libcmxml.so and libddsrrstorage.so must be pre-loaded:
```txt
ld 1,0,"lib/libddscore.so"
ld 1,0,"lib/libddsrrstorage.so"
ld 1,0,"lib/libcmxml.so"
ld 1,0,"bin/osp1"
os_putenv("OSPL_URI=file:///tgtsvr/etc/config/osp1.xml")
os_putenv("PATH=/tgtsvr/bin")
osp1("start")
```
# To run the C PingPong example from winsh
#
After the spliced and related services have started, you can start Pong:
```shell
cd "$OSPL_HOME"
ld 1,0,"lib/libdcpsgapi.so"
ld 1,0,"lib/libdcpssac.so"
cd "examples/dcps/PingPong/c/standalone"
ld 1,0,"sac_pingpong_kernel_app_only.out"
pong("PongRead PongWrite")
```
After the Pong application has started you can open another windsh and start Ping. However, if you are running the Ping application on another target board you must load and start spliced on that target also, as described above.
```lua
ping("100 100 m PongRead PongWrite")
ping("100 100 q PongRead PongWrite")
ping("100 100 s PongRead PongWrite")
ping("100 100 b PongRead PongWrite")
ping("100 100 f PongRead PongWrite")
ping("1 10 t PongRead PongWrite")
```
The ospl-info.log file can be inspected to check the deployment has been successful. By default, this is written to the /tgtsvr directory.
The moduleShow command can be used within the VxWorks shell to see that the service modules have loaded, and the i command should show that tasks have started for these services.
# 10.10.3 Load-time Optimisation: pre-loading OpenSplice Service Symbols
Loading spliced and its services may take some time if done exactly as described above. This is because the service Downloadable Kernel Modules (DKM) and entry points are dynamically loaded as required by Open-Splice.
It has been noted that the deployment may be slower when the symbols are dynamically loaded from the Target Server File System. However, it is possible to improve deployment times by optionally pre-loading service symbols that are known to be deployed by OpenSplice.
In this case OpenSplice will attempt to locate the entry point symbols for the services and invoke those that are already available. This removes the need for the dynamic loading of such symbols and can equate to a quicker deployment. When the entry point symbols are not yet available ( i.e. services have not been pre-loaded), OpenSplice will dynamically load the services as usual.
For example, for an OpenSplice system that will deploy spliced with the networking and durability services, the following commands could be used:
```txt
cd "$OSPL_HOME"
ld 1,0, "lib/libddscore.so"
ld 1,0, "bin/osp1"
ld 1,0, "bin/spliced"
ld 1,0, "bin/networking"
ld 1,0, "bin/durability"
os_putenv("OSPL_URI=file:///tgtsvr/etc/config/osp1.xml")
os_putenv("PATH=/tgtsvr/bin")
ospl("start")
```
The ospl-info.log file describes whether entry point symbols are resolved having been pre-loaded, or the usual dynamic symbol loading is required.
# 10.10.4 Notes
In this scenario osplcon2c has been used with the -x and -d options to create an empty configuraion which allows dynamic loading, and the resulting object has been included in the provided libddsos.so.
If desired the end user could create a new libddsos.so based on libddsos.a and a generated file from osplconf2c without the -x option, in order to statically link some services but also allow dynamic loading of others if the built-in xml is later overridden with a file URI. (See Overriding OpenSplice configuration at runtime.)
# 11
# VxWorks 6.x RTP
This chapter provides a brief description of how to deploy Vortex OpenSplice on VxWorks 6.x as a Real Time Process.
# 11.1 VxWorks Real Time Processes
Vortex OpenSplice is deployed on the VxWorks 6.x operating system as Real Time Processes (RTPs). For more information about RTPs please refer to WindRiver’s VxWorks documentation.
# 11.2 Installation
The following instructions describe installing Vortex OpenSplice for VxWorks 6.x on the Windows host environment.
Start the installation process by double-clicking the Vortex OpenSplice Host Development Environment (HDE) installer file. Follow the on-screen instructions and complete the installation. When asked to configure the installation with a license file, choose No. The installer will create an Vortex OpenSplice entry in Start > Programs which contains links to the Vortex OpenSplice tools, documentation, and an Uninstall option.

Please note that WindRiver’s Workbench GUI must be run in an environment where the Vortex OpenSplice variables have already been set. If you chose to set the Vortex OpenSplice variables globally during the installation stage, then Workbench can be run directly. Otherwise, Workbench must be run from the Vortex OpenSplice command prompt. Start the command prompt by clicking Start > Programs > Vortex Open-Splice menu entry > Vortex OpenSplice command prompt, then start the Workbench GUI. On VxWorks 6.6 the executable is located at
<WindRiver root directory>\workbench-3.0\wrwb\platform\eclipse\wrwb-x86-win32.exe
This executable can be found by right-clicking on the WindRiver’s Workbench Start menu item and choosing Properties.
# 11.3 VxWorks Kernel Requirements
The VxWorks kernel required to support Vortex OpenSplice on VxWorks 6.x is built using the development kernel configuration profile with the additional posix thread components enabled. A kernel based on this requirement can be built within Workbench, by starting the Workbench GUI and selecting File > New > VxWorks Image Project.
Type a name for the project then select the appropriate Board Support Package and Tool Chain (for example cpn805 and gnu). Leave the kernel options to be used as blank, and on the Configuration Profile dialog choose PROFILE\_DEVELOPMENT from the drop-down list.
Once the kernel configuration project has been generated, the additional required functionality can be enabled:
• POSIX threads (INCLUDE\_POSIX\_PTHREADS)
• POSIX thread scheduler in RTPs (INCLUDE\_POSIX\_PTHREAD\_SCHEDULER)
• built-in symbol table (INCLUDE\_STANDALONE\_SYM\_TBL)
Note that the Workbench GUI should be used to enable these components so that dependent components are automatically added to the project.
# 11.4 Deploying Vortex OpenSplice
As described in the Configuration section, Vortex OpenSplice is started with the Vortex OpenSplice domain service spliced and a number of optional services described within the Vortex OpenSplice configuration file (ospl.xml). On VxWorks 6.x, a Real Time Process for each of these services is deployed on to the target hardware. The sample ospl.xml configuration file provided with the VxWorks 6.x edition of Vortex Open-Splice has particular settings so that these RTPs can operate effectively.
The instructions below describe how to deploy these RTPs using the Workbench GUI and the Target Server File System (TSFS), although the processes can be deployed by using commands and other file system types.
# Step 1
Start the Workbench and create a connection to the target hardware using the Remote Systems view.
# Step 2
Create a connection to the host machine. In the Properties for the connection, make part of the host’s file system available to VxWorks using the TSFS by specifying both the -R and -RW options to tgtsvr. For example, connecting with the option -R c:\x -RW will enable read and write access to the contents of the c:\x directory from the target hardware under the mount name /tgtsvr.
# Step 3
Activate the new connection by selecting it and clicking Connect.
# Step 4
With a connection to the target hardware established, create a new RTP deployment configuration for the connection by right-clicking on the connection and choosing Run > Run RTP on Target....
# Step 5
Create a new configuration for the spliced deployment that points to the spliced.vxe executable from the Vortex OpenSplice installation. The following parameters should be set in the dialog:
RTP configuration for spliced.vxe Exec Path on Target /tgtsvr/spliced.vxe Arguments file://tgtsvr/ospl.xml Environment LD_BIND_NOW=1OSPL_URI=file://tgtsvr/ospl.xmlPATH=/tgtsvr Priority 100 Stack Size 0x10000
For simplicity it has been assumed that spliced.vxe and the other executables (located in the bin directory of the installation) and ospl.xml (located in the etc/config directory of the installation) have been copied to the directory made available as /tgtsvr described above. It is possible, if required, to copy the entire Vortex OpenSplice installation directory to the /tgtsvr location so that all files are available, but please be aware that log and information files will be written to the same /tgtsvr location when the spliced.vxe is deployed.
The screen shot from Workbench in Workbench showing spliced deployment configuration shows this configuration.
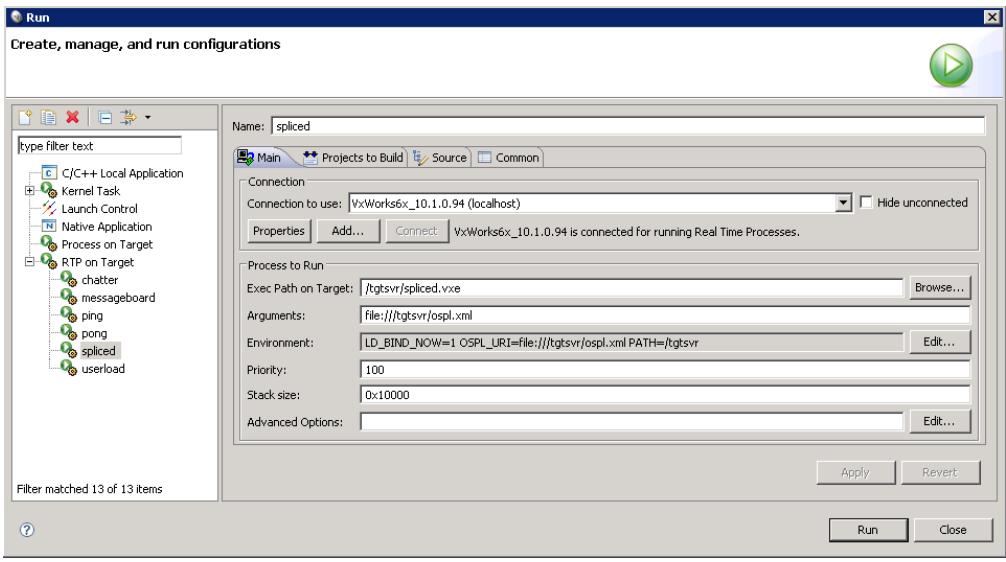
Figure 11.1: Workbench showing spliced deployment configuration
The configuration can be deployed by clicking Run, where an RTP for each service described in the configuration file should be created. These can be seen in Workbench in the Real Time Processes list for the target connection. An example is shown below in Workbench showing deployed Vortex OpenSplice RTPs. (The list may need to be refreshed with the F5 key.)
Deployment problems are listed in ospl-error.txt and ospl-info.txt, which are created in the /tgtsvr directory if the configuration described above is used.
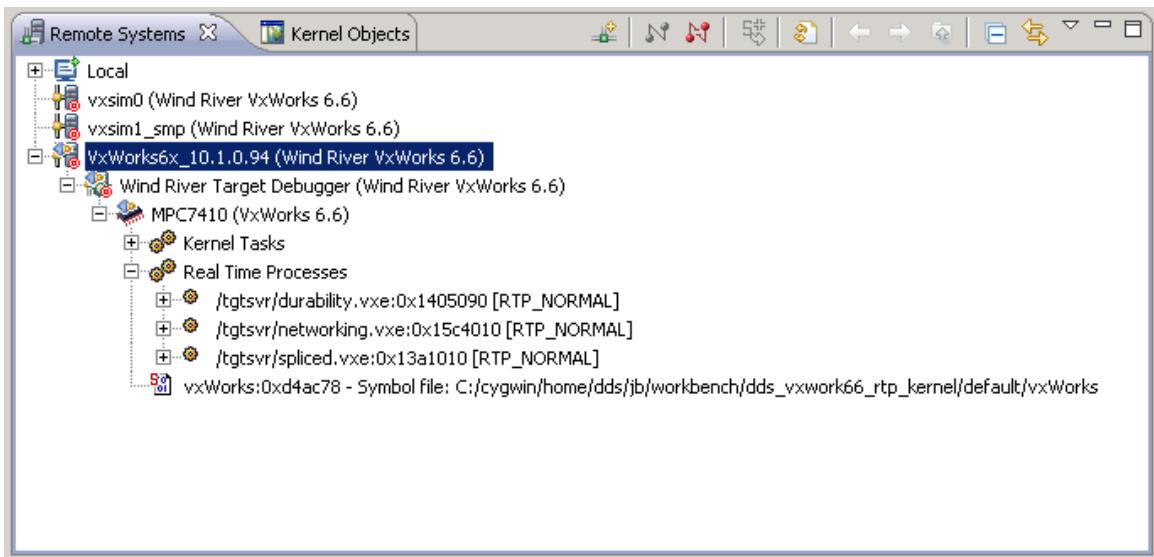
Figure 11.2: Workbench showing deployed Vortex OpenSplice RTPs
# 11.5 Vortex OpenSplice Examples
ADLINK provides a number of examples both for C and C++ that are described in the Examples section. These example are provided in the form of Workbench projects which can be easily built and then deployed on to the target hardware in a similar process to that described above.
Each project contains a README file briefly explaining the example and the parameters required to run it.
# 11.5. Vortex OpenSplice Examples
# 11.5.1 Importing Example Projects into Workbench
The example projects can be imported into Workbench by clicking File > Import... > General > Existing Projects into Workspace.
In the Import Projects dialog, browse to the examples directory of the Vortex OpenSplice installation. Select the required projects for importing from the list that Workbench has detected.
Ensure that the Copy projects into workspace box is un-checked.
# 11.5.2 Building Example Projects with Workbench
Projects in a workspace can be built individually or as a group.
• Build a single project by selecting it and then clicking Project > Build Project.
• Build all projects in the current workspace by clicking Project > Build All.
# 11.5.3 Deploying Vortex OpenSplice Examples
The PingPong and the Tutorial examples are run in identical ways with the same parameters for both C and C++. These should be deployed onto the VxWorks target with the arguments described in the README files for each project.
# Deploying PingPong
The PingPong example consists of the ping.vxe and pong.vxe executables. If these executables have been copied to the directory made available as /tgtsvr as described in Deploying Vortex OpenSplice, RTP configurations should have the following parameters:
RTP configuration for pong Exec Path on Target /tgtsvr/pong.vxe Arguments PongRead PongWrite Environment LD_BIND_NOW=1OSPL_URI=file://tgtsvr/ospl.xml Priority 100 Stack Size 0x10000
RTP configuration for ping Exec Path on Target /tgtsvr/ping.vxe Arguments 10 10 s PongRead PongWrite Environment LD_BIND_NOW=1OSPL_URI=file://tgtsvr/ospl.xml Priority 100 Stack Size 0x10000
When deployment is successful, the console shows output from both the ping and pong executables. The console view can be switched to show the output for each process by clicking the Display Selected Console button.
# Deploying the Chat Tutorial
The Chat Tutorial consists of the chatter.vxe, messageboard.vxe and userload.vxe executables. If these executables have been copied to the directory made available as /tgtsvr as described in Deploying Vortex OpenSplice, RTP configurations should have the following parameters:
RTP configuration for userload Exec Path on Target /tgtsvr/userload.vxe Arguments Environment LD_BIND_NOW=1OSPL_URI=file://tgtsvr/ospl.xml Priority 100 Stack Size 0x10000
RTP configuration for messageboard Exec Path on Target /tgtsvr/messageboard.vxe Arguments Environment LD_BIND_NOW=1OSPL_URI=file://tgtsvr/ospl.xml Priority 100 Stack Size 0x10000
RTP configuration for chatter Exec Path on Target /tgtsvr/chatter.vxe Arguments 1 User1 Environment LD_BIND_NOW=1OSPL_URI=file://tgtsvr/ospl.xml Priority 100 Stack Size 0x10000
When deployment is successful, the console will show output from each RTP. In particular the message board will show the messages sent by the chatter process. The console view can be switched to show the output for each process by clicking the Display Selected Console button.
# 12
# VxWorks 6.x Kernel Mode
This chapter provides a brief description of how to build the kernel and the supplied examples, and how to run those examples, using VxWorks 6.x kernel and the Workbench front end. For more information about VxWorks 6.x, please refer to WindRiver’s documentation.
# 12.1 VxWorks Kernel Requirements
The VxWorks kernel required to support Vortex OpenSplice on VxWorks 6.x is built using the development kernel configuration profile with the additional posix thread components enabled. A kernel based on this requirement can be built within Workbench, by starting the Workbench GUI and choosing File > New > VxWorks Image Project.
# 12.2 Deploying Vortex OpenSplice
Type a name for the project then select the appropriate Board Support Package and Tool Chain (for example pcPentium4 and gnu).
Leave all of the kernel options to be used blank except for the SMP option, which must match the Vortex Open-Splice build you are working with.
A The SMP option must only be checked for SMP builds of OpenSplice.
On the Configuration Profile dialog choose PROFILE\_DEVELOPMENT from the drop-down list.
Once the kernel configuration project has been generated, the additional required functionality can be enabled:
• POSIX threads (INCLUDE\_POSIX\_PTHREADS)
• built-in symbol table (INCLUDE\_STANDALONE\_SYM\_TBL)
• synchronize host and target symbol tables
• target shell components
– target shell
To successfully complete the C++ examples you will also require
• C++ components > standard library (FOLDER\_CPLUS\_STDLIB)
Note that the Workbench GUI should be used to enable these components so that dependent components are automatically added to the project.
# 12.2.1 Special notes for this platform
A If any kernel tasks which will call onto OpenSplice API’s are to be created before ospl\_spliced is started then the user must ensure that the function os\_procInstallHook (which takes no parameters) is called before they are started. There only needs to be one call to os\_procInstallHook; however, mutiple calls are harmless.
# 12.3 OpenSplice Examples
ADLINK provides the pingpong example both for C and C++ that are described in the Examples section. These example are provided in the form of Workbench projects which can be easily built and then deployed on to the target hardware in a similar process to that described above.
Each project contains a README file briefly explaining the example and the parameters required to run it.
# 12.3.1 Importing Example Projects into Workbench
The example projects can be imported into Workbench by choosing File > Import... > General > Existing Projects into Workspace.
In the Import Projects dialog, browse to the examples directory of the OpenSplice installation. Select the required projects for importing from the list that Workbench has detected.
Ensure that the Copy projects into workspace box is un-checked.
# 12.3.2 Building Example Projects with Workbench
Projects in a workspace can be built individually or as a group.
• Build a single project by selecting it and then clicking Project > Build Project.
• Build all projects in the current workspace by clicking Project > Build All.
# 12.4 Running the Examples (All linked in one complete DKM – recommended)
# Scenarios for building the OpenSplice examples
There are two included scenarios for build and deployment of the OpenSplice examples.
• You can build one DKM (Downloadable Kernel Module) containing the example, OpenSplice, and all of its required services and support libraries, as well as a default configuration file. (This is the recommended approach.)
• Alternatively, separate DKMs are supplied for each of the OpenSplice libraries and services, and each example can be built as a separate DKM (containing only the example), which we refer to as ‘AppOnly’ style.
# 12.4.1 Running the examples on two targets
# The C pingpong example
C
Step 1
Right-click on wb\_sac\_pingpong\_kernel and then choose Rebuild Build Project.
Step 2
Next configure the targets to use the target server filesystem, mapped as on the target as /tgtsvr.
# 12.3. OpenSplice Examples
# Step 3
Copy the newly-built wb\_sac\_pingpong\_kernel/PENTIUM4gnu/sac\_pingpong\_kernel/Debug/sac\_pingpong to the target server for each board as sac\_pingpong\_kernel.out.
# Step 4
Open a target shell connection to each board and in the C mode shell run:
```csv
ld 1,0,"/tgtsvr/sac_pingpong_kernel.out" ospl_spliced
```
# Step 5
Open another target shell connection to one board and run:
```txt
pong "PongRead PongWrite"
```
# Step 6
Open another target shell on the other board and run:
```txt
ping "100 100 m PongRead PongWrite"
ping "100 100 q PongRead PongWrite"
ping "100 100 s PongRead PongWrite"
ping "100 100 b PongRead PongWrite"
ping "100 100 f PongRead PongWrite"
ping "1 10 t PongRead PongWrite"
```
# The C++ pingpong example

# Step 1
Right-click on wb\_sacpp\_pingpong\_kernel and then choose Rebuild Build Project.
# Step 2
Next configure the targets to use the target server filesystem, mapped as on the target as /tgtsvr.
# Step 3
Copy the newly-built wb\_sacpp\_pingpong\_kernel/PENTIUM4gnu/sacpp\_pingpong\_kernel/Debug/sac\_ping to the target server for each board as sacpp\_pingpong\_kernel.out.
# Step 4
Open a target shell connection to each board and in the C mode shell run:
```csv
ld 1,0,"/tgtsvr/sacpp_pingpong_kernel.out" ospl_spliced
```
# Step 5
Open another target shell connection to one board and run:
```txt
pong "PongRead PongWrite"
```
# Step 6
Open another target shell on the other board and run:
```txt
ping "100 100 m PongRead PongWrite"
ping "100 100 q PongRead PongWrite"
ping "100 100 s PongRead PongWrite"
ping "100 100 b PongRead PongWrite"
```
```txt
ping "100 100 f PongRead PongWrite"
ping "1 10 t PongRead PongWrite"
```
# 12.4.2 Running the examples on one target
# The C pingpong example

# Step 1
Right-click on wb\_sac\_pingpong\_kernel and then choose Rebuild Build Project.
# Step 2
Next configure the targets to use the target server filesystem, mapped as on the target as /tgtsvr.
# Step 3
Copy the newly-built wb\_sac\_pingpong\_kernel/PENTIUM4gnu/sac\_pingpong\_kernel/Debug/sac\_pingpong to the target server as sac\_pingpong\_kernel.out.
# Step 4
Open a target shell connection and in the C mode shell run:
```csv
ld 1,0,"/tgtsvr/sac_pingpong_kernel.out" ospl_spliced
```
# Step 5
Open another target shell connection and run:
```txt
pong "PongRead PongWrite"
```
# Step 6
Open another target shell and run:
```txt
ping "100 100 m PongRead PongWrite"
ping "100 100 q PongRead PongWrite"
ping "100 100 s PongRead PongWrite"
ping "100 100 b PongRead PongWrite"
ping "100 100 f PongRead PongWrite"
ping "1 10 t PongRead PongWrite"
```
# The C++ pingpong example

# Step 1
Right-click on wb\_sacpp\_pingpong\_kernel and then choose Rebuild Build Project.
# Step 2
Next configure the targets to use the target server filesystem, mapped as on the target as /tgtsvr.
# Step 3
Copy the newly-built wb\_sacpp\_pingpong\_kernel/PENTIUM4gnu/sacpp\_pingpong\_kernel/Debug/sacpp\_pi to the target server as sacpp\_pingpong\_kernel.out.
# Step 4
Open a target shell connection and in the C mode shell run:
```csv
ld 1,0,"/tgtsvr/sacpp_pingpong_kernel.out" ospl_spliced
```
Open another target shell connection and run: pong “PongRead PongWrite”
```txt
Open another target shell and run:
ping "100 100 m PongRead PongWrite"
ping "100 100 q PongRead PongWrite"
ping "100 100 s PongRead PongWrite"
ping "100 100 b PongRead PongWrite"
ping "100 100 f PongRead PongWrite"
ping "1 10 t PongRead PongWrite"
```
# 12.4.3 Using a different path
A If you want or need to use a path other than /tgtsvr (e.g. if you are using a different filesystem) then you need to change the path set by the -e options of osplconf2c in the .wrmakefile.
i You can also set other environment variables with additional -e options.
# 12.4.4 Note about the example projects
The example builds by linking the object produced by compling the output of osplconf2c along with the example application, the splice deamon, and services enabled in the configuration XML, into one single downloadable kernel module. Users producing their own application could of course decide to link the object and library files into a monolithic kernel image instead.
NOTE for VxWorks kernel mode builds of OpenSplice the single process feature of the OpenSplice domain must not be enabled. i.e. “<SingleProcess>true</SingleProcess>” must not be included in the OpenSplice Configuration xml. The model used on VxWorks kernel builds is always that an area of kernel memory is allocated to store the domain database ( the size of which is controlled by the size option in the Database configuration for opensplice as is used on other platforms for the shared memory model. ) This can then be accessed by any task on the same VxWorks node.
# 12.5 Running the Examples (Alternative scenario, with multiple DKMs – ‘AppOnly’ style)
Loading separate DKMs is not recommended by ADLINK.
i NOTE: There are no C++ examples provided for the AppOnly style and there is no libdcpssacpp.out DKM because VxWorks only supports C++ modules that are self-contained. However, it should still be possible to link your C++ application with the libdcpssacpp.a, and then load the complete DKM after the other OpenSplice DKMs.
# 12.5.1 The C pingpong example

Step 1
Right-click on wb\_sac\_pingpong\_kernel\_app\_only for the C example or wb\_sacpp\_pingpong\_kernel\_app\_only for C++, then choose Rebuild Project.
# Step 2
Next configure the targets to use the target server filesystem, mapped on the target as /tgtsvr (use different host directories for each target).
# Step 3
Copy the ospl.xml file from the distribution to the target server directories, and adjust for your desired configuration.
# Step 4
Copy all the services from the bin directory in the distribution to the target server directories (for example, spliced.out, networking.out, etc.).
To run the examples on two targets, start the OpenSplice daemons on each target.
# Step 5
Open a Host Shell (windsh) connection to each board, and in the C mode shell enter:
```txt
cd "<path to opensplice distribution>"
ld 1,0,"lib/libddscore.out"
ld 1,0,"bin/ospl.out"
os_putenv("OSPL_URI=file:///tgtsvr/ospl.xml")
os_putenv("OSPL_LOGPATH=/tgtsvr")
os_putenv("PATH=/tgtsvr/")
ospl("start")
```
Please note that in order to deploy the cmsoap service for use with the OpenSplice DDS Tuner, it must be configured in ospl.xml and the libraries named libcmxml.out and libddsrrstorage.out must be pre-loaded:
```txt
cd "<path to opensplice distribution>"
ld 1,0,"lib/libddscore.out"
ld 1,0,"lib/libddsrrstorage.out"
ld 1,0,"lib/libcmxml.out"
ld 1,0,"bin/ospl.out"
os_putenv("OSPL_URI=file:///tgtsvr/ospl.xml")
os_putenv("OSPL_LOGPATH=/tgtsvr")
os_putenv("PATH=/tgtsvr/")
ospl("start")
```
# Step 6
To load and run the examples:

For the C example:
```csv
ld 1,0,"lib/libdcpsgapi.out"
ld 1,0,"lib/libdcpssac.out"
cd "examples/dcps/PingPong/c/standalone"
ld 1,0,"sac_pingpong_kernel_app_only.out"
```
# Step 7
Open a new Host Shell connection to one board and run:
```txt
pong "PongRead PongWrite"
```
# Step 8
Open another new Host Shell on the other board and run:
```txt
ping "100 100 m PongRead PongWrite"
ping "100 100 q PongRead PongWrite"
ping "100 100 s PongRead PongWrite"
ping "100 100 b PongRead PongWrite"
ping "100 100 f PongRead PongWrite"
ping "1 10 t PongRead PongWrite"
```
# 12.5.2 Running the examples on one target
Proceed as described in the section above, but make all windsh connections to one board, and only load and run ospl once.
# Load-time Optimisation: pre-loading OpenSplice Service Symbols
Loading spliced and its services may take some time if done exactly as described above. This is because the service DKMs (Downloadable Kernel Modules) and entry points are dynamically loaded as required by OpenSplice.
It has been noted that the deployment may be slower when the symbols are dynamically loaded from the Target Server File System. However, it is possible to improve deployment times by pre-loading the symbols for the services that are required by OpenSplice.
On startup, OpenSplice will attempt to locate the entry point symbols for the services and invoke them. This removes the need for the dynamic loading of the DKMs providing the symbols, and can equate to a quicker deployment. Otherwise, OpenSplice will dynamically load the service DKMs.
For example, for an OpenSplice system that will deploy spliced with the networking and durability services, the following commands could be used:
```txt
cd "<path to opensplice distribution>"
ld 1,0,"lib/libddscore.out"
ld 1,0,"bin/ospl.out"
ld 1,0,"bin/spliced.out"
ld 1,0,"bin/networking.out"
ld 1,0,"bin/durability.out"
os_putenv("OSPL_URI=file:///tgtsvr/ospl.xml")
os_putenv("PATH=/tgtsvr/bin")
os_putenv("OSPL_LOGPATH=/tgtsvr")
ospl("start")
```
The ospl-info.log file records whether entry point symbols were pre-loaded, or a DKM has been loaded.
# Notes
# i
In this scenario osplconf2c has been used with the -x and -d options to create an empty configuraion which allows dynamic loading. The resulting object has been included in the supplied libddsos.out. If desired, the end user could create a new libddsos.out based on libddsos.a and a generated file from osplconf2c without the -x option, in order to statically link some services, but also allow dynamic loading of others if the built-in xml is later overridden using a file URI. (See Overriding OpenSplice configuration at runtime.)
# 12.5.3 The osplconf2c tool
osplconf2c is required for example and user applications. osplconf2c is a tool which processes the Open-Splice configuration XML, and produces a source file to be compiled and linked into the final image. It contains the data from the XML file, as well as any environment variables that you require to configure OpenSplice and references to the symbols for the entry points of the OpenSplice services.
Environment variables can be added using the -e option. For example, you would use the -e "OSPL\_LOGPATH=/xxx/yyy" option if you wanted the logs to be placed in /xxx/yyy.
osplconf2c is run automatically by the example projects.
# Overriding OpenSplice configuration at runtime
You can override the OpenSplice configuration XML provided to osplconf2c at runtime by specifying the URI of a file when starting ospl\_spliced on the target; for example: ospl\_spliced "file:///tgtsvr/ospl.xml"
It should be noted, however, that the osplconf2c will have generated references to the symbols for the services which are specified in the xml file when it started, and only those services may be used in the new configuration, as other services will not be included in the image.
# The osplconf2c command
Usage
```txt
osplconf2c -h
osplconf2c [-u <URI>] [-e <env=var> ]... [-o <file>]
```
Options
```txt
-h, -? List available command line arguments and give brief reminders of their functions.
-u <URI> Identifies the configuration file to use (default: ${OSPL_URI}).
-o <file> Name of the generated file.
-e <env=var> Environment setting for configuration of OpenSplice e.g. -e
"OSPL_LOGPATH=/xxx/yyy"
```
# 13
# Integrity
This chapter provides a brief description of how to deploy Vortex OpenSplice on Integrity.
# 13.1 Integrity and GHS Multi
The ospl\_projgen tool is in the HDE/bin directory of the DDS distribution. It is a convenience tool provided for the Integrity platform in order to aid in the creation of GHS Multi projects for running the DDS-supplied PingPong example, the Touchstone performance suite, and the Chatter Tutorial. If desired, these generated projects can be adapted to suit user requirements by using Multi and the ospl\_xml2int tool, which is also described in this chapter.
# 13.2 The ospl\_projgen Command
Usage
```txt
ospl_projgen -h
ospl_projgen [-s <flash\|ram>\|-d] [-n] [-v] [-t <target>]
[-l <c\|c++>\|c++onc] [-u <URI>] -b <bsp name>
[-m <board model>] -o <directory> [-f]
```
Arguments shown between square brackets [ ] are optional; other arguments are mandatory. Arguments may be supplied in any order. All of the arguments are described in detail below.
# Arguments
-h List the command line arguments and give brief reminders of their functions.
-s <flash | ram> Use this argument if you wish to generate a project that will be statically linked with the kernel. The two options for this argument determine whether the resulting kernel image will be a flashable image or a loadable image. If both this argument and the -d argument are omitted the default of a staticallylinked ram-loadable image will be generated.
-d Use this argument to produce a project file that will yield a dynamic download image.

Arguments -s and -d are mutually exclusive.
-n Use this argument if you want to include the GHS network stack in your project.
-v Use this argument if you want to include filesystem support in your project.
-t <target> Use this argument to specify which address spaces to include in your project. Use -t list to show a list of available targets. (Targets available initially are examples supplied with Vortex OpenSplice and Integrity itself.)
-l <c | c++ | c++onc> Use this argument to specify the language for your project. The default is c++.
-u <URI> Use this argument to identify which configuration file to use. You can omit this argument if you have the environment variable OSPL\_URI set, or use it if you want to use a different configuration file from the one referred to by OSPL\_URI. The default is \$OSPL\_URI. The xml2int tool uses this configuration file when generating the Integrate file for your project.
-b <bsp name> Use this argument to specify the BSP name of your target board. Use -b list to show a list of supported target boards.
-m <board model> Use this argument to specify the model number for the target board. Use -b <bsp name> -m list to show a list of supported model numbers. (There are no separate model numbers for pcx86 boards.)
-o <directory> Use this argument to specify the output directory for the project files. The name you supply here will also be used as the name for the image file that will be downloaded/flashed onto the Integrity board.
-f Use this argument to force overwrite of the output directory.
When you run the tool, the output directory specified with the -o argument will be created. Go into this directory, run GHS Multi, and load the generated project.
If the output directory already exists and the -f argument has been omitted, ospl\_projgen will exit without generating any code and will notify you that it has stopped.

NOTE: The NetworkInterfaceAddress configuration parameter is required for Integrity nodes which have more than one ethernet interface, as it is not possible to determine which are broadcast/multicast enabled. (See sections 3.5.2.1 and 3.9.2.1 Element NetworkInterfaceAddress in the Vortex Deployment Guide.)
# 13.2.1 Using mmstat and shmdump diagnostic tools on Integrity
When mmstat or shmdump targets are specified to ospl\_projgen an address space will be added to the generated project. There will also be an appropriate mmstat.c or shmdump.c file generated into the project. In order to configure these, the command line arguments can be edited in the generated .c files. The mmstat tool can be controlled via telnet on port 2323 (by default).
# 13.3 PingPong Example
(Please refer to the Examples section for a description of this example application.)

To generate a project for the C++ PingPong example, follow these steps:
# Step 1
The I\_INSTALL\_DIR environment variable must be set to point to the Integrity installation directory on the host machine before running ospl\_projgen. For example:
```txt
export I_INSTALL_DIR=/usr/ghs/int509
```
# Step 2
Navigate to the examples/dcps/standalone/C++/PingPong directory
# Step 3
Run ospl\_projgen with the following arguments:
```batch
ospl_projgen -s ram -v -n -t pingpong -l c++ -b pcx86 -o projgen
```
# Step 4
Go into the projgen directory, which contains default.gpj and a src directory. (default.gpj is the default Multi project that will build all the sub-projects found in the src directory, and the src directory contains all the sub-projects and generated files produced by the tool.)
# Step 5
Start Multi:
```batch
multi default.gpj
```
You should see a screen similar to the screenshot Integrity: project defaults below:
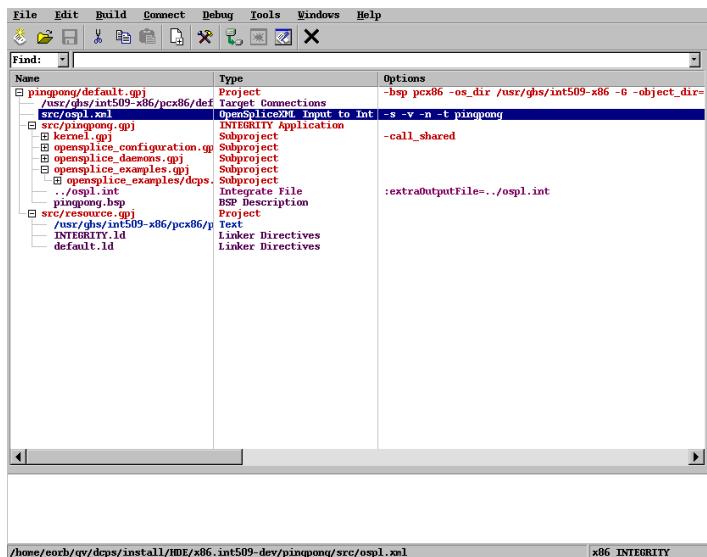
Figure 13.1: Integrity: project defaults
If no changes are required to the project, right-click on default.gpj and then click Build to build the project.
Upon successful completion of the build process, an image is generated (in our case called projgen) in the src directory and you are now ready to either dynamically download the resulting image to the board or to load the kernel image onto the board (depending on the arguments you have specified) and run the PingPong example.
If ospl\_projgen is run and the project built as described above, the generated image will contain:
• GHS Integrity OS (Kernel, Networking, and Filesystem support)
• Vortex OpenSplice (including spliced and the services described in the ospl.xml file)
• The PingPong example
Once the image has been downloaded to the board, the pong “Initial task” should be started and then the ping AddressSpace can be started in the same way, so that the example begins the data transfer. Parameters are not required to be passed to the Integrity processes because the ospl\_projgen tool generates code with particular values that simulate the passing of parameters.

This also applies to the Chat Tutorial (see Examples), if ospl\_projgen is run with the -t chat argument.
# 13.4 Changing the ospl\_projgen Arguments
If changes are subsequently required to the arguments that were originally specified to the ospl\_projgen tool, there are two choices:
1. Re-run the tool and amend the arguments accordingly
or
2. Make your changes through the Multi tool.
The first method guarantees that your project files will be produced correctly and build without needing manual changes to the project files. To use this method, simply follow the procedure described above but supply different arguments.
The second method is perhaps a more flexible approach, but as well as making some changes using Multi you will have to make other changes by hand in order for the project to build correctly.
The following section describes the second method.
# 13.4.1 Changing the generated Vortex OpenSplice project using Multi
You can make changes to any of the settings you specified with ospl\_projgen by following these steps:
# Step 1
Right-click on the highlighted ospl.xml file (as shown above) and click Set Options....
# Step 2
Select the All Options tab and expand the Advanced section.
# Step 3
Select Advanced Vortex OpenSplice XML To Int Convertor Options. In the right-hand pane you will see the options that you have set with the ospl\_projgen tool with their values, similar to Integrity: changing project options in Multi below.
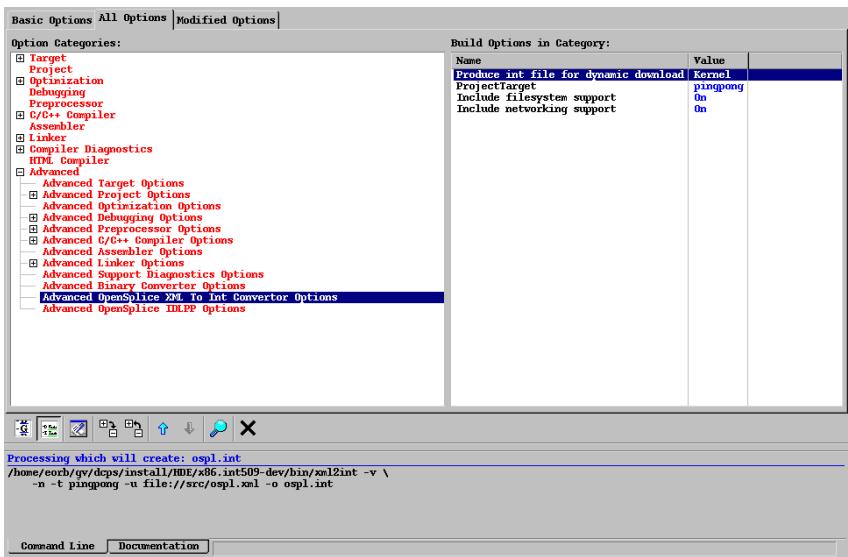
Figure 13.2: Integrity: changing project options in Multi
Right-click on the parameter that you want to change. For example, if you don’t need filesystem support to be included in the kernel image, right-click on Include filesystem support and set the option to Off.
The arguments for xml2int in the bottom pane are updated to reflect any changes that you make. If you switch off filesystem support, the -v argument is removed from the arguments. (The xml2int tool is used to generate the ospl.int Integrate file that will be used during the Integrate phase of the project. For more information on xml2int please see section The ospl\_xml2int command.)

Note that if you do remove filesystem support from the kernel image you should also remove all references to the ivfs library, and make appropriate changes to the ospl\_log.c file as well. See section Amending Vortex OpenSplice Configuration with Multi for information about ospl\_log.c.
Similarly you can change any other option and the changes are applied instantly.
When the changes are complete, rebuild the project by right-clicking on default.gpj and then click Build to build the project.
# 13.4.2 The ospl\_xml2int Tool
The ospl\_xml2int tool is used to inspect your Vortex OpenSplice configuration file (ospl.xml) and generate an appropriate Integrate file (ospl.int). For more information on Integrate files please consult the Integrity manual.
# 13.4.3 The ospl\_xml2int command
Usage
```txt
ospl_xml2int -h
ospl_xml2int [-s|-d] [-v] [-n] [-t <target>] [-u <URI>]
[-o <file>]
```
Arguments shown between square brackets [ ] are optional; other arguments are mandatory. Arguments may be supplied in any order. All of the arguments are described in detail below.
# Arguments
-h List the command line arguments and give brief reminders of their functions.
-s Generate for static linkage with kernel.
-d Use this argument to generate an Integrate file that will yield a dynamic download image. If both this argument and the -s argument are omitted the default of a statically-linked image will be generated.

The arguments -s and -d are mutually exclusive.
-v Include filesystem support.
-n Include network support.
-t <target>
# Available targets:
```txt
chat include chat tutorial
pingpong include PingPong example
touchstone include Touchstone
mmstat include mmstat
shmdump include shmdump
```
Multiple -t arguments may be given. This enables you to use mmstat and/or shmdump (see Using mmstat and shmdump diagnostic tools on Integrity) in conjunction with one of the examples.
-u <URI> Identifies the configuration file to use (default: \${OSPL\_URI}).
-o <file> Name of the generated Integrate file.
Applications linking with Vortex OpenSplice must comply with the following requirements:
• The First and Length parameters must match those of spliced address space (these are generated from ospl.xml).
• The address space entry for your application in the Integrate file must include entries as shown in the example below.
Have a look at the ospl.int for the PingPong example if in doubt as to what the format should be. (Make sure that you have built the project first or else the file will be empty.)
Example ospl.int contents:
```txt
AddressSpace
.
.
.
Object 10
Link ResourceStore
Name ResCon
OtherObjectName DDS_Connection
EndObject
Object 11
Link ResourceStore
Name ConnectionLockLink
OtherObjectName DDS_ConnectionLock
EndObject
Object 12
MemoryRegion your_app_name_database
MapTo splice_database
First 0x20000000
Length 33554432
Execute true
Read true
Write true
EndObject
.
.
.
EndAddressSpace
```
A Note: If you make any changes to the ospl.int file generated by the project and then you make any changes to the ospl.xml file and rebuild the project, the changes to the ospl.int file will be overwritten.
Make sure that you also edit the global\_table.c and mounttable.c files to match your setup. These files can be found under src/projgen/kernel.gpj/kernel\_kernel.gpj and src/projgen.gpj/kernel.gpj/ivfs\_server.gpj as shown in Integrity: changing global\_table.c and mounttable.c below:
Once you have made all of the required changes to ospl.int, you must rebuild the whole project. Your changes will be picked up by Vortex OpenSplice automatically.
# 13.5 Critical Warning about Object 10 and Object 11
We have used Object 10 and Object 11 in various address spaces to declare a semaphore and a connection object, but they may already be in use on your system.
You can change these numbers in the ospl.int file, but if you do then you must change all of the address spaces where Object 10 and Object 11 are defined (except those for ResourceStore as noted below). The value replacing 10 must be the same for every address space, and likewise for the value replacing 11. You must change all references in order for Vortex OpenSplice to work correctly.
The only exception is the ResourceStore address space. Object 10 and Object 11 are unique to the Vortex OpenSplice ResourceStore and they MUST NOT be altered. If you do change them, Vortex OpenSplice WILL NOT WORK!
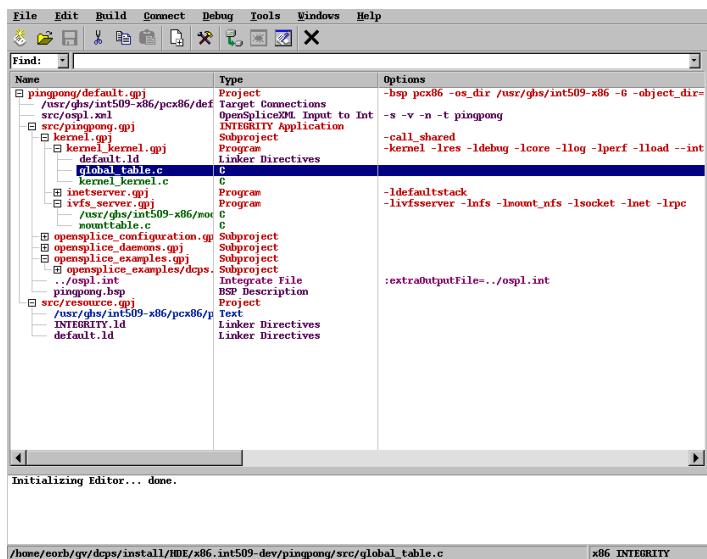
Figure 13.3: Integrity: changing global\_table.c and mounttable.c
# △△
# 13.6 Amending Vortex OpenSplice Configuration with Multi
You can make changes to the Vortex OpenSplice configuration from Multi by editing the files under the project src/projgen.gpj/opensplice\_configuration.gpj/libospl\_cfg.gpj. See Integrity: changing Vortex OpenSplice configuration in Multi below:
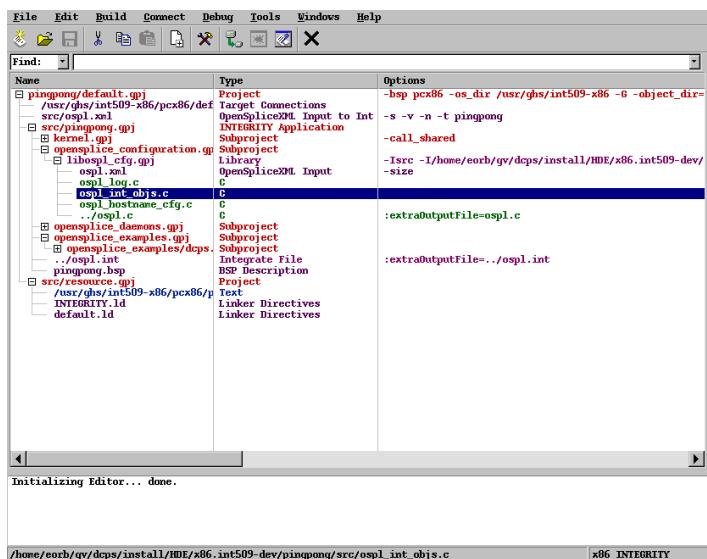
Figure 13.4: Integrity: changing Vortex OpenSplice configuration in Multi
A There are five files here but you may only change ospl.xml and ospl\_log.c. The others must NOT be altered!
ospl.xml This is your Vortex OpenSplice configuration file. (See Configuration for more information about the options an Vortex OpenSplice configuration file may have.)
ospl\_log.c This file determines where the log entries (errors, warnings and informational messages) from Vortex OpenSplice go. The way the default file is generated by ospl\_projgen depends on whether you have specified filesystem support or not. (See comments within the file for more information.)
# 14 二
# Windows CE
This chapter provides a brief description of how to deploy Vortex OpenSplice on Windows CE.
# 14.1 Prerequisites
Vortex OpenSplice requires certain environment variables to be present; as Windows CE does not support traditional environment variables, these are simulated by creating registry entries which contain the required data. References in this chapter to ‘environment variables’ are therefore actually references to values in the Windows CE registry.
The environment variables expected by Vortex OpenSplice are:
PATH The PATH variable must include the directory containing the Vortex OpenSplice executables that may be launched by the ospl utility.
OSPL\_URI This variable contains the location of the default ospl.xml configuration file which is used when not otherwise specified.
The descriptions in this chapter assume that the values shown in the table below have been added to the registry key
HKEY\_LOCAL\_MACHINE\Software\PrismTech\OpenSpliceDDS\<OpenSpliceVersion>
Windows CE Registry keys
Name Type Data PATH REG_SZ NAND FlashOpenSpliceDDS\\HDE\armv4i.wince OSPL_URI REG_SZ file://NANDFlash/OpenSpliceDDS/ /HDE/armv4i.wince/etc/config/ospl.xml

All Vortex OpenSplice dynamic link library (dll) files must also be copied into the \Windows directory on the Windows CE device prior to deployment.
# 14.2 Setting Registry Values with a CAB File
In development, a CAB file can be used to register the necessary variables in the registry. Place the CAB file in the Cold Boot directory on the target device (i.e. \NAND Flash\ColdBootInit) to make the registry settings available as soon as the device has booted.
# 14.2.1 Alternatives to CAB file
Microsoft’s Windows CE Remote Registry Editor can be used instead of a CAB file to set the necessary registry values. Alternatively, ADLINK also provides a convenient method of editing the registry variables by way of the ospl utility using the getenv and putenv parameters (described below).
Please refer to Microsoft’s Windows CE documentation for detailed information about CAB files and the Remote Registry Editor.
# 14.3 The Vortex OpenSplice Environment
Vortex OpenSplice requires the contents of the bin , lib and etc directories from within the Vortex OpenSplice installation to be available on the Windows CE target hardware. For development purposes, Microsoft’s ActiveSync can be used to load these on to the target system. The following description assumes that the bin, lib and etc directories have been copied from the Vortex OpenSplice installation onto the target at the following location:
```batch
\NAND Flash\OpenSpliceDDS\<OpenSpliceVersion>\HDE\armv4i.wince
```
For simplicity the whole OpenSpliceDDS installation directory can be copied to the \Nand Flash directory.
The following description explains deployment on Windows CE by using the Windows CE console. It is assumed that the console’s PATH variable has been set to point to the directory containing the Vortex OpenSplice executables. For example:
```batch
PATH "\NAND Flash\OpenSpliceDDS\<OpenSpliceVersion>\HDE\armv4i.wince\bin";%PATH%
```
(All Vortex OpenSplice dynamic link library (dll) files must have been copied into the ‘\Windows directory on the Windows CE device prior to deployment.)
When running Vortex OpenSplice executables on the command prompt, it is useful to redirect any output to text files by using the > operator.
If the PATH and OSPL\_URI variables have not already been set via a CAB file on device boot up, use the following commands to set those values manually:
```batch
ospl putenv PATH "\NAND Flash\OpenSpliceDDS\<OpenSpliceVersion>\HDE\armv4i.wince\bin" > osplputenv-path.txt
ospl putenv OSPL_URI "file://NAND Flash/OpenSpliceDDS/<OpenSpliceVersion>/HDE/armv4i.wince/etc/config/ospl.xml" > osplputenv-ospluri.txt
```
The values can be checked if required by using Microsoft’s Windows CE Remote Registry Editor, or by running the ospl getenv command:
```batch
ospl getenv PATH > osplgetenv-path.txt
```
# 14.4 Secure Networking
The secure networking service uses OpenSSL for cryptography support. To use this feature, the library libeay32.dll is required; it must be copied to the \Windows directory on the Windows CE device.
Vortex OpenSplice is tested against OpenSSL version 0.9.8i. This may be built as described below.
# 14.4.1 Building OpenSSL for Windows CE 6.0
This section describes the steps required to get an OpenSSL build for Windows CE. The version of OpenSSL used is 0.9.8i. The third-party library wcecompat is used, which also has to be built manually for Windows CE 6.0.
(The description that follows is based on the one given at http://blog.csdn.net/sooner01/archive/2009/06/22/4289147.aspx.)
# Prerequisites
The following are needed to make an OpenSSL build for Windows CE 6.0:
• Microsoft Visual Studio 2005 (VS2008 might also work but it has not been tested)
• An installed WinCE 6.0 SDK to be targeted In this description the target SDK is ’WinCE-GS3Target’
• Perl You will need to install Active Perl, from http://www.activestate.com/ActivePerl. (Note that perl by MSYS does not create correct makefiles.)
• OpenSSL The OpenSSL sources can be downloaded from http://www.openssl.org/. In this description we use version 0.9.8i. Other versions might not work with the steps described here.
• wcecompat compatibility library The wcecompat library adds the functionality to the C Runtime Library implementation of Windows CE which is needed in order to build OpenSSL for Windows CE. Obtain this from http://github.com/mauricek/wcecompat. Note that you should not download the latest version; browse the history and download the version committed on November 21, 2008 named updates for OpenSSL 0.9.9 with commit number f77225b....
# Build wcecompat
Extract the wcecompat download to an appropriate location. In this description the location C:\wcecompat is used, but you can use any location you want.
# Step 1
Start Visual Studio 2005 and open a Visual Studio 2005 command prompt.
# Step 2
Go to the wcecompat directory (C:\wcecompat).
# Step 3
Set the building environment:
```batch
set OSVERSION=WCE600
set TARGETCPU=ARMV4I
set PLATFORM=VC-CE
set PATH=C:\Program Files\Microsoft Visual Studio 8\VC\ce\bin\x86_arm;C:\Program Files\Microsoft Visual Studio 8\Common7\IDE;%PATH%
set INCLUDE=C:\Program Files\Windows CE Tools\wce600\WinCE-GS3Target\include\ARMV4I
set LIB=C:\Program Files\Windows CE Tools\wce600\WinCE-GS3Target\lib\ARMV4I;C:\Program Files\Microsoft Visual Studio 8\VC\ce\lib\armv4
```
If you target a different SDK, replace the text WinCE-GS3Target in the lines above with your own SDK.
# Step 4
Call perl config.pl to create the makefile configuration.
# Step 5
Call nmake to build the wcecompat library.
# Step 6
Exit the command prompt and exit Visual Studio to be sure of starting with a clean environment in the next stage.
# 14.4. Secure Networking
# Build OpenSSL
# Step 1
Extract OpenSSL to any location you like.
# Step 2
Apply the OpenSSL WinCE patch which can be found at http://marc.info/?l=openssldev&m=122595397822893&w=2.
# Step 3
Start Visual Studio 2005 and open a command prompt.
# Step 4
Go to your openSSL directory.
# Step 5
Set the building environment:
set OSVERSION=WCE600
set TARGETCPU=ARMV4I
set PLATFORM=VC-CE
```batch
set PATH=C:\Program Files\Microsoft Visual Studio
8\VC\ce\bin\x86_\arm;C:\Program Files\Microsoft Visual Studio
8\VC\bin;C:\Program Files\Microsoft Visual Studio
8\VC\PlatformSDK\bin;C:\Program Files\Microsoft Visual Studio
8\Common7\Tools;C:\Program Files\Microsoft Visual Studio
8\Common7\IDE;C:\Program Files\Microsoft Visual Studio
8\Common\Tools;C:\Program Files\Microsoft Visual Studio
8\Common\IDE;C:\Program Files\Microsoft Visual Studio 8;\%PATH%
```
```batch
set INCLUDE=C:\Program Files\Microsoft Visual Studio 8\VC\ce\include;C:\Program Files\Windows CE Tools\wce600\WinCE-GS3Target\include\ARMV4I;C:\Program Files\Windows CE Tools\wce600\WinCE-GS3Target\include;C:\Program Files\Microsoft Visual Studio 8\VC\ce\atlmfc\include;C:\Program Files\Microsoft Visual Studio 8\SmartDevices\SDK\SQL Server\Mobile\v3.0;
```
```batch
set LIB=C:\Program Files\Windows CE
Tools\wce600\WinCE-GS3Target\lib\ARMV4I;C:\Program Files\Microsoft Visual Studio 8\VC\ce\atlmfc\lib\ARMV4I;C:\Program Files\Microsoft Visual Studio 8\VC\ce\lib\ARMV4I
```
set WCECOMPAT=C:\wcecompat
If you target a different SDK, replace the text WinCE-GS3Target in the lines above with your own SDK. Also, change the wcecompat directory to your own if you used a different location.
# Step 6
Type perl Configure VC-CE to set up the compiler and OS.
# Step 7
Type ms\do\_ms to build the makefile configuration.
# Step 8
Type nmake -f ms\cedll.mak to build the dynamic version of the library.
# 14.4. Secure Networking
# Troubleshooting
If you get the following error message:
```batch
PTO -c .\\crypto\\rsa\\rsa\_pss.c
cl : Command line warning D9002 : ignoring unknown option '/MC'
rsa\_pss.c
f:\\openssl\\openssl98\\crypto\\rsa\\rsa\_pss.c(165) : error C2220:
warning treated as error - no 'object' file generated
f:\\openssl\\openssl98\\crypto\\rsa\\rsa\_pss.c(165) : warning C4748:
/GS can not protect parameters and local variables from local buffer
overrun because optimizations are disabled in function
NMAKE : fatal error U1077: "F:\\Program Files\\Microsoft Visual Studio
8\\VC\\ce\\bin\\x86\_arm\\cl.EXE" : return code '0x2'
Stop.
```
Remove /WX in the makefile (ce.mak).
# 14.5 Deploying Vortex OpenSplice
ospl start This command will start the Vortex OpenSplice splicedaemon and Vortex OpenSplice services specified within the configuration referred to by the OSPL\_URI variable:
ospl start > osplstart.txt
A different configuration file can be specified as an additional parameter; for example:
ospl start "file://NAND Flash/OpenSpliceDDS/<OpenSpliceVersion>/ HDE/armv4i.wince/etc/config/ospl.xml" > osplstart.txt
ospl list This command will list all the Vortex OpenSplice configurations that are currently running on the node.
ospl list > ospllist.txt
ospl stop This command will stop the Vortex OpenSplice splicedaemon and Vortex OpenSplice services specified within the configuration referred to by the OSPL\_URI variable:
ospl stop > osplstop.txt
A different configuration to be stopped can be specified as an additional parameter; for example:
ospl stop "file://NAND Flash/OpenSpliceDDS/<OpenSpliceVersion>/ HDE/armv4i.wince/etc/config/ospl.xml" > osplstop.txt
# 14.6 Using the mmstat Diagnostic Tool on Windows CE
To run mmstat, use this command:
start mmstat > mmstat.txt
To see the full list of options, use this command:
# 14.5. Deploying Vortex OpenSplice
```batch
start mmstat -h > mmstat-help.txt
```
The mechanism for terminating mmstat on Windows CE is different from other operating systems. All running instances of mmstat can be terminated with this command:
```batch
start mmstat -q > mmstat-quit.txt
```
If there are multiple instances of mmstat running, a particular instance can be terminated by specifying the process identifier:
```batch
start mmstat -q -x <process id> > mmstat-quit.txt
```
where <process id> is displayed in the output for the particular instance of mmstat.
# 14.7 Vortex OpenSplice Examples
Please refer to the Examples section for descriptions of the Vortex OpenSplice examples.
# 14.7.1 Building the examples
There is a shortcut to load the examples into Microsoft Visual Studio which can be accessed from Start > Programs > OpenSpliceDDS <OpenSpliceVersion> armv4i.wince HDE > Examples.
Once the projects are open in Microsoft Visual Studio, click Build/Rebuild Solution at the appropriate level to build the required examples.
Copy the produced executable files to the Vortex OpenSplice bin directory (i.e. \NAND Flash\OpenSpliceDDS\<OpenSpliceVersion>\HDE\armv4i.wince\bin) on the Windows CE device. For the PingPong example the executable files are Ping.exe and Pong.exe. For the Tutorial example the files are Chatter.exe, MessageBoard.exe, and UserLoad.exe.
As an alternative to using the shortcut, to set up the environment for a new project perform the following steps:
# Step 1
Run the Vortex OpenSplice command prompt from the OpenSplice entry under the Windows Start button:
```txt
Start > Programs > OpenSpliceDDS <OpenSpliceVersion> armv4i.wince HDE > OpenSpliceDDS command prompt
```
# Step 2
Copy the Windows Microsoft Visual Studio environment variables to the new command prompt. To obtain these, right-click on the Properties for the Visual Studio 2005 Command Prompt entry located at Start > Programs > Microsoft Visual Studio 2005 > Visual Studio Tools > Visual Studio 2005 Command Prompt , and paste the Shortcut Target entry into the Vortex OpenSplice command prompt. For example this could be
```batch
%comspec% /k ""C:\Program Files\Microsoft Visual Studio 8\VC\vcvarsall.bat"" x86
```
# Step 3
Start Microsoft Visual Studio in this prompt:
```txt
devenv
```
# Step 4
Open the solution file at
```txt
<OpenSpliceDDSInstallation>/examples/examples.sln
```
# 14.7.2 Deploying the PingPong example
Start Vortex OpenSplice as described above. The Ping and Pong executables can then be started as follows:
```batch
start pong PongRead PongWrite > pong.txt
start ping 100 100 m PongRead PongWrite > ping.txt
```
The ping.txt file produced should contain the expected Ping Pong measurement statistics for 100 cycles. The Pong executable can be shut down by running the ping shutdown command:
```batch
start ping 1 1 t PongRead PongWrite > ping-shutdown.txt
```
# 14.7.3 Deploying the Tutorial example
Start Vortex OpenSplice as described above. The Tutorial executables can then be started as follows:
```batch
start装载 > userload.txt
start MessageBoard > messageboard.txt
start Chatter 1 John > chatter.txt
```
The messageboard.txt file produced should contain the messages received from the Chatter executable. The MessageBoard executable can be terminated by running Chatter again with the -1 option:
```batch
start Chatter -1 > chatter-shutdown.txt
```
# 15
# PikeOS POSIX
This chapter provides a brief description of how to deploy Vortex OpenSplice on PikeOS.
# 15.1 How to Build for PikeOS
For this target, Vortex OpenSplice must be configured in the single-process mode and executables must be statically linked. Also, to avoid requiring filesystem support, the ospl.xml configuration file is built into the executable. A tool named osplconf2c is provided to generate the code required for this.
When executed with no arguments, osplconf2c takes the configuration file specified by OSPL\_URI (only file: URIs are supported) and generates a C source file named ospl\_config.c . The URI and filename can be specified using the -u and -o options respectively. The generated code should be compiled and linked with each executable. It comprises an array representing the configuration file and also the entry points which allow the configured services to be started as threads.
Vortex OpenSplice is built against the BSD POSIX support in PikeOS (bposix), and it also uses the lwIP networking facility. When linking an executable for PikeOS deployment it is necessary to specify the system libraries as follows:
```batch
-llwip4 -lsbuf -lm -lc -lp4 -lvm -lstand
```
The Vortex OpenSplice libraries for each configured service (networking, cmsoap, etc.) also have to be linked in.
# 15.2 Deployment Notes
When setting up an integration project in which to deploy an OpenSplice executable the following items should be configured:
• Networking should be enabled using the LwIP stack.
• The amount of available memory will generally need to be increased.

We recommend a minimum of 48MB available memory for OpenSplice partitions.
# Steps in CODEO:
1. Create a new integration project based on the devel-posix template.
2. Edit project.xml.conf:
1. Configure networking for the muxa in the service partition, if required.
2. Enable LwIP in the POSIX partition, set its device name and IP addresses.
3. Add a dependency in the POSIX partition on the network driver file provider.
3. Edit vmit.xml:
In the POSIX partition, set the SizeBytes parameter in Memory Requirement->RAM\_[partition] to at least 0x03000000 .
4. Copy your Vortex OpenSplice executable into the project’s target directory and build the project.
# 15.3 Limitations
A Multicast networking is not supported on PikeOS POSIX partitions. Consequently, the DDSI networking service is not supported.
i The native networking service is supported in a broadcast configuration.
# 15.4 PikeOS on Windows Hosts
Developing with Vortex OpenSplice for PikeOS on Windows differs from Vortex OpenSplice on other Windowshosted platforms. This is because PikeOS uses Cygwin to present a Unix-like environment for cross-development. OpenSplice development therefore follows similar practice to the Unix-hosted editions; for example, you would start a session by entering a bash shell and sourcing the release.com file.
However, the Vortex OpenSplice tools (idlpp, osplconf2c, ospltun, etc.) are built as Windows executables or will be running in Java for Windows and so need to be run with Windows-style pathnames. This is handled using the cygpath command as seen in the release.com script and the example makefiles. Tuner and Configurator may be launched from the Start menu as usual.
# 15.4.1 Building the examples
This proceeds as would be expected in a Unix environment. Assuming that Vortex OpenSplice and PikeOS are installed in the default locations:
Start Cygwin bash
```shell
declare -x PIKEOS_HOME=/opt/pikeos-3.1
declare -x PATH=$PATH:$PIKEOS_HOME/cdk/ppc/oea/bin
./opt/OpenSpliceDDS-V6.2.3/HDE/ppc.pikeos3/release.com
cd $OSPL_HOME/examples
make
```
# 15.4.2 Using a custom LwIP
The example makefiles are set up by default to link against the build of LwIP distributed with PikeOS, but in some circumstances it may be useful to rebuild LwIP.
In this case, before building the examples, set the environment variable LWIP\_HOME to a directory containing liblwip4.a, lwipconfig.o and lwipopts.h.
# 16
# UNIX ARM platform
This chapter provides a brief description of how to deploy Vortex OpenSplice on a UNIX ARM platform
# 16.1 Installation for UNIX ARM platform
The installation of the Vortex OpenSplice HDE or RTS on a UNIX ARM platform is depended on the type of installer that has been provided. Dependent on the platform the installer is either an executable or a tar file. An executable installer has either the extension .run or .exe. A tar file installer has the extension .tar.
The following combinations may be provided - both the HDE and RTS installers are executables - the HDE installer is an executable and the RTS is an tar file - both the HDE and RTS installers are tar files.
When the installer is provided as an executable follow the normal install procedure as described in section Installation for UNIX and Windows Platforms.
When the installer is provided as an tar file follow the procedure described below.
# Step 1
Untar the installer tar file,
go to the directory where Vortex OpenSplice has to be installed.
untar the tar file in this directory
```html
tar xf P-VortexOpenSplice<version>-<E>-<platform>.<os>-<comp>-<type>-<target>
```
where, some being optional,
- ADLINK’s code for the platform <version> - the Vortex OpenSplice version number, for example V6.0
<E> - the environment, either HDE or RTS
<platform> - the platform architecture, for example sparc or x86
<os> - the operating system for example solaris8 or linux2.6
<comp> - the compiler or glibc version
<type> - release, debug or dev, which is release with symbols
<target> - the target architecture for host/target builds.
# Step 2
Configure the Vortex OpenSplice environment.
Go to the <install\_dir>/<E>/<platform> directory, where <E> is HDE of RTS and