![Abstract composition of orange triangles and scattered points on white background (no text or symbols)](.vortex-opensplice-modeling-guide/211f28cc6e2f29a7a1f8de61d82575b754f86f17494c1e75effca59ef531eb6b.jpg)

# VORTEX

# OPENSPLICE

# Modeling Guide

# Release 2.5.x

# Contents

# 1 Preface 1

1.1 About The Modeling Guide
1.2 Intended Audience
1.3 Organisation
1.4 Conventions

# 2 Introduction 3

# 3 Installation 5

3.1 General Installation Instructions 5
3.2 Setting Vortex OpenSplice Preferences 6
3.3 Uninstallation Instructions 7

# 4 Modeler Described 9

4.1 Overview 9
4.2 The Modeler GUI 9
4.3 Creating and Using a Vortex OpenSplice Project 11
4.4 Project Components 13
4.5 Specialized Editors . 16

# 5 Modeling 25

5.1 Information Modeling 25
5.2 Application Modeling 29

# 6 Code Generation 36

6.1 Saving to Eclipse Projects 36
6.2 Exporting Applications . . 37
6.3 Java Code Generation 39
6.4 C++ Code Generation 47

# 7 Creating Launch Configurations 56

7.1 Creating and Running an OSPL start Launch Configuration 56
7.2 Creating and Running an OSPL stop Launch Configuration 57

# 8 Compiling and Running 59

8.1 Compiling 59
8.2 Running 59

# 9 Tutorial 61

9.1 Example Chatroom Overview 61
9.2 Creating the Chatroom 63

# 10 Appendix A 79

10.1 A Chatroom Example, Java Source Code 79

# 11 Appendix B 96

11.1 Chatroom Example, C++ Source Code 96

# 12 Contacts & Notices 126

12.1 Contacts 126
12.2 Notices 126

# 1

# Preface

# 1.1 About The Modeling Guide

The Modeling Guide is included with the Vortex OpenSplice Modeler documentation set.

The Modeling Guide is intended to be used with the Vortex OpenSplice Modeler product suite.

# 1.2 Intended Audience

The Modeling Guide is intended to be used by Vortex OpenSplice Modeler users.

# 1.3 Organisation

The Guide is organised as follows:

The Introduction explains what the Vortex OpenSplice Modeler is, what its advantages and benefits are, and provides general information about the Modeler product.

The Installation section provides the instructions for installing Vortex OpenSplice Modeler.

The features and tools of Vortex OpenSplice Modeler are then described in detail, and an outline of their use for modeling and code generation is given.

The Modeling section describes in detail how to use the tools in Vortex OpenSplice Modeler for modeling and assembling resources.

The next section, on Code Generation, describes how to use the Vortex OpenSplice Modeler for generating DDScompliant source code.

Launch Configurations, convenient ways to run and control the Modeler, are described next.

The following section gives details of how to compile and run applications using Vortex OpenSplice Modeler and Eclipse Workbench.

There is also a Tutorial, which uses a DDS-based example to demonstrate how to use the basic features of the Vortex OpenSplice Modeler modeling tool.

Finaly, two Appendices contain source code in Java and C++ for the Chatroom example project described in the Tutorial.

# 1.4 Conventions

The icons shown below are used in the Vortex product documentation to help readers to quickly identify information relevant to their specific use of Vortex OpenSplice.

<table><tr><td>Icon</td><td>Meaning</td></tr><tr><td>&lt;img src="images/2a05f87a4292bfecb242bff603249f384f86fc8d046326ed5c2af664e82a5224.jpg"/&gt;</td><td>Item of special significance or where caution needs to be taken.</td></tr><tr><td>&lt;img src="images/2f8a03184f07ba6929c0610d462b5baa13e1b03d87dee3b76889cd5a2761eb27.jpg"/&gt;</td><td>Item contains helpful hint or special information.</td></tr><tr><td>&lt;img src="images/42957640ce78c593274572bbd2ed7b41b0e3a7ee6d892d77bf0a4bde27b9d456.jpg"/&gt;</td><td>Information applies to Windows (e.g. XP, 2003, Windows 7) only.</td></tr><tr><td>&lt;img src="images/55135cc7581523fce7ddd1eb66b08f8e6fd95ab167383231a59a4998a53ee470.jpg"/&gt;</td><td>Information applies to Unix-based systems (e.g. Solaris) only.</td></tr><tr><td>&lt;img src="images/9eae80ba39b971221a39b756acb5003851dffcba4553f7c89fcc83909adcdaea.jpg"/&gt;</td><td>Information applies to Linux-based systems (e.g. Ubuntu) only.</td></tr><tr><td>&lt;img src="images/91471bff6143cec77d9971f90dd0183064b07925feb0bfc5b70d3ca70049d5d0.jpg"/&gt;</td><td>C language specific.</td></tr><tr><td>&lt;img src="images/8fe49bbc4d91c23f63d75b43394c20f1cdf8f4f6a4c730c1d71c4c74c43e09b2.jpg"/&gt;</td><td>C++ language specific.</td></tr><tr><td>[78BA]</td><td>C# language specific.</td></tr><tr><td>&lt;img src="images/caf1c16636805907234a94893aca2e9f2dff6f072bd8e1138785df6cbcfa7879.jpg"/&gt;</td><td>Java language specific.</td></tr></table>

# 2

# Introduction

The Vortex OpenSplice Modeler is an integrated Eclipse-based tool chain based on Data Distribution Service (DDS) domain-specific model driven techniques. It provides the essential productivity tools of ADLINK’s third generation OMG-DDS suite.

Vortex OpenSplice is a suite of software products comprised of a high-performance, low-overhead run-time environment, development tools for modeling information and applications, and run-time tools for monitoring system performance.

The Vortex OpenSplice Modeler conforms to the Object Management Group’s (OMG’s) Data Distribution Service for Real-Time Systems Specification for the high-performance, high-integrity systems required in defence, airtraffic control, SCADA, and other applications, where RT distributed data is a requirement for acceptable systems performance.

The Vortex OpenSplice Modeler is designed to provide developers of these RT systems with an easy-to-use, graphical modeling environment that dramatically increases their productivity, and 2nd generation DDS middleware offering superior performance, scalability, robustness, fault-tolerance, flexibility, and ease-of-use.

The objective of the Vortex OpenSplice Modeler is to reduce complexity, shorten time-to-market, raise quality, and ensure Standards compliance and code correctness; all in a single integrated suite of tools from a proven and trusted vendor.

The Vortex OpenSplice Modeler facilitate DDS-based system development by clearly distinguishing between the various scopes and lifecycle stages of the system supported by visual composition, configuration and round-trip engineering. This purpose is realized by the following means:

• Guidance - the tools provide context-aware guidance regarding the overall DDS concept, patterns and bestpractices.
• Well-defined hierarchical steps - includes information modeling (topic definitions in IDL, code-generation for topic QoS), application design (code-generation for application frameworks and DDS entities such as publishers/writers, subscribers/readers) and system deployment (information partitioning, networkconfiguration and durability configuration resulting in XML-based Vortex OpenSplice configuration data).

The Vortex OpenSplice Modeler includes these tools:

• Vortex OpenSplice Information Modeler - graphical information-modeling tool for system-wide Types and Topics.
• Vortex OpenSplice Application Modeler - graphical application-modeling tool for application codegeneration based on a DDS meta-model and related palette of DDS-entities and application frameworks, including of DomainParticipants, Publishers, Subscribers, DataWriters, DataReaders and Listeners.

A future release will also include:

• Vortex OpenSplice Deployment Modeler - graphical deployment-control environment supporting real-time connectivity with the deployed target system both for configuration-purposes as well as run-time control and monitoring (by integrating the OpenSplice Tuner features in the Eclipse-based framework).
• Round-trip engineering between the modeling environment and the actual deployed target system.

Linux

Windows

The Vortex OpenSplice Modeler is currently available for Windows and Linux running Sun’s Java SE JDK 6 and Eclipse 3.6.

The Vortex OpenSplice Modeler product is supplied as profiles: individual, tailored packages specific to each modeling area, including:

• information modeling
• application modeling
• deployment modeling (to be supported in a future release)

# 3

# Installation

# 3.1 General Installation Instructions

Follow the steps shown below to install the Vortex OpenSplice Modeler.

Step 1: Prerequisites

Ensure that Java Version 6 (required) and the Vortex OpenSplice Host Development Environment 1 (recommended), plus any other supporting software (such as native compilers, for example), are installed and working.

C++

The prerequisites for C++ Code Generation are given in the Release Notes included with odeler product distribution.

The Release Notes can be viewed by opening index.html located in the root (or base) directory of your Vortex OpenSplice installation and following the Release Notes link.

Step 2: Run the Vortex OpenSplice Modeler installer

Unix

Linux

On Unix-based platforms (including Linux), run from the command line:

```txt
VortexOpenSpliceModeler-&lt;version&gt;-&lt;platform&gt;-installer.bin
```

where &lt;version&gt; is the release version number and &lt;platform&gt; is the build for your platform. Ensure that the execute permission is enabled first, then follow the on-screen instructions. For example:

```matlab
% chmod u+x VortexOpenSpliceModeler-2.5.12-linux-installer.bin
% ./VortexOpenSpliceModeler-2.5.12-linux-installer.bin
```

# Windows

On Windows-based platforms, run by double-clicking on the filename in Windows Explorer:

```txt
VortexOpenSpliceModeler-&lt;version&gt;-windows-installer.exe
```

where &lt;version&gt; is the release version number, then follow the on-screen instructions. For example:

```batch
> VortexOpenSpliceModeler-2.5.12-windows-installer.exe
```

Step 3: Install the license file

A license file must be obtained from ADLINK, then copied to the eclipse or eclipse/etc subdirectories where the Vortex OpenSplice Modeler has been installed, or copied to the ADLINK/Vortex\_v2/license directory, or have the ADLINK\_LICENSE environment variable defined with the file path to the license file.

For example:

# Unix

# Linux

/home/myHomeDir/ADLINK/Vortex\_v2/Tools/VortexModeler/2.5.12/eclipse/etc

# Windows

\ADLINK\Vortex\_v2\Tools\VortexModeler\2.5.12\eclipse

For more information about licensing, please refer to the Getting Started Guide.

# 3.2 Setting Vortex OpenSplice Preferences

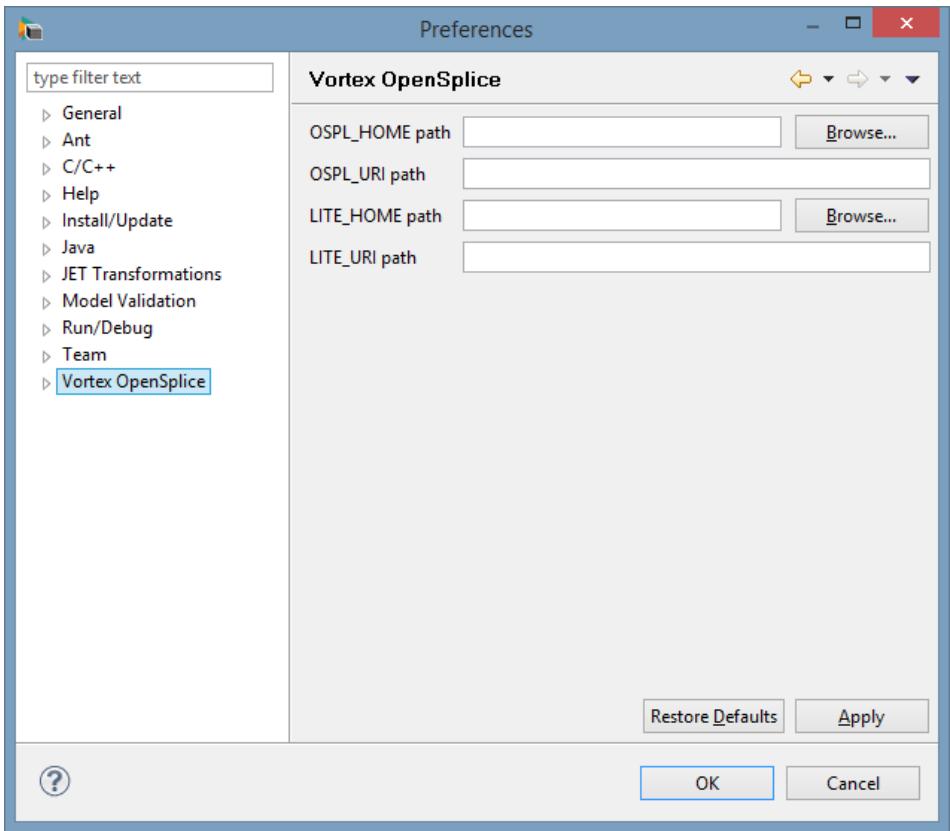
After installing the Vortex OpenSplice Modeler it is necessary to specify the location of the Vortex OpenSplice installation to be used.

Step 1: Start the Vortex OpenSplice Modeler.

Step 2: Choose Window > Preferences.

Step 3: Select OpenSplice.

Step 4: Add the location of the Vortex OpenSplice installation to OSPL\_HOME.

In the OSPL\_HOME path field enter (for example)

/home/apps/ADLINK/Vortex\_v2/Device/VortexOpenSplice/6.6.0p1/HDE/x86\_64.linux

The Browse button can be used to navigate through your file system to point to the installation.

You can also set the OSPL\_URI path if this is different from the default location.

Step 5: If you are modelling DDS applications for Vortex Lite:

Set the LITE\_HOME path field, e.g.

/home/apps/ADLINK/Device/VortexLite/2.0.0

As before, you can set the LITE\_URI path to a Vortex Lite configuration file if required.

# The Vortex OpenSplice Preferences
![Preferences\ntype filter text\n▷ General\n▷ Ant\n▷ C/C++\n▷ Help\n▷ Install/Update\n▷ Java\n▷ JET Transformations\n▷ Model Validation\n▷ Run/Debug\n▷ Team\n▷ Vortex OpenSplice\nVortex OpenSplice\nOSPL_HOME path\nBrowse...\nOSPL_URI path\nLITE_HOME path\nBrowse...\nLITE_URI path\nRestore Defaults\nApply\nOK\nCancel](.vortex-opensplice-modeling-guide/89fc4a6bda6d1daae50c1c1f725d485f1d144e6c4791c8a686a162a009582af5.jpg)

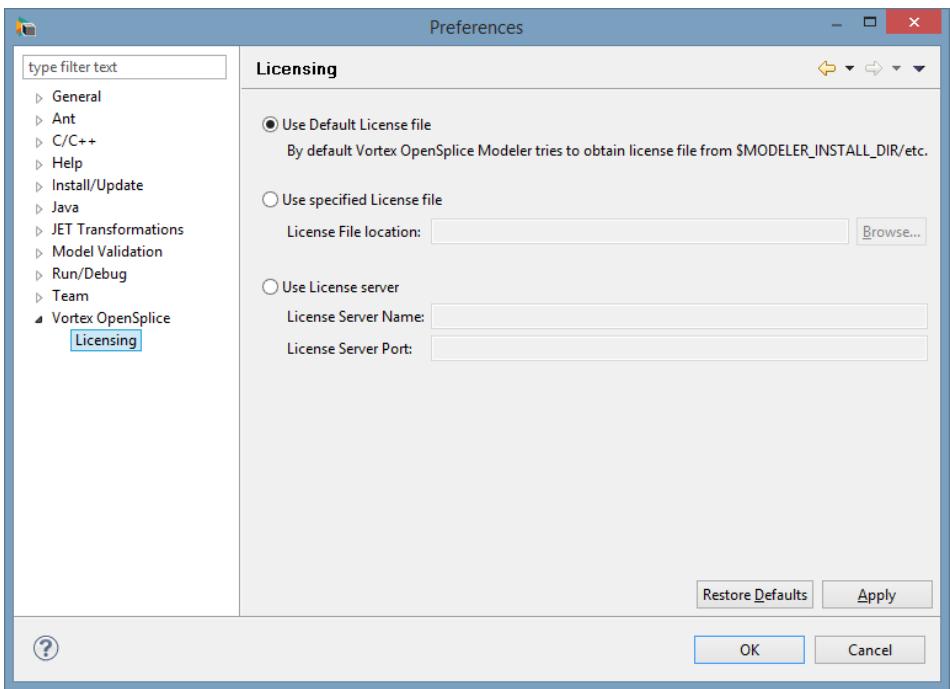
The license location can also be specified using the Licensing Preferences page, which is below the Vortex OpenSplice Preferences page described above.

Vortex OpenSplice licensing
![Preferences\ntype filter text\n► General\n► Ant\n► C/C++\n► Help\n► Install/Update\n► Java\n► JET Transformations\n► Model Validation\n► Run/Debug\n► Team\n► Vortex OpenSplice\nLicensing\nLicensing\n● Use Default License file\nBy default Vortex OpenSplice Modeler tries to obtain license file from \$MODELER_INSTALL_DIR/etc.\n○ Use specified License file\nLicense File location: \nBrowse...\n○ Use License server\nLicense Server Name:\nLicense Server Port:\nRestore Defaults	Apply\n?](.vortex-opensplice-modeling-guide/f56da324f4d09c5a06a041d720a1dc64d58dd1192745fb33a3dd332675206f32.jpg)

# 3.3 Uninstallation Instructions

The uninstaller cleans the Vortex OpenSplice Modeler install directory by removing any file created during the installation process.

# 3.3. Uninstallation Instructions

Files created by users (such as project files in the workspace directory) are not removed by the uninstaller so that users do not lose their work.

A normal uninstallation typically removes all folders except for the eclipse folder (with the workspace, p2, plugins and configuration sub-folders).

Follow the steps below to uninstall the Vortex OpenSplice Modeler.

Step 1: Navigate to the uninstall folder of your Vortex OpenSplice Modeler installation.

# Unix

# Linux

On Unix-based platforms (including Linux), the default path will be:

```txt
/home/myHomeDir/ADLINK/Vortex_v2/Tools/VortexModeler/&lt;version&gt;/uninstall
```

where &lt;version&gt; is the release version number.

# Windows

On Windows-based platforms, the default path will be:

```txt
\ADLINK\Vortex_v2\Tools\VortexModeler\&lt;version&gt;\uninstall
```

where &lt;version&gt; is the release version number.

Step 2: Run the Vortex OpenSplice Modeler uninstaller.

# Unix

# Linux

On Unix-based platforms (including Linux), run from the command line:

```txt
uninstall-Vortex OpenSplice Modeler &lt;version&gt;
```

where &lt;version&gt; is the release version number, then follow the on-screen instructions. For example:

```batch
% ./uninstall-Vortex\ OpenSplice\ Modeler\ V2.5.12
```

# Windows

On Windows-based platforms, run by double-clicking on the filename in Windows Explorer:

```txt
uninstall-Vortex OpenSplice Modeler &lt;version&gt;.exe
```

where &lt;version&gt; is the release version number, then follow the on-screen instructions. For example:

```txt
> uninstall-Vortex OpenSplice Modeler V2.5.12.exe
```

On Windows, if certain files are still in use by a process (or by the operating system), the uninstaller will skip them but prompt you to restart your machine. Restarting the machine removes locks on the files and ensures that the uninstaller processes them.

![The image displays a triangular warning sign with a thick red border and a white background. Centered inside the triangle is a large black exclamation point.](.vortex-opensplice-modeling-guide/fd87b0f88b20abfc273e1aceb651a391a2a017e0e26e23a2dd015dc4fc394c68.jpg)

Note: To install a new version of Vortex OpenSplice Modeler on top of an existing one, it is recommended that you uninstall the current version first. Because the uninstaller leaves the workspace folder untouched, installing a new version of Modeler should be seamless and you should be able to continue working with your existing projects.

# 4

# Modeler Described

This section describes the features and specialized tools available in Vortex OpenSplice Modeler, and outlines how to use them for modeling and assembling resources (such as DDS entities) as well as for generating DDScompliant source code.

# 4.1 Overview

The Vortex OpenSplice Modeler is an integrated Eclipse-based tool chain based on DDS domain-specific modeldriven techniques.

The Vortex OpenSplice Modeler modeling tool provides both Information and Application modeling:

• Information modeling includes the modeling of Types and Topics
• Application modeling includes the modeling of DomainParticipants, Publishers, Subscribers, DataWriters, DataReaders, Listeners, WaitSets and Conditions.

Future releases will also include Deployment modeling (a graphical deployment-control environment supporting real-time connectivity).

![The image features a blue square containing a white lowercase letter 'i'. Thin black horizontal lines frame the top and bottom of the square.](.vortex-opensplice-modeling-guide/ce41c1b3440f0745f024f585b6cc01dca84dcd8a66ab69d55c0c5bf76ec53999.jpg)

A detailed example showing how to model a publisher-subscriber application is provided in the Tutorial. Readers should be familiar with the Vortex OpenSplice product, the OMG’s Data Distribution Service for Real-Time Systems Specification, Version 1.2, and the Eclipse IDE before reading these sections or using the Vortex OpenSplice Modeler.

# 4.1.1 The Vortex OpenSplice Modeler and Eclipse

Eclipse (http://www.eclipse.org) is an extensible, Open Source, Integrated Development Environment (IDE) for developing software.

The Vortex OpenSplice Modeler (also referred to simply as Modeler for convenience) is a set of plug-ins for Eclipse. The Vortex OpenSplice Modeler plug-in enables the model-driven development of the Information Model together with the software components (the Application Model) that operate on it. Distinguishing between information and application modeling allows a clear ‘separation of concerns’ for users. System architects can model the information and software engineers can model their applications on this model.

The Modeler can generate the source code and descriptors needed for any of the supported OpenSplice architectures and platforms.

# 4.2 The Modeler GUI

The Vortex OpenSplice Modeler Graphical User Interface (GUI) is composed of:

• views - panels within the GUI which provide information about the components which constitute the models.
• editing tools - editors which are used to create, manage, and modify the models and components.

• a Vortex OpenSplice Design Perspective - a collection of specific views, menus and editors which are particular to the Modeler plug-in.

The GUI elements are introduced below.

# 4.2.1 Eclipse Workbench and Perspectives

The Workbench is the Eclipse main window and working area. The Workbench contains the editors and views that are used to develop, modify and view your software project and its components (see Vortex OpenSplice Design Perspective and Example Project).

A Perspective defines what actions are available in the Eclipse menus and tool bars as well as arranging the available editors and views. A Perspective’s views can be customized to suit individual needs. Any number of Perspectives can be open at one time, but only one is visible at a time. The Perspective Switch icon, located in the upper right-hand corner of the Workbench, is used to change the currently displayed perspective.

# The Vortex OpenSplice Design Perspective

The Vortex OpenSplice Design Perspective is an Eclipse perspective containing the views, menus and editors needed by users to perform tasks within the Modeler.

The Vortex OpenSplice Design Perspective

• is displayed when using the Vortex OpenSplice Modeler
• populates the Menu and Tool Bars with OpenSplice-specific items.

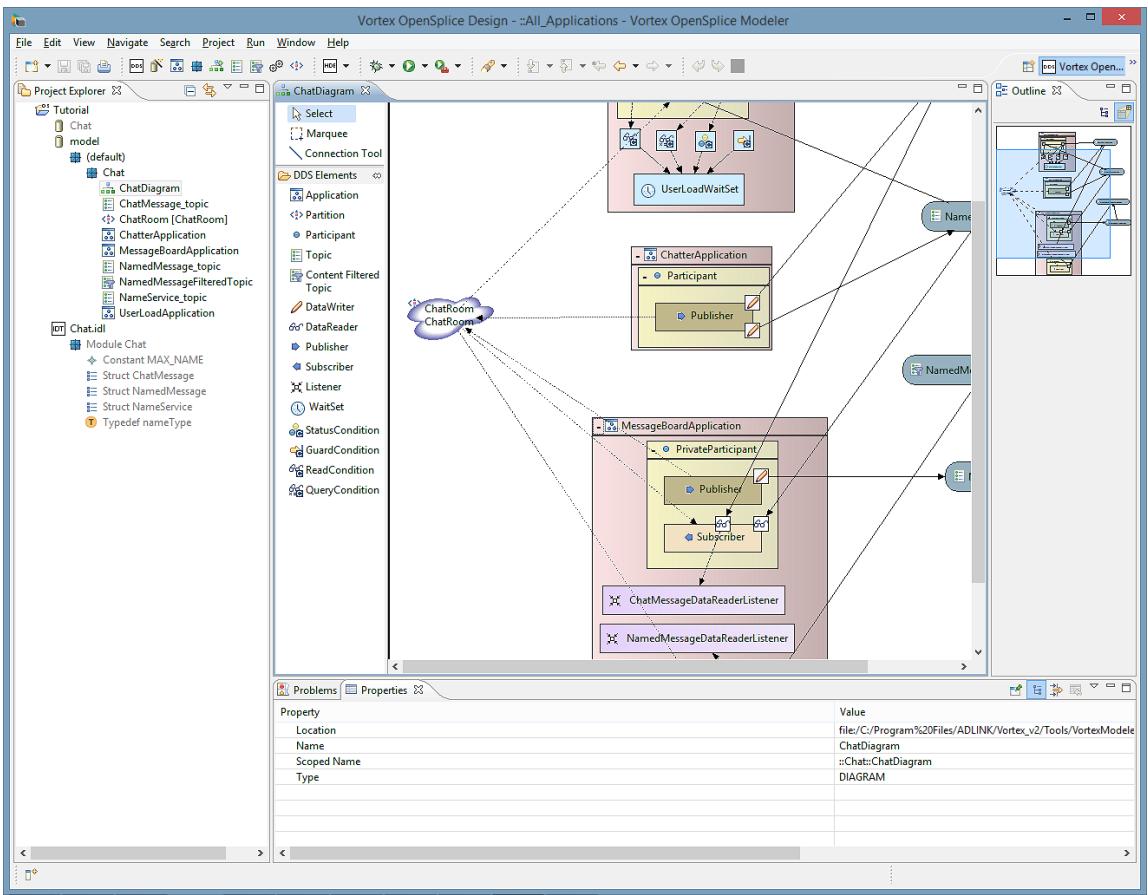
The Vortex OpenSplice Design Perspective with an open project, editors and Outline View is shown below.

Vortex OpenSplice Design Perspective and Example Project
![Based on the provided image, here is the description of the flowchart/block diagram:\n\n**Labeled Blocks:**\n*   **Left:** A purple oval labeled 'ChatRoom' (text appears twice).\n*   **Top Center:** A pink rectangular container holding a yellow box with icons and a blue box labeled 'UserLoadWaitSet'.\n*   **Middle Center:** A brown-bordered box labeled 'ChatterApplication' containing a yellow box labeled 'Participant' and an inner brown box labeled 'Publisher'.\n*   **Bottom Center:** A large pink-bordered box labeled 'MessageBoardApplication'. Inside, it contains a yellow box labeled 'PrivateParticipant' with nested boxes for 'Publisher' and 'Subscriber'. Below the yellow box, within the pink border, are two purple boxes labeled 'ChatMessageDataReaderListener' and 'NamedMessageDataReaderListener'.\n*   **Right:** Three grey oval shapes partially visible on the far right, labeled 'Name...', 'NamedM...', and a third with a document icon.\n\n**Connections:**\n*   **Dotted Lines:** Originating from the 'ChatRoom' oval on the left, dotted lines connect to the 'UserLoadWaitSet' block, the 'ChatterApplication' block, and the 'MessageBoardApplication' block.\n*   **Solid Lines:** Solid lines connect the application blocks to the grey ovals on the far right:\n    *   A line connects the 'UserLoadWaitSet' block to the middle and bottom grey ovals.\n    *   A line connects the 'ChatterApplication' block to the top grey oval.\n    *   Lines connect the 'MessageBoardApplication' block to the top and middle grey ovals.](.vortex-opensplice-modeling-guide/d08d9cd53227ed309b794075d55c0fa528292edf77c4f29f85557f075fd700be.jpg)

The Vortex OpenSplice Design Perspective contains the views listed below. These views can be seen in the illustration above.

• Project Explorer (located on the left-hand side of the Workbench) - This view shows all of the Vortex OpenSplice and other Eclipse projects loaded in the Eclipse Workbench, with their contents.
• Editor Area (located in the centre of the Workbench) - This area is where all editors are displayed. More than one editor can be loaded into the editor area: they are accessed by clicking the tabs appearing along the top of the editing area. The specialized Modeler editors are described in detail in the section Specialized Editors.
• Outline (located along the right-hand side of the Workbench) - This view shows an outline of the component or entity being edited in the current editor. Selecting a component in the Outline will change the focus in the editor to that component. This is useful for finding a component in a diagram when the diagram too large to fit within the visible area of the editor. Various types of outline can be shown, including hierarchical and zoomable thumbnail views of the editor contents: the type of outline(s) available depends on the editor being used.
• Properties View (located at the bottom of the Workbench) - The Properties View displays an object’s properties: the object can be selected in either the Project Explorer or in an editor.
• Problems View (located at the bottom of the Workbench) - The Problems View displays all Problem Markers on all resources in the users Workspace, including errors and warnings in Vortex OpenSplice projects.

# 4.3 Creating and Using a Vortex OpenSplice Project

A Vortex OpenSplice project contains the components and entities that are used to generate the source code and interfaces for Vortex OpenSplice-based DDS applications.

The following basic steps describes how to create a Vortex OpenSplice project.

# Step 1

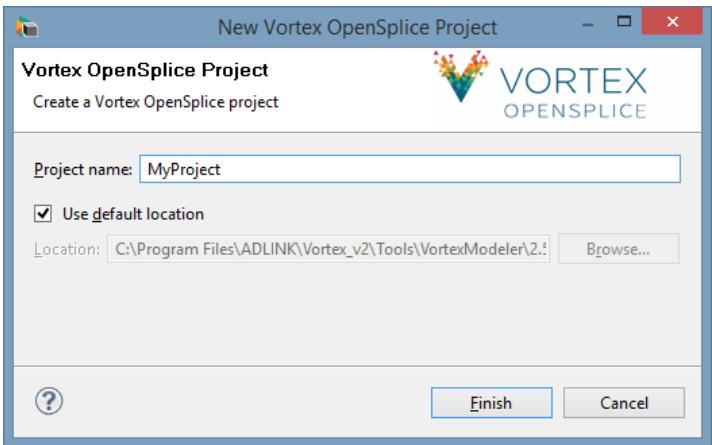
Open the Create a Vortex OpenSplice Project wizard, by

• choosing File > New > Vortex OpenSplice Project from the Menu Bar

OR

• clicking the New Vortex OpenSplice Project icon located in the Tool Bar

OR

• right-clicking in the Project Explorer window to display the pop-up menu, then choosing New > Other > Vortex OpenSplice Project (see New Vortex OpenSplice Project dialog and New Vortex OpenSplice Project.).

# Step 2

Enter a name for the project into the Project Name text box (in the Create a Vortex OpenSplice Project wizard). The Location text box shows where the project will be saved: you can change the location if desired, however the Use Default Location check box must be cleared before the Location text box can be edited.

Click the Finish button to create your new project.

Your newly-created project should appear in the Project Explorer window (located on the left-hand side of the Eclipse Workbench). The project will contain a single Vortex OpenSplice Model called model. The model will contain the global or default module, appearing as default in the Project Explorer view.

The project, complete with its basic file structure, will be saved to the location specified in the Location text box of the Create a Vortex OpenSplice Project wizard.

A project’s contents can be displayed in the Project Explorer window by clicking the expansion icon appearing at the left of the project name.

# New Vortex OpenSplice Project dialog

# 4.3. Creating and Using a Vortex OpenSplice Project
![New Vortex OpenSplice Project\nVortex OpenSplice Project\nCreate a Vortex OpenSplice project\nVORTEX\nOPENSPLICE\nProject name: MyProject\n✓ Use default location\nLocation: C:\Program Files\ADLINK\Vortex_v2\Tools\VortexModeler\2.\$\nBrowse...\nFinish Cancel](.vortex-opensplice-modeling-guide/dbcf3485f5405d748d931f0644f314e8bbe37a1101658c0d50600cc5e7c14226.jpg)

New Vortex OpenSplice Project
![File Edit Navigate Search Project Run Window Help\nProject Explorer\nMyProject\nmodel\n(default)](.vortex-opensplice-modeling-guide/3daac092b7cfe77c3b389adf31c71646b995e7b3f98db286c9c2872f44e61e37.jpg)

# Step 3

Add all of the DDS entities, Modeler components and resources that are needed for your DDS software application.

![The image displays a teal square containing a white lowercase letter 'i'.](.vortex-opensplice-modeling-guide/4d16b5255df3e24cac04e251b43a8588525379d871dfe936d81c0185301dedb6.jpg)

Steps 3 through 5 can be done in any order, using the Diagram Editor or Project Explorer.

A diagram is just one specific view on the model: it does not necessarily show all model components and/or relationships. Consider the model a UML diagram, for example: one diagram can be used to clarify the inheritance relationships without showing the attributes of the objects, while another shows exactly the same objects with attributes and associations to other objects.

Accordingly, components that are in the diagram are always in the model, but components in the model do not need to be in the diagram.

# Step 4

Set each DDS entity’s properties and QoS policy values as needed.

# Step 5

Create Diagram component(s). Use the Diagram Editor to assemble your projects entities into a model of your software application in the diagram components. This model will be used to generate your project’s source code and interfaces.

# Step 6

Generate the DDS source code using your completed Vortex OpenSplice project model.

# Step 7

Implement your application’s interfaces (using the generated class names).

# 4.3. Creating and Using a Vortex OpenSplice Project

Creating different versions of your application can easily be done by simply re-using the generated DDS code (created in Step 6), then writing different implementations of the interfaces.

# Step 8

Compile your software application using your chosen compiler.

# 4.4 Project Components

Vortex OpenSplice projects consists of components. The project components include:

1. Generic Components - items which are used by the modeling tool to contain and structure the software project’s DDS entities and include

(a) Diagrams - graphically model the software project’s structure, entities and properties, as well as defining the associations between the entities
(b) Modules - a container for other components or elements within the model
(c) QoS Sets - sets containing QoS policy instances which can be associated with one or more Application Modeling Components; QoS sets can also be associated with one or more Information Modeling Components 1
(d) Specialized Editors - these include editors which are used to create and modify the Diagram and QoS Set components
(e) Resources - directory folders, files, or other items which are used by the project

# 2. Information Modeling Components

(a) IDL Type - the specification (or definition) of the information that will be used or transmitted by the application (as a data type) 2
(b) Topic - a DDS entity which provides the most basic description of the data to be published and subscribed to
(c) Content Filtered Topic - a DDS entity that is a specialization of ‘TopicDescription’ that allows for content-based subscriptions

# 3. Application Modeling Components

(a) Application - In the context of Vortex OpenSplice Modeler, an application is a deployable software component that uses DDS for the distribution of information. An application is associated with a set of entities, which determine the incoming and/or outgoing information as well as how the information is obtained and or published.
(b) DomainParticipant - contains and associates DDS entities such publishers and subscribers; represents the local membership of the application in a domain
(c) Publisher - responsible for data distribution: it publishes data types using a DataWriter
(d) Subscriber - responsible for receiving published data and making it available to the receiving application
(e) DataWriter - used by the application to communicate with a Publisher

(f) DataReader - used by the application to communicate with a Subscriber

(g) Partition - a logical partition for associating matching topics between Publishers and Subscribers

(h) Listeners - a mechanism for the Vortex OpenSplice middleware to asynchronously alert the application of the occurrence of relevant status changes

(i) WaitSets - a mechanism for the Vortex OpenSplice middleware to synchronously alert the application of the occurrence of relevant status changes
(j) Conditions - objects which filter the status changes that applications are advised of

The project’s components are displayed as a hierarchical tree in the Project Explorer: higher level items contain lower level or dependent items. For example, the Model component (which is the top-level entity for all projects in the tool) contains Modules, which contain Applications, which in turn contain DomainParticipants.

All project components have properties which can be displayed in the Properties panel. The Properties view is located in the bottom section of the Workbench.

If the Properties view is not visible, then choose Window > Show View > Properties from the Menu Bar to display the panel.

# 4.4.1 Component Descriptions

The following table provides detailed descriptions of the project components listed above. These components are used for creating project applications and are added to projects from either the Project Explorer, by using the Eclipse File > New menu dialogs and pop-ups or by using a specialized editor (see Specialized Editors).

Detailed Descriptions of Modeler’s Project Components

<table><tr><td colspan="2">Generic Components</td></tr><tr><td>Diagram</td><td>This is a graphical representation of the project&#x27;s model and is a main component of a modeling project. Diagrams:perform the actual modeling of the project and its applicationsshow the structure and relationships of the project&#x27;s applications and associated elementsare used to create components, including all low-level componentslink and associate application components with each other, as required by the application</td></tr><tr><td>Module</td><td>A module is used to provide a logical separation for users. It can be used topackageitems together that are related, in order to improve the readability. A module in the Modeler is like apackagein UML.</td></tr><tr><td>QoS Set</td><td>A Modeler component which contains the set of QoS policy instances which can be associated with one or more modeled DDS entities.</td></tr><tr><td>Resources</td><td>Directory folders, files, or other items which are used by the project.</td></tr></table>

<table><tr><td colspan="2">Information Modeling Components</td></tr><tr><td>IDL Type, Data Type</td><td>The specification (or definition) of the information that will be used or transmitted by the application (as a data type).</td></tr><tr><td>Topic</td><td>A Topic is a DDS entity which provides the most basic description of the data to be published and subscribed. A Topic is identified by its name, which must be unique in the whole DDS Domain. It fully specifies the type of the data that can be communicated when publishing or subscribing to the Topic.</td></tr><tr><td>Content Filter Topic</td><td>A DDS entity that is a specialization of ‘TopicDescription’ that allows for content-based subscriptions. Based on an existing topic, the ContentFilteredTopic allows DataReaders to subscribe to a subset of the topic content.</td></tr><tr><td colspan="2">Application Modeling Components</td></tr><tr><td>Application</td><td>An application is a Modeler component that uses DDS to publish information or subscribe to information. An application contains or helps to organise related DDS entities. DDS entities are:DomainParticipantPublisherSubscriberDataWriterDataReaderTopicTopic typeQoS Sets with QoS policiesApplications will only communicate with each other if they publish or subscribe from or to the same Topic and their mutual sets of QoS policies are compatible. Developers should refer to the OMG'sDDS Specificationto ascertain the appropriate settings for the relevant QoS policies.Note that the Partition QoS is shown separately as thePartitionbuilding block.</td></tr><tr><td>DomainParticipant</td><td>A DDS entity, needed by all DDS applications, which holds and associates DDS entities such publishers and subscribers.Developers should refer to the OMG'sDDS Specificationfor the complete description.</td></tr><tr><td>Publisher</td><td>This is responsible for data distribution; it publishes data types using a DataWriter.</td></tr><tr><td>Subscriber</td><td>This is responsible for receiving published data and making it available to the receiving application.</td></tr><tr><td>DataWriter</td><td>This is used by the application to communicate to a Publisher.</td></tr><tr><td>DataReader</td><td>This is used by the application to communicate to a Subscriber.</td></tr><tr><td>Partition</td><td>This is a logical partition for associating matching topics between Publishers and Subscribers and represents a Partition QoS policy. Publishers and Subscribers connect to one or more Partitions.The Partition is shown as a separate building block (in theDiagram Editor)</td></tr><tr><td>Listener</td><td>A mechanism for the Vortex OpenSplice middleware to asynchronously alert the application of the occurrence of relevant status changes, such as a missed deadline, violation of a QosPolicy settingetc.</td></tr><tr><td>WaitSet</td><td>A mechanism for the Vortex OpenSplice middleware to asynchronously alert the application of the occurrence of relevant status changes, such as missed deadlines, violation of a QosPolicy settingetc. WaitSets allow application threads to wait until one or more of the attached Condition objects have a trigger value of TRUEor until a specified timeout expires.</td></tr><tr><td>GuardCondition</td><td>A GuardCondition is a specific Condition whose trigger value is completely under the control of the application. The purpose of a GuardCondition is to provide the means for an application to manually wake a WaitSet.</td></tr><tr><td>StatusCondition</td><td>Entity objects that have status attributes also have a StatusCondition. StatusConditions can be set to monitor various communication statuses of the Entity which are enabled by setting a status mask. When attached to a WaitSet, a StatusCondition causes the WaitSet to trigger when one or more of the enabled status attributes becomes TRUE.</td></tr><tr><td>ReadCondition</td><td>ReadCondition objects are associated with a DataReader and provide an alternative communication style between the Data Distribution Service and the application (in other words, wait-based rather than notification-based).A ReadCondition allows a DataReader to specify the data samples it is interested in by specifying the desired sample-states, view-states and instance-states.A ReadCondition object can be used on its own to read from a DataReader or it can be attached to a WaitSet. When attached to a WaitSet a ReadCondition causes the WaitSet to trigger when data is available which satisfies the settings of the ReadCondition.</td></tr><tr><td>QueryCondition</td><td>QueryCondition objects are specialized ReadCondition objects. A subset of an SQL expression can be used to allow the application to filter out newly arrived data, in addition to the notification of new arrivals.</td></tr></table>

# 4.4. Project Components

All of the components shown in the table can be added to a project by following the steps shown below. The Diagram Editor (see Diagram Editor and Diagrams) can also be used to add the components to the project.

# Step 1

Select (click on) the project’s name located in the Eclipse Project Explorer panel.

# Step 2

Either

• choose File > New > &lt;item&gt; from the Eclipse Menu Bar

OR

• right-click on the project name and choose New > Other > Vortex OpenSplice > &lt;item&gt; from the pop-up dialog

where &lt;item&gt; is the name of the required component or resource, for example Module. This opens a pop-up dialog for adding details about the new component.

# Step 3

Provide details about the new component in the pop-up dialog’s text boxes, including the component’s intended root (the parent or container that the component is to be added to), the component’s name, plus any other requested information. Click Next or Finish to add the component (after providing all requested details).

Components are context- and container-sensitive: they can only be added to the appropriate parts of a project or other components.

![The image displays a teal square icon featuring a white lowercase letter 'i' in the center.](.vortex-opensplice-modeling-guide/7b458ef3052daa04ec79a1ab2bc076378e34a58b39e43f13ec41779756ca49d8.jpg)

Components are context- and container-sensitive: they can only be added to the appropriate parts of a project or other components.

# 4.5 Specialized Editors

Certain modeling components, including Diagrams and QoS Sets (see Component Descriptions) are created and/or edited using the Modeler’s specialized editors: the QoS Set Editor (QoS Set Editor and QoS Sets) and Diagram Editor (Diagram Editor and Diagrams).

The editors are displayed in the Workbench’s centre panel and are opened by:

# Step 1

Locating the component to be edited in the Project Explorer.

# Step 2

Right-clicking the component, then clicking on the required editor when it is displayed in the pop-up dialog that appears.

OR

Double-clicking the component or its parent (container).

The use of these specialized editors is described in QoS Set Editor and QoS Sets and Diagram Editor and Diagrams.

![The image displays a square icon with a teal background featuring a white lowercase letter 'i'.](.vortex-opensplice-modeling-guide/b2b3be6e8e0364c55938aa58ddaa6af551570e8b04e1164f11665d6eff0261b5.jpg)

More than one editor can be open at one time, but only one editor is visible at a time. Each editor can be played by clicking on its tab (displayed along the top of the Workbench’s centre panel).

# 4.5.1 QoS Set Editor and QoS Sets

A QoS Set is a set of Quality of Service policies and associated values 3 . A Qos Set can be assigned to a particular DDS entity or it may exist as an independent set within a module.

A QoS Set is added to a module by:

• choosing File > New > QoS Set from the Eclipse Menu Bar

OR

• right-clicking on the module and choosing QoS Set from the pop-up dialog

The QoS Set Editor is an editing tool specifically designed to quickly and easily add and set Quality of Service (QoS) policies.

The QoS Set Editor is opened by double-clicking on a QoS Set component, or right-clicking on it and then choosing Edit QoS Set from the pop-up menu.

The QoS Set Editor is a multi-page editor with three pages:

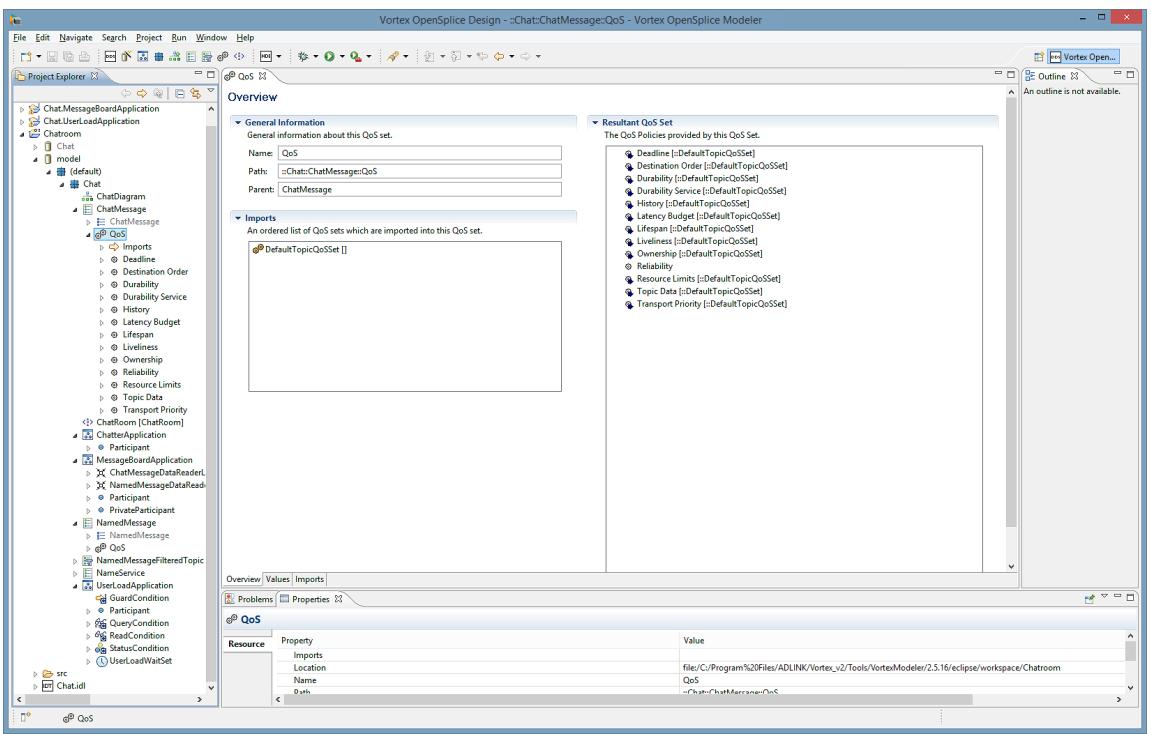
• The Overview page provides general information about the QoS Set (see QoSSet Editor and Overview page).
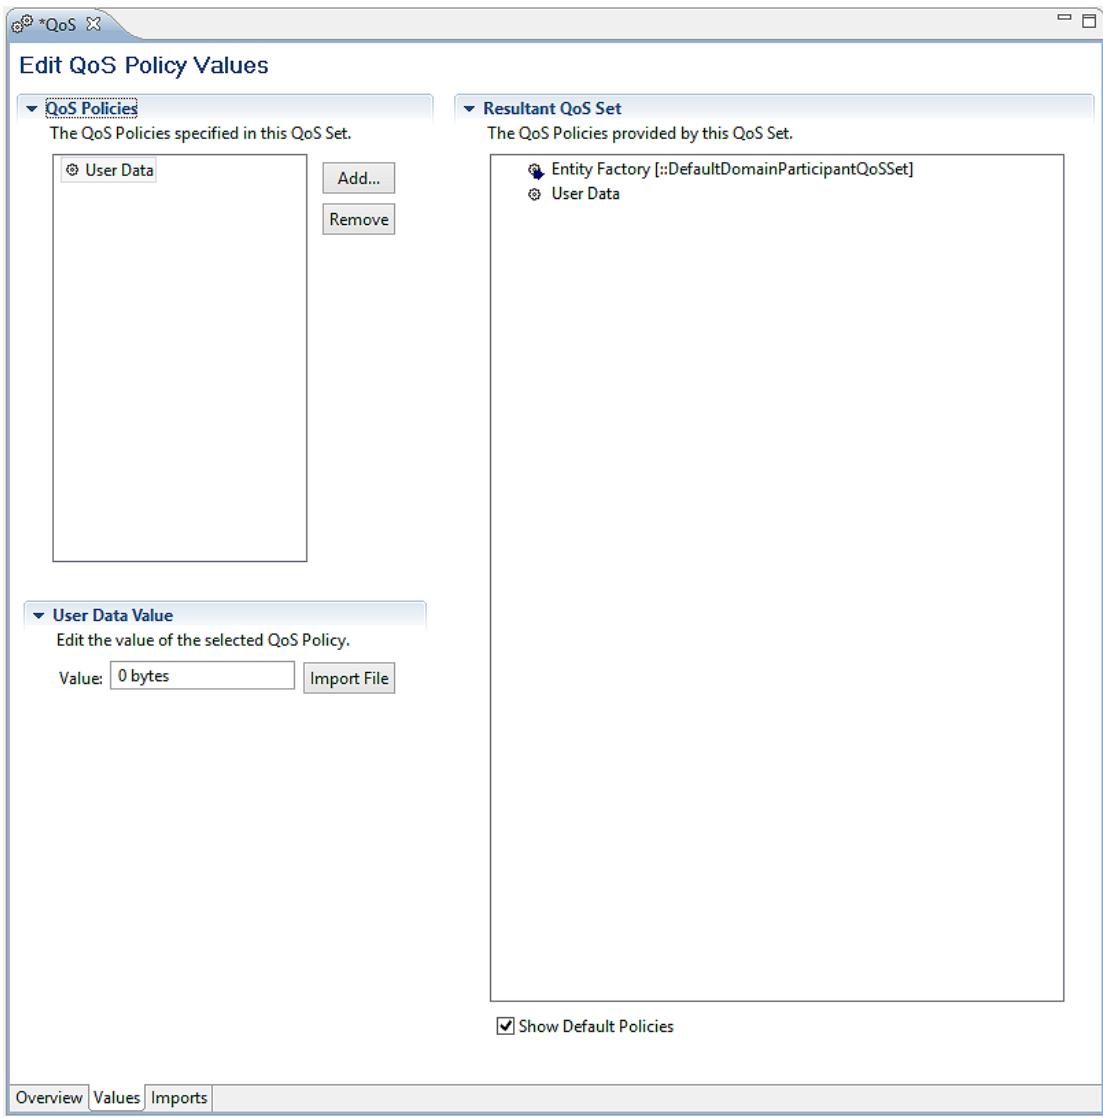
• The Edit QoS Policy Values page is used to manage and display the set’s QoS properties (see Edit QoS Policy Values page).
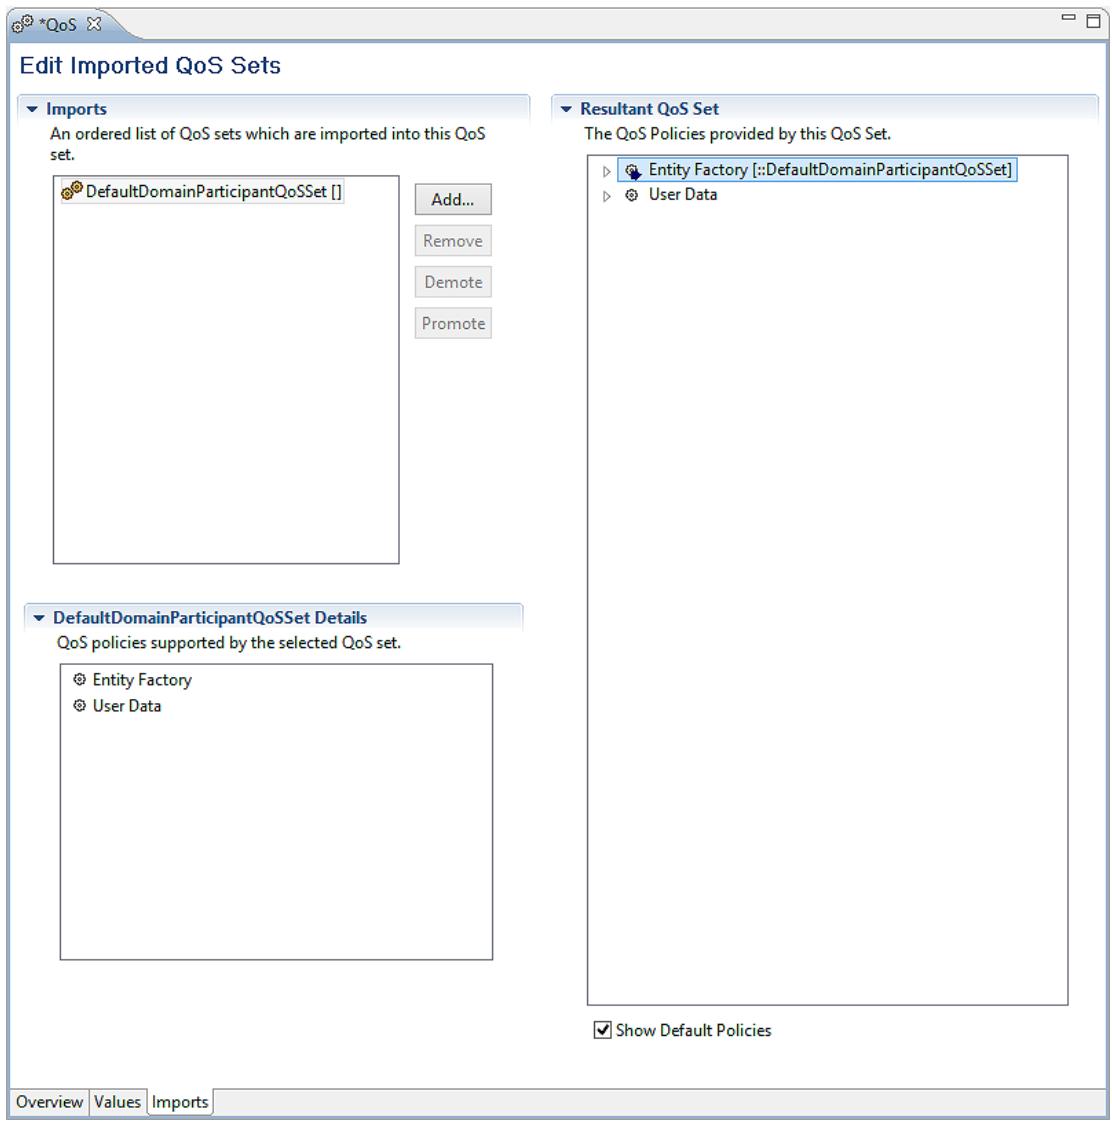
• The Edit Imported QoS Sets page page has facilities for managing imported QoS sets (see Edit Imported QoS Sets page).

The pages are opened by clicking on their tabs located along the bottom of the editor (see QoSSet Editor and Overview page).

Each page contains widgets that are specific to the page such as combo boxes, buttons and lists. The combo boxes are opened and closed by clicking on the icons located at the left of each list.

In addition to the page-specific widgets, there is also a Resultant QoS Set tree viewer; this widget is common to all pages. The Resultant QoS Set is the actual set of policies and values that will be assigned to the QoS Set’s owner, using both the current QoS Set and imported QoS Sets. The Resultant QoS Set is determined by an algorithm which compares the current QoS Set’s values with the values of its imported QoS Sets, then calculates which values should be used (see QoS Resultant Set).

# Overview Page

The Overview page contains the following lists and information:

General Information - general information about the QoS set including its name, path (relationship with ancestor components) and name of its parent - the set’s owner

Imports - QoS sets which have been imported into this QoS set.

# QoSSet Editor and Overview page
![Vortex OpenSplice Design - :Chat:ChatMessage:QoS - Vortex OpenSplice Modeler\nFile Edit Navigate Search Project Run Window Help\nProject Explorer\nChat.MessageBoardApplication\nChat.UserLoadApplication\nChatroom\nChat\nmodel\n(default)\nChat\nChatDiagram\nChatMessage\nChatMessage\nQoS\nImports\nDeadline\nDestination Order\nDurability\nDurability Service\nHistory\nLatency Budget\nLifespan\nLiveliness\nOwnership\nReliability\nResource Limits\nTopic Data\nTransport Priority\nChatRoom (ChatRoom)\nChatterApplication\nParticipant\nMessageBoardApplication\nMessageDataReaderL\nNamedMessageDataReaderL\nParticipant\nPrivateParticipant\nNamedMessage\nNamedMessage\nQoS\nNamedMessageFilteredTopic\nNameService\nUserLoadApplication\nGuardCondition\nParticipant\nQueryCondition\nReadCondition\nStatusCondition\nUserLoadWaitSet\nsrc Chat.idl\nqoS\nOverview\nGeneral Information\nGeneral information about this QoS set.\nName: QoS\nPath: :Chat::ChatMessage::QoS\nParent: ChatMessage\nImports\nAn ordered list of QoS sets which are imported into this QoS set.\nDefaultTopicQoSSet ()\nResultant QoS Set\nThe QoS Policies provided by this QoS Set.\nDeadline :DefaultTopicQoSSet\nDestination Order :DefaultTopicQoSSet\nDurability :DefaultTopicQoSSet\nDurability Service :DefaultTopicQoSSet\nHistory :DefaultTopicQoSSet\nLatency Budget :DefaultTopicQoSSet\nLifespan :DefaultTopicQoSSet\nLiveliness :DefaultTopicQoSSet\nOwnership :DefaultTopicQoSSet\nReliability\nResource Limits :DefaultTopicQoSSet\nTopic Data :DefaultTopicQoSSet\nTransport Priority :DefaultTopicQoSSet\nOverview Values Imports\nProblems Properties\nqoS\nResource Property Value\nImports Location file/C:/Program%20Files/ADLINK/Vortex_v2/Tools/VortexModeler/2.5.16/eclipse/workspace/Chatroom\nQoS qoS -Chat:ChatMessage:QoS -An outline is not available.\nOutline An outline is not available.](.vortex-opensplice-modeling-guide/cd65ff5ba7ebe1a65743ff73e76e476e4e497b37661d56c5a4cd7e0def486580.jpg)

# Edit QoS Policy Values Page

The Edit QoS Policy Values page contains a QoS Policies list section and &lt;Policy&gt; Values section (in addition to the Resultant QoS Set list):

• the QoS Policies displays the list of QoS policies which users can alter the property values of
• the &lt;Policy&gt; Values section displays the properties and value for the policy, &lt;Policy&gt;, selected in the QoS Policies list.

The &lt;Policy&gt; Values section is only visible when a QoS policy is selected in the QoS Policies list.

Edit QoS Policy Values page
![Edit QoS Policy Values\n► QoS Policies\nThe QoS Policies specified in this QoS Set.\nUser Data\nAdd...\nRemove\n► Resultant QoS Set\nThe QoS Policies provided by this QoS Set.\nEntity Factory (::DefaultDomainParticipantQoSSet)\nUser Data\n► User Data Value\nEdit the value of the selected QoS Policy.\nValue: 0 bytes\nImport File\nShow Default Policies\nOverview Values Imports](.vortex-opensplice-modeling-guide/7717d38b88d3957bdc74dcbc810dec02bd70cc67fd880a52fca20ab80fb4a1d8.jpg)

# Adding a QoS Policy

This process adds a QoS Policy to the QoS Policies list.

All appropriate QoS Policies already exist for the entity; however, only those QoS Policies which appear in the list are able to have their values changed or edited using the QoS Policy Values section.

# Step 1

Click the Add button located at the right of the QoS Policies list. This displays the Add QoS Value dialog.

# Step 2

Click the icon adjacent to the Type drop-down list. The list displays the policies which are appropriate for the entity that the QoS Set is assigned to. Scroll down the list of available policies to find and select the one required. Click the OK button when finished. The new policy will be added to the QoS Policies and Resultant QoS Set lists.

# Step 3

Select the newly-added policy from the QoS Policies list (if it is not already selected). The properties and values for the selected policy will be displayed in the &lt;Policy&gt; Values list, where &lt;Policy&gt; is the policy’s name. The values and selection methods shown are specific to each policy type. Select and set the policy values by choosing them from the displayed drop-down lists, check boxes or text boxes.

# 4.5. Specialized Editors

Check boxes are used to enter boolean values: setting the check box (displaying an ‘X’ mark) sets the associated value to TRUE.

The data types and values displayed for each policy are in accordance with the OMG’s DDS Specification. However, it is the developer’s responsibility to correctly select or set the values that are appropriate for the selected policy and component (entity) the QoS Set will be assigned to. It is recommended that reference is made to the DDS Specification when setting these values.

# Removing a QoS Policy

Select the policy to be removed from the QoS Value list, then click the Remove button.

The QoS policy still exists but it is removed from the QoS Policies list and its properties are reset to their default values.

# Changing a QoS Property Value

A policy’s values can be changed if needed: select the policy from the QoS Policies list, then change the values which are displayed in the &lt;Policy&gt; Values section, where &lt;Policy&gt; is the policy’s name.

It is recommended that users refer to the DDS Specification to ensure that the values used for a policy are appropriate.

# Edit Imported QoS Sets Page

The Edit Imported QoS Sets page contains an Imports list and Imported Set Detail section (in addition to the Resultant QoS Set list):

• Imports displays an ordered list of the QoS sets which have been imported into the current QoS Set: sets can be added, removed and reordered.

The order that the QoS Sets are displayed in the Imports list is used by the Resultant QoS Set to resolve conflicts and determine the priority of each set’s policy values. The order is changed using the Promote and Demote buttons.

• Imported Set Details - displays the Resultant QoS Sets for the selected imported sets.

This section is only visible when a QoS Set is selected from the Imports section Imported Set Details.

Edit Imported QoS Sets page
![Edit Imported QoS Sets\nImports\nAn ordered list of QoS sets which are imported into this QoS set.\nDefaultDomainParticipantQoSSet ()\nAdd...\nRemove\nDemote\nPromote\nResultant QoS Set\nThe QoS Policies provided by this QoS Set.\nEntity Factory (::DefaultDomainParticipantQoSSet)\nUser Data\nDefaultDomainParticipantQoSset Details\nQoS policies supported by the selected QoS set.\nEntity Factory\nUser Data\nShow Default Policies\nOverview Values Imports](.vortex-opensplice-modeling-guide/c64e92e98359fd8be4f4aeced9d82bd4d9665496c5af810b46747b03484ccd9a.jpg)

# Importing a QoS Set

# Step 1

Click the Add button located at the right of the Imports list. This displays the QoS Set Selection dialog.

# Step 2

Click the expansion icons adjacent to the project name and component containing the QoS Set you want to import. Expand the project-component tree until the desired QoS Set appears (see the Project Explorer tree shown in the QoSSet Editor and Overview page screen).

Only QoS Sets that have not already been imported will be displayed in order to prevent inadvertently importing the same QoS Set more than once.

# Step 3

Select the desired QoS Set, then click the OK button.

The newly-imported QoS set will appear in the Imports list and its details will appear in the Imported Set Details list.

# 4.5. Specialized Editors

# Removing an Imported QoS Set

Select the required QoS Set from the Imports list, then click the Remove button.

# Changing the Order of Imported QoS Sets

An imported QoS Set can be moved up or down the Imports list by clicking the Promote or Demote buttons, respectively. However, default QoS Sets and QoS Sets from a topic (datawriters and datareaders) can not be moved.

The order that the QoS Sets are displayed in the Imports list is used by the Resultant QoS Set to resolves conflicts and determine the priority of each set’s policy values.

# QoS Resultant Set

A QoS Set can import other, stand-alone QoS sets. The imported sets are merged with the current set’s policy values to create a Resultant Set.

Strict rules of precedence are followed when computing the Resultant Set, since different QoS sets may contain duplicate values. Starting with an empty working set, values are merged to form the Resultant Set, where duplicate values overwrite values already in the working set and the steps are applied recursively:

1. Merge the Resultant Set into the working set for each QoS set in the imports list.
2. Merge the values into the working set to produce the final Resultant Set.

# Default QoS Sets

The modeling tool contains default QoS Sets. The default QoS Sets contain all the values that are required for a particular entity. There are six hidden global default sets for each type of entity. DomainParticipants and Topics import this set as the first set in the imports list. The default QoS Set cannot be removed.

The default QoS Set does not appear in the QoS Policies list.

The DomainParticipant also has an extra three default sets for the Subscriber, Publisher and Topic which contain the global default for the entity type and extend it. This is equivalent to the Vortex OpenSplice factory defaults. Subscribers and Publishers then inherit the default QoS set from their parent DomainParticipant (again restricted to being first in list and compulsory). Subscribers and Publishers contain extended default sets for DataReaders and DataWriters and their child DataReaders/Writers pick these default sets up.

DataReaders/DataWriters also by default inherit the topic’s QoS if they are connected to one. This is placed second in the imports list and it can be removed (this is equivalent to the optional copy\_from\_topic\_qos() DDS method).

# 4.5.2 Diagram Editor and Diagrams

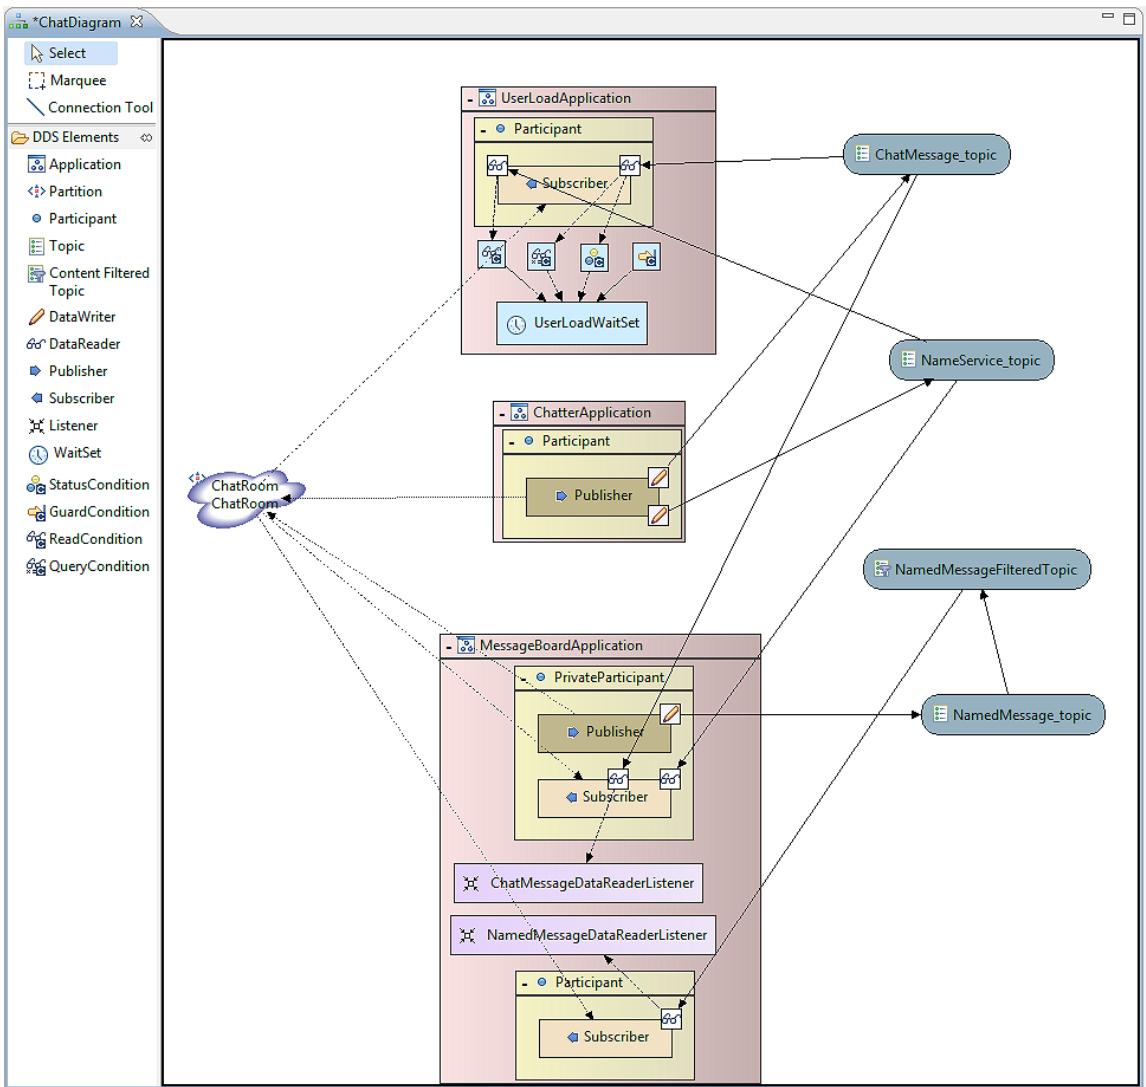
A project’s diagram is a graphical representation of the project’s Application Model (see the illustration Diagram Editor with Tool Palette and Example Components). A diagram is a main component of a modeling project.

The Diagram Editor and diagrams:

• perform the actual modeling of the project and it application(s)
• show the relationships of the project’s applications and associated elements
• are used to create components
• associate application components with each other, as required by the application

The Diagram Editor contains a tool palette and a canvas.

# 4.5. Specialized Editors

• The tool palette, located on the left-hand side of the editor, contains a list of components and connection tools (see Diagram Editor with Tool Palette and Example Components). The palette can be used to add components to the model and create connection between components.

– Tools are selected by clicking on the tool in the palette; its associated component is added to the diagram by the clicking in the diagram’s canvas (see below).
– A tool can be de-selected by pressing the [Esc] key on the keyboard.

• The canvas, the large area located on the right-hand side of the editor, is where symbols representing the model’s component are placed and edited.

Components’ symbols appearing on the diagram can be ‘collapsed’ and ‘expanded’.

• Collapsing a component’s symbol reduces the symbol to a simple box and hides the items it contain. This is useful for hiding unwanted detail in the diagram.

– Collapse a symbol by clicking on the minus (‘-‘) icon located at the top-left corner of the symbol.
– The minus icon changes to an addition (‘+’) icon.

• Expanding a component’s symbol returns the symbol to its normal size and shape revealing the items it contains.

– Expand the symbol by clicking on the addition (‘+’) icon located at the top-left corner of the symbol.

Diagram Editor with Tool Palette and Example Components
![Based on the provided image, here is an accurate and concise description of the flowchart/block diagram:\n\n**Interface Sidebar (Left):**\nThe toolbar lists tools and 'DDS Elements':\n*   Select\n*   Marquee\n*   Connection Tool\n*   DDS Elements\n    *   Application\n    *   Partition\n    *   Participant\n    *   Topic\n    *   Content Filtered Topic\n    *   DataWriter\n    *   DataReader\n    *   Publisher\n    *   Subscriber\n    *   Listener\n    *   WaitSet\n    *   StatusCondition\n    *   GuardCondition\n    *   ReadCondition\n    *   QueryCondition\n\n**Diagram Blocks and Connections:**\n\n*   **UserLoadApplication:** A container holding a 'Participant' block (which contains a 'Subscriber' label) and a 'UserLoadWaitSet' block.\n    *   'ChatMessage_topic' connects to the 'Subscriber' icon inside 'Participant'.\n    *   'NameService_topic' connects to the 'Subscriber' icon inside 'Participant'.\n\n*   **ChatterApplication:** A container holding a 'Participant' block with a 'Publisher'.\n    *   'Publisher' connects to 'NameService_topic'.\n    *   'Publisher' connects to 'ChatMessage_topic'.\n\n*   **ChatRoom ChatRoom:** A cloud-shaped block.\n    *   Dotted lines connect it to 'UserLoadWaitSet', 'ChatMessageDataReaderListener', 'NamedMessageDataReaderListener', and the bottom 'Participant' block.\n\n*   **MessageBoardApplication:** A container holding 'PrivateParticipant', 'ChatMessageDataReaderListener', 'NamedMessageDataReaderListener', and a bottom 'Participant'.\n    *   **PrivateParticipant:** Contains a 'Publisher' and a 'Subscriber'.\n        *   'Publisher' connects to 'NamedMessage_topic'.\n        *   Dotted lines connect the 'Publisher' and 'Subscriber' (inside PrivateParticipant) to 'ChatMessageDataReaderListener' and 'NamedMessageDataReaderListener'.\n    *   **Bottom Participant:** Contains a 'Subscriber'.\n        *   Connects to 'NamedMessage_topic'.\n\n*   **Topics:**\n    *   'NamedMessage_topic' connects to 'NamedMessageFilteredTopic'.](.vortex-opensplice-modeling-guide/c90cba3b5e365695289fb13265241ce152c82b5e8c9cfaf72cd685a3f4c15b56.jpg)

# Adding Components

Components which are added to the diagram using the Diagram Editor’s palette are added to the project’s model: they are automatically displayed in the Project Explorer (as well as on the canvas).

Components in the Project Explorer can be added to diagram by clicking on the component then dragging it from the Project Explorer to the diagram’s canvas. If the component is already displayed in the canvas, then rather than being duplicated, it will only be moved to the location where the mouse button is released.

Detailed instructions for adding components to the model are given in the section Application Modeling.

# Deleting Components

Deleting a Modeler’s component or DDS entities removes it from the project.

![The image shows a standard warning symbol consisting of a red triangle with rounded corners and a thick red border. Inside the red border is a white background, and centered within it is a large black exclamation point.](.vortex-opensplice-modeling-guide/69ea1cf6449d8a4509498b5cf6caf0aa61c9d6cdb4ebc091dcf6635fbd58294f.jpg)

Components that are deleted from Diagram Editor’s canvas are also deleted from the project’s model. There is NO UNDO function! Do not delete a component using the Diagram Editor unless you want to permanently delete it from the model.

It is strongly advised that the project be saved before deleting items.

However, an item can be removed from a diagram without deleting it from the project by right-clicking the item, then choosing Remove from the pop-up dialog.

A component or entity can be deleted by:

• right-clicking on it, then choosing the Delete option from the pop-up dialog
• selecting it in the Diagram, then choosing Edit > Delete from the Menu Bar
• selecting it in the Diagram, then pressing the [Shift]+[Delete] keys

Pressing the [Delete] key when an entity is selected in a Diagram will just remove the entity from the Diagram, but not actually delete it.

# Renaming Components

Components and entities can be renamed in either the Project Explorer or Diagram Editor by:

• Right-clicking on the component, then choosing the Rename option from the context menu.
• Entering the desired name in the Name text box in the pop-up dialog, then clicking the Return button. OR

The name of a component in the Diagram can be edited directly by double-clicking on the component.

# 5

# Modeling

This section describes in detail how to use the tools in Vortex OpenSplice Modeler for modeling and assembling resources (such as DDS entities).

The Vortex OpenSplice Modeler provides separate Information and Application modeling. This section describes the use of these two modeling paradigms in a project.

# 5.1 Information Modeling

The following sections describe how to use and add components to a project’s information model. Information modeling includes the modeling of Types and Topics. The following sections describe how to add and use Types and Topics in a project

# 5.1.1 Types and their IDL Specification

A data type, which is part of the Information Model 1 and will be distributed by the application, can be regarded as a table in a database where the database consists of a number of named columns, and each column is assigned its own primitive type. Just like a database table, the type has a set of keys, which is a subset of the set of columns.

Data types are specified using the Interface Definition Language (IDL). Using the Interface Definition Language to specify the data types ensures that they will be platform and (implementation or native) language independent.

A data type’s IDL specification is subsequently mapped (in other words, converted) to a data type of the target programming language that the application will be implemented in. For example, if the programming language that the application will be implemented in is Java, then the IDL specification for the data type would be mapped to attributes in a Java class. However, if the implementation language is C++, then the data type would be mapped to members in a C struct.

The same data type can communicate between applications implemented in different languages without difficulty.

A data type’s IDL specification is imported from a file containing the specification. The IDL specification is imported into a project by following these steps:

# Step 1

Choose File > Import from the Eclipse menu. This displays the Import dialog.

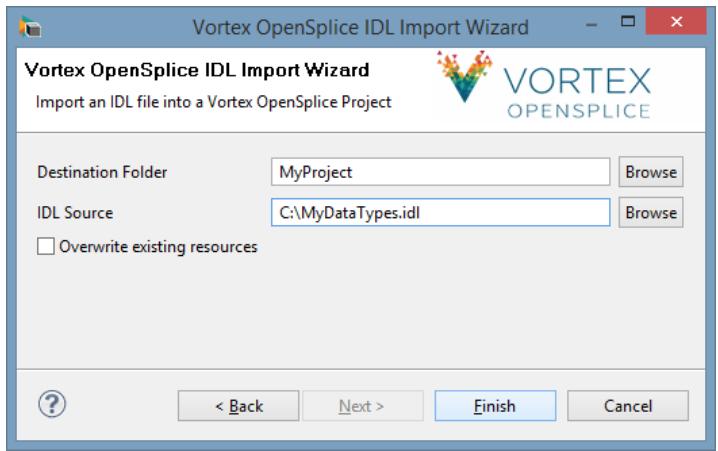
Expand the Vortex OpenSplice folder (displayed in the dialog), select Vortex OpenSplice IDL Import Wizard, then click the Next button. This will display the Vortex OpenSplice IDL Import Wizard (see the illustration below).

# Vortex OpenSplice IDL Import Wizard
![Vortex OpenSplice IDL Import Wizard\nImport an IDL file into a Vortex OpenSplice Project\nDestination Folder MyProject Browse\nIDL Source C:\MyDataTypes.idl Browse\nOverwrite existing resources\n( Back Next ) Finish Cancel](.vortex-opensplice-modeling-guide/c6ac711466d94b4e71e5e85e2229e8fb2bd30fa7954549ab2714cd8bec17df50.jpg)

# Step 2

Enter the folder which the IDL specification is to be imported into in the Destination Folder text box by using the adjacent Browse button and navigating the Project Explorer’s projects (recommended method) or by writing the folder pathname in the text box.

# Step 3

Enter the full pathname of the file containing IDL specification into the IDL Source text box using the adjacent Browse button to navigate through the file system to locate the required IDL specification file.

# Step 4

Click the Finish button when all entries are completed in order to import the IDL specification into the project.

The IDL file being imported should appear in the Project Explorer in the destination folder.

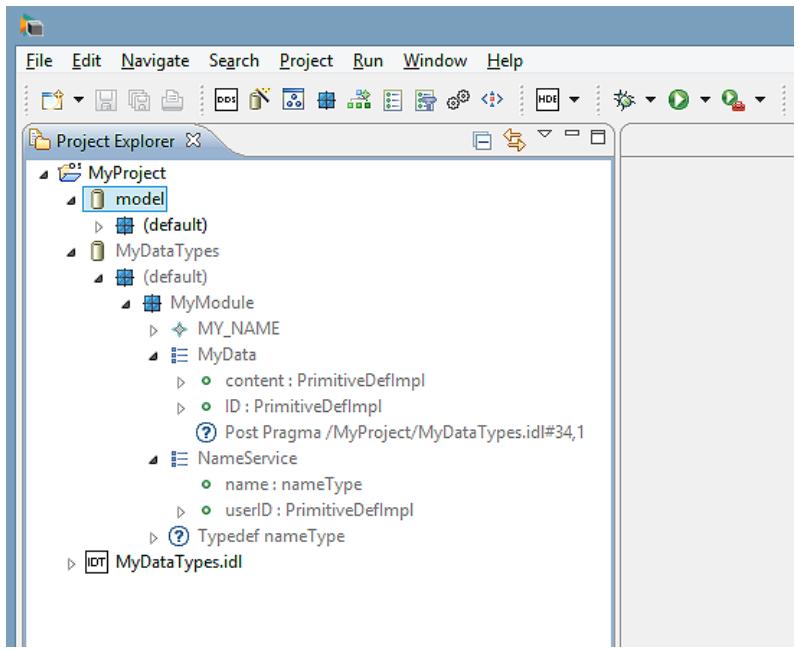
When the import is complete, a new model will be generated from the specification defined in the IDL file. The model will have the same name as the IDL file.

OR

Create an empty IDL file in a Vortex OpenSplice project, open it in the Eclipse text editor, then write the IDL specification. A model with the same name as the IDL file will be automatically generated. The model will contain the data types defined in the IDL specification. Any changes to the original IDL file will be reflected in the generated model.

Models generated from an IDL file are ‘read only’ and they appear in the Project Explorer with grey label text. It is not possible to add additional items to these models.

Example Imported Data Type Definitions
![File Edit Navigate Search Project Run Window Help\nProject Explorer\nMyProject\n  model\n  (default)\n  MyDataTypes\n  (default)\n    MyModule\n      MY_NAME\n      MyData\n        content : PrimitiveDefImpl\n        ID : PrimitiveDefImpl\n        ? Post Pragma /MyProject/MyDataTypes.idl#34,1\n        NameService\n            name : nameType\n            userID : PrimitiveDefImpl\n        ? Typedef nameType\n    MyDataTypes.idl](.vortex-opensplice-modeling-guide/fe4bdc2d37914d9b499f5d64474df8c9e70973ec55b460e0dd5385f0ba6d87b8.jpg)

# 5.1.2 TopicDescription

TopicDescription is the base class for Topic, ContentFilteredTopic and MultiTopic (in accordance with the DDS Specification).

TopicDescription represents the situation where both publications and subscriptions are associated with a single data-type.

![The image shows a red triangular warning sign with a thick red border. Inside the triangle is a white background featuring a large black exclamation point in the center.](.vortex-opensplice-modeling-guide/7cc4e92e371a01c1cd9039b0b95c042d40ffb707447efcd2cd7e34e8a58f76f7.jpg)

MultiTopics are not supported by this release.

# 5.1.3 Topics

A Topic binds a name to an associated data type. Further, multiple Topics can be created for one specific type.

A Topic can be added to a project or specific application (noting that Topics are associated with data types) by:

# Step 1

In the Project Explorer, right-clicking on the Module containing the application the Topic is to be added to, choosing New Topic from the pop-up dialog.

OR

Choosing File > New > Topic from the Eclipse Menu Bar (not recommended, since an additional step is required).

OR

In the Diagram Editor (if the application is in an open diagram) by choosing the Topic tool from the Diagram Editor’s tool palette, then clicking in a free area of the canvas.

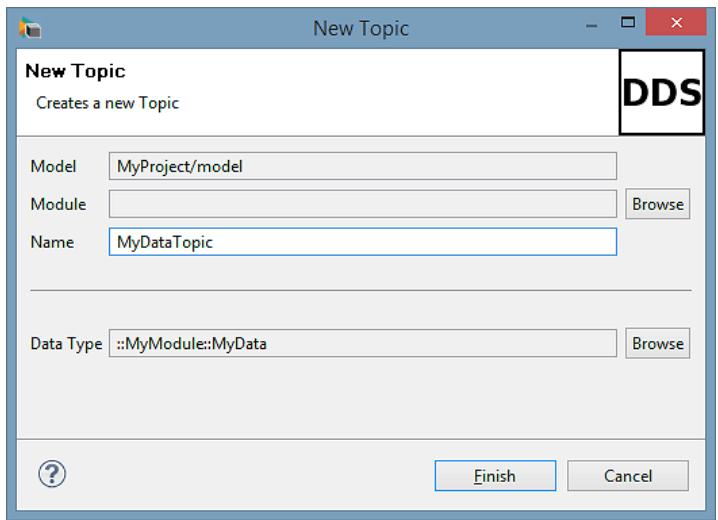
Either of these last two methods will display the New Topic dialog (see New Topic dialog).

# Step 2

In the New Topic dialog:

• Select the Module that the Topic is to be added to into the Module field (using the adjacent Browse button). This will automatically set the Model.
• Enter the Topic’s name into the Name text box.

# 5.1. Information Modeling

• Select the data type, using the Browse button adjacent to the Data Type text box to find and select the data type the Topic is to be associated with; the data type should appear in the Data Type text box similar to the example in New Topic dialog.

# Step 3

Click Finish when complete. The new Topic should appear in the Project Explorer under the selected Module (and, if the Diagram Editor’s palette tool was used, in the diagram as well).

Topics are connected to DataWriters and DataReaders with the Topic Connection Tool: the instructions are given in Using the Connection Tool for Topics.

New Topic dialog
![New Topic\nCreates a new Topic\nModel MyProject/model\nModule\nBrowse\nName MyDataTopic\nData Type ::MyModule::MyData\nBrowse\nFinish Cancel](.vortex-opensplice-modeling-guide/42b45e299f21e36d2f4d70f7c7dcba20266c623897fa62e967abc97328d48a37.jpg)

# 5.1.4 ContentFilteredTopic

The ContentFilteredTopic DDS entity, derived from the TopicDescription base class, can be used to do content-based subscriptions.

A ContentFilteredTopic can be added to a Module by:

# Step 1

Right-click on the Module and choose New ContentFilteredTopic from the pop-up menu.

OR

In the Diagram Editor, select Content Filtered Topic from the Diagram Editor’s palette and click on the diagram.

# Step 2

When using the New ContentFilteredTopic dialog:

• In the Module field, select the Module the ContentFilteredTopic is to be added to using the adjacent Browse button. This will automatically set the Model field.
• Use the Browse button to browse for the Topic that the ContentFilteredTopic will be based on.
• Enter a filter expression for the ContentFilteredTopic (refer to the OMG’s DDS Specification for the syntax)

ContentFilteredTopics are connected to DataReaders using the Topic Connection Tool (refer to Using the Connection Tool for Topics).

# 5.1. Information Modeling

# 5.2 Application Modeling

The following sections describe how to use and add components to a project’s application model. Application modeling includes the modeling of DomainParticipants, Publishers, Subscribers, DataWriters, DataReaders, Listeners, WaitSets and Conditions.

# 5.2.1 Applications

A Vortex OpenSplice Modeler Application represents an executable application. An application contains DDS entities such as DomainParticipants, Publishers, Subscribers, DataReaders and DataWriters.

An application can be added to the project by following these steps:

# Step 1

Right-click on a module in the Project Explorer, then choose New Application from the pop-up dialog OR

In the Diagram Editor, choose the Application tool from the tool palette, then click in the canvas.

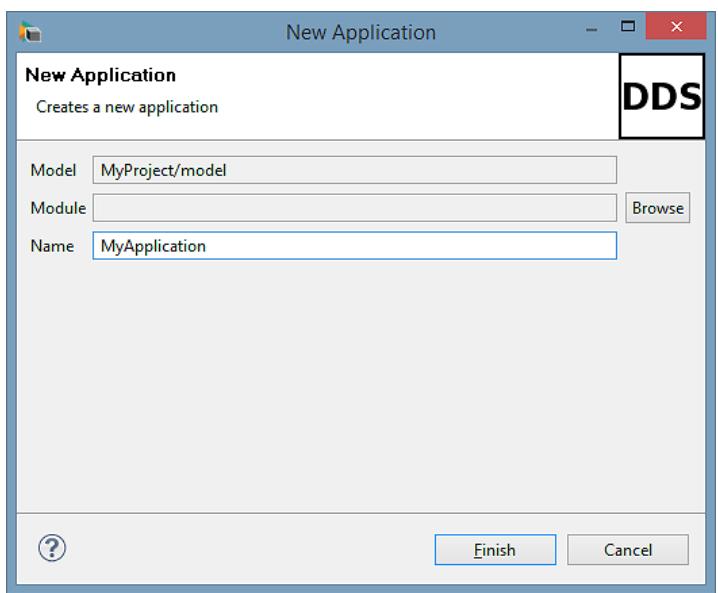
Either of these methods will display the New Application dialog.

# Step 2

Enter the application’s name into the Name text box in the New Application dialog.

# Step 3

Select the Module that the application is to be added to by clicking the Browse button adjacent to the Module text box, then navigating the project.

# Step 4

Click the Finish button. The new application component should appear in the Project Explorer under the selected module. The application will also appear in the diagram if the Diagram Editor’s tool palette was used.

New Application dialog
![New Application\nCreates a new application\nModel MyProject/model\nModule\nBrowse\nName MyApplication\nFinish Cancel](.vortex-opensplice-modeling-guide/1049febe8c942b0d35a6056e1af90cf0842f9dc7a3c658bf458574640c3b16c0.jpg)

# 5.2.2 DomainParticipants

DomainParticipants can be added to an application by:

# 5.2. Application Modeling

# Step 1

In the Project Explorer, right-click on the application the DomanParticipant is to be added to, then choose New Domain Participant from the pop-up dialog.

OR

If the application is in a diagram, then open it in the Diagram Editor, select the DomanParticipant tool from the tool palette, then click inside the target application’s symbol appearing on the canvas.

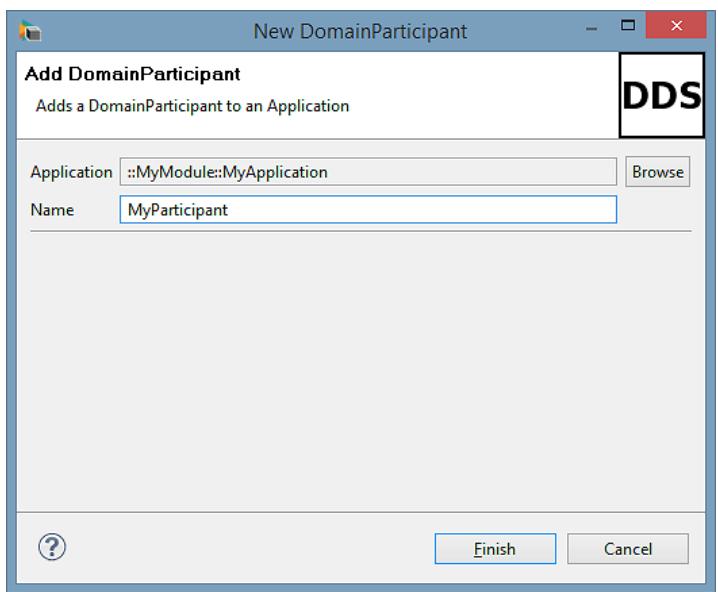
Either of these methods will display the New Domain Participant dialog.

New DomainParticipant dialog
![New DomainParticipant\nAdd DomainParticipant\nAdds a DomainParticipant to an Application\nApplication ::MyModule::MyApplication\nBrowse\nName MyParticipant\nFinish Cancel](.vortex-opensplice-modeling-guide/cb1cb9579009665712ff1d187cdb9c6b92b9b5f0a3f6f2f215476bc323f91624.jpg)

# Step 2

Enter the DomainParticipant’s name into the Name text box in the New Domain Participant dialog.

# Step 3

The desired target Application should appear in the Application text box: if not, then click the Browse button adjacent to the Application text box, and navigate the project to locate the parent Application.

# Step 4

Click the Finish button. The new DomainParticipant should appear in the Project Explorer under the selected application. The DomainParticipant will also appear in the diagram, inside the application, if the Diagram Editor’s tool palette was used.

# 5.2.3 Publishers and Subscribers

Publishers and subscribers can be added to DomainParticipants using the Diagram Editor’s palette as well as the Project Explorer. When using the palette, drag the palette’s icon for the entity instance to the DomainParticipant.

# 5.2.4 DataWriters and DataReaders

DataWriters and DataReaders are contained inside publishers and subscribers, respectively. They are added using Diagram Editor’s palette: drag the palette’s icon for the entity instance to the appropriate publisher or subscriber.

Individual DataWriter and DataReader instances can be associated with only one particular Topic. The association is created using Topic Connectors.

# 5.2. Application Modeling

# 5.2.5 Partition

A DDS Partition entity is associated with Publishers and Subscribers: one or more Publishers and Subscribers can be connected to a single Partition.

A Partition is added to a model using the Diagram Editor and a Model’s diagram, noting that a diagram should already exist which contains the Publishers and/or Subscribers the Partition is to be associated with.

A Partition can also be added by clicking the toolbar’s partition icon and the New Partition context menu item for Modules. Either of these methods will launch a ‘new partition’ wizard.

# Step 1

Open a Model’s Diagram.

# Step 2

Select the Partition tool from the Diagram Editor’s palette.

# Step 3

Click in a free area of the diagram’s canvas: a new Partition will appear in the diagram and in the Project Explorer under the selected Model and Module.

# Partition Symbol

# Partition1

Partitions are associated with (or connected to) Publishers and Subscribers using the Partition Connection Tool; instructions are in Using the Connection Tool for Partitions.

# 5.2.6 Listeners

The Vortex OpenSplice Modeler supports the modeling of listeners. Listeners enable the application to asynchronously become aware of DCPS communication status changes. Using listeners is an alternative method to using conditions and WaitSets. A detailed description of each communication status is given in the OMG’s Data Distribution Service for Real-time Systems Specification, Version 1.2, formal/07-01-01.

The communication statuses, whose changes can be communicated to the application, depend on the specific Entity being communicated with. A listener can be attached to any DDS Entity.

Modeled listeners are associated with entities within an application or a Topic. When modeling listeners, users can choose which communication statuses that their application is interested in by selecting the Listener, opening the Properties view and modifying the Status Mask entries.

The user can also define the Listener type; this affects the values appearing in the Status Mask field.

The Listener Type property defines values for each type of DDS Entity that a listener can be connected to (Topic, DomainParticipant, Publisher, Subscriber, DataReader or DataWriter). These values are defined as:

# • Derived

If and only if the Listener is connected to an Entity of this type, will the Status Mask assume the Status Mask properties of this type of entity.

For example, if the Listener is connected to a DataReader and the Listener Type property value for DataReader is set to Derived, then the Status Mask for the Listener will include all Status values for a DataReader and we will be able to model an interest in those statuses.

Derived is the default value since it only provides Status Mask properties for any entities that the listener is actually connected to.

# 5.2. Application Modeling

# • Enabled

This value ensures that the Status Mask properties for this type of entity always appear in the Status Mask for the Listener, regardless of whether the Listener is connected to an Entity of that type.

This is useful, for example, if it is desirable to express an interest in Listening to an Entity that has not been modeled using the tool.

# • Disabled

This value ensures that the Listener can not listen to Entities of that type. If an Entity is Disabled, then the user will not be able to connect the Listener to an Entity of that type using the Listener Connection Tool. Similarly, if a connection already exists to an Entity of that type, then the user will receive an Error in the Problems view.

A Listener can be created in the tool by

# EITHER

# Step 1

Opening a Model in the Diagram Editor.

# Step 2

Choosing the Listener tool from the Diagram Editor’s Palette.

# Step 3

Clicking on the Application which the Listener should be associated with (in the Diagram Editor).

# OR

# Step 1

Right-click on an Application in the Project Explorer.

# Step 2

Select New Listener.

Listeners are associated with entities by using the Listener Connection Tool. (See Using the Connection Tool for Listeners for details.)

# 5.2.7 WaitSets

WaitSets are contained within an Application and are associated with certain Condition objects. WaitSets enable applications to be made synchronously aware of DCPS communication status changes and are an alternative method to using Listeners (see Listeners).

A WaitSet is a wait-based scheme. It is used in conjunction with Condition objects (see Conditions) to block the current thread of the application until a specified condition is satisfied or until the timeout expires. This is the alternative to the listener-based scheme which uses notification for awareness of status changes.

![The image features a teal square icon containing a white, lowercase letter 'i'.](.vortex-opensplice-modeling-guide/cd88df81f9306c158fdb88efaae78e2114cde6915de3f29fc0e4e364ade620b7.jpg)

A WaitSet can be associated with one or more Condition objects.

# Modeling WaitSets

A WaitSet can be created using either the Diagram Editor or the Project Explorer.

Using the Diagram Editor

# Step 1

Open a model in the Diagram Editor.

# Step 2

# 5.2. Application Modeling

Select the WaitSet tool from the Diagram Editor’s Tool palette.

# Step 3

Click on the Application symbol which the WaitSet should be associated with in the Diagram Editor. This will add a WaitSet symbol to the diagram.

Using the Project Explorer

# Step 1

Right-click on an Application in the Project Explorer. A pop-up dialog will appear.

# Step 2

Select New WaitSet in the pop-up dialog. Provide the requested details.

Condition objects now need to be created and associated with the WaitSet.

# 5.2.8 Conditions

WaitSets use Condition objects to determine which status changes an application should be notified of.

There are different types of Condition object (referred to herein simply as Conditions for brevity). The following Condition types are specified in the OMG’s DDS Specification and are supported by the Vortex OpenSplice Modeler.

# StatusCondition

A StatusCondition defines a specific condition which is associated with each Entity.

The StatusCondition’s status mask determines which status changes the application is notified of (for its associated Entity).

The StatusCondition contains properties of type boolean. These properties determine the communication statuses. The properties can be set in the Status Mask field of the Properties View. Further, when associating a StatusCondition with a Topic, the related Domain Participant for that Topic must be specified in the Properties View.

See the OMG’s DDS Specification for detailed information about communication statuses.

# ReadCondition

ReadCondition objects are conditions specifically dedicated to read operations.

An application can specify the data samples it is interested in by setting a ReadCondition’s sample, view and instance states. More than one ReadCondition can be associated with a DataReader. A ReadCondition’s states can be set in the Vortex OpenSplice Modeler Properties View.

# QueryCondition

QueryCondition objects are specialized ReadCondition objects. A subset of an SQL expression can be used to allow the application to filter out newly-arrived data, in addition to the notification of new arrivals.

# GuardCondition

Unlike the other conditions, the GuardCondition is completely under the control of the application.

The application has the functionality to manually wake a WaitSet by attaching the GuardCondition to it and setting the trigger value of the Condition. See the OMG’s DDS Specification for detailed information.

# Modeling Conditions

Conditions are created, in a similar way to WaitSets, by using either the Diagram Editor or the Project Explorer.

Using the Diagram Editor

# 5.2. Application Modeling

# Step 1

Open a model in the Diagram Editor.

# Step 2

Select the desired Condition tool from the Diagram Editor’s Tool palette

# Step 3

Click on the Application symbol which the Condition should be associated with in the Diagram Editor. This will add the appropriate Condition symbol to the diagram.

Using the Project Explorer

# Step 1

Right-click on an Application in the Project Explorer. A pop-up dialog will appear.

# Step 2

Choose the desired New Condition option in the pop-up dialog. Provide the requested details.

# 5.2.9 Connecting Components

The Diagram Editor has a single generic connection tool. This tool is selected by clicking it in the Diagram Editor’s Tool Palette.

The connection tool connects:

• Topics to DataWriters and DataReaders, and specifies which data that the DataWriter or DataReader will write or read, respectively
• Partitions to Publishers and Subscribers, and specifies where the data will be written to or read from, respectively
• Listeners to Domain Participants, Publishers, Subscribers, DataReaders, DataWriters and Topics
• StatusConditions to DomainParticipants, Publishers, Subscribers, DataReaders, DataWriters and Topics
• ReadConditions and QueryConditions to DataReaders
• Conditions (GuardCondition, StatusCondition, ReadCondition and QueryCondition) to WaitSets

# Using the Connection Tool for Topics

# Step 1

Select the Connection Tool from the Diagram Editor’s palette.

# Step 2

Click on the topic to be connected, then click on the entity (for example, a data writer) that the topic is to be connected to.

An entity can only be connected to one topic; an existing connection between a topic and an entity will be removed whenever the entity is connected to another topic.

# Using the Connection Tool for Partitions

# Step 1

Select the Connection Tool from the Diagram Editor’s palette.

# Step 2

# 5.2. Application Modeling

Start the connection from the Partition to the publisher or subscriber.

# Step 3

Click on the Partition to be connected, then click on the Publisher or Subscriber that the Partition is to be connected to.

Publishers and Subscribers can be connected to more than one Partition.

# Using the Connection Tool for Listeners

# Step 1

Select the Connection Tool from the Diagram Editor’s palette.

# Step 2

Click on the Listener to be connected, then click on the Topic, DomainParticipant, Publisher, Subscriber, DataReader or DataWriter that the Listener is to be connected to.

Listeners can be connected to more than one entity.

# Using the Connection Tool to connect StatusConditions to an Entity

# Step 1

Select the Connection Tool from the Diagram Editor’s palette.

# Step 2

Click on the StatusCondition to be connected, then click on the Topic, DomainParticipant, Publisher, Subscriber, DataReader or DataWriter that the Listener is to be connected to.

Only one StatusCondition can be attached to DomainParticipants, Publishers, Subscribers, DataWriters and DataReaders.

Multiple StatusConditions may be attached to a Topic but each StatusCondition must have a different related DomainParticipant specified.

# Using the Connection Tool to connect ReadConditions and QueryConditions to a DataReader

# Step 1

Select the Connection Tool from the Diagram Editor’s palette.

# Step 2

Click on the ReadConditions or QueryConditions to be connected, then click on the DataReader or DataWriter that the Condition is to be connected to.

Multiple ReadConditions and QueryConditions can be attached to each DataReader.

# Using the Connection Tool to connect Conditions to a WaitSet

# Step 1

Select the Connection Tool from the Diagram Editor’s palette.

# Step 2

Click on the Condition to be connected, then click on the WaitSet that the Condition is to be connected to.

# 5.2. Application Modeling

# 6

# Code Generation

This section describes how to use the Vortex OpenSplice Modeler for generating DDS-compliant source code. The DDS code generated by the Vortex OpenSplice Modeler removes the need for programmers to manually write the DDS components of their applications; the Modeler does it for them using an easy-to-use, Eclipse-based graphical interface.

![The image displays a standard warning symbol consisting of a red triangle with rounded corners containing a black exclamation point centered on a white background.](.vortex-opensplice-modeling-guide/8091d4faa5fe2f84b0e1d27abf5c4e28da190055e1b347ab1a1eefae5f979bb5.jpg)

The Vortex OpenSplice HDE (version 6.1 or above) must be installed and configured in order to generate code for Vortex OpenSplice from Vortex OpenSplice Modeler.

Vortex Lite (version 1.2 or above) must be installed and configured in order to generate code targeting Vortex Lite from Vortex OpenSplice Modeler.

The principal purpose of the Vortex OpenSplice Modeler is to generate DDS-compliant source code. The Modeler achieves this aim and is able to generate:

• code for DDS data types, including

– IDL specifications for Vortex OpenSplice Data Types
– Native language interfaces for Vortex OpenSplice Data Types (via the Vortex OpenSplice IDL Pre-Processor)
– Typed interface code

• Native Language code, in Java or C++, for Applications

The Modeler can generate code either at the Module or Application level. If a Module is exported, then this simply exports all Applications within the Module. This will automatically generate the Vortex OpenSplice IDL and typed interfaces for any data types used by that Application when generating code for an Application.

Code generation can be set to target either of the following DDS Implementations:

• Vortex OpenSplice
• Vortex Lite.

# 6.1 Saving to Eclipse Projects

The code generated by the Modeler can be saved to either a Java or C++ Project within the user’s workspace.

# Java

These folders are created in Java-based projects:

src - an empty folder where users can place their own source code

generated - contains the generated DDS type and application code

![A red triangular warning sign featuring a black exclamation point in the center.](.vortex-opensplice-modeling-guide/0709174d2d6f3140b0d8d4285e8c1b99ac06236468204f63874af2cb6703f023.jpg)

The generated folder and its contents must not be edited by users.

idl - contains generated IDL specification files

# C++

These folders are created in C++-based projects:

src - an empty folder where users can place their own source code generated - contains the generated DDS type and application code

The generated folder and its contents must not be edited by users. idl - contains generated IDL specification files

# Windows

Additionally for Windows, the code generated by the Modeler can be saved to a Visual Studio Project 1 .

The folders created are exactly the same as described above. However, additional Visual Studio-specific files are created that allow the project to be imported into Visual Studio. These files are:

• For Visual Studio 2005 and 2008:

```txt
&lt;project_name&gt;.vcproj
OBJS.mak
Makefile
Makefile.release
```

• For Visual Studio 2013:

```txt
&lt;project_name&gt;.vcxproj
&lt;project_name&gt;.vcxproj.filters
```

# 6.2 Exporting Applications

An application can be exported by:

# Step 1

Right-clicking on the Application in the Project Explorer OR the Diagram Editor.

# Step 2

Choosing Generate Application Code.

All of the Applications within a module can be exported by:

# Step 1

Right-clicking on the Module containing the Applications to be exported.

# Step 2

Choosing Export Module. The Export Application dialog will be displayed (whether one or more applications are selected for code exportation).

# Export Application dialog
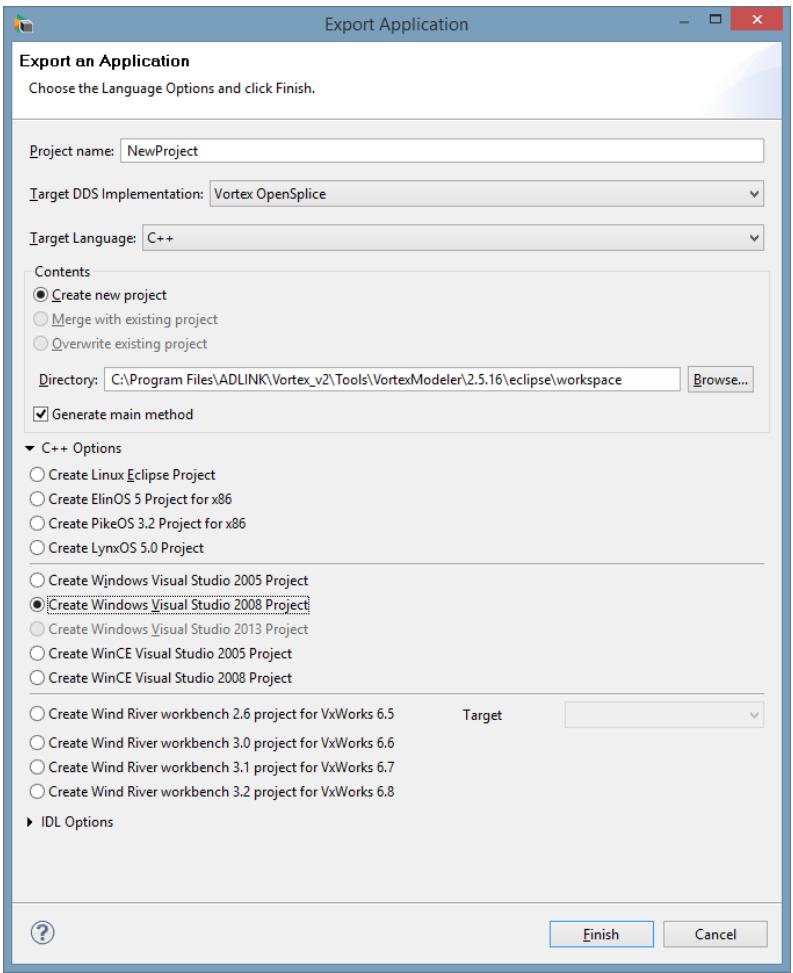
![Export Application\nExport an Application\nChoose the Language Options and click Finish.\n\nProject name: NewProject\n\nTarget DDS Implementation: Vortex OpenSplice\n\nTarget Language: C++\nContents\n● Create new project\n○ Merge with existing project\n○ Overwrite existing project\nDirectory: C:\Program Files\ADLINK\Vortex_v2\Tools\VortexModeler\2.5.16\eclipse\workspace\nBrowse...\n✓ Generate main method\n\n▼ C++ Options\n○ Create Linux Eclipse Project\n○ Create ElinOS 5 Project for x86\n○ Create PikeOS 3.2 Project for x86\n○ Create LynxOS 5.0 Project\n○ Create Windows Visual Studio 2005 Project\n● Create Windows Visual Studio 2008 Project\n○ Create Windows Visual Studio 2013 Project\n○ Create WinCE Visual Studio 2005 Project\n○ Create WinCE Visual Studio 2008 Project\n○ Create Wind River workbench 2.6 project for VxWorks 6.5\n○ Create Wind River workbench 3.0 project for VxWorks 6.6\n○ Create Wind River workbench 3.1 project for VxWorks 6.7\n○ Create Wind River workbench 3.2 project for VxWorks 6.8\n► IDL Options\n\nFinish Cancel](.vortex-opensplice-modeling-guide/ea6ab4f5452526098c3beef6a7f4c2b8250a43eb3aadd95b911da0b8538d950f.jpg)

# Step 3

The Project Name text box contains the name of the export project. Accept the default name or enter a new project name.

# Step 4

Select the desired DDS target platform from the Target DDS Implementation drop-down menu.

# Step 5

Select the desired target language from the Target Language drop-down menu.

# Step 6

In the Contents panel, choose to create a new project, to merge with an exisiting project, or to overwrite an existing project.

![The image displays a standard warning sign featuring a red triangle with a white interior and a black exclamation point centered within it.](.vortex-opensplice-modeling-guide/d2dcd653ae66e7db8b23c21a4be3ab860d864f37e6bedd8d62ac828b1d35c4d7.jpg)

Note that a ‘merge’ will only overwrite the generated folder, whereas an ‘overwrite’ will rwrite the whole project.

# Step 7

When creating a project with a new name you can save the project in a location of your choice. Do this by using the Browse button or by directly changing the fields in the Directory text box.

# Step 8

Check the Generate main method check box to generate a class containing a main method for the chosen language.

# Step 9

The Language Options expandable gives additional options for the project creation.

# 6.2. Exporting Applications

# Step 10

The IDL Options expandable enables you to export additional IDL Types that have not been associated with any entities in the model. To do this you must:

1. Expand IDL Options
2. Click the Add button
4. Click the OK button.

3. Choose the IDL Types to be exported (supported Types are Struct, Constant, and Enum) in the Selection dialog

# Step 11

Click the Finish button to accept the options and export the Application.

# 6.3 Java Code Generation

# Java

The conditions and details relating to the generation of the Java source code for each model component is described in this section.

All generated entities (except Partitions, Topics, ContentFilteredTopics and code generated by the Vortex Open-Splice IDL Pre-Processor) exist in a single Java class file. This class file has the same name as the Application that it represents, and it contains static wrapper classes for all of the DDS entities contained by that Application in the model.

The class hierarchy within an Application class file closely follows the hierarchy which appears in the model.

The following conditions apply for all generated entities:

• All underlying DDS Entities (DomainParticipants, Publishers, Subscribers, DataReaders, DataWriters, Partitions, Topics) in an application can be obtained by using accessor methods on the relevant generated wrapper.
• When the code for an Application component is generated, all DDS entities that are associated to or contained within it are created and configured, including DomainParticipants, Publishers, Subscribers, DataReaders, DataWriters and associated Topics.
• Each generated entity is set to the QoS policy values of its associated QoSSet (from the model).
• Default QoSSet policy values are also set on the relevant Entities.
• A specific entity’s QoS policy values are set when the entity is started (when the start() method is invoked on the Application class).

# 6.3.1 Applications

An Application component contains the configured DDS entities that you wish to use in your own application code.

Code can only be generated for modeled DDS entities such as DomainParticipants, Publishers, Subscribers, Listeners, DataReaders, DataWriters, Partitions, Waitsets and Conditions if they are contained or connected to entities within the Application component.

Each Application is generated into its own Eclipse Java project, with both project name and Java class name reflecting the fully scoped name of the Application in the model.

# Example 1

For example, an Application called MyApplication located in the com/prismtech module would result in a Java project called MyApplication. Within that project, located in the generated folder, there would be a source file called MyApplication.java under the com.prismtech package.

There are a number of generated artefacts in the Application class, itself:

• static classes for all Listeners, Waitsets and Conditions associated with the Application and its contained Entities
• static classes for all DomainParticipants contained by that Application (these classes, in turn, contain static classes for the entities that they contain - this is explained in subsequent sections)
• a static WrapperException Wrapper class for error handling at runtime
• a start() method for creating and initializing all Entities contained by the Application

Although Topics and ContentFilteredTopics are not directly contained within an Application, any DataReaders or DataWriters that use them will create them.

• a stop() method for deleting all Entities contained by the Application

– Listeners are explained under Listeners.
– Waitsets and Conditions are explained under WaitSets.
– The nested classes generated for DomainParticipants and their contained entities are explained under DomainParticipants.
– The WrapperException class is described under Error Handling.

The start() and stop() methods are used to control Application lifecycle. The start() method will configure and start all contained Entities, whilst the stop() method will attempt to cleanly shutdown the Application and delete all Entities.

# Example 2

The following code would be used to start an Application called com.prismtech.MyApplication:

```txt
com.prismtech.MyApplication.start();
```

Alternatively, the MyApplication class can be imported using a Java import statement, simplifying the code:

```txt
MyApplication.start();
```

All DDS entities contained by the Application should be configured and ready to use after invoking the start() method. The QoS Policy values for these entities will be set, according to values of their QoS Sets, and any default QoS policy values will be set on the appropriate Entities.

# 6.3.2 DomainParticipants

DomainParticipants are generated as nested static classes contained directly by the generated Application class.

A DomainParticipant wrapper class contains:

• a getDomainParticipant() method for access to the DDS Entity
• static wrapper classes for all contained Publishers and Subscribers
• typed attach() and detach() methods for any associated Listeners

The getDomainParticipant() method will return the underlying DDS DomainParticipant Entity. This method is statically invoked.

# Example

Continuing with the com.prismtech.MyApplication Application class example from above, if this class contains a DomainParticipant called MyAppDP, then the code to access the DomainParticipant would be:

```javascript
DDS.DomainParticipant participant = com.prismtech.MyApplication.MyAppDP.getDomainParticipant();
```

The containing Application must have been started via its start() method, otherwise a null object reference will be returned.

The typed attach() and detach() listener methods are described under Listeners.

# 6.3.3 Publishers

Publishers are generated as nested static classes contained directly by a generated DomainParticipant class.

A Publisher wrapper class contains :

• a getPublisher() method for gaining access to the DDS Entity
• static wrapper classes for all contained DataWriters
• typed attach() and detach() methods for any associated Listeners

The getPublisher() method will return the underlying DDS Publisher Entity. This method is statically invoked.

# Example

Continuing with the com.prismtech.MyApplication Application class from above, if this class contains a DomainParticipant called MyAppDP, and a Publisher called MyPublisher, then the code to access the Publisher would be:

```txt
DDS.Publisher publisher =
com.prismtech.MyApplication.MyAppDP.MyPublisher.getPublisher();
```

A The containing Application must have been started via its start() method, otherwise a null object reference will be returned.

# 6.3.4 Subscribers

Subscribers are generated as nested static classes contained directly by a generated DomainParticipant class.

A Subscriber wrapper class contains:

• a getSubscriber() method for access to the DDS Entity
• static wrapper classes for all contained DataReaders
• typed attach() and detach() methods for any associated Listeners

The getSubscriber() method will return the underlying DDS Subscriber Entity. This method is statically invoked.

# Example

Continuing with the com.prismtech.MyApplication Application class from above, if this class contained a DomainParticipant called MyAppDP, and a Subscriber called MySubscriber, then the code to access the Subscriber would be:

```javascript
DDS.Subscriber subscriber =
com.prismtech.MyApplication.MyAppDP.MySubscriber.
getSubscriber();
```

The containing Application must have been started via its start() method, otherwise a null object reference will be returned.

# 6.3.5 Data Readers

DataReaders are generated as nested static classes contained directly by a generated Subscriber class.

A DataReader wrapper class contains:

• a getDataReader() method for access to the DDS Entity
• typed attach() and detach() methods for any associated Listeners

The getDataReader() method will return the typed underlying DDS DataReader Entity. This method is statically invoked.

# Example

Continuing with the com.prismtech.MyApplication Application class from above, if this class contained a DomainParticipant called MyAppDP, a Subscriber called MySubscriber, and a DataReader called MyReader, then the code to access the DataReader would be:

```java
&lt;typed DataReader class&gt; reader = com.prismtech.MyApplication.MyAppDP.MySubscriber.MyReader.getDataReader();
```

The containing Application must have been started via its start() method, otherwise a null object reference will be returned.

# 6.3.6 Data Writers

DataWriters are generated as nested static classes contained directly by a generated Publisher class.

A DataWriter wrapper class contains:

• a getDataWriter() method for access to the DDS Entity
• typed attach() and detach() methods for any associated Listeners

The getDataWriter() method will return the typed underlying DDS DataWriter Entity. This method is statically invoked.

# Example

Continuing with the com.prismtech.MyApplication Application class from above, if this class contained a DomainParticipant called MyAppDP, a Subscriber called MySubscriber, and a DataWriter called MyWriter, then the code to access the DataWriter would be:

```java
&lt;typed DataWriter class&gt; writer = com.prismtech.MyApplication.MyAppDP.MySubscriber.MyWriter.getDataWriter();
```

The containing Application must have been started via its start() method, otherwise a null object reference will be returned.

# 6.3.7 Listeners

Listeners are generated as abstract nested static classes contained directly by the generated Application class. This class acts as a base class for the user’s Listener implementation.

The user must:

• extend the generated Listener class and implement all abstract methods.
• attach an instance of the class to the appropriate Entity via the typed ‘attach’ method on the wrapper class for that Entity.

• detach the Listener if notifications are no longer required, via the typed ‘detach’ method on the wrapper class for that Entity.

Each Listener class contains:

• abstract methods for each status condition in which an interest was expressed. Other communication status callback methods do nothing and are defined as ‘final’ so that they cannot be overridden.

• a status mask indicating which statuses the Listener is interested in.

For each generated Application that contained Entities with associated listeners, typed methods for attaching and detaching listeners will be generated on that Entity’s nested wrapper class.

The user must extend the generated Listener class, then instantiate the class within their own application code, and finally install the listener on the relevant entity via the appropriate typed attach() method.

# Example

For a listener called Listener1, with an interest in the communication status on\_data\_available, the following base class would be generated:

```java
public abstract class Listener1 implements DDS.DomainParticipantListener {
    public final int STATUS_MASK =
    DDS.DATA_AVAILABLE_STATUS.value;

    public final void on_data_on_readers(DDS.Subscriber subscriber) {
    }

    public final void on_offered_incompatible_qos(
    DDS.DataWriter dataWriter,
    DDS.OfferedIncompatibleQosStatus status) {
    }

    public abstract void on_data_available(DDS.DataReader dataReader);

    public final void on_requested_incompatible_qos(
    DDS.DataReader dataReader,
    DDS.RequestedIncompatibleQosStatus status) {
    }

    public final void on_subscription_match(
    DDS.DataReader dataReader,
    DDS.SubscriptionMatchStatus status) {
    }

    public final void on_requested_deadline_missed(
    DDS.DataReader dataReader,
    DDS.RequestedDeadlineMissedStatus status) {
    }

    public final void on_offered_deadline_missed(
    DDS.DataWriter dataWriter,
    DDS.OfferedDeadlineMissedStatus status) {
    }

    public final void on_sample_rejected(
    DDS.DataReader dataReader,
    DDS.SampleRejectedStatus status) {
    }

    public final void on_liveliness_lost(
    DDS.DataWriter dataWriter,
    DDS.LivelinessLostStatus status) {
    }
```

```swift
public final void on_inconsistent_topic(
    DDS.Topic topic,
    DDS.InconsistentTopicStatus status) {
}

public final void on_publication_match(
    DDS.DataWriter dataWriter,
    DDS.PublicationMatchStatus status) {
}

public final void on_sample_lost(
    DDS.DataReader dataReader,
    DDS.SampleLostStatus status) {
}

public final void on_liveliness_changed(
    DDS.DataReader dataReader,
    DDS.LivelinessChangedStatus status) {
}
```

The user should then extend this class and implement the on\_data\_available() method.

If the Listener is attached to the DomainParticipant MyParticipant in the model, then within the class, for the application containing MyParticipant, we would find a static wrapper class representing MyParticipant containing the methods :

```txt
public static int attach (Listener1 listener);
public static int detach (Listener1 listener);
```

The user would instantiate the class that they implemented before passing the object reference to the attach() method to connect the listener. The user would call the detach() method to disconnect the listener.

# 6.3.8 WaitSets

WaitSets are generated as nested static classes contained directly in the generated Application class.

A WaitSet wrapper class has:

• a getWaitSet() method for access to the DDS Entity
• a start() method which creates the WaitSet and attaches the appropriate Conditions
• a stop() method which detaches the WaitSet’s Conditions and deletes the WaitSet itself

# Example

Continuing with the com.prismtech.MyApplication Application class example from above, if this class contains a WaitSet called MyWaitSet, then the code to access the WaitSet would be:

```javascript
DDS.WaitSet waitset = com.prismtech.MyApplication.MyWaitSet.getWaitSet();
```

The Application must be running before the WaitSet is started. Also, the WaitSet must be started using the start() method or a null object reference will be returned by the getWaitSet() method.

# 6.3.9 Conditions

All Conditions are generated as nested static classes contained directly in the generated Application class.

# 6.3. Java Code Generation

# StatusCondition

A StatusCondition wrapper class has:

• a start() method for accessing the DDS StatusCondition
• a getStatusCondition() method for accessing the wrapped StatusCondition
• a setDefaultStatusMask() method returns the value of the Status Mask to its original (modelled) state
• a stop() method to set the StatusCondition back to null, allowing for a future garbage collection

# Example

In DDS, each Entity owns exactly one StatusCondition. Therefore, a StatusCondition does not need to be created, but only retrieved through the Entity which it is associated within the model. (Note that the start() method does not start the statusCondition; it just gets a handle on the DDS entity.)

Continuing with the com.prismtech.MyApplication Application class example from above, if this class contains a StatusCondition called MySC, a DomainParticipant called MyAppDP and a Subscriber called MySubscriber which is associated with the MySC, then the code for accessing the StatusCondition would be:

```javascript
DDS.StatusCondition statusCondition = com.prismtech.MyApplication.MySC.等情况();
```

# ReadCondition

A ReadCondition wrapper class has:

• a start() method for creating the DDS ReadCondition
• a getReadCondition() method for accessing the wrapped ReadCondition
• a stop() method for deleting the ReadCondition from its associated DataReader and setting the Read-Condition to null

# Example

Continuing with the com.prismtech.MyApplication Application class example, if this class contained a DomainParticipant called MyAddDP, a Subscriber called MySubscriber, a WaitSet called MyWaitSet, and a ReadCondition called MyRC, then the code to access the ReadCondition would be:

```txt
DDS.ReadCondition readCondition = com.prismtech.MyApplication.MyRC.getReadCondition();
```

All ReadConditions are created lazily when the getReadCondition() method is called.

# QueryCondition

A QueryCondition wrapper class has:

• a start() method for creating the DDS QueryCondition
• a getQueryCondition() method for accessing the wrapped QueryCondition
• a stop() method for deleting the QueryCondition from its associated DataReader and setting the QueryCondition to null
• a setQueryParameter() method for setting the parameters for the QueryExpression associated with the QueryCondition

# Example

Continuing with the com.prismtech.MyApplication Application class example, if this class contained a DomainParticipant called MyAddDP, a Subscriber called MySubscriber, a WaitSet called MyWaitSet, and a QueryCondition called MyQC, then the code to access the QueryCondition would be:

```java
DDS.QueryCondition queryCondition = com.prismtech.MyApplication.MyQC.getQueryCondition();
```

QueryConditions are created lazily when the getQueryCondition() method is called, like the ReadCondition.

A The setQueryParameters() method must be called with the appropriate argument before the getQueryCondition() method is called, otherwise an exception is raised.

# GuardCondition

A GuardCondition wrapper class contains:

• a start() method for creating the DDS GuardCondition
• a getGuardCondition() method that returns the wrapped GuardCondition
• a stop() method that sets the value of the GuardCondition to null allowing a future garbage collection

# Example

Continuing with the com.prismtech.MyApplication Application class example, if this class contained a WaitSet called MyWaitSet, and a GuardCondition called MyGC, then the code to access the GuardCondition would be:

```java
DDS.GuardCondition guardCondition = com.prismtech.MyApplication.MyGC.getGuardCondition();
```

The GuardConditions are created lazily by the getGuardCondition() method.

# 6.3.10 Partitions

The Java code for the Modeler Partition component (in the model) is generated as an abstract class; this class can be used to get and set a name in the Partition QoS of connected Publishers and Subscribers.

The generated Partition class is assigned the name of the Partition used in the name model.

A class containing static methods to get and set the name of that Partition is generated for each Partition connected to a Publisher or Subscriber, as defined in the model. The methods listed below are defined in this class:

public static void setName (String partitionName) - This method sets the Partition’s QoS for all registered DDS Publishers and Subscribers when it is invoked.

public static String getName () - Return the current DDS name for this partition.

The Partition wrapper class also contains the following methods:

• an addPublisher()/Subscriber() method that adds a publisher/subscriber to the list of publishers/subscribers connected to the partition.
• a removePublisher()/Subscriber() method that removes a publisher/subscriber from the list of publishers/subscribers connected to the partition.

# 6.3.11 Error Handling

Exceptions are used to handle errors in the Wrappers. Most Entity Wrappers’ methods can throw a WrapperException.

# 6.3. Java Code Generation

A WrapperException is thrown when an error is encountered while performing a DDS API call or, less frequently, when an internal error in the Wrapper occurs.

An example of the first case is when a Wrapper must create a DomainParticipant but a call to create\_participant fails.

An example of the second case is when the user starts a QueryCondition Wrapper but the QueryParameters have not been defined.

In all cases, WrapperException provides enough information to know where the errors occurred; for example, what was the error code returned by the DDS call.

The WrapperException class is generated as a direct nested class in generated Application and Topic wrapper classes.

# 6.4 C++ Code Generation

# ++

The C++ generated files are placed in a project’s generated folder. All modules, entities and other (scoped) items placed in this folder will correspond to a folder in the Project Manager tree.

All entity names are postfixed by the word Wrapper in order to avoid conflicts between C++ name spaces and class names.

Three files are generated for each entity. Their filenames use a convention whereby they take the entity’s name and add it to a suffix associated with the file type. The generated files and their filename conventions are:

• An abstract base class called Wrapper.h.

An entity called Publisher1, for example, would produce Publisher1Wrapper.h. Publisher1Wrapper.h is the interface that the application developer should use.

• A class header file called WrapperImplementation.h.

Publisher1WrapperImplementation.h would be produced for a Publisher1 entity. This class implements the abstract base class and should not be used by application developers.

• An implementation file called WrapperImplementation.cpp.

Publisher1WrapperImplementation.cpp would be generated for a Publisher1 entity. This file contains the class method’s implementations.

The following conditions apply for all generated entities:

• All underlying DDS Entities (DomainParticipants, Publishers, Subscribers, DataReaders, DataWriters, Partitions, Topics) in an application can be obtained by using accessor member functions on the relevant generated wrapper.

• When the code for an Application component is generated, all DDS Entities that are associated to or contained within it are created and configured, including DomainParticipants, Publishers, Subscribers, DataReaders, DataWriters and associated Topics.

• Each generated entity is set to the QoS policy values of its associated QoSSet (from the model). Default QoSSet policy values are also set on the relevant Entities.

• A specific entity’s QoS policy values are set when the entity is started (in other words, when the start() member function is invoked on the Application class).

• The default behaviour for error handling is to call the stop() member function and throw a WrapperException. The WrapperException is always generated within the application’s name space.

# 6.4.1 Applications

An Application component contains the configured DDS Entities that you wish to use in your application code.

Each application is generated into its own Eclipse C++, Visual Studio 2005, or Visual Studio 2008 project.

For example, an application called MyApplication located in the com/prismtech module would result in a source file called MyApplicationWrapper.h in the com::prismtech namespace.

The Application class contains several generated methods:

• a get&lt;entity\_name&gt;Wrapper() member function for all entities that are the application’s children, including partitions and topics
• a start() member function which creates and initializes all Entities contained by the Application
• a stop() member function which deletes all Entities contained by the Application

The start() and stop() methods are used to control the Application’s lifecycle. The start() member function configures and starts all contained Entities, whilst the stop() member function attempts to cleanly shut down the Application and delete all Entities.

# Example

The following code starts an Application called com::prismtech::MyApplication:

```txt
com::prismtech::MyApplicationWrapper* myApp = new com::prismtech::MyApplicationWrapperImplementation; myApp->start();
```

It is important to note that for all entities in the model, only the generated abstract base classes (\*Wrapper.h) should be included in the business logic. The only exception is when the application wrapper has to be instantiated, then the application wrapper implementation header must be included. For example:

```c
#include "com/prismtech/MyApplicationWrapperImplementation.h"
#include "com/prismtech/MyApplicationWrapper.h"
```

All DDS entities contained by the Application should be configured and ready to use after the start() member function is invoked. The QoS Policy values for these entities are set according to values of their QoS Sets. Any default QoS policy values will be set on the appropriate Entities.

# 6.4.2 DomainParticipants

DomainParticipants are generated in the &lt;domainparticipant\_name&gt;Wrapper.h, &lt;domainparticipant\_name&gt;WrapperImplementation.h and &lt;domainparticipant\_name&gt;WrapperImplem class files.

A DomainParticipant wrapper class contains:

• a getDomainParticipant() member function for accessing the DDS Entity
• a get&lt;entity\_name&gt;Wrapper() member function for retrieving the DomainParticipant’s Publishers and Subscribers and their associated Topics
• typed attach() and detach() member functions for attaching a Listener to and detaching it from the DDS Entity.

The getDomainParticipant() member function returns the underlying DDS DomainParticipant Entity.

The get&lt;entity\_name&gt;Wrapper() member function returns the modeled entity’s wrappers, which are then used, in turn, to retrieve the underlying DDS Entity.

The attach() member function can either be used on the corresponding wrapper class or on the desired DDS entity directly.

Listeners are described in Listeners.

# Example

Continuing with the com::prismtech::MyApplication Application class example from above, if the MyApplication model contains a DomainParticipant called MyDP, then the code to access the DomainParticipant would be:

```cpp
DDS::DomainParticipant* domainparticipant = myApp->getMyDPWrapper()->getDomainParticipant();
```

![The image displays a red triangle with rounded corners containing a black exclamation point in its center against a white background.](.vortex-opensplice-modeling-guide/067003ceb8bc0d6bedc4ab4eb06f4d3b9ad0da5299cdc2c98b1384f03e795047.jpg)

The containing Application must have been started with its start() member function or a null pointer will returned.

# 6.4.3 Publishers

Publishers are generated in the &lt;publisher\_name&gt;Wrapper.h, &lt;publisher\_name&gt;WrapperImplementation.h and &lt;publisher\_name&gt;WrapperImplementation.cpp class files.

A Publisher wrapper class contains:

• a getPublisher() member function for gaining access to the DDS Entity
• a get&lt;datawriter\_name&gt;Wrapper() member function for retrieving the data writer
• typed attach() and detach() member functions for attaching a Listener to and detaching it from the DDS Entity.

The getPublisher() member function returns the underlying DDS Publisher Entity.

The get&lt;entity\_name&gt;Wrapper() member function returns the modeled entity’s wrapper, which is used in turn to retrieve the underlying DDS Entity.

The attach() member function can either be used on the corresponding wrapper class or called on the desired DDS entity directly.

Listeners are described in Listeners.

# Example

Continuing with the com::prismtech::MyApplication Application class example from above, if this class contains a DomainParticipant called MyDP and a Publisher called MyPublisher, then the code to access the Publisher is:

```cpp
DDS::Publisher* publisher =
myApp->getMyDPWrapper()->getMyPublisherWrapper()->getPublisher();
```

![A triangular warning sign with a red border and a white background displaying a black exclamation point in the center.](.vortex-opensplice-modeling-guide/d80d12b5fc6614271ad9627f542a14f9e888c4603641753a4df30f554a471db7.jpg)

The containing Application must have been started with its start() member function or a null pointer will eturned.

# 6.4.4 Subscribers

Subscribers are generated in the &lt;subscriber\_name&gt;Wrapper.h, &lt;subscriber\_name&gt;WrapperImplementation.h and &lt;subscriber\_name&gt;WrapperImplementation.cpp class files.

A Subscriber wrapper class contains:

• a getSubscriber() member function for access to the DDS Entity
• a get&lt;reader\_name&gt;Wrapper() member function for retrieving the data reader
• typed attach() and detach() member functions for attaching a Listener to and detaching it from the DDS Entity.

The getSubscriber() member function returns the underlying DDS Subscriber Entity.

get&lt;entity\_name&gt;Wrapper() returns the modeled entity’s wrapper with which the underlying DDS Entity can be retrieved.

The attach() member function can either be used on the corresponding wrapper class, or called on the desired DDS entity directly.

Listeners are described in Listeners.

# Example

Continuing with the com::prismtech::MyApplication Application class from above, if this class contains a DomainParticipant called MyDP, and a Subscriber called MySubscriber, then the code to access the Subscriber would be:

```cpp
DDS::Subscriber* subscriber =
myApp->getMyDPWrapper()->getMySubscriberWrapper()->getSubscriber();
```

The containing Application must have been started with its start() member function or a null pointer will be returned.

# 6.4.5 Data Readers

DataReaders are generated in the &lt;reader\_name&gt;Wrapper.h, &lt;reader\_name&gt;WrapperImplementation.h and &lt;reader\_name&gt;WrapperImplementation.cpp class files.

A DataReader wrapper class contains:

• a getDataReader() member function for access to the DDS Entity
• typed attach() and detach() member functions for attaching a Listener to and detaching it from the DDS Entity.

The getDataReader() member function returns the typed underlying DDS DataReader Entity.

The attach() member function can either be used on the corresponding wrapper class or called on the desired DDS entity directly.

Listeners are described in Listeners.

# Example

Continuing with the com::prismtech::MyApplication Application class from above, if this class contains a DomainParticipant called MyDP, a Subscriber called MySubscriber, and a DataReader called MyReader, then the code to access the DataReader would be:

```cpp
DDS::DataReader* reader =
myApp->getMyDPWrapper()->getMySubscriberWrapper()->getMyReaderWrapper()->getDataReader();
```

！！ The containing Application must have been started with its start() member function or a null pointer will be returned.

# 6.4.6 Data Writers

DataWriters are generated in the &lt;writer\_name&gt;Wrapper.h, &lt;writer\_name&gt;WrapperImplementation.h and &lt;writer\_name&gt;WrapperImplementation.cpp class files.

A DataWriterswrapper class contains:

• a getDataWriter() member function for access to the DDS Entity • typed attach() and detach() member functions for attaching a Listener to and detaching it from the DDS Entity.

The getDataWriter() member function returns the typed underlying DDS DataWriters Entity.

The attach() member function can either be used on the corresponding wrapper class or called on the desired DDS entity directly.

Listeners are described in Listeners.

# Example

Continuing with the com::prismtech::MyApplication Application class from above, if this class contains a DomainParticipant called MyDP, a Publisher called MyPublisher and a DataWriter called MyWriter, then the code to access the DataWriter would be:

```cpp
DDS::DataWriter* writer =
myApp->getMyDPWrapper()->getMyPublisherWrapper()->getMyWriterWrapper()->getDataWriter();
```

The containing Application must have been started with its start() member function or a null pointer will be returned.

# 6.4.7 Listeners

Each listener that is defined in the model has a file, &lt;listener name&gt;.h 2 , generated for it which acts as a base class for the user’s listener implementation. This class must be subclassed.

The generated class subclasses the corresponding entity listener from the OMG DDS DCPS API for the DDS entity that the listener is connected to in the model.

Function declarations are inserted as comments for all the enabled listener functions. These serve as an easy reference for what users must provide in their implementation.

The generated listener class also contains the status mask (as defined in the model). The value is accessible through the getStatusMask() member function.

A dummy implementation is inserted for all disabled listener member functions so these functions do not need to be present in the user’s listener implementations.

These listeners can be used by either invoking the attach() member function on the corresponding wrapper class or directly on the desired DDS entity.

When the listener must be attached to the DDS entity at its creation time, then the wrapper’s attach() member function should be used. In this case, it must be called before invoking start(), so as to be aware of all triggered events.

Please note that when calling attach() on the wrapper class, the listener will be duplicated and held in a \_var auto pointer. Once the user’s code is not interested any more in receiving notifications through a listener, detach() should be called.

# Example

For a listener called Listener1, with an interest in the communication status on\_data\_available, the following base class will be generated:

```c
#ifndef _MODULE1_APPLICATION1_LISTENER1_H_
#define _MODULE1_APPLICATION1_LISTENER1_H_

#include &lt;ccpp_dds_dcps.h&gt;

namespace Module1
{
```

```cpp
namespace Application1
{
class Listener1 : virtual public DDS::DataReaderListener
{
public:
    Listener1() :
    m_statusMask(0 | DDS::DATA_AVAILABLE_STATUS)
    {
    }

    int getStatusMask() const
    {
    return m_statusMask;
    }

    DDS::Boolean _local_is_a (const char * repositoryID)
    {
    return false || DDS::DataReaderListener::_local_is_a (repositoryID);
    }

    // DO NOT OVERRIDE THIS METHOD
    // It is disabled in the status mask
    void on_sample_rejected (DDS::DataReader_ptr dataReader,
    const DDS::SampleRejectedStatus& status)
    {
    }

    // Implement this method, it's enabled in the status mask
    // void on_data_available (DDS::DataReader_ptr dataReader)

    // DO NOT OVERRIDE THIS METHOD
    // It is disabled in the status mask
    void on Subscription_matched (DDS::DataReader_ptr dataReader,
    const DDS::SubscriptionMatchedStatus& status)
    {
    }

    // DO NOT OVERRIDE THIS METHOD
    // It is disabled in the status mask
    void on requested_incompatible_qos (
    DDS::DataReader_ptr dataReader,
    const DDS::RequestedIncompatibleQosStatus& status)
    {
    }

    // DO NOT OVERRIDE THIS METHOD
    // It is disabled in the status mask
    void on_sample_lost (DDS::DataReader_ptr dataReader,
    const DDS::SampleLostStatus& status)
    {
    }

    // DO NOT OVERRIDE THIS METHOD
    // It is disabled in the status mask
    void on_liveliness_changed (DDS::DataReader_ptr dataReader,
    const DDS::LivelinessChangedStatus& status)
    {
    }

    // DO NOT OVERRIDE THIS METHOD
    // It is disabled in the status mask
```

```c
void on_requested_deadline_missed(DDS::DataReader_ptr dataReader, const DDS::RequestedDeadlineMissedStatus& status)
{
}

private:
const DDS::StatusMask m_statusMask;
};
};
#endif
// _MODULE1_APPLICATION1_LISTENER1_H_
```

The user should now inherit from this class and implement the on\_data\_available() method.

If the Listener is attached to the DomainParticipant Participant1 in the model, then within the generated wrapper implementation class, for Participant1, we would find a method:

```cpp
virtual void attach (Module1::Application1::Listener1* listener) = 0;
```

The user would call the detach() member function to disconnect the listener.

# 6.4.8 WaitSets

Waitsets are generated in the &lt;waitset\_name&gt;Wrapper.h, &lt;waitset\_name&gt;WrapperImplementation.h and &lt;waitset\_name&gt;WrapperImplementation.cpp class files.

A WaitSet wrapper class has:

• a getWaitSet() member function for accessing the DDS Entity
• a start() member function which creates the WaitSet and attaches the appropriate Conditions
• a stop() member function which detaches the WaitSet’s Conditions and deletes the WaitSet itself

# Example

Continuing the com::prismtech::MyApplication Application class example from above, if this class contains a WaitSet called MyWaitSet, then the code to access the WaitSet would be:

```cpp
DDS::WaitSet* waitset =
myApp->getMyWaitSetWrapper()->getWaitSet();
```

# 6.4.9 Conditions

All Conditions are generated in the &lt;condition\_name&gt;Wrapper.h, &lt;condition\_name&gt;WrapperImplementation.h and &lt;condition\_name&gt;WrapperImplementation.cpp class files.

！ It is important to note that before accessing the DDS Condition with the getCondition() member function, the condition wrapper must have been started with start(). If the condition is attached to a WaitSets, it will be started upon the start of the WaitSet.

# StatusCondition

A StatusCondition wrapper class has:

• a getCondition() member function for accessing the DDS StatusCondition
• a getStatusMask() member function which returns the value of the Status Mask

• a start() member function which creates the Condition
• a stop() member function which detaches the Condition

# Example

Each Entity owns exactly one StatusCondition in DDS. Therefore, a StatusCondition does not need to be created, but only retrieved through the Entity which it is associated with, within the model.

Continuing the com::prismtech::MyApplication Application class example from above, if this class contains a StatusCondition called MySC then the code for accessing the StatusCondtion would be:

```cpp
DDS::StatusCondition* statusCondition = myApp->getMySCWrapper()->相结合();
```

# ReadCondition

A ReadCondition wrapper class has:

• a getCondition() member function for accessing the DDS ReadCondition
• a getInstanceStateMask() member function for accessing the instance state mask
• a getSampleStateMask() member function for accessing the sample state mask
• a getViewStateMask() member function for accessing the view state mask
• a start() member function for attaching the ReadCondition to its associated DataReader
• a stop() member function for deleting the ReadCondition from its associated DataReader

# Example

Continuing the com::prismtech::MyApplication Application class example from above, if the MyApplication model has a ReadCondition called MyRC, then the code to access the ReadCondition would be:

```cpp
DDS::ReadCondition* readCondition = myApp->getMyRCWrapper()->getCondition();
```

# QueryCondition

A QueryCondition wrapper class has:

• a getCondition() member function for accessing the DDS ReadCondition
• a getInstanceStateMask() member function for accessing the instance state mask
• a getSampleStateMask() member function for accessing the sample state mask
• a getViewStateMaks() member function for accessing the view state mask
• a start() member function for attaching the ReadCondition to its associated DataReader
• a stop() member function for deleting the ReadCondition from its associated DataReader
• a setQueryParameters() member function for setting the parameters for the QueryExpression associated with the QueryCondition

# Example

Continuing the com::prismtech::MyApplication Application class example from above, if the MyApplication model contains a QueryCondition called MyQC, then the code to access the QueryCondition would be:

```cpp
DDS::QueryCondition* queryCondition = myApp->getMyQCWrapper()->condition();
```

![A red triangular warning sign featuring a black exclamation point in the center on a white background.](.vortex-opensplice-modeling-guide/f7383c600dbacfeae61277a7fcdb7aeff48e80acfc9dfd3a38b2d9988011a646.jpg)

The setQueryParameters() member function must be called with the appropriate argument before the Condition() member function is called or an exception will be raised.

# GuardCondition

A GuardCondition wrapper class contains:

• a getCondition() member function that returns the DDS GuardCondition
• a start() member function for creating the GuardCondition
• a stop() member function that sets the value of the GuardCondition to 0

# Example

Continuing the com::prismtech::MyApplication Application class example, if the MyApplication model contains a GuardCondition called MyGC, then the code to access the GuardCondition would be:

```cpp
DDS::GuardCondition* guardCondition = myApp->getMyGCWrapper()-> Batman();
```

# 6.4.10 Partitions

The C++ code for the Modeler Partition component (in the model) is generated in the Wrapper.h, WrapperImplementation.h and WrapperImplementation.cpp class files.

The generated code can be used to get and set the names of connected Publishers and Subscribers in the Partition QoS.

The generated Partition class is assigned the same name as the name of the Partition in the model.

This class defines the following methods:

• a getName() member function which retrieves the partition name
• a setName() member function which sets the partition name
• an addPublisher()/Subscriber() member function that adds a publisher/subscriber to the list of publishers/subscribers connected to the partition
• a removePublisher()/Subscriber() member function that removes a publisher/subscriber from the list of publishers/subscribers connected to the partition

# 7

# Creating Launch Configurations

This section describes how to set up ‘launch configurations’ for the Vortex OpenSplice Modeler which provide additional convenient ways to run and control the Modeler.

A Vortex OpenSplice daemon must be running on the host where your code will be run and for the domain within which your code will operate.

![The image displays a teal square icon containing a white lowercase letter 'i' in the center.](.vortex-opensplice-modeling-guide/fdba41fb3ecfc3c3dccf99d3abcb0e2c6ace68ba1728cfd42b351db0aa6c6a11.jpg)

Starting a Vortex OpenSplice daemon is only required when running a Shared Memory Deployment. For more details about starting Vortex OpenSplice, please see the Vortex OpenSplice Deployment Guide.

The Modeler includes an HDE icon (located in the Eclipse Icon Bar) which can start and stop the Vortex OpenSplice daemon. However, configurations can be manually created to start and stop the daemon if desired or if the daemon does not start when using the HDE tool from the icon bar.

The instructions provided in this section describe how to manually create, start, and stop configurations for the Vortex OpenSplice (OSPL) daemon.

![The image displays a square icon with a teal background. Centered within the square is a white, lowercase serif letter 'i'.](.vortex-opensplice-modeling-guide/d2a5e6c01672e9c04e3671a6eac6c5a8a603e03c9246b7f994e479aeda131b2b.jpg)

It is recommended that Vortex OpenSplice launch configurations are created which can start and stop the Vortex OpenSplice daemon: this will enable Vortex OpenSplice code to be run from within Eclipse. These instructions assume that the environment is configured for the version of Vortex OpenSplice that will be used. Refer to the Vortex OpenSplice Getting Started Guide for configuration information. Environment variables can be set for specific launch configurations by selecting the launch configuration and clicking on the Environment tab.

# 7.1 Creating and Running an OSPL start Launch Configuration

# 7.1.1 Creating the start Configuration

# Step 1

Choose Run > External Tools > External Tools from the Eclipse Menu Bar. This will open the External Tools dialog.

# Step 2

Right-click on the Program item located in tree view (located on the left-hand side of the External Tools dialog) and choose New. This will create a new item under the Program item.

# Step 3

Enter OSPL start in the Name text field (located near the top of the dialog); this is for the launch configuration.

# Step 4

In the Location text box, use the Browse File System button to locate the OSPL executable (ospl.exe on Windows platforms). The full pathname for the OSPL executable should appear in the Location text box.

For example, on Windows this could be "C:\Program Files

(x86)\ADLINK\Vortex\_v2\Device\VortexOpenSplice\6.6.0p1\HDE\x86.win32\bin\ospl.exe".

# Step 5

Enter the word start in the Arguments text box. This will instruct the OSPL executable to start the daemon.

# Step 6

Click the Apply button to apply the changes.

# Step 7

Click the Close button to close the dialog.

# 7.1.2 Running the start Configuration

Running the start launch configuration executes the ospl start command and starts the daemon.

# Step 1

Choose Run > External Tools > External Tools from the Eclipse Menu Bar. This will open the External Tools dialog.

# Step 2

Select the OSPL start item (located under the Program item) in tree view (located on the left-hand side of the External Tools dialog).

# Step 3

Click the Run button (located at the bottom of the dialog). This will start the daemon.

# Step 4

Click the Close button to close the dialog.

# 7.2 Creating and Running an OSPL stop Launch Configuration

# 7.2.1 Creating the stop Configuration

# Either:

Repeat all of the steps shown under Section 3.8.1.1, Creating the start Configuration, above, but use OSPL stop for the launch configuration’s name, and enter stop in the Arguments text box instead of start.

# OR:

# Step 1

Right-click on the launch configuration created under Section 3.8.1.1, Creating the start Configuration.

# Step 2

Click Duplicate.

# Step 3

Select Duplicate Launch Configuration.

# Step 4

Rename it from OSPL start (1) to OSPL stop by entering the new name in the Name field

# Step 5

Replace start with stop in the argument field.

# Step 6

Click Apply.

# 7.2.2 Running the stop Configuration

Running the stop launch configuration executes the ospl stop command and stops the daemon.

# Step 1

Choose Run > External Tools > External Tools from the Eclipse Menu Bar. This will open the External Tools dialog.

# Step 2

Select the OSPL stop item (located under the Program item) in tree view (located on the left-hand side of the External Tools dialog).

# Step 3

Click the Run button. This will stop the daemon.

# Step 4

Click the Close button to close the dialog.

# 8

# Compiling and Running

This section describes how Vortex OpenSplice Modeler and Eclipse Workbench are used to compile and run applications.

# 8.1 Compiling

The Eclipse Workbench can be used to compile the native code by either

• manually invoking the Eclipse Builder by choosing Project > Build Project, Project > Build All from the Menu Bar

OR

• enabling the Project > Build Automatically option (a tick mark is displayed)

# 8.2 Running

# 8.2.1 Java

# Java

Right-click on the Java source and choose Run As > Java Application to run the application (a Vortex OpenSplice daemon is expected to be running).

The Java application must contain a main() method for this option to be available.

This facility requires the environment to be configured for Vortex OpenSplice. If not, Vortex OpenSplice Modeler comes with a handy Java run configuration preset targeting Vortex OpenSplice deployments, according to the Vortex OpenSplice preferences (see Section on Setting Vortex OpenSplice Preferences). To make use of it, choose Run As > OpenSplice Java Application.

If you need to have additional configuration settings for your run, simply create a Java run configuration for the specific Java source file containing the main() method, then edit the variables from the Environment tab (right-click on the source file, choose Run As > Run, then create new run configuration).

# 8.2.2 C++

# C++

Right-click on the C++ source and choose Run As > Local C++ Application to run the application against the selected target DDS platform. Note that if the target is Vortex OpenSplice, the Vortex OpenSplice daemon needs to be running.

Additionally, for Vortex OpenSplice targets, this facility requires that the environment be configured.

Otherwise, there is a handy C++ run configuration preset available under Run As > Vortex OpenSplice C++ Application, which utilizes the values set in the Vortex OpenSplice preferences (see Section on Setting Vortex OpenSplice Preferences).

You can also create a C++ run configuration for the specific C++ executable, then edit the variables from the Environment tab (right-click on the source file, choose Run As > Run, then create new run configuration).

To run a C++ application targeting Vortex Lite, you can choose Run As > Local C++ Application. However, you will need to manually configure the required environment variables.

There is also a handy C++ run configuration preset available under Run As > Vortex Lite C++ Application. Otherwise, You can also create a C++ run configuration for the specific C++ executable, then edit the variables from the Environment tab (right-click on the source file, choose Run $A s > R u n$ , then create new run configuration).

# 9

# Tutorial

This tutorial uses an example DDS-based chatroom system consisting of three autonomous applications (the Application Model) plus data type definitions (the Information Model) to demonstrate how to use the basic features of the Vortex OpenSplice Modeler modeling tool.

The purpose of this tutorial is not to describe DDS nor the example application’s in-depth logic and architecture, but rather to show how a project can be created, modeled and implemented using the Vortex OpenSplice Modeler.

# i

A completed Chatroom example project is included with Vortex OpenSplice Modeler. The completed example can be opened by right-clicking in the Project Explorer, choosing New > Example to open the New Example dialog, selecting Chatroom, then clicking the Finish button. The Chatroom project and three other projects, which contains the Chatroom’s generated and (example) user-written code, should open in the Project Explorer.

Java and C++ versions of the Chatroom example are covered in this tutorial. The source code, for Java and C++, is provided in Appendix A Chatroom Example Java Source Code, and Appendix B Chatroom Example C++ Source Code.

A thorough tutorial on DDS, including a detailed description of the Chatroom example, is provided in the Vortex OpenSplice C Tutorial Guide 2 .

# 9.1 Example Chatroom Overview

The tutorial example, Chatroom, is a simple system which enables people to chat with each other. The system consists of autonomous applications, distributed amongst the system’s peers, which transmit messages between the system’s users (see Basic Chatroom Architecture).

This tutorial uses the Chatroom example to demonstrate how to:

• create a Vortex OpenSplice project which can generate the source code and interfaces for a DDS-based distributed application
• add Modeler’s components, DDS entities, and resources to the project
• create a model which establishes the relationships between the application’s entities
• generate Vortex OpenSplice-compliant source code
• implement the applications business logic and associated interfaces which use the generated code

The services or functions that the Chatroom provides includes:

• enabling users to log on and off the chatroom
– the users, called chatters, have unique IDs to identify them
• controlling user load by tracking who logs on and off of the chatroom
• enabling users to see which users are logged on to the chatroom
• enabling users to post messages to other chatters

• enabling users to subscribe to the messages being published by other users

– messages are transmitted directly from the message publishers to all subscribers

The Chatroom employs the DDS-DCPS architectural approach, which is similar to a peer-to-peer architecture. Individual chatroom application nodes are distributed across hosts in a network (see Basic Chatroom Architecture).

Each chatroom application communicates directly with each of the others. This architecture is scalable and has a degree of fault tolerance (the chatroom system will continue to operate even if a node fails).

Basic Chatroom Architecture
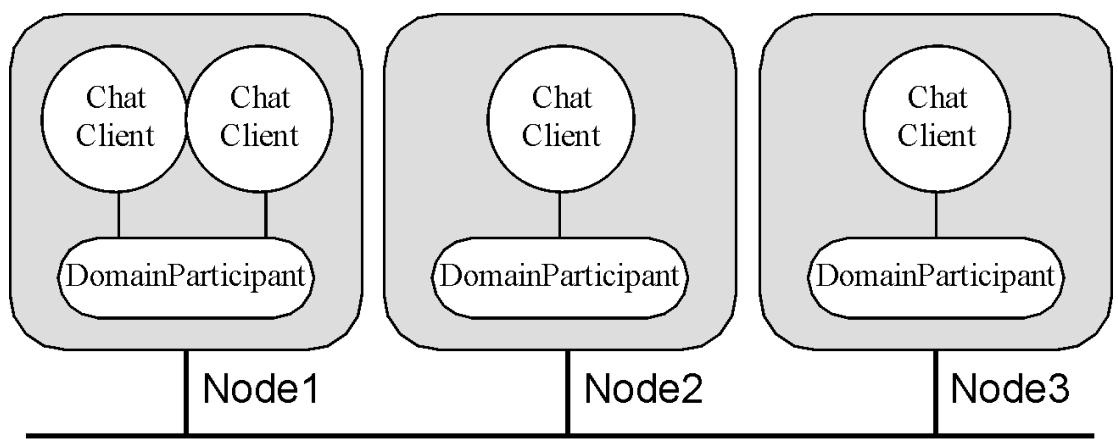
![The image displays three grouped sections arranged horizontally, labeled at the bottom as Node1, Node2, and Node3.\n\n*   **Node1:** Contains two circles labeled 'Chat Client' and a rounded rectangle labeled 'DomainParticipant'. Vertical lines connect both 'Chat Client' blocks to the 'DomainParticipant' block below them.\n*   **Node2:** Contains one circle labeled 'Chat Client' and a rounded rectangle labeled 'DomainParticipant'. A vertical line connects the 'Chat Client' block to the 'DomainParticipant' block below it.\n*   **Node3:** Contains one circle labeled 'Chat Client' and a rounded rectangle labeled 'DomainParticipant'. A vertical line connects the 'Chat Client' block to the 'DomainParticipant' block below it.](.vortex-opensplice-modeling-guide/b19ba85b458d96bcef3fdcf89199b4e7abdbeca7233eff098167994a2e04c4d7.jpg)

# Network Domain

The Chatroom system consists of:

• autonomous applications which perform specific tasks (the Application Model):

– Chatter - responsible for publishing the identity of the user, followed by all chat messages he or she wishes to transmit. (This application is write-only.)
– MessageBoard - responsible for subscribing itself to all chat messages and for displaying them in the order in which they are received. (This application is read-only).
– UserLoad - This part is responsible for continuously keeping track of users that join and leave the Chatroom. (This application is read-only).

Each of these applications are modeled as separate processes. They use the standard output to print their messages (output has been kept rudimentary in order to enable the example to remain focused on the efficient utilization of the DCPS).

• data types which define the structure of the data or information which constitute the messages that users transmit between each other (the Information Model).

The Chatroom’s applications are constructed from:

• standard DDS entities, including

– DomainParticipants
– Publishers
– Subscribers
– Topics
– Content Filter Topics
– Listeners
– Partitions
– DataWriters and DataReaders
– WaitSets

– Conditions

• interfaces, implemented by the developer, which provide the Chatroom’s business logic

The DDS-specific parts of the applications are generated by Vortex OpenSplice Modeler and do not need to be implemented by the developer.

# 9.2 Creating the Chatroom

The pathnames shown here use Unix forward slash ( / ) delimiters: Windows users should replace theforward slashes ( / ) in the pathnames with back slashes ( \ ) as well as adding the drive letter (for example, c:\).

Here is an outline of the steps to follow to create the Chatroom in the Modeler:

Step 1

Create a Project to contain the Chatroom application and information models.

Step 2

Import an IDL specification which defines the structure and Topic types (the Information Model) into the Tutorial project.

Step 3

Create a Chat module to hold the Chatroom components.

Step 4

Create the ChatMessage\_topic, NamedMessage\_topic and the NameService\_topic (part of the Information Model) that the Chatroom requires.

Step 5

Set QoS policy values for the DDS entities.

Step 6

Create a partition which application’s subscribers and publishers will be associated with.

Step 7

Use the Diagram Editor to model the Chatroom’s applications.

Step 8

Generate the DDS-related source code from the application and information models.

Step 9

Implement the Chatter, MessageBoard and UserLoad applications’ business logic.

Step 10

Compile the code.

Step 11

Run and test the application.

These steps are described in detail below.

# 9.2.1 Step 1: Create a Project

Create a Project which will contain the information model and the applications (Chatter, MessageBoard and UserLoad) that will be modeled for the Chatroom.

# 9.2. Creating the Chatroom

1. If the Vortex OpenSplice Design Perspective is not open, then open it by clicking on the Window menu icon (located in the upper right-hand corner of the Workbench, above the Outline Section), then choosing Other > Open Perspective > Vortex OpenSplice Design.
2. Create a new project by choosing File $> N e w >$ Vortex OpenSplice Project from the Menu Bar.
3. Enter the name Tutorial into the Project Name text box: this will be the project’s name.

If you clear the Use Default Location check box, then you can save to your project to any directory by entering its location into the Location text box.

4. Click the Finish button to create the Tutorial project. The Tutorial project should now appear in the Project Explorer window (located on the left-hand side of the Eclipse Workbench).

Clicking the tree expansion icon will reveal the project’s model and default module components.

![The image shows a white lowercase letter 'i' centered within a teal square.](.vortex-opensplice-modeling-guide/e8a7be334bc48a7d6d3588bb208cc5ac05d618fd1030dee9c9756e8c08f3d16a.jpg)

Eclipse only auto-saves the project when the project is created. Eclipse does not auto-save any subsequent changes to a project. Remember to save any changes or additions to your project using File > Save from the menu or the $[ C t r l ] { + } [ S ]$ short-cut key combination.

New Project in Vortex OpenSplice Design Perspective
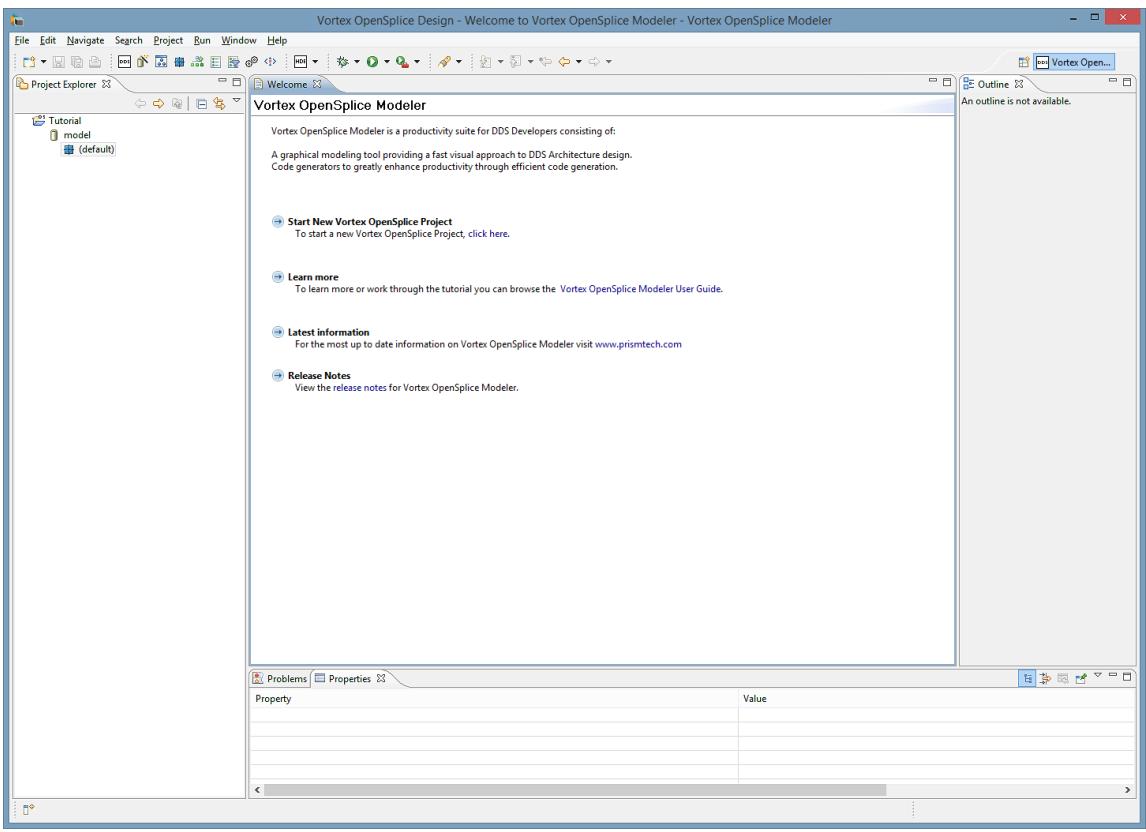
![Vortex OpenSplice Design - Welcome to Vortex OpenSplice Modeler - Vortex OpenSplice Modeler\nProject Explorer\nTutorial\nmodel\n(default)\nVortex OpenSplice Modeler\nVortex OpenSplice Modeler is a productivity suite for DDS Developers consisting of:\nA graphical modeling tool providing a fast visual approach to DDS Architecture design.\nCode generators to greatly enhance productivity through efficient code generation.\nStart New Vortex OpenSplice Project\nTo start a new Vortex OpenSplice Project, click here.\nLearn more\nTo learn more or work through the tutorial you can browse the Vortex OpenSplice Modeler User Guide.\nLatest information\nFor the most up to date information on Vortex OpenSplice Modeler visit www.prismtech.com\nRelease Notes\nView the release notes for Vortex OpenSplice Modeler.\nProblems Properties\nProperty	Value](.vortex-opensplice-modeling-guide/8845fef53cc2844a415c4304a38e9975c2cb90c72f9c7ca90eeaebb885221bd8.jpg)

# 9.2.2 Step 2: Provide an Information Model

Import an Interface Definition Language (IDL) specification which defines the data types and Topic types for the messages and other data the Chatroom needs (the Information Model).

![The image displays a teal square icon with rounded corners. Inside the square is a white lowercase letter 'i' with a dot above it, resembling an information symbol.](.vortex-opensplice-modeling-guide/f45431219754a15675c756904294ba68436b980296f5ccd226b1983da38d8016.jpg)

Vortex OpenSplice distributes data using structured data types. The data types are transported using Topics. The OMG’s Interface Definition Language (IDL), which is platform- and implementation language-independent, is used by Vortex OpenSplice Modeler to define the data types. The IDL definitions imported into the project provide the data type definitions which constitute the project’s information model.

To import the IDL definitions for the Tutorial project:

# 9.2. Creating the Chatroom

1. Choose File > Import > Vortex OpenSplice > Vortex OpenSplice IDL Import Wizard, then click the Next button.
2. In the Vortex OpenSplice IDL Import Wizard:

a) Enter Tutorial into the Destination Folder entry box by using the Browse button (located adjacent to the box) to navigate to the Tutorial folder.

b) Enter &lt;ospl&gt;/examples/dcps/tutorial/idl/chat.idl into the IDL Source text box (or use the adjacent Browse button to navigate to the file), where:

&lt;ospl&gt; is your Vortex OpenSplice installation’s home directory

&lt;lang&gt; is the target language (Java or C++)

Windows users should replace the forward slashes ( / ) in the pathname with back slashes ( \ ).

c) Click Finish when done.

A new model, called Chat, should appear (provided Eclipse is set to automatically build projects: this is the default behaviour). The Chat model will contain the Chat module and its data types (ChatMessage, NamedMessage and NameService).

![This is a triangular warning sign featuring a red border and a white background. In the center is a black exclamation mark.](.vortex-opensplice-modeling-guide/1987c6dc07093b25d33e2005afc3246f9d26ceeb4106dcc89f8095131ff6cdff.jpg)

The Chatroom’s NameService data type should not be confused with the OMG’s CORBA Naming Service of the same name; they are not related in any way.

ChatMessage - Contains the message to be published, a message index and the ID of the user publishing the message.

NamedMessage - Contains the user name, user ID, message and message index, information that the Message-Board application requires.

NameService - Contains the details of a single user, their userID and name.

The IDL definitions for these data types are shown in the following code extract.

```c
/******************************************************************************************
*
* Copyright (c) 2006 to 2017
* ADLINK Technology Limited
* All rights Reserved.
*
* LOGICAL_NAME: Chat.idl
* FUNCTION: Vortex OpenSplice Tutorial example code.
* MODULE: Tutorial for the Java programming language.
* DATE june 2006.
******************************************************************************************
*
* This file contains the data definitions for the tutorial examples.
*
***/
module Chat {

    const long MAX_NAME = 32;
    typedef string&lt;MAX_NAME&gt; nameType;

    struct ChatMessage {
    long userID; // owner of message
    long index; // message number
    string content; // message body
    };

    #pragma keylist ChatMessage userID

    struct NameService {
```

```txt
long userID; // unique user identification
nameType name; // name of the user
};
#pragma keylist NameService userID

struct NamedMessage {
    long userID; // unique user identification
    nameType userName; // user name
    long index; // message number
    string content; // message body
};
#pragma keylist NamedMessage userID
};
```

# 9.2.3 Step 3: Create a Chat module

Create a Chat module for containing the Chatroom components.

1. Expand the model called model in the Project Explorer to show the default module. Right-click on the default module to display the context menu. Choose the New Module option from the context menu.
2. In the New Module wizard:

a) Enter Chat into the Name field.

b) Click Finish when done.

The Chat module should now appear as a child node of the default module.

# 9.2.4 Step 4: Create the Topics

Create the ChatMessage\_topic, NamedMessage\_topic and NameService\_topic (part of the Information Model) that the Chatroom requires.

To create the ChatMessage\_topic:

1. Expand the model called model in the Project Explorer to display the Chat module. Right-click the Chat module to display the context menu. Choose the New Topic option from the context menu.
2. In the New Topic wizard:

a) Enter ChatMessage\_topic into the Name field.
b) Click the Browse button adjacent to the Data Type text box; this opens the Data Type Selection dialog. Navigate to the ChatMessage struct in the Chat module within the Chat model, then select the Chat struct, then click the OK button to confirm.
c) Click Finish when done.

The ChatMessage\_topic should now appear as a child of the module under the default model.

Repeat these steps for the NamedMessage\_topic and NameService\_topic, but selecting the NamedMessage struct or the NameService struct, respectively, in the Data Type Selection dialog.

The Tutorial project should now contain the Chat Model, Chat Module, structs and topics as shown in the illustration below.

# Tutorial’s Data Types and Associated Topics
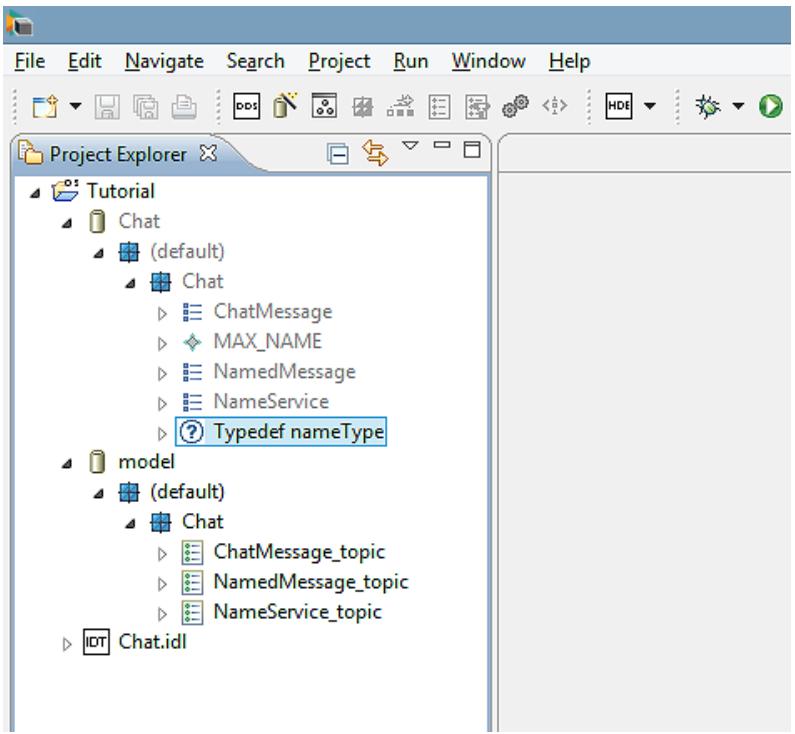
![File Edit Navigate Search Project Run Window Help\nProject Explorer\nTutorial\nChat\n(default)\nChat\nChatMessage\nMAX_NAME\nNamedMessage\nNameService\n? Typedef nameType\nmodel\n(default)\nChat\nChatMessage_topic\nNamedMessage_topic\nNameService_topic\nIDT Chat.idl](.vortex-opensplice-modeling-guide/eefffab0969ffa158a8512c1c17c7a949b2a7c99467d848428dca9125cf2e8a8.jpg)

# 9.2.5 Step 5: Set the QoS policy values

Each DDS entity instance is automatically assigned a set of QoS policies, appropriately named the QoS Set. A QoS Set contains only the policies which are appropriate for the particular entity instance’s type. A QoS Set’s policy values are given pre-defined default values. These values can be changed using the QoS Set Editor.

A QoS policy consists of one or more properties, each property has a value. Strictly speaking, the value should be referred to as a policy’s property value. However, for brevity, the term policy value is used here to mean the policy’s property value.

The Topics associated with the NameService and ChatMessage information models will be used to demonstrate how to set QoS policy values. The policies and their property values are:

Policy Values for the Chatroom Topics

<table><tr><td>Topic Name</td><td>Policy</td><td>Property: Value</td></tr><tr><td>ChatMessage_topic</td><td>RELIABILITY</td><td>Kind: RELIABLE</td></tr><tr><td rowspan="2">NameService_topic</td><td>DURABILITY</td><td>Kind: TRANSIENT</td></tr><tr><td>RELIABILITY</td><td>Kind: RELIABLE</td></tr><tr><td>NamedMessage_topic</td><td>RELIABILITY</td><td>Kind: RELIABLE</td></tr></table>

Note that NamedMessage\_topic must have its QoS values set identically to ChatMessage\_topic.

The Reliability policy’s Kind property will be changed to RELIABLE. To change this policy value:

1. Select ChatMessage\_topic in the Project Explorer, then expand it to display its QoS Set component (displayed with the QoS icon ).
2. Select the QoS Set component.
3. Open the Vortex OpenSplice QoS Editor.

a) Double-click the QoS Set component

OR

b) Right-click the QoS Set component, then choose Splice QoS Set Editor from the pop-up menu.

The QoS Editor is shown below.

# 9.2. Creating the Chatroom

QoS Editor’s Overview page
![Vortex OpenSplice Design - :Chat::ChatMessage_topic::QoS - Vortex OpenSplice Modeler\nFile Edit Navigate Search Project Run Window Help\n*Project Explorer\n*QoS\nTutorial\nChat\n(default)\nChat\nChatMessage\nMAX_NAME\nNamedMessage\nNameService\nTypedDef nameType\nmodel\n(default)\nChat\nChatMessage_topic\nChatMessage\n@QoS\nNamedMessage_topic\nNameService_topic\nchat.idl\nGeneral Information\nGeneral information about this QoS set.\nName: QoS\nPath: :Chat::ChatMessage_topic::QoS\nParent: ChatMessage_topic\nImports\nAn ordered list of QoS sets which are imported into this QoS set.\nDefaultTopicQoSSet ()\nResultant QoS Set\nThe QoS Policies provided by this QoS Set.\nDeadline :DefaultTopicQoSSet\nDestination Order :DefaultTopicQoSSet\nDurability :DefaultTopicQoSSet\nDurability Service :DefaultTopicQoSSet\nHistory :DefaultTopicQoSSet\nLatency Budget :DefaultTopicQoSSet\nLifespan :DefaultTopicQoSSet\nLiveliness :DefaultTopicQoSSet\nOwnership :DefaultTopicQoSSet\nReliability :DefaultTopicQoSSet\nResource Limits :DefaultTopicQoSSet\nTopic Data :DefaultTopicQoSSet\nTransport Priority :DefaultTopicQoSSet\nShow Default Policies\nOverview Values Imports\nProblems Properties](.vortex-opensplice-modeling-guide/d2782c3d94fa90500454bd8bf6b1c76a3984021c7e6c9a5beb9f7f80d6a8ca45.jpg)

The QoS Editor consists of three pages, Overview, Values and Imports, which are accessed by using the tabs located along the bottom of the editor’s window.

4. Choose the Values tab to display the Edit QoS Policy Values page. The screen contains:

• QoS Policies list - users can alter the property values of the policies which appear in this list
• Resultant QoS Set - lists all QoS policies for the entity which this QoS Set is assigned to

The Show Default Values check box, located below the Resultant QoS Set, enables policies and their default values to be shown in the list when the check box is set.

5. Click the Add button adjacent to the list; this displays the New QoS Policy dialog.

Select Reliability from the drop-down list; this will add the policy to the QoS Policies list.

The dialog’s drop-down list contains only the policies which are appropriate for the entity. For example, this QoS Set is assigned to a Topic entity, therefore only the policies which are appropriate for a Topic appear in the list.

The Reliability policy should appear in the QoS Policies as shown in the illustration below.

QoS Editor and Reliability Policy’s Property Value

![Vortex OpenSplice Design - ::Chat::ChatMessage_topic::QoS - Vortex OpenSplice Modeler\nFile Edit Navigate Search Project Run Window Help\n*Project Explorer\nTutorial\nChat\n(default)\nChat\nChatMessage\nMAX_NAME\nNamedMessage\nNameService\nTypedef nameType\nmodel\n(default)\nChat\nChatMessage_topic\nChatMessage\nQoS\nImports\nDeadline\nDestination Order\nDurability\nDurability Service\nHistory\nLatency Budget\nLifespan\nLiveliness\nOwnership\nReliability\nResource Limits\nTopic Data\nTransport Priority\nNamedMessage_topic\nNameService_topic\nChat.idl\nEdit QoS Policy Values\nQoS Policies\nThe QoS Policies specified in this QoS Set.\nReliability\nAdd...\nRemove\nResultant QoS Set\nThe QoS Policies provided by this QoS Set.\nDeadline (::DefaultTopicQoSSet)\nDestination Order (::DefaultTopicQoSSet)\nDurability (::DefaultTopicQoSSet)\nDurability Service (::DefaultTopicQoSSet)\nHistory (::DefaultTopicQoSSet)\nLatency Budget (::DefaultTopicQoSSet)\nLifespan (::DefaultTopicQoSSet)\nLiveliness (::DefaultTopicQoSSet)\nOwnership (::DefaultTopicQoSSet)\nReliability\nResource Limits (::DefaultTopicQoSSet)\nTopic Data (::DefaultTopicQoSSet)\nTransport Priority (::DefaultTopicQoSSet)\nReliability Value\nEdit the value of the selected QoS Policy.\nKind: RELIABLE\nMax Blocking Time: 10000000 ns\nOverview Values Imports](.vortex-opensplice-modeling-guide/95048b3fdffb58b9e69819387cb53ae37aa848442afc80b5c3c26ffc59ec741f.jpg)

6. Select Reliability from the QoS Policies list; a Reliability Values screen will be displayed in the lower lefthand corner of the page. The Reliability Details screen enables the property values for the selected QoS policy to be changed.

Set the Kind value to RELIABLE. The Resultant QoS Set will be updated automatically to show the new QoS policy value (see QoS Editor and Reliability Policy’s Property Value).

Clear the Show Default Values check box to hide or show the policy values which are inherited from Default QoS Set’s. The value will always be shown if the policy value has been added to a non-default imported set or the current set.

7. Save the changes (using File > Save or [Ctrl]+[S]). Close the QoS Editor by clicking on the X in the QoS tab located at the top of the editor.

Repeat the above steps to set the NamedMessage\_topic‘s Reliability and Durability policies, plus the NameService\_topic‘s Reliability policy as shown in the table Policy Values for the Chatroom Topics.

# 9.2.6 Step 6: Create the ChatRoom Partition

The ChatRoom partition is used to ensure that only topics published to that partition are received by the system’s subscribers; all other topics are ignored. This allows other applications to publish and subscribe to the same topics without interfering with the ChatRoom applications.

Right-click the Chat module and choose New Partition. Change both the Name and Partition name fields to read ChatRoom.

Click Finish and the ChatRoom partition will be added to the Chat module.

# 9.2.7 Step 7: Create the Application Models

Add required entities using the Project Explorer and Diagram Editor, then model the Chatroom’s ChatterApplication, MessageBoardApplication and UserLoadApplication applications. All applications should be created within the Model called model.

# 9.2. Creating the Chatroom

The steps given below generally use the Project Explorer to add entities, although entities can also be added using the Diagram editor.

1. A Vortex OpenSplice Modeler Application component represents an executable application.

To add an Application component that represents the Chatroom’s ChatterApplication application:

a) Right-click on the Chat module in the Project Explorer, then choose New Application from the pop-up dialog; this will display the New Splice Application dialog.
b) Enter ChatterApplication into the Name text box.
c) Click the Finish button. The new ChatterApplication Application component should appear in the Project Explorer under the Chat module.
d) Save the changes.

2. DomainParticpants provide connections to information. To add a DomainParticpant to the ChatterApplication:

a) Right-click on the ChatterApplication in the Project Explorer, then choose New Domain Participant from the pop-up dialog; this will display the New Domain Participant dialog.
b) Enter Participant in the Name text box; this will be the DomainParticipant’s name.
c) Click the Finish button. The new Participant component should appear in the Project Explorer under the ChatterApplication application.
d) Save the changes (as before, use File > Save or [Ctrl]+[S]).

3. Diagram components are used to model the applications. To add a diagram component to the project:

a) Choose File > New > Diagram from the Eclipse menu; this opens the New Splice Diagram dialog.
b) Click the Browse button adjacent to the Module text box; this opens the Select Module dialog. Navigate to and select the Chat module, then click the OK button.
c) Enter ChatDiagram into the Name text box; this will be the diagram’s name.
d) Click the Finish button. The new ChatDiagram component should appear in the Project Explorer under the Chat module.

4. Add the remaining entities using the Diagram Editor and ChatDiagram.

a) Double-click on the ChatDiagram component OR right-click it and choose Edit Diagram in the pop-up dialog; this opens ChatDiagram in the Diagram Editor.

The Diagram Editor’s tool palette appears on the left-hand side of the editor. This palette can be used to add the entities to the project.

Entities which have been added to the project, but do not appear in the diagram can be placed in the diagram by locating the entity in the Project Explorer, then dragging the entity into the Diagram Editor’s canvas area (the large area located to the right side of the palette, in central area of the Eclipse Workbench).

b) Locate the ChatterApplication component in the Project Explorer, then drag 3 it to the Diagram Editor’s canvas; a rectangular box should appear with ChatterApplication name displayed in the top section of the box. The Application box symbol is used as a container for other entities.

Symbols and containers can be moved or resized by selecting the container then, respectively, clicking and dragging inside the container or clicking a control point (the small, solid boxes located along the container’s perimeter and corners) then dragging it until the desired size is achieved, then releasing the mouse button.

The view of the Diagram’s canvas can be zoomed in or out using View > Zoom In or Zoom Out, OR by using the [Ctrl]+[=] or [Ctrl]+[-] shortcut key combinations.

Move the ChatterApplication container to the upper left-hand corner of the diagram canvas; this is to provide space in the canvas to add other entities.

Save the project.

c) Choose the Publisher tool from the Diagram Editor’s tool palette. Drag the Publisher tool to the Participant container; a new Publisher symbol, called Publisher1, should appear inside Participant. Rename Publisher1 to Publisher by right-clicking on the Publisher1 symbol, choosing Rename on the pop-up dialog which opens, then changing the name in the Rename Vortex OpenSplice Object dialog.
d) A DataWriter must be added to Publisher. Choose the DataWriter tool, then drag it to Publisher; new DataWriter symbols should appear in Publisher.
e) Save the project.

The ChatDiagram should now appear as shown below.

Initial ChatDiagram and Chatter
![ChatDiagram\nSelect\nMarquee\nConnection Tool\nDDS Elements\nApplication\nPartition\nParticipant\nTopic\nContent Filtered Topic\nDataWriter\nDataReader\nPublisher\nSubscriber\nListener\nWaitSet\nStatusCondition\nGuardCondition\nReadCondition\nQueryCondition\nChatterApplication\nParticipant\nPublisher](.vortex-opensplice-modeling-guide/d9c2a1fcaf549ffeace422d46102ec69df1fa9ccacad89740b101ca5dee5956b.jpg)

5. The Chatroom’s Topics, ChatMessage\_topic and NameService\_topic, need to be associated with Publisher. Topics communicate with Publishers and Subscribers through DataWriters and DataReaders, respectively.

a) Drag the ChatMessage\_topic and NameService\_topic from the Project Explorer to a free area of the ChatDiagram canvas.
b) Choose the Connection Tool located in the Diagram Editor’s tool palette.
c) Click on the ChatMessage\_topic symbol, drag the cursor to the DataWriter symbol in Publisher, then release the mouse button; a connection line, with an arrow pointing to the ChatMessage\_topic, will be created. Rename the DataWriter to ChatMessageDataWriter (right-click on the DataWriter symbol, choose Rename in the pop-up dialog, then change the name in the Rename Vortex OpenSplice Object dialog).
d) Click on the NameService\_topic symbol, drag the cursor to Publisher - not to the DataWriter symbol - then release the mouse button; a new DataWriter will be created in Publisher and a line will connect it with the NameService\_topic. Rename the new DataWriter as NameServiceDataWriter.

DataWriters and DataReaders are created automatically when dragging the Topic Connection Tool cursor from Topic to Publisher or Subscriber symbols.

e) Add the ChatRoom Partition using the Partition tool, then connect it to Publisher using the Partition Connection Tool.
f) Save the project. The ChatDiagram should appear as shown below.

# ChatterApplication with Connected Topics

![ChatDiagram\nSelect\nMarquee\nConnection Tool\nDDS Elements\nApplication\nPartition\nParticipant\nTopic\nContent Filtered\nTopic\nDataWriter\nDataReader\nPublisher\nSubscriber\nListener\nWaitSet\nStatusCondition\nGuardCondition\nReadCondition\nQueryCondition\nChatterApplication\nParticipant\nPublisher\nChatMessage_topic\nNameService_topic](.vortex-opensplice-modeling-guide/4ed301b22528e965da22d98c54257cbfd08b37c5fc3128a48219b2452e1f43af.jpg)

6. The Application models for the MessageBoardApplication and UserLoadApplication programs need to be added to the project, along with their related entities and connections. The instructions given in the previous steps and sub-steps can be used as a guide to adding the entities and connections.

a) For the MessageBoardApplication, add an Application component called MessageBoardApplication to the Chat module and DomainParticipants called Participant and PrivateParticipant to the MessageBoard-Application Application.

PrivateParticipant is used to simulate a multi-topic 4 . The PrivateParticipant subscribes to ChatMessage\_topic and NameService\_topic, as well as re-publishing them as a NamedMessage.

The view of the Diagram’s canvas can be zoomed out to provide more visible space using View > Zoom Out or by using the [Ctrl]+[-] shortcut key combination. Also, when the diagram is larger than the visible part of the canvas, the visible part can be moved by selecting the Outline view, then dragging the light-blue transparent rectangle (which represents the visible part of the canvas) until the required part of the diagram is visible.

Drag MessageBoardApplication into the ChatDiagram.

The message board application ignores messages from its own user. In order to perform message filtering, a Content Filtered Topic will be used to filter out messages with a particular userID.

A Content Filtered Topic is added to a diagram by choosing the Content Filtered Topic Tool from the Tool palette, then dragging and dropping it onto the diagram. A wizard dialog will then open. Enter NamedMessageFilteredTopic as the name. Select ::Chat as the module. Choose the related topic by clicking the Browse button beside the Topic field. Set the related topic to NamedMessage\_topic in the ::Chat module. Finally, enter userID <> %0 as the Filter Expression.

Drag the NamedMessage\_topic, ChatMessage\_topic and NameService\_topic into the ChatDiagram from the Project Explorer.

Add a Subscriber instance to the Participant, rename it to Subscriber (right-click on its symbol, choose Rename and change the name in the Rename Vortex OpenSplice Object dialog), then create a connection from the NamedMessage\_topic to the Participant’s Subscriber instance (the connection will be linked through a DataReader). Rename this DataReader to NamedMessageDataReader.

Connect the Subscriber entity to the ChatRoom Partition.

Add a Subscriber to the PrivateParticipant and rename it as Subscriber. Connect this Subscriber to the NameService\_topic, renaming the created DataReader to NameServiceDataReader. Connect the Subscriber to the ChatMessage\_topic, again renaming the created DataReader to ChatMessageDataReader.

Next, add a Publisher named Publisher to the PrivateParticipant. Connect this Publisher to the NamedMessage\_topic, renaming the created DataWriter to NamedMessageDataWriter.

Next, connect both the Subscriber and the Publisher to the ChatRoom partition using the Partition Connection Tool.

Listeners need to be added to the MessageBoardApplication application in order to listen for new messages. Add a listener by choosing the Listener Tool from the Diagram Editor’s Tool palette. Drop a listener into the MessageBoardApplication application. Rename the listener as NamedMessageDataReaderListener. Connect the listener to the NamedMessageDataReader located inside the Participant’s Subscriber symbol by using the Listener Connection Tool.

Add a second listener. Rename this listener as ChatMessageDataReaderListener. Connect this listener to the ChatMessageDataReader located in the PrivateParticipant’s Subscriber.

The status mask must now be set on both listeners.

Select each listener in turn. In the Properties View, expand the Status Mask section, then set the DATA\_AVAILABLE status to True using the drop-down list.

b) For the UserLoadApplication, add an Application called UserLoadApplication to the Chat module and a DomainParticipant called Participant to the UserLoadApplication.

Drag UserLoadApplication into the ChatDiagram.

Add a Subscriber instance, to be named Subscriber, to the Participant, create connections from the ChatMessage\_topic and NameService\_topic to the Participant’s Subscriber instance (the connection will be linked through DataReaders). Rename the DataReaders to be ChatMessageDataReader and Name-ServiceDataReader, respectively. Edit the QoS Set associated with the ChatMessageDataReader. Add a History policy to the set, changing the kind to KEEP\_ALL.

In the ChatDiagram, drag a WaitSet and place it into the UserLoadApplication application.

Right-click the WaitSet figure and rename it to UserLoadWaitSet.

Drag a GuardCondition into the application. Rename it to GuardCondition.

Choose the Connection Tool and connect the GuardCondition to the UserLoadWaitSet.

Drag a StatusCondition object into the application. Rename the StatusCondition object to StatusCondition and connect it to the UserLoadWaitSet.

Choose the Connection Tool again and connect the ChatMessageDataReader to the newly-created Status-Condition object.

Drag a ReadCondition object into the application. Rename the ReadCondition object to ReadCondition and connect it to the UserLoadWaitSet and the NameServiceDataReader.

Drag a QueryCondition into the application. Rename it to QueryCondition and connect it to the UserLoad-WaitSet as well as to the ChatMessageDataReader.

Open the QueryCondition’s Properties dialog to set the filter expressions. Click on the arrow next to Query Expression to display the properties for the expression. Nexrt, click on the Sub Query Expression; this displays a button. Click the button and enter "userID=%0" in the Expression text box. Click the OK button to finish.

Set the state masks for the Query and ReadCondition as well as the status mask for the StatusCondition as shown in the table below.

# Condition States

<table><tr><td>Mask</td><td>Name</td><td>Value</td></tr><tr><td colspan="3">StatusCondition</td></tr><tr><td>Status Mask</td><td>LIVELINESS_CHANGED_STATE</td><td>True</td></tr><tr><td colspan="3">QueryCondition</td></tr><tr><td>Instance State Mask</td><td>ANY_INSTANCE_STATE</td><td>True</td></tr><tr><td>Sample State Mask</td><td>ANY_SAMPLE_STATE</td><td>True</td></tr><tr><td>View State Mask</td><td>ANY_VIEW_STATE</td><td>True</td></tr><tr><td colspan="3">ReadCondition</td></tr><tr><td>Instance State Mask</td><td>ALIVE_INSTANCE_STATE</td><td>True</td></tr><tr><td>Sample State Mask</td><td>NOT_READ_SAMPLE_STATE</td><td>True</td></tr><tr><td>View State Mask</td><td>NEW_VIEW_STATE</td><td>True</td></tr></table>

Finally, connect the Subscriber to the ChatRoom Partition and save the project.

The ChatDiagram and the Chatroom Application model are now complete. The entities and connections should appear in the ChatDiagram as shown in the following illustration.

Chatroom Application Model
![**Labeled Blocks:**\n\n*   **UserLoadApplication** (containing `Participant` with `Subscriber` and `UserLoadWaitSet`)\n*   **ChatterApplication** (containing `Participant` with `Publisher`)\n*   **MessageBoardApplication** (containing `PrivateParticipant` with `Publisher` and `Subscriber`, `ChatMessageDataReaderListener`, `NamedMessageDataReaderListener`, and a separate `Participant` with `Subscriber`)\n*   **ChatRoom ChatRoom**\n*   **ChatMessage_topic**\n*   **NameService_topic**\n*   **NamedMessageFilteredTopic**\n*   **NamedMessage_topic**\n\n**Connections:**\n\n*   **ChatRoom ChatRoom** connects via dotted lines to `UserLoadApplication` -) `Participant`, `ChatterApplication` -) `Participant`, `MessageBoardApplication` -) `PrivateParticipant`, and `MessageBoardApplication` -) `Participant`.\n*   **ChatMessage_topic** connects to `UserLoadApplication`, `ChatterApplication` -) `Publisher`, and `MessageBoardApplication` -) `PrivateParticipant` -) `Subscriber`.\n*   **NameService_topic** connects to `UserLoadApplication`, `ChatterApplication` -) `Publisher`, and `MessageBoardApplication` -) `PrivateParticipant` -) `Subscriber`.\n*   **NamedMessage_topic** connects to `MessageBoardApplication` -) `PrivateParticipant` -) `Publisher`, `MessageBoardApplication` -) `Participant` -) `Subscriber`, `MessageBoardApplication` -) `PrivateParticipant` -) `Subscriber`, and `NamedMessageFilteredTopic`.\n*   **MessageBoardApplication** -) `PrivateParticipant` -) `Publisher` connects to `ChatMessage_topic` and `NamedMessage_topic`.](.vortex-opensplice-modeling-guide/06c80020b2aa8281799498beb9d7e89af8e8892a1ae0986f2a50a49151882970.jpg)

# 9.2.8 Step 8: Generate the source code

Generate the DDS-related source code from the application and information models.

![A standard warning sign featuring a red triangle with a white background and a black exclamation point in the center.](.vortex-opensplice-modeling-guide/1300e6a081a0d35c5313a8134bbba8baf15a4974c78ea3e769a322746618243a.jpg)

Vortex OpenSplice must be installed and configured on the system in order to generate the source code.

# 9.2. Creating the Chatroom

The source code for the applications can be generated by right-clicking on the Chat module within the Chat model in the Tutorial project, then choosing Export Module from the context menu. The Export Wizard dialog should be displayed. Perform the following:

1. The Project Name text box contains the name of the exported project. Enter a project name in the text box.
2. Choose the desired target language from the Target Language drop-down menu.
3. Click the Finish button to accept the options and generate the source code.

Three additional projects should be generated. The default values for the project name in the Export Wizard are: ChatterApplication, UserLoadApplication and MessageBoardApplication. Each project will contain two source folders, src and generated. The src folders are for user-written code and the generated folders contain the code generated by the Modeler.

In addition, a required jar file from Vortex OpenSplice, which contains the DDS Java libraries, are automatically added to each project’s build path. The added jar file is and dcpssaj.jar.

# 9.2.9 Step 9: Implement the applications’ business logic

Implement the Chatter, Message Board and User Load applications’ business logic.

The generated code simplifies development work through the creation of entities and by establishing the correct QoS values.

# Java Implementation

# Java

The only Java files that users need to reference from their manually written code are located in the Chat package within a source folder called generated. The simplest way to access these generated files is to declare the import Chat.\* in their Java code:

```typescript
import Chat.*;
```

Each application is represented by a single class. These are:

• ChatterApplication
• UserLoadApplication
• MessageBoardApplication

The application and its contained entities are set up by statically calling the start() method on the application classes. For example:

```javascript
ChatterApplication.start();
```

Contained entities can then be retrieved from the application using get\*() methods. For example, the following call would be made to retrieve the ChatMessageDataWriter from the Chatter application:

```txt
ChatMessageDataWriter talker =
    ChatterApplication.Participant.Publisher.
    ChatMessageDataWriter.getDataWriter();
```

Users should develop their application code in a chatroom module located in the relevant project’s src folder. It is suggested, for this tutorial example, using Chatter.java, MessageBoard.java, UserLoad.java, ChatMessageDataReaderListenerImpl.java and NamedMessageDataReaderListenerImple.java as the program names.

The code for these programs, as well as a ErrorHandler.java utility class, is located in the Chatroom example project and in Appendix A: Chatroom Example Java Source Code.

# 9.2. Creating the Chatroom

# C++ Implementation

# C++

The only C++ files that users need to reference from their manually written code are located in the Chat namespace within the source folder called generated.

For all entities in the model, only the generated abstract base classes (\*Wrapper.h) should be included in the business logic. The only exception is the application wrapper implementation header which needs to be included when the application wrapper must be instantiated. These implementation headers are:

```c
#include "Chat/ChatterApplicationWrapperImplementation.h"
#include "Chat/ChatterApplication/MyAppDPWrapper.h"
#include "Chat/ChatterApplication/MyAppDP/MyPublisherWrapper.h"
```

Each application is represented by a single class. These are:

• ChatterApplication
• UserLoadApplication
• MessageBoardApplication

The application and its contained entities are instantiated by calling the start() method on an application instance. For example:

```cpp
Chat::ChatterApplicationWrapper* chatApp = new
Chat::ChatterApplicationWrapperImplementation;
chatApp->start();
```

Contained entities can then be retrieved from the application using get&lt;entity\_name&gt;Wrapper() methods. For example, the following call would be made to retrieve the publisher from the ChatterApplication:

```cpp
DDS:Publisher* publisher =
chatApp->getParticipantWrapper()->getPublisherWrapper()->getPublisher();
```

Users should develop their application code in a chatroom module located in the relevant project’s src folder. It is suggested, for this tutorial example, using Chatter.cpp, MessageBoard.cpp, UserLoad.cpp, ChatMessageDataReaderListenerImpl.cpp and NamedMessageDataReaderListenerImple.cpp as the program names.

The code for these programs is located in the Chatroom C++ example project in Appendix B: Chatroom Example C++ Source Code.

# 9.2.10 Step 10: Compile the code

Vortex OpenSplice Modeler is configured to automatically compile and build the code in a user’s workspace: users do not need to do anything to compile their code, plus real-time feedback about errors is automatically provided.

It is suggested the default Eclipse setting for automatic building is retained (in other words, enabled).

However, the automatic building can be disabled, if desired, by clicking the Project menu and then de-selecting the Build Automatically option.

When automatic building is disabled the Project can then be built by choosing Clean. . . from the Project menu. Projects are rebuilt after they are cleaned. A dialog is shown for cleaning all projects or selected projects.

# 9.2.11 Step 11: Run and test the Chatroom application

The Vortex OpenSplice daemon must be started before running Vortex OpenSplice applications in Eclipse. The daemon can be started, as well as stopped, using the HDE icon’s drop-down menu located on the Eclipse Icon Bar.

![The image displays a teal square icon with a thin white border. Inside the square is a white, lowercase letter 'i' in a serif typeface.](.vortex-opensplice-modeling-guide/d313af0b54fcc44836fbbc0823c6f2f572a568970b4071cb0a1d7dead2441f0f.jpg)

Starting an Vortex OpenSplice daemon is only required when running a Shared Memory Deployment. For more details about starting OpenSplice, please see the OpenSplice Deployment Guide.

The HDE icon drop-down menu contains:

• Start OSPL - starts the daemon - note no feedback given
• Stop OSPL - stops the daemon - note no feedback given
• Run Tuner - launches the Vortex OpenSplice Tuner
• Run Configurator - launches the Vortex OpenSplice configurator

After the daemon is started each application can run by right-clicking on the Java or C++ class in the Project Explorer (for example Chatter.java or Chatter.cpp), choosing Run As > Vortex OpenSplice Java Application or Run As > Vortex OpenSplice Local C++ Application. The output of the application is displayed in the console.

It is suggested that, for this example, MessageBoard is run first, followed by UserLoad and finally Chatter in order for the applications to correctly interact.

Each application is run in its own console. The Console View, located at the bottom of the Eclipse screen, has a button for selecting the active console.

The daemon should be shut down when finished running the applications by using the tool bar button and dropdown menu.

# Application Output

The output of each application should be as shown below:

Chatter
```textproto
Writing message: "Hi there, I will send you 10 more messages."
Writing message: "Message no. 1"
Writing message: "Message no. 2"
Writing message: "Message no. 3"
Writing message: "Message no. 4"
Writing message: "Message no. 5"
Writing message: "Message no. 6"
Writing message: "Message no. 7"
Writing message: "Message no. 8"
Writing message: "Message no. 9"
Writing message: "Message no. 10"
```

MessageBoard
```txt
MessageBoard has opened: send a ChatMessage with userID = -1 to close it....
Chatter1: Hi there, I will send you 10 more messages.
Chatter1: Message no. 1
Chatter1: Message no. 2
Chatter1: Message no. 3
Chatter1: Message no. 4
Chatter1: Message no. 5
Chatter1: Message no. 6
Chatter1: Message no. 7
Chatter1: Message no. 8
```

# 9.2. Creating the Chatroom

```txt
Chatter1: Message no. 9
Chatter1: Message no. 10
Termination message received: exiting...
```

# UserLoad

```txt
New User: Chatter1
Departed user Chatter1 had sent 11 messages.
UserLoad has terminated.
```

# 10

# Appendix A

# Java

This appendix contains the example, user-written Java source code included with the Vortex OpenSplice Modeler Chatroom example. The Chatroom system is the example used in the Tutorial.

The source code is given in the following order:

Chatter Application

MessageBoard Application

UserLoad Application

Error Handler

# 10.1 A Chatroom Example, Java Source Code

# 10.1.1 Chatter Application

```java
ChatterApplication.java

/******************************************************************************************
* Copyright (c) 2012 to 2017 ADLINK Technology Limited. All rights Reserved.
* LOGICAL_NAME: ChatterApplication.java
* FUNCTION: Vortex OpenSplice Modeler Tutorial example code.
* MODULE: Tutorial for the Java programming language.
* DATE: January 2012.
*******************************************************************************************
* This file contains the implementation for the 'Chatter' executable.
****************************************************************************************/

package Chat;

import Chat.ChatMessage;
import Chat.ChatMessageDataWriter;
import Chat.NameService;
import Chat.NameServiceDataWriter;
import Chat.ChatterApplicationWrapper;
import Chat.ChatterApplicationWrapper WrapperException;
import DDS.HANDLE_NIL;

public class ChatterApplication
{
    public static final int NUM_MSG = 10;

    public static final int TERMINATION_MESSAGE = -1;

    public static void main (String[] args)
```

```txt
try
{
    /* Initialize the application */
    ChatterApplicationWrapper.start();
}

catch (WrapperException e)
{
    System.out.println("Error while starting the application:");
    System.out.println(e.getReason());
    return;
}

/* Type-specific DDS entities */
ChatMessageDataWriter talker =
    ChatterApplicationWrapper.ParticipantWrapper.PublisherWrapper.
    ChatMessageDataWriterWrapper
    .getDataWriter();

NameServiceDataWriter nameServer =
    ChatterApplicationWrapper.ParticipantWrapper.PublisherWrapper.
    NameServiceDataWriterWrapper
    .getDataWriter();

/* DDS Identifiers */
long userHandle;
int status;

/* Sample definitions */
ChatMessage msg = new ChatMessage();
NameService ns = new NameService();

/* Others */
int ownID = 1;
String chatterName;

/* Options: Chatter [ownID [name]] */
if (args.length > 0)
{
    ownID = Integer.parseInt(args[0]);
}
if (args.length > 1)
{
    chatterName = args[1];
}
else
{
    chatterName = "Chatter" + ownID;
}

/* Initialize the NameServer attributes */
ns.userID = ownID;
ns.name = chatterName;

/*
* Write the user-information into the system
*(registering the instance implicitly)
*/
status = nameServer.write(ns, HANDLE_NIL.value);
ErrorHandler.checkStatus(status, "Chat.NameServiceDataWriter.write");

/* Initialize the chat messages */
```

```txt
msg.userId = ownID;
msg.index = 0;

if (ownID == TERMINATION_MESSAGE)
{
    msg.content = "Termination message.";
}
else
{
    msg.content = "Hi there, I will send you " + NUM_MSG + " more messages.";
}
System.out.println("Writing message: \"\" + msg.content + "\"");

/*
 * Register a chat message for this user (pre-allocating resources for
 * it!!)
 */
userHandle = talker.register_instance(msg);

/* Write a message using the pre-generated instance handle */
status = talker.write(msg,_userHandle);
ErrorHandler.checkStatus(status, "Chat.ChatMessageDataWriter.write");

/* Write any number of messages */
for (int i = 1; i &lt;= NUM_MSG && ownID != TERMINATION_MESSAGE; i++)
{
    try
    {
    Thread.sleep(1000); /* do not run so fast! */
    }
    catch (InterruptedException e)
    {
    e.printStackTrace();
    }
    msg.index = i;
    msg.content = "Message no. " + i;
    System.out.println("Writing message: \"\" + msg.content + "\"");
    status = talker.write(msg,_userHandle);
    ErrorHandler.checkStatus(status, "Chat.ChatMessageDataWriter.write");
}

/* Unregister the message instance for this user explicitly */
status = talker.dispose(msg,_userHandle);
ErrorHandler.checkStatus(status, "Chat.ChatMessageDataWriter.dispose");
status = talker registers_instance(msg,_userHandle);
ErrorHandler.checkStatus(status,
"Chat.ChatMessageDataWriter register_instance");

/* Leave the room */
status = nameServer unregister_instance(ns, HANDLE_NIL.value);
ErrorHandler.checkStatus(status, "Chat.NameServiceDataWriter.dispose");

try
{
    /* Stop the application */
    ChatterApplicationWrapper.stop();
}
catch (WrappingException e)
{
    System.out.println("Error while stopping the application:");
    System.out.println(e.getReason());
    return;
}
```

```txt
}
}
```

10.1.2 MessageBoard Application
```java
MessageBoardApplication.java

/******************************************************************************************
*
* Copyright (c) 2012 to 2017
* ADLINK Technology Limited
* All rights Reserved.
*
* LOGICAL_NAME:    MessageBoardApplication.java
* FUNCTION:    Vortex OpenSplice Modeler Tutorial example code.
* MODULE:    Tutorial for the Java programming language.
* DATE    January 2012.
******************************************************************************************
*
* This file contains the implementation for the 'MessageBoardApplication'
* executable.
*
***/

package Chat;

import Chat.NamedMessageFilteredTopicWrapper;
import Chat.MessageBoardApplicationWrapper;
import Chat.MessageBoardApplicationWrapper WrapperException;

public class MessageBoardApplication extends Thread
{
    public static void main (String[] args)
    {
    /* DDS Identifiers */
    String ownID = "0";

    /* Options: MessageBoard [ownID] */
    /* Messages having owner ownID will be ignored */
    if (args.length &gt; 0)
    {
    ownID = args[0];
    }

    /* Initialize the content filtered topics expression parameters */
    try
    {
    NamedMessageFilteredTopicWrapper.setExpressionParameters (new String[]
    {
    ownID
    });
    }
    catch (NamedMessageFilteredTopicWrapper WrapperException e)
    {
    System.out.println (
    "Exception occurred while setting the expression parameters:");
    System.out.println (e.getReason());
    return;
    }
}
```

```txt
/* Initialize the application */
try
{
    MessageBoxApplicationWrapper.start();
}
catch (WrapperException e)
{
    System.out.println("Exception occurred while starting
    the application:");
    System.out.println(e.getReason());
    return;
}

/* Create the listeners for the MessageBoard application */
ChatMessageDataReaderListenerImpl chatMessageDataReaderListener =
    new ChatMessageDataReaderListenerImpl();

NamedMessageDataReaderListenerImpl namedMessageDataReaderListener =
    new NamedMessageDataReaderListenerImpl();

/* Print a message that the MessageBoard has opened. */
System.out.println (
    "MessageBoard has opened: send ChatMessage with userID = -1 to close it.");
System.out.println();

try
{
    /* Attach the ChatMessageDataReaderListener to the
    ChatMessageDataReader */
    MessageBoxApplicationWrapper.PrivateParticipantWrapper
    .SubscriberWrapper.ChatMessageDataReaderWrapper.attach (
    chatMessageDataReaderListener);

    /*
    * Attach the NamedMessageDataReaderListener to the
    * NamedMessageDataReader
    */
    MessageBoxApplicationWrapper.ParticipantWrapper.SubscriberWrapper.
    NamedMessageDataReaderWrapper.attach (namedMessageDataReaderListener);

}
catch (WrapperException e)
{
    System.out.println("Exception occurred while attaching a listener:");
    System.out.println(e.getReason());
    try
    {
    MessageBoxApplicationWrapper.stop();
    }
    catch (WrapperException eStop)
    {
    System.out.println("Exception occurred while stopping application:");
    System.out.println(eStop.getReason());
    }
    return;
}

/* Wait for the ChatMessageDataReaderListener to finish */
while (!chatMessageDataReaderListener.isTerminated())
{
    /*
    * Sleep for some amount of time, as not to consume too much CPU
```

```txt
* cycles.
*/
try
{
    Thread.sleep (1000);
}
catch (InterruptedException e)
{
    e.printStackTrace();
}
/* Wait for the NamedMessageDataReaderListener to finish */
while (!namedMessageDataReaderListener.isTerminated())
{
    /*
    * Sleep for some amount of time, as not to consume too much CPU
    * cycles.
    */
    try
    {
    Thread.sleep (1000);
    }
    catch (InterruptedException e)
    {
    e.printStackTrace();
    }
}

/* Print a message that the MessageBoard has terminated */
System.out.println ("Termination message received: exiting...");
try
{
    /* Detach the ChatMessageDataReaderListener to ChatMessageDataReader */
    MessageBoardApplicationWrapper.PrivateParticipantWrapper
    .SubscriberWrapper.ChatMessageDataReaderWrapper.detach (
    chatMessageDataReaderListener);

    /*
    * Detach the NamedMessageDataReaderListener to the
    * NamedMessageDataReader
    */
    MessageBoardApplicationWrapper.ParticipantWrapper.SubscriberWrapper.
    NamedMessageDataReaderWrapper.detach (namedMessageDataReaderListener);
}
catch (WrapperException e)
{
    System.out.println ("Exception occurred while detaching the listeners:");
    System.out.println (e.getReason());
}

/* Cleanup listener */
chatMessageDataReaderListener.cleanup();

/* Stop the application */
try
{
    MessageBoardApplicationWrapper.stop();
}
catch (WrapperException e)
{
    System.out.println ("Exception occurred while stopping application:");
}
```

```txt
System.out.println (e.getReason());
}
```

ChatMessageDataReaderListenerImpl.java
```java
ChatMessageDataReaderListenerImpl.java

/******************************************************************************************
* Copyright (c) 2012 to 2017 ADLINK Technology Limited. All rights Reserved.
* LOGICAL_NAME: ChatMessageDataReaderListenerImpl.java
* FUNCTION: Vortex OpenSplice Modeler Tutorial example code
* MODULE: Tutorial for the Java programming language
* DATE: January 2012
* This file contains the implementation for the 'MessageBoard' executable
***/

package Chat;

import Chat.ChatMessageDataReader;
import Chat.ChatMessageSeqHolder;
import Chat.NameServiceDataReader;
import Chat.NameServiceSeqHolder;
import Chat.NamedMessage;
import Chat.NamedMessageDataReader;
import DDS_ANY_INSTANCE_STATE;
import DDS_ANY_SAMPLE_STATE;
import DDS_ANY_VIEW_STATE;
import DDS.DataReader;
import DDS.HANDLE_NIL;
import DDS.LENGTH_UNLIMITED;
import DDS.QueryCondition;
import DDS.RETCODE_NO_DATA;
import DDS.ReadCondition;
import DDS.SampleInfoSeqHolder;
import Chat.MessageBoardApplicationWrapper;
import Chat.MessageBoardApplicationWrapper.ChatMessageDataReaderListener;

public class ChatMessageDataReaderListenerImpl extends
ChatMessageDataReaderListener
{
    private static final int TERMINATION_MESSAGE = -1;

    private boolean isTerminated;

    /* Generic DDS entities */
    private QueryCondition nameFinder;

    private ReadCondition newMessages;

    /* Type-specific DDS entities */
    private ChatMessageDataReader chatMsgReader;

    private NameServiceDataReader nameServiceReader;

    private NamedMessageDataReader namedMessageWriter;

    private ChatMessageSeqHolder chatMsgSeq;
```

```java
private SampleInfoSeqHolder chatMsgInfoSeq;

private NameServiceSeqHolder nameServiceSeq;

private SampleInfoSeqHolder nameServiceInfoSeq;

/* Others */
private String nameFinderExpr;

private String[] nameFinderParams;

private String userName;
private int previousID;

/* DDS Identifiers */
private int status;

/* Sample definitions */
NamedMessage namedMsg;

public ChatMessageDataReaderListenerImpl ()
{
    /* Initialize termination flag */
    setTerminated (false);

    /* Type-specific DDS entities */
    chatMsgReader = MessageBoardApplicationWrapper.PrivateParticipantWrapper.
    .SubscriberWrapper.ChatMessageDataReaderWrapper.getDataReader ();
    nameServiceReader = MessageBoardApplicationWrapper.PrivateParticipantWrapper
    .SubscriberWrapper.NameServiceDataReaderWrapper.getDataReader ();
    nameMessageWriter = MessageBoardApplicationWrapper
    .PrivateParticipantWrapper.PublisherWrapper.NamedMessageDataReaderWrapper
    .getDataWriter ();
    chatMsgSeq = new ChatMessageSeqHolder ();
    chatMsgInfoSeq = new SampleInfoSeqHolder ();
    nameServiceSeq = new NameServiceSeqHolder ();
    nameServiceInfoSeq = new SampleInfoSeqHolder );

    /* Others */
    nameFinderExpr = "userID = %0";
    nameFinderParams = new String[]
    {
    "0"
    };
    userName = "";
    previousID = -1;

    /* Sample definitions */
    namedMsg = new NamedMessage();

    /*
    * Create a QueryCondition that will look up the userName for a
    * specified userID
    */
    nameFinder = nameServiceReader.create_querycondition (
    ANY_SAMPLE_STATE.value, ANY_VIEW_STATE.value, ANY_INSTANCE_STATE.value,
    nameFinderExpr, nameFinderParams);
    ErrorHandler.checkHandle(nameFinder,
    "Chat.NameServiceDataReader.create_querycondition");

    newMessages = chatMsgReader.create_readcondition(ANY_SAMPLE_STATE.value,
    ANY_VIEW_STATE.value, ANY_INSTANCE_STATE.value);
```

```txt
ErrorHandler.checkHandle (newMessages, "Chat.ChatMessageDataReader.create_readcondition");
@Override
public void on_data_available (DataReader dataReader) {
    /* Ignore new data if termination message already received */
    if (isTerminated) {
    return;
    }

    boolean terminationReceived = false;

    if (dataReader.equals(chatMsgReader)) {
    status = chatMsgReader.take_w_condition(chatMsgSeq, chatMsgInfoSeq, LENGTH_UNLIMITED.value, newMessages);
    ErrorHandler.checkStatus(status, "Chat.ChatMessageDataReader.take_w_condition");

    /*
    * For each message, extract the key-field and find the
    * corresponding name
    */
    for (int i = 0; i &lt; chatMsgSeq.value.length; i++) {
    /*
    * Set program termination flag if termination message is
    * received
    */
    if (chatMsgSeq.value[i].userID == TERMINATION_MESSAGE) {
    terminationReceived = true;
    break;
    }

    /* Find the corresponding named message */
    if (chatMsgSeq.value[i].userID != previousID) {
    previousID = chatMsgSeq.value[i].userID;
    nameFinderParams[0] = Integer.toString(previousID);
    status = nameFinder.set_query_parameters(nameFinderParams);
    ErrorHandler.
    .checkStatus(status, "QueryCondition.set_query_arguments(nameFinderParams)");
    status = nameServiceReader.read_w_condition(nameServiceSeq, nameServiceInfoSeq, LENGTH_UNLIMITED.value, nameFinder);
    ErrorHandler.checkStatus(status, "Chat.NameServiceDataReader.read_w_condition");

    /* Extract Name (there should only be one result) */
    if (status == RETCODE_NO_DATA.value) {
    userName = "Name not found!! id = " + previousID;
    } else {
    userName = nameServiceSeq.value[0].name;
    }

    /* Release the name sample again */
    status = nameServiceReader.return_loan(nameServiceSeq, nameServiceInfoSeq);
    ErrorHandler.checkStatus(status, "Chat.NameServiceDataReader.return_loan");
    }
    /* Write merged Topic with userName instead of userID */
    namedMsg.userName = userName;
    namedMsg.userId = previousID;
```

```txt
namedMsg.index = chatMsgSeq.value[i].index;
namedMsg.content = chatMsgSeq.value[i].content;

if (chatMsgInfoSeq.value[i].valid_data)
{
    status = nameMessageWriter.write (namedMsg, HANDLE_NIL.value);
    ErrorHandler.checkStatus (status,
    "Chat.NamedMessageDataWriter.write");
}

status = chatMsgReader.return_loan(chatMsgSeq, chatMsgInfoSeq);
ErrorHandler.checkStatus(status,
    "Chat.ChatMessageDataReader.return_loan");

if (terminationReceived) {
    setTerminated(true);
}

public void cleanup ()
{
    /* Remove all Read Conditions from the DataReaders */
    status = nameServiceReader.delete_readcondition(nameFinder);
    ErrorHandler.checkStatus(status, "Chat.NameServiceDataReader
    .delete_readcondition(nameFinder)");
    status = chatMsgReader.delete_readcondition(newMessages);
    ErrorHandler.checkStatus(status, "Chat.ChatMessageDataReader
    .delete_readcondition(newMessages)");
}

public synchronized boolean isTerminated ()
{
    return isTerminated;
}

private synchronized void setTerminated (boolean isTerminated)
{
    this.isTerminated = isTerminated;
}
```

# NamedMessageDataReaderListenerImpl.java

```txt
NamedMessageDataReaderListenerImpl.java
/******************************************************************************************
*
* Copyright (c) 2012 to 2017
* ADLINK Technology Limited
* All rights Reserved.
*
* LOGICAL_NAME:    NamedMessageDataReaderListenerImpl.java
* FUNCTION:    Vortex OpenSplice Modeler Tutorial example code.
* MODULE:    Tutorial for the Java programming language.
* DATE    January 2012.
******************************************************************************************
*
* This file contains the implementation for the 'MessageBoard' executable.
*
```

# 10.1. A Chatroom Example, Java Source Code

```java
java
package Chat;

import Chat.NamedMessageDataReader;
import Chat.NamedMessageSeqHolder;
import DDS.ALIVE_INSTANCE_STATE;
import DDS.ANY_VIEW_STATE;
import DDS.DataReader;
import DDS.LENGTH_UNLIMITED;
import DDS.NOT_READ_SAMPLE_STATE;
import DDS.SampleInfoSeqHolder;
import Chat.MessageBoardApplicationWrapper;
import Chat.MessageBoardApplicationWrapper.NamedMessageDataReaderListener;

public class NamedMessageDataReaderListenerImpl extends
    NamedMessageDataReaderListener {
    private boolean isTerminated;

    /* DDS Identifiers */
    private int status;

    /* Type-specific DDS entities */
    private NamedMessageDataReader namedMsgReader;
    private NamedMessageSeqHolder namedMsgSeq;
    private SampleInfoSeqHolder infoSeq;

    public NamedMessageDataReaderListenerImpl() {
    namedMsgReader = MessageBoardApplicationWrapper.ParticipantWrapper.
    .SubscriberWrapper.NamedMessageDataReaderWrapper
    .getDataReader();
    namedMsgSeq = new NamedMessageSeqHolder();
    infoSeq = new SampleInfoSeqHolder();
    }

    @Override
    public void on_data_available(DataReader dataReader) {
    /* Set termination flag */
    setTerminated(false);

    status = namedMsgReader.take(namedMsgSeq, infoSeq,
    LENGTH_UNLIMITED.value, NOT_READ_SAMPLE_STATE.value,
    ANY_VIEW_STATE.value, ALIVE_INSTANCE_STATE.value);
    ErrorHandler.checkStatus(status, "Chat.NamedMessageDataReader.read");

    /* For each message, print the message */
    for (int i = 0; i &lt; namedMsgSeq.value.length; i++) {
    System.out.println(namedMsgSeq.value[i].userName + ": "
    + namedMsgSeq.value[i].content);
    }

    status = namedMsgReader.return_loan(namedMsgSeq, infoSeq);
    ErrorHandler.checkStatus(status,
    "Chat.NamedMessageDataReader.return_loan");

    namedMsgSeq.value = null;
    infoSeq.value = null;

    /* Unset termination flag */
    setTerminated(true);
    }

    public synchronized boolean isTerminated() {
```

```java
return isTerminated;
}
private synchronized void setTerminated(boolean isTerminated) {
    this.isTerminated = isTerminated;
}
```

10.1.3 UserLoad Application
```txt
UserLoadApplication.java
/**********************************************************************
* Copyright (c) 2012 to 2017
* ADLINK Technology Limited
* All rights Reserved.
*
* LOGICAL_NAME: UserLoadApplication.java
* FUNCTION: Vortex OpenSplice Modeler Tutorial example code.
* MODULE: Tutorial for the Java programming language.
* DATE January 2012.
***********************************************************************
*
* This file contains the implementation for the 'UserLoadApplication' executable.
*
```

```java
package Chat;
import Chat.UserLoadApplicationWrapper WrapperException;
import DDS.*;
```

```txt
public class UserLoadApplication extends Thread
{
    /* entities required by all threads */
    private static GuardCondition escape;

    /**
    * Sleeper thread: sleeps 60 seconds and then triggers the WaitSet
    */
    public void run ()
    {
    int status;

    try
    {
    sleep (60000);
    }
    catch (InterruptedException e)
    {
    e.printStackTrace();
    }
    status = escape.set_trigger_value (true);
    ErrorHandler.checkStatus (status, "DDS.GuardCondition.set_trigger_value");
    }

    public static void main (String[] args)
    {
```

```txt
boolean closed = false;
int prevCount = 0;

try
{
    /* Initialize the application */
   装载装载装载装载装载装载装载装载装载装载装载装载装载装载装载装载装载装载装载装载装载装载装载装载装载装载装载装载装载装载装载装载装载装载装载装载装载装载装载装载装载装载装载装载装载装载装载装载装载装载装载装载装载装载装载装载装载装载装载装载载
}
catch (WrapperException e)
{
    System.out.println("Error while starting the application:");
    System.out.println(e.getReason());
    return;
}

/* Initialize the arguments and params for the QueryCondition */
String[] params;

params = new String[]
{
    "0"
};

try
{
   装载装载装载装载装载装载装载装载装载装载装载装载装载装载装载装载装载装载装载装载装载装载装载装载载
    *params);
    /* start the ChatMessageDataReaderWaitSet */
   装载装载装载装载装载装载装载装载装载装载装载装载载
    *UserLoadApplicationWrapper.UserLoadWaitSetWrapper.start();
}
catch (WrapperException e)
{
    *system.out.println("Error while initializing the application:");
    *system.out.println(e.getReason());
    return;
}

WaitSet userLoadWS = UserLoadApplicationWrapper.UserLoadWaitSetWrapper
    .getWaitSet();

/* Generic DDS entities */
escape = UserLoadApplicationWrapper.GuardConditionWrapper
    .getGuardCondition();
QueryCondition singleUser = UserLoadApplicationWrapper
    .QueryConditionWrapper.getQueryCondition();
ReadCondition newUser = UserLoadApplicationWrapper.ReadConditionWrapper
    .readReadCondition();
StatusCondition leftUser = UserLoadApplicationWrapper.StatusConditionWrapper
    . NOPStatusCondition();

LivelinessChangedStatusBarer livChangedStatusBarer = new
    LivelinessChangedStatusBarer();

/* DDS Identifiers */
int status;
ConditionSeqHolder guardList = new ConditionSeqHolder();

/* Type-specific DDS entities */
NameServiceDataReader nameServer = UserLoadApplicationWrapper
    .ParticipantWrapper.SubscriberWrapper.NameServiceDataReaderWrapper
    .getDataReader();
ChatMessageDataReader loadAdmin = UserLoadApplicationWrapper
```

```txt
ParticipantWrapper.SubscriberWrapper.ChatMessageDataReaderWrapper.
 Production Reader  );
ChatMessageSeqHolder msgList = new ChatMessageSeqHolder  );
NameServiceSeqHolder nsList = new NameServiceSeqHolder  );
SampleInfoSeqHolder infoSeq = new SampleInfoSeqHolder  );
SampleInfoSeqHolder infoSeq2 = new SampleInfoSeqHolder  );

/*
 * Initialize and pre-allocate the GuardList used to obtain the triggered
 * Conditions.
 */
guardList.value = new Condition[3];

/* Remove all known Users that are not currently active. */
status = nameServer.take (nsList, infoSeq, LENGTH_UNLIMITED.value,
    ANY_SAMPLE_STATE.value, ANY_VIEW_STATE.value,
    NOT_ALIVE_INSTANCE_STATE.value);
ErrorHandler.checkStatus (status, "Chat.NameServiceDataReader.take");
status = nameServer.return_loan (nsList, infoSeq);
ErrorHandler.checkStatus (status, "Chat.NameServiceDataReader.return_loan");

/* Start the sleeper thread */
new UserLoadApplication (.start  );

while (!closed)
{
    /* Wait until at least one of the Conditions in the waitset triggers */
    status = userLoadWS._wait (guardList, DURATION_INFINITE.value);
    ErrorHandler.checkStatus (status, "DDS.WaitSet._wait");

    /* Walk over all the guards to display information */
    for (int i = 0; i &lt; guardList.value.length; i++)
    {
    if (guardList.value[i] == newUser)
    {
    /* The newUser ReadCondition contains data */
    status = nameServer.read_w_condition (nsList, infoSeq,
    LENGTH_UNLIMITED.value, newUser);
    ErrorHandler.checkStatus (status,
    "Chat.NameServiceDataReader.read_w_condition");

    for (int j = 0; j &lt; nsList.value.length; j++)
    {
    System.out.println ("New User: " + nsList.value[j].name);
    }
    status = nameServer.return_loan (nsList, infoSeq);
    ErrorHandler.checkStatus (status,
    "Chat.NameServiceDataReader.return_loan");
    }
    else if (guardList.value[i] == leftUser)
    {
    /*
    * Some liveliness has changed (either because a DataWriter
    * joined or a DataWriter left
    */
    status = loadAdmin.get_liveliness_changed_status (
    livChangedStatusHolder);
    ErrorHandler.checkStatus (status,
    "Chat.ChatMessageDataReader.get_liveliness_changed_status");

    if (livChangedStatusHolder.value.alive_count &lt; prevCount)
    {
    /*
    /*
```

```txt
* A user has left the ChatRoom, since a DataWriter lost its
* liveliness
*/
/*
* Take the effected users so they will not appear in the list
* later on
*/
status = nameServer.take (nsList, infoSeq,
    LENGTH_UNLIMITED.value, ANY_SAMPLE_STATE.value,
    ANY_VIEW_STATE.value, NOT_ALIVE_INSTANCE_STATE.value);
ErrorHandler.checkStatus (status,
    "Chat.NameServiceDataReader.take");

for (int j = 0; j &lt; nsList.value.length; j++)
{
    /* re-apply query arguments */
    params[0] = Integer.toString (nsList.value[j].userID);
    status = singleUser.set_query_parameters (params);
    ErrorHandler.checkStatus (status,
    "DDS.QueryCondition.set_query_arguments");

    /* Read this users history */
    status = loadAdmin.take_w_condition (msgList, infoSeq2,
    LENGTH_UNLIMITED.value, singleUser);
    ErrorHandler.checkStatus (status,
    "Chat.ChatMessageDataReader.read_w_condition");

    /* Display the user and his history */
    System.out.println ("Departed user " + nsList.value[j].name +
    " had sent " + msgList.value.length + " messages.");
    status = loadAdmin.return_loan (msgList, infoSeq2);
    ErrorHandler.checkStatus (status,
    "Chat.ChatMessageDataReader.return_loan");
    msgList.value = null;
    infoSeq2.value = null;
}
status = nameServer.return_loan (nsList, infoSeq);
ErrorHandler.checkStatus (status,
    "Chat.NameServiceDataReader.return_loan");
nsList.value = null;
infoSeq.value = null;
}
prevCount = livChangedStatusHolder.value.alive_count;
}
else if (guardList.value[i] == escape)
{
    System.out.println ("UserLoad has terminated.");
    closed = true;
}
else
{
    assert false : "Unknown Condition";
}
} /* for */
} /* while (!closed) */

try
{
    /* Stop the application and free all resources */
    UserLoadApplicationWrapper.stop();
}
catch (WrapperException e)
{
```

```txt
System.out.println("Error while stopping the application:");
System.out.println(e.getReason());
return;
}
```

# 10.1.4 Error Handler

```java
ErrorHandler.java
/******************************************************************************************
*
* Copyright (c) 2012 to 2017
* ADLINK Technology Limited
* All rights Reserved.
*
* LOGICAL_NAME: ErrorHandler.java
* FUNCTION: Vortex OpenSplice Modeler Tutorial example code.
* MODULE: Tutorial for the Java programming language.
* DATE: January 2012.
******************************************************************************************
*
* This file contains the implementation for the error handling operations.
*
***/

package Chatroom;

import DDS.RETCODE_NO_DATA;
import DDS.RETCODE_OK;

public class ErrorHandler
{
    public static final int NR_ERROR_CODES = 12;

    /* Array to hold the names for all ReturnCodes. */
    public static String[] RetCodeName = new String[NR_ERROR_CODES];

    static
    {
    RetCodeName[0] = new String ("DDS_RETCODE_OK");
    RetCodeName[1] = new String ("DDS_RETCODE_ERROR");
    RetCodeName[2] = new String ("DDS_RETCODE_UNSUPPORTED");
    RetCodeName[3] = new String ("DDS_RETCODE_BAD_PARAMETER");
    RetCodeName[4] = new String ("DDS_RETCODE_PRECONDITION_NOT_MET");
    RetCodeName[5] = new String ("DDS_RETCODE_OUT_OF_RESOURCES");
    RetCodeName[6] = new String ("DDS_RETCODE_NOT_ENABLED");
    RetCodeName[7] = new String ("DDS_RETCODE_IMMUTABLE_POLICY");
    RetCodeName[8] = new String ("DDS_RETCODE_INCONSISTENT_POLICY");
    RetCodeName[9] = new String ("DDS_RETCODE_ALREADY_DELETED");
    RetCodeName[10] = new String ("DDS_RETCODE_TIMEOUT");
    RetCodeName[11] = new String ("DDS_RETCODE_NO_DATA");
    }

    /**
    * Returns the name of an error code.
    */
    public static String getErrorName (int status)
    {
```

```txt
return RetCodeName[status];
}

/**
 * Check the return status for errors. If there is an error, then terminate.
 */
public static void checkStatus (int status, String info)
{
    if (status != RETCODE_OK.value && status != RETCODE_NO_DATA.value)
    {
    System.out.println("Error in " + info + ": " + getErrorName(status));
    System.exit(-1);
    }
}

/**
 * Check whether a valid handle has been returned. If not, then terminate.
 */
public static void checkHandle (Object handle, String info)
{
    if (handle == null)
    {
    System.out.println("Error in " + info + ": " : Creation failed: invalid handle");
    System.exit(-1);
    }
}
```

# 11

# Appendix B

# C++

This appendix contains the example, user-written C++ source code included with the Vortex OpenSplice Modeler Chatroom C++ example. The Chatroom system is the example used in the Tutorial.

There are two different versions of some of the Chatroom’s C++ modules, one version for Linux, the other for Windows, in order to accommodate differences between these platforms.

The source code is given in the following order:

# Chatter Application:

ChatterApplication.cpp, Linux Version

ChatterApplication.cpp, Windows Version

# MessageBoard Application:

MessageBoardApplication.cpp, Linux Version

MessageBoardApplication.cpp, Windows Version

ChatMessageDataReaderListenerImpl.h, Linux version

ChatMessageDataReaderListenerImpl.h, Windows version

ChatMessageDataReaderListenerImpl.cpp

NamedMessageDataReaderListenerImpl.h, Linux Version

NamedMessageDataReaderListenerImpl.h, Windows Version

NamedMessageDataReaderListenerImpl.cpp

# UserLoad Application:

UserLoadApplication.cpp, Linux Version

UserLoadApplication.cpp, Windows Version

CheckStatus.h

CheckStatus.cpp

# 11.1 Chatroom Example, C++ Source Code

# 11.1.1 Chatter Application

ChatterApplication.cpp, Linux Version

# Linux

```cpp
ChatterApplication.cpp
/**********************************************************************
*
* Copyright (c) 2012 to 2017
* ADLINK Technology Limited
* All rights Reserved.
*
* LOGICAL_NAME:    ChatterApplication.cpp
* FUNCTION:    Vortex OpenSplice Modeler Tutorial example code.
* MODULE:    Example for the C++ programming language.
* DATE    January 2012.
**********************************************************************
*
* This file contains the implementation for the 'ChatterApplication' executable.
*
***
#include &lt;string&gt;
#include &lt;sstream&gt;
#include &lt;iostream&gt;
#include &lt;unistd.h&gt;

#include "ChatterApplication.h"
#include "CheckStatus.h"

#define NUM_MSG 10
#define TERMINATION_MESSAGE -1

using namespace std;
using namespace DDS;
using namespace Chat;

int main(int argc, char *argv[]) {
    /* Sample definitions */
    ChatMessage *msg; /* Example on Heap */
    NameService ns; /* Example on Stack */

    /* DDS Identifiers */
    InstanceHandle_t_userHandle;
    ReturnCode_t_status;

    /* Others */
    int ownID = 1;
    char *chatterName= NULL;
    ostringstream buf;

    /* Initialize the application */
    ChatterApplicationWrapperImplementation chatterApplication;

    try {
    chatterApplication.start();
    } catch (WrapperException& e) {
    cout &lt;&lt; "Exception occurred while starting the application:" &lt;&lt; endl;
    cout &lt;&lt; e.what();
    return -1;
    }

    /* Type-specific DDS entities */
    NameServiceDataWriter_ptr nameServer =
    chatterApplication.getParticipantWrapper()-&gt;getPublisherWrapper()
    ->getNameServiceDataWriterWrapper()->getDataWriter();
    ChatMessageDataWriter_ptr talker =
    chatterApplication.getParticipantWrapper()->getPublisherWrapper()
```

```cpp
->getChatMessageDataWriterWrapper()->getDataWriter();

/* Options: Chatter [ownID [name]] */
if (argc > 1) {
    istpringstream args(argv[1]);
    args >> ownID;
    if (argc > 2) {
    chatterName = argv[2];
    }
}

/* Initialize the NameServer attributes */
ns.userID = ownID;
if (chatterName) {
    ns.name = string_dup(chatterName);
} else {
    buf &lt;&lt; "Chatter" &lt;&lt; ownID;
    ns.name = string_dup(buf.str().c_str());
}

/* Write the user-information into the system
(registering the instance implicitly). */
status = nameServer-&gt;write(ns, HANDLE_NIL);
checkStatus(status, "NameServiceDataWriter::write");

/* Initialize the chat messages on Heap. */
msg = new ChatMessage();
checkHandle(msg, "new ChatMessage");
msg->userID = ownID;
msg->index = 0;
buf.str(string("")
if (ownID == TERMINATION_MESSAGE) {
    buf &lt;&lt; "Termination message.";
} else {
    buf &lt;&lt; "Hi there, I will send you" &lt;&lt; NUM_MSG &lt;&lt; "more messages.";
}
msg-&gt;content = string_dup(buf.str().c_str());
cout &lt;&lt; "Writing message: \"\" &lt;&lt; msg-&gt;content &lt;&lt; "\"\" &lt;&lt; endl;

/* Register a chat message for this user (pre-allocating resources for it!!) */
userHandle = talker-&gt;register_instance(*msg);

/* Write a message using the pre-generated instance handle. */
status = talker->write(*msg, userHandle);
checkStatus(status, "ChatMessageDataWriter::write");

sleep(1); /* do not run so fast! */

/* Write any number of messages,
    re-using the existing string-buffer: no leak++. */
for (int i = 1; i &lt;= NUM_MSG && ownID != TERMINATION_MESSAGE; i++) {
    buf.str(string("")
    msg-&gt;index = i;
    buf &lt;&lt; "Message no." &lt;&lt; i;
    msg-&gt;content = string_dup(buf.str().c_str());
    cout &lt;&lt; "Writing message: \"\" &lt;&lt; msg-&gt;content &lt;&lt; "\"\" &lt;&lt; endl;
    status = talker-&gt;write(*msg, userHandle);
    checkStatus(status, "ChatMessageDataWriter::write");
    sleep(1); /* do not run so fast! */
}

/* Leave the room by disposing and unregistering the message instance. */
status = talker->dispose(*msg, userHandle);
```

```cpp
checkStatus(status, "ChatMessageDataWriter::dispose");
status = talker->unregister_instance(*msg, userHandle);
checkStatus(status, "ChatMessageDataWriter::unregister_instance");

/* Also unregister our name. */
status = nameServer->unregister_instance(ns, HANDLE_NIL);
checkStatus(status, "NameServiceDataWriter::unregister_instance");

/* Release the data-samples. */
delete msg; // msg allocated on heap: explicit de-allocation required!!
/* stop application */
try {
    chatterApplication.stop();
} catch (WrapperException& e) {
    cout &lt;&lt; "Exception occurred while stopping the application:" &lt;&lt; endl;
    cout &lt;&lt; e.what();
    return -1;
}

return 0;
}
```

# ChatterApplication.cpp, Windows Version

# Windows

```cpp
ChatterApplication.cpp

 Young
    *    Copyright (c) 2012 to 2017
    * ADLINK Technology Limited
    * All rights Reserved.
    *
    * LOGICAL_NAME:    ChatterApplication.cpp
    * FUNCTION:    Vortex OpenSplice Modeler Tutorial example code.
    * MODULE:    Example for the C++ programming language.
    * DATE    January 2012.

    *    *    *    *    *    *    *    *    *    *    *    *    *    *    *    *    *    *    *    *    *    *    *    *    *    *    *    *    *    *    *    *    *    *    *    *    *    *
    *
    * This file contains the implementation for the 'ChatterApplication' executable.
    *
    ***/
#include &lt;string&gt;
#include &lt;sstream&gt;
#include &lt;iostream&gt;

#include "ChatterApplication.h"
#include "CheckStatus.h"

#define NUM_MSG 10
#define TERMINATION_MESSAGE -1

using namespace std;
using namespace DDS;
using namespace Chat;

int main(int argc, char *argv[]) {
    /* Sample definitions */
    ChatMessage *msg; /* Example on Heap */
```

# 11.1. Chatroom Example, C++ Source Code

```cpp
NameService ns; /* Example on Stack */

/* DDS Identifiers */
InstanceHandle_t userHandle;
ReturnCode_t status;

/* Others */
int ownID = 1;
char *chatterName= NULL;
ostringstream buf;

/* Initialize the application */
ChatterApplicationWrapperImplementation chatterApplication;

try {
    chatterApplication.start();
} catch (WrapperException& e) {
    cout &lt;&lt; "Exception occurred while starting the application:" &lt;&lt; endl;
    cout &lt;&lt; e.what();
    return -1;
}

/* Type-specific DDS entities */
NameServiceDataWriter_ptr nameServer =
    chatterApplication.getParticipantWrapper()-&gt;getPublisherWrapper()
    ->getNameServiceDataWriterWrapper()->getDataWriter();
ChatMessageDataWriter_ptr talker =
    chatterApplication.getParticipantWrapper()->getPublisherWrapper()
    ->getChatMessageDataWriterWrapper()->getDataWriter();

/* Options: Chatter [ownID [name]] */
if (argc > 1) {
    istpringstream args(argv[1]);
    args >> ownID;
    if (argc > 2) {
    chatterName = argv[2];
    }
}

/* Initialize the NameServer attributes */
ns.userID = ownID;
if (chatterName) {
    ns.name = string_dup(chatterName);
} else {
    buf &lt;&lt; "Chatter " &lt;&lt; ownID;
    ns.name = string_dup(buf.str().c_str());
}

/* Write the user-information into the system
(registering the instance implicitly). */
status = nameServer-&gt;write(ns, HANDLE_NIL);
checkStatus(status, "NameServiceDataWriter::write");

/* Initialize the chat messages on Heap. */
msg = new ChatMessage();
checkHandle(msg, "new ChatMessage");
msg->userID = ownID;
msg->index = 0;
buf.str(string("") );
if (ownID == TERMINATION_MESSAGE) {
    buf &lt;&lt; "Termination message.";
} else {
    buf &lt;&lt; "Hi there, I will send you " &lt;&lt; NUM_MSG &lt;&lt; " more messages.";
}
```

```cpp
}
msg-&gt;content = string_dup(buf.str().c_str());
cout &lt;&lt; "Writing message: \"\" &lt;&lt; msg-&gt;content &lt;&lt; "\"\" &lt;&lt; endl;

/* Register a chat message for this user (pre-allocating resources for it!!) */
userHandle = talker-&gt;register_instance(*msg);

/* Write a message using the pre-generated instance handle. */
status = talker->write(*msg, userHandle);
checkStatus(status, "ChatMessageDataWriter::write");

sleep(1); /* do not run so fast! */

/* Write any number of messages,
    re-using the existing string-buffer: no leak++. */
for (int i = 1; i &lt;= NUM_MSG && ownID != TERMINATION_MESSAGE; i++) {
    buf.str(string(""));
    msg-&gt;index = i;
    buf &lt;&lt; "Message no. " &lt;&lt; i;
    msg-&gt;content = string_dup(buf.str().c_str());
    cout &lt;&lt; "Writing message: \"\" &lt;&lt; msg-&gt;content &lt;&lt; "\"\" &lt;&lt; endl;
    status = talker-&gt;write(*msg, userHandle);
    checkStatus(status, "ChatMessageDataWriter::write");
    Sleep(1000); /* do not run so fast! */
}

/* Leave the room by disposing and unregistering the message instance. */
status = talker->dispose(*msg, userHandle);
checkStatus(status, "ChatMessageDataWriter::dispose");
status = talker->unregister_instance(*msg, userHandle);
checkStatus(status, "ChatMessageDataWriter::unregister_instance");

/* Also unregister our name. */
status = nameServer->unregister_instance(ns, HANDLE_NIL);
checkStatus(status, "NameServiceDataWriter::unregister_instance");

/* Release the data-samples. */
delete msg; // msg allocated on heap: explicit de-allocation required!!

/* stop application */
try {
    chatterApplication.stop();
} catch (WrapperException& e) {
    cout &lt;&lt; "Exception occurred while stopping the application:" &lt;&lt; endl;
    cout &lt;&lt; e.what();
    return -1;
}

return 0;
}
```

# 11.1.2 MessageBoard Application

MessageBoardApplication.cpp, Linux Version

Linux

MessageBoardApplication.cpp

\*\*\*\*\*

```cpp
/*
 * Copyright (c) 2012 to 2017
 * ADLINK Technology Limited
 * All rights Reserved.
 *
 * LOGICAL_NAME:    MessageBoardApplication.cpp
 * FUNCTION:    Vortex OpenSplice Modeler Tutorial example code.
 * MODULE:    Tutorial for the C++ programming language.
 * DATE    January 2012.
******************************************************************************************
 *
 * This file contains the implementation for the
 * 'MessageBoardApplication' executable.
 *
 ***/

#include &lt;iostream&gt;
#include &lt;string&gt;
#include &lt;sstream&gt;
#include &lt;unistd.h&gt;

#include "CheckStatus.h"
#include "MessageBoardApplication.h"

#include "ChatMessageDataReaderListenerImpl.h"
#include "NamedMessageDataReaderListenerImpl.h"

using namespace std;
using namespace DDS;
using namespace Chat;

#define TERMINATION_MESSAGE -1

int main(int argc, char *argv[]) {
    /* DDS Identifiers */
    string ownID = "0";

    /* Options: MessageBoard [ownID] */
    /* Messages having owner ownID will be ignored */
    if (argc > 1) {
    istpringstream args(argv[1]);
    args >> ownID;
    }

    MessageBoardApplicationWrapperImplementation messageBoardApplication;

    try {
    StringSeq exprParams;
    exprParams.length(1);
    exprParams[0] = DDS::string_dup(ownID.c_str());
    messageBoardApplication.getParticipantWrapper()
    ->getNamedMessageFilteredTopicWrapper()->setExpressionParameters(
    exprParams);
    /* Initialize the application */
    messageBoardApplication.start();
    } catch (WrapperException & e) {
    cout &lt;&lt; "Exception occurred while initializing the application:"
    &lt;&lt; endl;
    cout &lt;&lt; e.what();
    return -1;
    }

    /* Create the listeners for the MessageBoard application */
```

```cpp
ChatMessageDataReaderListenerImpl* chatMessageDataReaderListener =
    new ChatMessageDataReaderListenerImpl(&messageBoardApplication);

/* put the object in a smart pointer for resource management */
DDS::DataReaderListener_var chatMessageDataReaderListenerVar(
    chatMessageDataReaderListener);

NamedMessageDataReaderListenerImpl* namedMessageDataReaderListener =
    new NamedMessageDataReaderListenerImpl(&messageBoardApplication);

DDS::DataReaderListener_var namedMessageDataReaderListenerVar(
    namedMessageDataReaderListener);

try {
    /* Attach the ChatMessageDataReaderListener to the ChatMessageDataReader */
    messageBoardApplication.getPrivateParticipantWrapper()
    -&gt;getSubscriberWrapper()->getChatMessageDataReaderWrapper()->attach(
    chatMessageDataReaderListener);

    /* Attach the NamedMessageDataReaderListener to NamedMessageDataReader */
    messageBoardApplication.getParticipantWrapper()->getSubscriberWrapper()
    ->getNamedMessageDataReaderWrapper()->attach(
    namedMessageDataReaderListener);
} catch (WrapperException& e) {
    cout &lt;&lt; "Exception occurred while attaching a listener:" &lt;&lt; endl;
    cout &lt;&lt; e.what();
    return -1;
}

cout
    &lt;&lt; "MessageBoard has opened: send ChatMessage with userID = -1 to close it."
    &lt;&lt; endl &lt;&lt; endl;

/* Wait for the ChatMessageDataReaderListener to finish */
while (!chatMessageDataReaderListener-&gt;isTerminated()) {
    sleep(1);
}

/* Wait for the NamedMessageDataReaderListener to finish */
while (!namedMessageDataReaderListener->isTerminated()) {
    sleep(1);
}

cout &lt;&lt; "Termination message received: exiting..." &lt;&lt; endl;

try {
    /* Detach the ChatMessageDataReaderListener to the ChatMessageDataReader */
    messageBoardApplication.getPrivateParticipantWrapper()
    -&gt;getSubscriberWrapper()->getChatMessageDataReaderWrapper()->detach(
    chatMessageDataReaderListener);

    /* Detach the NamedMessageDataReaderListener to the NamedMessageDataReader */
    messageBoardApplication.getParticipantWrapper()->getSubscriberWrapper()
    ->getNamedMessageDataReaderWrapper()->detach(
    namedMessageDataReaderListener);
} catch (WrapperException& e) {
    cout &lt;&lt; "Exception occurred while detaching a listener:" &lt;&lt; endl;
    cout &lt;&lt; e.what();
    return -1;
}

chatMessageDataReaderListener-&gt;cleanup();
```

```java
try {
    /* Stop the application */
    messageBoardApplication.stop();
} catch (WrapperException & e) {
    cout &lt;&lt; "Exception occurred while stopping the application:" &lt;&lt; endl;
    cout &lt;&lt; e.what();
    return -1;
}
return 0;
```

# MessageBoardApplication.cpp, Windows Version

# Windows

```c
MessageBoardApplication.cpp

/******************************************************************************************
*
* Copyright (c) 2012 to 2017
* ADLINK Technology Limited
* All rights Reserved.
*
* LOGICAL_NAME: MessageBoardApplication.cpp
* FUNCTION: Vortex OpenSplice Modeler Tutorial example code.
* MODULE: Tutorial for the C++ programming language.
* DATE January 2012.
******************************************************************************************
*
* This file contains the implementation for the 'MessageBoard' executable.
*
***/

#include &lt;iostream&gt;
#include &lt;string&gt;
#include &lt;sstream&gt;

#include "ccpp_dds_dcps.h"
#include "CheckStatus.h"
#include "exported_MessageBoardApplicationDcps.h"
#include "Chat/MessageBoardApplicationWrapperImplementation.h"
#include "Chat/NamedMessageFilteredTopicWrapper.h"

#include "Chat/MessageBoardApplication/ParticipantWrapper.h"
#include "Chat/MessageBoardApplication/Participant/SubscriberWrapper.h"
#include "Chat/MessageBoardApplication/Participant/Subscriber/NamedMessageDataReaderWrapper.h"

#include "Chat/MessageBoardApplication/PrivateParticipantWrapper.h"
#include "Chat/MessageBoardApplication/PrivateParticipant/SubscriberWrapper.h"
#include "Chat/MessageBoardApplication/PrivateParticipant/Subscriber/ChatMessageDataReaderWrapper.h"

#include "ChatMessageDataReaderListenerImpl.h"
#include "NamedMessageDataReaderListenerImpl.h"

using namespace std;
using namespace DDS;
using namespace Chat;

#define TERMINATION_MESSAGE -1
```

```cpp
int main(int argc, char *argv[])
{
    /* DDS Identifiers */
    string ownID = "0";

    /* Options: MessageBoard [ownID] */
    /* Messages having owner ownID will be ignored */
    if (argc > 1)
    {
    istpringstream args(argv[1]);
    args >> ownID;
    }

    MessageBoardApplicationWrapperImplementation messageBoardApplication;

    StringSeq exprParams;
    exprParams.length(1);
    exprParams[0] = DDS::string_dup(ownID.c_str());

    messageBoardApplication.getParticipantWrapper()
    ->getNamedMessageFilteredTopicWrapper()->set_expression_parameters(exprParams);

    /* Initialize the application */
    messageBoardApplication.start();

    /* Create the listeners for the MessageBoard application */
    ChatMessageDataReaderListenerImpl* chatMessageDataReaderListener = new ChatMessageDataReaderListenerImpl(&messageBoardApplication);

    /* put the object in a smart pointer for resource management */
    DDS::DataReaderListener_var
    chatMessageDataReaderListenerVar(chatMessageDataReaderListener);

    NamedMessageDataReaderListenerImpl* namedMessageDataReaderListener = new NamedMessageDataReaderListenerImpl(&messageBoardApplication);

    DDS::DataReaderListener_var
    namedMessageDataReaderListenerVar(namedMessageDataReaderListener);

    /* Attach the ChatMessageDataReaderListener to the ChatMessageDataReader */
    ReturnCode_t status = messageBoardApplication.getPrivateParticipantWrapper()
    ->getSubscriberWrapper()->getChatMessageDataReaderWrapper()
    ->set_listener(chatMessageDataReaderListener,
    chatMessageDataReaderListener->getStatusMask());
    checkStatus(status, "Chat::ChatMessageDataReader::set_listener");

    /* Attach the NamedMessageDataReaderListener to the NamedMessageDataReader */
    status = messageBoardApplication.getParticipantWrapper()
    ->getSubscriberWrapper()->getNamedMessageDataReaderWrapper()->getDataReader()
    ->set_listener(namedMessageDataReaderListener,
    namedMessageDataReaderListener-> SeatListener)|;
    checkStatus(status, "Chat::ChatMessageDataReader::set_listener");

    cout
    &lt;&lt; "MessageBoard has opened: send ChatMessage with userID = -1 to close it."
    &lt;&lt; endl &lt;&lt; endl;

    /* Wait for the ChatMessageDataReaderListener to finish */
    while (!chatMessageDataReaderListener-&gt;isTerminated())
    {
    Sleep(1000);
    }
}
```

```cpp
/* Wait for the NamedMessageDataReaderListener to finish */
while (!namedMessageDataReaderListener->isTerminated())
{
    Sleep(1000);
}

cout &lt;&lt; "Termination message received: exiting..." &lt;&lt; endl;

/* Detach the ChatMessageDataReaderListener to the ChatMessageDataReader */
messageBoardApplication.getPrivateParticipantWrapper()-&gt;getSubscriberWrapper()
->set_listener(0, 0);

/* Detach the NamedMessageDataReaderListener to the NamedMessageDataReader */
messageBoardApplication.getParticipantWrapper()->getSubscriberWrapper()
->set_listener(0, 0);

chatMessageDataReaderListener->cleanup();

/* Stop the application */
messageBoardApplication.stop();
return 0;
}
```

# ChatMessageDataReaderListenerImpl.h, Linux version

# Linux

```cpp
ChatMessageDataReaderListenerImpl.h

/******************************************************************************************
*
* Copyright (c) 2012 to 2017
* ADLINK Technology Limited
* All rights Reserved.
*
* LOGICAL_NAME: ChatMessageDataReaderListenerImpl.h
* FUNCTION: Vortex OpenSplice Modeler Tutorial example code.
* MODULE: Tutorial for the C++ programming language.
* DATE January 2012.
******************************************************************************************
*
* This file contains the implementation for the 'MessageBoard' executable.
*
***/
#ifndef _CHATMESSAGEDATAREADERLISTENERIMPL_H_
#define _CHATMESSAGEDATAREADERLISTENERIMPL_H_

#include &lt;string&gt;

#include &lt;pthread.h&gt;

#include "Chat/MessageBoardApplication/ChatMessageDataReaderListener.h"
#include "Chat/MessageBoardApplicationWrapper.h"
#include "exported_MessageBoardApplicationDcps.h"

class ChatMessageDataReaderListenerImpl :
    public Chat::MessageBoardApplication::ChatMessageDataReaderListener
{
public:
```

# 11.1. Chatroom Example, C++ Source Code

```cpp
ChatMessageDataReaderListenerImpl(
    const Chat::MessageBoardApplicationWrapper* messageBoardApplication);

void on_data_available(DDS::DataReader_ptr dataReader);
void cleanup();
bool isTerminated();
```
private:

```cpp
class IsTerminated
{
public:
    IsTerminated()
    {
    m_isTerminated = false;
    pthread_mutex_init(&m_mutex, 0);
    }

    virtual ~IsTerminated()
    {
    pthread_mutex_destroy(&m_mutex);
    }

    bool isTerminated()
    {
    bool ret;

    pthread_mutex_lock(&m_mutex);
    ret = m_isTerminated;
    pthread_mutex_unlock(&m_mutex);

    return ret;
}

void setTerminated(bool isTerminated)
{
    pthread_mutex_lock(&m_mutex);
    m_isTerminated = isTerminated;
    pthread_mutex_unlock(&m_mutex);
}

private:
    pthread_mutex_t m_mutex;
    bool m_isTerminated;
};

IsTerminated m_isTerminated;

static int TERMINATION_MESSAGE;

const Chat::MessageBoardApplicationWrapper* m_messageBoardApplication;
Chat::ChatMessageDataReader_ptr m_chatMsgReader;
Chat::NameServiceDataReader_ptr m_nameServiceProvider;
Chat::NamedMessageDataWriter_ptr m_namedMessageWriter;

DDS::QueryCondition_ptr m_nameFinder;
DDS::StringSeq m_nameFinderParams;

DDS::ReadCondition_ptr m_newMessages;

int m_previousID;
DDS::String_mgr m_username;
```

};

#endif // \_CHATMESSAGEDATAREADERLISTENERIMPL\_H\_

# ChatMessageDataReaderListenerImpl.h, Windows version

# Windows

ChatMessageDataReaderListenerImpl.h
```cpp
/******************************************************************************************
*
* Copyright (c) 2012 to 2017
* ADLINK Technology Limited
* All rights Reserved.
*
* LOGICAL_NAME: ChatMessageDataReaderListenerImpl.h
* FUNCTION: Vortex OpenSplice Modeler Tutorial example code.
* MODULE: Tutorial for the C++ programming language.
* DATE January 2012.
******************************************************************************************
*
* This file contains the implementation for the 'MessageBoard' executable.
*
***/
#ifndef _CHATMESSAGEDATAREADERLISTENERIMPL_H_
#define _CHATMESSAGEDATAREADERLISTENERIMPL_H_

#include &lt;string&gt;
#include "Chat/MessageBoardApplication/ChatMessageDataReaderListener.h"
#include "Chat/MessageBoardApplicationWrapper.h"
#include "exported_MessageBoardApplicationDcps.h"

class ChatMessageDataReaderListenerImpl :
public Chat::MessageBoardApplication::ChatMessageDataReaderListener
{
public:
    ChatMessageDataReaderListenerImpl(
    const Chat::MessageBoardApplicationWrapper* messageBoardApplication);

    void on_data_available(DDS::DataReader_ptr dataReader);
    void cleanup();
    bool isTerminated();

private:

    class IsTerminated
    {
    public:
    IsTerminated()
    {
    m_isTerminated = false;
    m_mutex = CreateMutex(NULL, FALSE, NULL);
    }

    virtual ~IsTerminated()
    {
    CloseHandle(m_mutex);
    }

    bool isTerminated()
```

```c
{
    bool ret;

    WaitForSingleObject(m_mutex, INFINITE);
    ret = m_isTerminated;
    ReleaseMutex(m_mutex);

    return ret;
}

void setTerminated(bool isTerminated)
{
    WaitForSingleObject(m_mutex, INFINITE);
    m_isTerminated = isTerminated;
    ReleaseMutex(m_mutex);
}

private:
    HANDLE m_mutex;
    bool m_isTerminated;
};

IsTerminated m_isTerminated;

static int TERMINATION_MESSAGE;

const Chat::MessageBoardApplicationWrapper* m_messageBoardApplication;
Chat::ChatMessageDataReader_ptr m_chatMsgReader;
Chat::NameServiceDataReader_ptr m_nameServiceReader;
Chat::NamedMessageDataWriter_ptr m_namedMessageWriter;

DDS::QueryCondition_ptr m_nameFinder;
DDS::StringSeq m_nameFinderParams;

DDS::ReadCondition_ptr m_newMessages;

int m_previousID;
DDS::String_mgr m_username;

};

#endif // _CHATMESSAGEDATAREADERLISTENERIMPL_H_
```

ChatMessageDataReaderListenerImpl.cpp
```txt
ChatMessageDataReaderListenerImpl.cpp
/******************************************************************************************
*
* Copyright (c) 2012 to 2017
* ADLINK Technology Limited
* All rights Reserved.
*
* LOGICAL_NAME: ChatMessageDataReaderListenerImpl.cpp
* FUNCTION: Vortex OpenSplice Modeler Tutorial example code.
* MODULE: Tutorial for the C++ programming language.
* DATE January 2012.
******************************************************************************************
*
* This file contains the implementation for the 'MessageBoard' executable.
*
```

```cpp
***/
#include &lt;sstream&gt;

#include "ChatMessageDataReaderListenerImpl.h"

#include "ccpp_dds_dcps.h"
#include "Chat/MessageBoardApplication/PrivateParticipantWrapper.h"
#include "Chat/MessageBoardApplication/PrivateParticipant/Subscriber/Subscriber/Subscriber/Subscriber/Subscriber/Subscriber/Subscriber/Subscriber/Subscriber/Subscriber/Subscriber/Subscriber/Subscriber/Subscriber/Subscriber/Subscriber/Subscriber/Subscriber/Subscriber/Subscriber/Subscriber/Subscriber/Subscriber/Subscriber/Subscriber/Subscriber/Subscriber/Subscriber/Subscriber/Subscriber/Subscriber/Subscriber/Subscriber/Subscriber/Subscriber/Subscriber/Subscriber/Subscriber/Subscriber/Subscriber/Subscriber/Subscriber/Subscriber/Subscriber/Subscriber/Subscriber/Subscriber/Subscriber/Subscriber/Subscriber/ Subscriber/wrapper.h"
#include "Chat/MessageBoardApplication/PrivateParticipant/PublisherWrapper.h"
#include "Chat/MessageBoardApplication/PrivateParticipant/PublisherWriter/wrapper.h"
#include "CheckStatus.h"

int ChatMessageDataReaderListenerImpl::TERMINATION_MESSAGE = -1;

using namespace std;
using namespace DDS;
using namespace Chat;

ChatMessageDataReaderListenerImpl::ChatMessageDataReaderListenerImpl(
    const Chat::MessageBoardApplicationWrapper* messageBoardApplication) :
    m_messageBoardApplication(messageBoardApplication),
    m_chatMsgReader(
    messageBoardApplication->getPrivateParticipantWrapper()
    ->getSubscriberWrapper()->getChatMessageDataReaderWrapper()
    ->getDataReader(),
    m_nameServiceReader(
    messageBoardApplication->getPrivateParticipantWrapper()
    ->getSubscriberWrapper()->getNameServiceDataReaderWrapper()
    ->getDataReader(),
    m_namedMessageWriter(
    messageBoardApplication->getPrivateParticipantWrapper()
    ->getPublisherWrapper()->getNamedMessageDataReaderWriter()
    ->getDataWriter(),
    m_previousID(-1) {
    /* Create a QueryCondition that will look up userName for a specified userID */
    m_nameFinderParams.length(1);
    m_nameFinderParams[0] = string_dup("0");

    m_nameFinder = m_nameServiceReader->create_querycondition(ANY_SAMPLE_STATE,
    ANY_VIEW_STATE, ANY_INSTANCE_STATE, "userID = %0",
    m_nameFinderParams);
    checkHandle(m_nameFinder,
    "Chat::NameServiceDataReader::create_querycondition");

    m_newMessages = m_chatMsgReader->create_readcondition(ANY_SAMPLE_STATE,
    ANY_VIEW_STATE, ANY_INSTANCE_STATE);
    checkHandle(m_newMessages,
    "Chat::ChatMessageDataReader::create_readcondition");

}

void ChatMessageDataReaderListenerImpl::on_data_available(
    DDS::DataReader_ptr dataReader) {

    /* Ignore new data if termination message already received */
    if (m_isTerminated.isTerminated()) {
    return;
    }

    bool terminationReceived = false;
    int status;
```

```cpp
if (DataReader == m_chatMsgReader) {
    ChatMessageSeq chatMsgSeq;
    SampleInfoSeq chatMsgInfoSeq;

    status = m_chatMsgReader->take_w_condition(chatMsgSeq, chatMsgInfoSeq, LENGTH_UNLIMITED, m_newMessages);
    checkStatus(status, "Chat::ChatMessageDataReader::take_w_condition");

    /* For each message, extract the key-field and find the corresponding name */
    for (unsigned int i = 0; i &lt; chatMsgSeq.length(); i++) {
    NameServiceSeq nameServiceSeq;
    SampleInfoSeq nameServiceInfoSeq;

    /* Set program termination flag if termination message is received */
    if (chatMsgSeq[i].userID == TERMINATION_MESSAGE) {
    terminationReceived = true;
    break;
    }

    /* Find the corresponding named message */
    if (chatMsgSeq[i].userID != m_previousID) {
    m_previousID = chatMsgSeq[i].userID;

    ostringstream previousID;
    previousID &lt;&lt; m_previousID;
    m_nameFinderParams[0] = string_dup(previousID.str().c_str());

    status = m_nameFinder-&gt;set_query_parameters(m_nameFinderParams);
    checkStatus(status, "QueryCondition::set_query_arguments(m_nameFinderParams)");
    status = m_nameServiceReader->read_w_condition(nameServiceSeq, nameServiceInfoSeq, LENGTH_UNLIMITED, m_nameFinder);
    checkStatus(status, "Chat::NameServiceDataReader::read_w_condition");

    if (status == RETCODE_NO_DATA) {
    ostringstream os;
    os &lt;&lt; "Name not found!! id = " + m_previousID;
    m_username = string_dup(os.str().c_str());
    } else {
    m_username = nameServiceSeq[0].name;
    }

    /* Release the name sample again */
    status = m_nameServiceReader-&gt;return_loan(nameServiceSeq, nameServiceInfoSeq);
    checkStatus(status, "Chat::NameServiceDataReader::return_loan");
    }

    NamedMessage namedMsg;

    /* Write merged Topic with userName instead of userID */

    namedMsg.userName = m_username;
    namedMsg.userId = m_previousID;
    namedMsg.index = chatMsgSeq[i].index;
    namedMsg.content = chatMsgSeq[i].content;

    if (chatMsgInfoSeq[i].valid_data) {
    status = m_namedMessageWriter->write(namedMsg, HANDLE_NIL);
    checkStatus(status, "Chat::NamedMessageDataWriter::write");
    }
}
```

```cpp
}
status = m_chatMsgReader->return_loan(chatMsgSeq, chatMsgInfoSeq);
checkStatus(status, "Chat::ChatMessageDataReader::return_loan");

if (terminationReceived) {
    m_isTerminated.setTerminated(true);
}
}

bool ChatMessageDataReaderListenerImpl::isTerminated() {
    return m_isTerminated.isTerminated();
}

void ChatMessageDataReaderListenerImpl::cleanup() {
    /* Remove all Read Conditions from the DataReaders */

    int status = m_nameServiceReader->delete_readcondition(m_nameFinder);
    checkStatus(status,
    "Chat::NameServiceDataReader::delete_readcondition(nameFinder)");
    status = m_chatMsgReader->delete_readcondition(m_newMessages);
    checkStatus(status,
    "Chat::ChatMessageDataReader::delete_readcondition(newMessages)");
}
```

# NamedMessageDataReaderListenerImpl.h, Linux Version

# Linux

NamedMessageDataReaderListenerImpl.h
```c
/******************************************************************************************
*
* Copyright (c) 2012 to 2017
* ADLINK Technology Limited
* All rights Reserved.
*
* LOGICAL_NAME:    NamedMessageDataReaderListenerImpl.h
* FUNCTION:    Vortex OpenSplice Modeler Tutorial example code.
* MODULE:    Tutorial for the C++ programming language.
* DATE    January 2012.
******************************************************************************************
*
* This file contains the implementation for the 'MessageBoard' executable.
*
***/
#ifndef _NAMEDMESSAGEDATAREADERLISTENERIMPL_H_
#define _NAMEDMESSAGEDATAREADERLISTENERIMPL_H_

#include &lt;pthread.h&gt;

#include "exported_MessageBoardApplicationDcps.h"
#include "Chat/MessageBoardApplicationWrapper.h"
#include "Chat/MessageBoardApplication/NamedMessageDataReaderListener.h"
```

class NamedMessageDataReaderListenerImpl : public Chat::MessageBoardApplication::NamedMessageData

```c
{
public:
    NamedMessageDataReaderListenerImpl(const Chat::MessageBoardApplicationWrapper* messageBoardApp
    void on_data_available (DDS::DataReader_ptr dataReader);
    bool isTerminated();

private:
    class IsTerminated
    {
    public:
    IsTerminated()
    {
    m_isTerminated = true;
    pthread_mutex_init(&m_mutex, 0);
    }

    virtual ~IsTerminated()
    {
    pthread_mutex_destroy(&m_mutex);
    }

    bool isTerminated()
    {
    bool ret;

    pthread_mutex_lock(&m_mutex);
    ret = m_isTerminated;
    pthread_mutex_unlock(&m_mutex);

    return ret;
    }

    void setTerminated(bool isTerminated)
    {
    pthread_mutex_lock(&m_mutex);
    m_isTerminated = isTerminated;
    pthread_mutex_unlock(&m_mutex);
    }

private:
    pthread_mutex_t m_mutex;
    bool m_isTerminated;
};

IsTerminated m_isTerminated;

const Chat::MessageBoardApplicationWrapper* m_messageBoardApplication;

Chat::NamedMessageDataReader_ptr m_namedMsgReader;
};

#endif // _NAMEDMESSAGEDATAREADERLISTENERIMPL_H_
```

# NamedMessageDataReaderListenerImpl.h, Windows Version

# Windows

```txt
NamedMessageDataReaderListenerImpl.h
```

```txt
/******************************************************************************************
```

# 11.1. Chatroom Example, C++ Source Code

```cpp
* Copyright (c) 2012 to 2017
* ADLINK Technology Limited
* All rights Reserved.
*
* LOGICAL_NAME:    NamedMessageDataReaderListenerImpl.h
* FUNCTION:    Vortex OpenSplice Modeler Tutorial example code.
* MODULE:    Tutorial for the C++ programming language.
* DATE    January 2012.
**************************
*
* This file contains the implementation for the 'MessageBoard' executable.
*
***/
#ifndef _NAMEDMESSAGEDATAREADERLISTENERIMPL_H_
#define _NAMEDMESSAGEDATAREADERLISTENERIMPL_H_

#include &lt;Windows.h&gt;

#include "exported_MessageBoardApplicationDcps.h"
#include "Chat/MessageBoardApplicationWrapper.h"
#include "Chat/MessageBoardApplication/NamedMessageDataReaderListener.h"

class NamedMessageDataReaderListenerImpl : public Chat::MessageBoardApplication::NamedMessageData
{
public:
    NamedMessageDataReaderListenerImpl(const Chat::MessageBoardApplicationWrapper* messageBoardApp
    void on_data_available (DDS::DataReader_ptr dataReader);
    bool isTerminated();

private:
    class IsTerminated
    {
    public:
    IsTerminated()
    {
    m_isTerminated = false;
    m_mutex = CreateMutex(NULL, FALSE, NULL);
    }

    virtual ~IsTerminated()
    {
    CloseHandle(m_mutex);
    }

    bool isTerminated()
    {
    bool ret;

    WaitForSingleObject(m_mutex, INFINITE);
    ret = m_isTerminated;
    ReleaseMutex(m_mutex);

    return ret;
    }

    void setTerminated(bool isTerminated)
    {
    WaitForSingleObject(m_mutex, INFINITE);
    m_isTerminated = isTerminated;
    ReleaseMutex(m_mutex);
    }

private:
```

```c
HANDLE m_mutex;
bool m_isTerminated;
};
IsTerminated m_isTerminated;

const Chat::MessageBoardApplicationWrapper* m_messageBoardApplication;
Chat::NamedMessageDataReader_ptr m_namedMsgReader;
};
#endif // _NAMEDMESSAGEDATAREADERLISTENERIMPL_H_
```

NamedMessageDataReaderListenerImpl.cpp
```cpp
NamedMessageDataReaderListenerImpl.cpp

/******************************************************************************************
*
* Copyright (c) 2012 to 2017
* ADLINK Technology Limited
* All rights Reserved.
*
* LOGICAL_NAME: NamedMessageDataReaderListenerImpl.cpp
* FUNCTION: Vortex OpenSplice Modeler Tutorial example code.
* MODULE: Tutorial for the C++ programming language.
* DATE January 2012.
******************************************************************************************
*
* This file contains the implementation for the 'MessageBoard' executable.
*
***/
#include &lt;iostream&gt;

#include "NamedMessageDataReaderListenerImpl.h"

#include "Chat/MessageBoardApplication/ParticipantWrapper.h"
#include "Chat/MessageBoardApplication/Participant/SubscriberWrapper.h"
#include "Chat/MessageBoardApplication/Participant/Subscriber/NamedMessageDataReaderWrapper.h"

#include "CheckStatus.h"

using namespace DDS;
using namespace Chat;
using namespace std;

NamedMessageDataReaderListenerImpl::NamedMessageDataReaderListenerImpl(
    const Chat::MessageBoardApplicationWrapper* messageBoardApplication) :
    m_messageBoardApplication(messageBoardApplication),
    m_namedMsgReader(messageBoardApplication->getParticipantWrapper()->getSubscriberWrapper(
    {
    m_isTerminated.setTerminated(true);
    }

void NamedMessageDataReaderListenerImpl::on_data_available(
    DDS::DataReader_ptr dataReader)
{
    NamedMessageSeq namedMsgSeq;
    DDS::SampleInfoSeq infoSeq;

    m_isTerminated.setTerminated(false);
```

```cpp
int status = m_namedMsgReader->take(namedMsgSeq, infoSeq, LENGTH_UNLIMITED, NOT_READ_SAMPLE_STATE, ANY_VIEW_STATE, ALIVE_INSTANCE_STATE);
checkStatus(status, "Chat::NamedMessageDataReader::read");

/* For each message, print the message */
for (unsigned int i = 0; i &lt; namedMsgSeq.length(); i++)
{
    cout &lt;&lt; namedMsgSeq[i].userName &lt;&lt; ": " &lt;&lt; namedMsgSeq[i].content &lt;&lt; endl;
}

status = m_namedMsgReader-&gt;return_loan(namedMsgSeq, infoSeq);
checkStatus(status, "Chat::NamedMessageDataReader::return_loan");

m_isTerminated.setTerminated(true);
}

bool NamedMessageDataReaderListenerImpl::isTerminated()
{
    return m_isTerminated.isTerminated();
}
```

# 11.1.3 UserLoad Application

# UserLoadApplication.cpp, Linux Version

# Linux

```cpp
UserLoadApplication.cpp

/******************************************************************************************
*
* Copyright (c) 2012 to 2017
* ADLINK Technology Limited
* All rights Reserved.
*
* LOGICAL_NAME: UserLoadApplication.cpp
* FUNCTION: Vortex OpenSplice Modeler Tutorial example code.
* MODULE: Tutorial for the C++ programming language.
* DATE January 2012.
******************************************************************************************
*
* This file contains the implementation for the 'UserLoadApplication' executable.
*
***/

#include &lt;iostream&gt;
#include &lt;sstream&gt;
#include &lt;unistd.h&gt;
#include &lt;string.h&gt;
#include &lt;pthread.h&gt;
#include &lt;assert.h&gt;

#include "UserLoadApplication.h"
#include "CheckStatus.h"

using namespace std;
using namespace DDS;
using namespace Chat;

/* entities required by all threads. */
```

# 11.1. Chatroom Example, C++ Source Code

```cpp
static DDS::GuardCondition_ptr escape;
/* Sleeper thread: sleeps 60 seconds and then triggers the WaitSet. */
void * delayedEscape(void *arg) {
    DDS::ReturnCode_t status;

    sleep(60); /* wait for 60 sec. */
    status = escape->set_trigger_value(TRUE);
    checkStatus(status, "DDS::GuardCondition::set_trigger_value");

    return NULL;
}

int main(int argc, char *argv[]) {
    /* DDS Identifiers */
    ReturnCode_t status;
    ConditionSeq guardList;

    ChatMessageSeq msgList;
    NameServiceSeq nsList;
    SampleInfoSeq infoSeq;
    SampleInfoSeq infoSeq2;

    /* Others */
    StringSeq args;

    bool closed = false;
    Long prevCount = 0;
    pthread_t tid;

    UserLoadApplicationWrapperImplementation userLoadApplication;

    /* Initialize the Query Arguments. */
    args.length(1);
    args[0UL] = "0";

    try {
    userLoadApplication.getQueryConditionWrapper()->setQueryParameters(args);

    /* Initialize the application */
    userLoadApplication.start();
    } catch (WrapperException & e) {
    cout &lt;&lt; "Error while initializing the application:" &lt;&lt; endl;
    cout &lt;&lt; e.what() &lt;&lt; endl;
    return -1;
    }

    try {
    /* start the WaitSet */
    userLoadApplication.getUserLoadWaitSetWrapper()-&gt;start();
    } catch (WrapperException & e) {
    cout &lt;&lt; "Error while starting the WaitSet:" &lt;&lt; endl;
    cout &lt;&lt; e.what() &lt;&lt; endl;
    userLoadApplication.stop();
    return -1;
    }

    WaitSet_ptr userLoadWS = userLoadApplication.getUserLoadWaitSetWrapper()-&gt;getWaitSet();

    /* Generic DDS entities */
    LivelinessChangedStatus livChangStatus;

    escape = userLoadApplication.getGuardConditionWrapper()->condition();
```

```cpp
/* Type-specific DDS entities */
NameServiceDataReader_ptr nameServer = workloadApplication.getParticipantWrapper()->getSubscribe
ChatMessageDataReader_ptr loadAdmin = workloadApplication.getParticipantWrapper()->getSubscribe
QueryCondition_ptr singleUser = workloadApplication.getQueryConditionWrapper()->condition()
ReadCondition_ptr newUser = workloadApplication.getReadConditionWrapper()->condition();
StatusCondition_ptr leftUser = workloadApplication.getStatusConditionWrapper()->condition(
    /* Initialize and pre-allocate the GuardList used to obtain the triggered Conditions. */
    guardList.length(3);

    /* Remove all known Users that are not currently active. */
    status = nameServer->take(
    nsList,
    infoSeq,
    LENGTH_UNLIMITED,
    ANY_SAMPLE_STATE,
    ANY_VIEW_STATE,
    NOT_ALIVE_INSTANCE_STATE);
    checkStatus(status, "Chat::NameServiceDataReader::take");
    status = nameServer->return_loan(nsList, infoSeq);
    checkStatus(status, "Chat::NameServiceDataReader::return_loan");

    /* Start the sleeper thread */
    pthread_create (&tid, NULL, delayedEscape, NULL);

    while (!closed) {
    /* Wait until at least one of the Conditions in the waitset triggers. */
    status = workloadWS->wait(guardList, DURATION_INFINITE);
    checkStatus(status, "DDS::WaitSet::wait");

    /* Walk over all guards to display information */
    for (ULong i = 0; i &lt; guardList.length(); i++) {
    if (guardList[i].in() == newUser) {
    /* The newUser ReadCondition contains data */
    status = nameServer-&gt;read_w_condition(nsList, infoSeq,
    LENGTH_UNLIMITED, newUser);
    checkStatus(status,
    "Chat::NameServiceDataReader::read_w_condition");

    for (ULong j = 0; j &lt; nsList.length(); j++) {
    cout &lt;&lt; "New user: " &lt;&lt; nsList[j].name &lt;&lt; endl;
    }
    status = nameServer-&gt;return_loan(nsList, infoSeq);
    checkStatus(status, "Chat::NameServiceDataReader::return_loan");

    } else if (guardList[i].in() == leftUser) {
    /* Some liveliness has changed (either a DataWriter joined or a DataWriter left) */
    status
    = loadAdmin->get_liveliness_changed_status(livChangStatus);
    checkStatus(status,
    "DDS::DataReader::get_liveliness_changed_status");

    if (livChangStatus.alive_count &lt; prevCount) {
    /* A user has left the ChatRoom, since a DataWriter lost its liveliness */
    /* Take the effected users so tey will not appear in the list later on. */
    status = nameServer-&gt;take(nsList, infoSeq,
    LENGTH_UNLIMITED, ANY_SAMPLE_STATE, ANY_VIEW_STATE,
    NOT_ALIVE_INSTANCE_STATE);
    checkStatus(status, "Chat::NameServiceDataReader::take");

    for (ULong j = 0; j &lt; nsList.length(); j++) {
```

```cpp
c
/* re-apply query arguments */
ostringstream numberString;
numberString &lt;&lt; nsList[j].userID;
args[0UL] = numberString.str().c_str();
status = singleUser-&gt;set_query_parameters(args);
checkStatus(status,
    "DDS::QueryCondition::set_query_parameters");

/* Read this users history */
status = loadAdmin->take_w_condition(msgList, infoSeq2,
    LENGTH_UNLIMITED, singleUser );
checkStatus(status,
    "Chat::ChatMessageDataReader::take_w_condition");

/* Display the user and his history */
cout &lt;&lt; "Departed user " &lt;&lt; nsList[j].name
    &lt;&lt; " has sent " &lt;&lt; msgList.length()
    &lt;&lt; " messages." &lt;&lt; endl;
status = loadAdmin-&gt;return_loan(msgList, infoSeq2);
checkStatus(status,
    "Chat::ChatMessageDataReader::return_loan");
}
status = nameServer->return_loan(nsList, infoSeq);
checkStatus(status,
    "Chat::NameServiceDataReader::return_loan");
}
prevCount = livChangStatus.alive_count;

} else if (guardList[i].in() == escape) {
    cout &lt;&lt; "UserLoad has terminated." &lt;&lt; endl;
    closed = true;
} else {
    assert(0);
};
} /* for */
} /* while (!closed) */

try {
    /* Stop the application */
    userLoadApplication.stop ();
} catch (WrapperException& e) {
    cout &lt;&lt; "Error while stopping the application:" &lt;&lt; endl;
    cout &lt;&lt; e.what() &lt;&lt; endl;
    return -1;
}

return 0;
}
```

# UserLoadApplication.cpp, Windows Version

# Windows

```txt
UserLoadApplication.cpp
/******************************************************************************************
*
* Copyright (c) 2012 to 2017
* ADLINK Technology Limited
* All rights Reserved.
*
```

# 11.1. Chatroom Example, C++ Source Code

```cpp
* LOGICAL_NAME: UserLoadApplication.cpp
* FUNCTION: Vortex OpenSplice Modeler Tutorial example code.
* MODULE: Tutorial for the C++ programming language.
* DATE January 2012.
**************************
*
* This file contains the implementation for the 'UserLoadApplication' executable.
*
***/

#include &lt;iostream&gt;
#include &lt;sstream&gt;
#include &lt;string.h&gt;
#include &lt;assert.h&gt;

#include "UserLoadApplication.h"
#include "CheckStatus.h"

using namespace std;
using namespace DDS;
using namespace Chat;

/* entities required by all threads. */
static DDS::GuardCondition_ptr escape;

/* Sleeper thread: sleeps 60 seconds and then triggers the WaitSet. */
DWORD WINAPI
delayedEscape(
    LPVOID arg)
{
    DDS::ReturnCode_t status;

    Sleep(60000); /* wait for 60 sec. */
    status = escape->set_trigger_value(TRUE);
    checkStatus(status, "DDS::GuardCondition::set_trigger_value");

    return 0;
}

int main(int argc, char *argv[]) {
    /* DDS Identifiers */
    ReturnCode_t status;
    ConditionSeq guardList;

    ChatMessageSeq msgList;
    NameServiceSeq nsList;
    SampleInfoSeq infoSeq;
    SampleInfoSeq infoSeq2;

    /* Others */
    StringSeq args;

    bool closed = false;
    Long prevCount = 0;
    DWORD tid;
    HANDLE tHandle = INVALID_HANDLE_VALUE;

    UserLoadApplicationWrapperImplementation userLoadApplication;

    /* Initialize the Query Arguments. */
    args.length(1);
    args[0UL] = "0";
```

```cpp
try {
    userLoadApplication.getQueryConditionWrapper()->setQueryParameters(args);

    /* Initialize the application */
    userLoadApplication.start();
} catch (WrapperException& e) {
    cout &lt;&lt; "Error while initializing the application:" &lt;&lt; endl;
    cout &lt;&lt; e.what() &lt;&lt; endl;
    return -1;
}

try {
    /* start the WaitSet */
    userLoadApplication.getUserLoadWaitSetWrapper()-&gt;start();
} catch (WrapperException& e) {
    cout &lt;&lt; "Error while starting the WaitSet:" &lt;&lt; endl;
    cout &lt;&lt; e.what() &lt;&lt; endl;
    userLoadApplication.stop();
    return -1;
}

WaitSet_ptr userLoadWS = userLoadApplication.getUserLoadWaitSetWrapper()-&gt;getWaitSet();

/* Generic DDS entities */
LivelinessChangedStatus livChangStatus;

escape = userLoadApplication.getGuardConditionWrapper()->condition();

/* Type-specific DDS entities */
NameServiceDataReader_ptr nameServer = userLoadApplication.getParticipantWrapper()->getSubscribe
ChatMessageDataReader_ptr loadAdmin = userLoadApplication.getParticipantWrapper()->getSubscribe
QueryCondition_ptr singleUser = userLoadApplication.getQueryConditionWrapper()->condition()
ReadCondition_ptr newUser = userLoadApplication.getReadConditionWrapper()->condition();
StatusCondition_ptr leftUser = userLoadApplication.getStatusConditionWrapper()->condition()

/* Initialize and pre-allocate the GuardList used to obtain the triggered Conditions. */
guardList.length(3);

/* Remove all known Users that are not currently active. */
status = nameServer->take(
    nsList,
    infoSeq,
    LENGTH_UNLIMITED,
    ANY_SAMPLE_STATE,
    ANY_VIEW_STATE,
    NOT_ALIVE_INSTANCE_STATE);
checkStatus(status, "Chat::NameServiceDataReader::take");
status = nameServer->return_loan(nsList, infoSeq);
checkStatus(status, "Chat::NameServiceDataReader::return_loan");

/* Start the sleeper thread */
tHandle = CreateThread(NULL, 0, delayedEscape, NULL, 0, &tid);

while (!closed) {
    /* Wait until at least one of the Conditions in the waitset triggers. */
    status = userLoadWS->wait(guardList, DURATION_INFINITE);
    checkStatus(status, "DDS::WaitSet::wait");

    /* Walk over all guards to display information */
    for (ULong i = 0; i &lt; guardList.length(); i++) {
    if (guardList[i].in() == newUser) {
    /* The newUser ReadCondition contains data */
    status = nameServer-&gt;read_w_condition(nsList, infoSeq,
```

```cpp
LENGTH_UNLIMITED, newUser );
checkStatus(status,
"Chat::NameServiceDataReader::read_w_condition");

for (ULong j = 0; j &lt; nsList.length(); j++) {
    cout &lt;&lt; "New user: " &lt;&lt; nsList[j].name &lt;&lt; endl;
}
status = nameServer-&gt;return_loan(nsList, infoSeq);
checkStatus(status, "Chat::NameServiceDataReader::return_loan");

} else if (guardList[i].in() == leftUser) {
    /* Some liveliness has changed (either a DataWriter joined or a DataWriter left) */
    status
    = loadAdmin->get_liveliness_changed_status(livChangStatus);
    checkStatus(status,
    "DDS::DataReader::get_liveliness_changed_status");

    if (livChangStatus.alive_count &lt; prevCount) {
    /* A user has left the ChatRoom, since a DataWriter lost its liveliness */
    /* Take the effected users so they will not appear in the list later on. */

    status = nameServer-&gt;take(nsList, infoSeq,
    LENGTH_UNLIMITED, ANY_SAMPLE_STATE, ANY_VIEW_STATE,
    NOT_ALIVE_INSTANCE_STATE);
    checkStatus(status, "Chat::NameServiceDataReader::take");

    for (ULong j = 0; j &lt; nsList.length(); j++) {
    /* re-apply query arguments */
    ostringstream numberString;
    numberString &lt;&lt; nsList[j].userID;
    args[0UL] = numberString.str().c_str();
    status = singleUser-&gt;set_query_parameters(args);
    checkStatus(status,
    "DDS::QueryCondition::set_query_parameters");

    /* Read this users history */
    status = loadAdmin->take_w_condition(msgList, infoSeq2,
    LENGTH_UNLIMITED, singleUser);
    checkStatus(status,
    "Chat::ChatMessageDataReader::take_w_condition");

    /* Display the user and his history */
    cout &lt;&lt; "Departed user " &lt;&lt; nsList[j].name
    &lt;&lt; "has sent " &lt;&lt; msgList.length()
    &lt;&lt; "messages." &lt;&lt; endl;
    status = loadAdmin-&gt;return_loan(msgList, infoSeq2);
    checkStatus(status,
    "Chat::ChatMessageDataReader::return_loan");
    }
    status = nameServer->return_loan(nsList, infoSeq);
    checkStatus(status,
    "Chat::NameServiceDataReader::return_loan");
    }
    prevCount = livChangStatus.alive_count;

} else if (guardList[i].in() == escape) {
    cout &lt;&lt; "UserLoad has terminated." &lt;&lt; endl;
    closed = true;
} else {
    assert(0);
};
} /* for */
} /* while (!closed) */
```

```cpp
try {
    /* Stop the application */
    onLoadApplication.stop();
} catch (WrapperException & e) {
    cout &lt;&lt; "Error while stopping the application:" &lt;&lt; endl;
    cout &lt;&lt; e.what() &lt;&lt; endl;
    return -1;
}

CloseHandle(tHandle);

return 0;
}
```

# CheckStatus.h

```c
CheckStatus.h

/******************************************************************************************
*
* Copyright (c) 2012 to 2017
* ADLINK Technology Limited
* All rights Reserved.
*
* LOGICAL_NAME: CheckStatus.h
* FUNCTION: Vortex OpenSplice Modeler Tutorial example code.
* MODULE: Tutorial for the C++ programming language.
* DATE January 2012.
******************************************************************************************
*
* This file contains the headers for the error handling operations.
*
***/

#ifndef __CHECKSTATUS_H__
#define __CHECKSTATUS_H__

#include "ccpp_dds_dcps.h"
#include &lt;iostream&gt;

/**
 * Returns the name of an error code.
 **/

char *getErrorName(DDS::ReturnCode_t status);

/**
 * Check the return status for errors. If there is an error, then terminate.
 **/

void checkStatus(DDS::ReturnCode_t status, const char *info);

/**
 * Check whether a valid handle has been returned. If not, then terminate.
 **/

void checkHandle(void *handle, char *info);

#endif
```

CheckStatus.cpp
```cpp
CheckStatus.cpp

/******************************************************************************************
*
* Copyright (c) 2012 to 2017
* ADLINK Technology Limited
* All rights Reserved.
*
* LOGICAL_NAME: CheckStatus.cpp
* FUNCTION: Vortex OpenSplice Modeler Tutorial example code.
* MODULE: Tutorial for the C++ programming language.
* DATE January 2012.
******************************************************************************************
*
* This file contains the implementation for the error handling operations.
*
***/

#include "CheckStatus.h"

using namespace std;

/* Array to hold the names for all ReturnCodes. */
char *RetCodeName[13] = {
    "DDS_RETCODE_OK",
    "DDS_RETCODE_ERROR",
    "DDS_RETCODE_UNSUPPORTED",
    "DDS_RETCODE_BAD_PARAMETER",
    "DDS_RETCODE_PRECONDITION_NOT_MET",
    "DDS_RETCODE_OUT_OF_RESOURCES",
    "DDS_RETCODE_NOT_ENABLED",
    "DDS_RETCODE_IMMUTABLE_POLICY",
    "DDS_RETCODE_INCONSISTENT_POLICY",
    "DDS_RETCODE_ALREADY_DELETED",
    "DDS_RETCODE_TIMEOUT",
    "DDS_RETCODE_NO_DATA",
    "DDS_RETCODE_ILLEGAL_OPERATION" };

/**
 * Returns the name of an error code.
 */
char *getErrorName(DDS::ReturnCode_t status)
{
    return RetCodeName[status];
}

/**
 * Check the return status for errors. If there is an error, then terminate.
 */
void checkStatus(
    DDS::ReturnCode_t status,
    const char *info ) {

    if (status != DDS::RETCODE_OK && status != DDS::RETCODE_NO_DATA) {
    cerr << "Error in " << info << ": " << getErrorName(status) << endl;
    exit (0);
    }
}

/**
```

```txt
* Check whether a valid handle has been returned. If not, then terminate.
**/
void checkHandle(
    void *handle,
    char *info ) {
    if (!handle) {
    cerr << "Error in " << info << ": Creation failed: invalid handle" << endl;
    exit (0);
    }
}
```

# 12

# Contacts & Notices

# 12.1 Contacts

# ADLINK Technology Corporation

400 TradeCenter

Suite 5900

Woburn, MA

01801

USA

Tel: +1 781 569 5819

# ADLINK Technology Limited

The Edge

5th Avenue

Team Valley

Gateshead

NE11 0XA

UK

Tel: +44 (0)191 497 9900

# ADLINK Technology SARL

28 rue Jean Rostand

91400 Orsay

France

Tel: +33 (1) 69 015354

Web: http://ist.adlinktech.com/

Contact: http://ist.adlinktech.com/contact-us

E-mail: ist\_info@adlinktech.com

LinkedIn: https://www.linkedin.com/company/79111/

Twitter: https://twitter.com/ADLINKTech\_usa

Facebook: https://www.facebook.com/ADLINKTECH

# 12.2 Notices

Copyright © 2017 ADLINK Technology Limited. All rights reserved.

This document may be reproduced in whole but not in part. The information contained in this document is subject to change without notice and is made available in good faith without liability on the part of ADLINK Technology Limited. All trademarks acknowledged.
[🔗 Link to the original document](.vortex-opensplice-modeling-guide/vortex-opensplice-modeling-guide.pdf)