![Abstract composition of orange triangles and scattered points on white background (no text or symbols)](.vortex-opensplice-rnr-manager-guide/765146d92f0cf3c5c4c7a7ebadb4c3d996aa3135515180c406aaa2ac3bd2824e.jpg)

# VORTEX

# OPENSPLICE

# RnR Manager User Guide

# Release 6.8.3

# Contents

# 1 Preface 1

1.1 About The RnR Manager User Guide
1.2 Intended Audience
1.3 Organisation
1.4 Conventions

# 2 Introduction 3

2.1 Overview 3
2.2 Key Concepts . . 5

# 3 Installation 9

3.1 Pre-requisites 9
3.2 Supported Platforms 9
3.3 General Installation Instructions 9

# 4 Using the Record and Replay Manager 11

4.1 RnR Manager Overview 11
4.2 Domain Browser 14
4.3 Service Status 16
4.4 Storage Status 16
4.5 Scenario Status 18
4.6 Topics – One Click Record . 20
4.7 Scenario Editors 22
4.8 Storage Data 39
4.9 Storage Editor 43

# 5 Contacts & Notices 49

5.1 Contacts 49
5.2 Notices 49

# 1

# Preface

# 1.1 About The RnR Manager User Guide

The Vortex OpenSplice Record and Replay Manager (RnR Manager) User Guide is intended to provide a complete reference on how to use this tool to manage the Vortex OpenSplice Record and Replay Service (RnR Service).

This User Guide is intended to be used after the Vortex OpenSplice software including the RnR Service has been installed on the network and configured according to the instructions in the Vortex OpenSplice Getting Started Guide.

# 1.2 Intended Audience

The User Guide is intended to be used by all Vortex OpenSplice users, including programmers, testers, system designers and system integrators.

# 1.3 Organisation

The User Guide is organised as follows:

The Introduction gives an overview of the purpose and design of RnR Manager, together with general descriptions of its features.

Installation describes how to install RnR Manager and its license file.

Using the Record and Replay Manager gives detailed descriptions of all of the functions and features of RnR Manager.

# 1.4 Conventions

The icons shown below are used in Vortex product documentation to help readers to quickly identify information relevant to their specific use of Vortex OpenSplice.

<table><tr><td>Icon</td><td>Meaning</td></tr><tr><td>&lt;img src="images/2a05f87a4292bfecb242bff603249f384f86fc8d046326ed5c2af664e82a5224.jpg"/&gt;</td><td>Item of special significance or where caution needs to be taken.</td></tr><tr><td>&lt;img src="images/2f8a03184f07ba6929c0610d462b5baa13e1b03d87dee3b76889cd5a2761eb27.jpg"/&gt;</td><td>Item contains helpful hint or special information.</td></tr><tr><td>&lt;img src="images/4fe2b4a96e5a4b452bc5568d6f3865119632a2c2edabd550e9a06ba0786d19b9.jpg"/&gt;</td><td>Information applies to Windows (e.g. XP, 2003, Windows 7) only.</td></tr><tr><td>[4B6K]</td><td>Information applies to Unix-based systems (e.g. Solaris) only.</td></tr><tr><td>&lt;img src="images/8900901b866cfe9cfcd7831571589bc731bf0d8c1bc097997ff86d32e54d94ff.jpg"/&gt;</td><td>Information applies to Linux-based systems (e.g. Ubuntu) only.</td></tr><tr><td>&lt;img src="images/8722f419d393c3bbb0a636f2f9be25626b1ff366bae29885cce82fe83d6c1e42.jpg"/&gt;</td><td>C language specific.</td></tr><tr><td>&lt;img src="images/5187ea8199f4587188507201b111cab32a79fe7de38664ea33120658de893b1d.jpg"/&gt;</td><td>C++ language specific.</td></tr><tr><td>&lt;img src="images/0388ee0b2ce3ef57acafdcc66c22e17bfdd93ab5193748ca350639f6a130cba1.jpg"/&gt;</td><td>C# language specific.</td></tr><tr><td>&lt;img src="images/16f7797247fe2ad4c3e888f65321777b2aaf2ae21b5f4149dd3385a6356449ea.jpg"/&gt;</td><td>Java language specific.</td></tr></table>

# 2

# Introduction

The Vortex OpenSplice Record and Replay Manager, or RnR Manager, is a tool to control Vortex OpenSplice Record and Replay Services (RnR Services) and to inspect and change recorded data.

# 2.1 Overview

This section provides a brief introduction to the Vortex OpenSplice RnR Service and the RnR Manager tool.

![The image displays a triangular warning sign with a thick red border and a white interior, featuring a black exclamation mark centered inside.](.vortex-opensplice-rnr-manager-guide/d94927e8c5297510ca2bdaa342bdb8471fb1d56a575a69b361b6b9c1ea5d9aaf.jpg)

Version 6.4 of RnR Manager is compatible with Vortex OpenSplice version 6.4. It is not compatible with earlier versions of Vortex OpenSplice.

# 2.1.1 Vortex OpenSplice Record and Replay Service

RnR Services are the Vortex OpenSplice software modules responsible for implementing record and replay.

# Vortex OpenSplice RnR Service Features

Features provided by the RnR Service include the ability to:

• Control and monitor the service using regular DDS topics.
• Use expressions with wildcards to select partitions and topics of interest, for record and/or replay.
• Store data in XML records for easy post-analysis and data-mining.
• Store data in CDR records for efficient recording and replaying of high-volume data
• Create scenarios, grouping multiple commands into a logical set.
• Use replay filters to replay only the data recorded in a specific time-range.
• Query and edit storage data.

# Non-Intrusiveness of Vortex OpenSplice RnR

Vortex OpenSplice Record and Replay is a pluggable service of the Vortex OpenSplice Middleware and is capable of recording and/or replaying DDS datasets (i.e. topic samples) in a DDS system. As a ‘DDS service’, Record and Replay benefits from the inherent ‘decoupling in time and space’ that the DDS architecture offers, with respect to automatic discovery of the service’s dynamic interest in subscribing or publishing data as well as the transparent routing of information to and from the service.

Relevant characteristics of this service with respect to ‘intrusiveness’ for an existing system are:

1. The RnR service can be optionally configured on any DDS node in the system.

(a) When run as part of an existing federation of applications, it utilizes the federation’s shared memory segment to obtain the data. (So locally-published data is not required to travel over the network to be recorded by the service and vice versa for replaying towards co-located subscribers.)

(b) When run on a dedicated RnR node, to be recorded data is transparently forwarded to that RnR node typically using multicast network features (so as not to induce extra network traffic).

2. RnR services are controlled in ‘the DDS way’, i.e. a data-centric way where command and status topics enable DDS based ‘remote control’ of the service from anywhere in the system.

(a) A dedicated record and replay partition is utilized by RnR to bound the control/status flows.
(b) In the case of a dedicated RnR node, this partition can be configured to be a so-called ‘local partition’, thus bounding all control/status traffic to the RnR node (see Section 2.5.2.6 in the Vortex OpenSplice Deployment Guide).

3. Replaying (subsets) of recorded data ‘by definition’ has an impact on an existing system:

(a) As it can induce unanticipated traffic flows towards subscribing applications.
(b) As it typically triggers application processing of such replayed data.
(c) Which can be considered intentional and inherent to the purpose of replaying recorded data.

Summarizing, it can be stated that when dedicating a specific computing node for Recording and Replaying and confining the control and status traffic to control the service to stay inside that node, recording the data in a multicast-enabled network is non-intrusive.

![A blue square features a large, white lowercase 'i' in a serif typeface centered within it.](.vortex-opensplice-rnr-manager-guide/f143437e22b97b0db230d2c20a28b983fb55d90c1772ff0a2eb8ee575a3928bc.jpg)

Note: The few shared topic-definitions (definitions ONLY, not actual samples of these topics when these are ‘confined’ to the RnR node) that would be visible system-wide when inspecting the built-in topics of the system (for instance with a tool like the Vortex OpenSplice Tuner) are considered not instrusive as they only imply a small amount of static data space occupied by the related built-in topic samples.)

# Vortex OpenSplice Deployment Documentation

Please refer to the Vortex OpenSplice Deployment Guide (OpenSplice\_Deployment.pdf) for more detailed information on how to configure Vortex OpenSplice.

The Vortex OpenSplice configuration editor (osplconf) provides facilities to create, modify and save configuration files. This tool is described in Section 3.2 in the Vortex OpenSplice Deployment Guide.

# Vortex OpenSplice RnR Service Configuration Example - ospl.xml

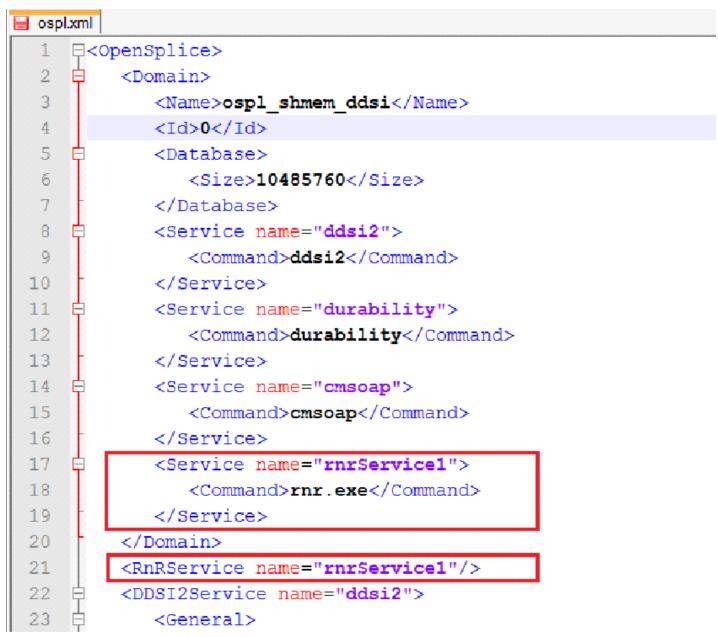
In order to use the RnR service, a new service needs to be defined in the xml configuration files. In the example below, the RnR-related entries are highlighted in red.

RnR Service Configuration in ospl.xml
![(OpenSplice)\n    (Domain)\n        (Name)ospl_shmem_ddsi(/Name)\n            (Id)0(/Id)\n            (Database)\n                (Size)10485760(/Size)\n            (/Database)\n            (Service name='ddsi2')\n                (Command)ddsi2(/Command)\n            (/Service)\n            (Service name='durability')\n                (Command)durability(/Command)\n            (/Service)\n            (Service name='cmsoap')\n                (Command)cmsoap(/Command)\n            (/Service)\n            (Service name='rnrService1')\n                (Command)rnr.exe(/Command)\n            (/Service)\n            (/Domain)\n    (RnRService name='rnrService1'/)\n    (DDSI2Service name='ddsi2')\n        (General)](.vortex-opensplice-rnr-manager-guide/40ab836b73f8ad1947127e4f653ce738d6c50a5dfd4edd418cb4e8d25ad39c42.jpg)

The service name in the example is rnrService1. A system can have many rnr services. The service name can be any string value.

# 2.1.2 RnR Manager Product Overview

The Vortex OpenSplice Record and Replay Manager, or RnR Manager, is a tool to control Vortex OpenSplice Record and Replay Services (RnR Services) and to inspect and change recorded data.

RnR Manager uses the internal Control and Monitoring API for access to the Vortex OpenSplice Middleware. Connections to local nodes via JNI and remote nodes (via SOAP) are supported. The manager tool does not need to have Vortex OpenSplice installed locally. A connection can be made remotely to a node that is running Vortex OpenSplice.

# RnR Manager Features

Features provided by the RnR Manager product include:

• Control and Monitor all Recorder and Player instances in the system.
• Connect to local and remote nodes.
• Monitor RnR Service status (scenarios, storages and services).
• Record and Replay scenarios.
• Import and export recorded data.
• Query and edit recorded data.

# 2.2 Key Concepts

# 2.2.1 Services

The Vortex OpenSplice middleware RnRService is responsible for implementing record and replay functionality.

A system may be configured to have multiple RnR Service instances.

An RnR Service is identified by a name. This name (also known as rnrId) is used to address the commands to a specific RnR Service. It is defined by the ‘name’ attribute of the service tag in the Vortex OpenSplice configuration. For example:

# 2.2. Key Concepts

```xml
&lt;OpenSplice&gt;
    &lt;Domain&gt;
    &lt;Name&gt;domain_name&lt;/Name&gt;
    &lt;Id&gt;0&lt;/Id&gt;
    &lt;Database&gt;
    &lt;Size&gt;10485670&lt;/Size&gt;
    &lt;/Database&gt;
    &lt;Service name="durability"&gt;
    &lt;Command&gt;durability&lt;/Command&gt;
    &lt;/Service&gt;
    &lt;Service name="cmsoap"&gt;
    &lt;Command&gt;cmsoap&lt;/Command&gt;
    &lt;/Service&gt;
    &lt;Service name="rnr_service_name"&gt;
    &lt;Command&gt;rnr&lt;/Command&gt;
    &lt;/Service&gt;
&lt;/Domain&gt;
&lt;RnRService name = "rnr_service_name"/&gt;
```

Where "rnr\_service\_name" will be used to identify this service.

The middleware uses this identifier to resolve the configuration options that apply to the service. A Record and Replay service only accepts commands with an rnrId that matches its Service name. In addition, an asterisk ‘\*’ can be used as rnrId for commands targeted at all available RnR Services in a domain.

# 2.2.2 Scenarios

The actions of a Record and Replay service are organized in ‘scenarios’. Scenarios are used to logically discriminate between different recording and replay command sequences (or sessions). A scenario is an instance of the scenario topic, a group of commands sharing the same scenarioName.

During initialization the RnR Service starts an initial scenario, called the BuiltinScenario. This is a special scenario that is always running while the service is operational. RnR Manager uses the BuiltinScenario to configure and control the RnR Service and create new scenario topic readers for each scenario ‘rr\_scenarioReader\_&lt;scenarioName&gt;’.

A Scenario may be in one of the following states:

SCENARIO\_RUNNING Scenario is active and able to receive and process commands

SCENARIO\_STOPPED Scenario is stopped and unable to receive commands

SCENARIO\_SUSPENDED Scenario is suspended and will resume processing commands when scenario is (re)started or continued

![The image displays a standard warning symbol featuring a red triangle with a thick border. Inside the triangle, centered on a white background, is a black exclamation point.](.vortex-opensplice-rnr-manager-guide/eb6d82d96ca323dce593b0374184a904ead02a28eaaaade944d78a7c8d7765d4.jpg)

Note that the BuiltinScenario can not be stopped.

# Scenario Commands

RnR commands are sent to the Scenario’s Command topic. Supported scenario commands are: Add Record, Add Replay, Remove Record, Remove Replay, Set Replay Speed, Truncate, Start, Stop and Suspend.

Add Record Specify interest to record data to a storage.

Add Replay Specify interest to replay data from a storage.

Remove Record Remove record interest from a storage.

Remove Replay Remove replay interest from a storage.

Set Replay Speed Change the replay speed of a storage.

Truncate Remove data from a storage.

# 2.2. Key Concepts

Start Start a scenario, or continue a suspended scenario.

Stop Stop a running scenario.

Suspend Suspend processing of new commands in a running scenario.

Config Add a storage to the service or modify properties of an existing storage.

![The image displays a triangular warning sign with a thick red border and a white interior. Centered inside the triangle is a black exclamation mark.](.vortex-opensplice-rnr-manager-guide/5481009e83a69e13fc073f60b3ca9ec7f9b46fa5908962d041a73d8aa87d53b9.jpg)

It is important to understand that a scenario, once stopped, cannot be started again. However, it is possible to start a new scenario with the same name as the stopped scenario. If any commands of the original scenario were published as transient data they will be delivered to and processed by the new scenario, giving the impression that the scenario has been re-started.

# Different versions of the scenario topic

Starting with Vortex OpenSplice RnR Manager V6.6.0, the tool interacts with two versions of the RnR service provided scenario command topic: rr\_scenario and rr\_scenario\_v2. The new version of the topic contains support for Transformations (partition, QoS) of data during replay.

The tool will only publish comands to the v2 command topic. If there exist scenarios from the previous version of the topic, e.g. from a persistent DDS store, then the tool will be able to read in the scenario commands for display in the Scenario Editor but if the scenario is stopped and started again from the editor, the scenario commands will be republished in the the v2 command topic, and the old topic scenario will be disposed.

Vortex OpenSplice RnR Manager expects the rr\_scenario\_v2 topic to be registered by the time it needs to publish commands, e.g. when starting/stopping a scenario or creating a storage. If the v2 topic is not registered, command publication will not take place. The tool does not attempt to publish commands on the old rr\_scenario topic.

# 2.2.3 Storages

The RnR Service operates in conjunction with storages, which can be configured statically in a configuration file or dynamically through interaction with the service.

RnR Manager determines the available storages by subscribing to the storage status topic. It can be used to add new storages to a service.

Storages may have the following states:

STORAGE\_READY Defined, but not opened yet.

STORAGE\_OPEN Storage successfully opened and can be written to.

STORAGE\_ERROR An unrecoverable error has occurred in the storage.

STORAGE\_OUTOFRESOURCES The storage is out of resources.

STORAGE\_CLOSED The storage has been closed and can no longer be written to.

# 2.2.4 Samples

The RnR Service records and replays DDS data, or Samples. A recorded Sample is stored in XML form in the file associated with the Storage. In addition to recording the topic data (for future replay), the RnR Service records additional Sample Information such as the Partition, Topic name, and recording time (timestamp).

When a Storage is imported into RnR Manager, the Sample data and recording information can be viewed using the Storage Editor.

# 2.2. Key Concepts

# 2.2.5 Time Ranges

Time Ranges can be used to limit the selection of data in a replay session. Users can select sample data based on the recorded timestamps. A range is defined with a start and an end timestamp.

# 3

# Installation

# 3.1 Pre-requisites

Vortex OpenSplice RnR Manager requires Oracle Java of at least version 1.6. OpenJDK Java is not supported.

RnR Manager does not need Vortex OpenSplice to be installed on the same system in order to control the RnR service. However, certain features of RnR Manager require a local installation of Vortex OpenSplice in order to operate. This includes connecting to a locally running Vortex OpenSplice domain using Domain URI, or Domain ID, and the storage Import/Export functions.

(Please refer to the Vortex OpenSplice Getting Started Guide for full details of how to install Vortex OpenSplice.)

Other information regarding recent changes to RnR Manager, or known issues are given in the Release Notes included with the distribution.

# 3.2 Supported Platforms

The RnR Manager will run on the Windows and Linux operating systems.

# 3.3 General Installation Instructions

To install the Vortex OpenSplice RnR Manager, start the installer and follow the on-screen instructions.

# 3.3.1 Installation on Unix and Linux

# Unix

# Linux

On Unix-based platforms (including Linux), first ensure that execute permission is enabled, then run the installer from the command line:

```txt
% VortexOpenSpliceRNRManager-&lt;version&gt;-&lt;platform&gt;-installer.bin
```

where &lt;version&gt; is the release version number and &lt;platform&gt; is the build for your platform.

# 3.3.2 Installation on Windows

# Windows

On Windows-based platforms, start the installer by double-clicking on its filename in Windows Explorer:

```txt
VortexOpenSpliceRNRManager-&lt;version&gt;-windows-installer.exe
```

where &lt;version&gt; is the release version number.

# 3.3.3 Installing the license file

Please refer to the Vortex OpenSplice Getting Started Guide for full details of how Vortex OpenSplice is licensed.

ADLINK supplies a license file for the RnR Manager product. This file is not included in the software distribution.

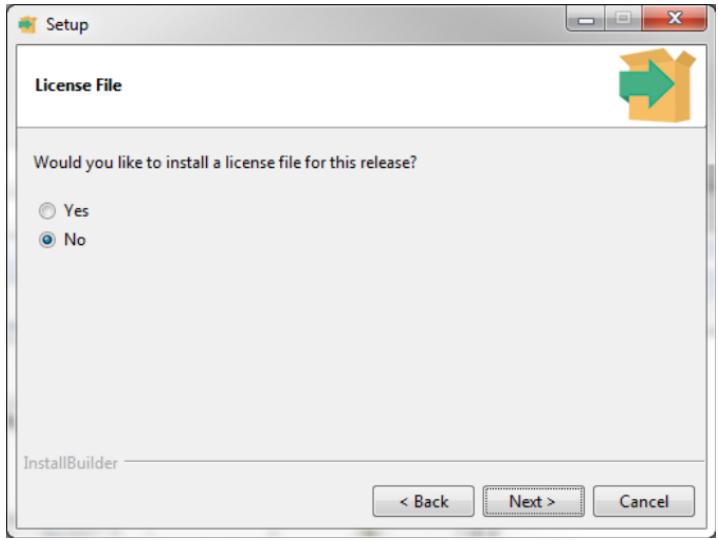
During the installation, you have the option of specifying the license file.

Installing a License file
![Setup\nLicense File\nWould you like to install a license file for this release?\nYes\nNo\nInstallBuilder\n( Back	Next )	Cancel](.vortex-opensplice-rnr-manager-guide/6664d886789f9c48c2cb87473a731a868d57c0df1326efb562c2b4c2d863ba43.jpg)

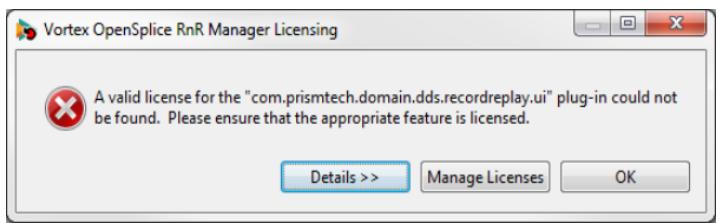
If you did not specify a license file during the installation, you will see a licensing error on startup.

License file error
![Vortex OpenSplice RnR Manager Licensing\nA valid license for the 'com.prismtech.domain.dds.recordreplay.ui' plug-in could not be found. Please ensure that the appropriate feature is licensed.\nDetails ))\nManage Licenses\nOK](.vortex-opensplice-rnr-manager-guide/9dcc6dcc748947c117ab3b6020886f808788e03f56e5006ebab212541c2e1087.jpg)

Click the Manage Licenses button and then Import License File. Click the button Restart Workbench after importing the license file.

# 4

# Using the Record and Replay Manager

RnR Manager does not need to be installed on a system with Vortex OpenSplice; it just needs to connect to a computer running Vortex OpenSplice with RnR Services configured.

# 4.1 RnR Manager Overview

# 4.1.1 Starting RnR Manager

RnR Manager is started by executing the startRnRManager script, located in the eclipse directory of the RnR Manager install directory. The script’s purpose is to ensure the proper setting of the Vortex OpenSplice environment variables prior to application launch.

The script allows for command line options to be passed to the application. Any command line options accepted by an Eclipse application are also accepted by RnR Manager. A particularly useful option is -data &lt;directory&gt;, which allows a user to specify a custom directory use as the RnR Manager workspace, in case the default directory is shared or write protected.

Example of starting RnR Manager with a non default workspace location:

```txt
&lt;path-to-RnRManager&gt;/startRnRManager.sh -data /home/user/rnrworkspace
```

```batch
&lt;path-to-RnRManager&gt;\startRnRManager.bat -data C:\Users\user\rnrworkspace
```

![A square icon featuring a white lowercase letter 'i' centered on a teal blue background.](.vortex-opensplice-rnr-manager-guide/819f969ca98085d00a4ab064e83fb04c1e6cbca8bcc52359fb8317681bb5ebfd.jpg)

Path arguments to the start script must be absolute paths.

# 4.1.2 Views

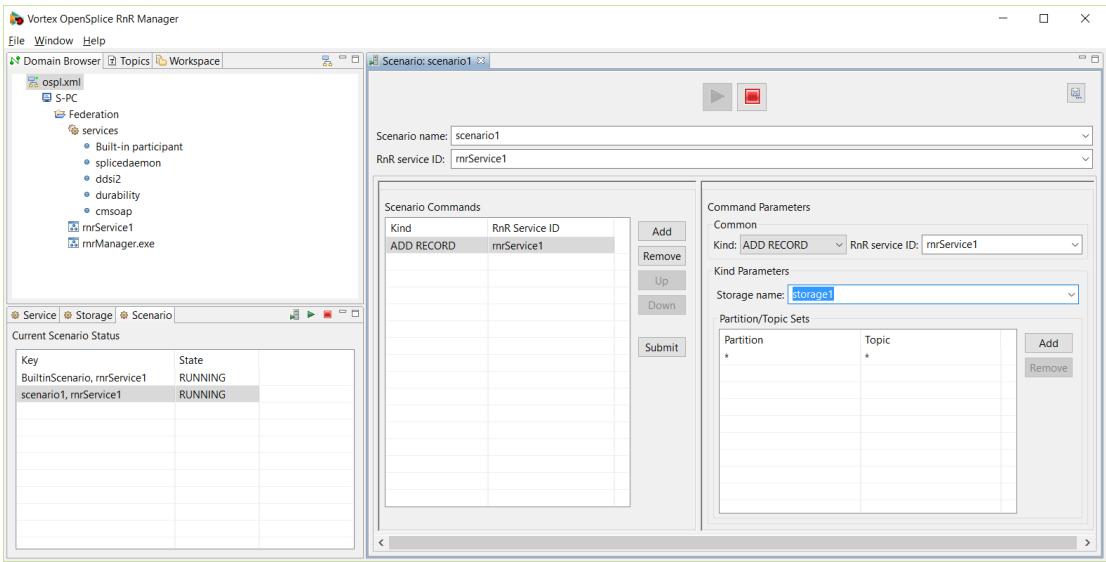
The RnR Manager supports various views to monitor the state of a connected domain. It also provides two editors.

These views and editors provide users with the ability to manage OSPL record and replay functionality. Additionally, record and replay data can be queried, and edited.

The views are:

• Domain Browser
• Service Status
• Storage Status
• Scenario Status
• Imported Storages

The editors are:

• Scenario Editor
• Storage Editor

Each view and editor has a detailed section to describe its features and intended usage.

RnR Manager Overview
![Vortex OpenSplice RnR Manager\nFile Window Help\nDomain Browser Topics Workspace\nospl.xml\nS-PC\nFederation\nservices\nBuilt-in participant\nsplicedaemon\nddsi2\ndurability\ncmsoap\nmrService1\nmrManager.exe\nScenario: scenario1\nScenario name: scenario1\nRnR service ID: rmService1\nScenario Commands\nKind	RnR Service ID\nADD RECORD rmService1\nAdd\nRemove\nUp\nDown\nSubmit\nCommand Parameters\nCommon\nKind: ADD RECORD RnR service ID: rmService1\nKind Parameters\nStorage name: storage1\nPartition/Topic Sets\nPartition	Topic\n*\n*\nAdd\nRemove\nService Storage Scenario\nCurrent Scenario Status\nKey	State\nBuiltinScenario, rmService1	RUNNING\nscenario1, mrService1	RUNNING](.vortex-opensplice-rnr-manager-guide/e4987d1f01eeec828387c84906e9a63dc00eb71f03050f2629eec3c7848d44b5.jpg)

# 4.1.3 Preferences

RnR Manager preferences can be set using the main Window/Preferences menu.

# OpenSplice

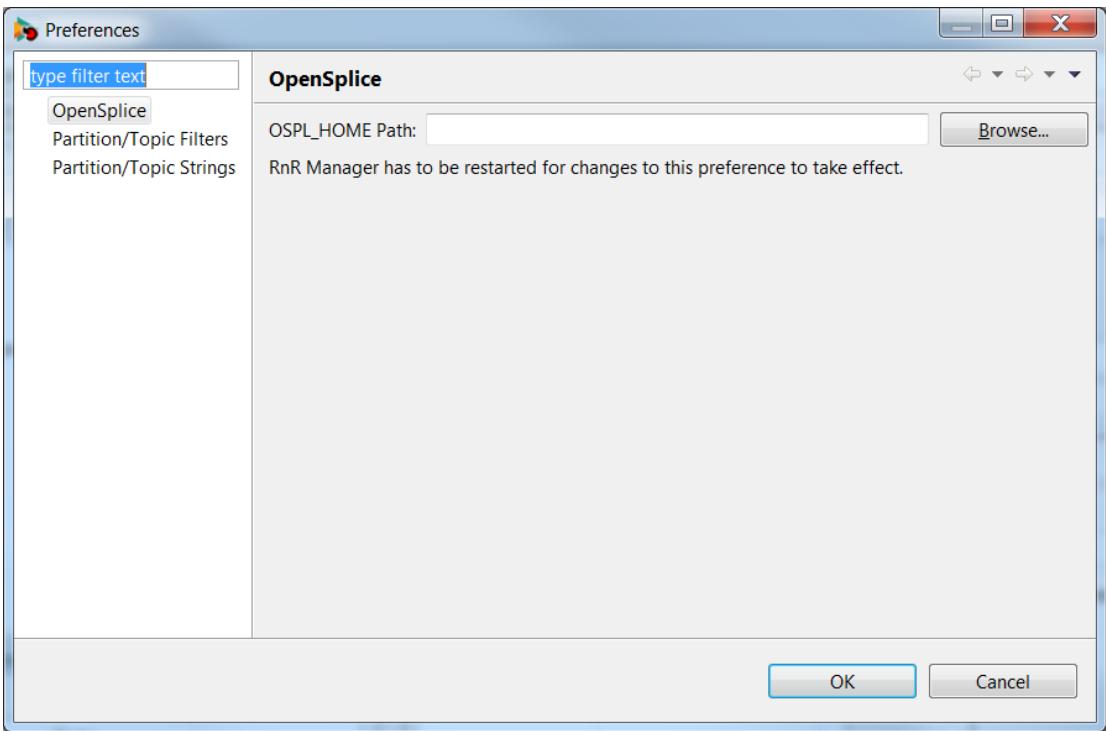
This preference page enables you to set the OSPL\_HOME path for the RnR Manager if one is not set for the environment.

![The image displays a standard warning sign. It is a red triangle with a white background containing a black exclamation point in the center.](.vortex-opensplice-rnr-manager-guide/9966a66a1ec60532d675fa7e64a757eee1f22195a6c8da896e43211c390de8db.jpg)

RnR Manager must be restarted for this preference to come into effect.

OpenSplice Preferences page
![Preferences\ntype filter text\nOpenSplice\nPartition/Topic Filters\nPartition/Topic Strings\nOpenSplice\nOSPL_HOME Path:\nBrowse...\nRnR Manager has to be restarted for changes to this preference to take effect.\nOK	Cancel](.vortex-opensplice-rnr-manager-guide/1fef0bc83a1b0b3bdb6381317cc2e0f4aee278dd80bb70cc1312bf783e1c3f6e.jpg)

# 4.1. RnR Manager Overview

# Partition/Topic Filters

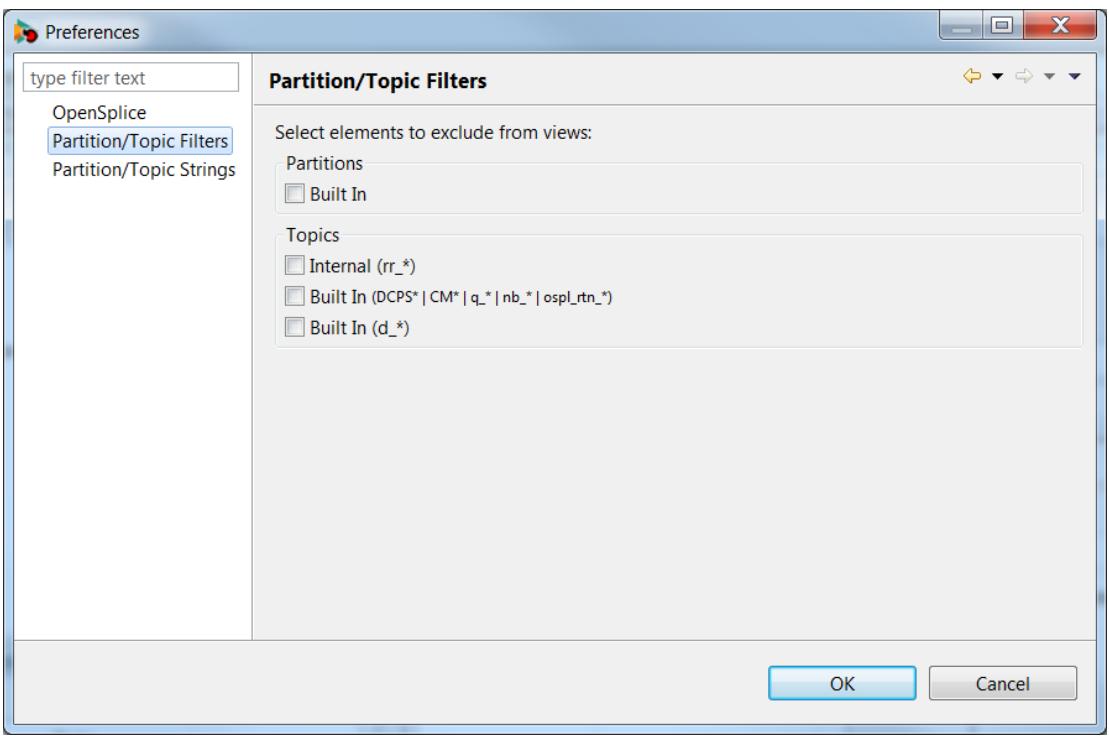
The Partition/Topic Filters page enables you to specify which partitions and topics you would like to filter out in the general UI display. For example, any topics that are filtered out would not be seen in the in dropdowns used to list topics or in the Topics view.

Partition/Topic Filters Preferences page
![Preferences\ntype filter text\nOpenSplice\nPartition/Topic Filters\nPartition/Topic Strings\nPartition/Topic Filters\nSelect elements to exclude from views:\nPartitions\nBuilt In\nTopics\nInternal (rr_*)\nBuilt In (DCPS* | CM* | q_* | nb_* | ospl_rtn_*)\nBuilt In (d_*)\nOK	Cancel](.vortex-opensplice-rnr-manager-guide/32a80f9d2ee432c7457d4cf722b45d29e38025b86ef29ec9c8ef7d1e1a2950c0.jpg)

# Partition/Topic Strings

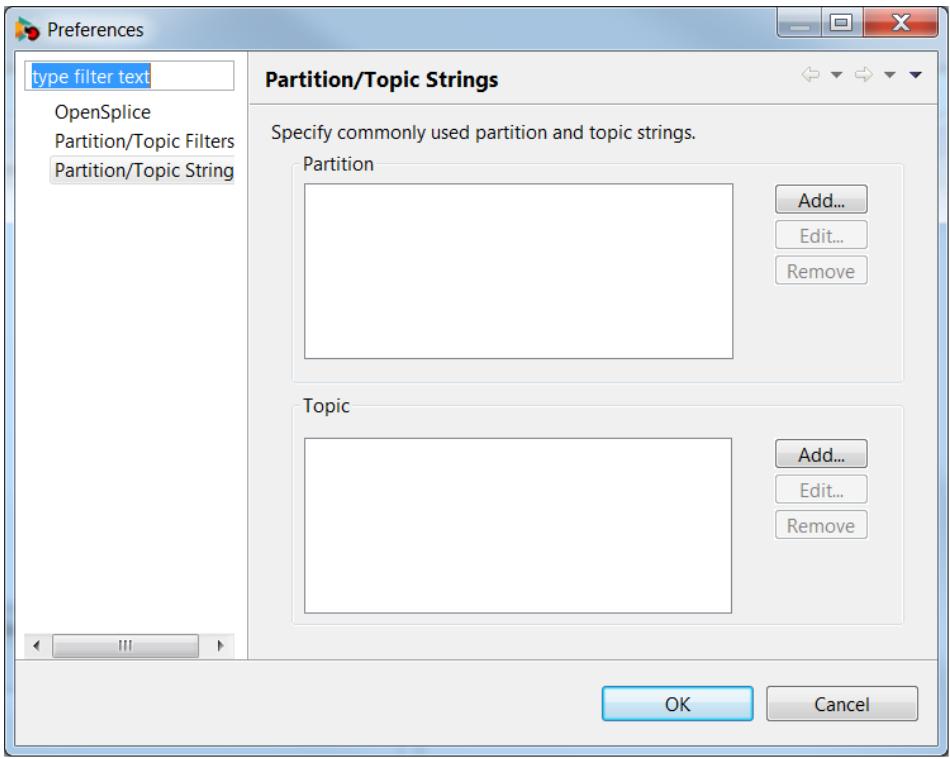
The Partition/Topic Strings page enables you to specify partition and topic strings that are displayed in the general UI. For example, any topic strings that are added here are displayed in drop-down topic lists.

Partition/Topic Strings
![Preferences\ntype filter text\nOpenSplice\nPartition/Topic Filters\nPartition/Topic String\nPartition/Topic Strings\nSpecify commonly used partition and topic strings.\nPartition\nAdd...\nEdit...\nRemove\nTopic\nAdd...\nEdit...\nRemove\nOK	Cancel](.vortex-opensplice-rnr-manager-guide/1a6a291275b232c6a256cdd9266f970162eacca3a4280f30cde9dc6dea1c5d7a.jpg)

# 4.1.4 Help

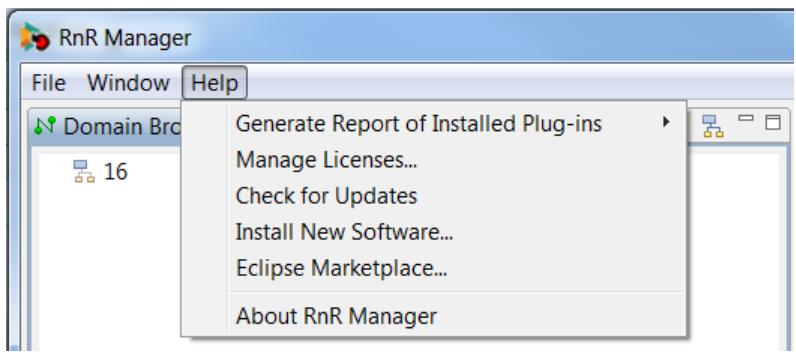
Various help actions are available from the main Help menu. These include actions for managing licenses, checking for updates, and product About... information.

Help menu
![RnR Manager\nFile Window Help\nDomain Bro\n16\nGenerate Report of Installed Plug-ins\nManage Licenses...\nCheck for Updates\nInstall New Software...\nEclipse Marketplace...\nAbout RnR Manager](.vortex-opensplice-rnr-manager-guide/837704e019a79ee0920407461eabf36f6537147c36f01630c2a9217b0fe3b675.jpg)

# 4.2 Domain Browser

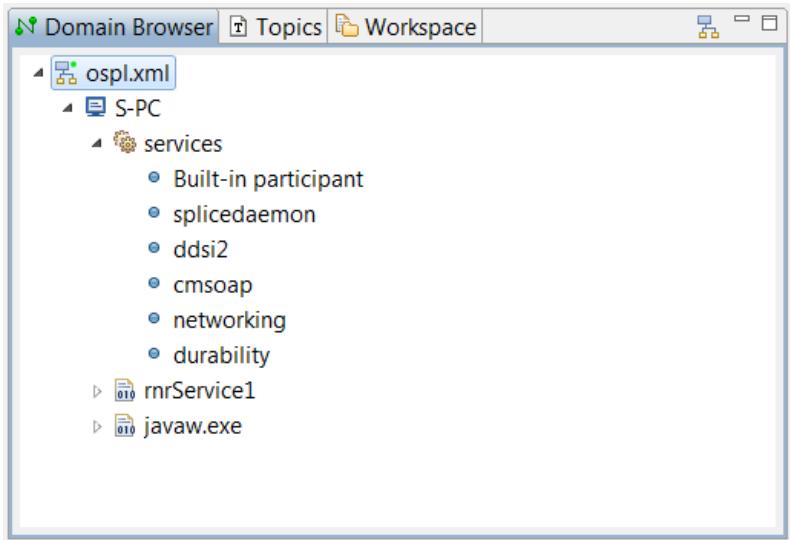
The Domain Browser is used to define and connect to a domain. It also provides information about domain nodes, and the services the nodes support.

# Domain Browser
![ospl.xml\nS-PC\nservices\n  Built-in participant\n  splicedaemon\n  ddsi2\n  cmsoap\n  networking\n  durability\n  rnrService1\n  javaw.exe](.vortex-opensplice-rnr-manager-guide/1b8720e23e15a33c52a471902544cca2cc09739cce58ab489ee846a29afd7ada.jpg)

# 4.2.1 Defining a domain

To define an OSPL domain, click on the button in the top right corner of the Domain Browser.

Add Domain button
![The image displays a simple diagram resembling a flowchart or hierarchy node. A light blue rectangle sits at the top center, connected by dark branching lines to two smaller yellow rectangles positioned side-by-side directly below it. The background is white, and faint grey borders are visible on the left and top edges.](.vortex-opensplice-rnr-manager-guide/c44f0e5b453c3adc96f10eda345382ebe640a7bc8798c62a7ff6150ccdea59a2.jpg)

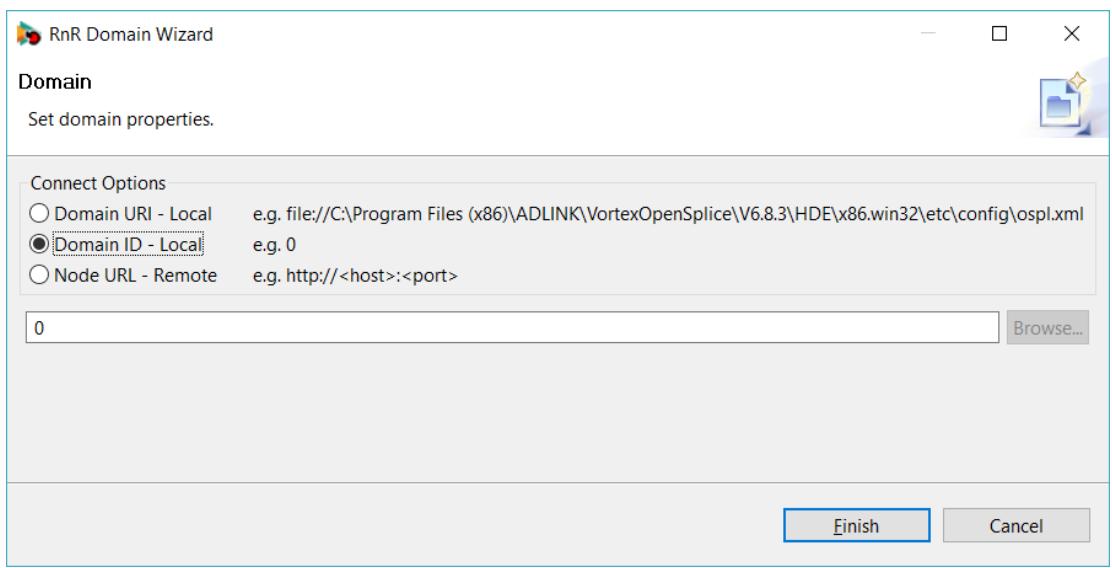
The RnR Wizard dialog will open. Multiple domain connection options are provided:

• A local domain can be connected to using an xml file or by specifying a domain id.
• A remote domain can be connected to using the node URL.

RnR Domain Wizard
![RnR Domain Wizard\nDomain\nSet domain properties.\nConnect Options\n○ Domain URI - Local e.g. file:///C:\Program Files (x86)\ADLINK\VortexOpenSplice\V6.8.3\HDE\x86.win32\etc\config\ospl.xml\n● Domain ID - Local e.g. 0\n○ Node URL - Remote e.g. http://(host):(port)\n0 Browse...\nFinish Cancel](.vortex-opensplice-rnr-manager-guide/61180fbf68f226478baf46c6f95f92cd1f161d495dcec608010b28e7b0b46af6.jpg)

# 4.2.2 Domain Connect

Once a domain has been defined, an entry will appear in the Domain Browser.

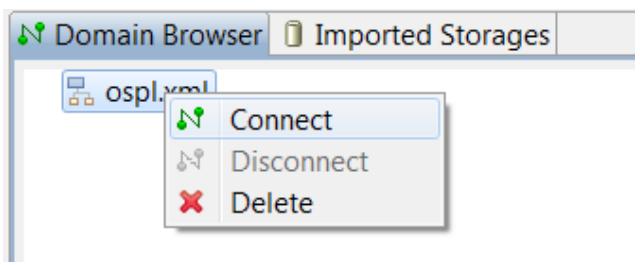
To connect, double-click on the entry, or right-click to display the domain menu and choose Connect.

# Connect to Domain

# 4.2. Domain Browser
![Domain Browser\nImported Storages\nospl.xml\nConnect\nDisconnect\nDelete](.vortex-opensplice-rnr-manager-guide/941e1a4de8883167e8a76530c3c15618aa904c1d7a627d8f548416a36b16bbe0.jpg)

When Connect is clicked, an attempt is made to connect to the RnR Services of the selected domain. If successful, the domain icon will change to $\scriptstyle { \frac { 1 } { 5 } } =$ and you will be able to expand the domain to browse the nodes.

RnR Manager needs to be connected to the RnR Services of a domain in order to manage the recording and/or replaying of sample data.

![The image displays a triangular warning sign with a thick red border and a white background. In the center, there is a black exclamation point.](.vortex-opensplice-rnr-manager-guide/274cd8255a763823af8c303b6f2ea5999363eeea13cdf3e484a8e5562ffb71de.jpg)

RnR Manager can only connect to one domain at a time.

# 4.2.3 Domain Disconnect and Delete

To disconnect or delete a domain, right-click on the domain to display the Domain menu.

# 4.3 Service Status

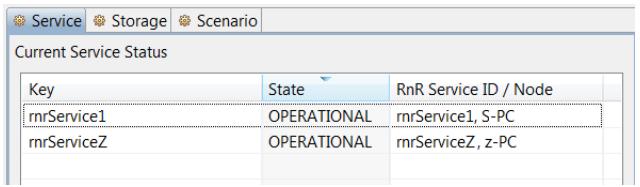
The service status view lists the current state of the OSPL RnR services available to the currently connected domain.

The list can be sorted by Key or State by clicking on the column header.

Service Status view
![Service Storage Scenario\nCurrent Service Status\nKey State RnR Service ID / Node\nmrService1 OPERATIONAL mrService1, S-PC\nmrServiceZ OPERATIONAL mrServiceZ, z-PC](.vortex-opensplice-rnr-manager-guide/8c923be8f0770c3a3aafc51635a950d3c54b75b393cebb31c068fec354555424.jpg)

# 4.4 Storage Status

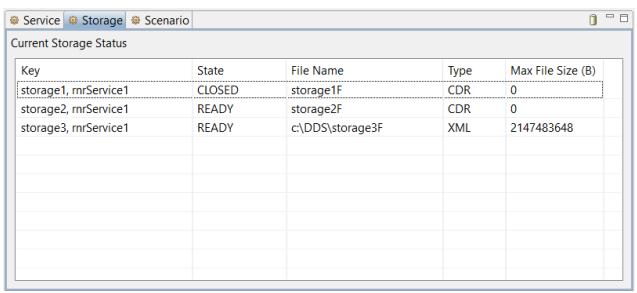
The storage status view lists the current state of the OSPL RnR storages available to the currently-connected domain.

The list can be sorted by Key or State by clicking on the column header.

Storage Status view
![Service Storage Scenario\nCurrent Storage Status\nKey State File Name Type Max File Size (B)\nstorage1, mrService1 CLOSED storage1F CDR 0\nstorage2, mrService1 READY storage2F CDR 0\nstorage3, mrService1 READY c:\DDS\storage3F XML 2147483648](.vortex-opensplice-rnr-manager-guide/018b2ab0005e8bd3dc36de62a13ba6c13ef5a689f630422ad99d22af4a5fe4fd.jpg)

# 4.4.1 Creating a new storage

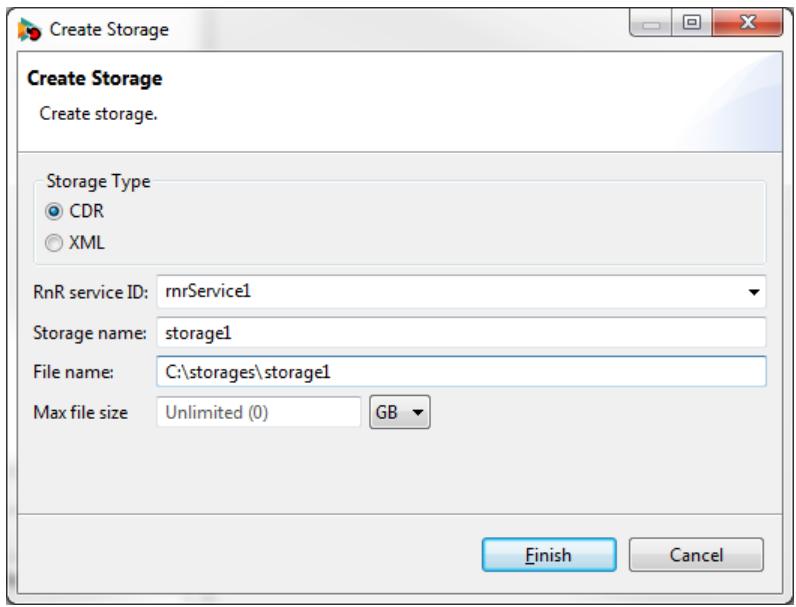
To create a new storage, click on the Add new storage button in the top right corner of the view to open the Create Storage dialog.

Add new storage button

![The image displays a pixelated, vertical, cylindrical object resembling a soda can or tin can. It is colored in shades of pale yellow and beige, with dark brown or black pixels outlining the top oval rim and the bottom edge. A vertical highlight runs down the center of the can's side. The background is a plain, light gray square. There is no text visible in the image.](.vortex-opensplice-rnr-manager-guide/0d5b1ceed435d07bd974f29b8224d2e22ee9b55698d45d7104c70842cad73683.jpg)

Create Storage dialog
![Create Storage\nCreate storage.\nStorage Type\nCDR\nXML\nRnR service ID: rmrService1\nStorage name: storage1\nFile name: C:\storages\storage1\nMax file size Unlimited (0) GB\nFinish Cancel](.vortex-opensplice-rnr-manager-guide/f42cab67f3c453b4ca5dd645e94b04763833131e3f35a2f21c768082b33c7c5d.jpg)

A wizard runs, with the input fields required for creating and configuring a new RnR storage.

The RnR Service ID field specifies for which service the storage will be created.

The Storage name field specifies what name the RnR service will recognize the storage by.

(See also Storage Attributes below.)

Clicking on Finish will create the storage. The Storage status view should be updated with a new entry for the newly-created storage.

# Storage Attributes

When creating new storages or reconfiguring existing storages, such as when using the Create Storage wizard, the following attributes can be set:

File name - The file name and path on the RnR service’s local filesystem in which it will keep the storage data. Relative paths are relative to the RnR service’s process working directory. File names have no rules or restrictions for file extensions; file names can have any extension, or no extension if required.

Storage type - The encoding format for the storage. The file formats available are CDR (binary) and XML. The CDR format is more efficient (compact) than XML.

Max file size - The maximum size per storage file. When approaching the maximum size while recording, a new storage file is automatically created with a sequence number appended to the filename. The active file is also switched transparently while replaying from a storage that contains multiple data files (eg. if file name is "file", the name sequence is file, file0, file1, etc.).

# 4.4. Storage Status

Valid max size is any positive integer in denominations of bytes, kilobytes, megabytes, or gigabytes, up to a maximum value of $2 ^ { \sim } 6 4 \mathrm { ~ ~ - ~ } 1$ total bytes. Leaving the field empty, or inputting the value 0, is considered to be unlimited file size.

# 4.5 Scenario Status

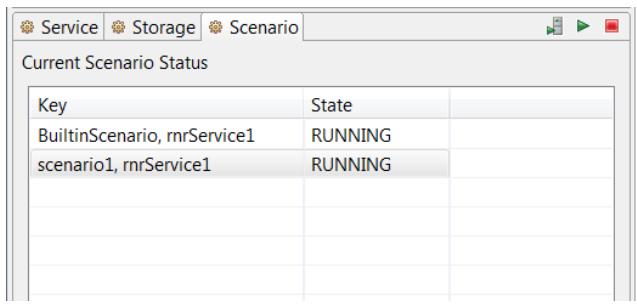
Record and Replay is based on Scenarios. Scenarios are used to logically discriminate between different recording and replaying command sequences. A scenario is an instance of the scenario topic, a group of commands sharing the same scenarioName.

The Scenario status view lists the current state of the OSPL RnR scenarios available to the currently-connected domain.

The list can be sorted by Key or State by clicking on the column header.

Scenario Status view
![Service Storage Scenario\nCurrent Scenario Status\nKey	State\nBuiltinScenario, rnrService1	RUNNING\nscenario1, rnrService1	RUNNING](.vortex-opensplice-rnr-manager-guide/1fc2e0410e2129224e270ccc674c2a698c97fe614b4781972d71277e6bef27bc.jpg)

# 4.5.1 Open Scenario Editor

To open an empty scenario editor, click on the Create scenario button in top right corner of the scenario status view.

Please refer to Scenario Editors for more information on the Scenario Editor.

Create scenario button
![The image shows a low-resolution, pixelated graphic featuring a large, green triangular arrow pointing to the right. To its right stands a tall, vertical cabinet or wardrobe structure with a brown frame and light blue panels. A small green square is visible near the top section of the cabinet. There is no text in the image.](.vortex-opensplice-rnr-manager-guide/6289976cd14987f510dd92804006ab4b5217b97e79c70cb9558c1052e49c2703.jpg)

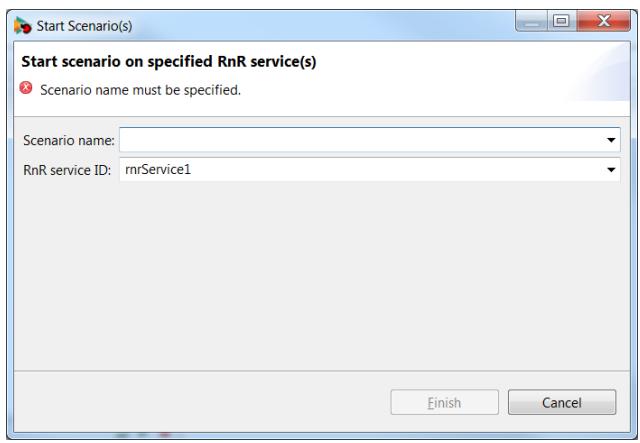
# 4.5.2 Starting Scenario(s)

To start a scenario or set of scenarios, click on the Start scenario(s) button to open the Start Scenario(s) dialog.

Start scenario button

![The image displays a green triangle pointing to the right, resembling a 'play' button icon. It is centered on a white square background and is flanked by thin black vertical bars on the left and right sides. The green triangle features a gradient, transitioning from a lighter green on the left to a darker green on the right.](.vortex-opensplice-rnr-manager-guide/94f5beaa3e0397d4c089a830150cd857eadfdeb551fb04926122113b7b455dc1.jpg)

The wildcard character ‘\*’ (asterisk) is supported.

Start Scenario(s) dialog
![Start Scenario(s)\nStart scenario on specified RnR service(s)\nScenario name must be specified.\nScenario name:\nRnR service ID: rmrService1\nFinish Cancel](.vortex-opensplice-rnr-manager-guide/3d1b7a1c0d02b5fd5c207ccf405544a1a33d0877fd940bf3a457c135b72ebdda.jpg)

A start scenario command is executed using the parameters specified in the dialog.

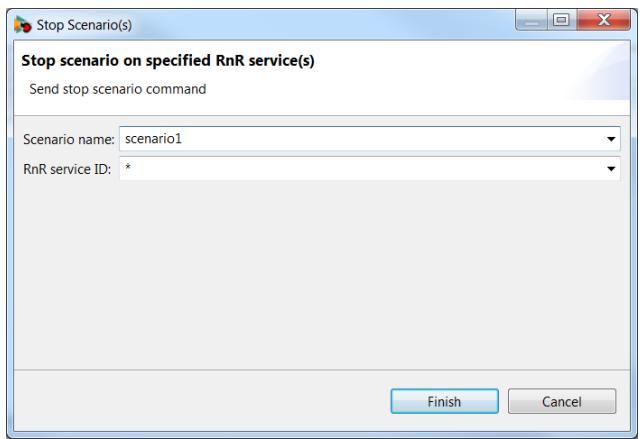
# 4.5.3 Stopping Scenario(s)

To stop a scenario or set of scenarios, click on the Stop scenario(s) button to open the Stop Scenario(s) dialog.

Stop scenario button

![The image displays a square graphic centered on a white background. It is composed of concentric squares with varying shades of red and pink. The outermost border is dark red. Inside that is a middle band of light pink or peach. The innermost square is a solid red color.](.vortex-opensplice-rnr-manager-guide/03455fd45a8a390fdf94677a5cbc167ecabb51eaf42aa7163a978f3ca6c578f1.jpg)

The wildcard character ‘\*’ (asterisk) is supported.

Stop Scenario(s) dialog
![Stop Scenario(s)\nStop scenario on specified RnR service(s)\nSend stop scenario command\nScenario name: scenario1\nRnR service ID: *\nFinish Cancel](.vortex-opensplice-rnr-manager-guide/9b629e7417762b3235836ad7e871cf99c0b01db53e283467414ff6287fc08bd6.jpg)

A stop scenario command is executed using the parameters specified in the dialog.

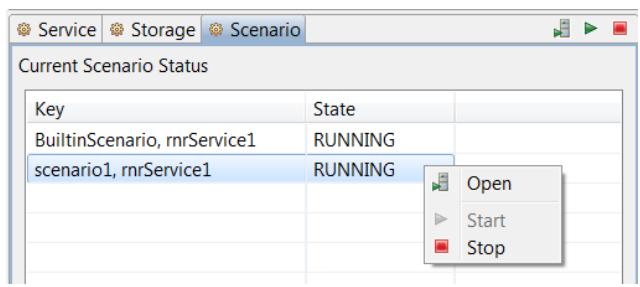
# 4.5.4 Scenario Menu

Actions are available for a scenario with a specific scenario name and rnrID.

To access the scenario menu, right-click on a scenario name in the scenario status table.

# Scenario Menu
![Service Storage Scenario\nCurrent Scenario Status\nKey State\nBuiltinScenario, rnrService1 RUNNING\nscenario1, rnrService1 RUNNING\nOpen\nStart\nStop](.vortex-opensplice-rnr-manager-guide/26aceede6396cdab82f0422d37feca3e3850fcd55ee530de9a9f8702a0fe45e2.jpg)

The scenario menu has the following options:

Open – Opens a scenario editor on the selected scenario and RnR service. Please refer to Scenario Editors for more information on the Scenario Editor.

Start – Start the selected scenario. This menu item is disabled if the scenario is already in the RUNNING state.

Stop – Stop the selected scenario. This menu item is disabled if the scenario is not in the RUNNING state.

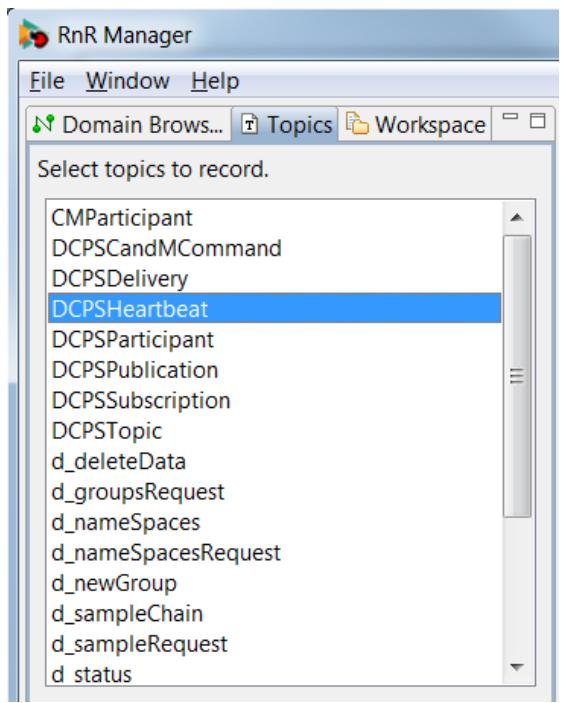
# 4.6 Topics – One Click Record

The Topics view displays all of the DDS system topics that are available for recording. This view enables the user to start recording quickly using the Record Topic(s) dialog. Default parameters for the recording are provided for the selected topics.

To verify the status of the recording, the storage and scenario views can be viewed. The scenario editor can also be opened for the scenario.

The Topics list
![RnR Manager\nFile Window Help\nDomain Brows... Topics Workspace\nSelect topics to record.\nCMParticipant\nDCPSCandMCommand\nDCPSDelivery\nDCPSHeartbeat\nDCPSParticipant\nDCPSPublication\nDCPSSubscription\nDCPSTopic\nd_deleteData\nd_groupsRequest\nd_nameSpaces\nd_nameSpacesRequest\nd_newGroup\nd_sampleChain\nd_sampleRequest\nd_status](.vortex-opensplice-rnr-manager-guide/122573540c4b60e41b1d4a369013f36bf82c8efb21882d984ae479c345828e04.jpg)

# 4.6.1 To Record a Topic

Step 1

Select one or more topics to record in the topic list.

Step 2

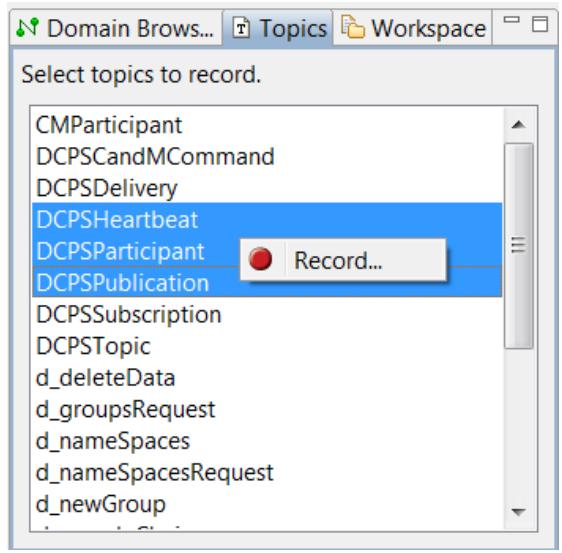
Right-click and choose Record... to open the Record Topic(s) dialog.

Topics selected for recording
![Domain Brows... Topics Workspace\nSelect topics to record.\nCMParticipant\nDCPSCandMCommand\nDCPSDelivery\nDCPSHeartbeat\nDCPSParticipant Record...\nDCPSPublication\nDCPSSubscription\nDCPSTopic\nd_deleteData\nd_groupsRequest\nd_nameSpaces\nd_nameSpacesRequest\nd_newGroup](.vortex-opensplice-rnr-manager-guide/b15d1b0ce6f8126155d6ee7ad63406ab215bd39dcbb4638b034df927697f19d8.jpg)

# Step 3

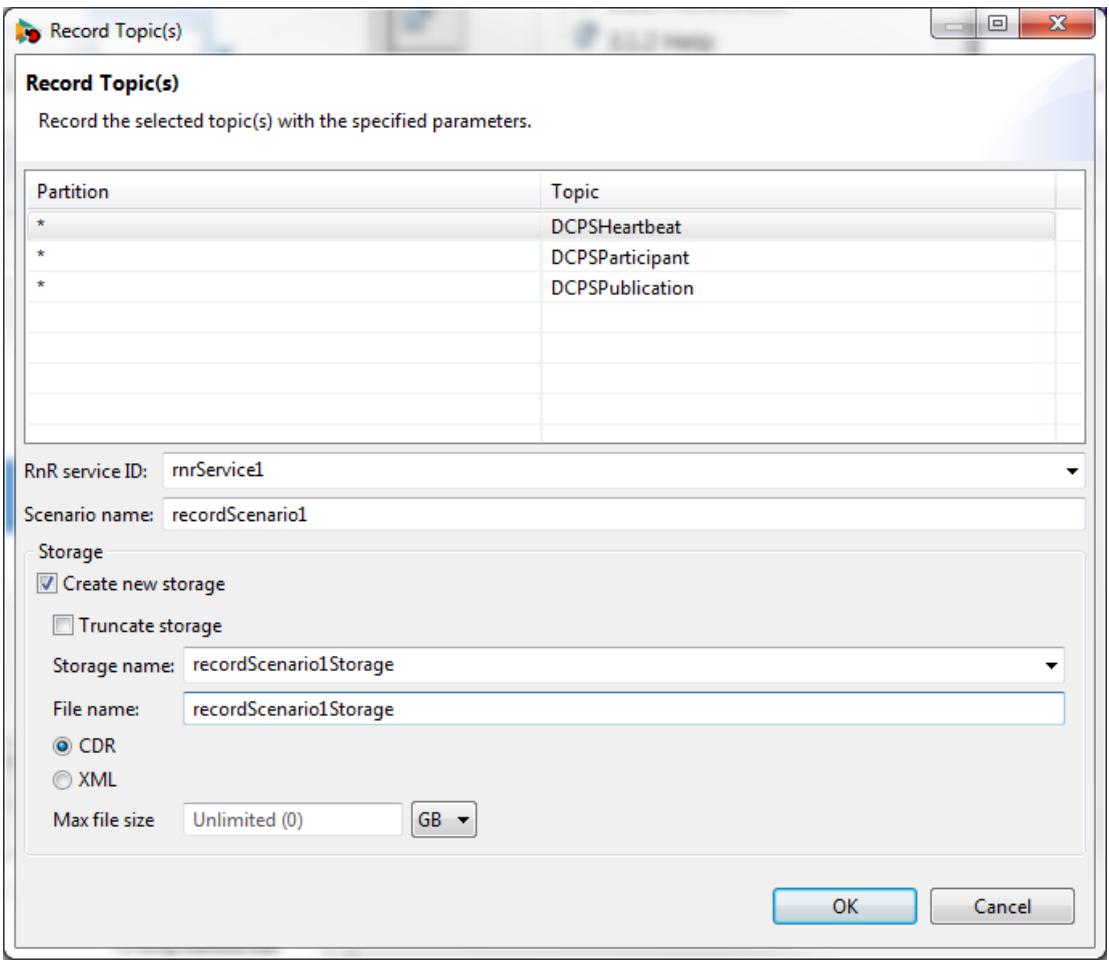
Modify the default parameters if required and click on OK.

Record Topic(s) dialog parameters
![Record Topic(s)\nRecord the selected topic(s) with the specified parameters.\nPartition\nTopic\n*\nDCPSHeartbeat\n*\nDCPSParticipant\n*\nDCPSPublication\nRnR service ID: rmrService1\nScenario name: recordScenario1\nStorage\n✓ Create new storage\n□ Truncate storage\nStorage name: recordScenario1Storage\nFile name: recordScenario1Storage\n○ CDR\n○ XML\nMax file size Unlimited (0) GB\nOK Cancel](.vortex-opensplice-rnr-manager-guide/782197ee0000c9164b51c3b3168aea288dfa4b53e5abb13e020444ffb7db1169.jpg)

# 4.6.2 The Record Topic(s) Dialog

Default parameters are provided in the dialog in order to provide ‘one click’ functionality. These default parameters can be edited if required.

# Partition/Topic pairs

The partition/topic pairs listed in the dialog reflect the selection in the Topics view when the dialog is opened.

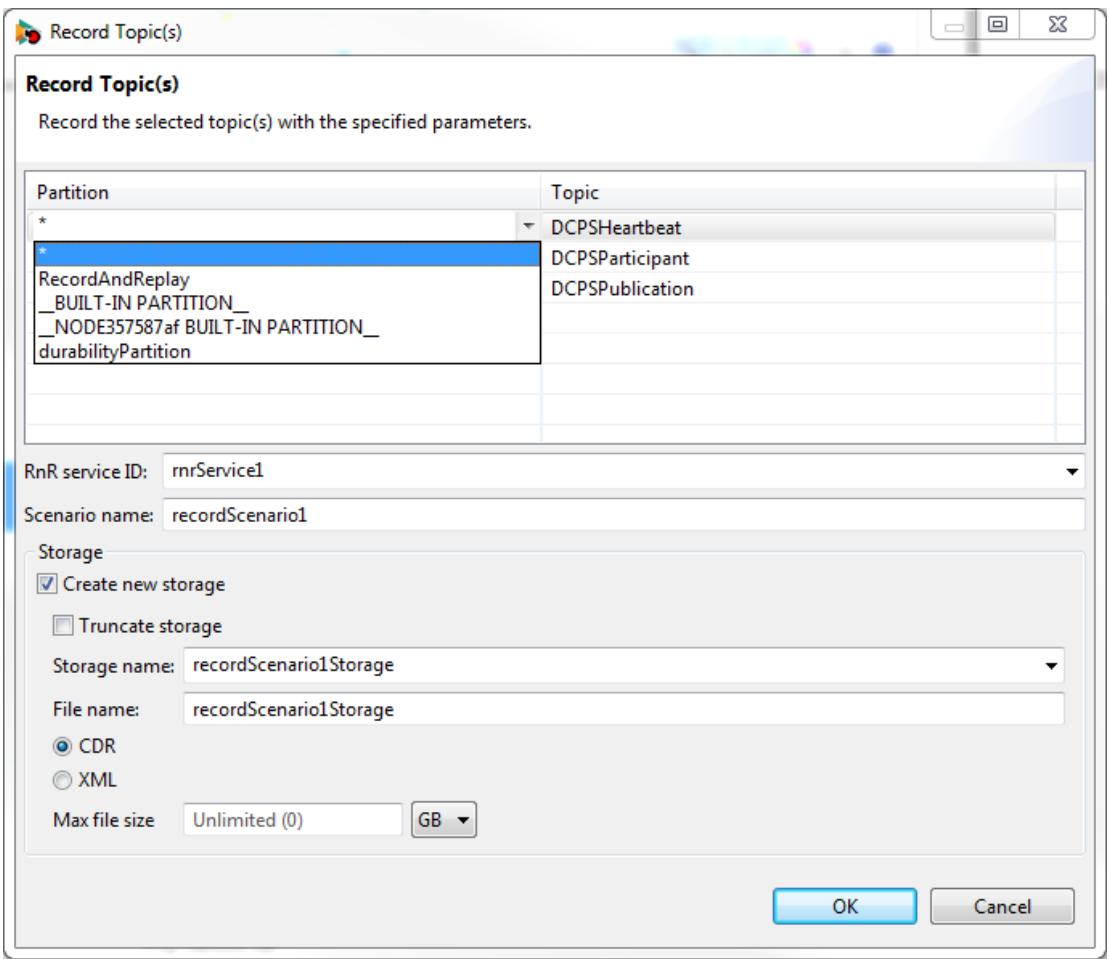
The partitions can be modified by selecting from a drop-down list. The topics are not editable.

Record Topic(s) dialog Partition parameter
![Record Topic(s)\nRecord the selected topic(s) with the specified parameters.\nPartition\n*\nRecordAndReplay\n__BUILT-IN PARTITION_\n__NODE357587af BUILT-IN PARTITION_\ndurabilityPartition\nTopic\nDCPSHeartbeat\nDCPSParticipant\nDCPSPublication\nRnR service ID: rmrService1\nScenario name: recordScenario1\nStorage\n✓ Create new storage\n□ Truncate storage\nStorage name: recordScenario1Storage\nFile name: recordScenario1Storage\n○ CDR\n○ XML\nMax file size Unlimited (0) GB\nOK Cancel](.vortex-opensplice-rnr-manager-guide/e797bcbd125105372b367ece375e3e4e10bbc9641b89bf1103851a67fa0dd51b.jpg)

The fields are:

RNR Service ID – Specify the RNR Service ID parameter.

Scenario Name – Specify the scenario name. By default if one topic is chosen, a name that reflects the topic is used. Otherwise a generic record name is provided.

The currently-known scenarios in the DDS system are checked, and a scenario name is provided where no current scenarios of that name are known.

Storage Name – A default storage name is provided that matches the scenario name. If that storage is already known to the DDS system, a warning message is provided at the top of the dialog.

The storage name can be modified to be any string; a drop-down list is provided to allow for the selection of existing storages.

Truncate existing storage – If this option is checked, a truncate command will be added for the specified storage. Otherwise, no truncate command is submitted.

Create new storage – If this option is checked, the storage specified by the Storage name field will be created/configured with the specified storage attributes. See Storage Attributes for more information.

# 4.7 Scenario Editors

The actions of a Record and Replay service are organized in scenarios.

# 4.7. Scenario Editors

A scenario is an instance of the scenario topic, a group of commands sharing the same scenarioName. Each service subscribes to the command topic and uses a content filter to only process commands with an rnrId matching the service name (or ‘\*’).

It is possible to create an intricate nesting of scenarios by defining a scenario that includes control commands targeting other scenarios.

RnR Manager has two editors related to scenarios. These editors are used to view and edit the commands of a scenario.

Scenario Editor – Enables viewing, adding, and editing scenarios in the DDS system.

Scenario File Editor – Enables viewing and editing of scenario data that is persisted using an xml file. The scenarios are saved as xml, and can be loaded into the DDS system as required.

# 4.7.1 Overview of the Scenario Editor

The scenario editor is used to view and edit the commands of a scenario within the DDS system.

The scenario editor can be opened from the Scenario Status view by any of the following actions:

• double-clicking on a selected scenario in the table
• right-clicking on a selected scenario in the table and then choosing Open
• clicking on the Create Scenario button

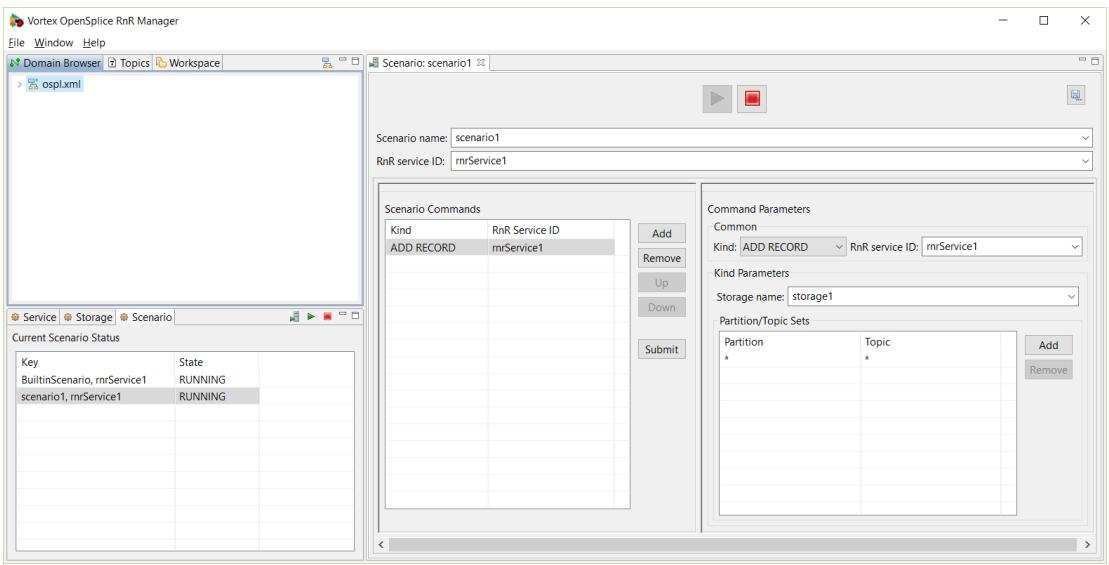
The Scenario Editor
![Vortex OpenSplice RnR Manager\nFile Window Help\nDomain Browser Topics Workspace\nospl.xml\nScenario: scenario1\nScenario name: scenario1\nRnR service ID: rmService1\nScenario Commands\nKind	RnR Service ID\nADD RECORD	mrService1\nAdd\nRemove\nUp\nDown\nSubmit\nCommand Parameters\nCommon\nKind: ADD RECORD	RnR service ID: rmService1\nKind Parameters\nStorage name: storage1\nPartition/Topic Sets\nPartition	Topic\n*\n*\nAdd\nRemove\nService Storage Scenario\nCurrent Scenario Status\nKey	State\nBuiltinScenario, rmService1	RUNNING\nscenario1, rmService1	RUNNING](.vortex-opensplice-rnr-manager-guide/f18db20b634102b127a29ea3b50cd10e3350517a70d4eb710bcf2bd533ca068a.jpg)

Scenario Editor elements:

Start and Stop buttons

The Start and Stop buttons, when clicked, submit the Start and Stop commands for the specified scenario and RnR service ID. These commands are published with a durability setting of VOLATILE.

Scenario name and RnR service ID

A new scenario name can be entered, or an existing scenario can be selected from the drop-down list.

Scenarios with the same scenario name can exist on multiple rnr services. The RnR service ID is also specified to identify the appropriate scenario. The wildcard character ‘\*’ (asterisk) can be used to denote all rnr services.

Scenario Commands

The scenario commands table displays all commands for a scenario with the specified RnR service ID.

# 4.7. Scenario Editors

# Command Parameters

The command parameters section displays the values associated with the selected command in the scenario commands table.

# 4.7.2 Overview of the Scenario File Editor

The scenario file editor can be used to edit the commands of a scenario and save them to an xml file. This xml file can later be loaded and submitted to a DDS scenario.

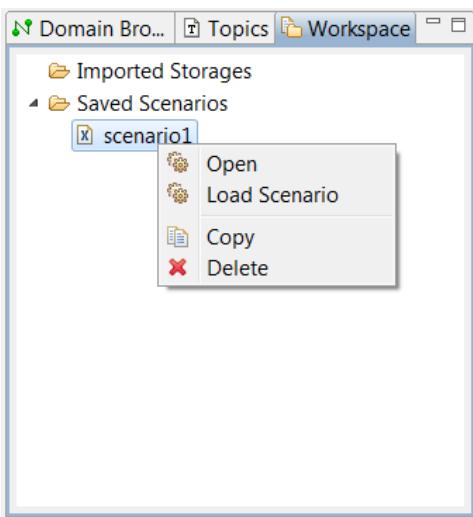
The scenario file editor can be opened from the Workspaces view by any of the following actions:

• double-clicking on a scenario file (under the Saved Scenarios folder)
• right-clicking on a selected scenario file and then choosing Open

Workspace Saved Scenarios
![Imported Storages\nSaved Scenarios\nscenario1\nOpen\nLoad Scenario\nCopy\nDelete](.vortex-opensplice-rnr-manager-guide/87ee410214b315d9c4b05dfef40c330c6baccb991bb23ac5c815628e082a99e1.jpg)

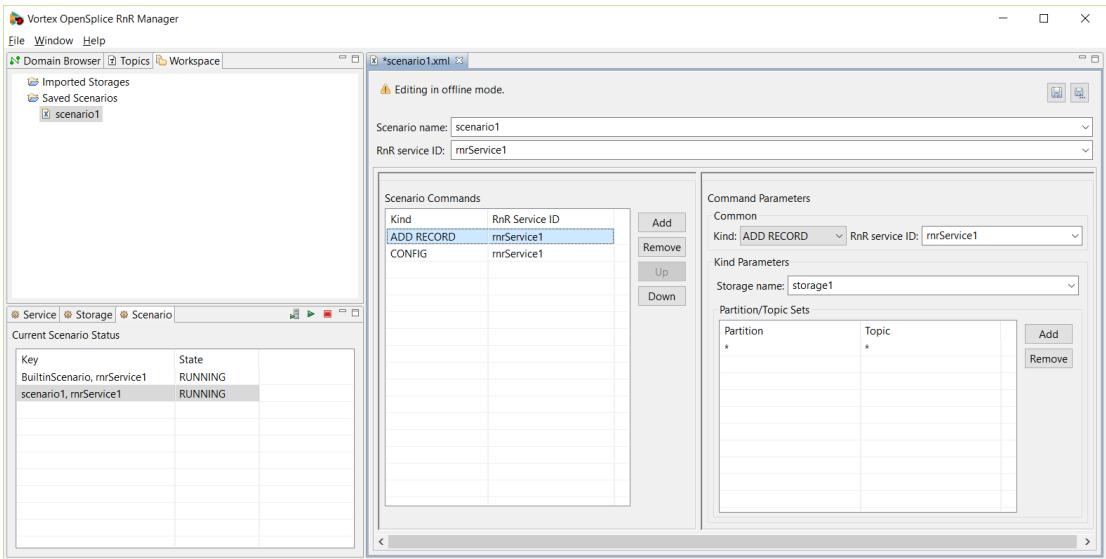
The Scenario File Editor
![Vortex OpenSplice RnR Manager\nFile Window Help\nDomain Browser Topics Workspace\nImported Storages\nSaved Scenarios\nscenario1\nEditing in offline mode.\nScenario name: scenario1\nRnR service ID: mrService1\nScenario Commands\nKind RnR Service ID\nADD RECORD mrService1\nCONFIG mrService1\nAdd\nRemove\nUp\nDown\nCommand Parameters\nCommon\nKind: ADD RECORD RnR service ID: mrService1\nKind Parameters\nStorage name: storage1\nPartition/Topic Sets\nPartition Topic\n*\n+\nAdd\nRemove\nService Storage Scenario\nCurrent Scenario Status\nKey State\nBuiltinScenario, mrService1 RUNNING\nscenario1, mrService1 RUNNING](.vortex-opensplice-rnr-manager-guide/28cd7818876af87d914ec9e71f90f51560a0c30d9578aed59a2fe12c66c91bd5.jpg)

Scenario File Editor elements:

Save and Save As... buttons

The Save button saves the current xml file.

The Save As... button saves the scenario to a new file and opens a new scenario file editor.

Scenario name and RnR service ID

# 4.7. Scenario Editors

A new scenario name can be entered, or an existing scenario can be selected from the drop-down list.

Scenarios with the same scenario name can exist on multiple rnr services. The RnR service ID is also specified to identify the appropriate scenario. The wildcard character ‘\*’ (asterisk) can be used to denote all rnr services.

# Scenario Commands

The scenario commands table displays all commands for a scenario with the specified RnR service ID.

# Command Parameters

The command parameters section displays the values associated with the selected command in the scenario commands table.

# 4.7.3 Re-sizing the Editors

# Full View

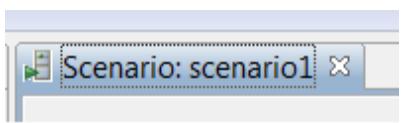
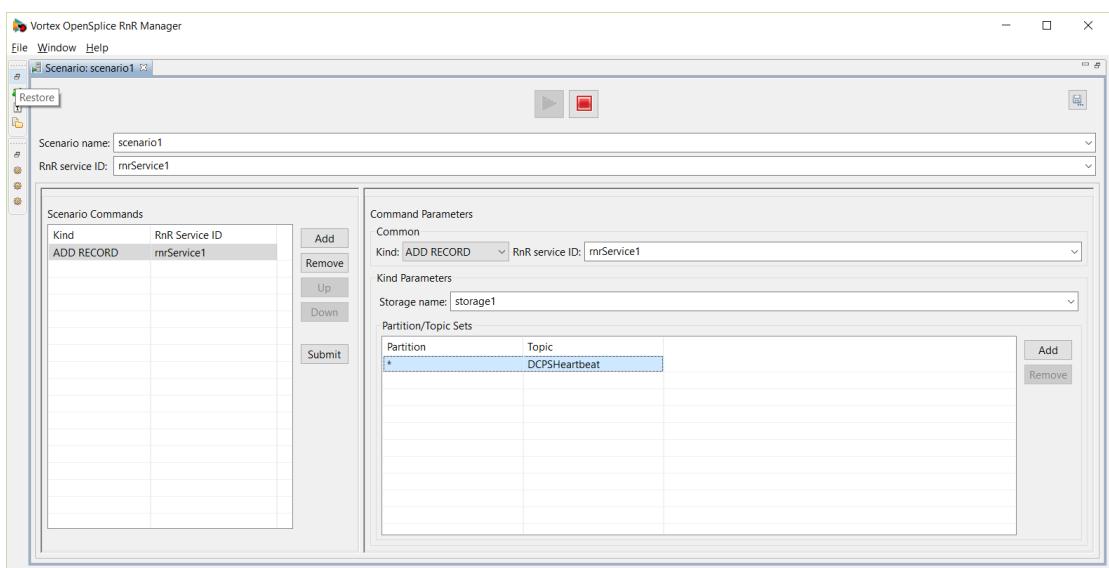
In order to maximize the view of an editor, double-click on the editor tab.

Scenario Editor tab
![Scenario: scenario1](.vortex-opensplice-rnr-manager-guide/76dd75cd0378002c49246e217e48f3120c6743d1f97e399e76502a6e62660951.jpg)

To restore the regular view, click on the ‘restore’ button, or double-click again on the editor tab.

Resizing an Editor
![Vortex OpenSplice RnR Manager\nFile Window Help\nScenario: scenario1\nRestore\nScenario name: scenario1\nRnR service ID: mrService1\nScenario Commands\nKind	RnR Service ID\nADD RECORD	mrService1\nAdd\nRemove\nUp\nDown\nSubmit\nCommand Parameters\nCommon\nKind: ADD RECORD	RnR service ID: mrService1\nKind Parameters\nStorage name: storage1\nPartition/Topic Sets\nPartition	Topic\n*	DCPSHeartbeat\nAdd\nRemove](.vortex-opensplice-rnr-manager-guide/81e8617868fce624a12ce2a276472f6bf90d362a13ff81b902f422ea920744ee.jpg)

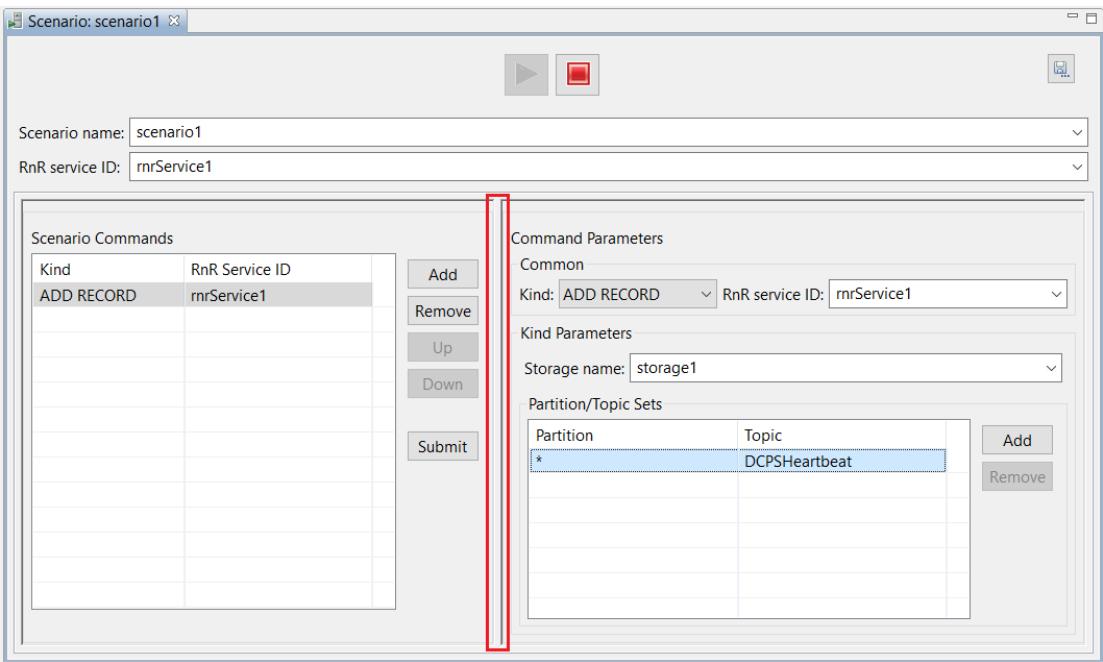
# Resize Editor groups

The widths of the Scenario Commands and Command Parameters groups can be changed by dragging the border with the mouse.

# Resizing Editor groups

# 4.7. Scenario Editors
![Scenario: scenario1\nScenario name: scenario1\nRnR service ID: mrService1\nScenario Commands\nKind	RnR Service ID\nADD RECORD	rnService1\nAdd\nRemove\nUp\nDown\nSubmit\nCommand Parameters\nCommon\nKind: ADD RECORD	RnR service ID: rrService1\nKind Parameters\nStorage name: storage1\nPartition/Topic Sets\nPartition	Topic\n*	DCPSHeartbeat\nAdd\nRemove](.vortex-opensplice-rnr-manager-guide/0f57032dc3600d68f354868c58b9ac95b6729fd12eabbebb471dc03e6c439eec.jpg)

# 4.7.4 Scenario Editor Features

A Scenario Editor
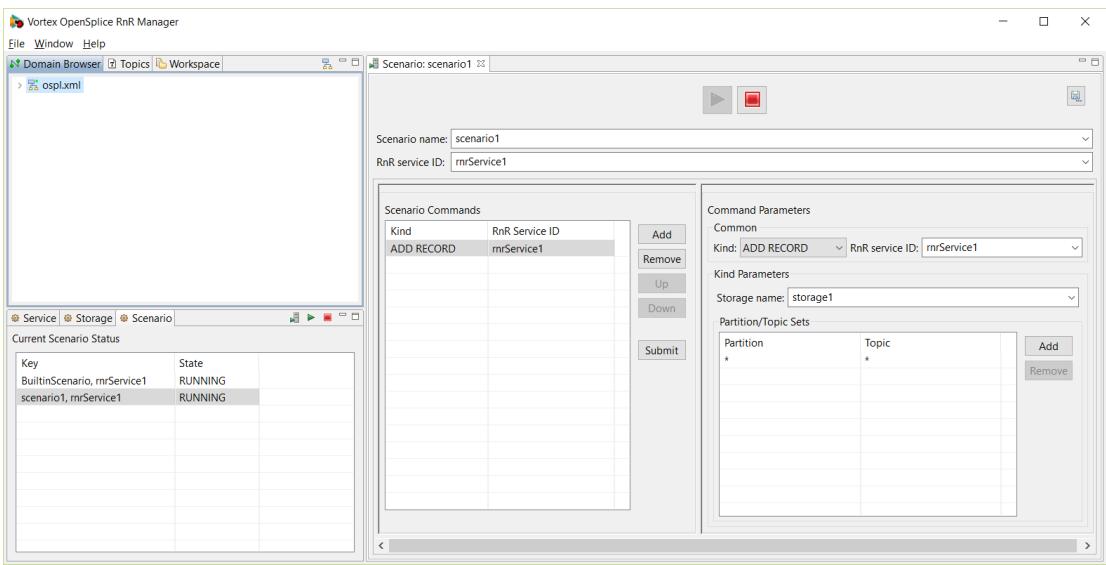
![Vortex OpenSplice RnR Manager\nFile Window Help\nDomain Browser Topics Workspace\nospl.xml\nScenario: scenario1\nScenario name: scenario1\nRnR service ID: rmService1\nScenario Commands\nKind RnR Service ID\nADD RECORD rmService1\nAdd\nRemove\nUp\nDown\nSubmit\nCommand Parameters\nCommon\nKind: ADD RECORD RnR service ID: rmService1\nKind Parameters\nStorage name: storage1\nPartition/Topic Sets\nPartition Topic\n*\n+\nAdd\nRemove\nCurrent Scenario Status\nKey State\nBuiltinScenario, rmService1 RUNNING\nscenario1, rmService1 RUNNING](.vortex-opensplice-rnr-manager-guide/e605d9fc518fed399ca8fa309f1b6decdec200c6c770bbe464f8adf3c7e2cd14.jpg)

The scenario editor displays the current state and the existing commands of a scenario in the DDS system.

• Existing commands for a specific scenario are displayed and are not editable.
• New commands can be added and submitted.

The functionality provided by the editor changes depending on the state of the scenario.

The state of a scenario can also be determined by viewing the scenario in the Scenario Status view.

# Running vs. Stopped Scenarios

# For RUNNING scenarios:

The Start button is disabled, the Stop button is enabled.

The Submit button is enabled.

# 4.7. Scenario Editors

Previously-submitted commands are displayed in the scenario commands table, but are ‘view only’. A visual indicator of this is that the font color is light gray. These commands can not be removed or edited.

Editable and non-editable commands
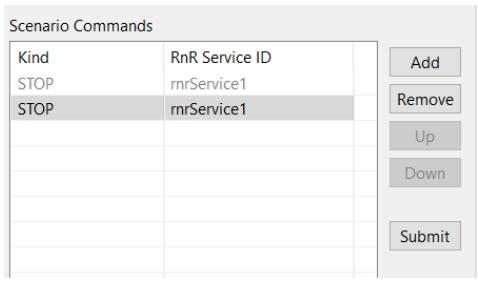
![Scenario Commands\nKind	RnR Service ID\nSTOP	rnrService1\nSTOP	rnrService1\nAdd\nRemove\nUp\nDown\nSubmit](.vortex-opensplice-rnr-manager-guide/a05a647f72c427356f7defc51410d655ce17a384366368173f2539152070a302.jpg)

# For STOPPED scenarios:

The Start button is enabled, the Stop button is disabled.

The Submit button is disabled, as it is not necessary. All commands are submitted if the Start button is clicked.

Previously-submitted commands displayed in the scenario commands table that were uneditable while the scenario was in the RUNNING state become editable again when in the STOPPED state.

# Adding new commands

To add a new command, click on the Add button in the Scenario Commands section.

Specify the appropriate parameters for this new command in the Command Parameters section.

• If a scenario is already in the RUNNING state, click on the Submit button to submit the command or commands.
• If a scenario is in the STOPPED state, click on the Start button at the top of the editor to submit all the new commands and start the scenario.

A Running Scenario
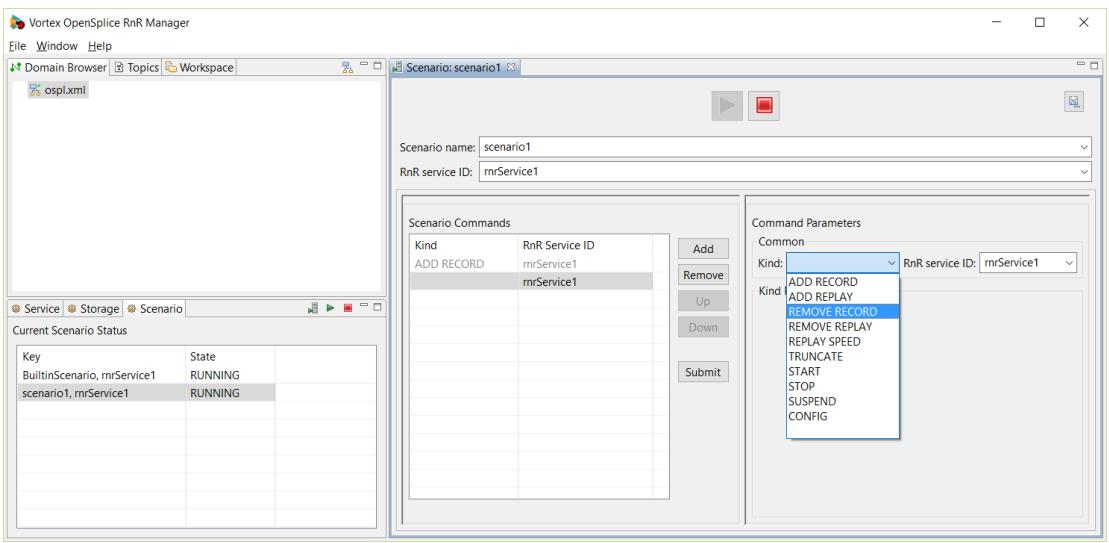
![Vortex OpenSplice RnR Manager\nFile Window Help\nDomain Browser Topics Workspace\nospl.xml\nScenario: scenario1\nScenario name: scenario1\nRnR service ID: mrService1\nService Storage Scenario\nCurrent Scenario Status\nKey State\nBuiltinScenario, mrService1 RUNNING\nscenario1, mrService1 RUNNING\nAdd Record RnR Service ID\nrrmService1\nrrmService1\nAdd Remove\nUp\nDown\nSubmit\nCommand Parameters\nCommon\nKind:\nADD RECORD\nADD REPLAY\nREMOVE RECORD\nREMOVE REPLAY\nREPLAY SPEED\nTRUNCATE\nSTART\nSTOP\nSUSPEND\nCONFIG\nKind:\nRnR service ID: mrService1](.vortex-opensplice-rnr-manager-guide/d5c9e28f487916116bdb6367b6366b5a0af0caa2f530881aa6ce8b4223ef4bc9.jpg)

# Existing commands

![The image shows a standard general warning sign, depicted as a red triangle with a thick red border and a white interior. Centered inside the triangle is a large black exclamation mark.](.vortex-opensplice-rnr-manager-guide/cf5a99c06eba719b6ee5bc3b13dc8c15dd691bfaeec8fea3edbf6bb082a8100b.jpg)

Once a command has been submitted for a scenario, it cannot be deleted or edited.

# 4.7. Scenario Editors

# Removing commands

The Remove button is only enabled if a command is editable.

Only newly-added commands are editable.

# Ordering commands

The Up and Down buttons allow for the commands to be re-ordered, if the selected command is editable.

Alternatively, the editable selected command can be moved by dragging and dropping it in the commands table.

Only newly-added commands are editable in running Scenarios. If a scenario is stopped, then all commands can be re-ordered.

# Duplicating commands

Scenario commands can be duplicated using Copy and Paste buttons available by right-clicking them to bring up the context menu.

Users can copy any command, which will copy all of the settings included in that command and place it on RnRManager’s clipboard.

Users can only paste a copied command where the “Paste” context menu entry is enabled. Pasting a command will insert it after a selected command, however users cannot insert commands after already submitted commands in a running scenario; they will have to stop the scenario to do that similar to the re-ordering of the commands in the previous section.

To paste a command:

1. Select the command after which you want to insert it
2. Right click on that command
3. Press the “Paste” button

All scenario commands can be duplicated, whether they have been submitted or not in both Live and Offline mode in the Scenario Editor.

# Validation

Commands that have invalid parameters are highlighted with red text in the scenario commands table. Individual invalid command parameters also have their labels highlighted with red text.

If the command is edited to correct the parameters, the entry in the scenario commands table will no longer be highlighted with red.

The Submit and Start buttons will do nothing if there are validation errors.

# Invalid command parameters
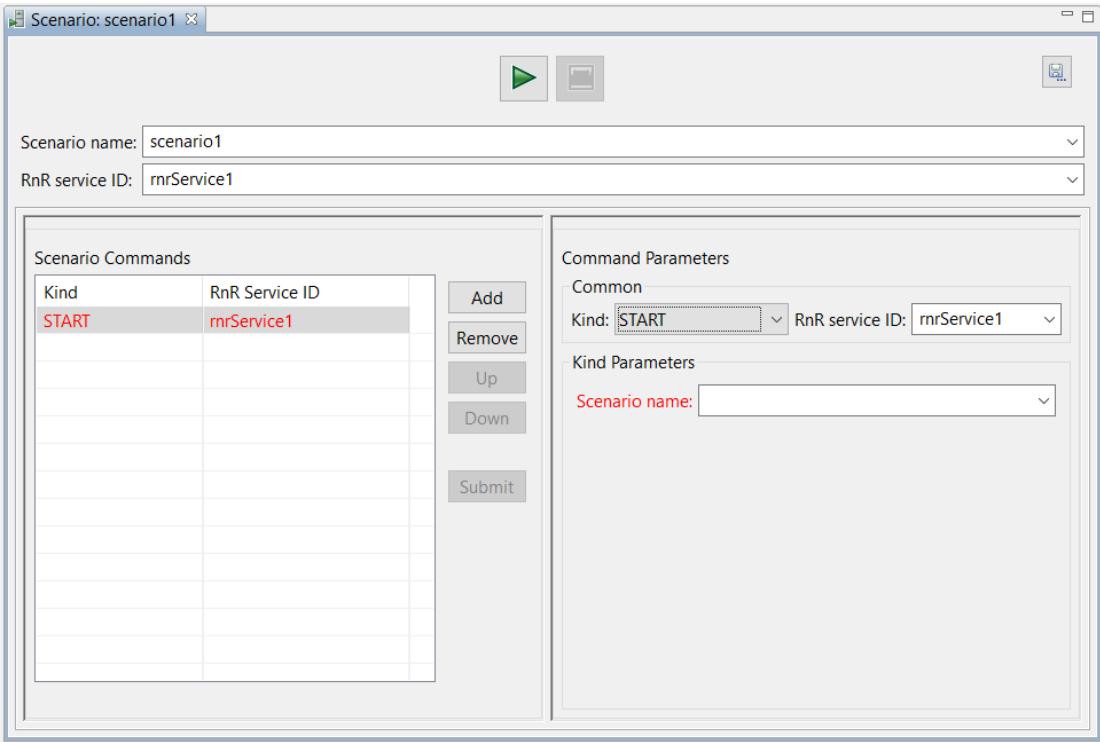
![Scenario: scenario1\nScenario name: scenario1\nRnR service ID: mrService1\nScenario Commands\nKind	RnR Service ID\nSTART	mrService1\nAdd\nRemove\nUp\nDown\nSubmit\nCommand Parameters\nCommon\nKind: START	RnR service ID: mrService1\nKind Parameters\nScenario name:](.vortex-opensplice-rnr-manager-guide/840cf2993ba7b4f0d4686bc99c772c5ddfa7b0e36f156e50ac7d96e767f71d81.jpg)

# Save As...

The scenario editor has a Save As... button in the top-right corner.

Scenario Editor Save As... button
![This image displays a digital icon, likely representing a 'Save' or 'Save As' function in a computer interface. It features a classic floppy disk symbol centered within a square button frame. The floppy disk is rendered in shades of blue and grey, with a horizontal blue strip near the top and a square blue section at the bottom. Below the disk, positioned towards the right, are three small blue dots arranged in a horizontal line. The icon is set against a white background with a light grey border.](.vortex-opensplice-rnr-manager-guide/dd2715cad2178463798b933e47767af9dde1e342f9f796b5e9a18fca8927cb53.jpg)

The Save As... functionality enables the saving of a scenario’s commands and command parameters as an xml file that is not known to the DDS system.

Please refer to the next section, Scenario File Editor Features, for more information on saving scenarios to files.

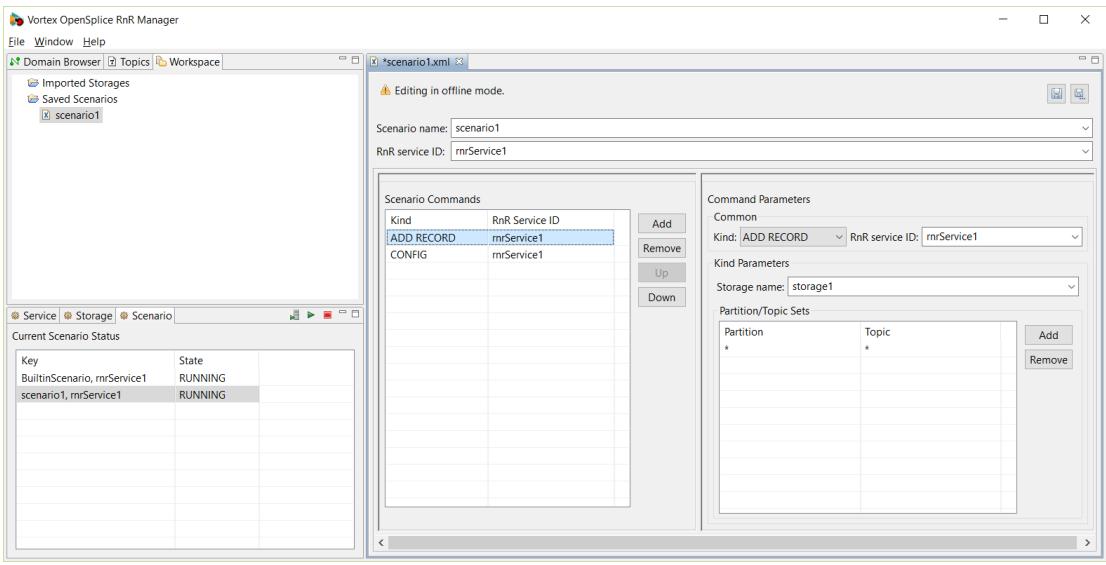
# 4.7.5 Scenario File Editor Features

The Scenario File Editor

# 4.7. Scenario Editors
![Vortex OpenSplice RnR Manager\nFile Window Help\nDomain Browser Topics Workspace\nImported Storages\nSaved Scenarios\nscenario1\n*scenario1.xml\nEditing in offline mode.\nScenario name: scenario1\nRnR service ID: mrService1\nScenario Commands\nKind RnR Service ID\nADD RECORD rmrService1\nCONFIG rmrService1\nAdd\nRemove\nUp\nDown\nCommand Parameters\nCommon\nKind: ADD RECORD RnR service ID: mrService1\nKind Parameters\nStorage name: storage1\nPartition/Topic Sets\nPartition Topic\n*\n+\n-\nRemove\nService Storage Scenario\nCurrent Scenario Status\nKey State\nBuiltinScenario, mrService1 RUNNING\nscenario1, mrService1 RUNNING](.vortex-opensplice-rnr-manager-guide/549545d2712db4ace4a0e9f37ea4fff97a3dce4311495d730d00fd3cb6f4b2d7.jpg)

# Creating New Files

# Scenario Editor Save As

A new scenario file can be created by clicking on the Save As... button in the top right corner of the scenario editor. This will save the commands specified in the scenario editor to an xml file.

This allows for the saving of a specific DDS system scenario to be loaded at a later date.

# New Scenario File

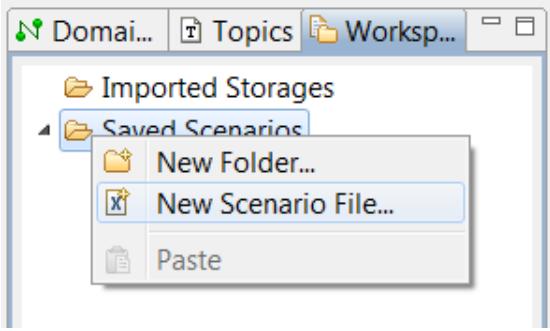
A new file can be created by right-clicking on a folder under the Saved Scenarios directory structure in the Workspace view and choosing New Scenario File....

New Scenario File
![Imported Storages\nSaved Scenarios\nNew Folder...\nNew Scenario File...\nPaste](.vortex-opensplice-rnr-manager-guide/c896873618fd83547148b2a7b50c499315c5fadf032afb209ef9db74f7efba33.jpg)

# Editing Commands

• To add a new command, click on the Add button in the Scenario Commands section.
Specify the appropriate parameters for this new command in the Command Parameters section.
• To remove a command, click on the Remove button in the Scenario Commands section.

# Load Scenario

A scenario file can be quickly loaded and submitted into the DDS system.

# Step 1

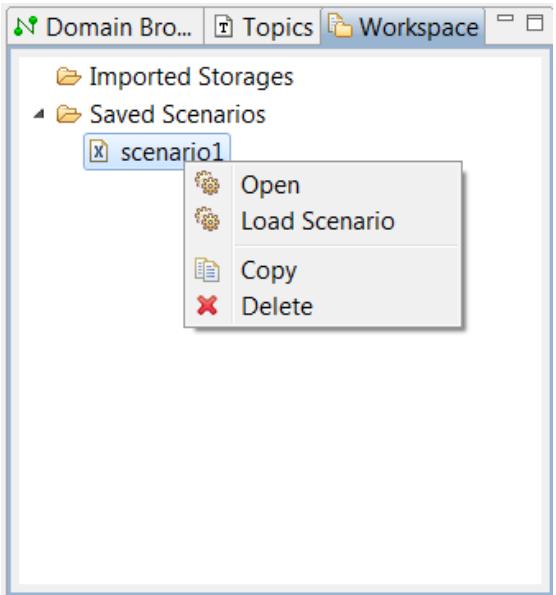
Select the xml file, right-click and choose Load Scenario.

Load Scenario

# 4.7. Scenario Editors
![Imported Storages\nSaved Scenarios\nscenario1\nOpen\nLoad Scenario\nCopy\nDelete](.vortex-opensplice-rnr-manager-guide/9eff689adf162fdf71a2fc5654ae3a2cfb23dc7cd304edd05c247043ad81c94f.jpg)

# Step 2

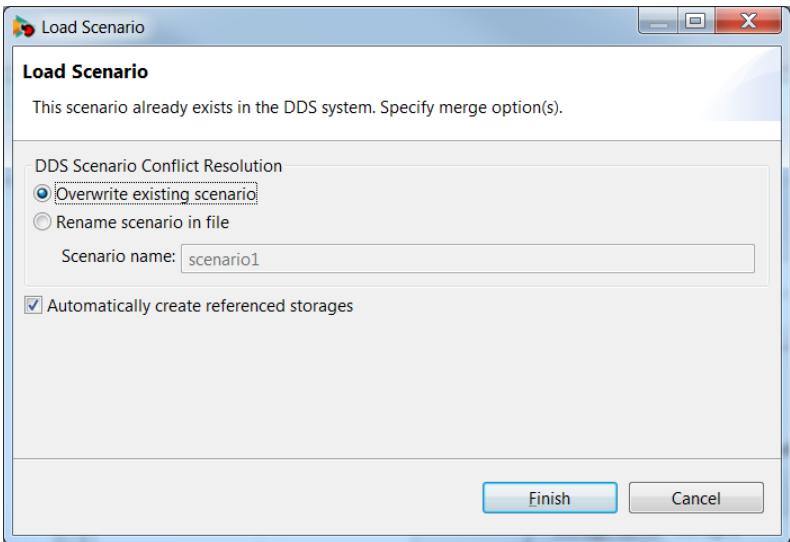
Specify merge options in the Load Scenario wizard.

Load Scenario wizard
![Load Scenario\nThis scenario already exists in the DDS system. Specify merge option(s).\nDDS Scenario Conflict Resolution\nOverwrite existing scenario\nRename scenario in file\nScenario name: scenario1\nAutomatically create referenced storages\nFinish Cancel](.vortex-opensplice-rnr-manager-guide/a5949e848c8c7f2c2bbe60398bbfae3ba56a14643dd2425ac4339cbb9699329f.jpg)

If a senario with the same name already exists, the wizard offers these merge options:

Overwrite existing scenario – The existing scenario with the same name will be stopped (if not already stopped) and disposed.

Rename scenario in file – The scenario name in the file will be changed, and that scenario name will be loaded.

Automatically create referenced storages – Create any storages referenced in the file if they do not already exist in the DDS system.

A new scenario editor opens and the commands from the file are displayed.

# Step 3

Click on Play to submit the scenario commands to the DDS system.

# Validation

Commands that have invalid parameters are highlighted with red text in the scenario commands table. Individual invalid command parameters also have their labels highlighted with red text.

# 4.7. Scenario Editors

If the command is edited to correct the parameters, the entry in the scenario commands table will no longer be highlighted with red.

![A teal square icon featuring a white lowercase letter 'i'.](.vortex-opensplice-rnr-manager-guide/87ea4d54ccfa413380033b2a18e73b6324a63d64fbbe187e4b7d204c821132ea.jpg)

A scenario file can be saved with invalid parameters.

# 4.7.6 Command Parameters

To view or edit the command parameters of a scenario command, choose the command in the Scenario Commands table. The values associated with that command will populate the scenario editor’s Command Parameters section. If the command is editable, the parameters can be modified.

# Common Parameters

Various command types are supported. To specify the command type, use the dropdown box entitled Kind.

The RnR service ID is also a common parameter for all command kinds.

# Kind Parameters

The Kind Parameters section is where all the command kind-specific parameters are edited or viewed.

The command kinds supported are:

Add Record

Add Replay

Remove Record

Remove Replay

Set Replay Speed

Truncate

Start

Suspend

Config

# Add Record

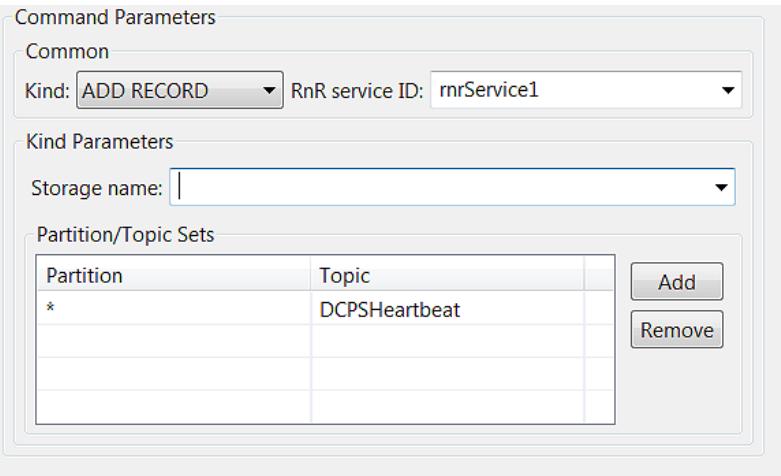
The add record command is used to specify an interest to record data to a storage.

Add Record parameters
![Command Parameters\nCommon\nKind: ADD RECORD ▼ RnR service ID: rmrService1\nKind Parameters\nStorage name: |\nPartition/Topic Sets\nPartition Topic\n* DCPSHeartbeat\nAdd\nRemove](.vortex-opensplice-rnr-manager-guide/d3d145cfcfea1a9e63c34dc44c522609edcc03e2cb415f02465bec0d89b5dfe5.jpg)

The parameters are:

Storage name – The name of the storage in which the data is to be stored. If the storage cannot be resolved, the command is ignored. To assist you, a dropdown list of recognized storages is provided.

Partition/Topic Sets – One or more partition/topic sets can be added to define the record interest.

# 4.7. Scenario Editors

Wildcards are supported: ‘?’ will match a single character and ‘\*’ will match any number of characters. If expressions (partially) overlap, data will only be recorded once.

# Add Replay

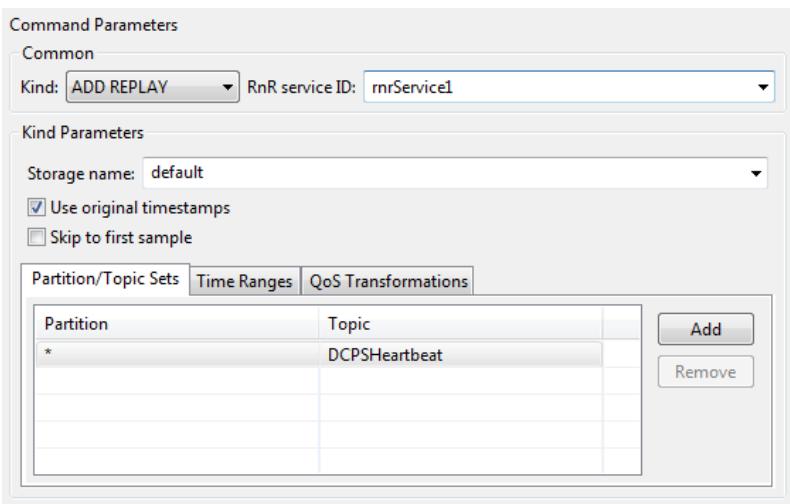
The add replay command is used to specify an interest to replay data from a storage.

Add Replay parameters
![Command Parameters\nCommon\nKind: ADD REPLAY RnR service ID: mrService1\nKind Parameters\nStorage name: default\n✓ Use original timestamps\n☐ Skip to first sample\nPartition/Topic Sets Time Ranges QoS Transformations\nPartition Topic\n* DCPSHeartbeat\nAdd\nRemove](.vortex-opensplice-rnr-manager-guide/c2a86b7951c5021e61a39f9ff586a2c715c5857d0a5a359d28ed75c467c8fcd6.jpg)

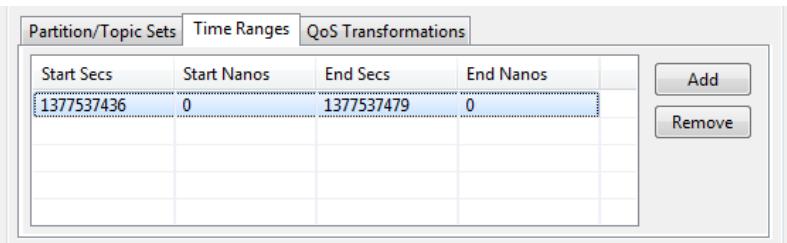
Add Replay time ranges
![Partition/Topic Sets\nTime Ranges\nQoS Transformations\nStart Secs\nStart Nanos\nEnd Secs\nEnd Nanos\n1377537436\n0\n1377537479\n0\nAdd\nRemove](.vortex-opensplice-rnr-manager-guide/9a16de77cd8edccbba41ba499dda1f2a3ca3a39de2b7d1a21c0bbf8ccd720e31.jpg)

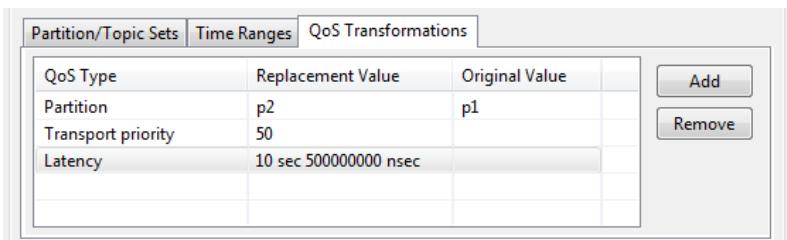
Add Replay QoS transformations
![Partition/Topic Sets | Time Ranges | QoS Transformations\nQoS Type	Replacement Value	Original Value\nPartition	p2	p1\nTransport priority	50\nLatency	10 sec 500000000 nsec\nAdd\nRemove](.vortex-opensplice-rnr-manager-guide/80e54ef3dfe194416b234a8e16e7a16c36ef9a528b0f0ae04b0c77fc16112217.jpg)

The parameters are:

Storage name – The name of the storage from which the data will be replayed. If the storage cannot be resolved the command is ignored.

Use original timestamps – With the default value of true, when a sample is recorded, its original write and allocation timestamps are preserved. When this sample is replayed, it will be delivered to readers with these original timestamps. Depending on resource limits and QoS settings, readers may discard the replayed data if data with more recent timestamps is available. By setting useOriginalTimestamps to false, the timestamps will be updated with the current time upon replay.

Skip to first sample – By default this value is false and when a sample matches interest expressions but doesn’t match any of the supplied time-ranges, the Record and Replay service tries to mimic original timing behaviour by sleeping until the next sample is evaluated based on record timestamps. Sometimes this is not the required behavior and the service should simply skip all non-matching samples and start replaying im-

# 4.7. Scenario Editors

mediately the first sample that matches an interest expression and time-range. This behaviour can be enabled by setting skipToFirstSample to true.

Partition/Topic Sets – One or more partition/topic sets can be added to define the replay interest.

Wildcards are supported: ‘?’ will match a single character and ‘\*’ will match any number of characters. If expressions (partially) overlap, data will only be published into DDS once.

Time Ranges – Specifying time ranges is optional.

Time ranges are used in combination with partition/topic sets to select a subset of data available in a storage for replay. Each time range is applied to each partition/topic set. A sample read from a storage is only replayed if its partition/topic can be matched against the partition/topic sets and its record-time can be matched against the time-ranges. The time ranges are optional; when omitted, a sample is replayed when a partition/topic set matches.

QoS Transformations - Specifying QoS transformations is optional.

A series of transformations to apply to each sample’s QoS upon replay. Transformations are only applied for replay samples that have matched the partition/topic set AND the time ranges (if specified). The supported transformations types and their valid values are described in the tables below.

<table><tr><td>QoS Type</td><td>Description</td></tr><tr><td>Partition</td><td>Partition in which the sample is replayed</td></tr><tr><td>Deadline</td><td>Deadline QoS policy</td></tr><tr><td>Latency</td><td>Latency budget QoS policy</td></tr><tr><td>Ownership strength</td><td>Ownership strength QoS policy (applies only to samples written with exclusive ownership-kind QoS policy)</td></tr><tr><td>Transport priority</td><td>Transport priority QoS policy</td></tr><tr><td>Lifespan</td><td>Lifespan QoS policy</td></tr></table>

<table><tr><td>QoS Type</td><td>Valid Values</td></tr><tr><td>Partition</td><td>Partition transformations are supported for non-empty partition names consisting of alphanumeric and special characters ‘-’, ‘/’ and ‘_’.</td></tr><tr><td>Ownership strength Transport priority</td><td>Any positive 32 bit integer.</td></tr><tr><td>Deadline Latency Lifespan</td><td>A floating point value for seconds and nanoseconds. eg. inputting 10.5 is 10 seconds and 50000000 nanoseconds. Additionally, the string &quot;Infinite&quot; is also valid input, signifying the ‘infinite’ time period (2147483647.2147483647)</td></tr></table>

The string value written to the Replacement Value column will be the new value of the QoS policy. Optionally, values in the Original Value column are taken as the filter to conditionally apply the transformation; e.g. for a Partition transformation with Replacement Value "p2" and Original Value "p1", all samples with partition "p1" will be transformed to partition "p2".

![A triangular warning sign with a thick red border and white background featuring a black exclamation point in the center.](.vortex-opensplice-rnr-manager-guide/d45146312ccb4a81237337e94b180006e529061cf86f345ca1bc86d85533337a.jpg)

Note that the original value needs to be an exact match; wildcards and expressions are not supported.

# Time Range Copy and Paste

The time range record values can be copied from the storage editor and pasted into the scenario editor. Please refer to Selected Row(s) Menu for details of how to copy a time range.

To paste the record time range, Add a new time range. Select the time range in the Time Ranges table, and right-click and then choose Paste Record Time Range.

# Paste Record Time Range

# 4.7. Scenario Editors

![Partition/Topic Sets\nTime Ranges\nQoS Transformations\nStart Secs\nStart Nanos\nEnd Secs\nEnd Nanos\n0\n0\n0\n0\nPaste Record Time Range\nRemove](.vortex-opensplice-rnr-manager-guide/e14e0cd34ef0e7c439c124de6e2645b0a17bb5c5e112055143a36e49e6490f93.jpg)

# Remove Record

The remove record command is used to remove a record interest from a storage.

Remove Record parameters
![Command Parameters\nCommon\nKind: REMOVE RECORD ▼ RnR service ID: rnrService1\nKind Parameters\nStorage name:\nPartition/Topic Sets\nPartition Topic\n* DCPSHeartbeat\nAdd\nRemove](.vortex-opensplice-rnr-manager-guide/b6db9cfc55803218037f6f23d56ec6e9b1f6f9ffdbf081d00319d565391c1ad7.jpg)

The parameters are:

Storage name – The name of the storage of which record-interest is removed.

Partition/Topic Sets – One or more partition/topic sets can be added to define the record interest(s) to be removed.

![The image shows a triangular warning sign with a thick red border and a white background. Centered inside the triangle is a black exclamation point.](.vortex-opensplice-rnr-manager-guide/6bbbc257e33d34c252d100e2d36efff78fc846503f2fb3404ef8390d26fe3eb6.jpg)

Note that the partition/topic sets need to match those used previously in an add record command.

# Remove Replay

The remove replay command is used to remove a replay interest from a storage.

Remove Replay parameters
![Command Parameters\nCommon\nKind: REMOVE REPLAY RnR service ID: rnrService1\nKind Parameters\nStorage name: default\nPartition/Topic Sets Time Ranges QoS Transformations\nPartition Topic\n* DCPSHeartbeat\nAdd\nRemove](.vortex-opensplice-rnr-manager-guide/b44ebb53bdf476d99f60241c1adaf38661d290dcd4438d402644201170a873af.jpg)

The parameters are:

Storage name – The name of the storage of which replay-interest is removed.

# 4.7. Scenario Editors

Partition/Topic Sets – One or more partition/topic sets can be added to define the replay interest(s) to be removed.

![The image shows a red triangular warning sign with a white background and a thick red border. In the center of the triangle is a black exclamation point.](.vortex-opensplice-rnr-manager-guide/c21429b64653e5291823ee095f38796d2bd51a0b242a74269ef9a91bb85807aa.jpg)

Note that the partition/topic sets need to match those used previously in an add replay command.

QoS Transformations - Specifying QoS transformations is optional.

The QoS transformations to remove from the replay interest. If specified, a replay interest will no longer apply the transformation.

![The image shows a triangular warning sign with a thick red border and a white background. Centered inside the triangle is a black exclamation point.](.vortex-opensplice-rnr-manager-guide/d2f67859866df399d4ec2499f97e9f9509d05b91aad164f652a2db9a206f6c30.jpg)

If any replay interest is to be removed completely, the set of transformations should match exactly the included in add\_replay command(s) responsible for adding the interest.

Time Ranges – Specifying time ranges is optional.

The time ranges to remove. Similar to the add replay command, this parameter is optional. If this parameter is specified, only the interest that exactly matches the time ranges is removed. As a shortcut, if no time ranges are specified, any interest that matches the interest expressions in the remove replay command is removed regardless of the time ranges attached to that interest.

# Set Replay Speed

The set replay speed command is used to change the replay speed of a storage.

Replay Speed parameters
![Command Parameters\nCommon\nKind: REPLAY SPEED RnR service ID: rnrService1\nKind Parameters\nStorage name: s1\nReplay speed: 0.0](.vortex-opensplice-rnr-manager-guide/3d794f486ef672223dc95afc8cb46f2aa18eb23220e032094d15f090560f307d.jpg)

The parameters are:

Storage name – The name of the storage of which to change the replay speed. If the storage cannot be resolved the command is ignored.

Replay speed – Floating-point value containing the new replay-speed. The following values have a special meaning:

-1 : Maximum speed

Delays between samples are skipped and the samples from the storage are inserted into DDS as fast as possible.

1 : Same speed

Replays samples with the same timing characteristics as when originally recorded.

0 : Pause the storage

No samples are replayed until the speed is increased.

The default replay speed is 1 (samples are replayed with the same timing characteristics as when originally recorded).

# Truncate

This command can be used to clear a storage.

# 4.7. Scenario Editors

When recording samples to an existing storage, the data is appended. If instead the required behaviour is to overwrite the storage, the truncate command can be used to remove the data recorded to the storage during previous sessions.

![The image displays a standard warning sign: an equilateral triangle with a thick red border and a white interior. In the center of the triangle is a bold, black exclamation mark. There is no text present.](.vortex-opensplice-rnr-manager-guide/9133cd9cb0e5294b9c1b355370c884582b19d7bb72a210af333ddf9de0251676.jpg)

Note that the truncate command can only be executed if the storage isn’t busy recording and/or replaying data. Thus is may be neccessary to first publish remove record/replay commands, in order to remove all interest from a storage so that it gets closed by the RnR service, before the truncate command can be successfully processed. The Storage Status view can be used to verify the state of the storage.

Truncate parameter
![Command Parameters\nCommon\nKind: TRUNCATE ▼ RnR service ID: mrService1\nKind Parameters\nStorage name: s1](.vortex-opensplice-rnr-manager-guide/d350f2b20b4e09c9a24ff619b511fffe2a7f7bd9cf66018631eea73a7fd4dfc5.jpg)

The parameter is:

Storage name – The name of the storage to clear.

# Start

The start command instructs the service to start processing "scenario name". The service will publish a status update that changes the state of the scenario to RUNNING. If the target scenario is already known to the service, and is in the suspended state, a start command causes the scenario to resume processing commands, changing the scenario status from SUSPENDED to RUNNING.

Start parameter
![Command Parameters\nCommon\nKind: START RnR service ID: rnrService1\nKind Parameters\nScenario name: scenario1](.vortex-opensplice-rnr-manager-guide/2330f6edc213e7c35bf71a522a38f7fb2adee6f743a258c8a9b0ae8a08d0dd17.jpg)

The parameter is:

Scenario name – The name of the scenario to start.

# Stop

The stop command stops the execution of a scenario, including any recording and/or replaying that was defined as part of that scenario.

Stop parameter
![Command Parameters\nCommon\nKind: STOP RnR service ID: rnrService1\nKind Parameters\nScenario name: scenario1](.vortex-opensplice-rnr-manager-guide/0b03b722d096e74aa656754dd8d0f3fb040f5a51252463c67d2ca68eef2d40d8.jpg)

# 4.7. Scenario Editors

The parameter is:

Scenario name – The name of the scenario to stop.

![The image shows a standard warning sign featuring a red triangular border with a black exclamation mark (!) centered inside.](.vortex-opensplice-rnr-manager-guide/f049f02c080e34d4990d1aec34f0fd7d2d2adfb37b2547a6da18a48a7af0a9df.jpg)

It is important to understand that a scenario, once stopped, cannot be started again.

However, it is possible to start a new scenario with the same name as the stopped scenario. If any commands of the original scenario were published as transient data they will be delivered to and processed by the new scenario, giving the impression that the scenario has been re-started.

# Suspend

The suspend command suspends the processing of commands by the scenario. This enables applications to submit a number of commands to a scenario, without any immediate effects. When the scenario is resumed all new commands are processed as if they were published in a batch although in reality they may have been published with varying intervals.

Suspend parameter
![Command Parameters\nCommon\nKind: SUSPEND RnR service ID: mrService1\nKind Parameters\nScenario name: scenario1](.vortex-opensplice-rnr-manager-guide/44decbe931b92f1bb2a9f156caed928d108dc40c0390d17c1c607dfbe3862d99.jpg)

The parameter is:

Scenario name – The name of the scenario to suspend.

# CONFIG

The config command is used to modify the runtime configuration of an RnR service.

config : Sequence of KeyValue objects.

A config command can be used to add a storage to the service or modify properties of an existing storage. Storages can also be configured in the OpenSplice configuration file, but config commands provide the opportunity to create and configure storages dynamically.

A single config command can apply to multiple storages, if the config sequence consists of multiple elements. The key of the KeyValue object should always be ‘Storage’.

CONFIG command
![Command Parameters\nCommon\nKind: CONFIG RnR service ID: rmrService1\nKind Parameters\nStorage Configurations\nName Filename Kind Max size Statistics Interval Reset\nstorage1 storage1 CDR 500M Enable 30 False\nstorage2 C:\storages\storage2 CDR Unlimited (0) N/A\nAdd\nRemove](.vortex-opensplice-rnr-manager-guide/681a7f71a4dfe78fb04ef3163417d5dcc287beeab79ab5d7f502a11a9bfbd255.jpg)

One or more storage configurations can be specified in the CONFIG command.

Name – The name used to identify the storage in Record and Replay commands.

Filename – The file used to store XML data. The filename may include a relative or absolute path. If a path is omitted, the storage file is created in the current working directory.

Kind – This attribute sets the format of the storage file. The data can either be stored in XML or CDR format.

# 4.7. Scenario Editors

![A triangular warning sign with a thick red border and a white interior, featuring a black exclamation point in the center.](.vortex-opensplice-rnr-manager-guide/19465745aaccb0bb4171aee72429249e4db1537c41a920f7902d1ebd43cea2e8.jpg)

Note that when changing the Kind of an existing storage it is recommended that a TRUNCATE command be issued first so that the storage file does not contain data of both formats.

Max file size - This optional attribute specifies a maximum storage size for individual files. Exceeding a single file size rolls the storage over to a new numbered index file. No value or 0 indicates unlimited file size. Valid input is any positive integer not greater than $2 ^ { \cdot } 6 4 \cdot - 1$ (in bytes). The value can have a suffix to indicate magnitude: K‘‘(ilobyte), ‘‘M‘‘(egabyte) or ‘‘G‘‘(igabtye); for example, ‘‘10M results in 10485760 bytes. The suffix is not case sensitive.

Statistics – This optional attribute specifies whether statistics should be maintained for this storage.

Interval – This attribute specifies the publication interval of the statistics belonging to this storage, in a Record and Replay storage statistics topic. The publish interval is a value in seconds but may also be set to -1, which means that the statistics are published when the storage is closed. Note that a value of 0 means that statistics are never published for this storage.

Reset – This attribute enables you to reset the current values of statistics belonging to the storage. Note that this only makes sense in a configuration command for an existing storage, since new storages created from the OpenSplice configuration file always start out with empty statistics.

# 4.7.7 BuiltinScenario

# OpenSplice BuiltInScenario

Since commands are targeted at a service and a scenario, the service must start an initial scenario. If it did not, there wouldn’t be anything to address commands to.

During startup, the service starts this initial scenario, called the BuiltinScenario. This is a special scenario that is always running while the service is operational. It serves as the starting hook for any new scenarios. To run a new scenario, a start command must be published for the BuiltinScenario. Like any scenario, the BuiltinScenario can also process other commands like record and/or replay commands.

![A standard warning sign featuring a red triangle with a thick border surrounding a white center containing a black exclamation point.](.vortex-opensplice-rnr-manager-guide/bd92e887c4c1e5849f92f610748746f56b696fbe11286b64af7f67dbfc28c144.jpg)

Note that the BuiltinScenario cannot be stopped.

Since one can assume that the BuiltinScenario is always available and running, it is a safe choice to address config and control commands to the BuiltinScenario. Especially in a dynamic and distributed environment, in which DDS is regularly used, this can be helpful when interacting with the service through scripts or perhaps when injecting commands stored in a persistent store.

# BuiltinScenario in RnR Manager

The scenario editor disables the start and stop functionality for the BuiltinScenario.

Start and Stop actions are also disabled in the Scenario Status view.

# 4.8 Storage Data

The OpenSplice Record and Replay service enables the recording and replaying of data. The service records the data to storage xml files. These xml files can get quite large, and can be difficult to query and read.

RnR Manager provides a Storage Editor that makes it easier to query, view and update this storage data.

On import, the xml storage files are converted to a database file. The database can then be queried and updated. Updated data can be exported back into the OpenSplice Record and Replay service storage xml format if required.

# 4.8.1 Workspace - Imported Storages

The starting point for viewing storage data is the Workspace view.

To import storage data, navigate to the Workspace view and select the Imported Storages folder. Right-click to display a menu with options for manipulating storage database files.

Imported Storages view
![Domain Browser\nTopics\nWorkspace\nImported Storages\nheartbeat1\nSaved Scenarios](.vortex-opensplice-rnr-manager-guide/def250d3a619fe99b7ca2eb3d13ad88150fffc74374d55a72562eeb2c18b895b.jpg)

# 4.8.2 Database File Management

The Imported Storages folder displays the database files that have been imported. The files can be managed by using the menu options provided in the view. These menu options are accessible by right-clicking on the items in the view.

Imported Storages menu
![Domain Browser\nTopics\nWorkspace\nImported Storages\nheartb\nSaved Sc\nNew Folder...\nPaste\nImport Storage...](.vortex-opensplice-rnr-manager-guide/7bec3ccd54eeca67444f8faae603534227f50972644db7e396a00d9a64605a8f.jpg)

These database files are created in a workspace project maintained by the RnR Manager, which provides facilities to open, copy, paste, delete, and create new folders within this workspace.

# 4.8.3 Import Storage

To import OpenSplice record and replay storage data, open the Import Storage dialog by choosing the Import Storage... option from the right-click menu. (A folder must be selected in the view.)

Import Storage

![Import Storage\nImport Storage\nImport RnR storage from a node.\n\nFrom\nStorage path: C:\Program Files\ADLINK\Vortex_v2\Device\VortexOpenSplice\6.8.2\HD\nBrowse...\n\nTo\nFile name: test\n\nBatch Processing\nOn import, a batch counter is used to limit the number of samples loaded into memory at one time.\nIf import is unsuccessful, and out of memory exceptions are occurring, reduce the batch size number.\nBatch size: 5000\n\n✓ Open editor after import\n\nFinish Cancel](.vortex-opensplice-rnr-manager-guide/23231eff697644adad8175de8c4026e8ebbf908e131b45391ba4c343368a5689.jpg)

To import:

# Step 1

Browse to and select your local storage file.

If storage file names were configured with a relative path, the RnR service creates the storage files relative to its process working directory.

Using the file chooser, select the .meta file associated with the storage. The storage data file is automatically resolved.

# Step 2

Specify the database file name. The file will be created in the selected folder.

# Step 3

If necessary, decrease the batch size. The default batch size is 5000.

A batch counter is used to limit the number of samples loaded into memory. If the import is unsuccessful, and/or ‘out of memory’ exceptions are occurring, reduce the batch size number.

# 4.8.4 Export

To export OpenSplice record and replay storage data, open the Export Storage dialog by choosing the Export Storage... option from the right-click menu. (A database file must be selected in the view.)

On export a new OpenSplice storage is created and the sample data contained in the imported database file will be written to this storage.

# Storage Parameters

The storage parameters are specified on the first page of the Export Storage wizard.

Export Storage - Create Storage

# 4.8. Storage Data

![Export Storage\nCreate Storage\nSpecify the parameters to create a new storage.\nTo\nStorage Type\nCDR\nXML\nRnR service ID: mrService1\nStorage name: modifiedStorage\nFile name: C:\storages\modifiedStorage\nBrowse...\nMax file size Unlimited (0) GB\nBatch Processing\nOn export, a batch counter is used to limit the number of samples loaded into memory at one time.\nIf export is unsuccessful, and out of memory exceptions are occurring, reduce the batch size number.\nBatch size: 10000\n( Back Next ) Finish Cancel](.vortex-opensplice-rnr-manager-guide/4e8efbd2c41b95f0deddc4527e3dd67e001dfb66ae47d0b725d69c0b8959695c.jpg)

If RnR Manager is currently connected to a DDS domain, the storage attributes are editable, and clicking on the Finish button configures a new storage with the specified storage attributes. If RnR Manager is not connected, only the file name attribute is editable, and clicking Finish only does the data export to file. See Storage Attributes for further information.

If necessary, decrease the batch size. The default batch size is 10000.

A batch counter is used to limit the number of samples loaded into memory. If the export is unsuccessful, and/or ‘out of memory’ exceptions are occurring, reduce the batch size number.

# Sample Set Parameters

The second page of the wizard enables you to export a subset of the sample data contained in the database. You can also edit the actual database file to contain the appropriate subset using the storage editor. The ability to specify subset parameters is an additional feature of export.

All unique partition/topic sets of the database file are displayed. You can choose to exclude any of these sets by unchecking it the list.

Additionally you can define a time range for the export. Any data samples that do not fall within the time range are excluded.

Export Storage Samples

![Export Storage\nExport Samples\nSpecify the sample set parameters.\nExport all samples\nPartition Topic Sets\nAll partition topic sets\n_BUILT-INPARTITION_,DCPSHeartbeat\nTime Range (message.writetime)\nAll\nStart time 03/28/13 14:25:36:640\nSeconds: 1364495136 Nanos: 640636914\nEnd time 03/28/13 14:25:48:640\nSeconds: 1364495148 Nanos: 640943575\n( Back Next ) Finish Cancel](.vortex-opensplice-rnr-manager-guide/b6d85dc396a0f0a4619a4848145c6e7e56b7964e9731a92e1690ed3da729542f.jpg)

# 4.9 Storage Editor

Once a storage has been imported, the database file can be queried and updated using the Storage Editor.

The storage editor is opened by double-clicking on the database file in the Imported Storages folder in the Workspace view. It can also be opened automatically on import.

The editor is comprised of two pages. The first page is used to define the query parameters. You can specify query parameters to view subsets of the sample data. The second page displays the sample data that meet the query parameter criteria.

Storage Editor

![RnR Manager\nFile Window Help\nDomain Brows... Topics Workspace\nImported Storages\nheartbeat1\nSaved Scenarios\nheartbeat1\nQuery Parameters\nField Selection\nSelect the fields to be displayed in the data table.\nRecord and Replay\nkernelModule:v_heartbeatInfo\nMessage\nTime Range (message.writeTime)\nSpecify the time range for the samples.\nAll\nStart Time 07/22/13 09:40:48:762\nSeconds: 1374500448 Nanos: 762844050\nEnd Time 07/22/13 09:58:00:813\nSeconds: 1374501480 Nanos: 813985977\nLoad\nSpecify the number of samples to incrementally load into memory.\nTotal Sample Size: 517\nLoad All Samples\nLoad #: 10000\nOrder By\nSpecify the fields to order the data.\nmessage.writeTime.seconds\nmessage.writeTime.nanoseconds\nAdd...\nRemove\nUp\nDown\nWhere Clause\nSpecify the sample selection criteria.\nAdd Operator\nAdd Clause\nRemove\nQuery Parameters Data](.vortex-opensplice-rnr-manager-guide/34d72ee1fc93b53c1417c7d59e14970dc7e8a2b508c434a5d02d428d2b3282cf.jpg)

# 4.9.1 Query Parameters

# Field Selection

This section is used to select the data fields (columns) that you would like to see displayed in the data page table. The Record and Replay node lists the fields that are written to each record and replay sample.

The Message node lists the fields that are written with each sample.

The other nodes contain the fields that are specific to each MetaType or topic.

# Where Clause

The where section can be used to defined SQL-like where conditions.

This section is optional. If no entries are added, no additional conditions are added when running the query and populating the data page.

# Operator

To define a where condition an operator must be added. The operator can be an AND or an OR.

To add an operator, click on the Add Operator button. By default, AND is selected. To add OR, select the cell, then choose the OR item in the dropdown menu.

Add Operator
![Where Clause\nSpecify the sample selection criteria.\nAND\nAND\nOR\nAdd Operator\nAdd Clause\nRemove](.vortex-opensplice-rnr-manager-guide/e6c9bf0a80896d1c8e1391a9364325c34154dbe48724805f893dbd284ca75a42.jpg)

Each operator must have at least one child clause for the query to be valid. If this condition is not met, a red icon is displayed to indicate a problem. The Run Query button will not be enabled unless all validation problems on the query page are resolved.

# 4.9. Storage Editor

# Invalid AND

# Where Clause

Specify the sample selection criteria.

<table><tr><td>☒ AND</td><td></td><td></td></tr><tr><td></td><td></td><td></td></tr></table>

# Clause

To add where selection criteria, add one or more clauses to your operator. Each clause contains a field, an operator and a value.

Field – A database field or metaType field. Available fields are provided in a dropdown list.

# Clause field

![OR\ntopic (Value)\npartition\ntopic\nrecordtime.seconds\nrecordtime.nanoseconds\nmessage UCLA.id.systemId](.vortex-opensplice-rnr-manager-guide/4908007384820a1eb9ad4727cfaeec25876a4a40019831b28294e45a6c529a2b.jpg)

Clause Operator – Various comparison operators are available for selection in a dropdown list.

# Clause Operator

# Where Clause

Specify the sample selection criteria.

![OR\ntopic = tbeat\ntopic =\n((\n)\n(\n)=](.vortex-opensplice-rnr-manager-guide/d20f38907834af7dd41f54f04146b6f6577676c86dcbef6f3984a3bc2c017a60.jpg)

Value – The expected value of the database field.

Each clause must have a defined field and value. If this condition is not met, a red icon is displayed to indicate a problem. The Run Query button will not be enabled unless all validation problems on the query page are resolved.

# Invalid Clause

# Where Clause

Specify the sample selection criteria.

![AND\nField) = Value)\nAdd Operator\nAdd Clause\nRemove](.vortex-opensplice-rnr-manager-guide/3dd117401d73e0b2b6b5557690bdae04ae0f39db5e1ade6049267fa36c6e571d.jpg)

# Valid Condition

# Where Clause

Specify the sample selection criteria.

![OR\ntopic = DCPSHeartbeat\ntopic = circle\nAdd Operator\nAdd Clause\nRemove](.vortex-opensplice-rnr-manager-guide/cfee81a681d71e39287e6f48f813d2dba27f8705537948f3d7f414655f42e483.jpg)

# Time Range (message.writeTime)

By default the time range is set to all times. A start and/or end time can be defined to query samples within a specific time range.

# Load

Many of the storage files have a large amount of data. For larger files, it is not always possible to load all of the data into memory. For these cases, samples can be incrementally loaded into memory.

The number of samples to load at a time is specified in the Load # field.

You can then use the Next and Previous buttons on the data page to view the samples incrementally.

![The image displays a standard warning sign consisting of a red equilateral triangle with a thick red border and a white background. Centered inside the triangle is a black exclamation point.](.vortex-opensplice-rnr-manager-guide/59252eb62129bc90eb111955b7e26969b4481c9a32af6c0d7fa2024f32cf5fe1.jpg)

Note: Any edits made to loaded data will not be retained when the Next and Previous buttons are clicked. Such edits must be saved explicitly prior to loading next or previous samples.

# Order By

The data display can be ordered by data fields. By default, the order is done using the message.writeTime fields. You can add any data field to the order by criteria.

# Data

The data page contains one table that displays the samples that meet the query criteria. Each row is one sample.

The columns are resizable. The columns can also be re-ordered by dragging them in the table.

To get the full name of the column, hover on the column header with the mouse.

Values can be edited in the table on a per cell basis.

To change the data that is displayed, specify different query parameters on the query page, and click on the Run Query button.

Data page

<table><tr><td>partition</td><td>topic</td><td>recordtime.seco...</td><td>recordtime....</td><td>message.us...</td><td>message.us...</td><td>message.us...</td><td>message.us.</td></tr><tr><td>_BUILT-INPARTITION_</td><td>DCPSHeartbeat</td><td>1364495136</td><td>640698082</td><td>608165244</td><td>48</td><td>1</td><td>10</td></tr><tr><td>_BUILT-INPARTITION_</td><td>DCPSHeartbeat</td><td>1364495138</td><td>640682892</td><td>608165244</td><td>48</td><td>1</td><td>10</td></tr><tr><td>_BUILT-INPARTITION_</td><td>DCPSHeartbeat</td><td>1364495140</td><td>640791681</td><td>608165244</td><td>48</td><td>1</td><td>10</td></tr><tr><td>_BUILT-INPARTITION_</td><td>DCPSHeartbeat</td><td>1364495142</td><td>640900060</td><td>608165244</td><td>48</td><td>1</td><td>10</td></tr><tr><td>_BUILT-INPARTITION_</td><td>DCPSHeartbeat</td><td>1364495144</td><td>640950965</td><td>608165244</td><td>48</td><td>1</td><td>10</td></tr><tr><td>_BUILT-INPARTITION_</td><td>DCPSHeartbeat</td><td>1364495146</td><td>640867628</td><td>608165244</td><td>48</td><td>1</td><td>10</td></tr><tr><td>_BUILT-INPARTITION_</td><td>DCPSHeartbeat</td><td>1364495148</td><td>641338910</td><td>608165244</td><td>48</td><td>1</td><td>10</td></tr><tr><td></td><td></td><td></td><td></td><td></td><td></td><td></td><td></td></tr><tr><td></td><td></td><td></td><td></td><td></td><td></td><td></td><td></td></tr><tr><td></td><td></td><td></td><td></td><td></td><td></td><td></td><td></td></tr><tr><td></td><td></td><td></td><td></td><td></td><td></td><td></td><td></td></tr><tr><td></td><td></td><td></td><td></td><td></td><td></td><td></td><td></td></tr><tr><td></td><td></td><td></td><td></td><td></td><td></td><td></td><td></td></tr><tr><td></td><td></td><td></td><td></td><td></td><td></td><td></td><td></td></tr><tr><td></td><td></td><td></td><td></td><td></td><td></td><td></td><td></td></tr></table>

# Selected Row(s) Menu

Actions are available for the table’s selected row(s). These actions are accessed by using right-click.

# Data table actions

# Samples

View and/or edit samples.

<table><tr><td>partition</td><td>topic</td><td>recordtime....</td><td>recordtime....</td><td>message.us...</td></tr><tr><td>_BUILT-INP...</td><td>DCPSHeartbeat</td><td>1364495136</td><td>640698082</td><td>608165244</td></tr><tr><td>_BUILT-INP...</td><td>DCPSHeartbeat</td><td colspan="2">Multi Edit...</td><td>608165244</td></tr><tr><td>_BUILT-INP...</td><td>DCPSHeartbeat</td><td colspan="2">Copy Record Time Range</td><td>608165244</td></tr><tr><td>_BUILT-INP...</td><td>DCPSHeartbeat</td><td colspan="2">Delete</td><td>608165244</td></tr><tr><td>Built-inp.</td><td>DCPSHeartbeat</td><td>1364495144</td><td>640698065</td><td>608165244</td></tr></table>

# Multi Edit...

The table supports editing a selected row’s field value.

However, if a batch change is required, it is not possible to do it in the table itself. The Multi Edit dialog provides support for batch changes.

# Step 1

Select the rows you would like to edit in the table.

# Step 2

Right-click and choose the Multi Edit... action.

# Step 3

Check the field(s) you would like to batch update.

# Step 4

Specify the value(s) to be applied to all the selected rows.

# Multi Edit dialog

# 4.9. Storage Editor

![Update field values\nCheck the field(s) to be updated and specify the new value(s) for the selected\nitems.\nField	Value\npartition\ntopic\nrecordtime.seconds\nrecordtime.nanoseconds\nmessage.userData.id.systemId\nmessage.userData.id.localId\nmessage.userData.id.serial	2\nmessage.userData.period.seconds\nmessage.userData.period.nanoseconds\nOK	Cancel](.vortex-opensplice-rnr-manager-guide/42fd6c03a567ff3f8dd0461afd31cca32dffee2d7706f8aaacef11f9e37b1f98.jpg)

# Copy Record Time Range

This action is enabled when more than one row is selected. It is used in conjunction with the scenario editor.

The record time of the first and last selected row are saved. These values can be pasted into the scenario editor for a replay command. Please refer to Add Replay for details of how to paste the values into the scenario editor.

# Delete

The delete action deletes all selected rows.

# Next and Previous

The Next and Previous buttons are enabled when the samples are being loaded incrementally.

Please see Load for details of load functionality.

Next and Previous buttons
![The image displays two white square buttons with gray borders side-by-side on a light gray background. The left button features two left-pointing chevrons ('(('), and the right button features two right-pointing chevrons ('))').](.vortex-opensplice-rnr-manager-guide/ad97538c5f56f063fe6ed8f969152399ab3c04524c0a3839170e58d04874a109.jpg)

Undo, Save and Save As...

Undo, Save, and Save As... buttons
![The image displays three icons arranged horizontally against a light background. On the far left is a yellow arrow pointing diagonally down and to the left. In the center is a blue floppy disk icon. On the right is a blue floppy disk icon with three small blue dots positioned to its lower right.](.vortex-opensplice-rnr-manager-guide/341c1737930c52e6654b6c81387d385d6e1b4fe92abe84d53e7b2061900ae100.jpg)

The buttons are:

Undo — Undo all changes to the database file since the last save.

Save — Save all changes to the database file.

Save As... — Save the currently loaded samples into a new database file.

# 4.9. Storage Editor

# 5

# Contacts & Notices

# 5.1 Contacts

# ADLINK Technology Corporation

400 TradeCenter

Suite 5900

Woburn, MA

01801

USA

Tel: +1 781 569 5819

# ADLINK Technology Limited

The Edge

5th Avenue

Team Valley

Gateshead

NE11 0XA

UK

Tel: +44 (0)191 497 9900

# ADLINK Technology SARL

28 rue Jean Rostand

91400 Orsay

France

Tel: +33 (1) 69 015354

Web: http://ist.adlinktech.com/

Contact: http://ist.adlinktech.com

E-mail: ist\_info@adlinktech.com

LinkedIn: https://www.linkedin.com/company/79111/

Twitter: https://twitter.com/ADLINKTech\_usa

Facebook: https://www.facebook.com/ADLINKTECH

# 5.2 Notices

Copyright © 2018 ADLINK Technology Limited. All rights reserved.

This document may be reproduced in whole but not in part. The information contained in this document is subject to change without notice and is made available in good faith without liability on the part of ADLINK Technology Limited. All trademarks acknowledged.
[🔗 Link to the original document](.vortex-opensplice-rnr-manager-guide/vortex-opensplice-rnr-manager-guide.pdf)